
REACT Routing
https://www.npmjs.com/package/@craco/craco
Setup Craco w/ ESLint
https://jrpotatodev.medium.com/how-to-use-import-aliases-in-react-with-craco-2021-aaa3b4893dd
ALIASES – Why do we need this? Well we don’t necessarily HAVE to use import aliases in our React app. It’s just to make the lives of developers a little easier but it does come with a small drawback, it can be a little tricky to set up sometimes without proper guidance. Here is an example of what using import aliases looks like
without import aliasesimport SecondaryButton from '../../components/SecondaryButton';with import aliasesimport SecondaryButton from '@components/SecondaryButton';
As you can see it’s especially helpful for any nested components you have, or another example of this would be when your using Redux and want to import your actions into a file under another directory.
Benefits:
- Cleaner import statements ( who doesn’t like clean code )
- Could increase development time
- Useful if there is a need to refactor your code or file structure
Cons:
- Need to spend some time setting it up
Let’s begin!
- I’ll be using create-react-app ( we won’t need to eject )instead we will be using Craco )
// Replace `my-react-app` with you app namenpx create-react-app my-react-app// Use . instead if u want to create the app in current directorynpx create-react-app .
![]()

React app file structure
\2. Next we need to install Craco and a craco plugin from here
npm install --save @craco/craco&&npm install --save-dev craco-alias
Your package.json should look like something like the following
![]()
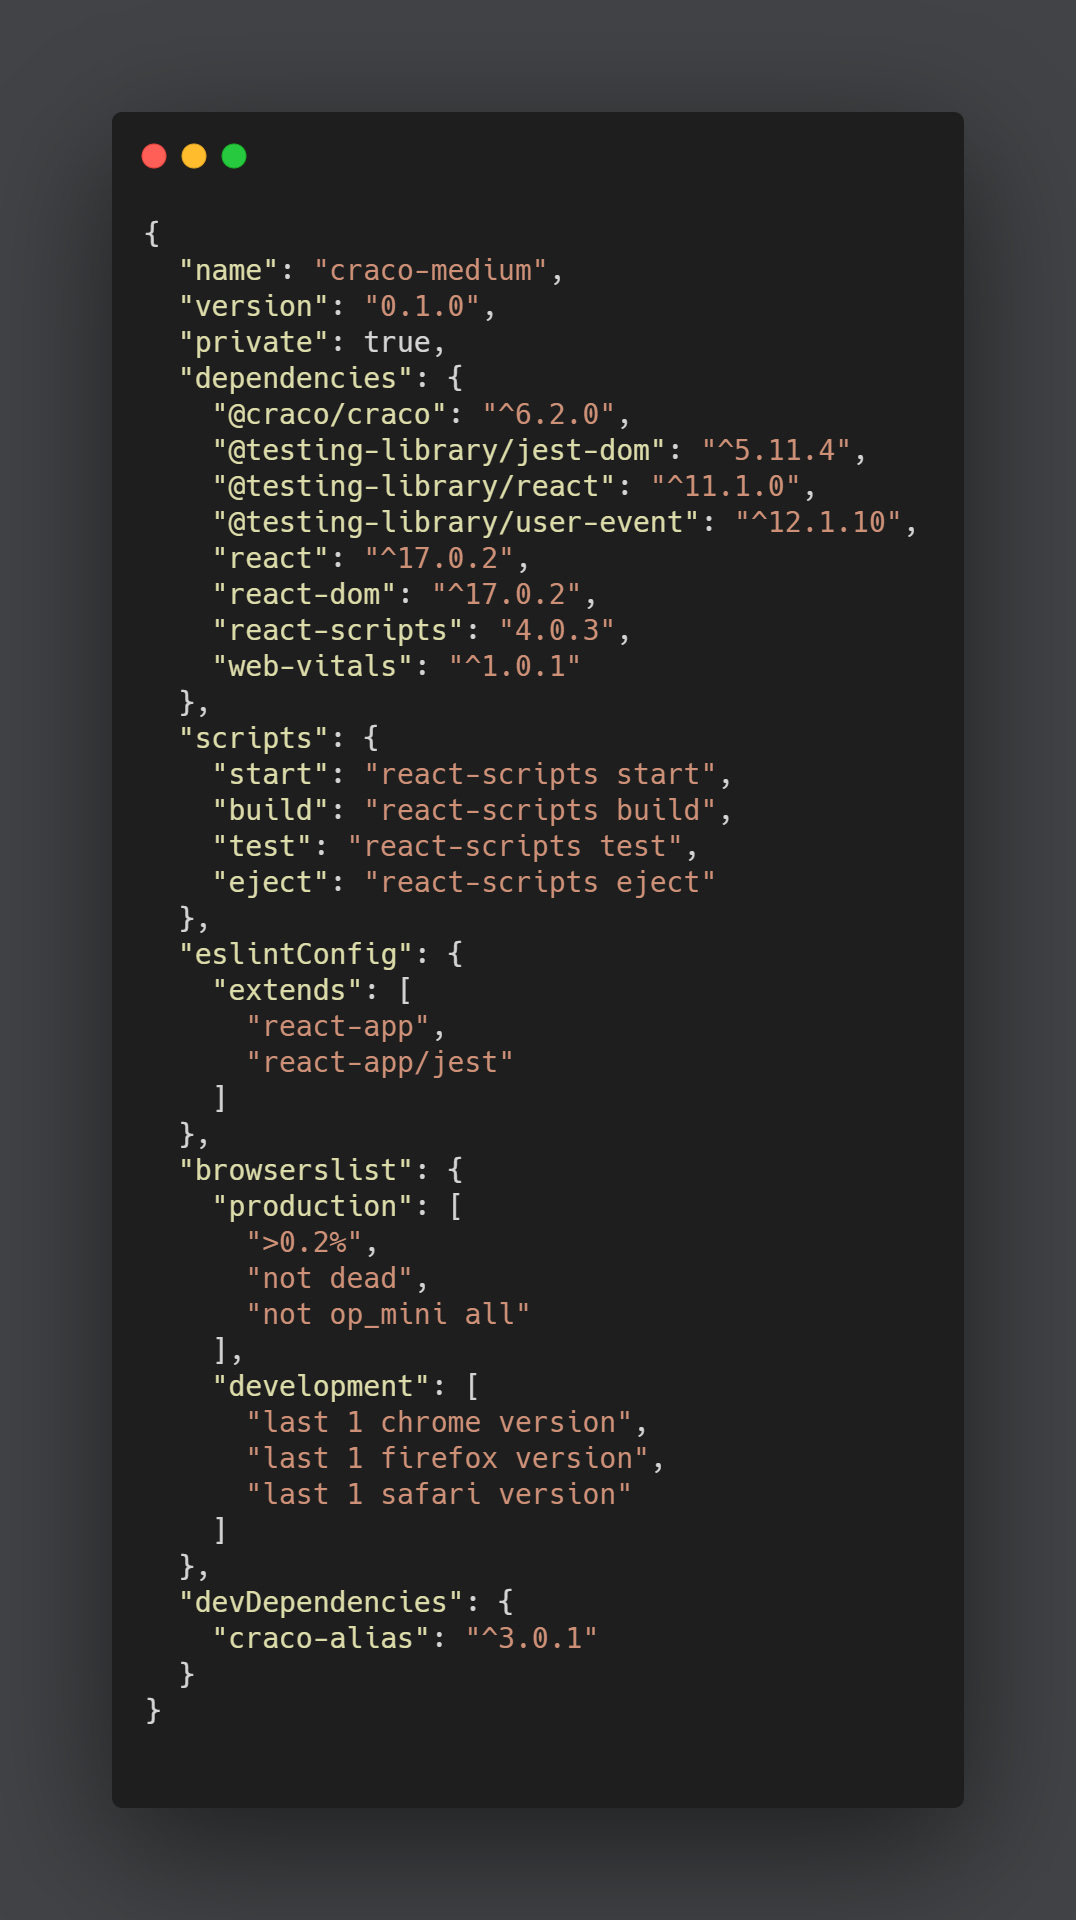
package.json
\3. After the packages have been installed we will need to change the scripts, just replace react-scripts with craco
package.json
\4. Now we need to create two files, first up we will create a craco.config.js
CODEcraco.config.js
const cracoAlias = require("craco-alias");

module.exports = {
  plugins: [
    {
      plugin: cracoAlias,
      options: {
        baseUrl: "./src",
        source: "jsconfig",
      }
    }
  ]
};
- make sure you set the base URL from where your folders are, in a React app the structure usually goes like this, so for our project its all under the
srcfolder so we will set our base URL assrc
![]()

Typical file structure
\5. Now we create the second file, jsconfig.json
{
  "compilerOptions": {
    "baseUrl": "./src",
    "paths": {
      // Aliases for the folders we want to use
      "@components": ["./components"],
      "@pages": ["./pages"],
      "@assets": ["./assets"],
      "@images": ["./assets/img"],
      "@icons": ["./assets/icons"],
    }
  },
  "exclude": ["node_modules"]
}
- make sure you set the base URL here as well and be careful of any syntax errors as this is in JSON unlike the previous file which uses Javascript
\6. (Optional) Next up if your using eslint in your project u will want to do the following as well
npm install --save-dev eslint-import-resolver-alias eslint-plugin-import
And then add the following to your existing .eslintrc.js
CODE
module.exports = {
  // ... your existing config
  settings: {
    'import/resolver': {
      alias: {
        map: [
          // And all your import aliases
          ['@components', './src/components'],
          ['@pages', './src/pages'],
          ['@store', './src/store'],
          ['@assets', './src/assets'],
          ['@images', './src/assets/img'],
          ['@icons', './src/assets/icons'],
        ],
        extensions: ['.ts', '.js', '.jsx', '.json'],
      },
    },
  },
};
That’s it you can now import your modules and components using import aliases.
Some useful links:
- craco — https://www.npmjs.com/package/@craco/craco
- craco-alias — https://www.npmjs.com/package/craco-alias
- create-react-app — https://reactjs.org/docs/create-a-new-react-app.html
- jsconfig — https://code.visualstudio.com/docs/languages/jsconfig
React tips — Working with relative path using create-react-app
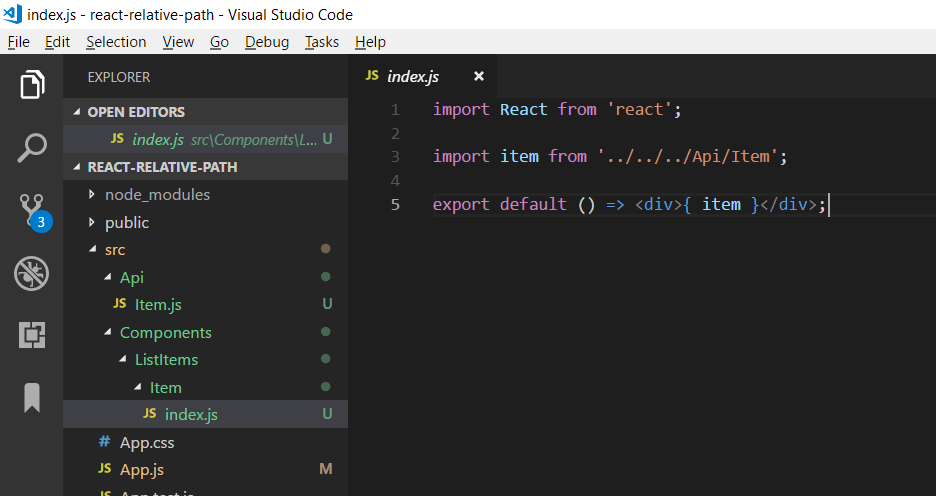
Photo by Jack Anstey on Unsplash
Deal with relative path is not a complex thing, but when we are creating an application using create-react-app sometimes it could be a tough work. To configure paths and other configurations we usually use Babel, but Babel is not available to edit when we create an app using create-react-app, unless you eject.
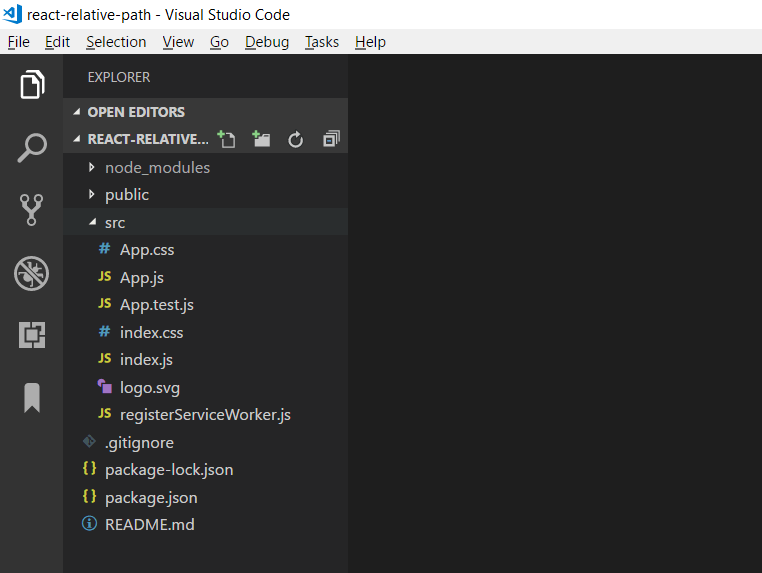
In this post I will show you how to change path configuration using Babel without eject your application. Let’s create an app using create-react-app called react-relative-path:
$ create-react-app react-relative-path
![]()
Now, I will create some folders, add some components and add references to each other.
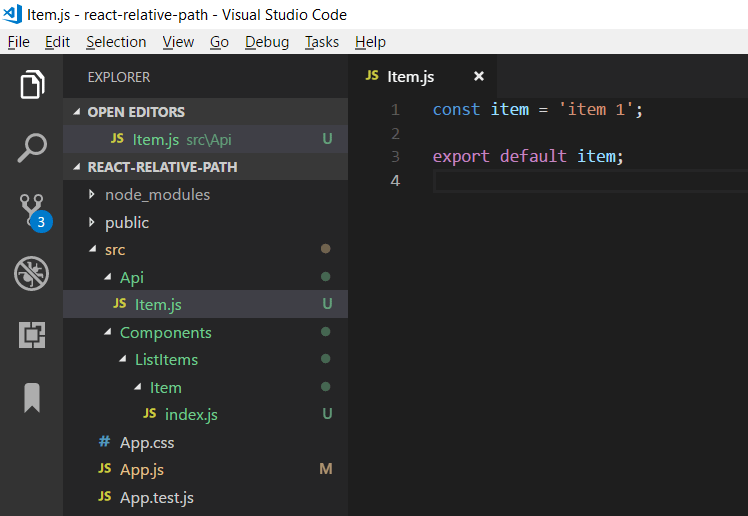
First create a folder called Api and add a Item.js file.
![]()
And a folder called Components with subfolders ListItems and Item as we can see below:


On App.js we just import and use the component Item:
![]()

The result should be like this:


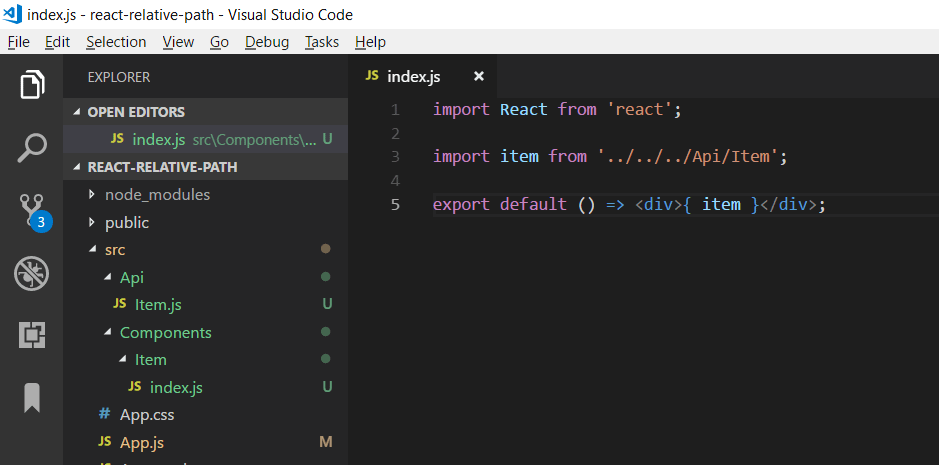
Alright, everything is working well, but if you decide to change the folder structure? Remember the path inside Item component:
import item from '../../../Api/Item';
If you decide to remove the folder ListItems and let only the folder Item:

Now we have an error:


We have to change all paths inside all components inside Item folder, of course in this case is easy, but imagine you have many components, I could be hard to maintain.
In order to deal with this situation, we can use some third-part components. This first we need to install is the react-app-rewired. This component allow us to change webpack configuration without using ‘eject’ and without creating a fork of the react-scripts:
npm i --dev react-app-rewired
The second component the babel-plugin-root-import, that allow us to import components using root based paths.
npm i --dev babel-plugin-root-import
Alright, now we need create a file on root folder called config-overrides.js:
![]()

In this file we are going to configure basically two things: the root prefix and root sufix. The rootPathPrefix is the character we would like to use to refer the root folder and the rootPathSuffix is the name of the root folder.
Next step is change the package.json file to use the react-app-rewired (except the eject script):


Finally let’s change the Item component to use the new prefix “~”:

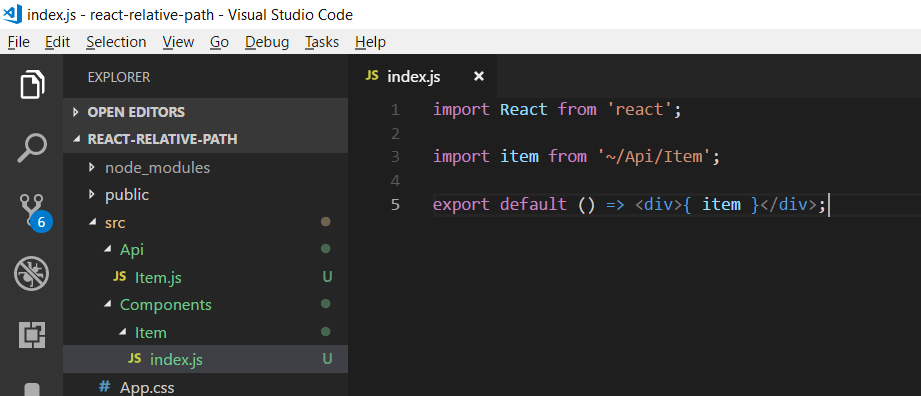
And now it’s working again:


If you are using VSCode, I have one more tip. After these changes we’ve made, you can see we lost the intellisense for paths. So, after you type ~/… the VSCode will not complete or suggest the available path. To fix this, we need to add a file called jsconfig.json and add some configs:

The most important part is the “paths” section. In this section we instruct the VSCode to map the path “~/” to “./src” and after that the intellisense will work again:


You can clone this project here: https://github.com/lblima/react-relative-path
That’s all folks,
Path aliases in React apps
https://hello-js.com/articles/path-aliases-in-react-application/
Imports with aliases
Path aliases have been with me for years, but recently I had a chance to join a new project. To my surprise path aliases were not set to work with my code editor (VSC) and I needed to set it up to work comfortably.
This situation showed me how important aliases are, and how limited is work without it.
What are path aliases?
Normally you are able to import files using relative paths. Relative paths are not so bad, especially for small application, but when your app grows then maintaining it with relative paths is so hard and could be annoying.
Relative path example:
import { Header } from '../../components/Header;
Alias path example
import { Header } from '@components/Header;
As you can see above, alias lets us import resources from any place in your code starting from@componentswhich points directly to the path set for this alias.
In this article I am going to show you path aliases implementation for React application created with and without CRA.
Application created without CRA
For application created without CRA we need to define aliases in webpack file.
module.exports = {
    ...
    resolve: {
      ...
      alias: {
        ...
        'components': path.resolve(__dirname, '../src/components/'),
        'images': path.resolve(__dirname, '../src/images/'),
      },
      ...
    },
    ...
};
After setting aliases in webpack config file we should be able to use aliases.
import { Header } from '@components/Header;
Before I show you how to set aliases for CRA apps, I would like to mention that in the end of this article you can find instruction how improve your VS Code to work with aliases.
Path aliases for CRA
If you created React application with CRA, then you don't have an access to webpack file. To be able to set aliases or make another config changes you can eject or use external library which let you override CRA configuration files.
Path aliases with CRA eject
To get more information about ejecting CRA, please read a documentation https://create-react-app.dev/docs/available-scripts/#npm-run-eject
Remember that this is one way command – You won't be able to bring your application back!
What CRA documentation says about ejecting:
If you aren’t satisfied with the build tool and configuration choices, you can eject at any time. This command will remove the single build dependency from your project.
Instead, it will copy all the configuration files and the transitive dependencies (webpack, Babel, ESLint, etc.) into your project as dependencies in package.json.
To eject you should write following command.
npm run eject
Now you can edit your config/webpack.config.js the same way as we did in the first example:
module.exports = {
    ...
    resolve: {
      ...
      alias: {
        ...
        'components': path.resolve(__dirname, '../src/components/'),
        'images': path.resolve(__dirname, '../src/images/'),
      },
      ...
    },
    ...
};
Great, you should be able to use aliases like so:
import { Header } from '@components/Header;
External library to override CRA config
In this example I use Craco library. This library let you override CRA configuration without ejecting.
For this example I created repository where you can see my code and commits for all needed steps. https://github.com/michalrozenek/import-aliases
Ok, let's do this!
First we need to install craco.
$ yarn add @craco/craco

# OR

$ npm install @craco/craco --save
Create a craco.config.js file in the root directory and configure it
const path = require('path');

module.exports = {
  webpack: {
    alias: {
      '@components': path.resolve(__dirname, 'src/components/'),
      '@images': path.resolve(__dirname, 'src/images/')
    },
  },
};
Update package.json scripts section by replacing commands for craco instead of react-scripts.
/* package.json */

"scripts": {
    "start": "craco start",
    "build": "craco build"
    "test": "craco test"
    "eject": "craco eject"
}
That's all, now you should be able to build your application.
VS Code aliases setup
Currently we have aliases set for webpack which is great! But… we are not able to work comfortable with our imports. We are not able to navigate through files by clicking on import.
Please take a loot at image below

You can notice that when I hovered the mouse over Header component then VSC showed me just any. Nothing more about Header component reference. Similar situation when I try to click on Header in import path – Nothing happens.
To solve it we need to tell VS Code about our aliases.
First we must define new file in the root directory (jsconfig.json) and set few things. In this example I would like to focus mostly on two:
- baseUrl: It is starting path for our aliases
- paths: Here we can define our path aliases starting from place equivalent to baseUrl
{
  "compilerOptions": {
    "baseUrl": "./",
    "paths": {
      "@components/*": ["./src/components/*"],
      "@images/*": ["./src/images/*"]
    },
  },
  "exclude": ["node_modules"]
}
More about jsconfig here

Now you can see that VS Code shows me what Header is and let me go directly to the file which contains it. Awesome!
Sum up
Aliases are great! But the real time saver is a proper VS Code configuration to handle hints and navigation between files. I really hope that this article will save your developing time
https://adrianmanduc.medium.com/path-aliases-in-create-react-app-v4-without-ejecting-3d7ac5f2c86a
As soon as a React application starts growing in size and complexity, various problems also arise. One of those is managing module imports, especially when the codebase contains several folders, nested on multiple levels. Very often you’ll end up having very long import statements using relative paths.


Imports hell
In this post, we’ll explore using Webpack path aliases to solve this issue, allowing for much cleaner import statements, which will also make refactoring significantly easier.


Imports using aliases
This guide assumes that you’ve got Node >= 8.10 and npm >= 5.6 installed on your machine
Creating an app
Create React App (CRA) is a very popular tool for scaffolding React web apps. It gives developers a big advantage, by allowing them to scaffold a production ready React application blazingly fast, without having to spend additional time on setup or complex configuration of tools such as Babel or Webpack.
To create an app, you need to run a single command in a terminal:
npx create-react-app awesome-app
This will create a folder awesome-app with all the required filed to get you started, including some pre-installed dependencies.
By exploring the contents of this folder, you can see that by using CRA all the configuration layer is hidden from the user. This is most of the times great, and has a lot of advantages, however it also brings up some disadvantages, such as the ability to modify these configurations.
A possible solution to customize the config is by ejecting, however this can problematic as it cannot be reverted and moves the responsibility of managing and keeping up to date all the required configuration on the developers’ shoulders.
Using craco
craco (Create React App Configuration Override) is a package that allows developers to customize the underlying configuration of CRA without ejecting. We will be using craco to modify the Webpack configuration in order to create path aliases.
Installation
First, navigate to the root folder of your application and install the plugin from npm using npm install or yarn add .
cd awesome-appnpm install @craco/craco --save
# OR
yarn add @craco/craco
Configuration
Next, create a craco.config.js file at the root of the project.
awesome-app
├── node_modules
├── ...
└── craco.config.js
In this file, we will be adding the Webpack path aliases:
To be able to use these aliases, you will have to create an assets folder and an images folder inside it, in the src folder from the root of your project. Similarly, you should create a components folder inside the src folder.
...
src
  ├── ...
  ├── components
  ├── assets
      ├── images
Update package.json scripts
Next, you will have to update the existing scripts in the package.json file to use craco instead of react-scripts.
Run the application
npm start
This is it! You should now be able to use the path aliases inside your components.
Bonus: VS Code IntelliSense Support
By using a jsconfig.json file, you can help VS Code recognize the paths and give autocomplete suggestions.
To do this, you need to create a jsoconfig.json at the root of your project:
By using the exclude property , VS Code IntelliSense does not get slowed down by performing the search in unwanted locations (such as node_modules).
Tip: If you are using a jsconfig.json file, instead of manually adding the aliases inside the craco config file, you can use the craco-alias plugin.