asdf primarily requires git & curl. Here is a non-exhaustive list of commands to run for your package manager (some might automatically install these tools in later steps).
(possible to do with homebrew – but just like nvm – better to use git version)
3. Install asdf
There are many different combinations of Shells, OSs & Installation methods all of which affect the configuration here. Expand the selection below that best matches your system:
Completions are configured by either a ZSH Framework asdf plugin or by adding the following to your .zshrc:
# append completions to fpath
fpath=(${ASDF_DIR}/completions $fpath)
# initialise completions with ZSH's compinit
autoload -Uz compinit && compinit
if you are using a custom compinit setup, ensure compinit is below your sourcing of asdf.sh
if you are using a custom compinit setup with a ZSH Framework, ensure compinit is below your sourcing of the framework
Warning
If you are using a ZSH Framework the associated asdf plugin may need to be updated to use the new ZSH completions properly via fpath. The Oh-My-ZSH asdf plugin is yet to be updated, see ohmyzsh/ohmyzsh#8837open in new window.
asdf scripts need to be sourced after you have set your $PATH and after you have sourced your framework (oh-my-zsh etc).
Restart your shell so that PATH changes take effect. Opening a new terminal tab will usually do it.
asdf performs a version lookup of a tool in all .tool-versions files from the current working directory up to the $HOME directory. The lookup occurs just-in-time when you execute a tool that asdf manages.
WARNING
Without a version listed for a tool execution of the tool will error. asdf current will show you the tool & version resolution, or absence of, from your current directory so you can observe which tools will fail to execute.
Global defaults are managed in $HOME/.tool-versions. Set a global version with:
asdf global nodejs latest
$HOME/.tool-versions will then look like:
nodejs 16.5.0
Some OSs already have tools installed that are managed by the system and not asdf, python is a common example. You need to tell asdf to pass the management back to the system. The Versions reference section will guide you.
Local versions are defined in the $PWD/.tool-versions file (your current working directory). Usually, this will be the Git repository for a project. When in your desired directory execute:
asdf supports the migration from existing version files from other version managers. Eg: .ruby-version for the case of rbenv. This is supported on a per-plugin basis.
asdf-nodejsopen in new window supports this via both .nvmrc and .node-version files. To enable this, add the following to your asdf configuration file $HOME/.asdfrc:
legacy_version_file = yes
See the configuration reference page for more config options.
That completes the Getting Started guide for asdf 🎉 You can now manage nodejs versions for your project. Follow similar steps for each type of tool in your project!
asdf has many more commands to become familiar with, you can see them all by running asdf --help or asdf. The core of the commands are broken into three categories:
Run curl -o- https://raw.githubusercontent.com/nvm-sh/nvm/v0.36.0/install.sh | bash
Close and reopen your terminal, or open a new terminal window
Type nvm and it’ll give you a list of commands and options if you’ve installed it successfully
Install the versions of node that you need
You can install as many versions of node that you like.
nvm install node to install the most recent version
nvm install 10 to install the latest version of node 10 (replace 10 with whatever version you need). You can specify the minor and patch versions too if needed, e.g. nvm install 10.1.2
Repeat for each different version you need
nvm ls will list the versions of node you have installed, with an arrow pointing at the version currently in use (normally the last one you installed)
Set the default node version
You’re probably going to want to set the default version of node as the most up to date version.
nvm alias default node
Now when you use nvm ls you’ll see something like default -> node (-> v12.19.0) just after all the node versions you’ve got installed. That middle ‘node’ is what tells you whatever the latest version version is will be the default.
Switch node version for a project
Now that you’ve got nvm set up, you can jump between any versions of node that you’ve installed.
There are three ways to swap node versions:
Run a command to specify what version of node to use
Run a command to switch to a pre-defined version of node
Automatically switch to a pre-defined version of node when you move in/out of a directory
Run a command with the node version you need
On the face of it, this is the simplest way to do it. Just run a command to use the right version of node for a project, for example nvm use 12 to use the highest version of node 12 that you have installed.
The problem with this method is that you need to know which version to use before you run the command. You might be lucky and find:
Either of these would tell you which version of node is required to run the project.
Run a command to switch to a pre-defined version
If a project has an .nvmrc file there’s a handy way to switch to the version specified in there without even opening the file; just run:
npm use
When you’re finished work, just cd out of the project folder and run npm use again to switch back to the system default version. Note: if this doesn’t work out of the box, add an .nvmrc file to your user root directory by running this:
echo "default" > ~/.nvmrc
The problem with this method is that you have to remember to switch back to the global version of node once you’re finished work on your project.
Auto-switch to pre-defined version
So we’ve got an .nvmrc file in the project and possibly one in your user root directory (~/). Wouldn’t it be nice if it just changed automatically, rather than your having to run npm use every time you jump in/out of a project folder? So it would work something like this:
cd into your project directory
nvm will hook up to the version of node specified in the .nvmrc file
When finished work, navigate out of project folder
nvm will hook up to the globally installed version of node
That would mean you:
Never have to check for the node version number in an .nvmrc file
Won’t run into issues because a project needs an older version of node than the one running globally
Don’t have to worry about forgetting to switch back to the global version when you’re finished work on that project
Well, all you have to do is add a script to your Bash or Zsh config file (depending on which shell you use – those two are pretty popular). The script checks for an .nvmrc file; if there is one, it switches to the specified version of node automatically. When you move out of the folder again, it reverts back to the global version.
If using Zsh
Add
this script
to the bottom of your ~/.zshrc file:
autoload -U add-zsh-hook
load-nvmrc() {
  local node_version="$(nvm version)"
  local nvmrc_path="$(nvm_find_nvmrc)"

  if [ -n "$nvmrc_path" ]; then
  local nvmrc_node_version=$(nvm version "$(cat "${nvmrc_path}")")

  if [ "$nvmrc_node_version" = "N/A" ]; then
    nvm install
  elif [ "$nvmrc_node_version" != "$node_version" ]; then
    nvm use
  fi
  elif [ "$node_version" != "$(nvm version default)" ]; then
  echo "Reverting to nvm default version"
  nvm use default
  fi
}
add-zsh-hook chpwd load-nvmrc
load-nvmrc
Run source ~/.zshrc
If using Bash
Add
this script
to the bottom of your ~/.bashrc file
find-up() {
  path=$(pwd)
  while [[ "$path" != "" && ! -e "$path/$1" ]]; do
    path=${path%/*}
  done
  echo "$path"
}

cdnvm() {
  cd "$@";
  nvm_path=$(find-up .nvmrc | tr -d '\n')

  if [[ ! $nvm_path = *[^[:space:]]* ]]; then

    declare default_version;
    default_version=$(nvm version default);

    if [[ $default_version == "N/A" ]]; then
      nvm alias default node;
      default_version=$(nvm version default);
    fi

    if [[ $(nvm current) != "$default_version" ]]; then
      nvm use default;
    fi

    elif [[ -s $nvm_path/.nvmrc && -r $nvm_path/.nvmrc ]]; then
    declare nvm_version
    nvm_version=$(<"$nvm_path"/.nvmrc)

    declare locally_resolved_nvm_version
    locally_resolved_nvm_version=$(nvm ls --no-colors "$nvm_version" | tail -1 | tr -d '\->*' | tr -d '[:space:]')

    if [[ "$locally_resolved_nvm_version" == "N/A" ]]; then
      nvm install "$nvm_version";
    elif [[ $(nvm current) != "$locally_resolved_nvm_version" ]]; then
      nvm use "$nvm_version";
    fi
  fi
}
alias cd='cdnvm'
cd $PWD
Your NPM version is tied to your NodeJS version.You can only have one NPM version per Node version.
Per Node version (e.g. per folder) you globally install the version of NPM that you want to use.
#npm controls npm (use -g just for project)

$ npm install -g npm@x.x
_______

#nvm to install / contorl node versions

//lists all versions
nvm ls-remote

//installs the version you want (in this case version 14.0.0)
nvm install v14.0.0

//use the version that you installed as the default
nvm use v14.0.0
Get exact node and npm version you want
After switching node versions with nvm use (and confirming you switched with node –version), you should globally update/downgrade npm with:
npm install -g npm@5.6.0 // -g arg is important
Switch back to other node version and it should be using its own version. Also see this npm article about installing npm versions.
If you want to know why it is installed globally: run in the command line:
Use CLI – 1st – it should open a browser if you need a 1 time passcode (goes to email of user account)
npm login
npm notice Log in on https://registry.npmjs.org/
Username: username
Password:
Email: (this IS public) name@email.com
npm notice Please check your email for a one-time password (OTP)
Enter one-time password: (get from email)
Logged in as username on https://registry.npmjs.org/.

- OR -

npm login
npm notice Log in on https://registry.npmjs.org/
Login at:
https://www.npmjs.com/login?next=/login/cli/xxxxxxxxxx-73a0-4465-b28b-17089cf6e766
Press ENTER to open in the browser...

Logged in on https://registry.npmjs.org/.
make a new branch for yourself + set it to track origin (upstream branch):
$ git checkout -b MyNameIsLocalBranch origin/working-on-remote-branch

  Branch MyNameIsLocalBranch set up to track remote branch working-on-remote-branch from origin.
  Switched to a new branch 'MyNameIsLocalBranch'
.gitignore only ignores files that are not part of the repository yet. If you already git added some files, their changes will still be tracked. To remove those files from your repository (but not from your file system) use git rm –cached on them.
git rm –cached file_name.ext wroks fine for me to update gitignore for one file. thanks. –
git rm -r –cached folder to recursively remove the cache on a folder –
Ignoring the files didn’t work for me but I ignored the dist folder like Pablo mentioned and it worked beautifully! –
The local branch exists on the local machine and can be seen only by the local user. The remote branch is a branch on a remote location. Sometimes, you want to know what files are changed between the local and remote repositories. In this tutorial, we will show the simplest way of comparing local and remote branches.
The asterisk next to the "master" branch indicates that you're currently on that branch.
If you want to show the remote branches then type the git branch with -roption:
git branch -r
Comparing local and remote branches
The second step is running the git diff command to show the difference between the branches:
git diff <local-branch-name> <remote-branch-name>
Branching
The git branch command creates, lists, and deletes branches. Branches represent an isolated line of development. Checking a local branch out from a remote one automatically generates a tracking branch, which is a local branch that has a direct relationship to a remote branch. A remote-tracking branch is a local copy of a remote branch. The -r option with git branch causes the remote-tracking branches to be listed, and the -a option shows both local and remote branches.
Comparing
When you’re working on a new feature or bug fix, having the chance to see how branches differ helps to avoid lots of problems beforehand. The git diff is used to compare changes committed in Git. This command allows you to view the differences between the two versions. It takes two input data sets and output the modifications between them. While executing, this command runs a diff function on Git data sources, including commits, branches, files, etc.
TO REMOTE pt1: STATUS see what you have changed – provides a list:
git status
TO REMOTE pt2: ADD add changes into git to be committed:
git add filenamefromstatuslist
(can do them one at a time or use git add .)
TO REMOTE pt3: COMMIT once you add them – commit them:
git commit -a -m “a note about what these changes are for”
TO REMOTE pt4: PULL get tip of remote even + integrate remote into local branch:
Different Named Branches Need Pulling
Pull performs a merge on the retrieved changes, you should ensure that your local work is committed before running the pull command.
Before you begin to push – you have a local branch with a different name (MyNameIsLocalBranch) than the remote (working-on-remote-branch):
In order to push your MyNameIsLocalBranch to another branch, you may need to merge the remote working-on-remote-branch branch to your current local branch MyNameIsLocalBranch.
In order to be merged, the tip of the remote branch cannot be behind the branch you are trying to push.
Before pushing, make sure to pull the changes from the remote branch and integrate them with your current local branch.
You may also have to resolve conflicts between your branch and origin
In IntellIJ – choose:
GIT -> Resolve Conflicts or select VCS -> GIT -> Resolve Conflicts, if no conflict dialog module pops open
$ git pull origin working-on-remote-branch (will pull working-on-remote-branch from remote)

$ git checkout MyNameIsLocalBranch (to be sure you are on correct local branch)

$ git merge origin/working-on-remote-branch (merge remote into MyNameIsLocalBranch)
Merging changes into your local branch (more examples)
Merging combines your local changes with changes made by others.
Typically, you’d merge a remote-tracking branch (i.e., a branch fetched from a remote repository) with your local branch:
$ git merge remotename/branchname
# Merges updates made online with your local work
Pulling changes from a remote repository
git pull is a convenient shortcut for completing both git fetch and git merge in the same command:
$ git pull remotename branchname
# Grabs online updates and merges them with your local work
Because pull performs a merge on the retrieved changes, you should ensure that your local work is committed before running the pull command. If you run into a merge conflict you cannot resolve, or if you decide to quit the merge, you can use git merge –abort to take the branch back to where it was in before you pulled.
another merge example
merge is used to bring two (or more) branches together.
a little example:
# on branch A:
# create new branch B
$ git checkout -b B
# hack hack
$ git commit -am "commit on branch B"

# create new branch C from A
$ git checkout -b C A
# hack hack
$ git commit -am "commit on branch C"

# go back to branch A
$ git checkout A
# hack hack
$ git commit -am "commit on branch A"
so now there are three separate branches (namely A B and C) with different heads
to get the changes from B and C back to A, checkout A (already done in this example) and then use the merge command:
# create an octopus merge
$ git merge B C
your history will then look something like this:
…-o-o-x-------A
      |\     /|
      | B---/ |
       \     /
        C---/
if you want to merge across repository/computer borders, have a look at git pull command, e.g. from the pc with branch A (this example will create two new commits):
# pull branch B
$ git pull ssh://host/… B
# pull branch C
$ git pull ssh://host/… C
$ git log --oneline
b764644 File with three lines
7c709f0 File with two lines
9ef9173 File with one line
if we want to reset master to point to the commit two back from the current commit, we could use either of the following methods:
`$ git reset 9ef9173` (using an absolute commit SHA1 value 9ef9173)
or
$ git reset current~2` (using a relative value -2 before the "current" tag)
Figure 2 shows the results of this operation. After this, if we execute a git log command on the current branch (master), we'll see just the one commit.
CONNECT:
sshfs user@ip.add.re.ss:/home3/usr/public_html/ ~/desktop/sshsf/bluehost

UNMOUNT:
diskutil umount /Users/spiffy/desktop/sshsf/bluehost
drag to trash / eject - unmount does not seem to work
The .git/config file in a particular clone of a repository is local to that clone. Any settings placed there will only affect actions for that particular project.
(By default, git config modifies .git/config, not ~/.gitconfig – only with –global does it modify the latter.)
In its default mode, git pull is shorthand for git fetch followed by git merge FETCH_HEAD.
When you do a git pull origin master, git pull performs a merge, which often creates a merge commit. Therefore, by default, pulling from the remote is NOT a harmless operation: it can create a new commit sha that didn’t exist before. This behavior can confuse a user, because what feels like it should be a harmless download operation actually changes the commit history in unpredictable ways.
To avoid this, you need
git pull --ff-only
(or not? read on to see which one fits your requirements)
With git pull --ff-only, Git will update your branch only if it can be “fast-forwarded” without creating new commits. If this can’t be done, git pull --ff-only simply aborts with an error message.
You can configure your Git client to always use --ff-only by default, so you get this behavior even if you forget the command-line flag:
git config --global pull.ff only
Note: The --global flag applies the change for all repositories on your machine. If you want this behaviour only for the repository you're in, omit the flag.
Pulling without specifying how to reconcile divergent branches is discouraged. You can squelch this message by running one of the following commands sometime before your next pull:
git config pull.rebase false # merge (the default strategy)
git config pull.rebase true # rebase
git config pull.ff only # fast-forward only
You can replace "git config" with "git config –global" to set a default preference for all repositories. You can also pass –rebase, –no-rebase, or –ff-only on the command line to override the configured default per invocation.
The warning presents three commands as options, all of these will suppress the warning. But they serve different purposes:
git config pull.rebase false # merge (the default strategy)
This keeps the default behaviour and suppresses the warning.
git config pull.rebase true # rebase
This actually commits on top of the remote branch, maintaining a single branch both locally and remotely (unlike the default behaviour where two different branches are involved – one on local and the other on remote – and, to combine the two, a merge is performed).
git config pull.ff only # fast-forward only
This only performs the pull if the local branch can be fast-forwarded. If not, it simply aborts with an error message (and does not create any commits).
Update:
If you have Git 2.29 or above, you can now set pull.ff to false, true or only to get rid of the warning.
git config pull.ff true
true – This is the default behaviour. Pull is fast-forwarded if possible, otherwise it's merged.
git config pull.ff false
false – Pull is never fast-forwarded, and a merge is always created.
git config pull.ff only
only – Pull is fast-forwarded if possible, otherwise operation is aborted with an error message.
To undo a Git commit that was not pushed, you are given a few major options:
Undo the commit but keep all changes staged
Undo the commit and unstage the changes
Undo the commit and lose all changes
Method 1: Undo commit and keep all files staged
In case you just want to undo the commit and change nothing more, you can use
git reset --soft HEAD~;
This is most often used to make a few changes to your latest commit and/or fix your commit message. Leaves working tree as it was before reset. soft does not touch the index file or the working tree at all (but resets the head to the previous commit). This leaves all your changed files Changes to be committed, as git status would put it.
Method 2: Undo commit and unstage all files
In case you want to undo the last commit and unstage all the files you can use the following
git reset HEAD~;
or
git reset --mixed HEAD~;
mixed will reset the index but not the working tree (i.e., the changed files are preserved but not marked for commit) and reports what has not been updated. This is the default action.
Method 3: Undo the commit and completely remove all changes
The following method will undo the commit and revert all changes so that your state is exactly as it was before you started making changes.
git reset --hard HEAD~;
hard resets the index and working tree. Any changes to tracked files in the working tree since the previous commit are discarded.
Note: In case you just want to rewrite the commit message, you could use git –amend instead.
If you're brand new to Git, you can learn how to start using Git on the command line. Now, without any further ado, here's how we can fix six of the most common Git mistakes.
1. Oops… I spelled that last commit message wrong
After a good few hours of coding, it's easy for a spelling error to sneak into your commit messages. Luckily, there's a simple fix.
git commit --amend
This will open up your editor and allow you to make a change to that last commit message. No one needs to know you spelled, "addded" with three "d"s.
2. Oops… I forgot to add a file to that last commit
Another common Git pitfall is committing too early. You missed a file, forgot to save it, or need to make a minor change for the last commit to make sense. --amend is your friend once again.
Add that missed file then run that trusty command.
git add missed-file.txt
git commit --amend
At this point, you can either amend the commit message or just save it to keep it the same.
3. Oops… I added a file I didn't want in the repo
But what if you do the exact opposite? What if you added a file that you didn't want to commit? A rogue ENV file, a build directory, a picture of your cat that you accidentally saved to the wrong folder? It's all fixable.
If all you did was stage the file and you haven't committed it yet, it's as simple as resetting that staged file:
git reset /assets/img/misty-and-pepper.jpg
If you've gone as far as committing that change, you need to run an extra step before:
This will undo the commit, remove the image, then add a new commit in its place.
4. Oops… I committed all those changes to the master branch
So you're working on a new feature and in your haste, you forgot to open a new branch for it. You've already committed a load of files and now them commits are all sitting on the master branch. Luckily, GitLab can prevent you from pushing directly to master. So we can roll back all these changes to a new branch with the following three commands:
Note: Make sure you commit or stash your changes first, or all will be lost!
This creates a new branch, then rolls back the master branch to where it was before you made changes, before finally checking out your new branch with all your previous changes intact.
5. Oops… I made a spelling mistake in my branch name
The keen-eyed among you will notice a slight spelling error in my last example. It's almost 3:00 PM and I haven't had lunch yet, so in my hunger, I've named our new branch future-brunch. Delicious.
We rename this branch in a similar way to how we rename a file with the mv command: by moving it to a new location with the correct name.
git branch -m future-brunch feature-branch
If you've already pushed this branch, there are a couple of extra steps required. We need to delete the old branch from the remote and push up the new one:
This command is for when everything has gone wrong. When you've copy-pasted one too many solutions from Stack Overflow and your repo is in a worse state than it was when you started. We've all been there.
git reflog shows you a list of all the things you've done. It then allows you to use Git's magical time-traveling skills to go back to any point in the past. I should note, this is a last resort thing and should not be used lightly. To get this list, type:
git reflog
Every step we took, every move we made, Git was watching us. Running that on our project gives us this:
3ff8691 (HEAD -> feature-branch) HEAD@{0}: Branch: renamed refs/heads/future-brunch to refs/heads/feature-branch
3ff8691 (HEAD -> feature-branch) HEAD@{2}: checkout: moving from master to future-brunch
2b7e508 (master) HEAD@{3}: reset: moving to HEAD~
3ff8691 (HEAD -> feature-branch) HEAD@{4}: commit: Adds the client logo
2b7e508 (master) HEAD@{5}: reset: moving to HEAD~1
37a632d HEAD@{6}: commit: Adds the client logo to the project
2b7e508 (master) HEAD@{7}: reset: moving to HEAD
2b7e508 (master) HEAD@{8}: commit (amend): Added contributing info to the site
dfa27a2 HEAD@{9}: reset: moving to HEAD
dfa27a2 HEAD@{10}: commit (amend): Added contributing info to the site
700d0b5 HEAD@{11}: commit: Addded contributing info to the site
efba795 HEAD@{12}: commit (initial): Initial commit
Take note of the left-most column, as this is the index. If you want to go back to any point in the history, run the below command, replacing {index} with that reference, e.g. dfa27a2.
git reset HEAD@{index}
So there you have six ways to get out of the most common Gitfalls.
If you want to rename a branch while pointed to any branch, do:
git branch -m <oldname> <newname>
If you want to rename the current branch, you can do:
Rename a local branch – push to repo – delete old
git branch -m <newname>
If you want to push the local branch and reset the upstream branch:
git push origin -u <newname>
And finally if you want to Delete the remote branch:
git push origin --delete <oldname>
A way to remember this is -m is for "move" (or mv), which is how you rename files. Adding an alias could also help. To do so, run the following:
git config --global alias.rename 'branch -m'
If you are on Windows or another case-insensitive filesystem, and there are only capitalization changes in the name, you need to use -M, otherwise, git will throw branch already exists error:
Run the following command which creates a branch called ‘main’ using the history from ‘master’. Using the argument -m will transfer all of the commit history on the ‘master’ branch to your new ‘main’ branch so nothing gets lost.
git branch -m master main
Step 2 – Push ‘main’ to remote repo
Remember that git is version control software on your local machine and GitHub is the remote server that stores your code. For this reason, you’ll have to push your new ‘main’ branch up to GitHub and tell the local branch to start tracking the remote branch with the same name.
git push -u origin main
Step 3 – Point HEAD to ‘main’ branch
At this stage if ‘master’ was your default branch you cannot remove it without first changing HEAD, the pointer to the current branch reference. This following command will point it to ‘main’.
All three steps are shown in the screenshot below:
At this point you can take a breather. You’re on the home stretch! If you want to check that things are going as planned then you’re welcome to run the following that should show the HEAD is pointing to main which now frees you up to delete ‘master’. Note: When you enter this command in your Terminal you will have to type :q to exit it. Not CTRL+C, ESC, etc.
git branch -a
Step 4 – Change default branch to ‘main’ on GitHub site
At this point you’ve succesfully transitioned everything to the ‘main’ branch, but you can’t delete the ‘master’ branch without changing the default branch in GitHub to something other than ‘master’. This is the only step that requires you to leave the Terminal and navigate in your browser to your GitHub repository. From there, click "Settings" -> "Branches" on the left rail and change the default branch to ‘main’. I’ve included some screenshots below and GitHub provides instructions for doing this here: https://docs.github.com/en/github/administering-a-repository/setting-the-default-branch.
Step 5 – Delete ‘master’ branch on the remote repo
Now that the local ‘master’ is gone and there’s nothing pointing to it on Github you can delete it with the following command:
git push origin --delete master
That’s it! You’re done! You should no longer see “master” or “remotes/origin/master” locally or on your GitHub repository. If you want to check, you can always run the following:
git branch -a
Feel free to let me know if this worked for you or if you had issues! Note: I take no responsibility for messing up your git repo. In case this wasn’t clear enough, all instructions are available in its own repo here: https://github.com/StevenMMortimer/master-to-main.
All commands
# Step 1
# create main branch locally, taking the history from master
git branch -m master main

# Step 2
# push the new local main branch to the remote repo (GitHub)
git push -u origin main

# Step 3
# switch the current HEAD to the main branch
git symbolic-ref refs/remotes/origin/HEAD refs/remotes/origin/main

# Step 4
# change the default branch on GitHub to main
# https://docs.github.com/en/github/administering-a-repository/setting-the-default-branch

# Step 5
# delete the master branch on the remote
git push origin --delete master
Suppose I have two branches, A and B. Do the following properties hold?
Merging A into B conflicts if and only if merging B into A conflicts.
The contents of my files after merging A into B is the same as the contents of my files after merging B into A.
Assuming there are no conflicts, the content of the merge is the same.
@Maroun That is my hunch as well, but is that actually documented somewhere? Or, does it logically follow from the known properties of the merging algorithms?
cmaster's answer is correct, with caveats. Let's start by noting these items / assumptions:
There is always a single merge base commit. Let's call this commit B, for base.
The other two inputs are also single commits. Let's call them L for left / local (--ours) and R for right / remote (--theirs).
The first assumption is not necessarily true. If there are multiple merge base candidates, it is up to the merge strategy to do something about this. The two standard two-head merge strategies are recursive and resolve. The resolve strategy simply picks one at (apparent) random. The recursive strategy merges the merge bases two at a time, and then uses the resulting commit as the merge base. The one chosen by resolvecan be affected by the order of arguments to git merge-base and hence to git merge, so that's one caveat right there. Because the recursive strategy can do more than one merge, there's a second caveat here that is difficult to describe yet, but it applies only if there are more than two merge bases.
The second assumption is much more true, but note that the merge code can run on a partially-modified work-tree. In this case all bets are off, since the work-tree does not match either L or R. A standard git merge will tell you that you must commit first, though, so normally this is not a problem.
Merge strategies matter
We already noted the issue with multiple merge bases. We're assuming a two-head merge as well.
Octopus merges can deal with multiple heads. This also change the merge base computation, but in general octopus merge won't work with cases that have complicated merge issues and will just refuse to run where the order might matter. I would not push hard on it though; this is another case where the symmetry rule is likely to fail.
The -s ours merge strategy completely ignores all other commits so merge order is obviously crucial here: the result is always L. (I am fairly sure that -s ours does not even bother computing a merge base B.)
You can write your own strategy and do whatever you want. Here, you can make the order matter, as it does with -s ours.
High level merging (with one merge base): file name changes
Git now computes, in effect, two change-sets from these three snapshots:
L – B, or git diff --find-renames *B L*
R – B, or git diff --find-renames *B R*
The rename detectors here are independent—by this I mean neither affects the other; both use the same rules though. The main issue here is that it's possible for the same file in B to be detected as renamed in both change-sets, in which case we get what I call a high level conflict, specifically a rename/rename conflict. (We can also get high level conflicts with rename/delete and several other cases.) For a rename/rename conflict, the final name that Git chooses is the name in L, not the name in R. So here, the order matters in terms of final file name. This does not affect the work-tree merged content.
Low level merging
At this point we should take a small tour of Git's internals. We have now paired up files in B-vs-L and in B-vs-R, i.e., we know which files are "the same" files in each of the three commits. However, the way Git stores files and commits is interesting. From a logical point of view, Git has no deltas: each commit is a complete snapshot of all files. Each file, however, is just a pair of entities: a path name P and a hash ID H.
In other words, at this point, there is no need to walk through all the commits leading from B to either L or R. We know that we have some file F, identified by up to three separate path names (and as noted above, Git will use the L path in most cases, but use the R path if there is only one rename in the B-vs-R side of the merge). The complete contents of all three files are available by direct lookup: HB represents the base file content, HL represents the left-side file, and HR represents the right-side file.
Two files match exactly if and only if their hashes match.1 So at this point Git just compares the hash IDs. If all three match, the merged file is the same as the left and right and base files: there is no work. If L and R match, the merged file is the L or R content; the base is irrelevant as both sides made the same change. If B matches either L or R but not the other, the merged file is the non-matching hash. Git only has to do the low-level merge if there is a potential for a low-level merge conflict.
So now, Git extracts the three contents and does the merge. This works on a line-by-line basis (with lines grouped together when multiple adjacent lines are changed):
If both left and right sides touched only different source lines, Git will take both changes. This is clearly symmetric.
If left and right touched the same source lines, Git will check whether the change itself is also the same. If so, Git will take one copy of the change. This, too, is clearly symmetric.
If left and right touched the same lines, but made different changes, Git will declare a merge conflict. The work-tree content will depend on the order of the changes, since the work-tree content has <<<<<<< HEAD ... ||||||| base ... ======= ... other >>>>>>> markers (the base section is optional, appearing if you choose diff3 style).
The definition of the same lines is a little tricky. This does depend on the diff algorithm (which you may select), since some sections of some files may repeat. However, Git always uses a single algorithm for computing both L and R, so the order does not matter here.
You can override merge conflict complaints using -X ours or -X theirs. These direct Git to resolve conflicts in favor of the L or R change respectively.
Merging makes a merge commit, which affects merge base computation
This symmetry principle, even with the above caveats, is fine for a single merge. But once you have made a merge, the next merge you run will use the modified commit graph to compute the new merge base. If you have two merges that you intend to do, and you do them as:
git merge one    (and fix conflicts and commit if needed)
git merge two    (fix conflicts and commit if needed)
then even if everything is symmetric in each merge, that does not mean that you will necessarily get the same result as if you run:
git merge two
git merge one
Whichever merge runs first, you get a merge commit, and the second merge now finds a different merge base.
This is particularly important if you do have conflicts that you must fix before finishing whichever merge goes first, since that also affects the L input to the second git merge command. It will use the first merge's snapshot as L, and the new (maybe different) merge base as B, for two of its three inputs.
This is why I mentioned that -s recursive has potential order differences when working with multiple merge bases. Suppose there are three merge bases. Git will merge the first two (in whatever order they pop out of the merge base computation), commit the result (even if there are merge conflicts—it just commits the conflicts in this case), and then merge that commit with the third commit and commit the result. The final commit here is then the input B. Only if all parts of this process are symmetric will that final B result be order-insensitive. Most merges are symmetric, but we saw all the caveats above.
Thanks for supplementing my very high-level, imprecise answer with this low-level, precise, technical detail answer 🙂
Once you’ve completed work on your branch, it is time to merge it into the main branch. Merging takes your branch changes and implements them into the main branch. Depending on the commit history, Git performs merges two ways: fast-forward and three-way merge. Let’s examine both of these based on the branches and commit history in the following diagram.When you merge the hotfix branch into the main branch, Git will move the main branch pointer forward to commit nr7jk. Git does this because the hotfix branch shares a direct ancestor commit with the main branch and is directly ahead of its commit. This commit is a fast-forward merge.Once you merge the hotfix branch, continue working on the feature1 branch. As you continue making commits on the feature1 branch, the commit history diverges.Git is unable to move the pointer to the latest commit like in a fast-forward commit. To bring the feature1 branch into the main branch, Git performs a three-way merge. Git takes a snapshot of three different commits to create a new one:The common commit both branches share (a90hb)The latest commit of the branch (az84f)The commit of the branch to merge into (nr7jk)Merging Branches in a Local RepositoryTo merge branches locally, use git checkoutto switch to the branch you want to merge into. This branch is typically the main branch. Next, use git mergeand specify the name of the other branch to bring into this branch. This example merges the jeff/feature1 branch into the main branch. Note that this is a fast-forward merge.git checkout main git merge jeff/feature1Work continues on the main and other branches, so they no longer share a common commit history. Now a developer wants to merge the jeff/feature2 branch into the main branch. Instead, Git performs a three-way (or recursive) merge commit.git checkout main git merge jeff/feature2Merging Branches to Remote RepositoryIf you create a branch in your local repository, the remote repository is not aware of the branch’s existence. Before you can push the branch code in the remote repository, you set the remote repository as the upstream branch using the git pushcommand. This command simultaneously sets the upstream branch and pushes the branch contents to the remote repository.git push --set-upstream origin <branch name>Merging Main into a BranchWhile you are working on your branch, other developers may update the main branch with their branch. This action means your branch is now out of date of the main branch and missing content. You can merge the main branch into your branch by checking out your branch and using the same git merge command.git checkout <branch name> git merge mainGit FAQsWhat is creating a branch in Git?Creating a branch takes a snapshot of the existing code so you can work on it independently of the main branch.How do I create a new branch in Git?Use the git branch command and specify the branch name, e.g., git branch feature1.How can I view which branch is active?Use git branch to view available branches and which one is active. Git typically designates the active branch with an asterisk and a different colored font.How can I switch to working on another branch?Use git checkout and the name of the branch to make it active.Can I create a branch inside another branch?Yes, specify the name of the branch to base the new branch, e.g., git branch feature-bug feature1.My branch only exists locally. How can I add my branch to my remote Git repository?Yes, use the git push command to set the upstream branch, e.g., git push –set-upstream origin .How can I update the main branch with my branch’s changes?Switch to the main branch using the git checkout command, then merge the branch using the git merge command along with the branch name.How can I delete a branch?When you are done with a branch, delete it using the git branch command and the -d switch, e.g., git branch -d feature1.ClosingGit branching is a powerful feature that allows teams to work on the code independently of each other. Knowing how to create, name, and merge branches are essential skills for any developer, systems administrator, or DevOps engineer.
While developing software with the Git tool, you can create different branches for different features. When making changes to master, those changes are not automatically added to other branches.
This article will explain how to pull all changes from master into another branch in Git.
When using the Git tool, you may need to pull the changes you made in the master to a different branch. These changes are not transferred automatically, so you have to make them manually.
The rest of the article will explain how to pull changes from the master to the dev branch in three different ways.
Note
Because it may be considered dehumanizing toward enslaved people, the master branch has been renamed to main.
First, we need to switch to the branch we want to work. The checkout command updates the files in the working tree according to the specified branch.
Use the following command to switch to the dev branch.
git checkout dev
The git fetch command downloads objects and refs from another repository. Use the below command to update your branch if the main branch is changed.
git fetch origin
The git merge command incorporates changes from the named commits into the current branch. Finally, you need to use the following command to merge the changes.
Use the command below to switch to the dev branch.
git checkout dev
The git pull command fetches from and integrates with another branch. The --allow-unrelated-histories parameter can be used to merge histories that do not share a common ancestor when merging projects.
Use the following command to get the changes from the main.
git pull origin main --allow-unrelated-histories
Write for us
DelftStack articles are written by software geeks like you. If you also would like to contribute to DelftStack by writing paid articles, you can check the write for us page.
I checked out branch B1, did a pull, then merged it with B2.
You can either merge or rebase the branch b1 to branch b2.
git checkout b2
git merge b1
or
git checkout b2
git rebase b1
I tried the first option with the merge, but it says already up to date. However, I know it's not the case when I compare against the github commi thistory. Maybe it's pulling from master somehow?
Try to pull first before merging or rebasing. git checkout b2 git pull similarly pull for branch b1 and then perform the merge or rebase
Than you! That worked. I checked out branch B1, did a pull, then merged it with B2.
So I have a branch B1 which is a branch of master. I later created branch B2 from branch B1. However, when I do git pull in B2, I'm not pulling the changes from branch B1. How do I pull changes from B1? Thank you.
you will have to merge B1 into B2 to get the changes
2 Answers
I recommend avoidinggit pull entirely, at least (or especially) if you're just starting with Git. All git pull does is run git fetch, then run a second Git command for you. The problem is that this obscures what is really happening, preventing you from learning what you need to know.
What you need to know starts with what a commit really is and does, because Git is all about commits. Git is not about files, though a commit does hold files; and it's not even really about branches either, though branch names like b1 and b2 help you—or at least Git—find commits. But while commits hold files, and branch names hold commit hash IDs, Git is really all about the commits.
So, each commit:
Holds a snapshot of all of your files. That's a full snapshot, not changes since the previous commit.
Holds some extra information—some metadata—such as your name and email address, and why you made the commit you made. Most of this is just for other humans, but there's a key element in the metadata that's for Git itself, which we'll get to in a moment.
Has a hash ID. That hash ID is a big ugly string of letters and digits. It looks random, though it's entirely not-random. In fact, the hash ID is a cryptographic checksum of the complete contents of the commit: the files-as-snapshot, and the metadata.
The result of all this is that once made, no part of any commit can ever change. You can take everything out of a commit, make changes to it somewhere else, and then make a new commit from the result, but if you've changed even one single bit anywhere—your name, your log message, one bit of some source file, whatever—what you get is a new and different commit. So commit hash IDs are guaranteed to find one particular commit, and every Git uses the same hash algorithm, so all Gits everywhere use the same hash IDs for the same commits.
How branches grow, or,there is no such thing as a sub-branch
The next thing you need to know is that there is no such thing as a sub-branch.
Given that every commit has its own unique hash ID, we're still left with a problem: how do we find commits? The hash IDs look random, and certainly are not in any sort of useful order. This is where Git's internal metadata, and branch names, come in.
Every commit holds, as part of its metadata, a list of parent commit hash IDs. Usually there is just one hash ID here. That one hash ID is the (singular) parent of this commit. This ties all commits together, one by one, backwards:
... <-F <-G <-H
where H stands for the hash ID of the last commit in the chain. Commit H itself records the actual hash ID of earlier commit G, so by looking inside H we can find the number—the hash ID—that lets us find G. Commit G stores the hash ID of earlier commit F, and so on.
We've now reduced the problem to finding commit H. The way we do that is with a branch name like master or b1. We store the raw hash ID of commit H into the name, giving us:
...--F--G--H <-- b1
Each branch name holds exactly one commit hash ID. If we make a second branch b2, we must pick one of the various existing commits, and make b2 hold that hash ID. Typically we might pick the current commit, i.e., the one with hash H:
...--F--G--H <-- b1, b2
Now we need to remember which name we're using. Git uses the special name HEAD (in all uppercase like this) for that. There are several ways to draw that; here, I'll just attach HEAD in parentheses to one of these branch names:
...--F--G--H <-- b1 (HEAD), b2
or:
...--F--G--H <-- b1, b2 (HEAD)
At this point, let's make a new commit, in the usual way: modify something, git add, and git commit. Git builds the snapshot for the new commit from Git's index—something we won't describe properly here, but this index is why you have to run git add all the time–and the appropriate metadata, including a log message you must write. This new commit gets a new, unique hash ID. The data for the new commit is the new snapshot, and the metadata is what you said, except for the parent: that comes from what Git knows, which is that the current commit is H at this time. So new commit I points back to existing commit H:
...--F--G--H
            \
             I
and now Git updates whichever branch name HEAD is attached to. If that's b2, the name b2 now holds the hash ID of commit I:
...--F--G--H   <-- b1
            \
             I   <-- b2 (HEAD)
Note that commits up through H are now on both branches, while commit I is only on b1. The name HEAD remains attached to the current branch, but now the current commit is commit I.
Merging
Suppose you start with:
...--G--H <-- master (HEAD)
and then create names b1 and b2, both pointing to existing commit H. You then select b1 to work on, with git checkout b1, and make two commits:
          I--J   <-- b1 (HEAD)
         /
...--G--H   <-- master, b2
Note that b2 has not yet moved. Now you run git checkout b2 to select commit H again. The snapshots you made for I and J are still there, frozen for all time, but now you're working with the snapshot from H again. You can now make a couple of commits here on b2, giving:
We won't worry about this just yet, but note that nothing happened to any existing commit or any other branch name. Each time we added new commits, the current branch name moved. The new commits all just added to the existing graph of all-commits-so-far. It's totally impossible to change any existing commit, but we never did. All we did was add new commits that link back to the existing ones, and then change the branch names.
Let's go back to the idea of merging, though. We didn't make any new master commits after all, and if we git checkout b1, and temporarily stop drawing in the namemaster (because it will get in the way), we have:
          I--J   <-- b1 (HEAD)
         /
...--G--H
         \
          K--L   <-- b2
We can now run git merge b2, or we can run git checkout b2; git merge b1. Git will now do its best to combine work, because git merge is about combining work.
Now, each commit holds a snapshot, but combining work requires looking at changes. What Git does here is to use its internal difference engine, which you can invoke yourself with git diff. To make this work, Git first has to find the best common commit: a commit that is on both branches, and not too different from the latest commit on each branch.
Here, it's super-obvious which commit is the best common commit. That's commit H. So Git will now compare the snapshot in H to the snapshot in whichever commit we picked with our git checkout—the commit HEAD is attached to. If we assume that's b1, the commit for this comparison is J:
git diff --find-renames <hash-of-H> <hash-of-J> # what we changed
This tells Git what "we" changed on b1, with respect to the common starting point. Then Git diffs the other pairing:
git diff --find-renames <hash-of-H> <hash-of-L> # what they changed
This tells Git what "they" changed on b2, with respect to the same starting point.
The merge operation now combines these changes, file by file. If we changed line 42 of main.py and they didn't touch main.py at all, Git takes our change. If they did touch main.py too, but not line 42, Git takes their change as well. If we both touched line 42, we'd better both have changed it the same way. If not, Git declares a merge conflict and leaves us with a mess.
Assuming there are no merge conflicts—the above is not a complete list of possible conflicts, just the obvious kind—Git will be able to combine the two sets-of-changes and apply all those changes to all the files as they appear in commit H. That way, the new commit that Git is about to make has our changes from J, but also has their changes from L.
At this point, Git makes the new commit. As usual, the new commit has a snapshot: that's the one Git built by combining changes. As usual, the new commit has a parent; since we're on branch b1, this parent is J. But—not as usual—the new commit has a second parent too. Since we told Git to merge commit L, this second parent is L.
Having made the commit, Git drags our current branch name forward:
Now, you're probably not the only person who makes commits. Other people make commits too. You typically start by cloning a repository, perhaps from GitHub, perhaps from somewhere else. This gets you all of their commits. Your Git is going to call this other Git origin, by default.
We already saw that in any repository, we find the last commit of some branch by its branch name. So their Git—the one over on GitHub, or whatever—has some branch names:
...--o--o   <-- master
         \
          o--o--o   <-- develop
and so on. When you clone their repository, you get all of their commits, with their unique hash IDs that stay those hash IDs. But you don't get their branch names. Those are theirs. Your Git takes their names and changes them, so that you can have your own branch names.
The changes your Git makes to their branch names turn their names into your remote-tracking names. These names look like origin/master and origin/develop. These remember, in your repository, where theirbranch names were:
For the last step of your git clone, your Git creates a new branch name, pointing to the same commit as one of their branch names. You can choose which branch this is but usually it's just master, so that you get:
Now, suppose that they, whoever they are, manage to create two new commits on theirmaster. Your Git does not have these commits yet, but you can get them.
You run:
git fetch origin
(or just git fetch, which defaults to origin). Your Git calls up their Git again. They tell your Git about their branch names (and other names) and your Git discovers that, gosh, there are new commits K-L to get from them. So your Git does, and then your Git updates your origin/master accordingly:
(I've assumed here they did not add new commits to their develop, otherwise we'd have new commits on origin/develop now too.)
So, this is what git fetch is all about: your Git calls up some other Git, and gets new commits from that Git (if there are any to get) and then updates your remote-tracking names. After this git fetch you may have new commits. What if you want to use them?
To use their new commits after fetching, you need a second Git command
Let's say that you'd like to merge their work with your work, to create merge commit M in the usual way. You can now run:
git merge origin/master
This will make new merge commit M on its own, if it can, merging your J with their L, exactly as we saw above. It doesn't matter that commit L is found by a remote-tracking name instead of a branch name. Git doesn't care about names; Git cares about commits. So we get:
The pull command just combines two commands into one:
run git fetch to get new commits from them; then
run a second Git command to incorporate those new commits.
The default second command is git merge, so git fetch uses the commits that just came in to run a git merge. But git pull can run a deliberately limited kind of fetch, and doesn't just merge with any new commits from them. To know what to merge, git pull requires that you say what to use here.
The confusing part is that when you name what to use on the git pull command, you must use their branch names, even though your Git is going to work with your own remote-tracking names in a moment. So if you want to fetch from origin, then merge with what they call b2, you need:
git pull origin b2
This runs a limited kind of git fetch, then merges with whichever commit they're naming via their b2, that your Git names via your origin/b2. The missing slash here is because the first step—the git fetch—needs to know which Git to call up (the one at origin) and the second step needs to know which of their branch names to use.
Both of these two steps, git fetch and git merge, can fail. It's very unlikely for git fetch to fail (and git pull will stop if it does), but if you keep these as two separate commands, you can tell which one failed, if either one did. Moreover—and for me, much more important—you can look to see what git fetchfetched before you run git merge. And last, not so important once you know it, you'll realize that these are two entirely separate operations in Git: fetch gets commits; merge combines work.
It's safe to run git fetch any time, from any branch. Fetch just calls up another Git and gets commits from them. This does not touch anything you're doing right now. It's not so safe to run git merge any time: that merges something into your current branch, and you only have one current branch at any time. If you have lots of branches to update, you can git fetch and update all your remote-tracking names all at once, but then you have to, one by one, git checkout the branches you want updated, and git merge each one, with whichever commit you want to merge with—probably from the remote-tracking name for that branch, but because you can look, you can check first to see if you really do want that merge.
Sending commits to them
You now have commits I-J-M (with M having two parents, the first being J and the second being L) that they don't have. To send them your commits, you can use git push, providing they give you permission. (Note: these permissions are controlled by the hosting software, not by Git itself.) Running:
git push origin master
has your Git call up their Git, give them commits you have that they don't, that they'll need—in this case, I, J, and M—and then ask them to set their branch name. Note that you do not ask them to set a remote-tracking name. There are no remote-tracking names in this direction! You just ask them to set a branch name directly.
Sometimes, they'll accept this request. Sometimes they might refuse, because they've set up preventive barriers—maybe on specific branch names, and again, this is controlled by the hosting software—or because they just don't allow pushes at all. Or, they might refuse because you didn't merge, or didn't merge recently enough. Suppose they had the above, but while you were running git merge, someone else added another commit. If you run git fetch now, you'll get:
which means that theirmaster now names commit N, which didn't exist a moment ago. You might need to merge again, or maybe you want to remove your commit M entirely (which is a little tricky sometimes) and make a new merge O that incorporates N this time.
NVM is super simple to use. Here’s the commands you’ll need to know when you want to work with NVM in the command line.
nvm ls-remote
This shows you all available LTS versions of Node.js.
This is just a fraction of all the available Node.js versions NVM has to offer.
nvm ls
Shows you all installed versions available locally on your machine.
The versions of Node.js installed on my local machine.
nvm install node OR nvm install 8.15.1
Typing nvm install node will install the latest version of Node.js to your machine, or nvm install <SPECIFIC_NODE_VERSION> will install the specified version.
I just installed the latest version of Node.js to my local development machine.
nvm use node OR nvm use 11.10.0
This command will set the version of Node.js running locally to the latest version downloaded if you just type nvm use node, or the version specified if you append the command with the version numbernvm use --version e.g. nvm use 8.15.1.
Both of the use commands: the first defaults to the latest version (11.10.1), the second sets the version to 11.10.0.
Note: the version you want to run locally must be installed on your machine first, or else Node will fall back to whatever version it was running before the command was issued.
nvm run node OR nvm run 11.10.0
This command is almost the same as the one above, the only difference is typing nvm run node or nvm run --version like nvm run 11.10.0 will switch to the specified version of Node.js and open up a Node command line for you to run commands manually from afterwards.
From nvm run node, I can then run commands like console.log(‘hello world’) or server.js right after switching to a Node version.
In this way, you could, potentially, have multiple terminals open running multiple versions of Node at once. 🤔 Pretty handy…
nvm alias default node OR nvm alias default 11.10.0
These commands will set an NVM alias called ‘default’ to the latest downloaded version of node with nvm alias default node, or the specified version with nvm alias default --version like nvm alias default 11.10.0.
Once this default alias is set, any new shell will default to running with that version of Node.
These are the main commands you’ll probably use to download and switch between Node.js versions while doing local web development. At least, they’re the ones I use most of the time.
The NVM documentation though, is pretty good and it goes into real depth if you want to get fancy with your NVM-ing.
Depending on your version control system, conflicts may arise in different situations.
When you work in a team, you may come across a situation when somebody commits changes to a file you are currently working on. If these changes do not overlap (that is, changes were made to different lines of code), the conflicting files are merged automatically. However, if the same lines were affected, your version control system cannot randomly pick one side over the other, and asks you to resolve the conflict.
Conflicts may also arise when merging, rebasing or cherry-picking branches.
Non-Distributed Version Control Systems
When you try to edit a file that has a newer version on the server, IntelliJ IDEA informs you about that, showing a message popup in the editor:
In this case, you should update your local version before changing the file, or merge changes later.
If you attempt to commit a file that has a newer repository version, the commit fails, and an error is displayed in the bottom right corner telling you that the file you are trying to commit is out of date.
If you synchronize a file that already has local changes with a newer repository version committed by somebody else, a conflict occurs. The conflicting file gets the Merged with conflicts status. The file remains in the same changelist in the Local Changes view, but its name is highlighted in red. If the file is currently opened in the editor, the filename on the tab header is also highlighted in red.
Distributed Version Control Systems
Under distributed version control systems, such as Git and Mercurial, conflicts arise when a file you have committed locally has changes to the same lines of code as the latest upstream version and when you attempt to perform one of the following operations: pull, merge, rebase, cherry-pick, unstash, or apply patch.
If there are conflicts, these operations will fail and you will be prompted to accept the upstream version, prefer your version, or merge the changes manually:
The Conflicts dialog is triggered automatically when a conflict is detected on the Version Control level.
If you click Close in this dialog, or call a Git operation that leads to a merge conflict from command line, a Merge Conflicts node will appear in the Local Changes view with a link to resolve them:
IntelliJ IDEA provides a tool for resolving conflicts locally. This tool consists of three panes:
The left page shows the read-only local copy
The right pane shows the read-only version checked in to the repository
The central pane shows a fully-functional editor where the results of merging and conflict resolving are displayed. Initially, the contents of this pane is the same as the base revision of the file, that is, the revision from which both conflicting versions are derived.
Resolve conflicts
Last modified: 08 March 2021
When you work in a team, you may come across a situation when somebody pushes changes to a file you are currently working on. If these changes do not overlap (that is, changes were made to different lines of code), the conflicting files are merged automatically. However, if the same lines were affected, Git cannot randomly pick one side over the other, and asks you to resolve the conflict.
In Git, conflicts may arise when you attempt to perform one of the following operations: pull, merge, rebase, cherry-pick, unstash changes or apply a patch. If there are conflicts, these operations will fail, and you will be prompted to accept the upstream version, prefer your version, or merge the changes:
The Conflicts dialog is triggered automatically when a conflict is detected on the Git level.
If you click Close in this dialog, or call a Git operation that leads to a merge conflict from command line, a Merge Conflicts node will appear in the Local Changes view with a link to resolve them:
IntelliJ IDEA provides a tool for resolving conflicts locally. This tool consists of three panes:
The left pane shows the read-only local copy
The right pane shows the read-only version checked in to the repository.
The central pane is a fully-functional editor where the results of resolving conflicts are displayed. Initially, the contents of this pane are the same as the base revision of the file, that is, the revision from which both conflicting versions are derived.
Resolve conflicts
Click Merge in the Conflicts dialog, the Resolve link in the Local Changes view, or select the conflicting file in the editor and choose VCS | Git | Resolve Conflicts from the main menu.
To automatically merge all non-conflicting changes, click (Apply All Non-Conflicting Changes) on the toolbar. You can also use the (Apply Non-Conflicting Changes from the Left Side) and (Apply Non-Conflicting Changes from the Right Side) to merge non-conflicting changes from the left/right parts of the dialog respectively.
To resolve a conflict, you need to select which action to apply (accept or ignore ) to the left (local) and the right (repository) version, and check the resulting code in the central pane:
You can also right-click a highlighted conflict in the central pane and use the commands from the context menu. The Resolve using Left and Resolve using Right commands provide a shortcut to accepting changes from one side and ignoring them from the other side respectively:
For simple conflicts (for example, if the beginning and the end of the same line have been modified in different file revisions), the Resolve simple conflicts button that allows merging the changes in one click becomes available.
Such conflicts are not resolved with the Apply All Non-Conflicting Changes action since you must make sure that they are resolved properly.
Note that the central pane is a fully-functional editor, so you can make changes to the resulting code directly in this dialog.
It may also be useful to compare different versions to resolve a conflict. Use the toolbar button to invoke the list of options. Note that Base refers to the file version that the local and the repository versions originated from (initially displayed in the middle pane), while Middle refers to the resulting version.
Review merge results in the central pane and click Apply.
Productivity tips
Apply non-conflicting changes automatically
You can configure IntelliJ IDEA to always apply non-conflicting changes automatically instead of telling it to do so from the Merge dialog. To do this, select the Automatically apply non-conflicting changes option on the Tools | Diff Merge page of the IDE settings ⌘,.
Manage changes in the central pane
You can manage changes in the central pane using the toolbar that appears when you hover the mouse cursor over a change marker in the gutter, and then click it. The toolbar is displayed together with a frame showing the previous contents of the modified line:For example, when there are multiple non-conflicting changes, and you only need to skip one or two of them, it's easier to apply all of them simultaneously using the Apply all non-conflicting changes action, and then undo the unwanted ones using the Revert action from this toolbar.
Handle conflicts related to LF and CRLF line endings
Quite often, people working in a team and contributing to the same repository use different operating systems. This may result in problems with line ending, because Unix, Linux and MacOS us LF, and Windows uses CRLF to mark the end of a line.
IntelliJ IDEA displays the discrepancies in line endings in the Differences Viewer, so you can fix them manually. If you want Git to solve such conflicts automatically, you need to set the core.autocrlf attribute to true on Windows and to input on Linux and MacOS (for more details, see Dealing with line endings). You can change the configuration manually by running git config --global core.autocrlf true on Windows or git config --global core.autocrlf input on Linux and macOS.
However, IntelliJ IDEA can automatically analyze your configuration, warn you if you are about to commit CRLF into a remote repository, and suggest setting the core.autocrlf setting to true or input depending on your operating system.
To enable smart handling of LF and CRLF line separators, open the Settings/Preferences dialog ⌘,, and select the Version Control | Git node on the left. Enable the Warn if CRLF line separators are about to be committed option.
After you have enabled this option, IntelliJ IDEA will display the Line Separators Warning Dialog each time you are about to commit a file with CRLF separators, unless you have set any related Git attributes in the affected file (in this case, IntelliJ IDEA supposes that you clearly understand what you are doing and excludes this file from analysis).
In the Line Separators Warning Dialog, click one of the following:
Commit As Is to ignore the warning and commit a file with CRFL separators.
Fix and Commit to have the core.autocrlf attribute set to true or input depending on your operating system. As a result, CRLF line separators will be replaced with LF before the commit.
If, at a later time, you need to review how exactly conflicts were resolved during a merge, you can locate the required merge commit in the Log tab of the Git tool window ⌘9, select a file with conflicts in the Commit Details pane in the right, and click < or press ⌘D (see Review how changes were merged for details).
NPM creates a new package-lock.json – do you commits?
(e.g. my version of silvermine player had to be updated to match up with the updated package.json file from stage)
Yes, package-lock.json is intended to be checked into source control. If you're using npm 5+, you may see this notice on the command line: created a lockfile as package-lock.json. You should commit this file. According to npm help package-lock.json:
package-lock.json is automatically generated for any operations where npm modifies either the node_modules tree, or package.json. It describes the exact tree that was generated, such that subsequent installs are able to generate identical trees, regardless of intermediate dependency updates.
This file is intended to be committed into source repositories, and serves various purposes:
Describe a single representation of a dependency tree such that teammates, deployments, and continuous integration are guaranteed to install exactly the same dependencies.
Provide a facility for users to "time-travel" to previous states of node_modules without having to commit the directory itself.
To facilitate greater visibility of tree changes through readable source control diffs.
And optimize the installation process by allowing npm to skip repeated metadata resolutions for previously-installed packages.
One key detail about package-lock.json is that it cannot be published, and it will be ignored if found in any place other than the toplevel package. It shares a format with npm-shrinkwrap.json, which is essentially the same file, but allows publication. This is not recommended unless deploying a CLI tool or otherwise using the publication process for producing production packages.
If both package-lock.json and npm-shrinkwrap.json are present in the root of a package, package-lock.json will be completely ignored.
If software did not resolve package.json conflicts
Occasionally, two separate npm install will create package locks that cause merge conflicts in source control systems. As of npm@5.7.0, these conflicts can be resolved by manually fixing any package.json conflicts, and then running npm install [--package-lock-only] again. npm will automatically resolve any conflicts for you and write a merged package lock that includes all the dependencies from both branches in a reasonable tree. If --package-lock-only is provided, it will do this without also modifying your local node_modules/.
To make this process seamless on git, consider installing npm-merge-driver, which will teach git how to do this itself without any user interaction. In short: $ npx npm-merge-driver install -g will let you do this, and even works with pre-npm@5.7.0 versions of npm 5, albeit a bit more noisily. Note that if package.json itself conflicts, you will have to resolve that by hand and run npm install manually, even with the merge driver.
Conceptually, the "input" to npm install is a package.json, while its "output" is a fully-formed node_modules tree: a representation of the dependencies you declared. In an ideal world, npm would work like a pure function: the same package.json should produce the exact same node_modules tree, any time. In some cases, this is indeed true. But in many others, npm is unable to do this. There are multiple reasons for this:
different versions of npm (or other package managers) may have been used to install a package, each using slightly different installation algorithms.
a new version of a direct semver-range package may have been published since the last time your packages were installed, and thus a newer version will be used.
A dependency of one of your dependencies may have published a new version, which will update even if you used pinned dependency specifiers (1.2.3 instead of ^1.2.3)
The registry you installed from is no longer available, or allows mutation of versions (unlike the primary npm registry), and a different version of a package exists under the same version number now.
If these are the only versions of A, B, and C available in the registry, then a normal npm install A will install:
A@0.1.0
`-- B@0.0.1
    `-- C@0.0.1
However, if B@0.0.2 is published, then a fresh npm install A will install:
A@0.1.0
`-- B@0.0.2
    `-- C@0.0.1
assuming the new version did not modify B's dependencies. Of course, the new version of B could include a new version of C and any number of new dependencies. If such changes are undesirable, the author of A could specify a dependency on B@0.0.1. However, if A's author and B's author are not the same person, there's no way for A's author to say that he or she does not want to pull in newly published versions of C when B hasn't changed at all.
To prevent this potential issue, npm uses package-lock.json or, if present, npm-shrinkwrap.json. These files are called package locks, or lockfiles.
Whenever you run npm install, npm generates or updates your package lock, which will look something like this:
This file describes an exact, and more importantly reproduciblenode_modules tree. Once it's present, any future installation will base its work off this file, instead of recalculating dependency versions off package.json.
The presence of a package lock changes the installation behavior such that:
The module tree described by the package lock is reproduced. This means reproducing the structure described in the file, using the specific files referenced in "resolved" if available, falling back to normal package resolution using "version" if one isn't.
The tree is walked and any missing dependencies are installed in the usual fashion.
If preshrinkwrap, shrinkwrap or postshrinkwrap are in the scripts property of the package.json, they will be executed in order. preshrinkwrap and shrinkwrap are executed before the shrinkwrap, postshrinkwrap is executed afterwards. These scripts run for both package-lock.json and npm-shrinkwrap.json. For example to run some postprocessing on the generated file:
Using a locked package is no different than using any package without a package lock: any commands that update node_modules and/or package.json's dependencies will automatically sync the existing lockfile. This includes npm install, npm rm, npm update, etc. To prevent this update from happening, you can use the --no-save option to prevent saving altogether, or --no-shrinkwrap to allow package.json to be updated while leaving package-lock.json or npm-shrinkwrap.json intact.
It is highly recommended you commit the generated package lock to source control: this will allow anyone else on your team, your deployments, your CI/continuous integration, and anyone else who runs npm install in your package source to get the exact same dependency tree that you were developing on. Additionally, the diffs from these changes are human-readable and will inform you of any changes npm has made to your node_modules, so you can notice if any transitive dependencies were updated, hoisted, etc.
Resolving lockfile conflicts
Occasionally, two separate npm install will create package locks that cause merge conflicts in source control systems. As of npm@5.7.0, these conflicts can be resolved by manually fixing any package.json conflicts, and then running npm install [--package-lock-only] again. npm will automatically resolve any conflicts for you and write a merged package lock that includes all the dependencies from both branches in a reasonable tree. If --package-lock-only is provided, it will do this without also modifying your local node_modules/.
To make this process seamless on git, consider installing npm-merge-driver, which will teach git how to do this itself without any user interaction. In short: $ npx npm-merge-driver install -g will let you do this, and even works with pre-npm@5.7.0 versions of npm 5, albeit a bit more noisily. Note that if package.json itself conflicts, you will have to resolve that by hand and run npm install manually, even with the merge driver.
DO NOT – Delete `package-lock.json` to Resolve Conflicts quickly
Yes it can have bad side effects, maybe not very often but for example you can have in package.json “moduleX”: “^1.0.0” and you used to have “moduleX”: “1.0.0” in package-lock.json.
By deleting package-lock.json and running npm install you could be updating to version 1.0.999 of moduleX without knowing about it and maybe they have created a bug or done a backwards breaking change (not following semantic versioning).
Anyway there is already a standard solution for it.
Fix the conflict inside package.json
Run: npm install –package-lock-only
https://docs.npmjs.com/cli/v7/configuring-npm/package-locks#resolving-lockfile-conflicts
package-lock.json – role
It stores an exact, versioned dependency tree rather than using starred versioning like package.json itself (e.g. 1.0.*). This means you can guarantee the dependencies for other developers or prod releases, etc. It also has a mechanism to lock the tree but generally will regenerate if package.json changes.
package-lock.json is automatically generated for any operations where npm modifies either the node_modules tree, or package.json. It describes the exact tree that was generated, such that subsequent installs are able to generate identical trees, regardless of intermediate dependency updates.
This file is intended to be committed into source repositories, and serves various purposes:
Describe a single representation of a dependency tree such that teammates, deployments, and continuous integration are guaranteed to install exactly the same dependencies.
Provide a facility for users to “time-travel” to previous states of node_modules without having to commit the directory itself.
To facilitate greater visibility of tree changes through readable source control diffs.
And optimize the installation process by allowing npm to skip repeated metadata resolutions for previously-installed packages.”
To answer jrahhali’s question below about just using the package.json with exact version numbers. Bear in mind that your package.json contains only your direct dependencies, not the dependencies of your dependencies (sometimes called nested dependencies). This means with the standard package.json you can’t control the versions of those nested dependencies, referencing them directly or as peer dependencies won’t help as you also don’t control the version tolerance that your direct dependencies define for these nested dependencies.
Even if you lock down the versions of your direct dependencies you cannot 100% guarantee that your full dependency tree will be identical every time. Secondly you might want to allow non-breaking changes (based on semantic versioning) of your direct dependencies which gives you even less control of nested dependencies plus you again can’t guarantee that your direct dependencies won’t at some point break semantic versioning rules themselves.
The solution to all this is the lock file which as described above locks in the versions of the full dependency tree. This allows you to guarantee your dependency tree for other developers or for releases whilst still allowing testing of new dependency versions (direct or indirect) using your standard package.json.
NB. The previous shrink wrap json did pretty much the same thing but the lock file renames it so that it’s function is clearer. If there’s already a shrink wrap file in the project then this will be used instead of any lock file.
One thing that can be costly when done wrong is solving conflicts in generated files, like package-lock.json. It usually happens when two branches add or update a dependency. The result of package-lock then changes, and whoever gets their PR merged to main first is the lucky one who avoided those conflicts. It's almost like a race.
So here you are, updating your PR with the base branch, and git shows you this huge amount of conflicts in package-lock.json. The conflicts in package.json are usually easily solved (if there even are any), so I think it is tempting to just delete package-lock.json and run npm install. After all, this will give you a brand new package-lock.json, which you can happily commit.
Why you should never delete package-lock.json
When you install a dependency for the first time, it is usually automatically added to your dependencies or devDependencies with ^version, which means "compatible with version, according to semver". You can try out what that means here.
Enter, for example, lodash as the package and ^4.2.1 as version, and you will see that you can get anything from 4.2.1 to 4.17.20 (the latest version)
This is where package-lock.json comes into play. Upon installing, it will "lock" you in on the version that you just installed. So if 4.2.1 is the latest version at the moment of your install, this version will be written to package-lock and will, from there on, always be installed. Even if newer versions come out that are theoretically compatible with it.
This is important because it guarantees that every developer in the team will have the same version on their machine, and it is equally important for CI/CD. I would not want to ship a newer version to production than we tested with, even if it's just a patch version.
So when you delete package-lock.json, all those consistency goes out the window. Every node_module you depend on will be updated to the latest version it is theoretically compatible with. This means no major changes, but minors and patches. I believe this is bad for three reasons:
It trusts that everyone strictly adheres to semantic versioning, and I sincerely doubt that this is the case. There is also no way to enforce this.
Major version zero is exempt from the rules of semantic versioning. From
the semver spec
:
Major version zero (0.y.z) is for initial development. Anything MAY change at any time. The public API SHOULD NOT be considered stable.
Have a look at your package-lock.json and count how many dependencies with major version 0 you have. For this blog (made with gatsby) I have 362!
This also applies to transitive dependencies. So even if you are using strict versions (without the ^), the libraries you are using do not.
If you delete package-lock.json now from any one of your projects and run npm install again, it will most certainly look completely different.
Will your app be fine? Maybe, maybe not. No one can tell. For me, this would usually mean: "regression test everything", which is certainly not what I have in mind when I am just solving a conflict.
What you can do instead
My usual approach was the following:
Solve the conflicts in package.json
Take package-lock.json from the base branch
run npm install again
This will then just re-install whatever changes we made in our branch. However, I recently learned about and even easier way:
npm can automatically detect conflicts in package-lock.json and resolve them for us. From the npm docs:
Occasionally, two separate npm install will create package locks that cause merge conflicts in source control systems. As of npm@5.7.0, these conflicts can be resolved by manually fixing any package.json conflicts, and then running npm install [–package-lock-only] again. npm will automatically resolve any conflicts for you and write a merged package lock that includes all the dependencies from both branches in a reasonable tree. If –package-lock-only is provided, it will do this without also modifying your local node_modules/.
This means that we can just keep the conflicts in the lock file. All we have to do is get package.json right, and npm will do the rest for us 🎉.
I wish I had known this sooner – it would've saved me some trouble.
Other ways to unset remote tracking
You don’t have to delete your local branch.
Simply delete the local branch that is tracking the remote branch:
git branch -d -r origin/
-r, –remotes tells git to delete the remote-tracking branch (i.e., delete the branch set to track the remote branch). This will not delete the branch on the remote repo!
See “Having a hard time understanding git-fetch”
https://stackoverflow.com/questions/1070496/having-a-hard-time-understanding-git-fetch
there’s no such concept of local tracking branches, only remote tracking branches.
So origin/master is a remote tracking branch for master in the origin repo
As mentioned in Dobes Vandermeer’s answer, you also need to reset the configuration associated to the local branch:
git config --unset branch..remote
git config --unset branch..merge
Remove the upstream information for .
If no branch is specified it defaults to the current branch.
That will make any push/pull completely unaware of origin/.
Set tracking branches for existing local branches
On the other hand, you may have chosen to work on a local branch and to set the upstream branch (or the remote tracking branch later on).
It is perfectly fine, but you will have to use the “git branch” in order to set the existing branch upstream branch.
$ git branch -u /
Let’s take the example of the “feature” branch that you just created to start working.
$ git checkout -b feature
Switched to a new branch ‘feature’
You created some commits in your branch, you want to set the tracking branch to be master.
$ git branch -u origin/master
Branch ‘feature’ set up to track remote branch ‘master’ from ‘origin’.
Great! You successfully set the upstream branch for your existing local branch.
Sorting out which branch is which – origin / pull / push
“origin” is not special
Just like the branch name “master” does not have any special meaning in Git, neither does “origin”. While “master” is the default name for a starting branch when you run git init which is the only reason it’s widely used, “origin” is the default name for a remote when you run git clone. If you run git clone -o booyah instead, then you will have booyah/master as your default remote branch.
Using the example of my copy of Puppet checked out from the upstream Git repository on Github.com…
$ git remote show origin
* remote origin
  Fetch URL: git://github.com/reductivelabs/puppet.git
  Push  URL: git://github.com/reductivelabs/puppet.git
  HEAD branch: master
  Remote branches:
    0.24.x                 tracked
    0.25.x                 tracked
    2.6.x                  tracked
    master                 tracked
    next                   tracked
    primordial-ooze        tracked
    reins-on-a-horse       tracked
    testing                tracked
    testing-17-march       tracked
    testing-18-march       tracked
    testing-2-april        tracked
    testing-2-april-midday tracked
    testing-20-march       tracked
    testing-21-march       tracked
    testing-24-march       tracked
    testing-26-march       tracked
    testing-29-march       tracked
    testing-31-march       tracked
    testing-5-april        tracked
    testing-9-april        tracked
    testing4268            tracked
  Local branch configured for 'git pull':
    master merges with remote master
  Local ref configured for 'git push':
    master pushes to master (up to date)
Then if I were to execute the following:
$ git checkout -b local_2.6 -t origin/2.6.x
Branch local_2.6 set up to track remote branch 2.6.x from origin.
Switched to a new branch 'local_2.6'
And finally re-run the git remote show origin command again I will then see the following down near the bottom:
  Local branches configured for 'git pull':
    local_2.6 merges with remote 2.6.x
    master    merges with remote master
Upstream shorthand
When you have a tracking branch set up, you can reference its upstream branch with the @{upstream} or @{u} shorthand. So if you’re on the master branch and it’s tracking origin/master, you can say something like git merge @{u} instead of git merge origin/master if you wish.
Tracking Branches
Checking out a local branch from a remote-tracking branch automatically creates what is called a “tracking branch” (and the branch it tracks is called an “upstream branch”). Tracking branches are local branches that have a direct relationship to a remote branch. If you’re on a tracking branch and type git pull, Git automatically knows which server to fetch from and which branch to merge in.
When you clone a repository, it generally automatically creates a master branch that tracks origin/master. However, you can set up other tracking branches if you wish — ones that track branches on other remotes, or don’t track the master branch. The simple case is the example you just saw, running git checkout -b /. This is a common enough operation that Git provides the –track shorthand:
$ git checkout --track origin/serverfix
Branch serverfix set up to track remote branch serverfix from origin.
Switched to a new branch 'serverfix'
In fact, this is so common that there’s even a shortcut for that shortcut. If the branch name you’re trying to checkout (a) doesn’t exist and (b) exactly matches a name on only one remote, Git will create a tracking branch for you:
$ git checkout serverfix
Branch serverfix set up to track remote branch serverfix from origin.
Switched to a new branch 'serverfix'
To set up a local branch with a different name than the remote branch, you can easily use the first version with a different local branch name:
$ git checkout -b sf origin/serverfix
Branch sf set up to track remote branch serverfix from origin.
Switched to a new branch 'sf'
Now, your local branch sf will automatically pull from origin/serverfix.
If you already have a local branch and want to set it to a remote branch you just pulled down, or want to change the upstream branch you’re tracking, you can use the -u or –set-upstream-to option to git branch to explicitly set it at any time.
$ git branch -u origin/serverfix
Branch serverfix set up to track remote branch serverfix from origin.
Note
Upstream shorthand
When you have a tracking branch set up, you can reference its upstream branch with the @{upstream} or @{u} shorthand. So if you’re on the master branch and it’s tracking origin/master, you can say something like git merge @{u} instead of git merge origin/master if you wish.
If you want to see what tracking branches you have set up, you can use the -vv option to git branch. This will list out your local branches with more information including what each branch is tracking and if your local branch is ahead, behind or both.
$ git branch -vv
  iss53     7e424c3 [origin/iss53: ahead 2] Add forgotten brackets
  master    1ae2a45 [origin/master] Deploy index fix
* serverfix f8674d9 [teamone/server-fix-good: ahead 3, behind 1] This should do it
  testing   5ea463a Try something new
So here we can see that our iss53 branch is tracking origin/iss53 and is “ahead” by two, meaning that we have two commits locally that are not pushed to the server. We can also see that our master branch is tracking origin/master and is up to date. Next we can see that our serverfix branch is tracking the server-fix-good branch on our teamone server and is ahead by three and behind by one, meaning that there is one commit on the server we haven’t merged in yet and three commits locally that we haven’t pushed. Finally we can see that our testing branch is not tracking any remote branch.
It’s important to note that these numbers are only since the last time you fetched from each server. This command does not reach out to the servers, it’s telling you about what it has cached from these servers locally. If you want totally up to date ahead and behind numbers, you’ll need to fetch from all your remotes right before running this. You could do that like this:
$ git fetch --all; git branch -vv
Pulling
While the git fetch command will fetch all the changes on the server that you don’t have yet, it will not modify your working directory at all. It will simply get the data for you and let you merge it yourself. However, there is a command called git pull which is essentially a git fetch immediately followed by a git merge in most cases. If you have a tracking branch set up as demonstrated in the last section, either by explicitly setting it or by having it created for you by the clone or checkout commands, git pull will look up what server and branch your current branch is tracking, fetch from that server and then try to merge in that remote branch.
Generally it’s better to simply use the fetch and merge commands explicitly as the magic of git pull can often be confusing.
Push Branch to Another Branch (different named branches)
In some cases, you may want to push your changes to another branch on the remote repository.
In order to push your branch to another branch, you may need to merge the remote branch to your current local branch.
In order to be merged, the tip of the remote branch cannot be behind the branch you are trying to push.
Before pushing, make sure to pull the changes from the remote branch and integrate them with your current local branch.
Note : when merging the remote branch, you are merging your local branch with the upstream branch of your local repository.
In order to push your branch to another remote branch, use the “git push” command and specify the remote name, the name of your local branch as the name of the remote branch.
$ git push <remote> <local_branch>:<remote_name>
As an example, let’s say that you have created a local branch named “my-feature”.
$ git branch

  master
* my-feature
  feature
However, you want to push your changes to the remote branch named “feature” on your repository.
In order to push your branch to the “feature” branch, you would execute the following command
$ git push origin my-feature:feature

Enumerating objects: 6, done.
Counting objects: 100% (6/6), done.
Delta compression using up to 2 threads
Compressing objects: 100% (3/3), done.
Writing objects: 100% (3/3), 513 bytes | 513.00 KiB/s, done.
Total 3 (delta 1), reused 0 (delta 0)
remote: Resolving deltas: 100% (1/1), completed with 1 local object.
To https://github.com/SCHKN/repo.git
   b1c4c91..9ae0aa6  my-feature -> feature
Origin
setting origin for local branch (different named branches)
Use the colon notation:
git push -u origin local_branch:remote_branch
More Origin notes
git remote show origin
origin is an aliason your system for a particular remote repository. It's not actually a property of that repository.
By doing
git push origin branchname
you're saying to push to the origin repository. There's no requirement to name the remote repository origin: in fact the same repository could have a different alias for another developer.
Remotes are simply an alias that store the URL of repositories. You can see what URL belongs to each remote by using
git remote -v
In the push command, you can use remotes or you can simply use a URL directly. An example that uses the URL:
git push git@github.com:git/git.git master
You can also specify -v, which shows you the URLs that Git has stored for the shortname to be used when reading and writing to that remote:
$ git remote -v
Set upstream branch – same name
Given a branch foo and a remote upstream:
As of Git 1.8.0:
git branch -u upstream/foo
Or, if local branch foo is not the current branch:
git branch -u upstream/foo foo
Or, if you like to type longer commands, these are equivalent to the above two:
All of the above commands will cause local branch foo to track remote branch foo from remote upstream.
The old (1.7.x) syntax is deprecated in favor of the new (1.8+) syntax. The new syntax is intended to be more intuitive and easier to remember.
Defining an upstream branch will fail when run against newly-created remotes that have not already been fetched. In that case, run git fetch upstream beforehand.
git branch --set-upstream-to, which can be used as follows, if you're on the branch my_branch:
It was tempting to say git branch --set-upstream origin/master, but that tells Git to arrange the local branch origin/master to integrate with the currently checked out branch, which is highly unlikely what the user meant. The option is deprecated; use the new --set-upstream-to (with a short-and-sweet -u) option instead.
A shortcut, which doesn't depend on remembering the syntax for git branch --set-upstream 1 is to do:
git push -u origin my_branch
… the first time that you push that branch. Or, to push to the current branch to a branch of the same name (handy for an alias):
git push -u origin HEAD
You only need to use -u once, and that sets up the association between your branch and the one at origin in the same way as git branch --set-upstream does.
Personally, I think it's a good thing to have to set up that association between your branch and one on the remote explicitly. It's just a shame that the rules are different for git push and git pull.
1 It may sound silly, but I very frequently forget to specify the current branch, assuming that's the default – it's not, and the results are most confusing
Update 2012-10-11: Apparently I'm not the only person who found it easy to get wrong! Thanks to VonC for pointing out that git 1.8.0 introduces the more obvious git branch --set-upstream-to, which can be used as follows, if you're on the branch my_branch:
It was tempting to say git branch --set-upstream origin/master, but that tells Git to arrange the local branch origin/master to integrate with the currently checked out branch, which is highly unlikely what the user meant. The option is deprecated; use the new --set-upstream-to (with a short-and-sweet -u) option instead.
When you're publishing a local branch – same names remote and local
Let's now look at the opposite scenario: you started a new local branch and now want to publish it on the remote for the first time:
$ git push -u origin dev
You can tell Git to track the newly created remote branch simply by using the -u flag with "git push".
When you decide at a later point in time
In cases when you simply forgot, you can set (or change) a tracking relationship for your current HEAD branch at any time:
$ git branch -u origin/dev
Push Branch To Remote – same names remote and local
In order to push a Git branch to remote, you need to execute the “git push” command and specify the remote as well as the branch name to be pushed.
$ git push <remote> <branch>
For example, if you need to push a branch named “feature” to the “origin” remote, you would execute the following query
$ git push origin feature
git push branch to remote
If you are not already on the branch that you want to push, you can execute the “git checkout” command to switch to your branch.
If your upstream branch is not already created, you will need to create it by running the “git push” command with the “-u” option for upstream.
git push upstream branch to remote
$ git push -u origin feature
Congratulations, you have successfully pushed your branch to your remote!

 Watch a video course Git & GitHub – The Practical Guide

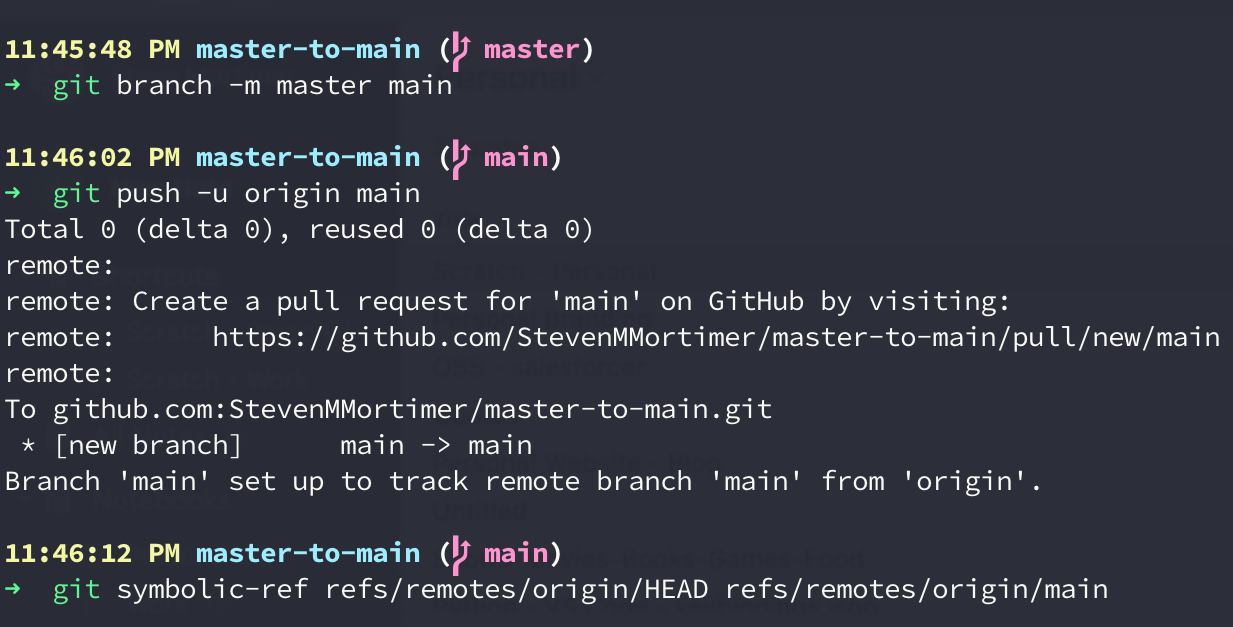
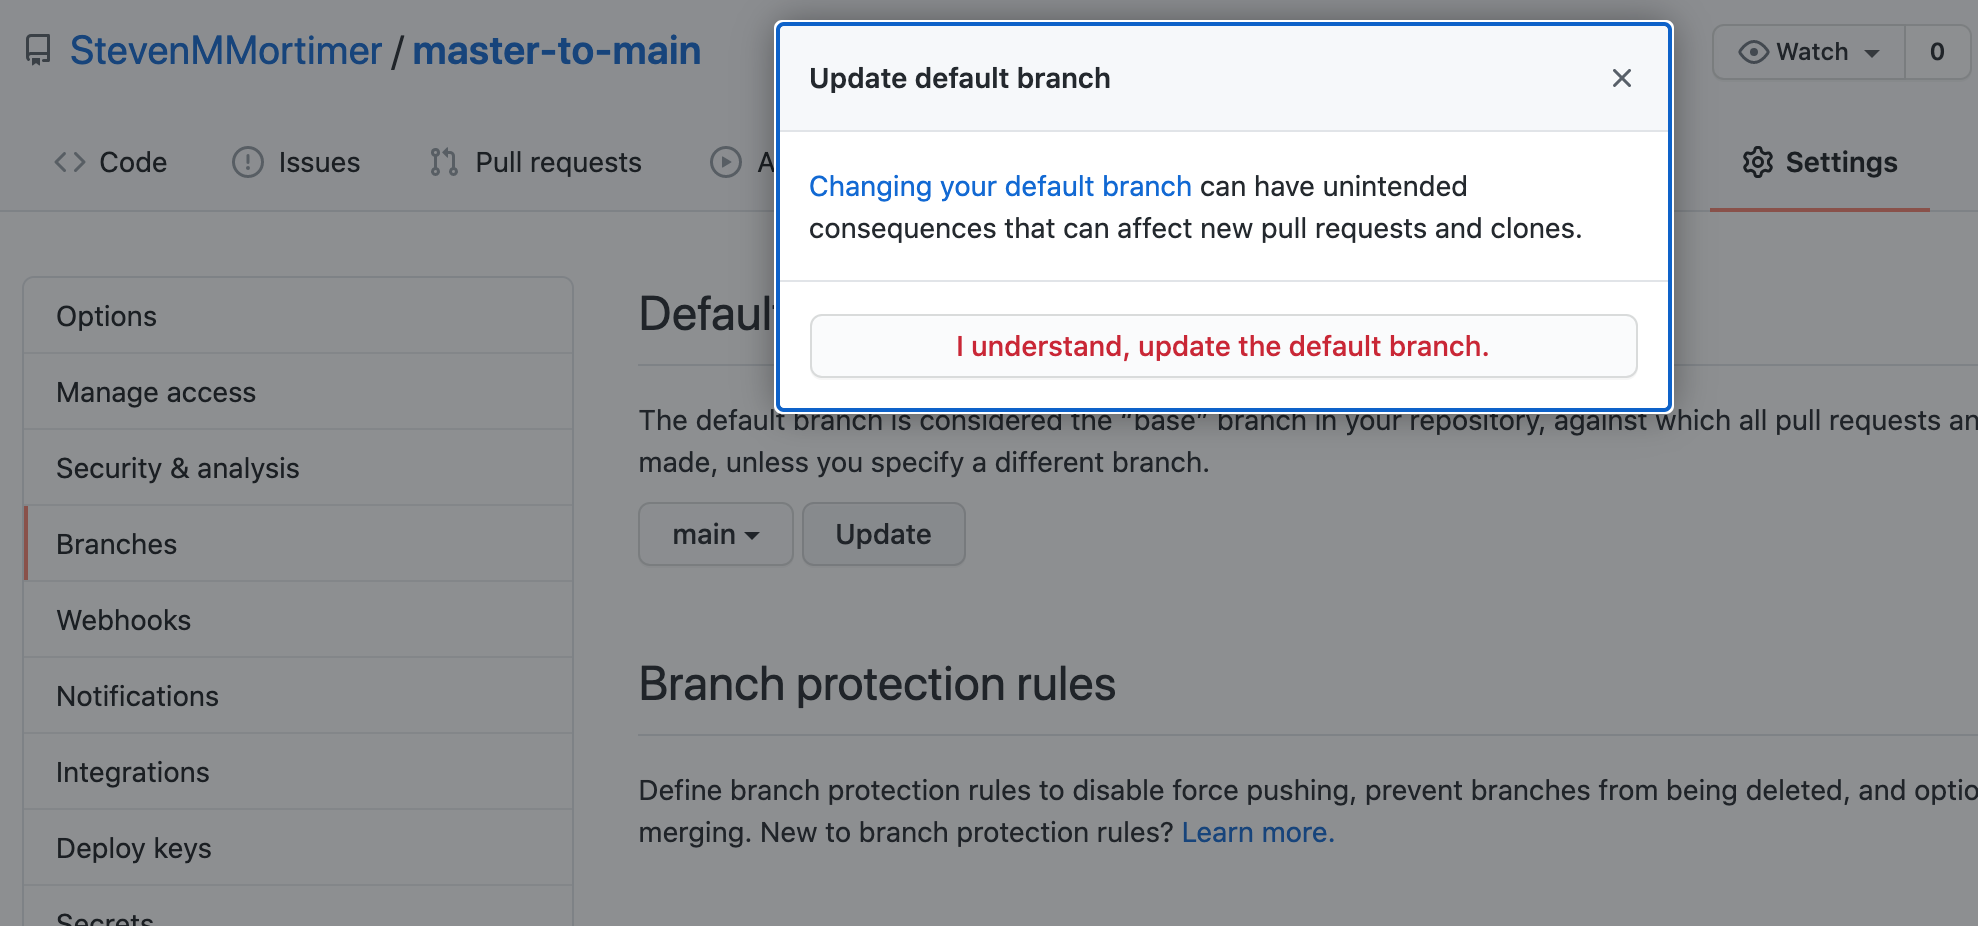
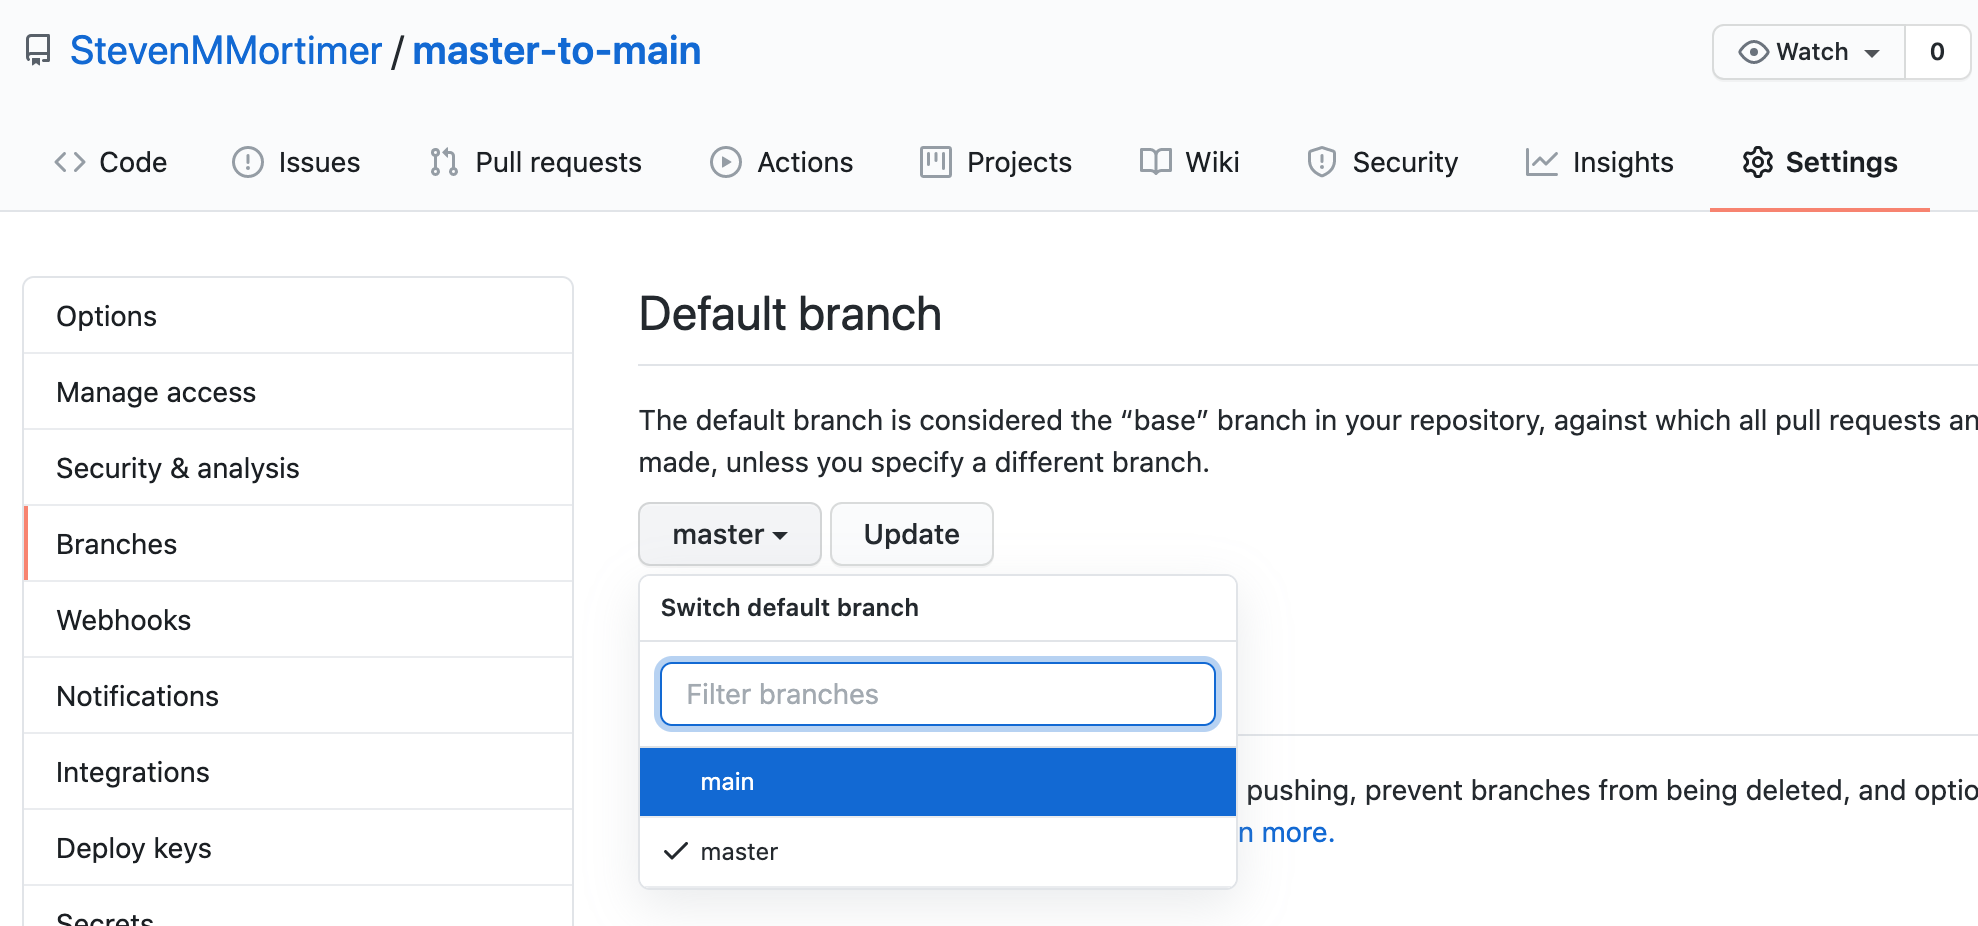


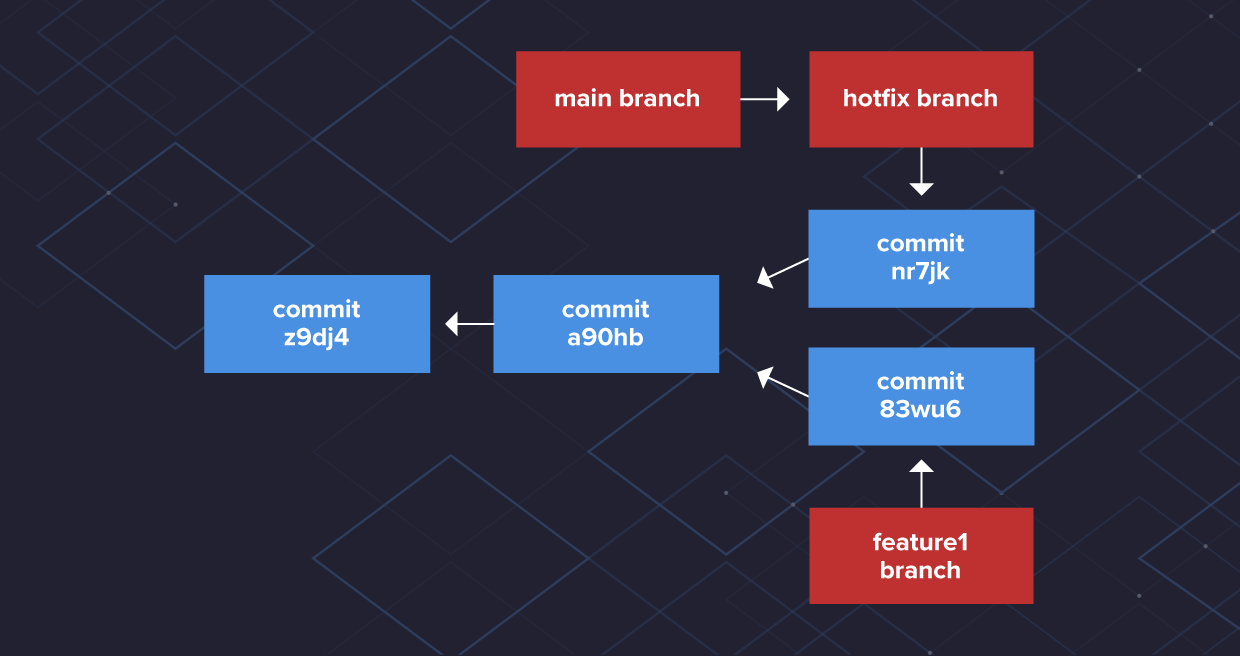

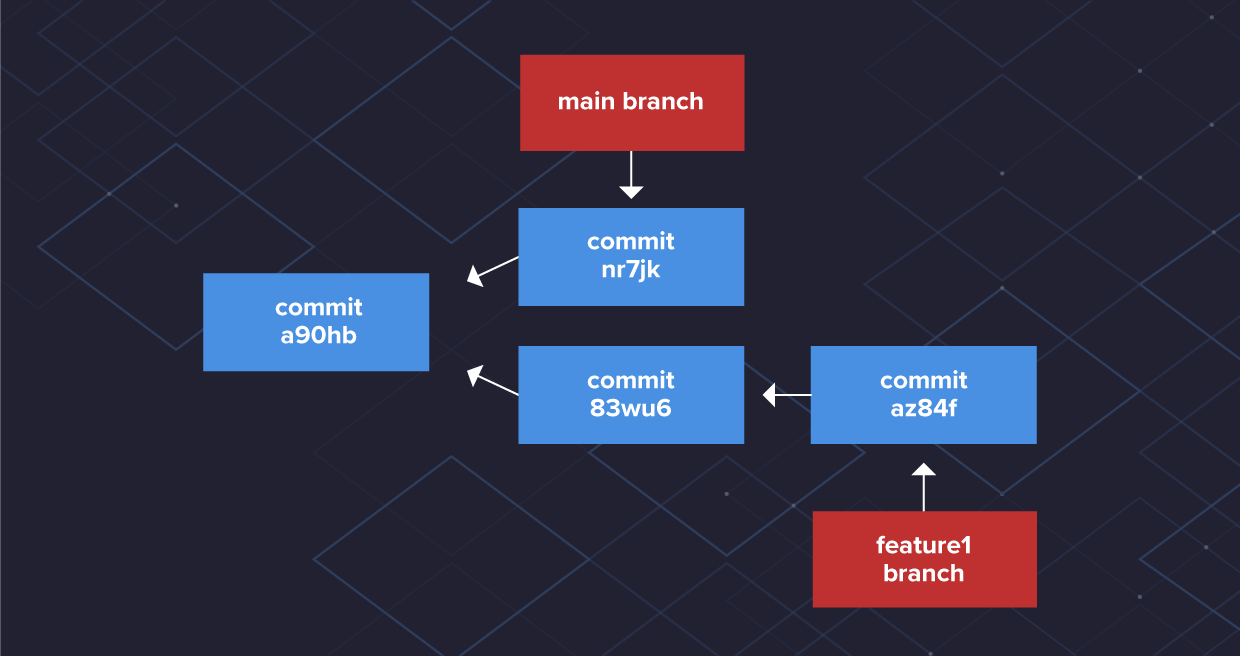


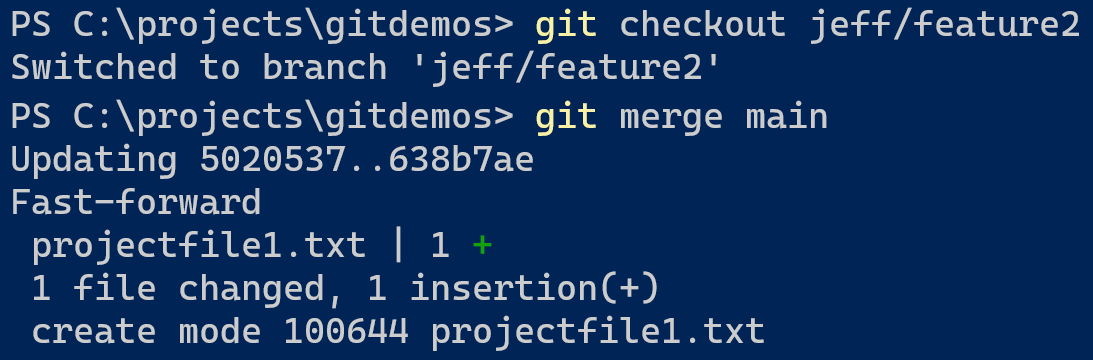

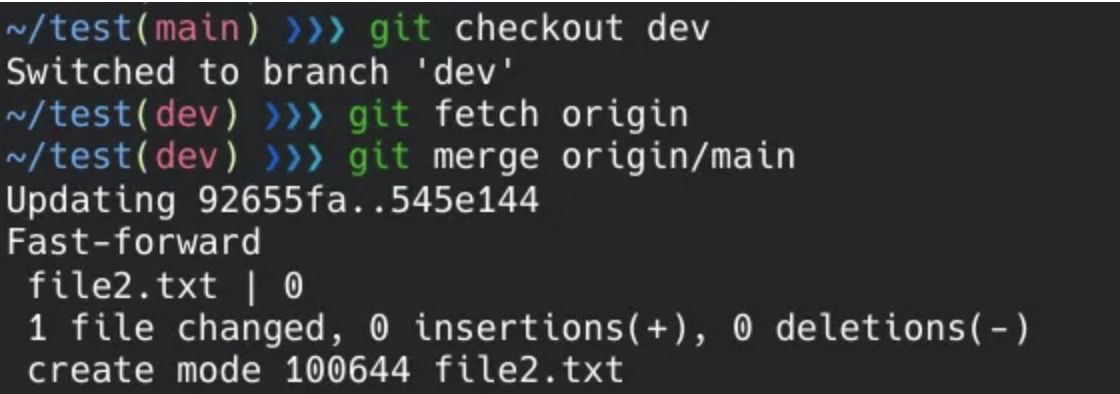


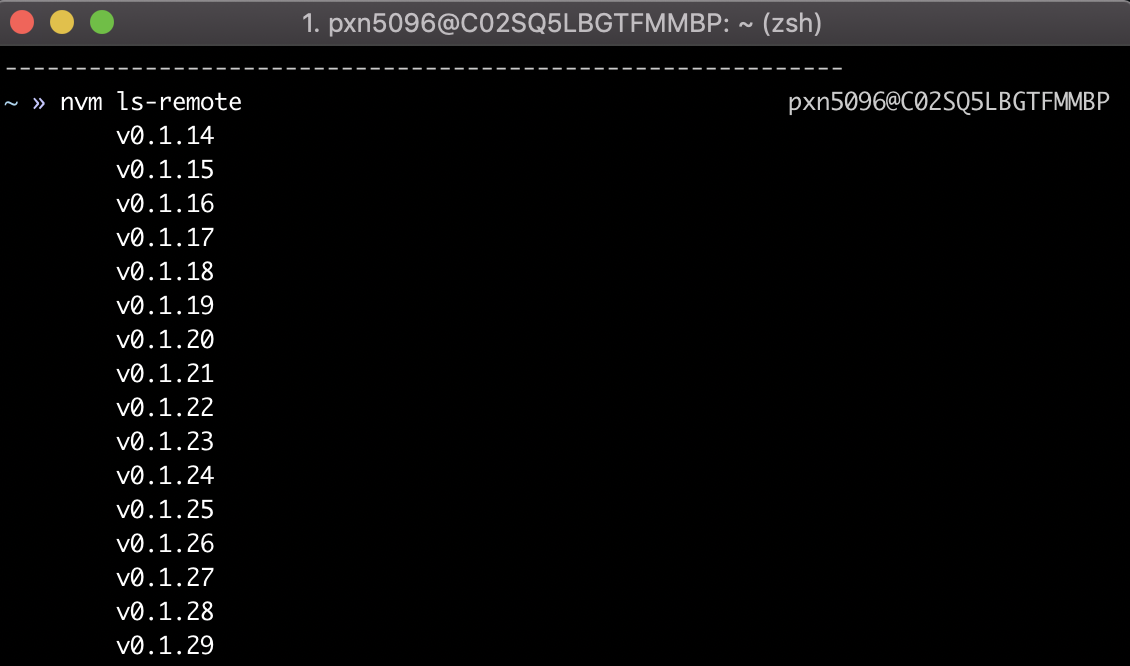

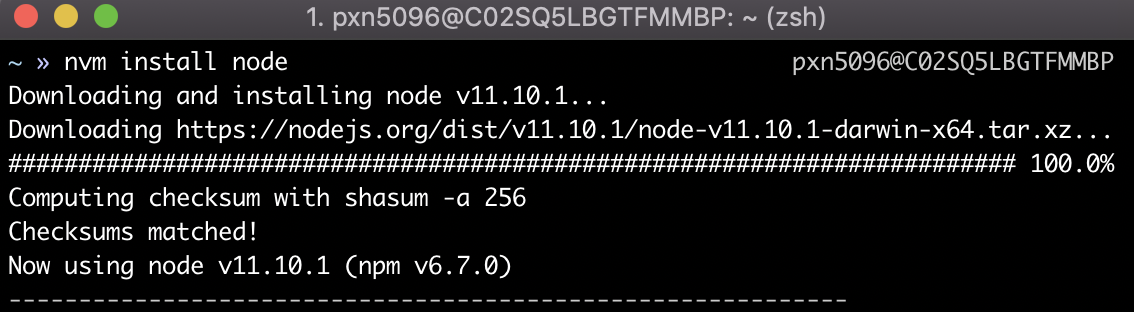

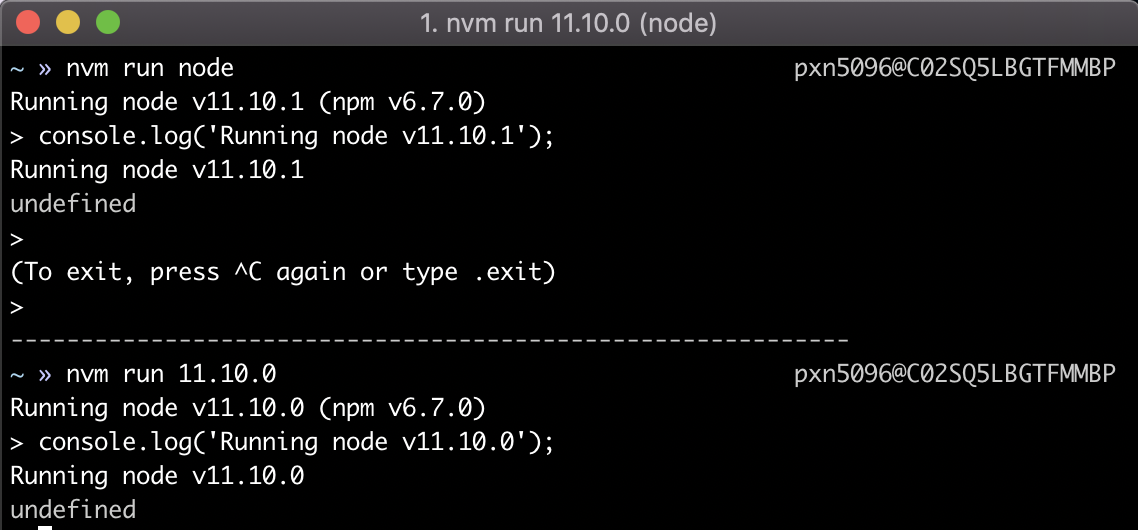
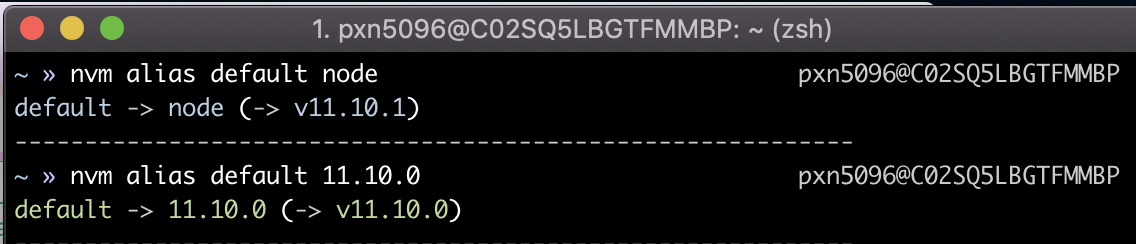
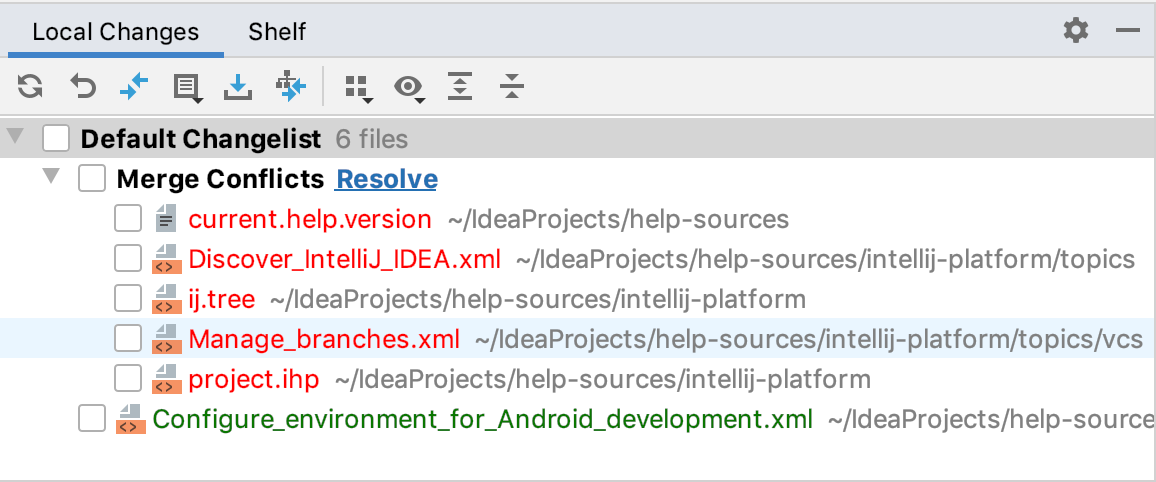

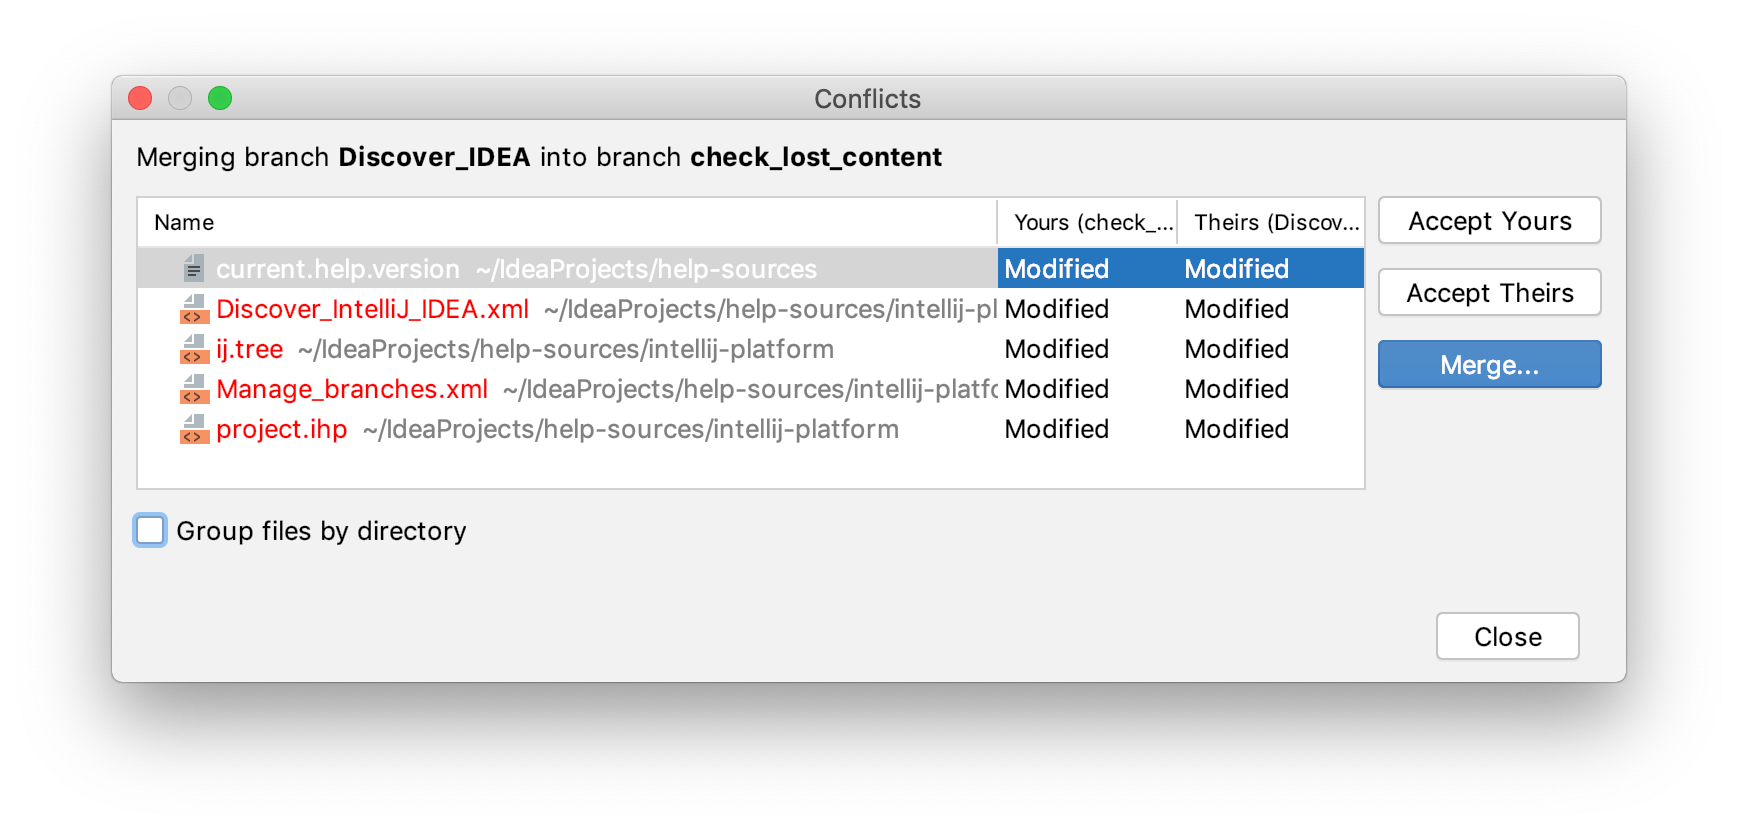


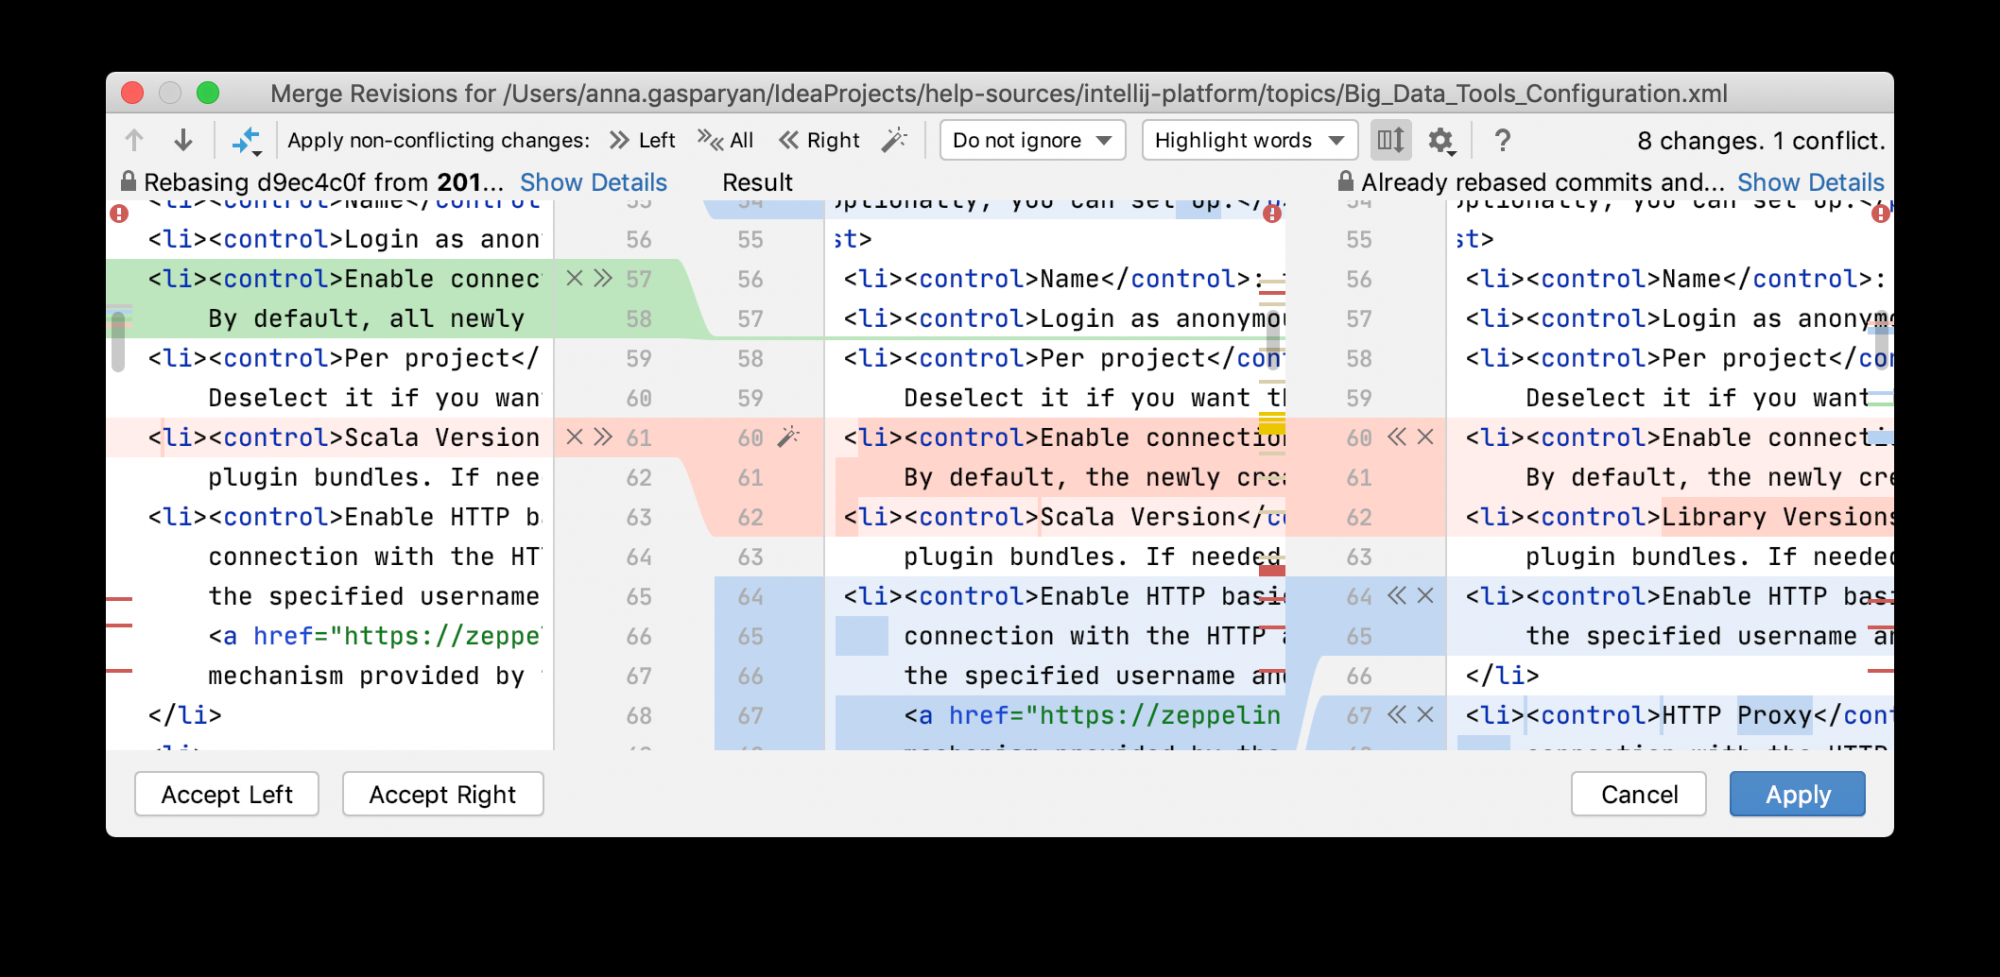
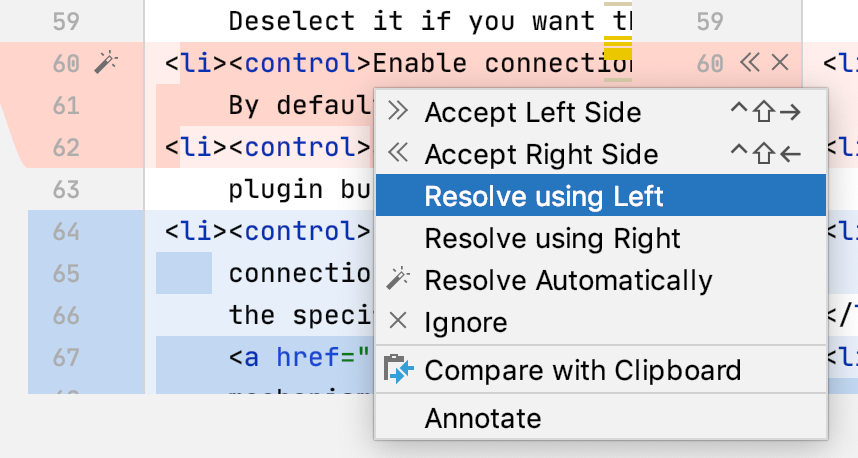


