CLONING TO LOCAL – DEPLOY TO GITHUB PAGES or GITLAB
https://stackoverflow.com/questions/47137086/starting-react-app-from-pulled-github-project
Step 1:
git clone [repository url]
Step 2:
cd [local repository]
Step 3:
Check package.json file and ensure scripts are notated as below:
"scripts": { "start": "react-scripts start", "build": "react-scripts build", "test": "react-scripts test", "eject": "react-scripts eject" },
Step 4:
Delete the node_modules folder and any 'lock' files such as yarn.lock or package-lock.json if present.
Step 5
I install node on a project by project basis – so you will need to install it to this repo
//Next in your terminal type:
nvm install (whatever you decided)
//Step 5: npm install
//Step 6: npm start
Deploying a React App* to GitHub Pages
* created using create-react-app
Introduction
In this tutorial, I'll show you how I deployed a React app—which I created using create-react-app—to GitHub Pages.
You can visit the deployed app, at https://gitname.github.io/react-gh-pages/.
This repository contains the files related to the app. The master branch contains the app's source code (the code the app's developers edit), and the gh-pages branch contains a built version of the app (i.e. the code that GitHub Pages serves to the app's visitors).
The remainder of this document contains a tutorial on creating a React app (using create-react-app) and deploying that app to GitHub Pages.
Tutorial
Prerequisites
An adequate version of
Node.jsis installed. Here's the adequate version I use:$ node --version v6.10.1An adequate version of
npmis installed. Here's the adequate version I use:$ npm --version 3.10.10An adequate version of
create-react-appis installed. Here's the adequate version I use:$ create-react-app --version 1.3.1In the case of
create-react-app, you can either install it globally (i.e.$ npm install -g create-react-app) or install it locally (i.e.$ npm install create-react-app). If you choose the latter, you will have to specify its path whenever you invoke it (e.g.path/to/node_modules/.bin/create-react-app).(Optional) An adequate version of
sedis installed. Here's the adequate version I use:$ sed --version sed (GNU sed) 4.4A GitHub account.

A command-line Git client setup according to GitHub.
Procedure
Create an *empty* repository on GitHub. (2 minutes)
- For this tutorial, I'll create a repository named
react-gh-pages. - By empty, I mean without a
README.mdfile, a.gitignorefile, aLICENSEfile, or any other files.
- For this tutorial, I'll create a repository named
Create a new React app on your computer. (5 minutes)
Create your React app
To install the full React toolchain on WSL, we recommend using create-react-app:
Open a terminal(Windows Command Prompt or PowerShell).
Create a new project folder:
mkdir ReactProjectsand enter that directory:cd ReactProjects.Install React using create-react-app, a tool that installs all of the dependencies to build and run a full React.js application:
PowerShellCopy
npx create-react-app my-appNote
npx is the package runner used by npm to execute packages in place of a global install. It basically creates a temporary install of React so that with each new project you are using the most recent version of React (not whatever version was current when you performed the global install above). Using the NPX package runner to execute a package can also help reduce the pollution of installing lots of packages on your machine.
This will first ask for your permission to temporarily install create-react-app and it's associated packages. Once completed, change directories into your new app ("my-app" or whatever you've chosen to call it):
cd my-app.Start your new React app:
PowerShellCopy
npm startThis command will start up the Node.js server and launch a new browser window displaying your app. You can use Ctrl + c to stop running the React app in your command line.
Note
Create React App includes a frontend build pipeline using Babel and webpack, but doesn't handle backend logic or databases. If you are seeking to build a server-rendered website with React that uses a Node.js backend, we recommend installing Next.js, rather than this create-react-app installation, which is intended more for single-page apps. You also may want to consider installing Gatsby if you want to build a static content-oriented website.
When you're ready to deploy your web app to production, running
npm run buildwill create a build of your app in the "build" folder. You can learn more in the Create React App User Guide.
$ create-react-app react-gh-pages- This is the app you will deploy to GitHub Pages in step 7.
- I opted to give the app the same name as my GitHub repository (i.e.
react-gh-pages). However, you can name them differently from one another (e.g. you can name your appapp-123and your GitHub Repositoryrepo-456). - This will create a new folder named
react-gh-pages(or whatever you named your app) on your computer.
Install the
gh-pagespackage as a "dev-dependency" of the app. (1 minute)$ cd react-gh-pages $ npm install gh-pages --save-dev- The commands shown in the following steps can all be issued from within the app's folder.
Add some properties to the app's
package.jsonfile. (3 minutes)- At the top level, add a
homepageproperty. Define its value to be the stringhttp://{username}.github.io/{repo-name}, where{username}is your GitHub username, and{repo-name}is the name of the GitHub repository you created in step 1. Since my GitHub username isgitnameand the name of my GitHub repository isreact-gh-pages, I added the following property:
//... "homepage": "http://gitname.github.io/react-gh-pages"- In the existing
scriptsproperty, add apredeployproperty and adeployproperty, each having the values shown below:
"scripts": { //... "predeploy": "npm run build", "deploy": "gh-pages -d build" }- Shortcut: Instead of adding those properties using a text editor; if I have
sedinstalled on my system, I can add the properties by issuing the following shell commands:
$ sed -i '5i\ "homepage": "http://gitname.github.io/react-gh-pages",' ./package.json $ sed -i '15i\ "predeploy": "npm run build",' ./package.json $ sed -i '16i\ "deploy": "gh-pages -d build",' ./package.json- At the top level, add a
Create a git repository in the app's folder. (1 minute)
$ git init
Initialized empty Git repository in C:/path/to/react-gh-pages/.git/
Add the GitHub repository as a "remote" in your local git repository. (1 minute)
$ git remote add origin https://github.com/gitname/react-gh-pages.git- This will make it so the
gh-pagespackage knows where you want it to deploy your app in step 7. - It will also make it so git knows where you want it to push your source code (i.e. the commits on your
masterbranch) in step 8.
- This will make it so the
Generate a *production build* of your app, and deploy it to GitHub Pages. (2 minutes)
$ npm run deploy- That's it! Your app is now accessible at the URL you specified in step 4.
- In my case, my app is now accessible at: https://gitname.github.io/react-gh-pages/
- I recommend exploring the GitHub repository at this point. When I explored it, I noticed that, although a
masterbranch did not exist, agh-pagesbranch did exist. I noticed the latter contained the built app code, as opposed to the app's source code.
Optionally, commit your source code to the "master" branch and push your commit to GitHub. (1 minute)
$ git add . $ git commit -m "Create a React app and publish it to GitHub Pages" $ git push origin master- I recommend exploring the GitHub repository once again at this point. When I did that, I noticed that a
masterbranch now existed, and it contained the app's source code. - So, the
masterbranch held the source code, and thegh-pagesbranch held the built app code.
- I recommend exploring the GitHub repository once again at this point. When I did that, I noticed that a
References
- [Facebook's tutorial on deploying a React app to GitHub Pages](
DEPLOY TO GITLAB
https://medium.com/front-end-weekly/host-your-react-app-with-gitlab-c3ef2f93d0a2
React has been around for quite long and we don’t want another blog covering the basics. So my assumption is that you got the following covered: \1. A working react-app (*reference-link*) \2. Basic Git understanding and a Gitlab account (*go-now*)
Step Zero
Create a new project on Gitlab and push your react-app OR May be you already have this setup done.
First Step
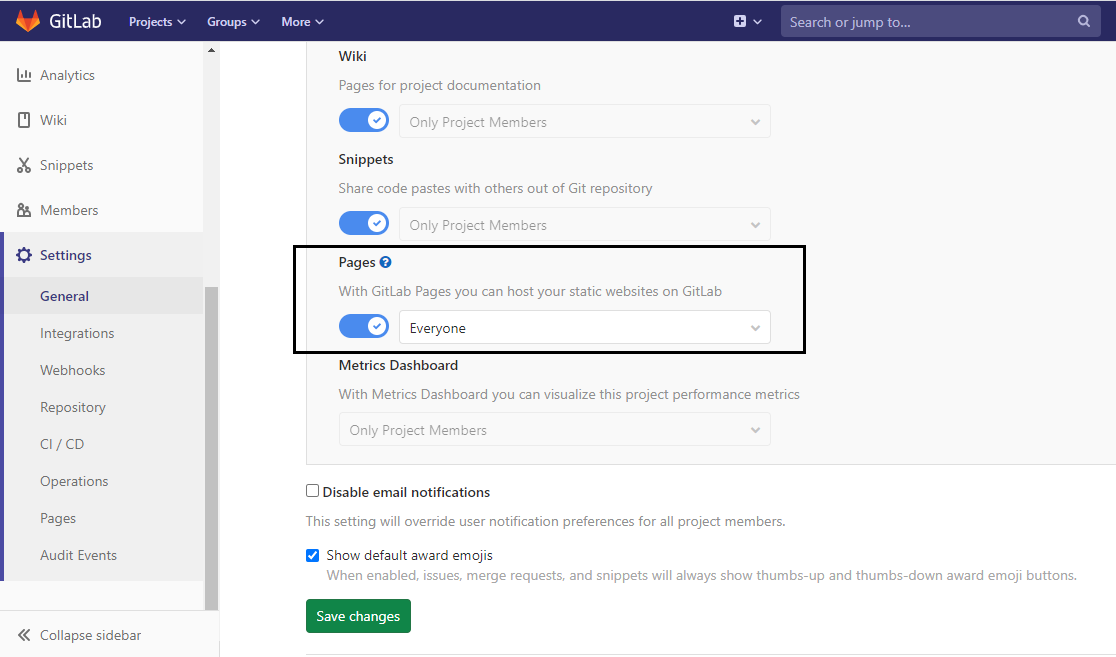
Enable Page support for your project. The setting would have to be for Everyone for the website to be accessible publicly. Please note that the project’s visibility is a different setting.


Setting > General > Visibility > Pages
Second Step
Create a CI file ( .gitlab-ci.yaml ) in your project’s root directory
image: node:10.16.3 # change to match your project's node version

cache:
  paths:
    - node_modules/

before_script:
  - rm -rf build
  - CI=false npm install

pages:
  stage: deploy
  script:
    - CI=false npm run build
    - rm -rf public
    - cp build/index.html build/404.html
    - mv build public
  artifacts:
    paths:
      - public
  only:
    - master
Once committed, this file will help get the pipelines trigger everything we do in our local machine. Install the required dependencies, run for a production build.
Checkout this *link* for what all we can have a brief look into what all is possible with the .gitlab-ci.yaml
The line cp build/index.html build/404.html helps us to redirect every route to the index page. This is necessary for React or any other Single Page Applications.
Third Step
A successful pipeline


CI/CD > Pipelines
The pipeline will now do it’s job and you would see a similar page.
Seeing is believing
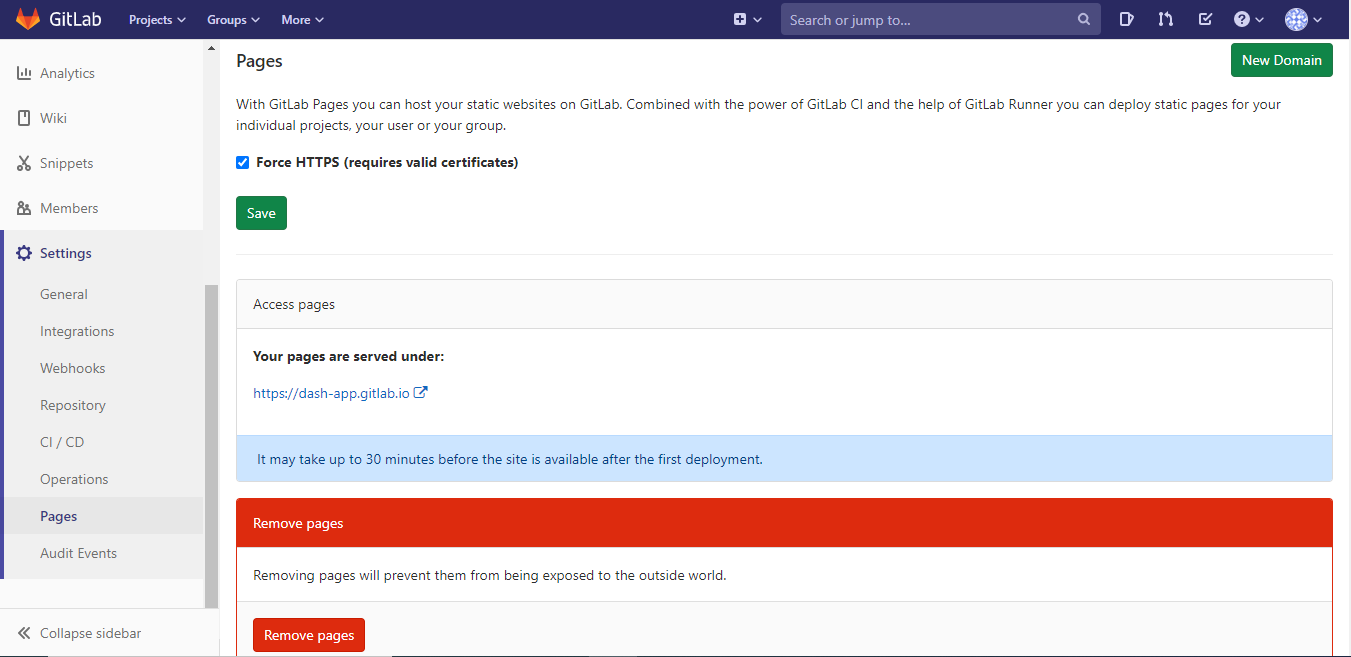
You should now see a link in Settings > Pages* *You can find the link to your application in here. The link might take some time to work but I found it to be fast enough for me. *Update:* We would need to update the following in package.json:
“homepage”: “https://{your-username}.gitlab.io/{project}”


Settings > Pages
You’ve successfully deployed a react application with Gitlab CI/CD and it’s gonna update itself with each of the commit you make. 😃

