
https://wordpress.stackexchange.com/questions/270010/change-image-url-to-a-cdn
Since the major adoption of Responsive Images and the addition of new srcset attribute to the element. WordPress has to evolve too. WordPress 4.4 added the responsive images feature.
If you inspect the src attribute it might point to the CDN, however, you still need to consider the srcset attribute which might still be using the local version of the images.
First, we need to provide the algorithm for changing the local URL to the CDN version. The algorithm I use adheres your test case above; i.e. https://test.com/ to https://cdn.test.com/
Add these to functions.php

[code style=”php”]
// Add .cdn after http:// or https://
function to_cdn($src) {
$dslash_pos = strpos($src, ‘//’) + 2;
$src_pre = substr($src, 0, $dslash_pos); // http:// or https://
$src_post = substr($src, $dslash_pos); // The rest after http:// or https://
return $src_pre . ‘cdn.’ . $src_post;
}[/code]
Then we need to change the src attribute of the image using the wp_get_attachment_image_src filter.
[code style=”php”]
function test_get_attachment_image_src($image, $attachment_id, $size, $icon) {
if(!is_admin()) {
if(!image) {
return false;
}
if(is_array($image)) {
$src = to_cdn($image[0]); // To CDN
$width = $image[1];
$height = $image[2];
return [$src, $width, $height, true];
} else {
return false;
}
}
return $image;
}
add_filter(‘wp_get_attachment_image_src’, ‘test_get_attachment_image_src’, 10, 4);[/code]
Next is for the srcset attribute this time using wp_calculate_image_srcset filter.
[code style=”php”]
function test_calculate_image_srcset($sources, $size_array, $image_src, $image_meta, $attachment_id) {
if(!is_admin()) {
$images = [];
foreach($sources as $source) {
$src = to_cdn($source[‘url’]); // To CDN
$images[] = [
‘url’ => $src,
‘descriptor’ => $source[‘descriptor’],
‘value’ => $source[‘value’]
];
}
return $images;
}
return $sources;
}
add_filter(‘wp_calculate_image_srcset’, ‘test_calculate_image_srcset’, 10, 5);[/code]
All about img src in wordpress
https://stackoverflow.com/questions/35460815/wordpress-srcset-gets-http-instead-of-https-in-all-posts
In Wordpress 4.4 images get automatically a srcset attribute. My problem with this was the following (I solved it while I was writing this question, see my answer below):
in order to transit everything to https, I replaced all the src=”http://… references in the posts table by src=”https://… (I changed it later to src=”//… for supporting both protocols);
the images on all the posts get the correct URL in the src attribute;
however in all the images that get the srcset attribute the URLs in it are always with http:// references.
Why does this happen? Why these URLs don’t get my newly updated https:// beginnings?
After searching for a while in the wp-includes folder, the wp_calculate_image_srcset method in the media.php file uses these 2 lines:
$image_baseurl = _wp_upload_dir_baseurl();
$image_baseurl = trailingslashit( $image_baseurl ) . $dirname;
And this $image_baseurl will actually form the new URL for the srcset attribute, i.e. even if the entire URL is in the wp_poststable and used in the src attribute, its beginning won’t be used.
This means that if your base url in the wp_options table is still in http://, the images will get that protocol and won’t show up by default by your browser when navigating in https.
https://wordpress.stackexchange.com/questions/252774/modify-featured-image-url-at-runtime
http://hookr.io/4.7.4/files/wp-includes-media/
– how the url is built –
FEATURED IMAGES INFO::::
The featured image is stored in the *_postmeta table under the _thumbnail_id key. In fact, chances are that you’ve got a lot of image/media urls in that table, which you haven’t changed. The problem is that a number of things are stored in serialized arrays and changing them with SQL as above will (probably) break those arrays
******** is this it?
[code style=”php”]
<!–mep-nl–>add_filter(‘wp_get_attachment_url’, ‘clrs_get_attachment_url’, 10, 2);
<!–mep-nl–>
<!–mep-nl–>function clrs_get_attachment_url($url, $post_id) {
<!–mep-nl–> http://cdn.thesword.com
<!–mep-nl–> return $url;
<!–mep-nl–>}
<!–mep-nl–>[/code]
https://wordpress.stackexchange.com/questions/16809/add-filter-example-for-wp-get-attachment-link/16817#16817
https://premium.wpmudev.org/blog/moving-wordpress-media-to-amazon-s3/
[code style=”php”]
<!–mep-nl–>/**
<!–mep-nl–> * Fires before fetching the post thumbnail HTML.
<!–mep-nl–> *
<!–mep-nl–> * Provides "just in time" filtering of all filters in wp_get_attachment_image().
<!–mep-nl–> *
<!–mep-nl–> * @since 2.9.0
<!–mep-nl–> *
<!–mep-nl–> * @param int <!–mep-tab–> <!–mep-tab–> $post_id <!–mep-tab–> <!–mep-tab–> The post ID.
<!–mep-nl–> * @param string <!–mep-tab–> $post_thumbnail_id The post thumbnail ID.
<!–mep-nl–> * @param string|array $size <!–mep-tab–> <!–mep-tab–> <!–mep-tab–> The post thumbnail size. Image size or array of width
<!–mep-nl–> * <!–mep-tab–> <!–mep-tab–> <!–mep-tab–> <!–mep-tab–> <!–mep-tab–> <!–mep-tab–> <!–mep-tab–> <!–mep-tab–> <!–mep-tab–> <!–mep-tab–>and height values (in that order). Default ‘post-thumbnail’.
<!–mep-nl–> */
<!–mep-nl–>function wpse_begin_fetch_post_thumbnail_html( $post_id, $post_thumbnail_id, $size ) {
<!–mep-nl–> <!–mep-tab–>// For example, if the post id is 1479, we will add our callback to modify the image.
<!–mep-nl–> <!–mep-tab–>// You could use whatever logic you need to determine if the filter should be added.
<!–mep-nl–> <!–mep-tab–>if ( 1479 === $post_id ) {
<!–mep-nl–> <!–mep-tab–> <!–mep-tab–>add_filter( ‘wp_get_attachment_image_src’, ‘wpse_wp_get_attachment_image_src’, 10, 4 );
<!–mep-nl–> <!–mep-tab–>}
<!–mep-nl–>}
<!–mep-nl–>add_action( ‘begin_fetch_post_thumbnail_html’, ‘wpse_begin_fetch_post_thumbnail_html’, 10, 3 );
<!–mep-nl–>
<!–mep-nl–>[/code]
[code style=”php”]
<!–mep-nl–>
<!–mep-nl–>/**
<!–mep-nl–> * Fires after fetching the post thumbnail HTML.
<!–mep-nl–> *
<!–mep-nl–> * @since 2.9.0
<!–mep-nl–> *
<!–mep-nl–> * @param int <!–mep-tab–> <!–mep-tab–> $post_id <!–mep-tab–> <!–mep-tab–> The post ID.
<!–mep-nl–> * @param string <!–mep-tab–> $post_thumbnail_id The post thumbnail ID.
<!–mep-nl–> * @param string|array $size <!–mep-tab–> <!–mep-tab–> <!–mep-tab–> The post thumbnail size. Image size or array of width
<!–mep-nl–> * <!–mep-tab–> <!–mep-tab–> <!–mep-tab–> <!–mep-tab–> <!–mep-tab–> <!–mep-tab–> <!–mep-tab–> <!–mep-tab–> <!–mep-tab–> <!–mep-tab–>and height values (in that order). Default ‘post-thumbnail’.
<!–mep-nl–> */
<!–mep-nl–>function wpse_end_fetch_post_thumbnail_html( $post_id, $post_thumbnail_id, $size ) {
<!–mep-nl–> <!–mep-tab–>// Now we remove the callback so that it only affects the desired post.
<!–mep-nl–> <!–mep-tab–>if ( 1479 === $post_id ) {
<!–mep-nl–> <!–mep-tab–> <!–mep-tab–>remove_filter( ‘wp_get_attachment_image_src’, ‘wpse_wp_get_attachment_image_src’, 10, 4 );
<!–mep-nl–> <!–mep-tab–>}
<!–mep-nl–>}
<!–mep-nl–>add_action( ‘end_fetch_post_thumbnail_html’, ‘wpse_end_fetch_post_thumbnail_html’, 10, 3 );
<!–mep-nl–>
<!–mep-nl–>[/code]
[code style=”php”]
<!–mep-nl–>
<!–mep-nl–>/**
<!–mep-nl–> * Filters the image src result.
<!–mep-nl–> *
<!–mep-nl–> *
<!–mep-nl–> * @param array|false $image <!–mep-tab–> <!–mep-tab–> Either array with src, width & height, icon src, or false.
<!–mep-nl–> * @param int <!–mep-tab–> <!–mep-tab–> $attachment_id Image attachment ID.
<!–mep-nl–> * @param string|array $size <!–mep-tab–> <!–mep-tab–> Size of image. Image size or array of width and height values
<!–mep-nl–> * <!–mep-tab–> <!–mep-tab–> <!–mep-tab–> <!–mep-tab–> <!–mep-tab–> <!–mep-tab–> <!–mep-tab–> <!–mep-tab–> <!–mep-tab–>(in that order). Default ‘thumbnail’.
<!–mep-nl–> * @param bool <!–mep-tab–> <!–mep-tab–> $icon <!–mep-tab–> <!–mep-tab–> Whether the image should be treated as an icon. Default false.
<!–mep-nl–> */
<!–mep-nl–>function wpse_wp_get_attachment_image_src( $image, $attachment_id, $size, $icon ) {
<!–mep-nl–> <!–mep-tab–>$image[0] = ‘https://placekitten.com/g/600/600’;
<!–mep-nl–> <!–mep-tab–>return $image;
<!–mep-nl–>}
<!–mep-nl–>][/code]
https://gist.github.com/mizner/8bed09419cf7ecc4182548a545c2e982
https://gist.github.com/mizner
[code style=”php”]
<!–mep-nl–>/**
<!–mep-nl–> * Plugin Name: Remote Images
<!–mep-nl–> */
<!–mep-nl–>
<!–mep-nl–>if(!in_array($_SERVER[‘wordpress.ccravys68osw.us-east-1.rds.amazonaws.com’], [‘thesword.com’, ‘www.thesword.com’])) {
<!–mep-nl–> <!–mep-tab–>return;
<!–mep-nl–>}
<!–mep-nl–>
<!–mep-nl–>// Replace src paths
<!–mep-nl–>add_filter(‘wp_get_attachment_url’, function ($url)
<!–mep-nl–>{
<!–mep-nl–> <!–mep-tab–>if(file_exists($url))
<!–mep-nl–> <!–mep-tab–>{
<!–mep-nl–> <!–mep-tab–> <!–mep-tab–>return $url;
<!–mep-nl–> <!–mep-tab–>}
<!–mep-nl–> <!–mep-tab–>return str_replace(WP_HOME, ‘http://cdn.thesword.com’, $url);
<!–mep-nl–>});
<!–mep-nl–>
<!–mep-nl–>// Replace srcset paths
<!–mep-nl–>add_filter(‘wp_calculate_image_srcset’, function($sources)
<!–mep-nl–>{
<!–mep-nl–> <!–mep-tab–>foreach($sources as &$source)
<!–mep-nl–> <!–mep-tab–>{
<!–mep-nl–> <!–mep-tab–> <!–mep-tab–>if(!file_exists($source[‘url’]))
<!–mep-nl–> <!–mep-tab–> <!–mep-tab–>{
<!–mep-nl–> <!–mep-tab–> <!–mep-tab–> <!–mep-tab–>$source[‘url’] = str_replace(WP_HOME, ‘http://cdn.thesword.com’, $source[‘url’]);
<!–mep-nl–> <!–mep-tab–> <!–mep-tab–>}
<!–mep-nl–> <!–mep-tab–>}
<!–mep-nl–> <!–mep-tab–>return $sources;
<!–mep-nl–>});
<!–mep-nl–>[/code]
REGEX
https://marisks.net/2017/05/14/changing-static-resource-urls-to-cdn-urls-with-url-rewrite/
Amazon S3 Quick Start Guide
Introduction
This guide aims to help you start offloading your WordPress Media Library to an Amazon S3 bucket with WP Offload Media as quickly as possible.
We also have Quick Start Guides for other storage providers.
This article covers the following steps:
- Login to the AWS Console
- Create an Amazon Web Services (AWS) User
- Saving the AWS User’s access details for WP Offload Media to use
- Activate Your WP Offload Media License
- Configure WP Offload Media to offload newly uploaded media to an Amazon S3 bucket
- Offload Your Existing Media Library
- Next steps for setting up WP Offload Media to use a CDN
Login to the AWS Console
Already have an Amazon Web Services (AWS) account? Sign in here.
If you don’t have an AWS account yet, you will need to sign up here.
Create an IAM User
Once you have logged into the console, you will need to create a new IAM user:
Navigate to the IAM Users page in the AWS Console, click the Add user button.
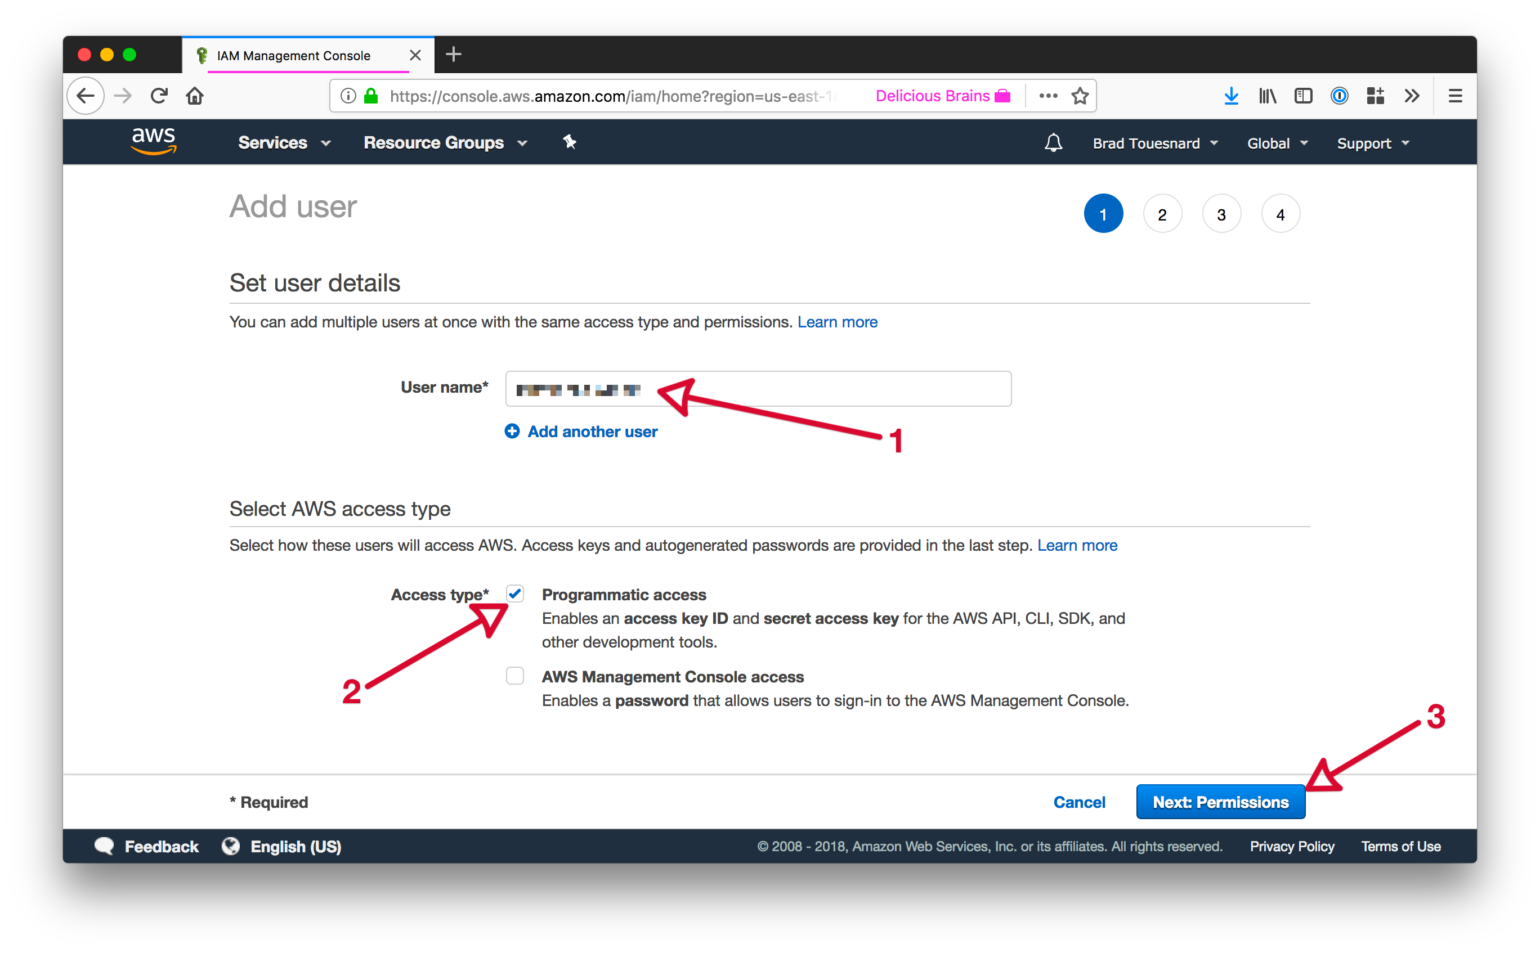
Enter a name for the user in the User name field.
Names are case insensitive and must be unique within your AWS account. User names can be a combination of up to 64 letters, digits, and these characters: plus (+), equal (=), comma (,), period (.), at sign (@), and hyphen (-).
Under Access type select the checkbox for Programmatic access, then click the Next: Permissions button.
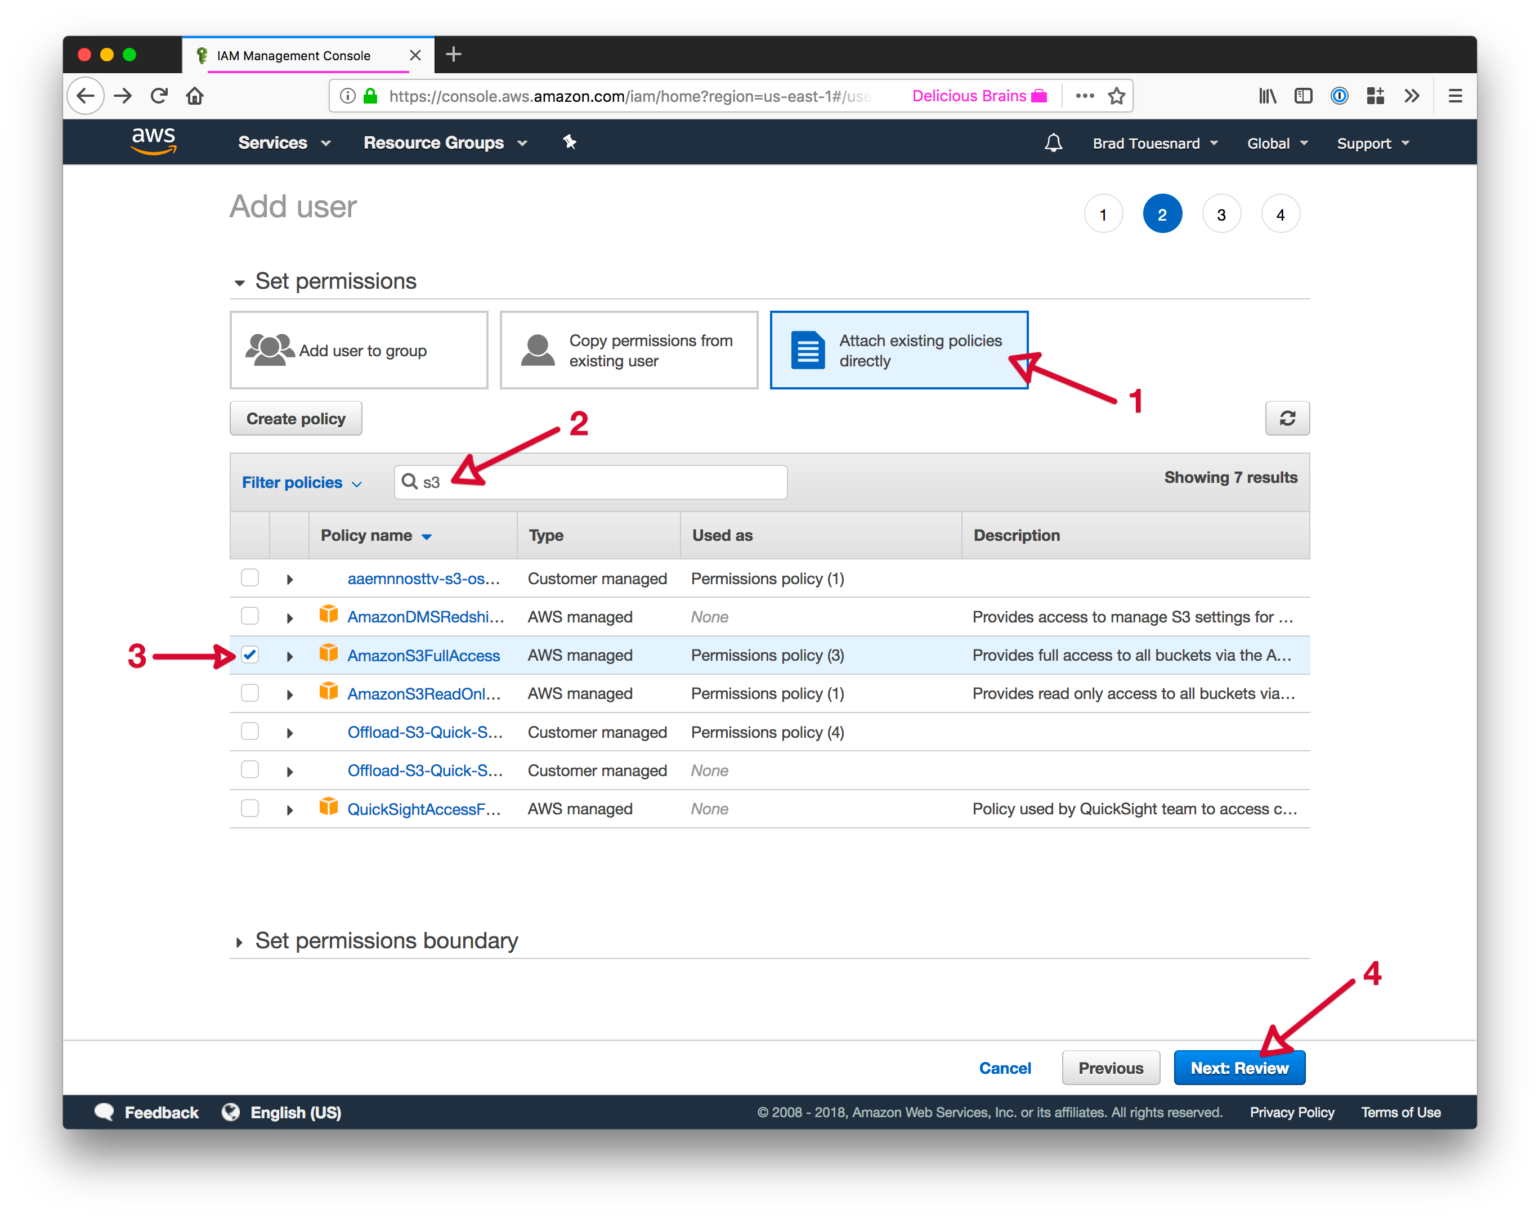
To allow the new user to manage buckets and objects in the S3 service, you need to grant it specific permissions.
Click the “Attach existing policies directly” button, and then enter “s3” in the filter policies input box.
Select the “AmazonS3FullAccess” policy, then click the Next: Review button at the bottom of the page.
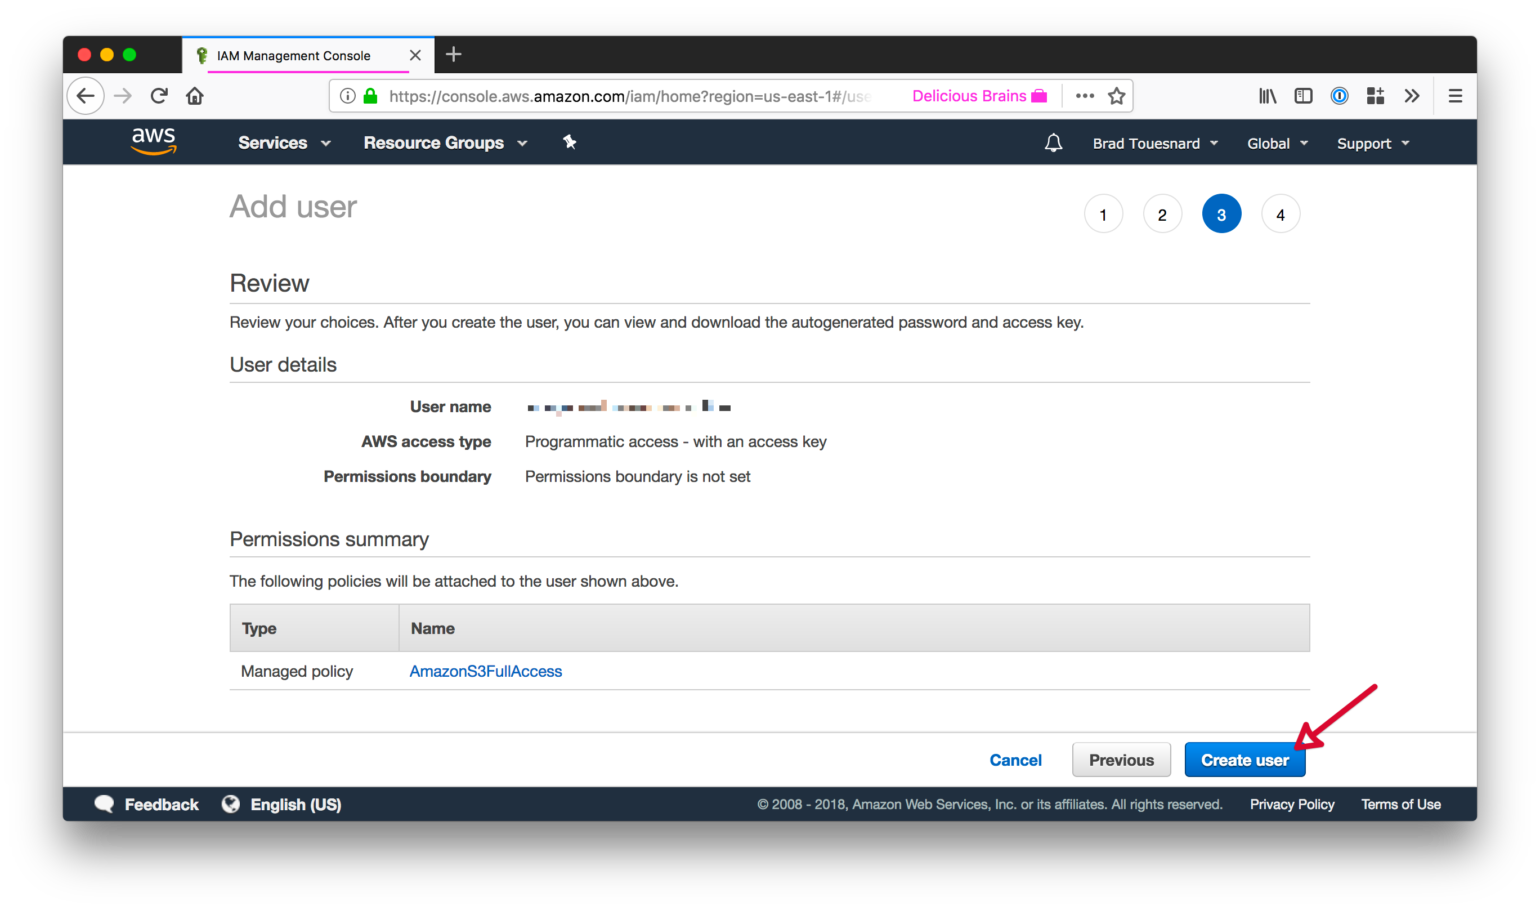
If everything looks good, click the Create user button.
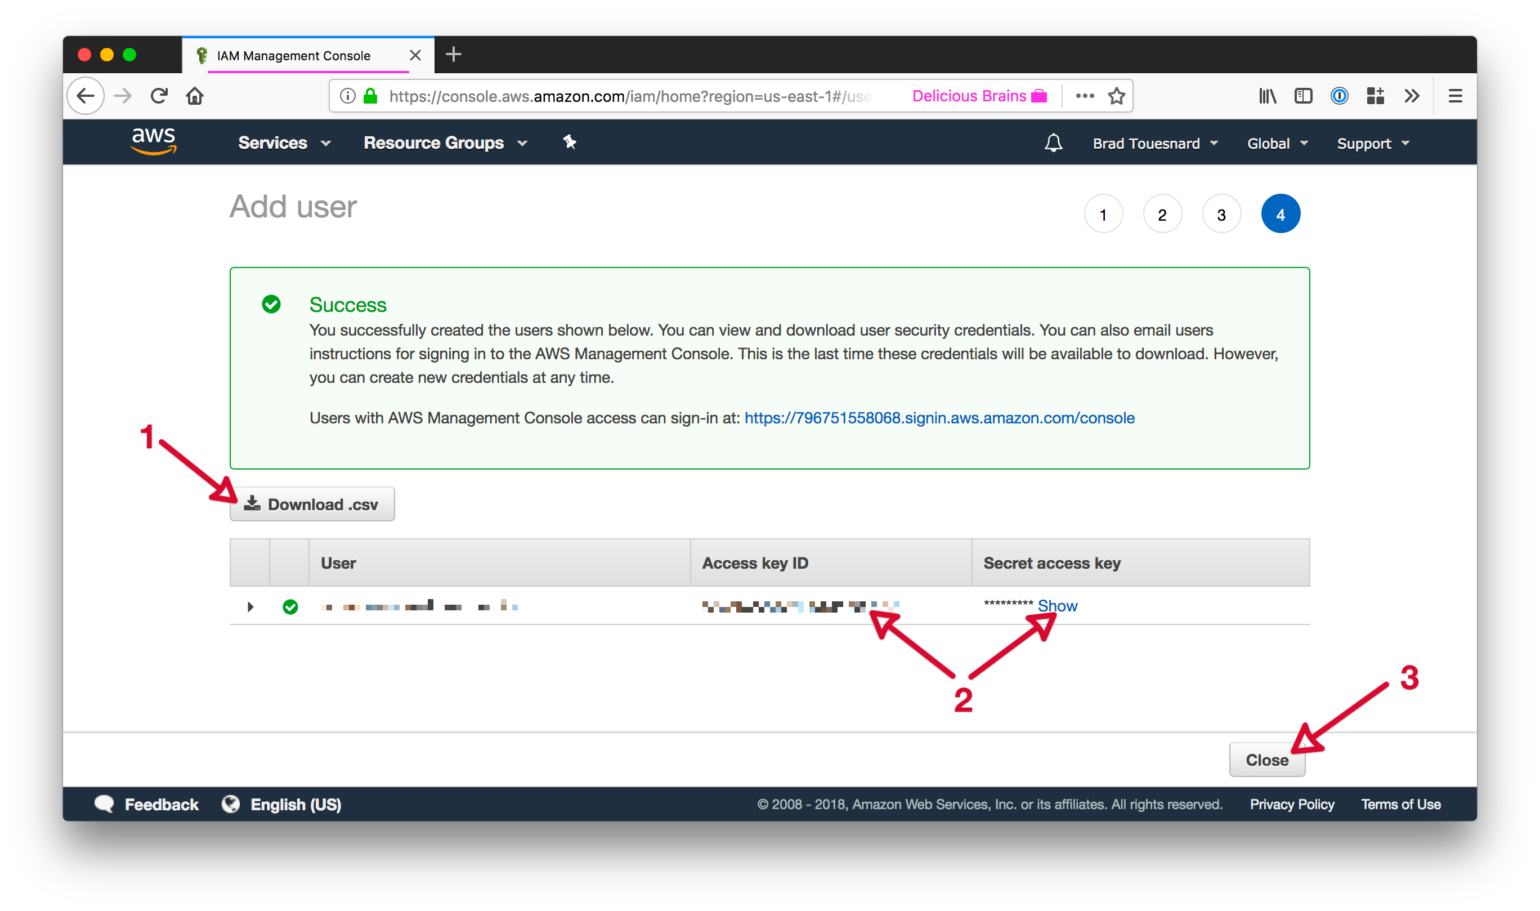
You will be shown the security credentials for the user, which consists of an Access Key ID and a Secret Access Key. Amazon will not show these again so please download them as a .csv and also copy them somewhere safe. If you lose them, you can always create a new set of keys from the console but you cannot retrieve the secret key again later.
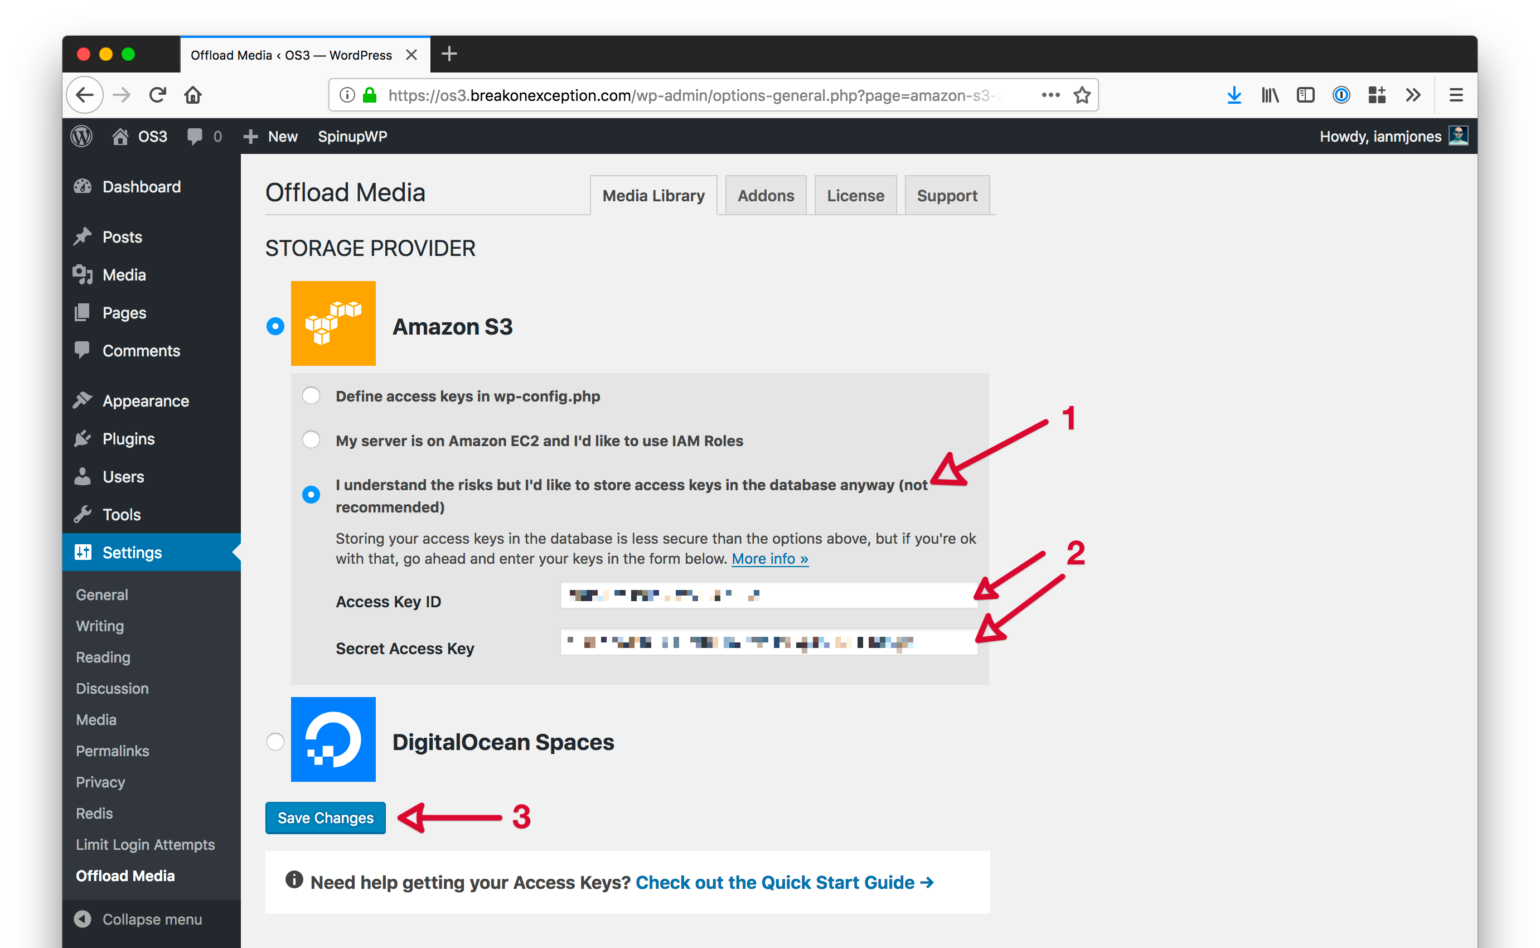
Define Your Access Keys
Now that you have your AWS Access Keys, you need to add them to your site so that WP Offload Media can use them to work with the Amazon S3 service.
For better security, we recommend defining your access keys in your wp-config.php:
define( 'AS3CF_SETTINGS', serialize( array(
    'provider' => 'aws',
    'access-key-id' => '********************',
    'secret-access-key' => '**************************************',
) ) );
These should be placed before the following block of code in your wp-config.php:
/* That's all, stop editing! Happy blogging. */

/** Absolute path to the WordPress directory. */
if ( !defined('ABSPATH') )
    define('ABSPATH', dirname(__FILE__) . '/');

/** Sets up WordPress vars and included files. */
require_once(ABSPATH . 'wp-settings.php');
Warning: If you define your access keys after this block of code, WP Offload Media will not be able to read them.
Alternatively, you can enter your access keys into the form on the Storage Provider page inside WP Offload Media, the first page shown when no keys are defined. This will save them to the database, which is less secure than defining them in your wp-config.php.
IAM Roles
If you’re running your site on an Amazon EC2 instance, you might like to use an IAM Role instead. This is even more secure than defining your access keys in wp-config.php.
Make Sure Cron Is Set Up
We highly recommend that you configure a proper cron job on your server as WP Offload Media relies heavily on background processing. See our Cron Setup doc for details on how to accomplish this.
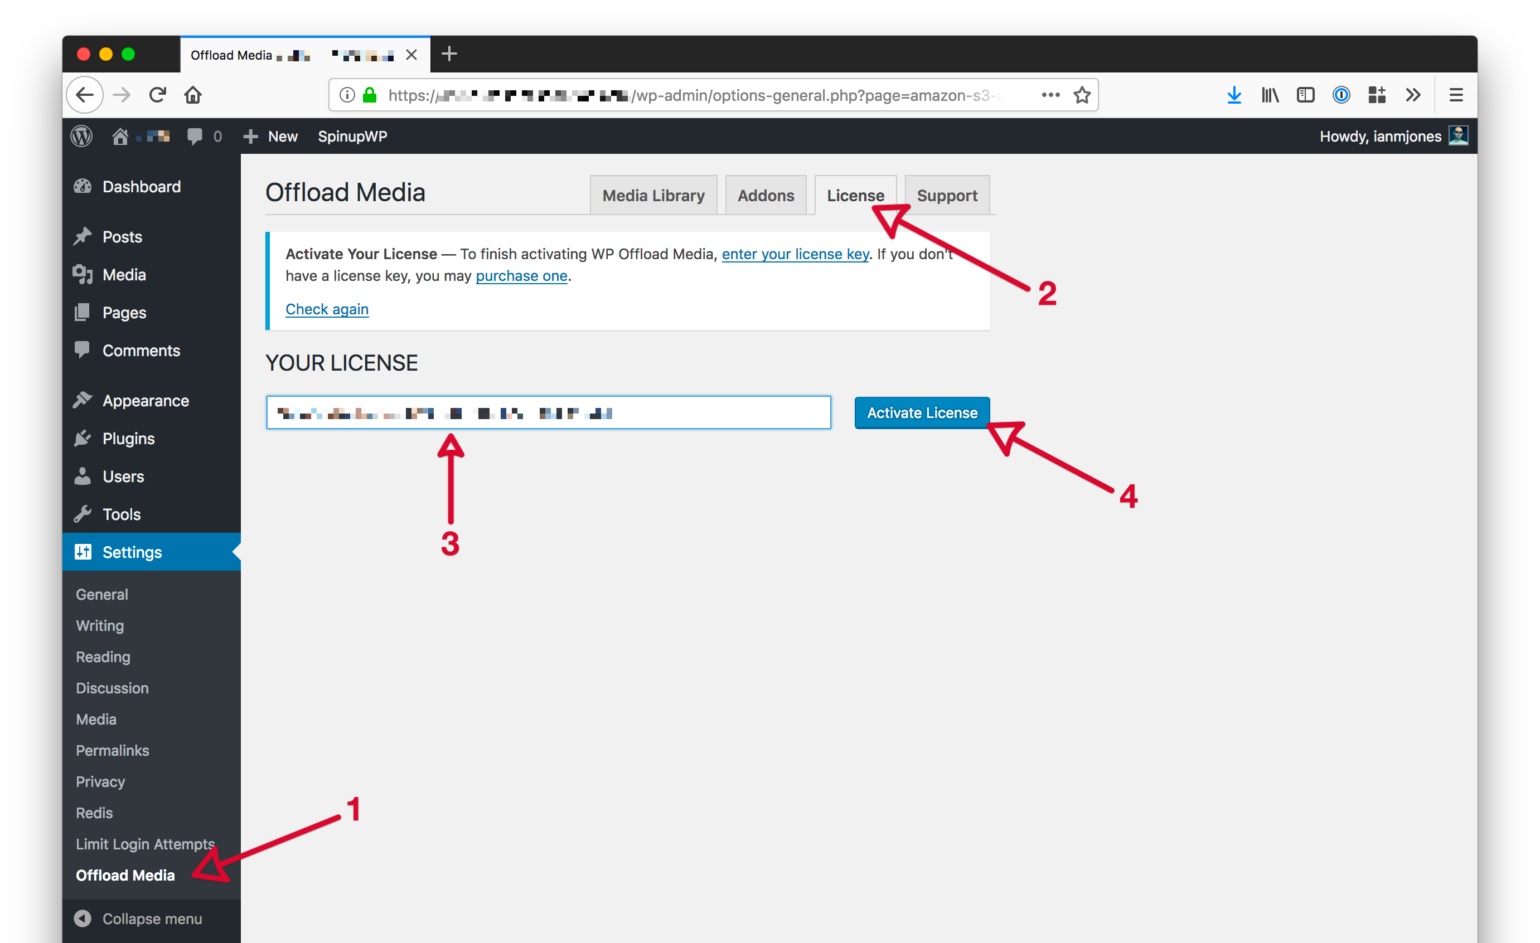
Activate Your WP Offload Media License
Now’s a good time to activate your WP Offload Media license so that (once configured) you can instantly take advantage of all its goodies.
Go to WP Offload Media’s settings page in the WordPress admin dashboard, found under the “Settings” menu.
Then click on the “License” tab, enter your license key in the input box, and click the “Activate License” button.
Configure WP Offload Media
To start offloading newly uploaded media to Amazon S3 you need to first tell WP Offload Media which bucket it should use. If you have not already created a bucket to use with WP Offload Media, it can be created for you from WP Offload Media’s Settings page.
Go to the “Media Library” tab of WP Offload Media’s Settings page in the WordPress admin dashboard. If you have followed the steps above then you should see something like the following.

If you have already created the bucket you want to offload your media to, then you can enter the bucket name in the above input and click the “Save Bucket” button.
If you haven’t created the bucket yet, then you can click the “Create new bucket” link to get a form where you can specify the new bucket’s name and region.

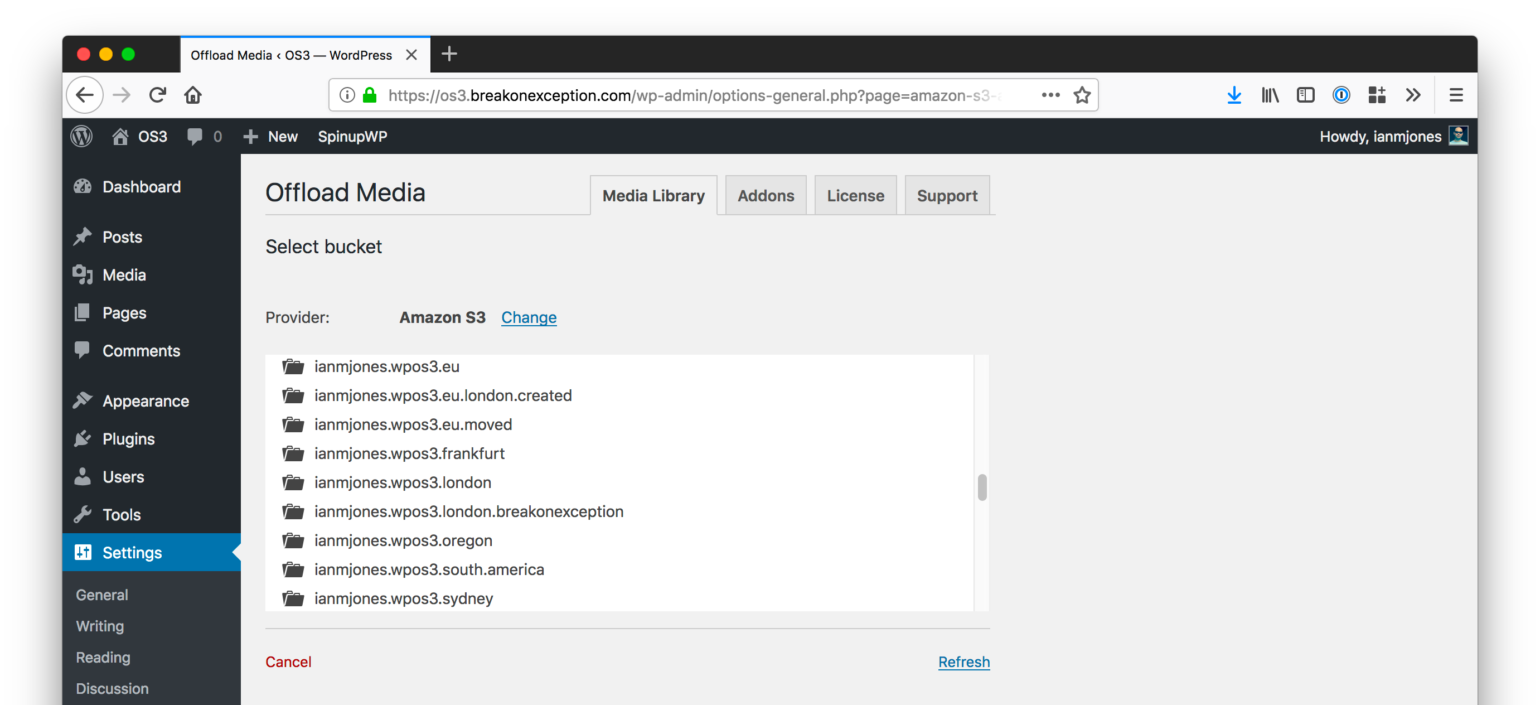
As long as you haven’t restricted your IAM User’s access to list buckets then you can also “Browse existing buckets.”
Regardless of how you specify the bucket, once saved, WP Offload Media will be set up to offload newly-uploaded media to the bucket with some recommended default settings.
Access Denied to Bucket
If you see an “Access Denied to Bucket” error notice after selecting a bucket created in the AWS Console, the chances are you have “Public Access Settings” enabled for the bucket. You can tell by selecting the bucket in the AWS Console’s list of buckets and looking at the “Public access settings” option within the “Permissions” section of the pop-over panel.
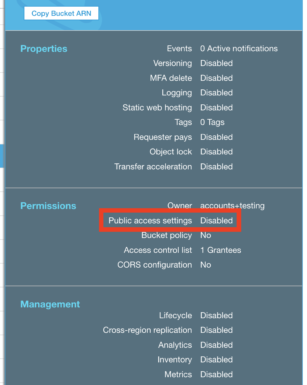
WP Offload Media needs to be able to make objects in the bucket public readable (not editable) so that your site visitors can see them, this is safe to do as it is on a per object basis and is different from making the bucket public. Even if you’re only going to use WP Offload Media to offload “private” objects for WooCommerce, Easy Digital Downloads or similar, it still needs to be able to change the permissions on individual objects in the bucket.
If “Public access settings” does not say “Disabled“, click the “Permissions” section link in the pop-over panel and click “Edit”.
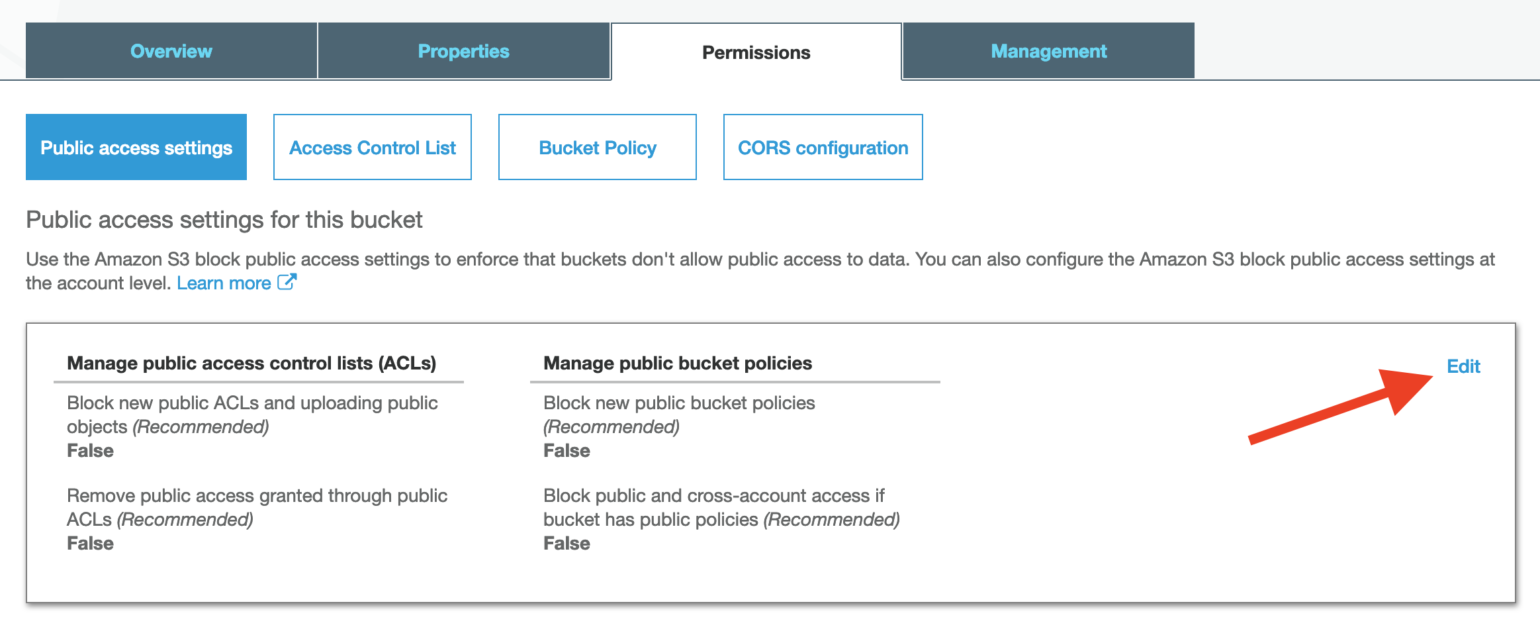
Uncheck all of the settings and save the changes, you’ll need to confirm the change if asked.

Refresh WP Offload Media’s settings page and the “Access Denied to Bucket” error should disappear.
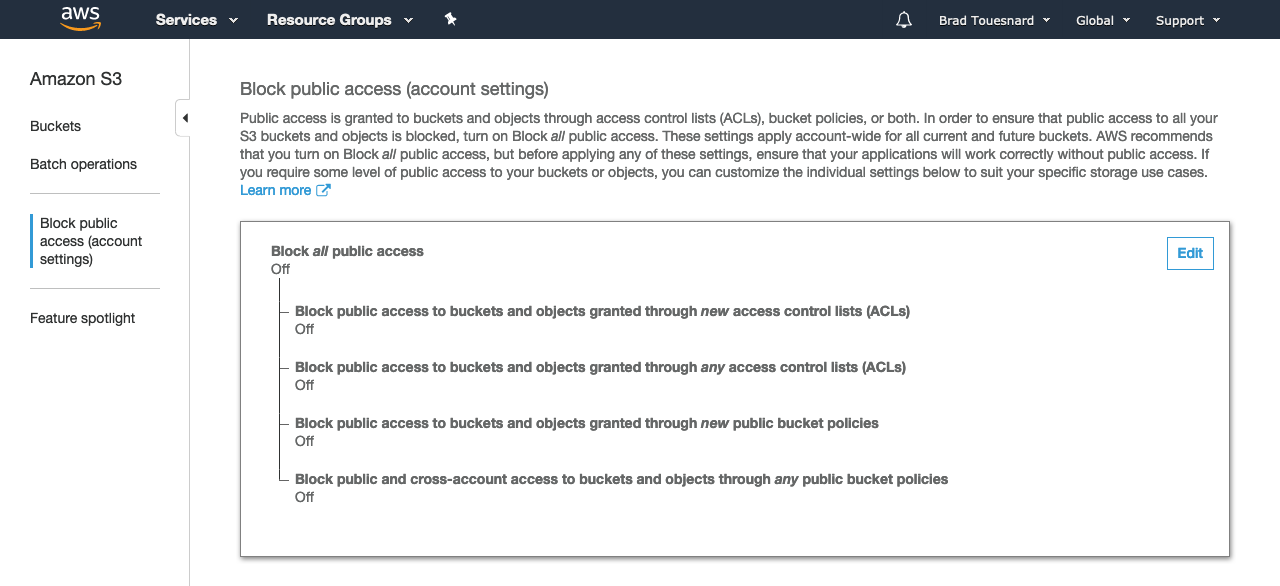
IMPORTANT: There is also a Block public access (account settings) page that can be accessed from the Amazon S3 sidebar that can also be used to disable public access to objects in all existing and new buckets. If the AWS account is relatively new, or someone has visited this settings page and turned on the blocking of public access, you may need to visit the page, click “Edit”, clear the “Block all public access” checkbox, and then save the changes.
Offload Your Existing Media Library
Now that your site is configured to offload newly-uploaded media to Amazon S3, you might want to offload any existing media to the bucket too.
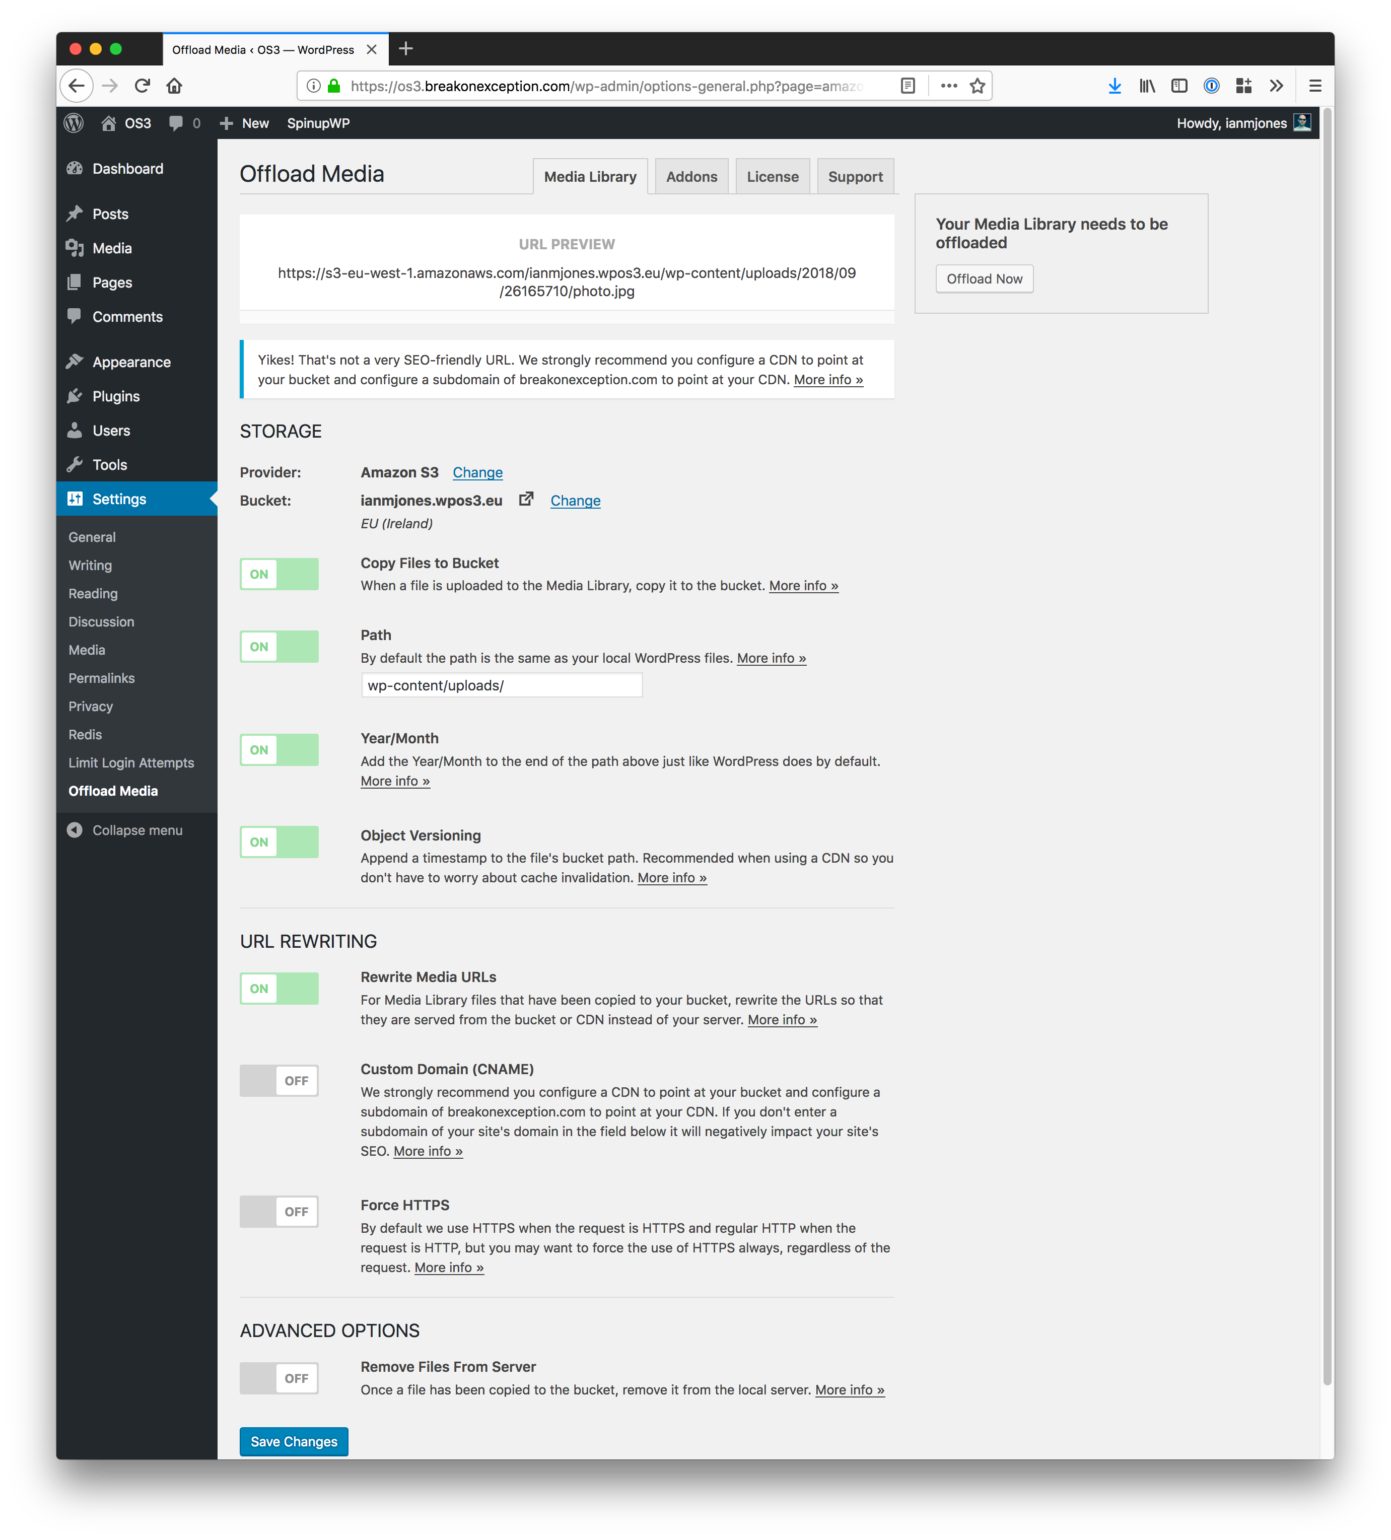
In the right-hand sidebar of WP Offload Media’s “Media Library” tab you should see what we call the “Offload Tool”, this can be used to offload existing media to the bucket.
If you have not offloaded anything yet, then you’ll see a “Your Media Library needs to be offloaded” message in the Offload Tool with an “Offload Now” button.
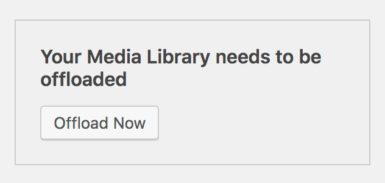
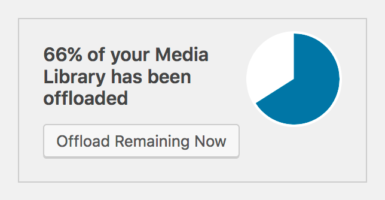
If you have already offloaded a few items, then you might see a message like “66% of your Media Library has been offloaded” in the Offload Tool, with an “Offload Remaining Now” button.
Either way, clicking the Offload Tool’s button will start an upload to the bucket of all existing media yet to be offloaded.
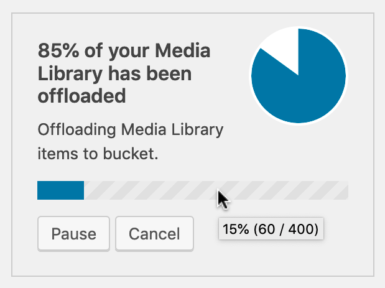
The media offload progresses in small batches in the background to keep things efficient. You can close the tab and just forget about it, when the tool finishes its job, you’ll get a notice in the WordPress dashboard, or you can monitor progress from WP Offload Media’s settings page.
Once complete, the Offload Tool displays a “100% of your Media Library has been offloaded, congratulations!” message and the “Download all files from bucket to server” and “Remove all files from bucket” tools are made available.

Next Steps: Using a Content Delivery Network (CDN)
Now that your media is offloaded to Amazon S3, your next step if you’re concerned about performance (i.e. load time and SEO), is to configure a Content Delivery Network (CDN).
By default WP Offload Media is configured to use raw Amazon S3 URLs when serving offloaded media. Your media URLs might look something like this:
http://s3-eu-west-1.amazonaws.com/wicked-awesome-bucket-name/wp-content/uploads/…
Not only is this an ugly URL, but this URL is also bad for SEO as Google likes to see your media on your own domain. Also, Amazon S3 is primarily a storage platform and is not optimized for high speed delivery of media. Faster media is obviously better for user experience but also better for SEO. For these reasons, we strongly recommend configuring CloudFront or another CDN for delivering your media. For more details about the benefits of CloudFront and other CDNs, please read our Why Use a CDN? doc.
We have two guides for setting up CloudFront as your CDN. The first you should follow is our CloudFront Setup guide. It gets you up and running with CloudFront properly configured to use your Amazon S3 bucket as its origin, and shows how to update WP Offload Media’s settings to use it.
The second guide builds on the first, showing how to Configure a Custom Domain For CloudFront With HTTPS. This allows you to switch from serving your media from a default CloudFront domain to using a subdomain of your site’s domain.
If you’re planning to set up the Assets Pull addon as well, you will most likely want to use the same domain name for both your media and assets with CloudFront. Check out our guide to accomplish that.
If you don’t want to use CloudFront for your CDN, you can also use any other CDN. We have a guide for setting up MaxCDN as well as Cloudflare.
Quick Start Guide
Introduction
WP Offload Media (formerly WP Offload S3) copies files from your WordPress Media Library to Amazon S3, DigitalOcean Spaces or Google Cloud Storage and rewrites URLs to serve the files from S3, DigitalOcean Spaces, Google Cloud Storage, CloudFront, or another CDN. And with the Assets addon, it can identify assets (CSS, JS, images, etc) used by your site and serve them from CloudFront or another CDN.
Configure Cloud Storage
To quickly get started with your preferred cloud storage provider, please follow the appropriate guide from the following list.
Each guide will walk you through the setup required in the cloud storage provider’s account to obtain Authentication Credentials, the steps to configure WP Offload Media to offload your Media Library, and finally the (optional but recommended) steps to configuring a Content Delivery Network (CDN)
- Amazon S3 Quick Start Guide
- DigitalOcean Spaces Quick Start Guide
- Google Cloud Storage Quick Start Guide
Questions?
Each of the above quick start guides should help you with getting started with WP Offload Media but if you run into any issues, you can search these docs via the search bar above.
If you’re not able to find what you need in the docs, you can always contact our team via the Help tab in the plugin.
Next Steps: Using a Content Delivery Network (CDN)
Now that your media is offloaded to Amazon S3, DigitalOcean Spaces or Google Cloud Storage, your next step if you’re concerned about performance (i.e. load time and SEO), is to configure a Content Delivery Network (CDN).
By default WP Offload Media is configured to use raw bucket URLs when serving offloaded media. Your media URLs might look something like this example from Amazon S3:
http://s3-eu-west-1.amazonaws.com/wicked-awesome-bucket-name/wp-content/uploads/…
Not only is this an ugly URL, but this URL is also bad for SEO as Google likes to see your media on your own domain. Also, cloud storage is primarily a storage platform and is not optimized for high speed delivery of media. Faster media is obviously better for user experience but also better for SEO. For these reasons, we strongly recommend configuring CloudFront or another CDN for delivering your media. For more details about the benefits of CloudFront and other CDNs, please read our Why Use a CDN? doc.
If you are using Amazon S3 as your cloud storage provider we have two guides for setting up CloudFront as your CDN. The first you should follow is our CloudFront Setup guide. It gets you up and running with CloudFront properly configured to use your Amazon S3 bucket as its origin, and shows how to update WP Offload Media’s settings to use it.
The second guide builds on the first, showing how to Configure a Custom Domain For CloudFront With HTTPS. This allows you to switch from serving your media from a default CloudFront domain to using a subdomain of your site’s domain.
If you don’t want to use CloudFront for your CDN, you can also use any other CDN. We have a guide for setting up MaxCDN as well as Cloudflare.
For DigitalOcean Spaces we also have two guides; DigitalOcean Spaces CDN Setup helps with setting up DigitalOcean’s built in CDN for Spaces, and How to Set Up a Custom Domain for DigitalOcean Spaces with KeyCDN is useful if you would like to use a custom domain via a third party CDN.
We also have a guide for How to Set Up a Custom Domain CDN for Google Cloud Storage.
Cron Setup
WP Offload Media relies heavily on cron functioning correctly for background processing. Out of the box WordPress checks for cron jobs on every single page load by firing a request off to wp-cron.php, which is very inaccurate. If a site doesn’t receive any visits for a set amount of time, cron will not run during this period. This is also true of sites that implement full page caching, as WordPress is generally bypassed. Basic auth and some security plugins can also restrict cron if not correctly configured.
To ensure that cron runs more often, you need another method of hitting wp-cron.php. If your site is running on Linux and you have access to SSH you can you use the built in crontab. If not, a cron service can be used.
Regardless of which method you choose, a cron schedule of 5 minutes or less is recommended.
Cron Services
There are various cron services available and most offer a free plan, however, the free plans usually limit the frequency in which cron jobs can be scheduled.
www.easycron.com
www.setcronjob.com
Signup for an account at your chosen provider and proceed to create your first cron job.
Enter the URL to your site’s cron file. The free plan at www.easycron.com limits cron jobs to 10 minute intervals.
Cron will now fire every 10 minutes, regardless of whether or not any visits are received.
Crontab
SSH to your server.
ssh username@server.com
Open the crontab. If this is the first time, you may be asked to select an editor. Option 2 (nano) is usually the easiest.
crontab -e
Add a new line to the end of the file, ensuring that you specify the absolute file path to your WordPress install.
*/5 * * * * cd /var/www/example.com/public; php -q wp-cron.php >/dev/null 2>&1
Alternatively, you can use cURL if PHP CLI causes you issues.
*/5 * * * * curl http://example.com/wp-cron.php?doing_wp_cron >/dev/null 2>&1
Hit CTRL-X followed by Y to save and exit. Cron will now fire every 5 minutes, regardless of whether or not your site receives any visits.
Testing Cron
You can test that cron is correctly configured by installing WP Crontrol. Once installed and activated head to Tools > Cron Events.
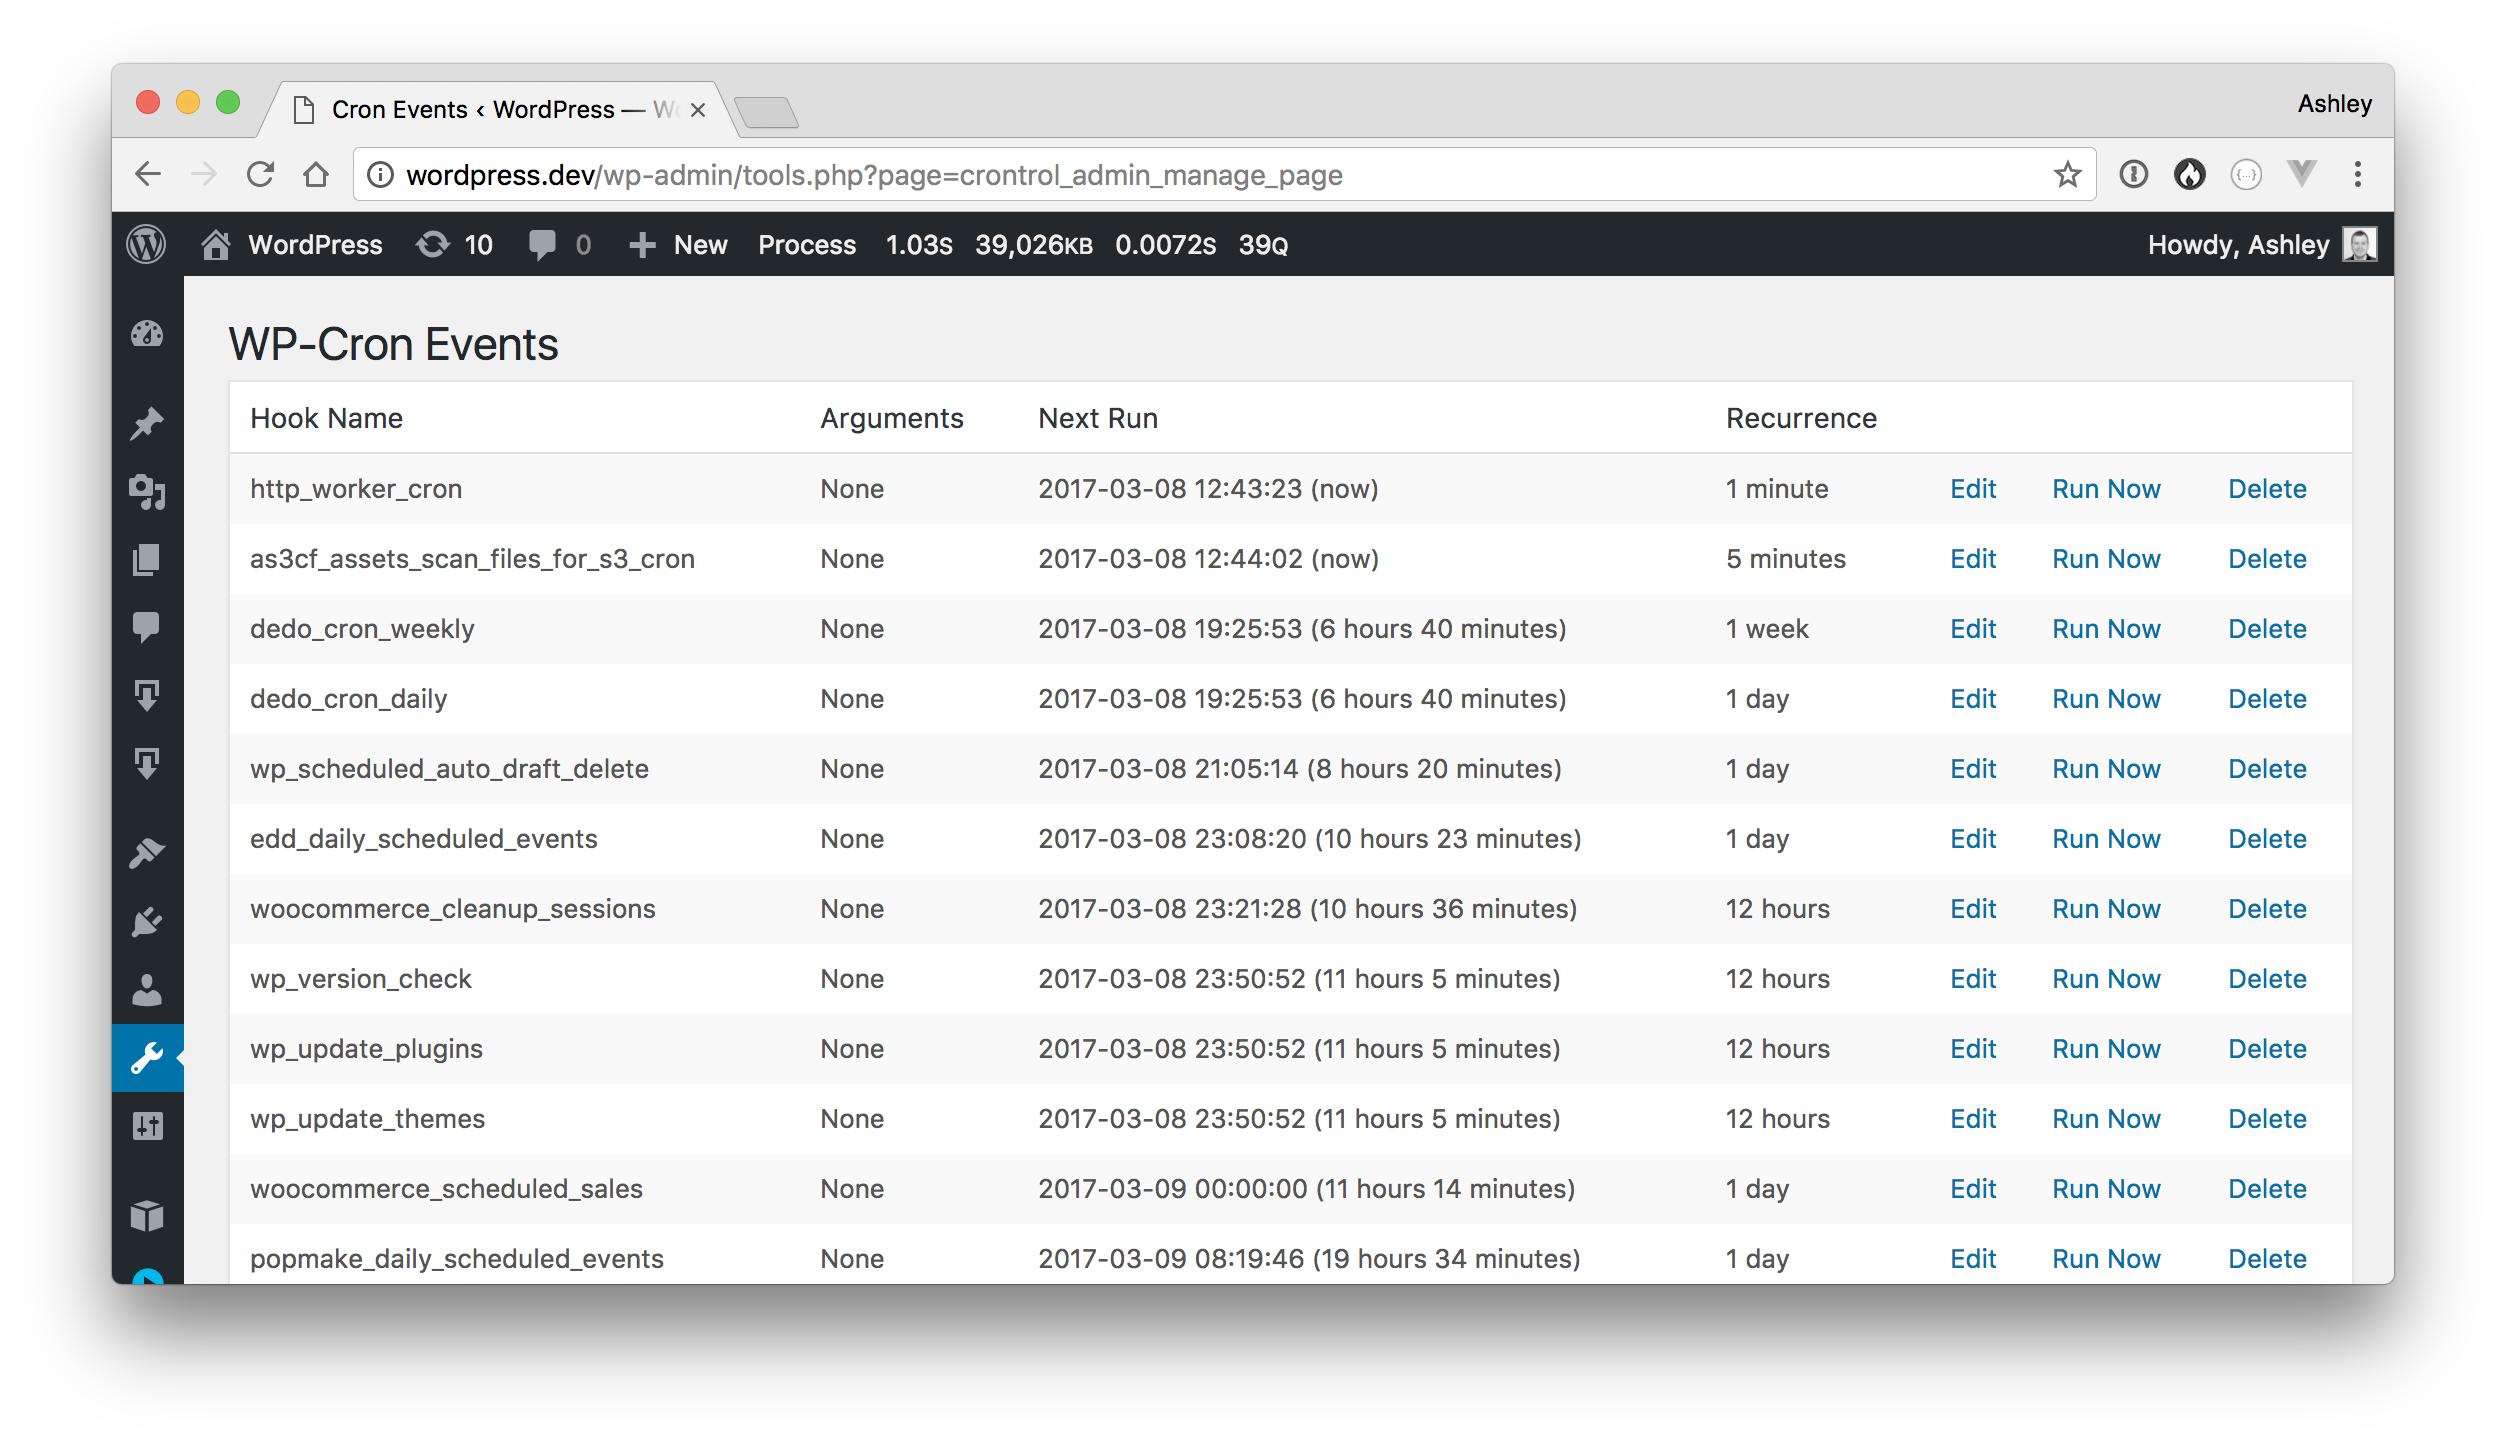
Each scheduled event will have it’s next run time displayed. An event which has now in the next run column is due for processing and should be handled on the next cron tick. If the next run time doesn’t update and the cron interval you have configured has elapsed, then cron jobs are not being processed. You need to check that your cron job is configured correctly, as detailed above.
Disable WP Cron
On high traffic sites, you may wish to disable WP Cron once you’ve configured a custom cron job and confirmed that it’s working correctly. To do so add the following line to your wp-config.php file:
define('DISABLE_WP_CRON', true);
Once set, WordPress will no longer fire off a request to wp-cron.php on every page request.
Amazon S3 Quick Start Guide
Introduction
This guide aims to help you start offloading your WordPress Media Library to an Amazon S3 bucket with WP Offload Media as quickly as possible.
We also have Quick Start Guides for other storage providers.
This article covers the following steps:
- Login to the AWS Console
- Create an Amazon Web Services (AWS) User
- Saving the AWS User’s access details for WP Offload Media to use
- Activate Your WP Offload Media License
- Configure WP Offload Media to offload newly uploaded media to an Amazon S3 bucket
- Offload Your Existing Media Library
- Next steps for setting up WP Offload Media to use a CDN
Login to the AWS Console
Already have an Amazon Web Services (AWS) account? Sign in here.
If you don’t have an AWS account yet, you will need to sign up here.
Create an IAM User
Once you have logged into the console, you will need to create a new IAM user:
Navigate to the IAM Users page in the AWS Console, click the Add user button.
Enter a name for the user in the User name field.
Names are case insensitive and must be unique within your AWS account. User names can be a combination of up to 64 letters, digits, and these characters: plus (+), equal (=), comma (,), period (.), at sign (@), and hyphen (-).
Under Access type select the checkbox for Programmatic access, then click the Next: Permissions button.
To allow the new user to manage buckets and objects in the S3 service, you need to grant it specific permissions.
Click the “Attach existing policies directly” button, and then enter “s3” in the filter policies input box.
Select the “AmazonS3FullAccess” policy, then click the Next: Review button at the bottom of the page.
If everything looks good, click the Create user button.
You will be shown the security credentials for the user, which consists of an Access Key ID and a Secret Access Key. Amazon will not show these again so please download them as a .csv and also copy them somewhere safe. If you lose them, you can always create a new set of keys from the console but you cannot retrieve the secret key again later.
Define Your Access Keys
Now that you have your AWS Access Keys, you need to add them to your site so that WP Offload Media can use them to work with the Amazon S3 service.
For better security, we recommend defining your access keys in your wp-config.php:
define( 'AS3CF_SETTINGS', serialize( array(
    'provider' => 'aws',
    'access-key-id' => '********************',
    'secret-access-key' => '**************************************',
) ) );
These should be placed before the following block of code in your wp-config.php:
/* That's all, stop editing! Happy blogging. */

/** Absolute path to the WordPress directory. */
if ( !defined('ABSPATH') )
    define('ABSPATH', dirname(__FILE__) . '/');

/** Sets up WordPress vars and included files. */
require_once(ABSPATH . 'wp-settings.php');
Warning: If you define your access keys after this block of code, WP Offload Media will not be able to read them.
Alternatively, you can enter your access keys into the form on the Storage Provider page inside WP Offload Media, the first page shown when no keys are defined. This will save them to the database, which is less secure than defining them in your wp-config.php.
IAM Roles
If you’re running your site on an Amazon EC2 instance, you might like to use an IAM Role instead. This is even more secure than defining your access keys in wp-config.php.
Make Sure Cron Is Set Up
We highly recommend that you configure a proper cron job on your server as WP Offload Media relies heavily on background processing. See our Cron Setup doc for details on how to accomplish this.
Activate Your WP Offload Media License
Now’s a good time to activate your WP Offload Media license so that (once configured) you can instantly take advantage of all its goodies.
Go to WP Offload Media’s settings page in the WordPress admin dashboard, found under the “Settings” menu.
Then click on the “License” tab, enter your license key in the input box, and click the “Activate License” button.
Configure WP Offload Media
To start offloading newly uploaded media to Amazon S3 you need to first tell WP Offload Media which bucket it should use. If you have not already created a bucket to use with WP Offload Media, it can be created for you from WP Offload Media’s Settings page.
Go to the “Media Library” tab of WP Offload Media’s Settings page in the WordPress admin dashboard. If you have followed the steps above then you should see something like the following.
If you have already created the bucket you want to offload your media to, then you can enter the bucket name in the above input and click the “Save Bucket” button.
If you haven’t created the bucket yet, then you can click the “Create new bucket” link to get a form where you can specify the new bucket’s name and region.
As long as you haven’t restricted your IAM User’s access to list buckets then you can also “Browse existing buckets.”
Regardless of how you specify the bucket, once saved, WP Offload Media will be set up to offload newly-uploaded media to the bucket with some recommended default settings.
Access Denied to Bucket
If you see an “Access Denied to Bucket” error notice after selecting a bucket created in the AWS Console, the chances are you have “Public Access Settings” enabled for the bucket. You can tell by selecting the bucket in the AWS Console’s list of buckets and looking at the “Public access settings” option within the “Permissions” section of the pop-over panel.
WP Offload Media needs to be able to make objects in the bucket public readable (not editable) so that your site visitors can see them, this is safe to do as it is on a per object basis and is different from making the bucket public. Even if you’re only going to use WP Offload Media to offload “private” objects for WooCommerce, Easy Digital Downloads or similar, it still needs to be able to change the permissions on individual objects in the bucket.
If “Public access settings” does not say “Disabled“, click the “Permissions” section link in the pop-over panel and click “Edit”.
Uncheck all of the settings and save the changes, you’ll need to confirm the change if asked.
Refresh WP Offload Media’s settings page and the “Access Denied to Bucket” error should disappear.
IMPORTANT: There is also a Block public access (account settings) page that can be accessed from the Amazon S3 sidebar that can also be used to disable public access to objects in all existing and new buckets. If the AWS account is relatively new, or someone has visited this settings page and turned on the blocking of public access, you may need to visit the page, click “Edit”, clear the “Block all public access” checkbox, and then save the changes.
Offload Your Existing Media Library
Now that your site is configured to offload newly-uploaded media to Amazon S3, you might want to offload any existing media to the bucket too.
In the right-hand sidebar of WP Offload Media’s “Media Library” tab you should see what we call the “Offload Tool”, this can be used to offload existing media to the bucket.
If you have not offloaded anything yet, then you’ll see a “Your Media Library needs to be offloaded” message in the Offload Tool with an “Offload Now” button.
If you have already offloaded a few items, then you might see a message like “66% of your Media Library has been offloaded” in the Offload Tool, with an “Offload Remaining Now” button.
Either way, clicking the Offload Tool’s button will start an upload to the bucket of all existing media yet to be offloaded.
The media offload progresses in small batches in the background to keep things efficient. You can close the tab and just forget about it, when the tool finishes its job, you’ll get a notice in the WordPress dashboard, or you can monitor progress from WP Offload Media’s settings page.
Once complete, the Offload Tool displays a “100% of your Media Library has been offloaded, congratulations!” message and the “Download all files from bucket to server” and “Remove all files from bucket” tools are made available.
Next Steps: Using a Content Delivery Network (CDN)
Now that your media is offloaded to Amazon S3, your next step if you’re concerned about performance (i.e. load time and SEO), is to configure a Content Delivery Network (CDN).
By default WP Offload Media is configured to use raw Amazon S3 URLs when serving offloaded media. Your media URLs might look something like this:
http://s3-eu-west-1.amazonaws.com/wicked-awesome-bucket-name/wp-content/uploads/…
Not only is this an ugly URL, but this URL is also bad for SEO as Google likes to see your media on your own domain. Also, Amazon S3 is primarily a storage platform and is not optimized for high speed delivery of media. Faster media is obviously better for user experience but also better for SEO. For these reasons, we strongly recommend configuring CloudFront or another CDN for delivering your media. For more details about the benefits of CloudFront and other CDNs, please read our Why Use a CDN? doc.
We have two guides for setting up CloudFront as your CDN. The first you should follow is our CloudFront Setup guide. It gets you up and running with CloudFront properly configured to use your Amazon S3 bucket as its origin, and shows how to update WP Offload Media’s settings to use it.
The second guide builds on the first, showing how to Configure a Custom Domain For CloudFront With HTTPS. This allows you to switch from serving your media from a default CloudFront domain to using a subdomain of your site’s domain.
If you’re planning to set up the Assets Pull addon as well, you will most likely want to use the same domain name for both your media and assets with CloudFront. Check out our guide to accomplish that.
If you don’t want to use CloudFront for your CDN, you can also use any other CDN. We have a guide for setting up MaxCDN as well as Cloudflare.
CloudFront Setup for Media Offloaded to Amazon S3
This article assumes that you’ve already set up an Amazon S3 bucket and followed the steps within our Amazon S3 Quick Start Guide.
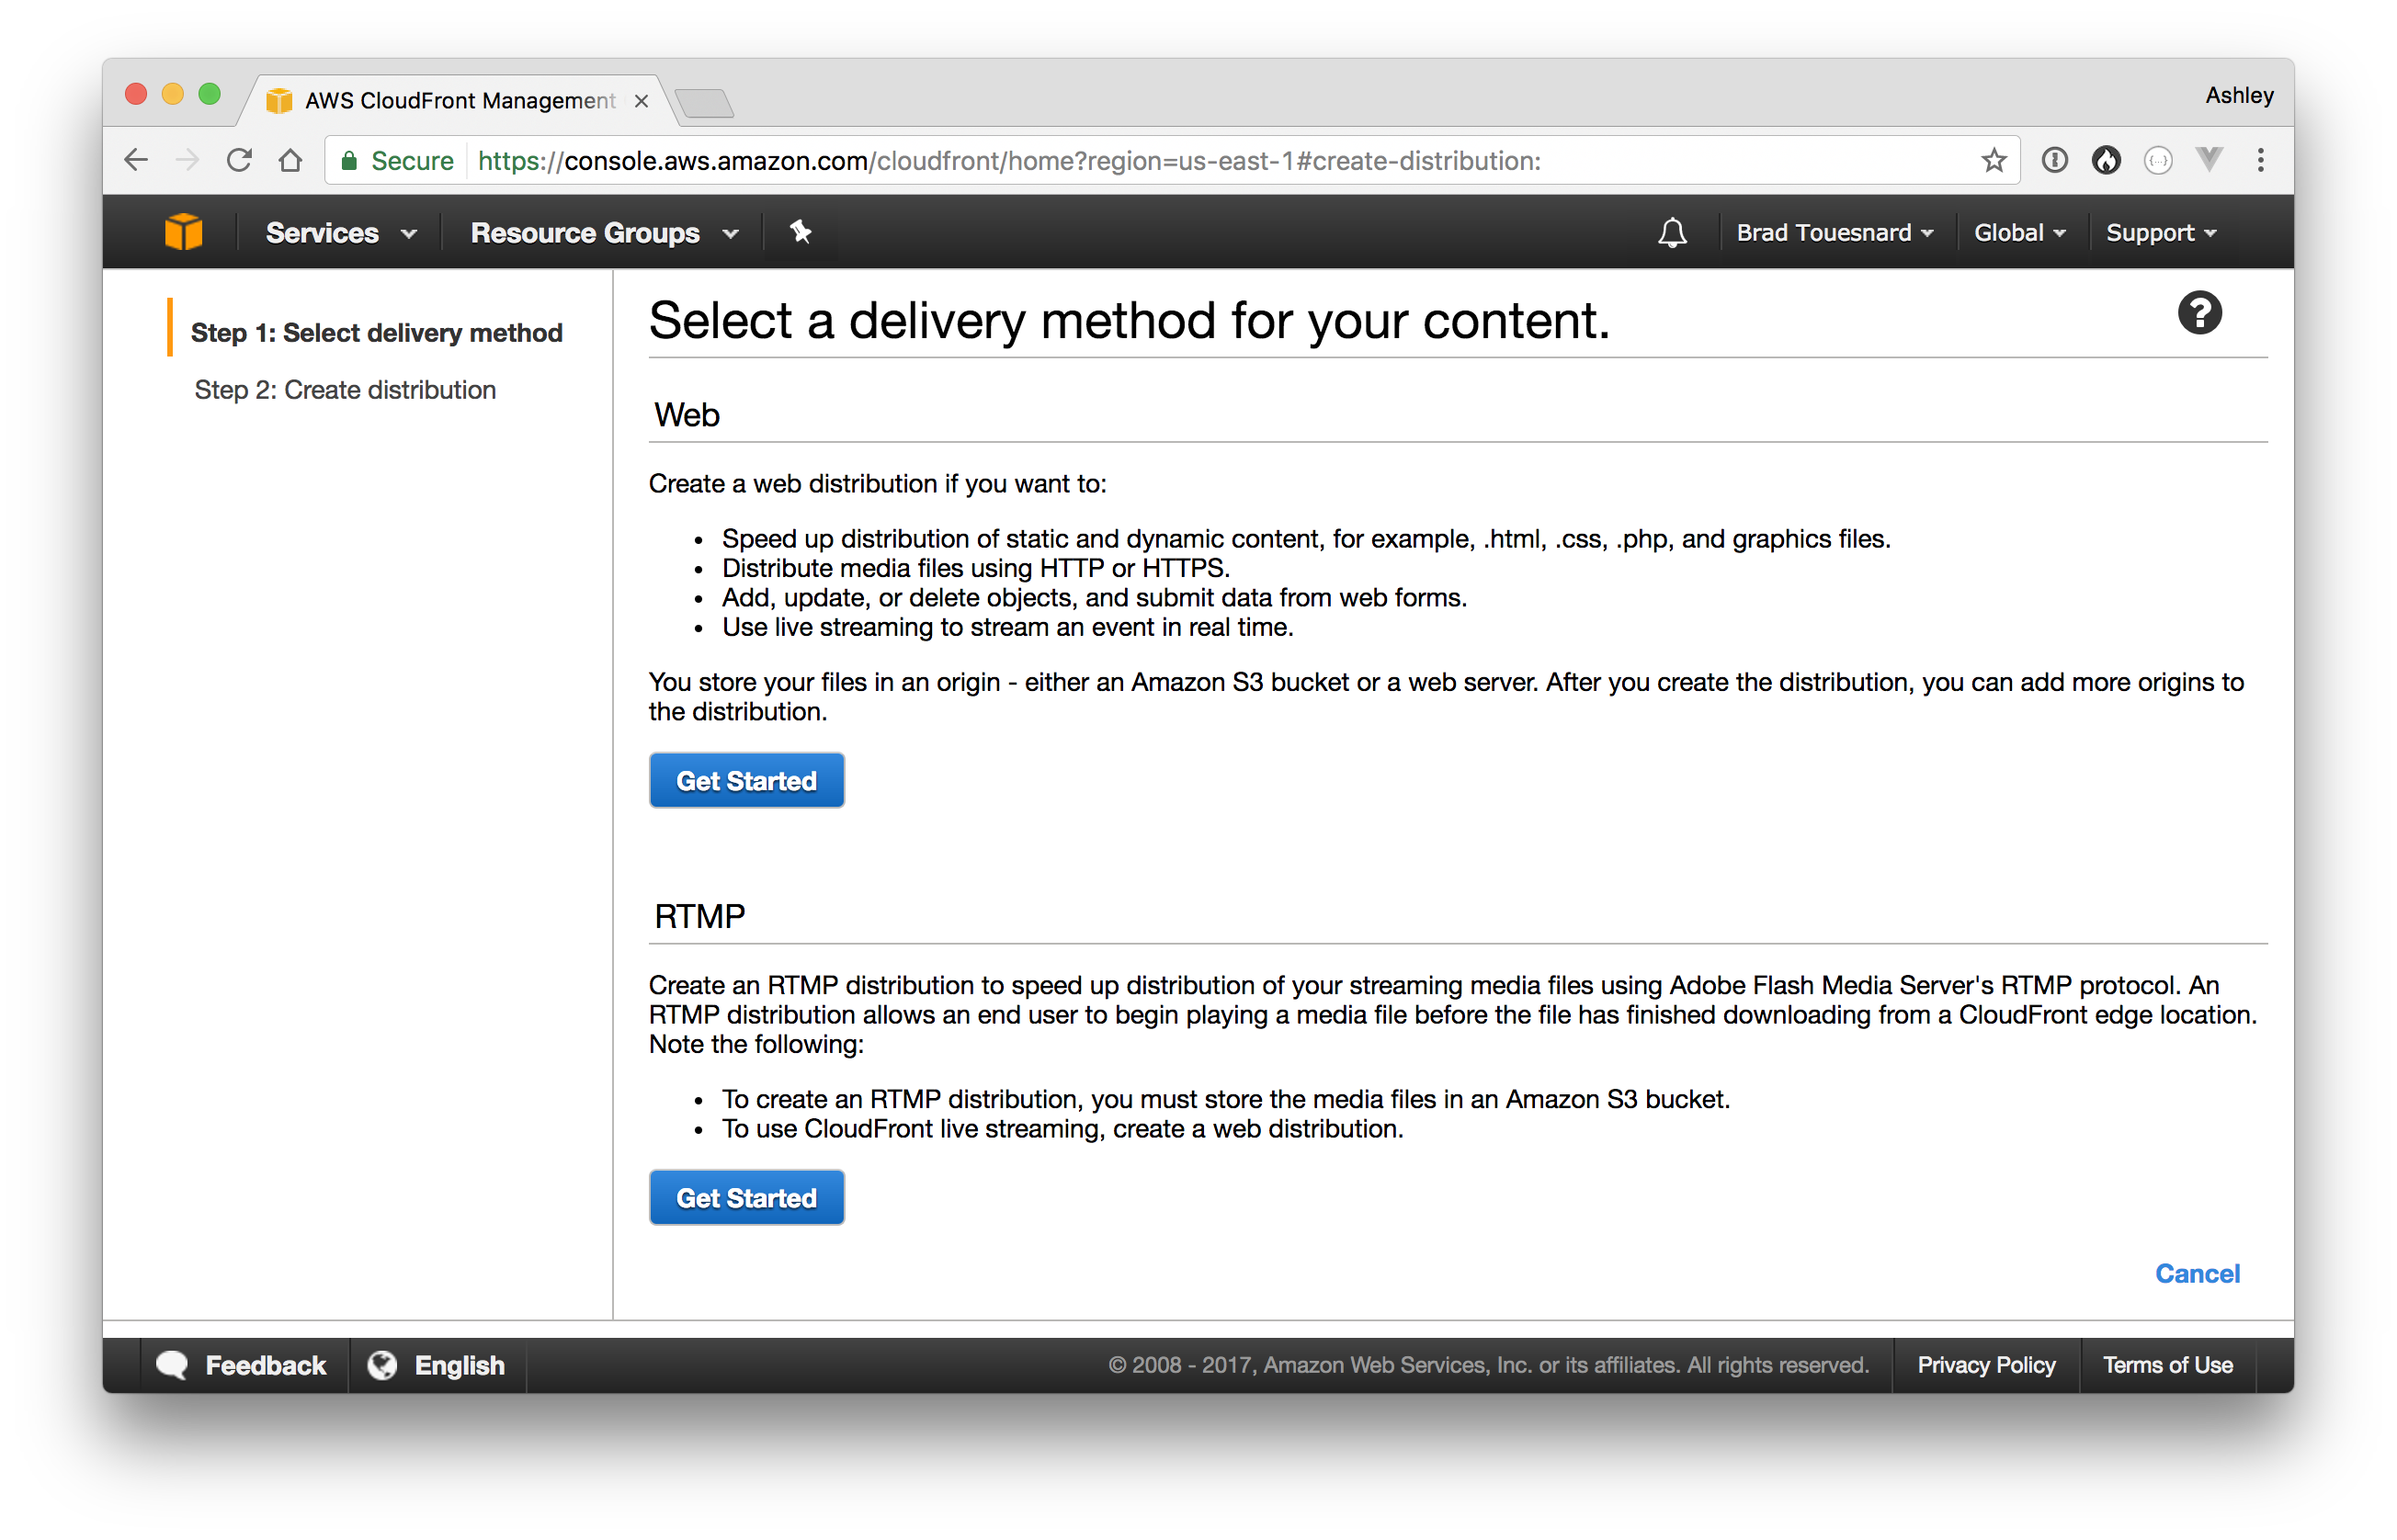
Once the above steps are taken care of, login into the AWS console and visit the CloudFront page. Click Create Distribution followed by Get Started under the Web delivery method.
Populate Origin Domain Name with the desired S3 bucket, however, leave Origin Path blank. Feel free to customize the remaining options if required, but the defaults are fine in most cases.
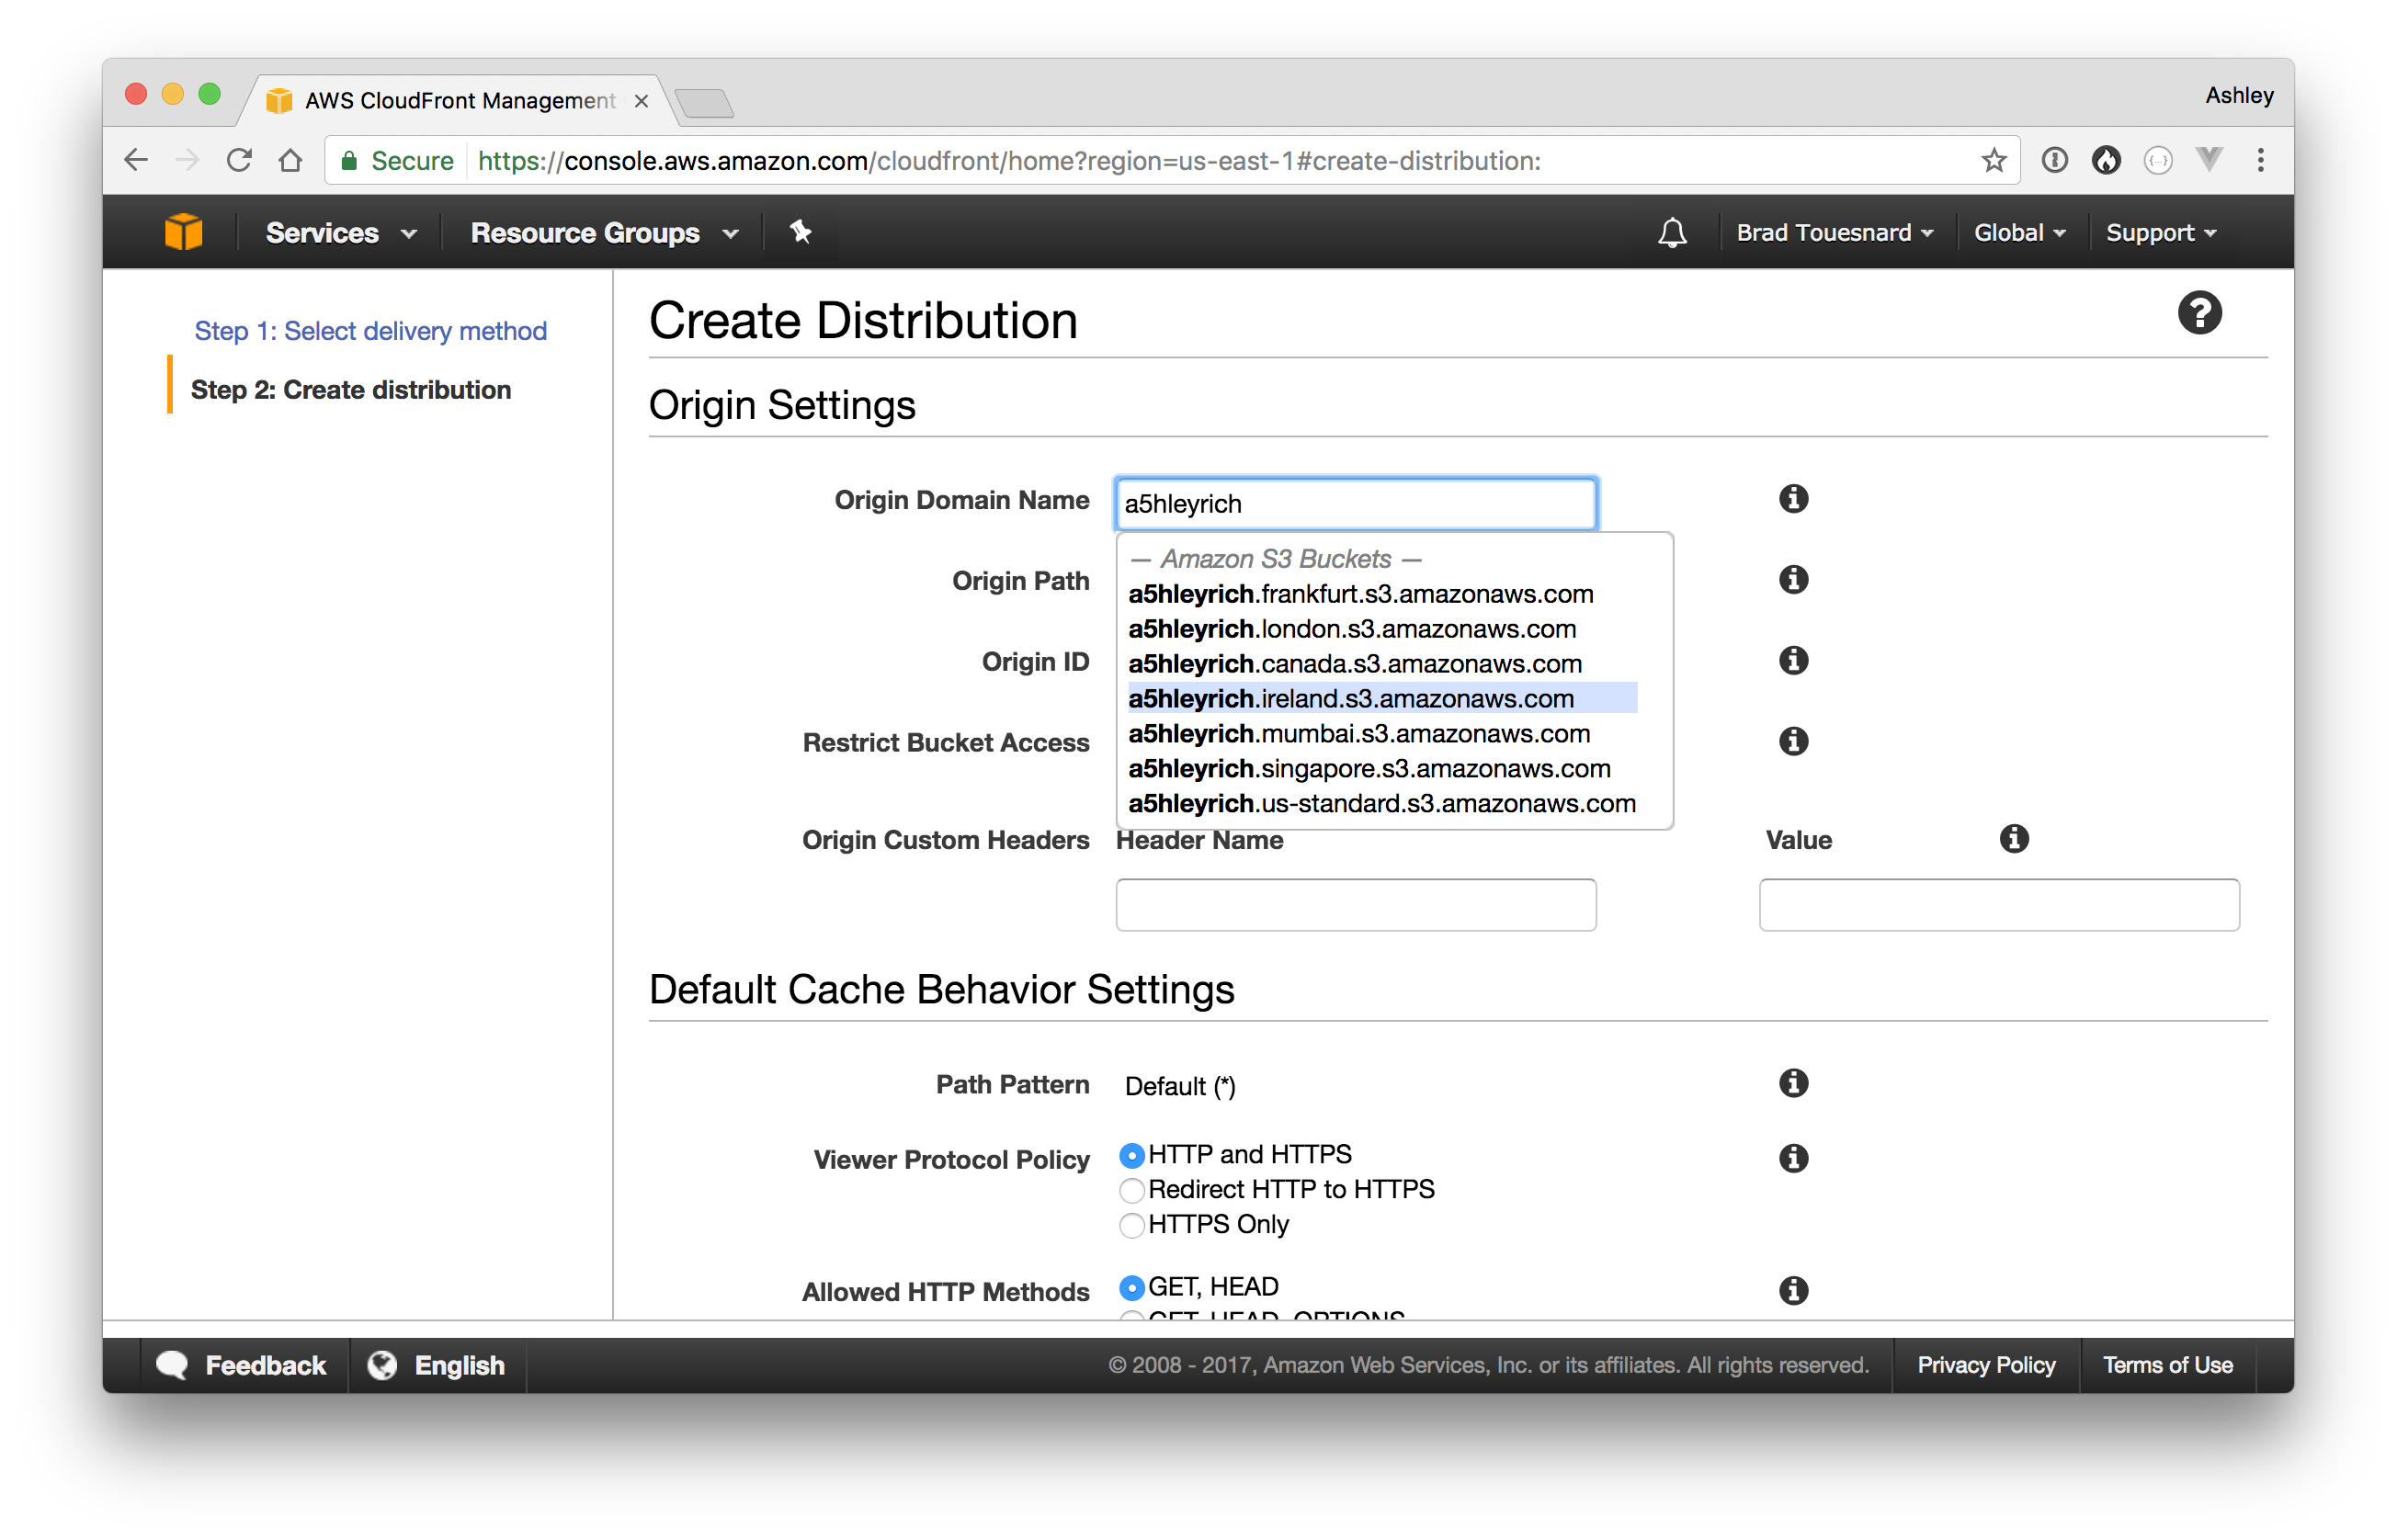
Click Create Distribution. CloudFront will begin copying all of your files from the specified bucket to its edge servers. This can take a while depending on the size of your Media Library.
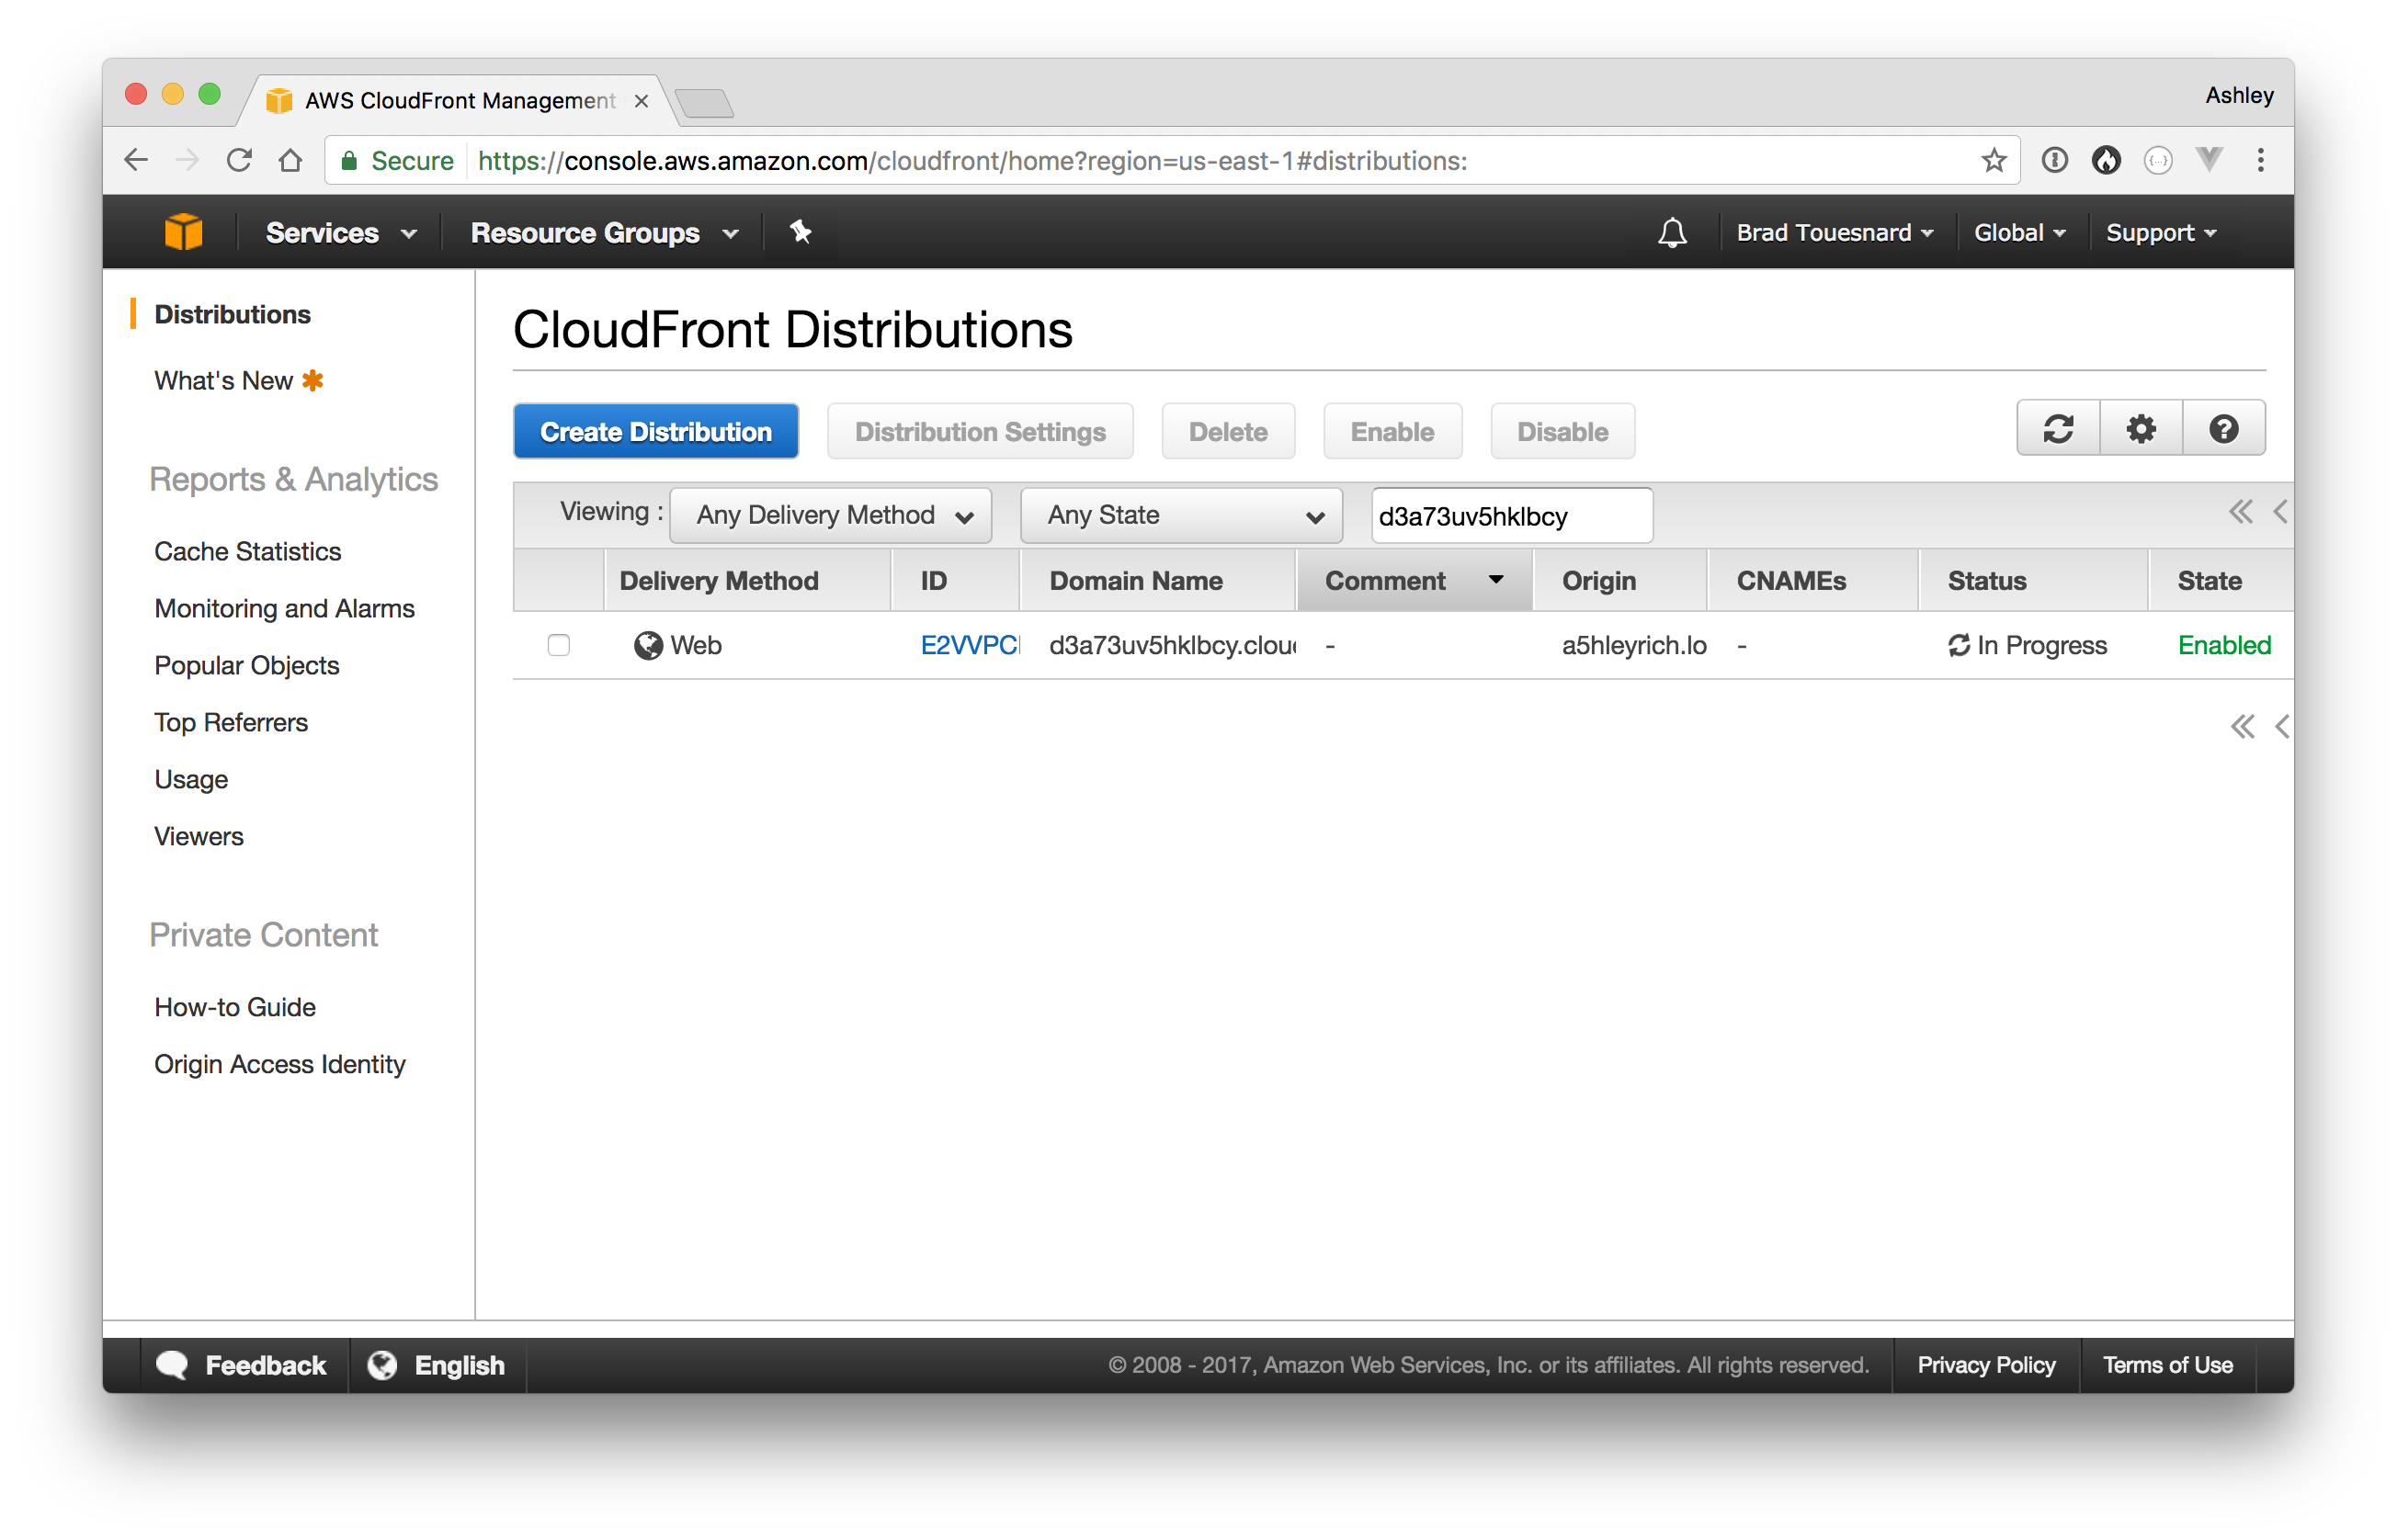
Once the Status has changed from In Progress to Deployed, you can configure WP Offload Media to start serving from CloudFront using the cloudfront.net domain provided. However, we highly recommend that you configure a custom domain for your CloudFront distribution. Using the cloudfront.net domain name is not great for your site’s SEO. See the doc Configure a Custom Domain for CloudFront with HTTPS for step-by-step instructions.
If you are fine with using the cloudfront.net domain name, head over to your WordPress site. Visit the WP Offload Media screen and enter your cloudfront.net domain name into the Custom Domain (CNAME) option.

Click Save Changes. All of your media library files will now be served from the CloudFront distributed servers.
Integration Guide for WordPress Amazon S3 and CDN

In this tutorial, we are going to walk you through how to complete a WordPress Amazon S3 integration as well as optionally using a content delivery network (CDN) alongside it. This can dramatically save you on bandwidth costs, act as a backup, and help speed up your site.
Amazon S3 is a storage solution, and part of Amazon Web Services many products. Typically this is used for large sites that either need additional backups or are serving up large files (downloads, software, videos, games, audio files, PDFs, etc.). Amazon has a proven track record of being very reliable, and because of their massive infrastructure, they are able to offer very low storage costs. Some of S3’s customers include Netflix, Airbnb, SmugMug, Nasdaq, etc.

Due to the fact that Amazon S3 deals entirely with bulk storage, you can almost guarantee that pricing will be cheaper than your WordPress host. Offloading media to AWS can be a great way to save money and is free for your first year (up to 5 GB storage). Also, because the requests for your media is served directly from Amazon, this puts less load on your WordPress site, meaning faster load times.
Amazon S3 is not to be confused with Amazon CloudFront. CloudFront is a CDN solution, whereas S3 is a storage solution. However, they can both be used interchangeably as we’ll get into more below.
Important
For Kinsta users who do not want to go through the process of setting up an external storage provider like Amazon S3, we offer a one-click disk space add-on.
WordPress Amazon S3 Setup
For this integration, we recommend using the WP Offload S3 Lite plugin, developed by the awesome team over at Delicious Brains. The basic version is free. The plugin copies files from your WordPress site to Amazon S3 automatically as they are uploaded to the media library. There is then an optional configuration for adding a CDN, such as Amazon CloudFront, KeyCDN, or MaxCDN.
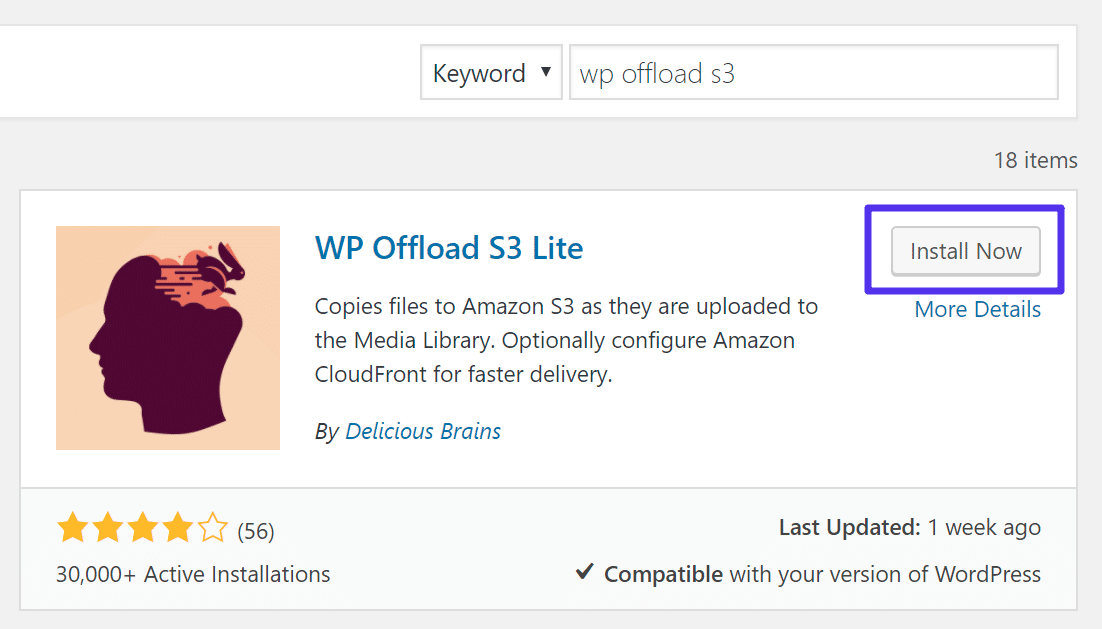
WP Offload S3 Lite
This plugin is pretty lightweight, only 204 KB to be exact. As of writing this, it currently has over 30,000 active installs with a 4 out of 5-star rating. Follow the steps below.
Step 1
Next, install the free WP Offload S3 Lite plugin. You can download it from the WordPress repository or by searching for “wp offload s3” within your WordPress dashboard under “Add New” plugins. Click on “Install Now” and activate it.
Install WP Offload S3 Lite
Step 2
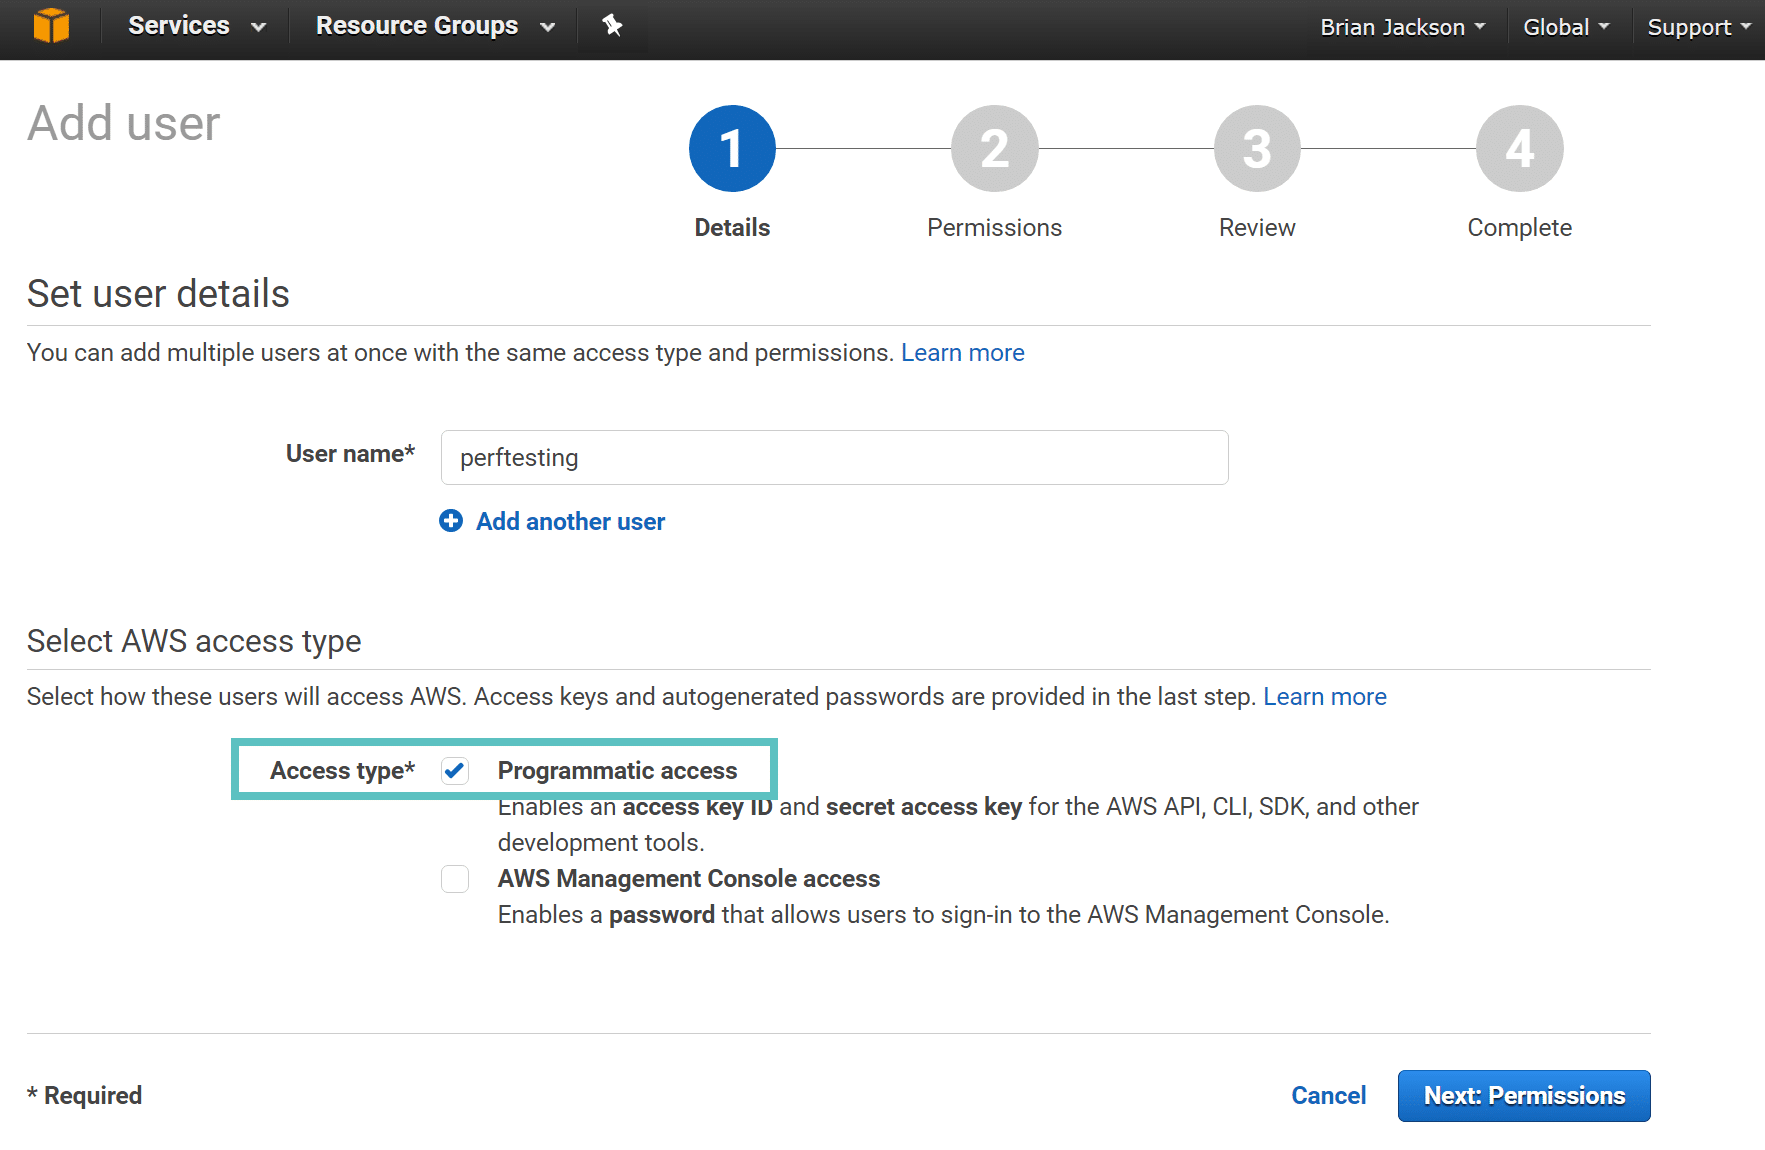
You can follow the WordPress Amazon S3 documentation from Delicious Brains or we will walk you through the rest in more depth. Log in to your Amazon Web Services account. If you don’t have one you can sign up for free. You will then need to create a new user. Choose a username and make sure you select “Programmatic access.”
Amazon Web Services – Add User
Step 3
Now you need to setup permissions for the user to manage files in S3, so select “Attach existing policies directly” and click on “Create policy.” This will open in a new window. Once you are done you will need to come back to this.
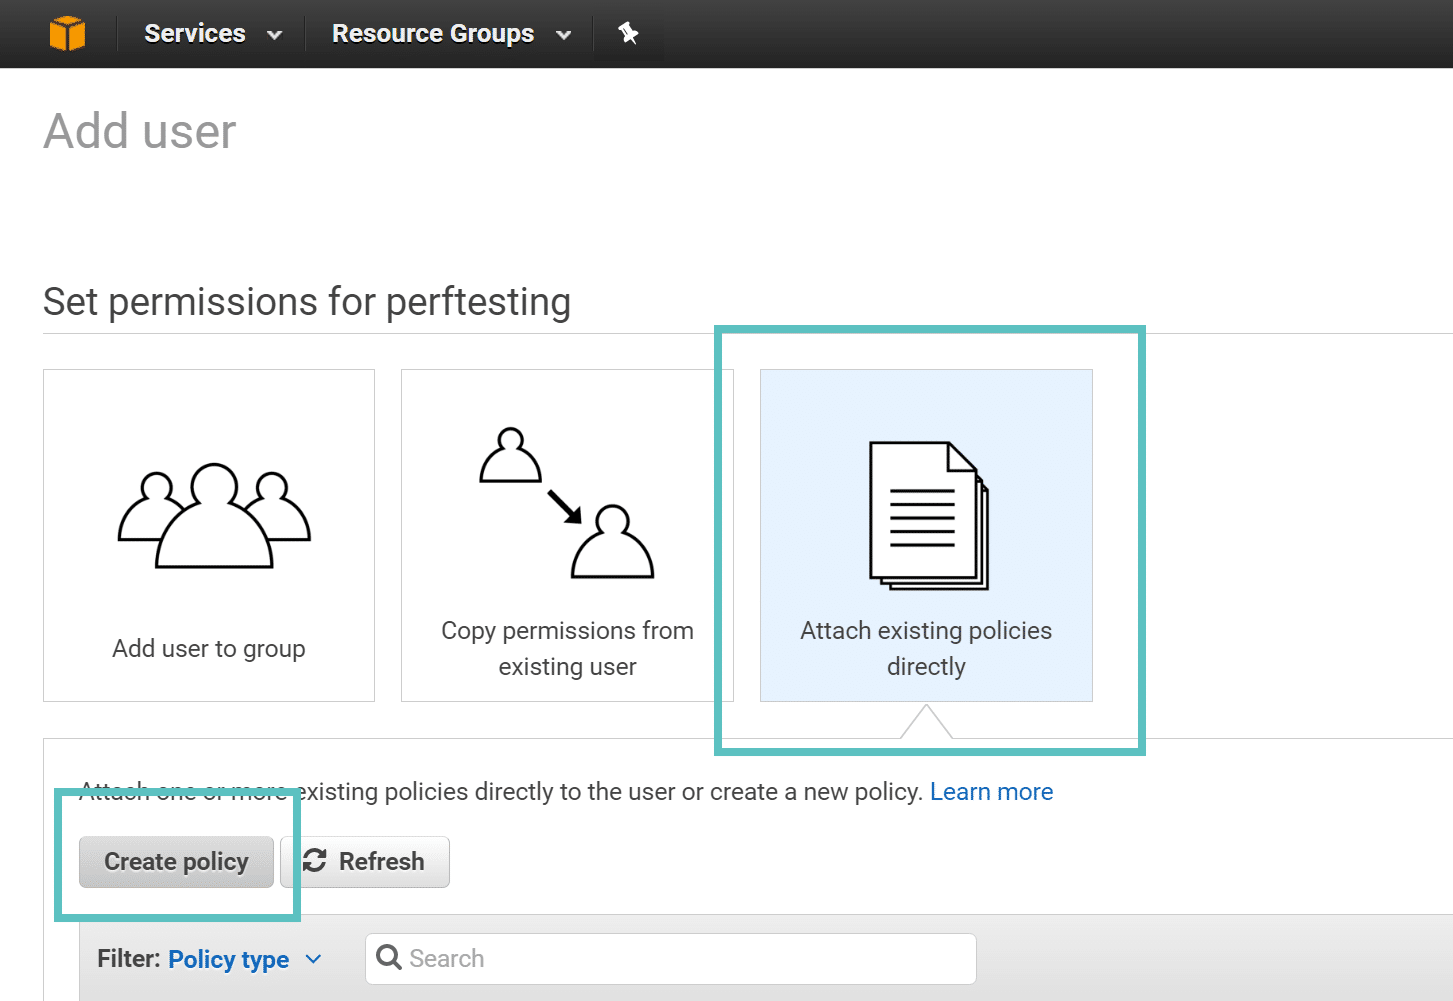
Permissions in AWS
Step 4
Click “Select” next to the create your own policy option.
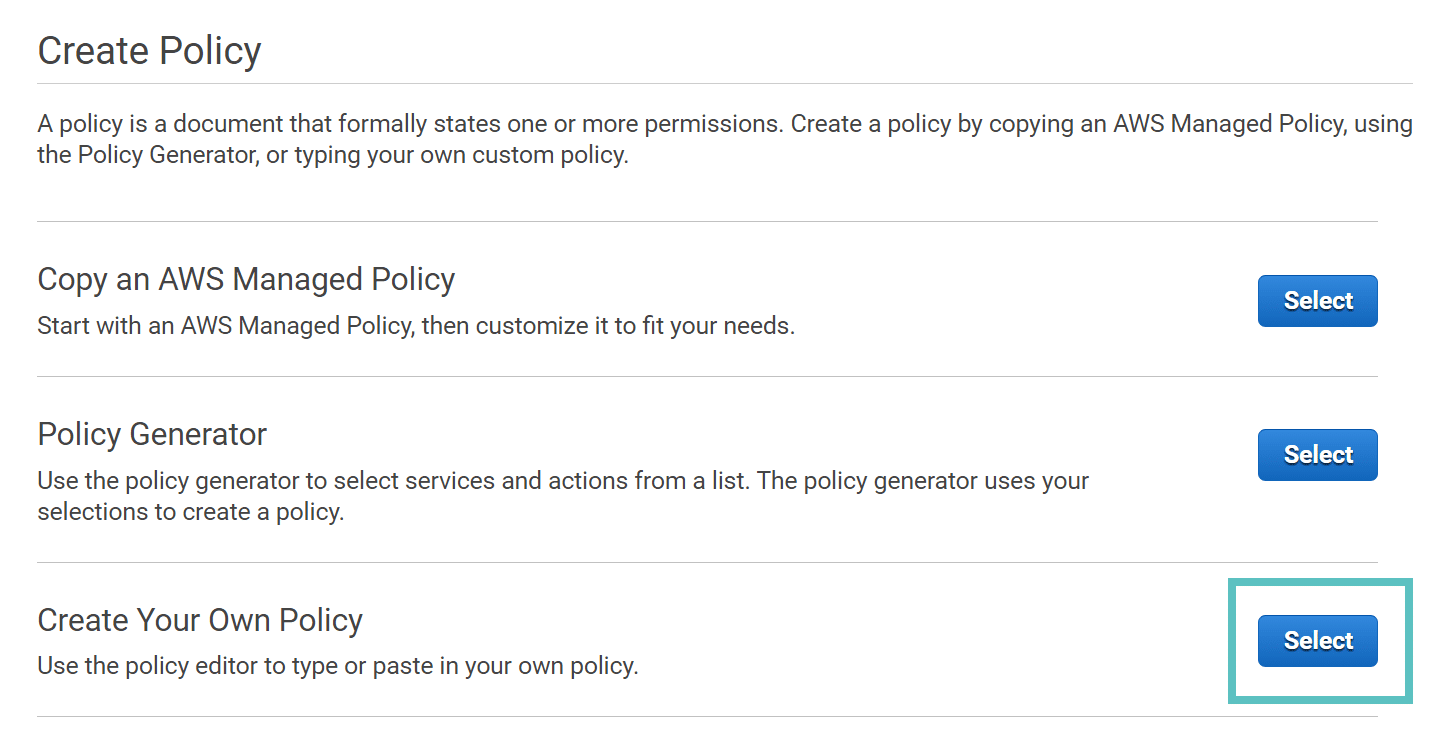
Create policy in AWS
Step 5
Next you will need to give your policy a name and description. This can be whatever you want. Then copy the following code into the “Policy Document” section.
{
  "Version": "2012-10-17",
  "Statement": [
    {
      "Effect": "Allow",
      "Action": [
        "s3:CreateBucket",
        "s3:DeleteObject",
        "s3:Put*",
        "s3:Get*",
        "s3:List*"
      ],
      "Resource": [
        "arn:aws:s3:::*"
      ]
    }
  ]
}
This policy allows the user to create buckets, delete files only (not buckets), upload files, download files, and list files and buckets. This is the basic level of permissions the plugins require to function.
However, we recommend checking out Delicious Brain’s documentation on additional bucket restrictions. For example, modifying the resource section above and adding your bucket name to lock it down (perftesting is the name of our buck down in Step 11).
"Resource": [
 "arn:aws:s3:::perftesting/*",
]
Then click on “Create Policy.”
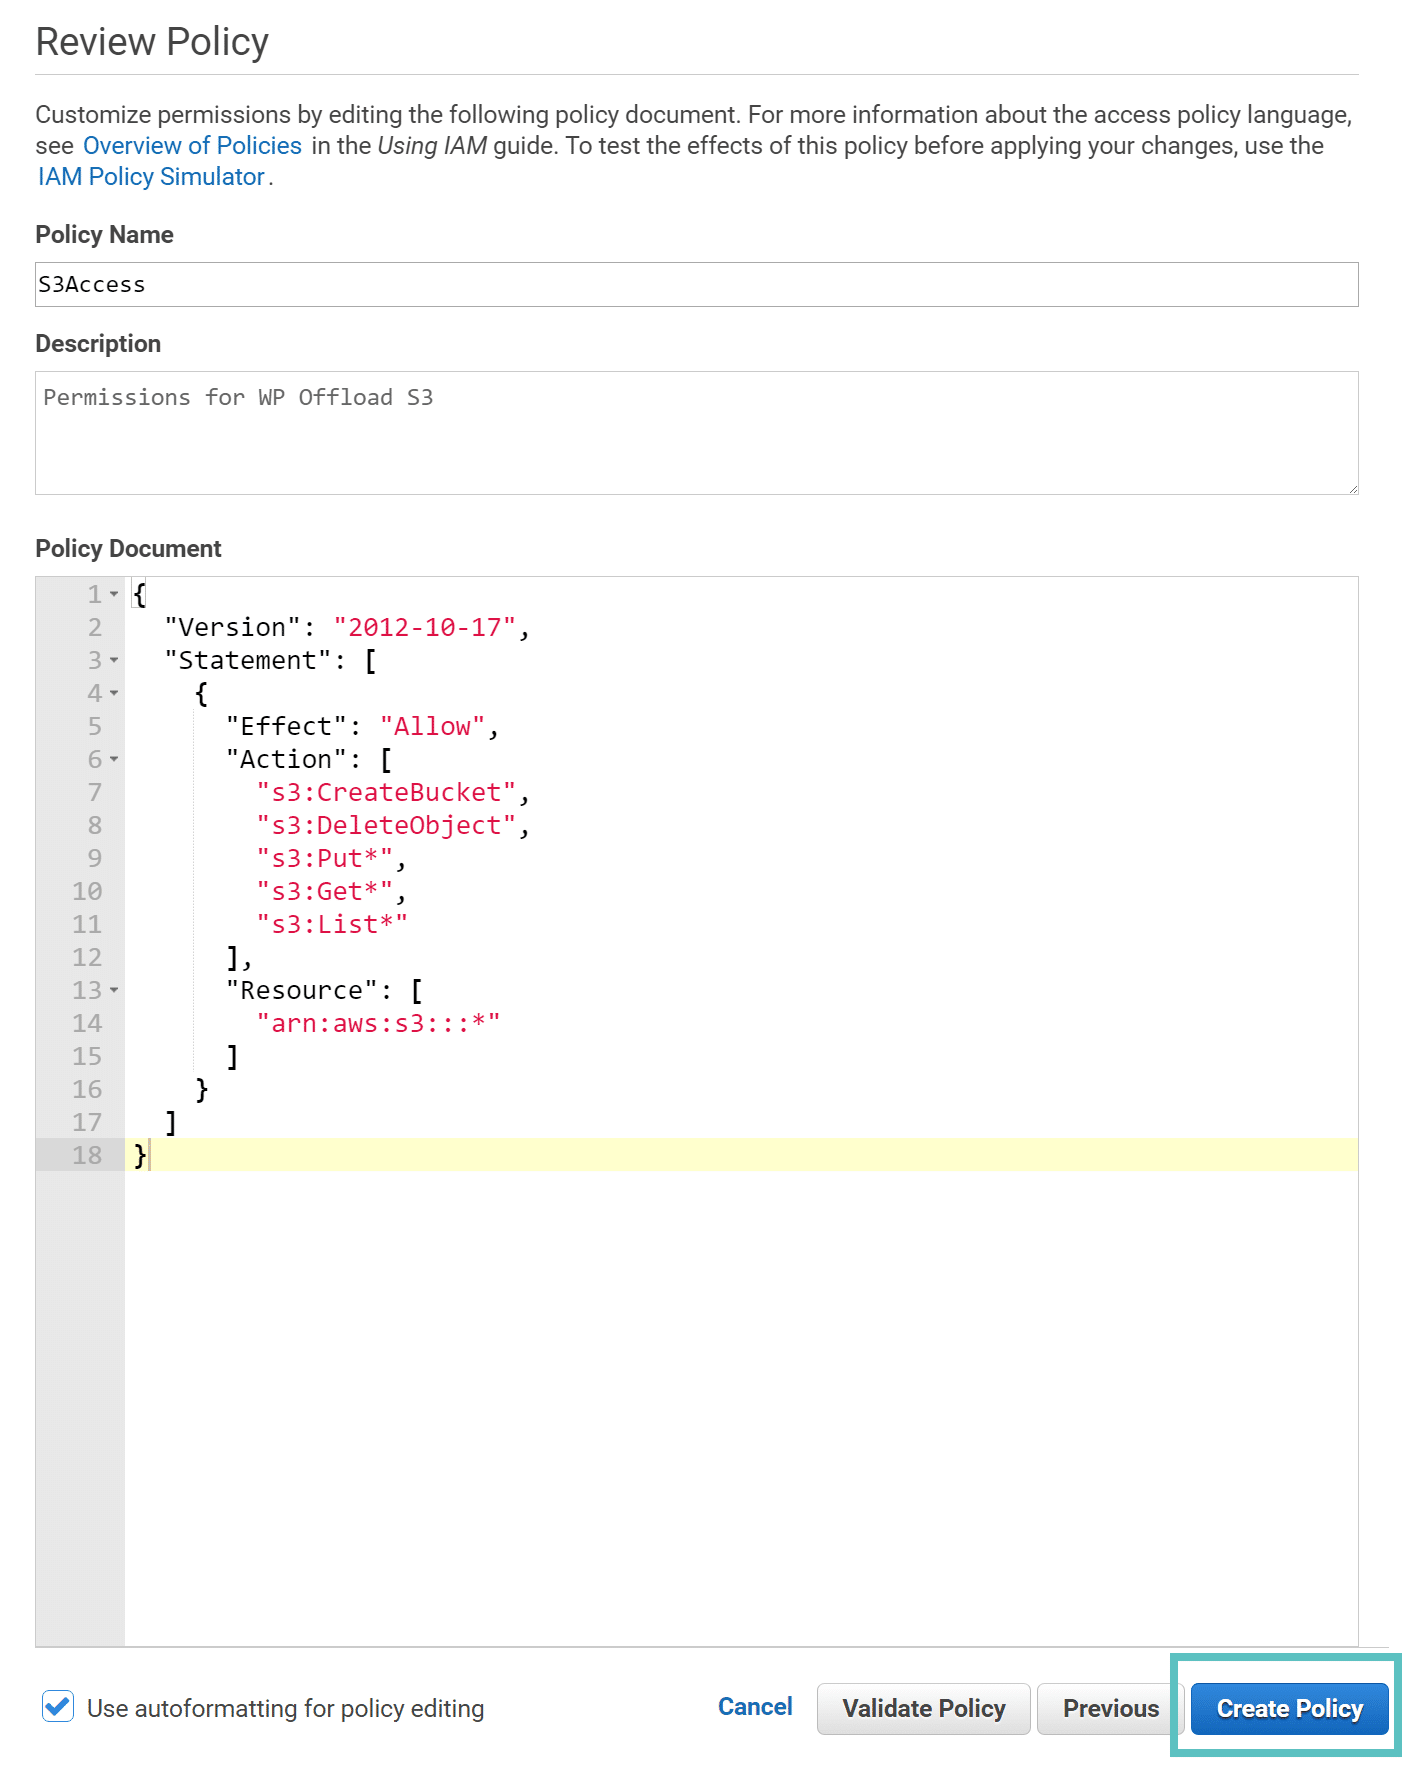
Review policy in AWS
Step 6
Returning to the window from Step 4, you now need to add the policy to the user you are creating. Click on “Refresh” and you should see your new policy you just created at the top. Select that and click on “Next.”

AWS permissions for user
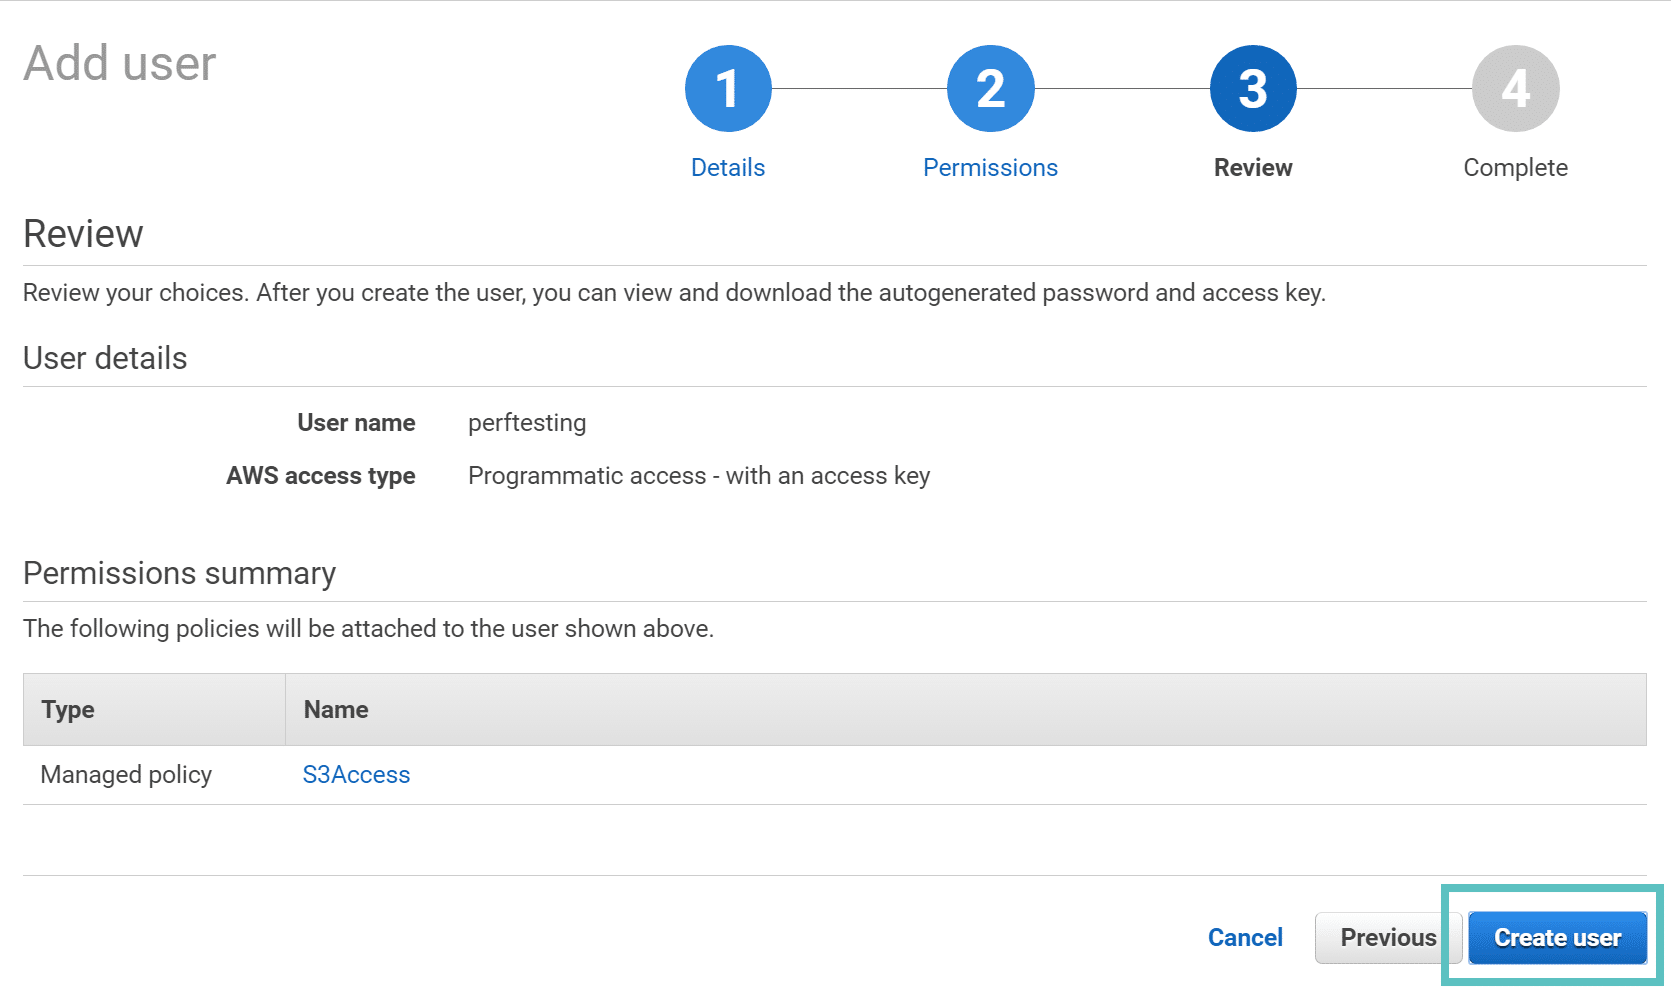
Step 7
Then click on “Create user.”
AWS create user
Step 8
On the last screen you will need to copy down your access key ID and secret access key to a safe place as you will need this for back in your WordPress dashboard.
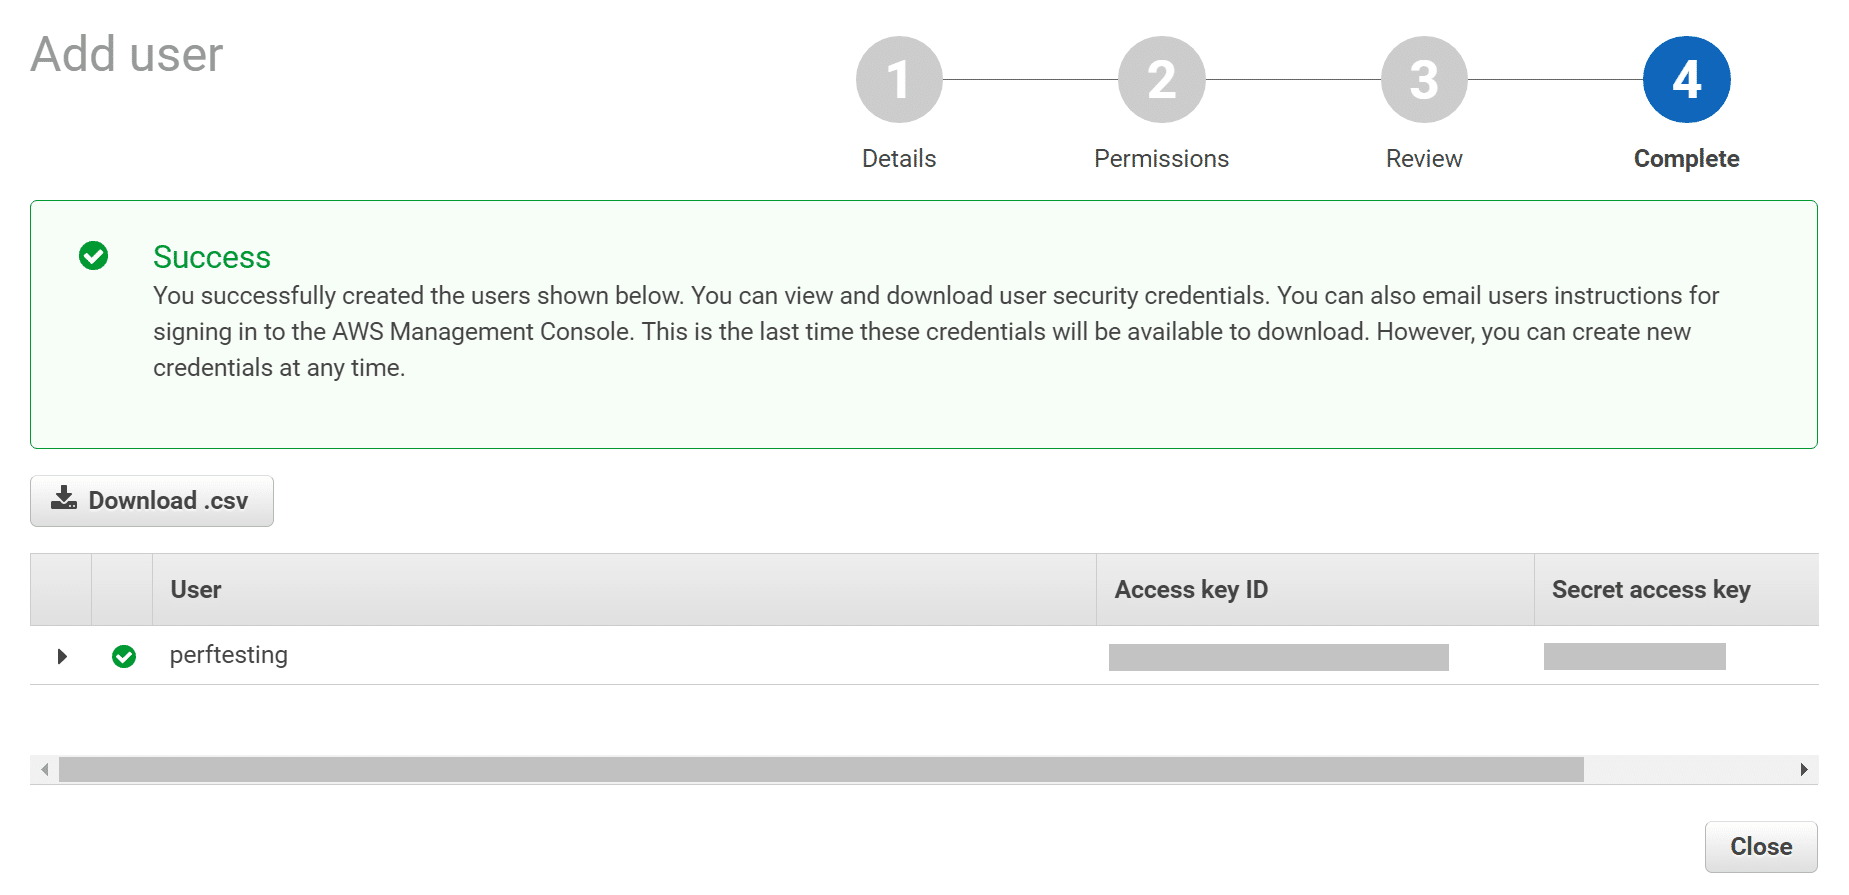
AWS access key
Step 9
Then back in WordPress click into “Access Keys” under AWS and input your credentials that you just created. Or, as Delicious Brains recommends, it is better to define them in your wp-config.php file. Simply copy the following snippet and replace the stars with the keys.
define( 'DBI_AWS_ACCESS_KEY_ID', '********************' );
define( 'DBI_AWS_SECRET_ACCESS_KEY', '****************************************' );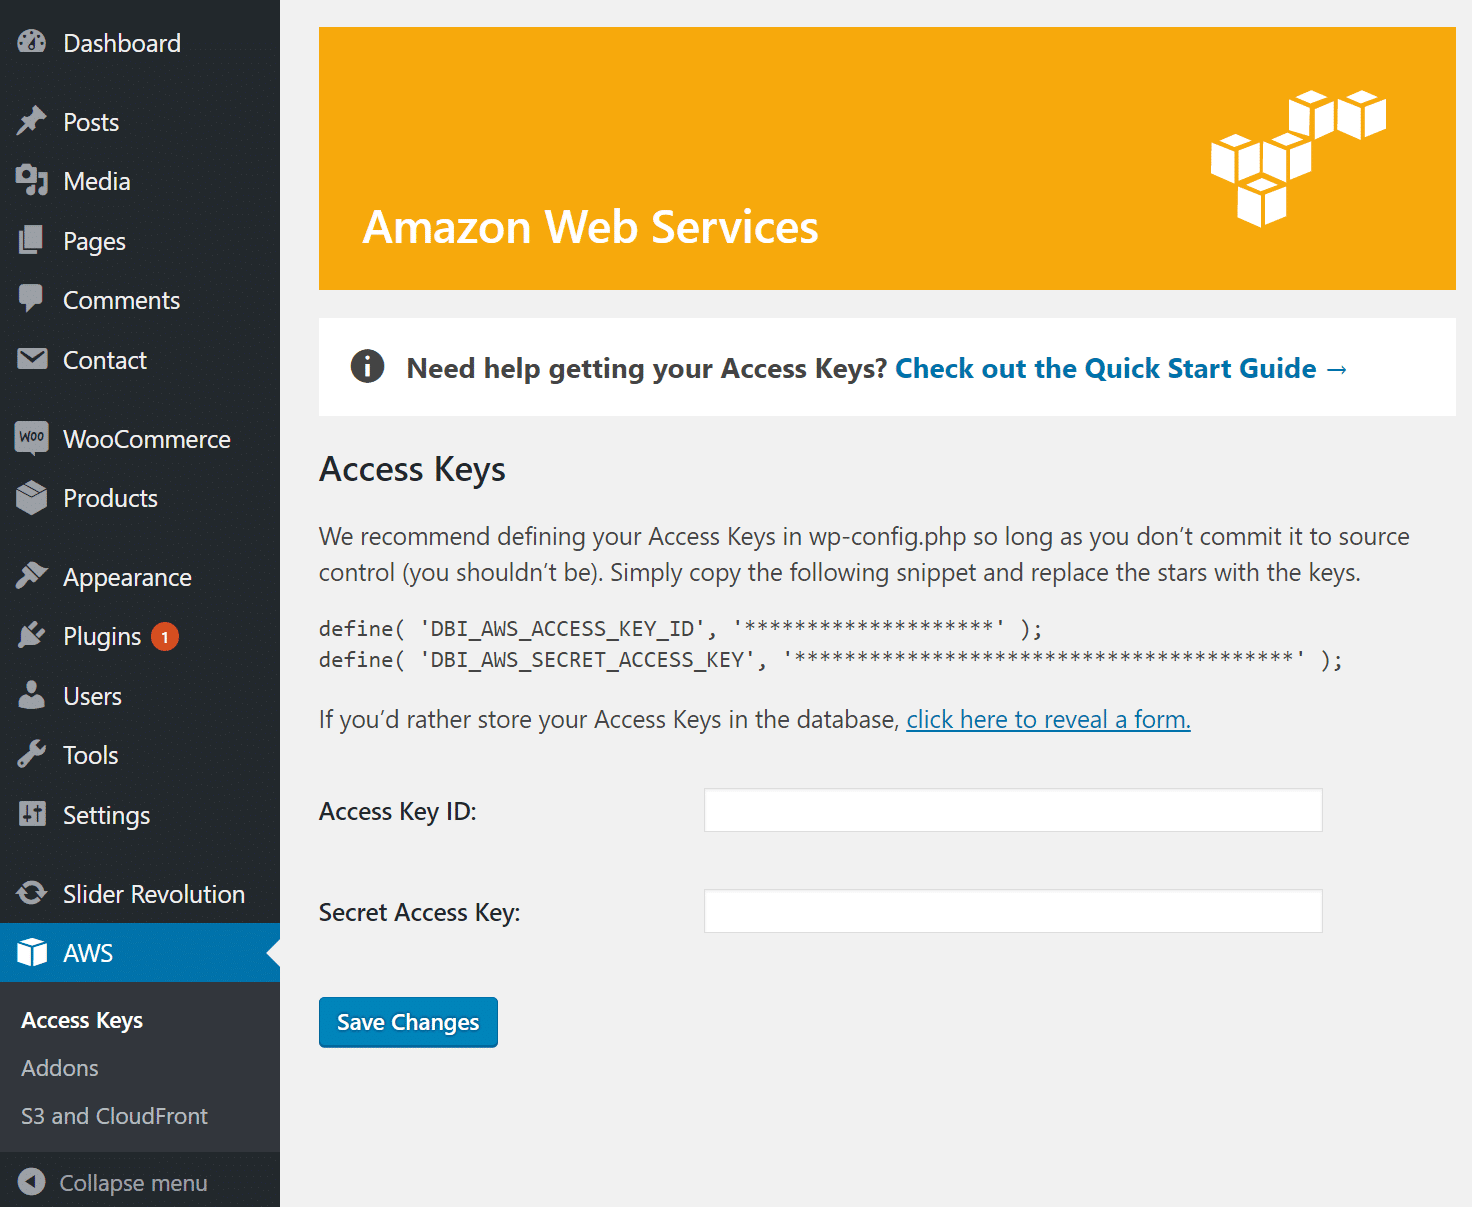
Hookup Amazon Web Services in WordPress
Step 10
You must then create a bucket to use. If you are not signed up yet with Amazon S3, you can signup here. They have a free trial you can get started with. Click into “S3 and CloudFront” under the AWS plugin settings and click “Create bucket.” You can then choose a region. Click on “Create New Bucket.” Remember that storage costs vary per region. See prices.
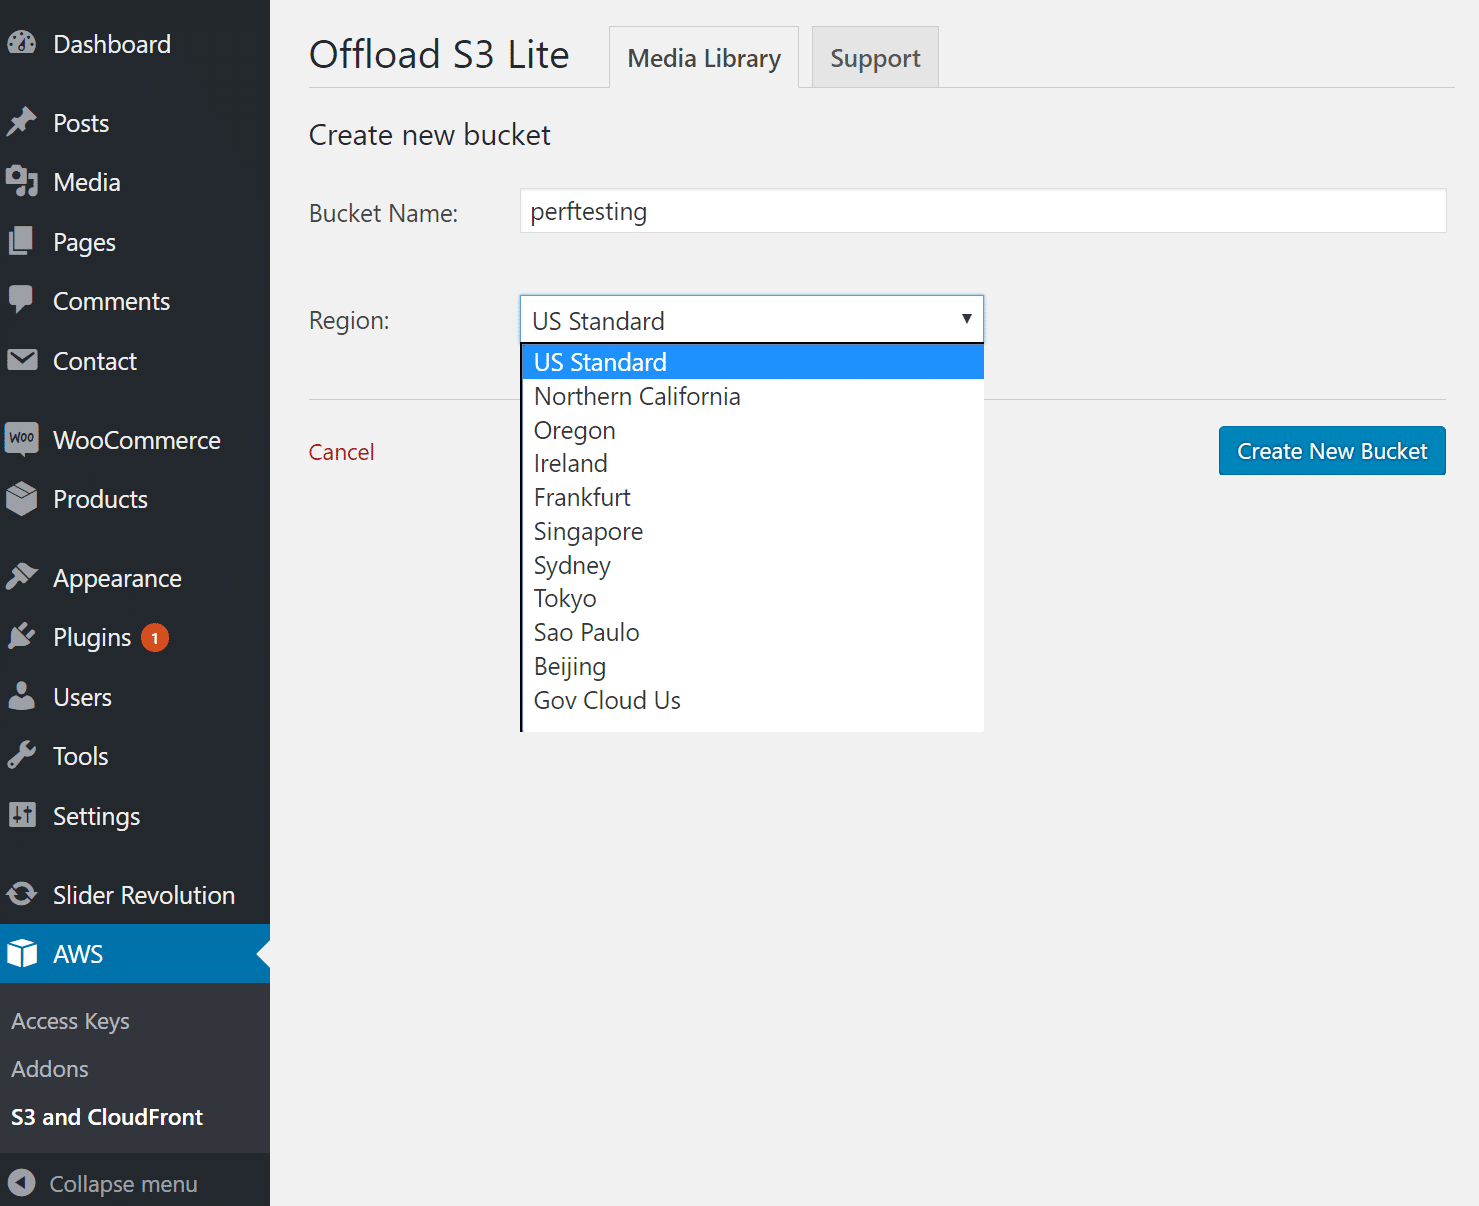
Create Amazon S3 Bucket
Step 11
To get WP Offload S3 to work with certain 3rd party plugins such as WooCommerce, you might need to install and activate some of their compatibility addons. And this sometimes requires paying for their premium license. However, there are a lot of times you can get by with the free version as well. By default, the following options as seen below are checked. if you are running over HTTPS you will want to enable that.
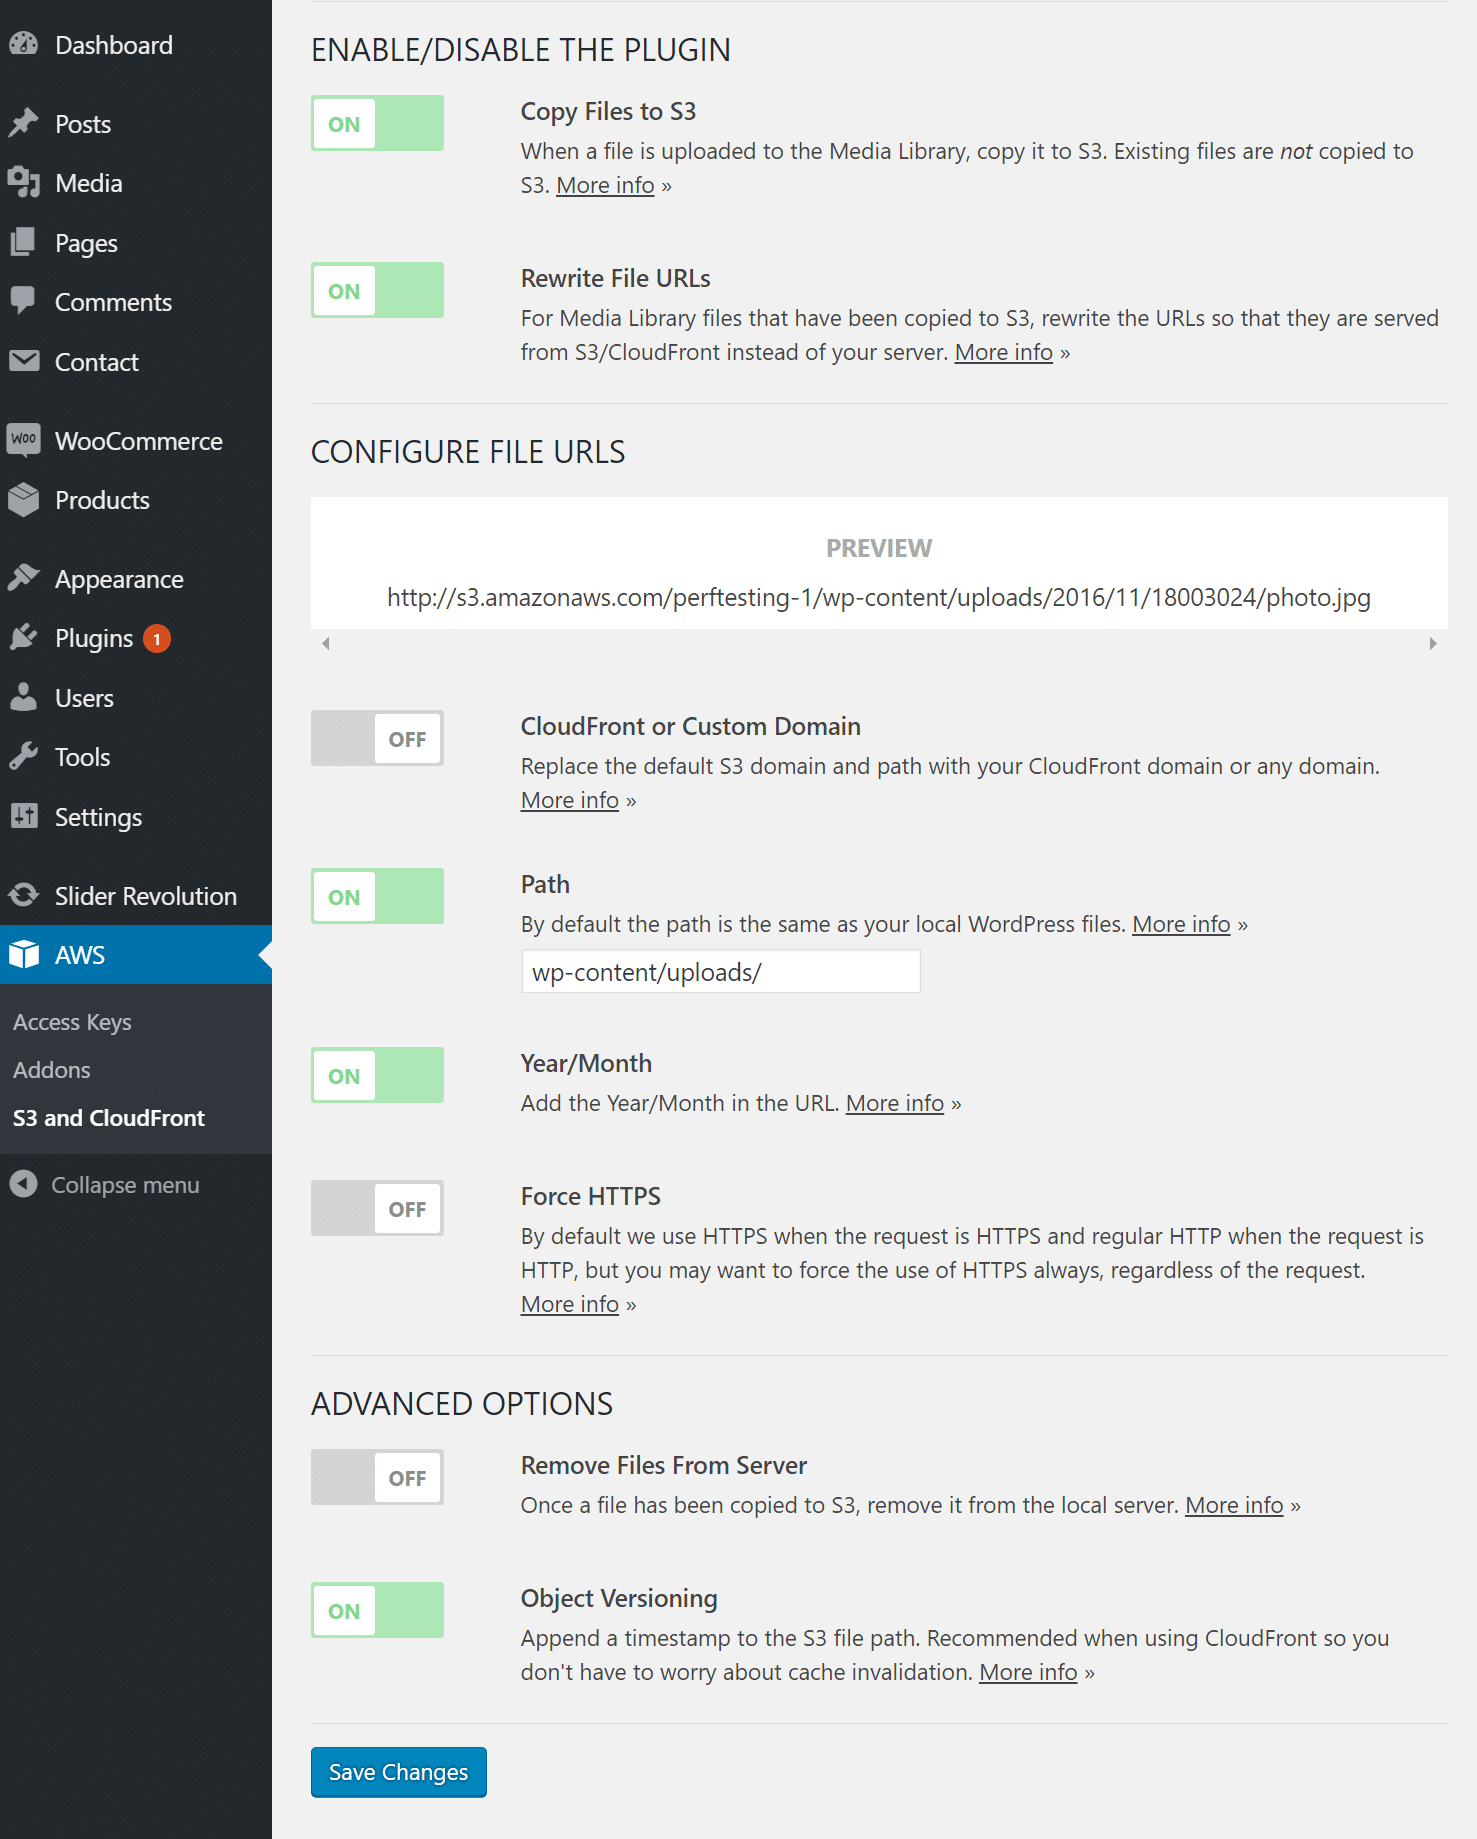
AWS plugin settings
Your WordPress Amazon S3 setup is now complete! Your images will now be copied to Amazon S3 storage when they are uploaded to your WordPress media library. You can also do the same technique with your assets (CSS, JS, fonts, etc), but it requires the premium license to get the assets pull addon.
Note: Uploaded files manually via SFTP will not get copied to Amazon S3. WP Offload Media only offloads items that are first uploaded to your WordPress media library.
Another important setting above is the option to remove the files from the local server once they have been offloaded to S3. This can help drastically reduce the disk space need with your WordPress host. Just make sure to check compatibility with other plugins if you enable this. You can also check out this tutorial on uploading files to Amazon S3 from the browser.
WordPress Amazon S3 and a CDN
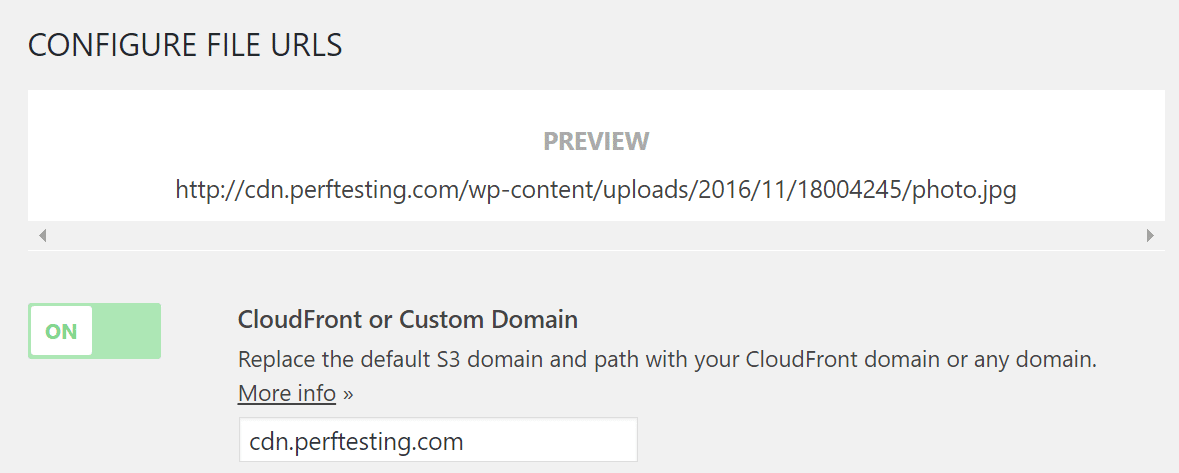
If you are using a CDN to speed up delivery of your assets, you can enable this under the CloudFront or Custom Domain section. Check out these following tutorials to get you up and going.
Once you have it setup and your CDN URL, you can input it into the custom domain field as seen below.
CDN Amazon S3
Make sure to also check out our guide on how to offload media to Google Cloud Storage.
If you enjoyed this tutorial, then you’ll love our support. All Kinsta’s hosting plans include 24/7 support from our veteran WordPress developers and engineers. Chat with the same team that backs our Fortune 500 clients. Check out our plans
Typically speaking, there are four ways of testing CDN setups.
CDN Setup Method 1: The Basic Method
This simple method involves setting up a CNAME to point to a CDN provider. For example, making CNAME to example.com.clients.somecdnprovider.net.
After doing this, the browser cache must be flushed and time given for the DNS changes to take effect. You can then perform a CDN test by checking the site to see if anything is broken.
Method 2: Hosts File Editing
- Find the IP of example.com.clients.somecdnprovider.net
- Map that IP to in your hosts file
- Clear browser cache and OS DNS cache
- You can then browse your site while keeping the developer tools of your browser open to ensure everything is working
Method 3: Manipulate GET HTTP Request
When you issue a GET request for website file (for example ), a specific process happens:
- The client gets the IP for from the OS
- The client establishes a HTTP Connection with the returned IP
- The client asks the server for /style.css , and amongst the other request headers, it includes “Host: ”
- The server uses the information given by the Host header to know which virtual zone it may be mapped to. This is the most important request header.
This means that the server connection and Host header is completely under the control of the client. To test how this would work under a CDN, you must manipulate this information.
This can be done a few different ways:
To fetch the example file from the CDN you would issue the following command:
GET -H ‘Host: ’
Or for curl:
curl -H ‘Host: ’
ApacheBench:
ab -H ‘Host: ’
The results of doing this is that the original process changes to:
- The client gets the IP for example.com.clients.somecdnprovider.net from the OS
- The client establishes a HTTP Connection with the returned IP
- The client asks the server for /style.css , and amongst the other request headers, it includes Host:
- The server uses the information given by the Host header to know which virtual zone it may be mapped to. This is the most important request header.
Method 4: webpagetest.org
This is the simplest method for completing a CDN test and involves fooling the test browser into thinking that the CNAME switch has already been done using
WordPress S3 Tutorial: How to Connect WordPress to Amazon S3 Bucket


Looking for a WordPress S3 tutorial to get your WordPress site up and running with Amazon S3? In this post, I’ll take you through everything that you need to know about WordPress and Amazon S3.
First, I’ll start with an overview of what Amazon S3 *actually* is and how it can benefit your WordPress site. Then, I’ll take you through the exact process you need to follow to start offloading your WordPress site’s files to Amazon S3.
There’s a lot to cover so let’s dive in…


What is Amazon S3?
Amazon S3 is an object storage service from Amazon Web Services. You might not realize it, but a huge chunk of the Internet relies on Amazon S3, which is why even a brief S3 outage in one location can cause the whole Internet to collectively…well, freak out.
I’m not super interested in getting into the specific details of what object storage is (Wikipedia can help you out there). Instead, I’m more interested in how Amazon S3 and object storage connect to your WordPress site.


The most common use of Amazon S3 is to store all of the files that you would usually store in your WordPress Media Library in the cloud. Essentially, you can store (“offload”) your:
- 🖼️ images
- 📹 videos
- 🎵 audio files
- 📁 PDF documents
- etc.
Beyond that, some people also use S3 to store assets like CSS, JavaScript, etc.
Each Amazon S3 storage area is called a “bucket”. A bucket is basically a collection of files (you can read up about object storage if you want to know how those files are actually stored).
So essentially, rather than storing files on your own server, you’ll store them in a bucket at Amazon S3.
What are the benefits of using Amazon S3 for your WordPress site?
- Reduced requests to server – because your server no longer has to deliver media files (or potentially assets), you can reduce your page load times.
- More affordable storage – if you’re butting up against your host’s storage limits, I can almost guarantee that S3’s storage prices are cheaper than what your host will charge.
- Detached media – because your media files are detached from your site, it’s a heckuva lot easier to move your WordPress site around (like between hosts). You’re basically just moving the PHP files, which takes up almost no space.
- Scalability – because Amazon S3 powers the entire Internet (ok, that’s a bit of hyperbole), you can be pretty confident that Amazon can scale with whatever’s happening to your site.
And here’s the fun part:
Amazon S3 is free for your first year (up to 5GB storage). And even after that, it’s surprisingly affordable.
What’s the difference between Amazon S3 and a CDN?
A lot of people talk about Amazon S3 as if it’s the same as a CDN. I understand why – there are definitely some surface-level similarities that make it easy to confuse the two.
That is, like a CDN, you can opt to load images from Amazon S3 instead of from your WordPress site’s server.
But here’s what’s not like a CDN:
When you create a bucket at Amazon S3, it’s located in one physical location (that you can choose).
A CDN, on the other hand, has distributed locations around the globe.
So in this respect, Amazon S3 actually has more in common with your own server (a single physical location) than a CDN (lots of locations around the globe).
In a nutshell:
Amazon S3: While you can definitely serve files from S3 to your visitors, S3’s primary focus is storage.
CDN: A CDN is focused on delivering files as quickly as possible, rather than affordably storing them (like S3).
Why not just use a CDN, then?
Well, here’s the thing:
You still can use a CDN. It’s surprisingly simple to connect your Amazon S3 bucket to your favorite CDN. You can use it with everything from Cloudflare to KeyCDN to Stackpath.
Amazon Web Services even has their own CDN, called CloudFront, that’s also super easy to connect to Amazon S3.
In fact, that’s how I recommend you do it if you have a global audience.
By using both, you:
- still get the storage benefits of S3
- also get the performance benefits of a CDN
The WordPress S3 connection explained
If you follow the instructions in this post, here’s how your WordPress site is going to function at the end of this WordPress S3 tutorial:
- You upload files to your WordPress Media Library like normal (i.e. through the regular Add Media button)
- Your chosen WordPress S3 plugin automatically copies or moves those files to Amazon S3
- Your WordPress site either serves the file that’s stored on S3 or uses a CDN that’s connected to your S3 bucket
Here’s what you need in order to set up the WordPress S3 integration
To connect WordPress to Amazon S3, you’ll need:
- An Amazon Web Services account – this is free to sign up for.
- A public Amazon S3 bucket – this is free for your first year (up to 5GB). I’ll show you how to create one.
- A WordPress S3 plugin – this helps you automatically offload the files that you upload to WordPress to your S3 bucket.
Which WordPress S3 plugin should you use?
There are a few different WordPress S3 plugins that you can choose from:
- WP Offload Media Lite – has a fairly generous free version, but that free version only works with newly uploaded files. If you go Pro, you’ll also be able to store and serve your assets from S3 and upload existing files. Also makes it very easy to use a CDN later on (if that’s in your plan).
- W3 Total Cache – W3 Total Cache includes a feature that lets you connect your site to Amazon S3 if you choose S3 as your CDN in the W3 Total Cache settings.
- Media Library Folders Pro S3 – lets you manage your WordPress media library with folders while simultaneously offloading all or some of those files to Amazon S3 and maintaining the same folder structure.
- Human Made S3 Uploads – with no actual interface, this GitHub-hosted project from Human Made isn’t built for casual users. But developers should appreciate it. You can read more about it here.
The WordPress S3 plugin that I will use for this tutorial
For this tutorial, I’m going to use WP Offload Media Lite from Delicious Brains because it’s the most well-known option at the time that I’m writing this article.

But here’s the thing about the setup process:
Most of the steps will happen in the Amazon S3 interface and are identical across all plugins. That means you can probably follow most of this guide even if you decide to use one of the other plugins.
The only differences will be the very brief portions that happen inside each plugin’s interface.
How to use WordPress with Amazon S3: step-by-step
Here’s everything that you need to do to start using Amazon S3 with your WordPress site:
It should probably go without saying, but I highly recommend that you back up your site before you begin this process.
Step 1: Install and activate WP Offload Media Lite plugin
You’re not really going to do anything in the plugin’s interface quite yet. But before you jump into the Amazon S3 interface, it’s a good idea to make sure that you have the plugin installed and activated on your site.
When you activate WP Offload Media Lite, it will prompt you to Define your AWS keys.
Over the next few steps, you’ll follow the process to actually generate those keys.
Step 2: Create a new bucket at Amazon S3
If you haven’t already created a free Amazon Web Services account, go ahead and do that now.
Once you create your account, either navigate to the Amazon S3 section from inside your AWS account dashboard or click here to go straight to S3.
In the S3 interface, click the button to Create bucket:


On the popup interface:
- Give your bucket a name
- Choose a Region (make this as close to your target audience as possible, especially if you’re not planning to use a CDN)
- Click Create


Step 3: Set your bucket policy
In order for everything to function properly, you need to make your S3 bucket public. To do that, you use something called a bucket policy.
To add a bucket policy, click on your bucket in the S3 interface:


In the screenshot above, you can see that my other bucket is already public, while the codeinwp bucket that I created for this tutorial is marked as Not public. After this step, you want that Public indicator for your bucket as well.
On the next screen, click on the Permissions tab and then select Bucket Policy:


You should see a JSON code editor. Paste in the below snippet and save your changes.
Make sure to replace codeinwp with the actual name of your bucket:
{
	"Version": "2008-10-17",
	"Statement": [
	{
		"Sid": "AllowPublicRead",
		"Effect": "Allow",
		"Principal": {
			"AWS": "*"
		},
		"Action": "s3:GetObject",
		"Resource": "arn:aws:s3:::codeinwp/*"
	}
	]
}

Once you save your changes, you should see your bucket marked as Public in the Amazon S3 dashboard:


Step 4: Create an IAM user and policy
Now, you need to create something called an IAM user. This user basically allows the plugin to manage your S3 bucket, which is essential if you want the plugin to automatically add the files that you upload to WordPress.
This is the most complicated part of the entire process, so I’m going to break everything down step-by-step and use plenty of screenshots.
Once you finish this process it will give you the AWS keys that the plugin asks for and you’re pretty much finished.
To create your IAM user, go to the IAM area in your AWS account.
From there, select the Users tab:


Then, click on Add user at the top:


In the Add user interface, you need to give your user a name. Then, make sure to select Programmatic access under Access type. Once you’ve done that, click Next: Permissions:


On the next page, select the Attach existing policies directly tab and select Create policy:


That will launch a new window. In that new window, go to the JSON tab and paste in this code snippet:
{
	"Version": "2012-10-17",
	"Statement": [
	{
		"Effect": "Allow",
		"Action": [
			"s3:CreateBucket",
			"s3:DeleteObject",
			"s3:Put*",
			"s3:Get*",
			"s3:List*"
		],
		"Resource": [
			"arn:aws:s3:::codeinwp",
			"arn:aws:s3:::codeinwp/*"
		]
	}
	]
}
Make sure to replace the two instances of codeinwp with the actual name of your Amazon S3 bucket.
Then, click Review policy at the bottom:


On the next screen, give it a name and then click Create policy:


Now:
- Go back to the IAM Add User tab from before
- Click Refresh
- Select the policy that you just created from the list (you can search for it by name to save time)
- Click Next: Review


On the next screen, click Create user:


On the next screen, you should see:
- Access key ID
- Secret access key (you’ll need to click Show to actually see the secret key)


Keep both these values handy because you’re going to need them in the next step.
Step 5: Add access keys to wp-config.php file
Phew! You’re officially done with the AWS interface.
Now, you can head back to the friendly confines of your WordPress site.
Specifically, you need to edit your wp-config.php file. You can either do this via FTP or via cPanel file manager.
Add the code snippet below to your wp-config.php file, making sure to replace the asterisks with your actual keys from the previous step:
define( 'AS3CF_AWS_ACCESS_KEY_ID', '********************' );
define( 'AS3CF_AWS_SECRET_ACCESS_KEY', '**************************************' );
Here’s how it looks in my site’s wp-config.php file:


Make sure to save your changes.
Step 6: Select S3 bucket in WP Offload Media Lite settings
Now, go to Settings → Offload S3.
Type your S3 bucket’s name in the What bucket would you like to use? field and click Save Bucket:


Once you save your changes, you should see the full plugin’s interface:


Note – because of how I had you set up the IAM user policy, the buttons to Browse existing buckets or Create new bucket will not work. This is actually intentional as it’s more secure.
If you don’t like sacrificing this functionality for security, you can change the IAM user policy to the policy outlined here. But, as you’ll see in that same article, Delicious Brains recommends the method that I used as a more secure approach in the BUCKET RESTRICTIONS section.
Step 7: Configure Offload S3 settings (if desired)
At this point, you’re pretty much fully set up. Any new files that you upload will automatically be offloaded to Amazon S3. Additionally, the plugin will automatically rewrite the file URLs for those files so that the file is served from Amazon S3 instead of your server.
You can test this by uploading a new media file and looking at the source code when you insert it:


If you want the plugin to upload existing files to Amazon S3, though, you’ll need the premium version.
If you want to adjust any of the plugin’s functionality, you can make changes here. But for most situations, the default settings should be just fine.
Step 8: (Optional) Connect Amazon S3 to a CDN
Like I said at the beginning, it’s possible to use a CDN in conjunction with Amazon S3.
Showing you how to do this for every single CDN provider would require a lengthy post of its own, but I can give you some pointers.
If you want to connect to Amazon CloudFront, you can do it right from your AWS account by following this tutorial.
For origin pull CDNs like KeyCDN or Stackpath, pretty much all you need to do is enter your Amazon S3 bucket URL in the Origin URL box when you set up your CDN.
To find your S3 bucket URL, just follow this format:
https://bucket_name.s3.amazonaws.com/
For example:
https://codeinwp.s3.amazonaws.com/
And it’s even possible to use Cloudflare with Amazon S3 (though you may need to rename your bucket).
Once you get your CDN set up, you can use WP Offload Media Lite’s CloudFront or Custom Domain option to rewrite the file URLs to use your CDN instead of your S3 bucket:


If you opted to use one of the other WordPress S3 plugins, the CDN Enabler plugin can do pretty much the same thing.
WordPress S3: A helpful partnership
By using a WordPress S3 plugin, you can easily offload your files and take advantage of Amazon Web Services’ infrastructure.
While the process might take 30 minutes or so to get set up, once you’ve knocked it out the WordPress S3 integration is pretty pain-free and shouldn’t require any further work.
Have any other questions about connecting your WordPress site to Amazon S3?
Leave a comment and we’ll do our best to help out!
Don’t forget to join our crash course on speeding up your WordPress site. With some simple fixes, you can reduce your loading time by even 50-80%:


Layout and presentation by Karol K.