
Plugins – Permissions Fail
Fixing – Plugin Update Fail
https://techubber.blogspot.com/2017/09/how-to-fix-wordpress-plugin-update-failed-solutions.html
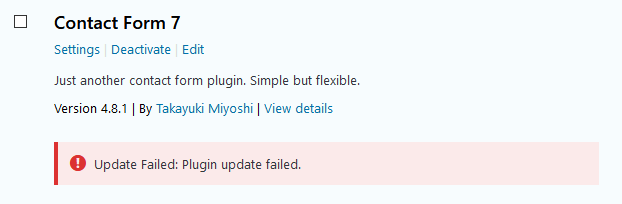
Alright, so I had some notifications in a WordPress website to update some plugins, which is damn easy in WordPress. Yes, just click update and finish. But no, this time, a new situation had cropped up. On clicking on ‘Update’ from the interface, I got the message “Update Failed: Plugin update failed“. I immediately turned to Google, searched for solutions others have tried for this WordPress plugin update failed error. Here are a few things findings and solution that worked for me.
Before we go to the possible solutions, here is a brief about recommended default permissions for files and folders for any website, WordPress or otherwise.
- 755 for all folders and sub-folders.
- 644 for all files.
- r if reading is permitted, – if it is not.
- w if writing is permitted, – if it is not.
- x if execution is permitted, – if it is not.
In numeric notation, file permission may be shown as 755, which means,
OWNER has permission 7 or 111 (in binary) or rwx
GROUP has permission 5 or 101 (in binary or r-x
OTHERS has permission 5 or 101 (in binary or r-x
So symbolically 755 means rwxr-xr-x
where the first there letters denote the permission for OWNER, the middle three letter denotes the permission for GROUP and the last three letters denote permissions for OTHERS.
| Permission: 755 | ||||
| read | write | execute | numerically | |
| Owner | 1 | 1 | 1 | 7 |
| Group | 1 | 0 | 1 | 5 |
| Others | 1 | 0 | 1 | 5 |
| read | write | execute | numerically | |
| Owner | r | w | x | 7 |
| Group | r | – | x | 5 |
| Others | r | – | x | 5 |
Similarly, 644 means 110100100 or rw-r–r–
OWNER has permission rw-
GROUP has permission r–
OTHERS has permission r–
In web host file manager, you may have a web interface from where you can change file permission such as in the image given below:

Solution 1. Chmod the upgrade directory to 777
One of the solutions recommended for the “Update Failed: Plugin update failed” is to change the permission of the upgrade directory to 777.
Where is the Upgrade directory in WordPress?
It’s at wp-content/upgrade
After you change the permission to 777 and updated the plugin, make sure to change the permission back to 644.
Solution 2. Delete upgrade directory and recreate it.
The solution to change the permission of the ‘Upgrade’ directory did not work in my case. So I turned to the next solution – apparently. And that is to delete the ‘upgrade’ directory and then recreate it.
So again, we can delete the ‘upgrade’ directory from the web based file manager provided by the host or via FTP client. Simply delete the ‘upgrade’ directory and recreate it. Make sure the permission is 644 after you create the directory.
Go back to the WordPress dashboard and try to update the plugin again.
Well, this worked in my case. And I did not bother to dig further why and how.
Other solutions that others reported to have worked for “Update Failed: Plugin update failed” in WordPress are:
Disabling Ask Apache Password Protect Plugin
I did not have this plugin so I could try this. But if you have ‘Ask Apache Password Protect’ plugin installed, try disabling this plugin and try the other plugin update.
No hard disk space left?
Unless you are on a very tight hosting plan, the chances of hard disk space running out is rare. Or if due to some reason, a lot of big files got generated and you have not done any maintenance, then chances are that you may be running out of disk space.
If you receive any of the error messages:
- Could not remove the old plugin
- Plugin upgrade Failed or Unpacking the update
- Could not copy file /public_html/wp-content/xxxx
Then, you might want to have a look at your web hard disk space. If it is so, do some maintenance, clear some backups you don’t need, clear some space and then try the plugin update again.
These are a few solutions I have encountered and a solution I tried from among the solutions. Let me know which one worked for you or if you have other solutions to resolve this issue – “Update Failed: Plugin update failed“.
@import url(https://clickety-clack.click/wp-content/plugins/siteorigin-panels/css/front-flex.min.css); #pgc-108703-0-0 { width:61.8034%;width:calc(61.8034% – ( 0.38196600790794 * 30px ) ) } #pgc-108703-0-1 { width:38.1966%;width:calc(38.1966% – ( 0.61803399209206 * 30px ) ) } #pl-108703 .so-panel { margin-bottom:30px } #pl-108703 .so-panel:last-child { margin-bottom:0px } #pg-108703-0.panel-no-style, #pg-108703-0.panel-has-style > .panel-row-style { -webkit-align-items:flex-start;align-items:flex-start } @media (max-width:780px){ #pg-108703-0.panel-no-style, #pg-108703-0.panel-has-style > .panel-row-style { -webkit-flex-direction:column;-ms-flex-direction:column;flex-direction:column } #pg-108703-0 > .panel-grid-cell , #pg-108703-0 > .panel-row-style > .panel-grid-cell { width:100%;margin-right:0 } #pgc-108703-0-0 { margin-bottom:30px } #pg-108703-0 { margin-bottom:px } #pl-108703 .panel-grid-cell { padding:0 } #pl-108703 .panel-grid .panel-grid-cell-empty { display:none } #pl-108703 .panel-grid .panel-grid-cell-mobile-last { margin-bottom:0px } }