
Using NAS as a VPN server
https://www.asustor.com/en/online/College_topic?topic=323
COURSE OBJECTIVES
Upon
completion of this course you should be able to
1. Be able to use your ASUSTOR NAS as a VPN
server and connect to it using Windows and Mac.
PREQUISITES
Course Prerequisites:
None
Students are
expected to have a working knowledge of:
N/A
OUTLINE
1.1 Enabling and configuring PPTP
connections
1.2 Enabling and configuring OpenVPN
connections
1.3 Enabling
and configuring L2TP connections
2.1.1 Connecting using
Windows 7
2.2.1 Connecting using
Windows 7
2.3 Configuring the gateway and routing for the
VPN client
2.3.1 Configurations
using Windows 7
2.3.3 Configurations
using a Mac
2.4 Connecting to your VPN server via L2TP/Ipsec
1. Configuring Your VPN Server
In the following example, we wil configure
ASUSTOR NAS’s VPN Server.
Before you begin, log in to ADM from your
Web browser and then search for and install [VPN Server] from [App
Central].
1.1 Enabling and configuring PPTP connections
STEP
1
Enabling
PPTP service: You can use the toggle found under [PPTP] to enable PPTP service.

STEP
2
Adding
a new user: Select [Privilege] → [User] → [Add]. In the graphic
below, we have chosen to add the account “vpn” as an example. After you have
chosen the user that wish to add, click on [Save].
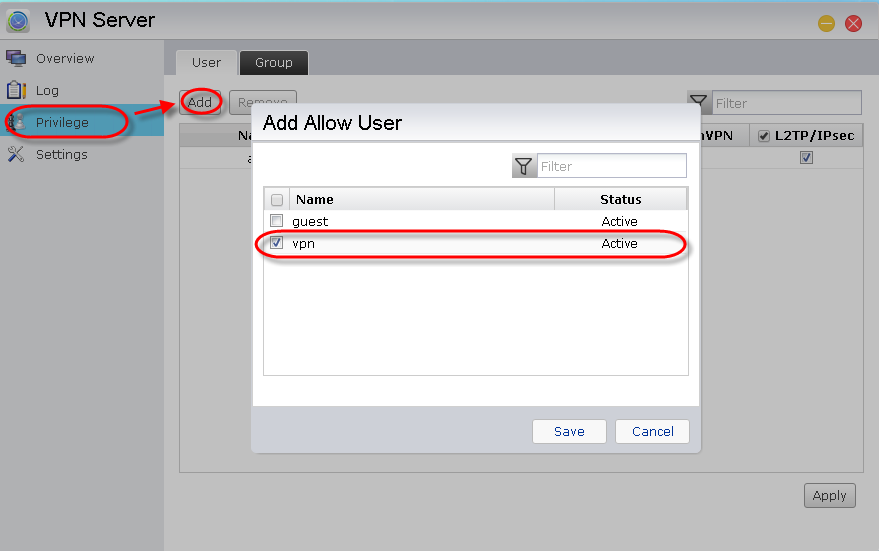
Select the [PPTP] checkbox and then click on [Apply]. Now, the “vpn” user account
will be able to utilize PPTP connections.

STEP
3
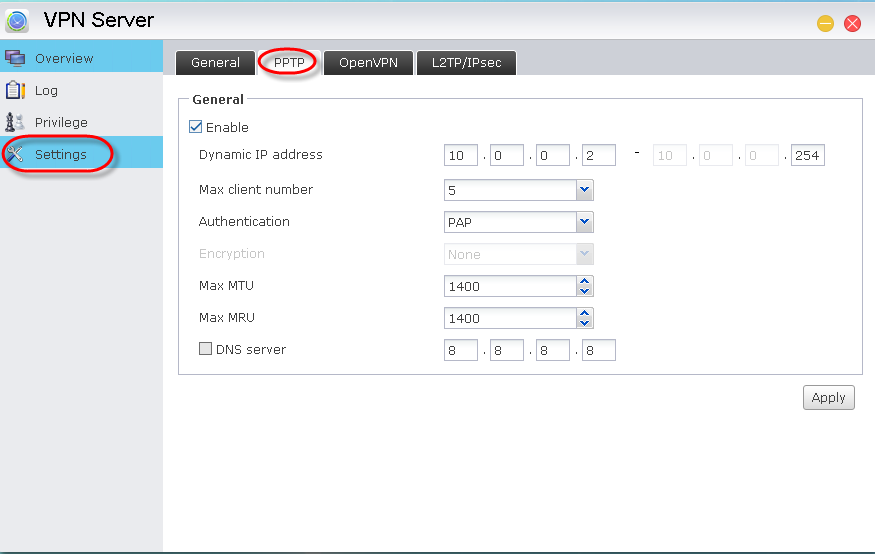
Configuring
advanced settings: Select [Settings] → [PPTP]. Here, you will be
able to configure settings for [Dynamic
IP address], [Max. client number], [Authentication], [Max. MTU], [Max. MRU] and [DNS server].
Make sure to click on [Apply] after
you have made any changes to the settings.
1.2 Enabling and configuring OpenVPN connections
STEP
1
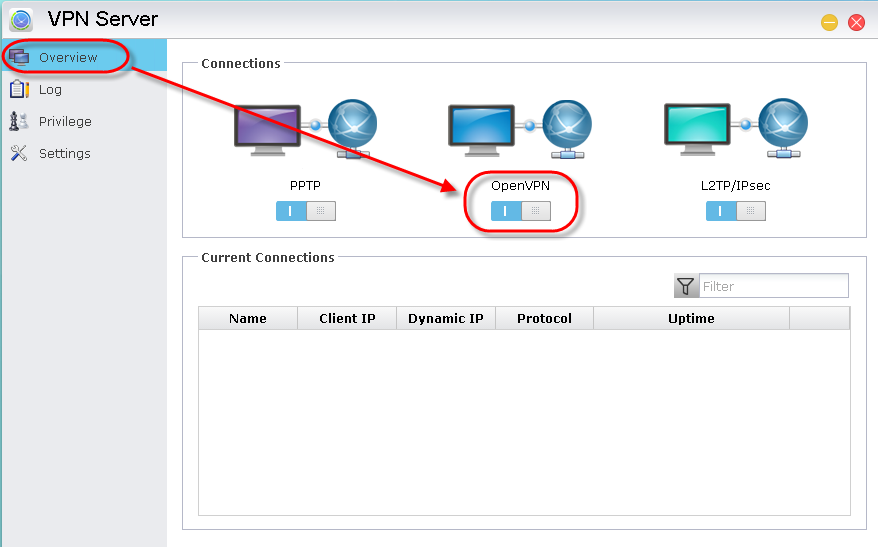
Enabling
OpenVPN service: You can use the toggle found under [OpenVPN] to enable OpenVPN service.
STEP
2
Adding
a new user: Select [Privilege] → [User] → [Add]. In the graphic
below, we have chosen to add the account “vpn” as an example. After you have
chosen the user that wish to add, click on [Save].

Select the [OpenVPN] checkbox and then click on [Apply]. Now, the “vpn” user account
will be able to utilize PPTP connections.
STEP
3
Configuring
advanced settings: Select [Settings] → [OpenVPN]. Here, you will be
able to configure settings for [Dynamic
IP address], [Transmission Protocol], [Port], [Max. client number], [Checksum
(Digest)], [Encryption (Cipher)], [DNS server], [Redirect gateway] and [VPN
link compression]. Make sure to click on [Apply] after you have made any changes to the settings.

Note: Click on the [Download
configuration file] button to download the configuration file for
OpenVPN clients. You must import this file to your VPN client in order to
successfully create OpenVPN connections.
1.3 Enabling and configuring L2TP connections
STEP 1
Enabling L2TP service: Enable XL2TP service by using the provided toggle button.
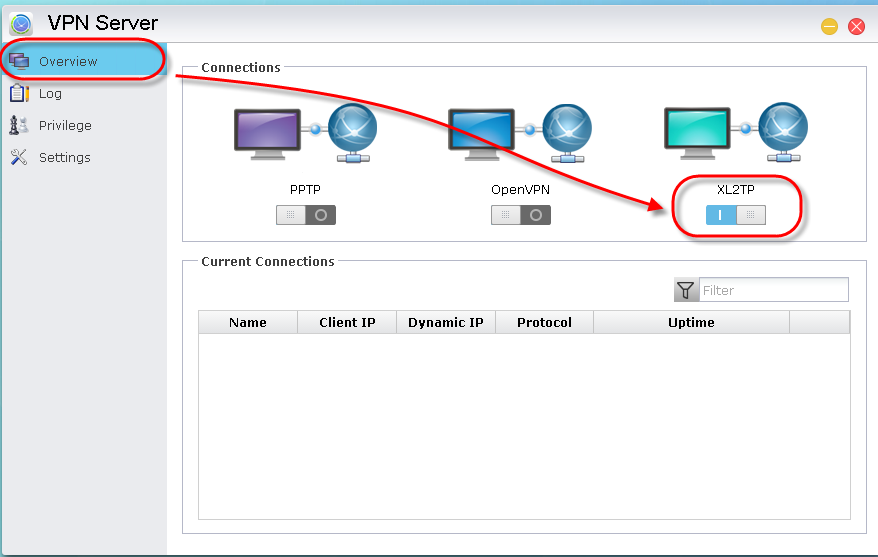
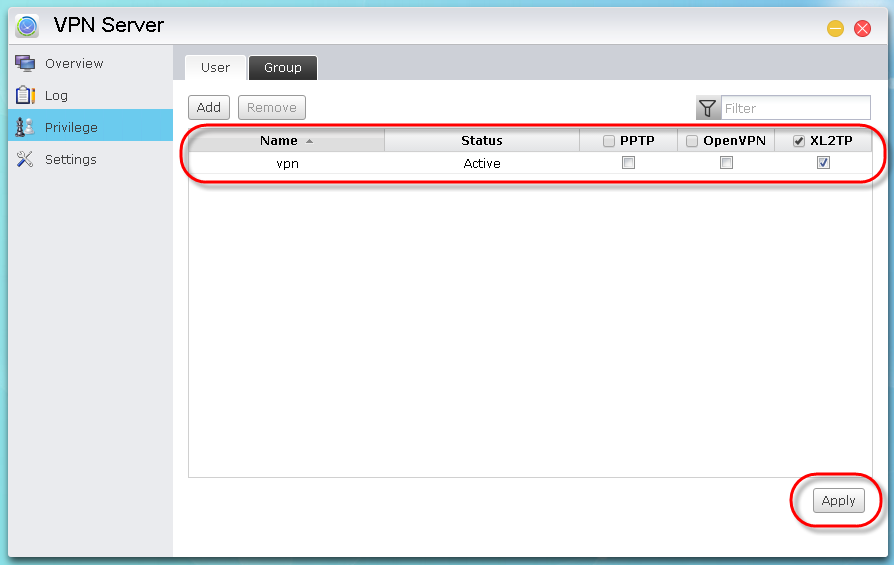
STEP 2
Add new users: Select [Privilege] > [User] > [Add]. In this example we add the user “vpn” by selecting its checkbox and then clicking on [Save].
For the added user, select the [XL2TP] checkbox and then click on [Apply]. This will allow the user to use XL2TP connections.
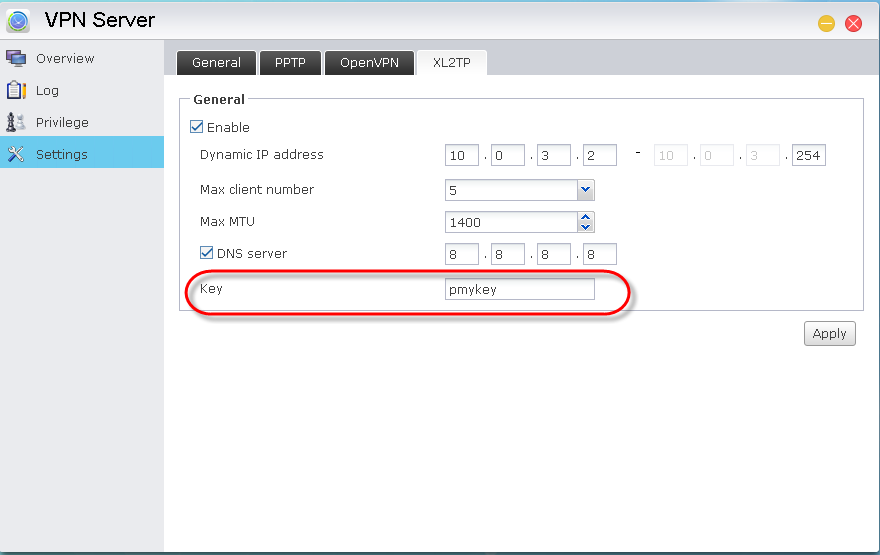
STEP 3
Modifying advanced settings: Click on [Settings] >[XL2TP]. Here you will be able to configure settings such as the dynamic IP address, max client number, max MTU, DNS server and key. Make sure to click on [Apply] once you are done modifying the settings.

2. Connecting to Your VPN
Server Using Windows and Mac
2.1 Connecting to your VPN server via
PPTP
2.1.1 Connecting using Windows 7
STEP
1
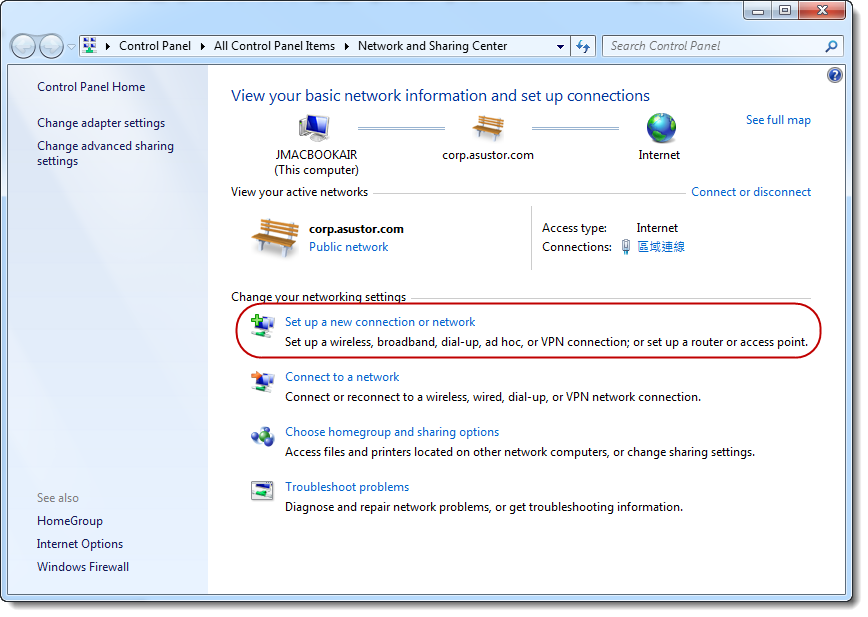
Select [Control
Panel] → [All
Control Panel Items] → [Network and Sharing Center] → [Set
up a new connection or network].
STEP
2
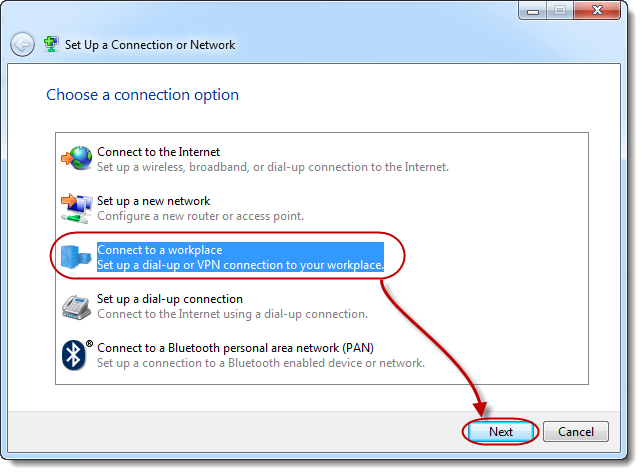
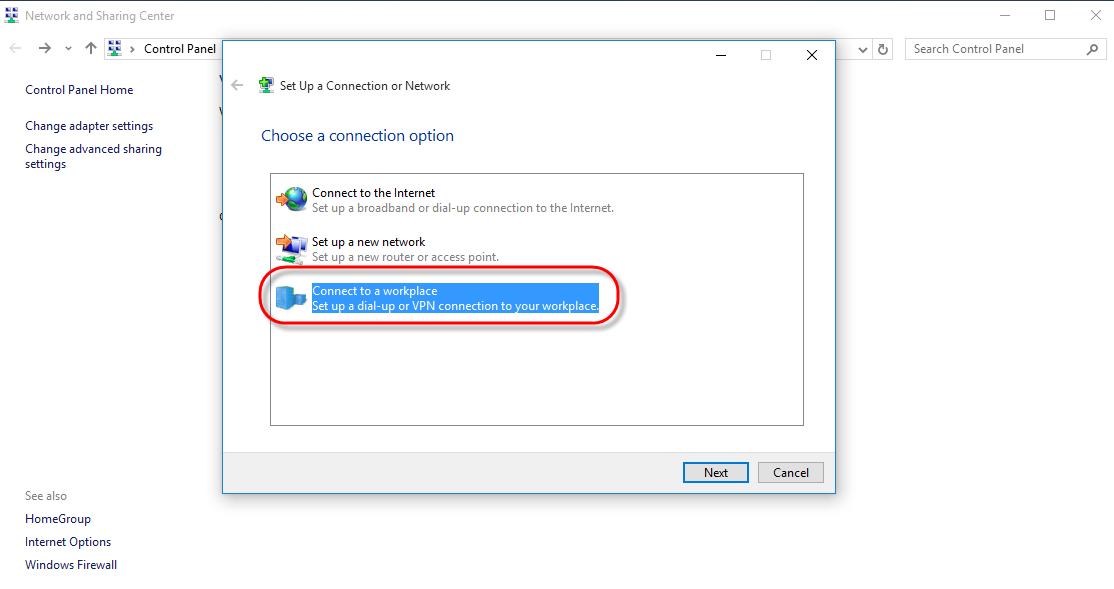
Select [Connect
to a workplace] → [Next].

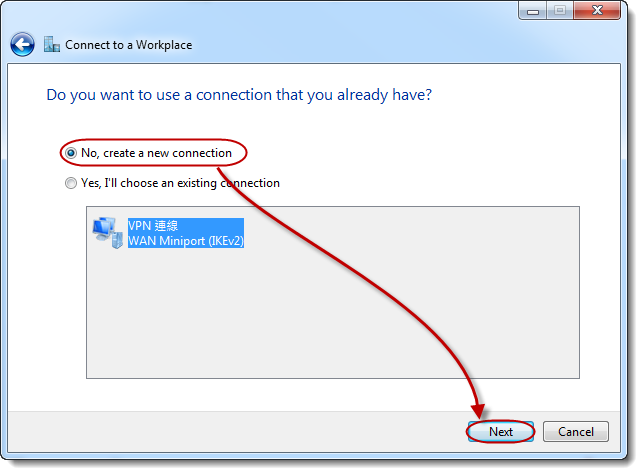
STEP
3
Select [No, create a new connection] → [Next].
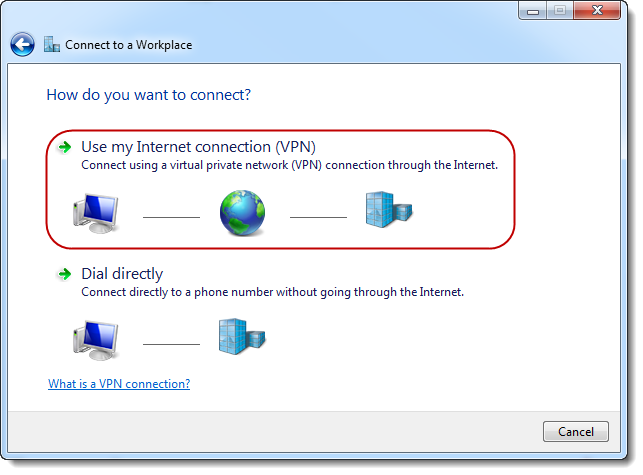
STEP
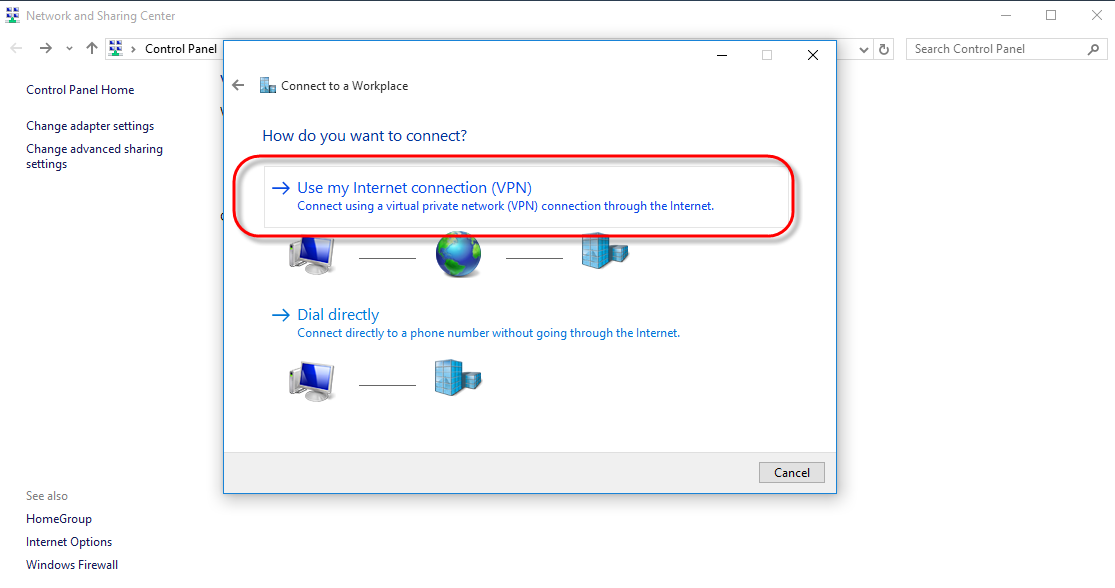
4
Select [Use my Internet connection (VPN)].
STEP
5
Enter
the IP address of your ASUSTOR NAS into the [Internet address] field and then click on [Next].
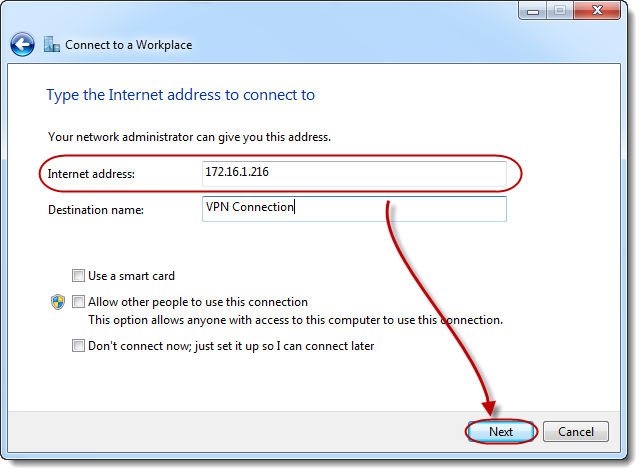
STEP 6
Enter a username and password in the appropriate fields and then click
on [Connect]. You will now be able
to access your ASUSTOR NAS through Windows.

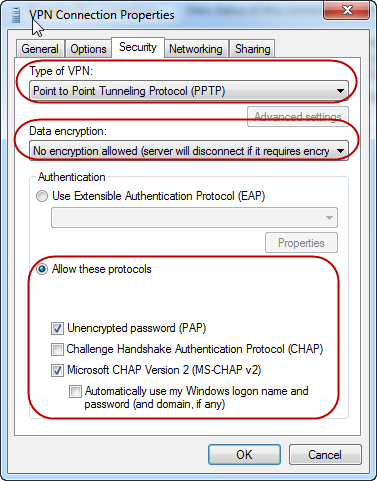
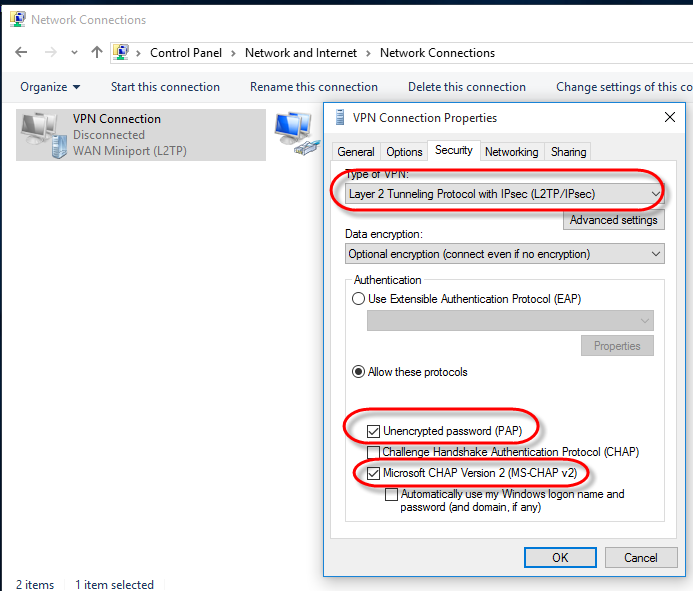
Note: If you are unable to connect to your
VPN server, please ensure that your VPN settings are identical to your VPN
server settings.
For example, in the graphic below, we check
that the [Type of VPN] is Point to Point Tunneling Protocol (PPTP),
that the [Data encryption] method is PAP or MS-CHAP v2 and that they have been allowed under the [Allow these protocols] radio button.
2.1.2 Connecting using Windows 10
STEP
1
Click the [Network] icon on the bottom right-hand
side of the system tray and select [Network
Settings].

STEP
2
Select [VPN] from the left panel, and click [Add a VPN connection].

STEP
3
Select Windows (built-in) in [VPN
Provider] field. Type in the name for this VPN connection and enter the IP address of your ASUSTOR NAS into the [Server name or address] field. Choose PPTP as the [VPN Type], enter the username/password in the
appropriate fields, and click [Save].

STEP
4
Now you can see that the
newly created VPN connection has appeared. To specify the authentication protocol,
please click [Change adapter options].

Right click on the VPN
connection and select [Properties].

STEP
5
Select the [Security] tab, check the [Allow these protocols] option, then
choose the same protocol (PAP or MS-CHAP v2) as the VPN server on your ASUSTOR
NAS. Click [OK] to save the
settings.

STEP
6
To establish the VPN
connection, go to the Windows [NETWORK
& INTERNET] > [VPN] page,
select an existing VPN profile and click [Connect].

2.1.3 Connecting using a Mac
STEP 1
From the Apple menu, select [System Preferences…].

STEP 2
Select [Network].

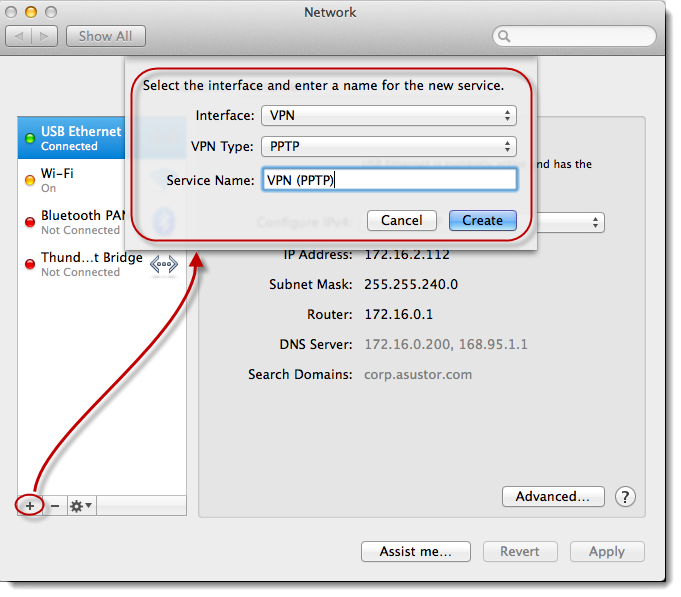
STEP
3
Click on the [ + ] button and then select [VPN] for Interface, [PPTP] for VPN Type,
fill in the Service Name as “VPN (PPTP)”
and then click on [Create].
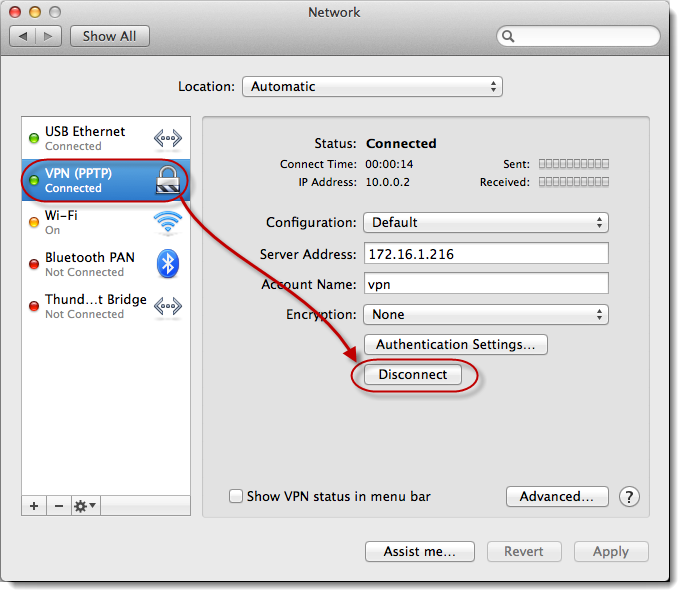
STEP
4
Enter your [Server Address] and [Account
Name], select “None” for [Encryption] and then click on [Connect]. Please ensure that your VPN
client settings and VPN server settings are identical.

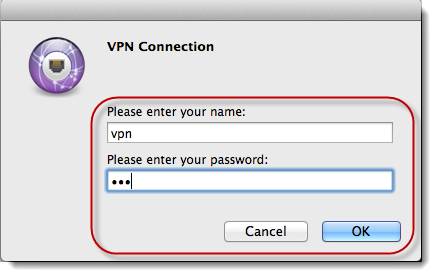
STEP 5
Enter the name and password for
your VPN server and then click on [OK].
STEP
6
You should now be successfully connected and should be able to access
your ASUSTOR NAS using your Mac. You can disconnect the connection at any time
by clicking on the [Disconnect] button.
2.2 Connecting to your VPN server via OpenVPN
2.2.1 Connecting using Windows 7
STEP
1
Download and
install the OpenVPN program from the OpenVPN website.

STEP
2
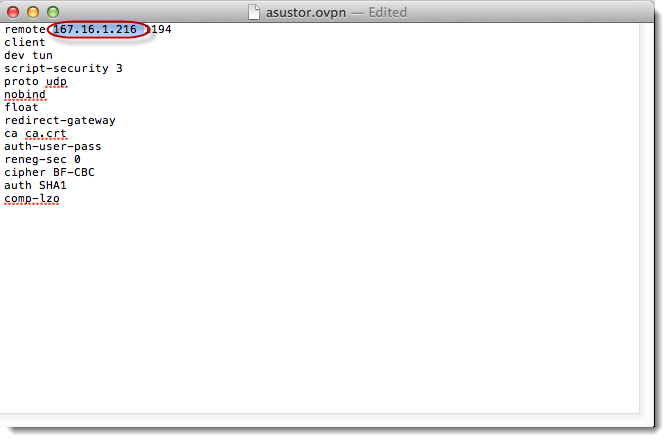
Extract the OpenVPN configuration file that you
have downloaded from your ASUSTOR NAS’s VPN server (see section 3.2). Open the [asustor.ovpn] file, change the IP
address for the VPN server and then save the changes. In the graphic below, we
have changed the IP address of the VPN server to 172.16.2.102.

STEP
3
Copy the [asustor.ovpn] and [ca.crt] files to the (C:Program
FilesOpenVPNconfig) folder.

STEP
4
Open [OpenVPN GUI].
You
should now be able to see the [OpenVPN
GUI] icon in your system tray. Double-click on it.
![]()
STEP
5
Enter the username and
password for your ASUSTOR NAS VPN server and then click on [OK].

STEP
6
After
successfully connecting, you should be able to see that the OpenVPN GUI icon in
your system tray has turned green. You should now be able to access your
ASUSTOR NAS using Windows.
![]()
2.2.2 Connecting using a Mac
STEP
1
Download tunnelblick.

STEP
2
Install [Tunnelblick].
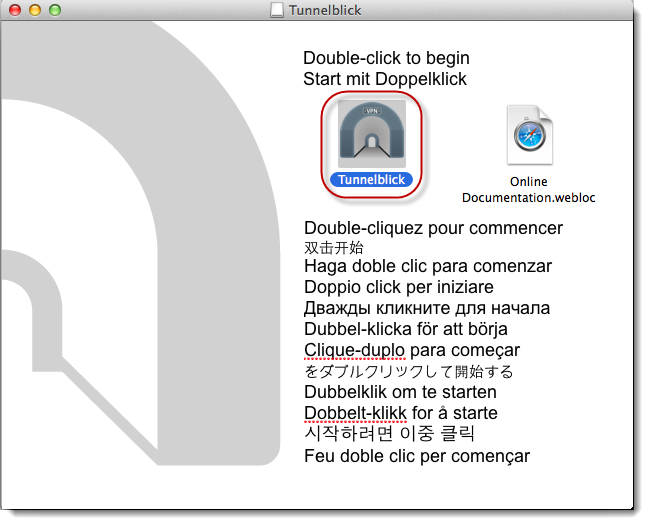
After
installation, click on [Launch].

STEP
3
Click
on [I have configuration files].
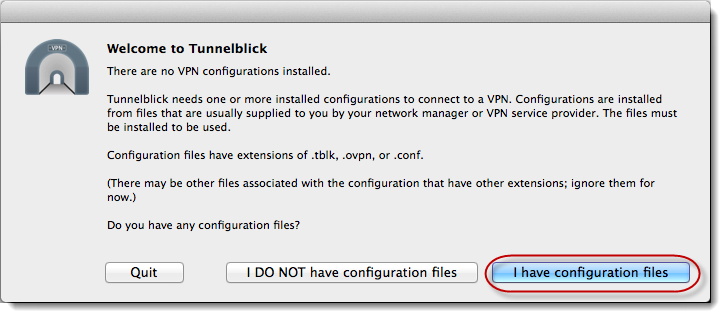
If
you have already download the configuration file from your ASUSTOR NAS’s VPN
server, click on [OpenVPN
Configuration(s)].

You should now be able to
see the newly created [Empty Tunnelblick
VPN Configuration] folder on your desktop. Copy the configuration file from
your ASUSTOR NAS’s VPN server to this folder.
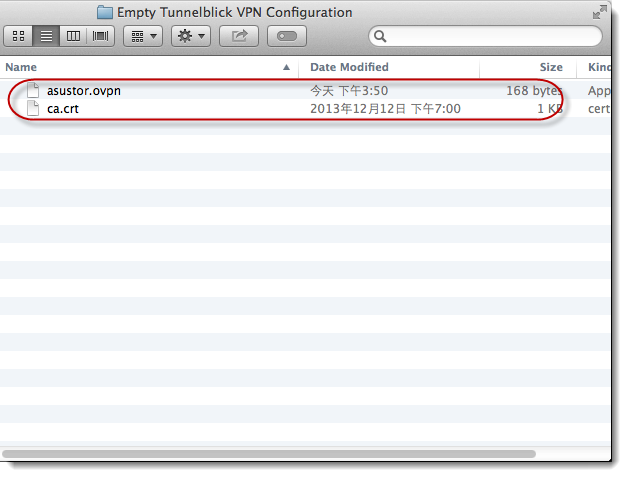
Open
the [asustor.ovpn] file and then
change the IP address for your ASUSTOR NAS VPN server.
After
saving the changes to the file, change the name of the folder to “ASUSTORVPN.tblk”.

Tunnelblick
VPN configurations should have now been installed successfully.

STEP
4
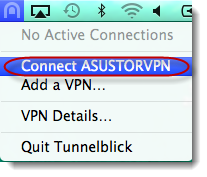
From
the Mac menu bar, click on the [Tunnelblick] icon and then select [Connect
ASUSTORVPN].
STEP
5
After
successfully connecting, you will be able to see the connection status and time
in the menu bar as shown in the graphic below.

2.3 Configuring the gateway and routing for the VPN client
When
using a VPN client, the system will automatically forward your VPN server’s default gateway.
Under these circumstances, you will not be able to connect to the Internet.
Therefore, we must change the VPN gateway and routing in order to connect to
the Internet.
2.3.1 Configurations using Windows 7
STEP
1
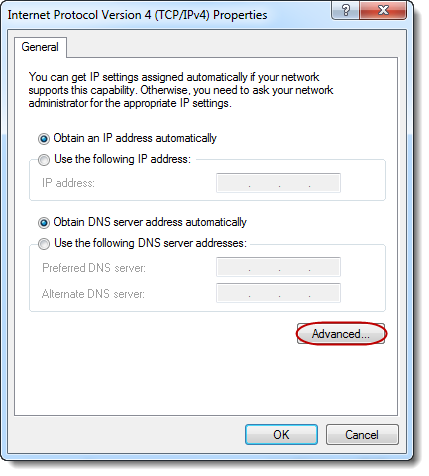
Right-click
on your VPN connection and then select [Properties].
Select [Internet
Protocol Version 4 (TCP/IPv4)] and
then click on [Properties].

STEP
2
Click
on [Advanced…].
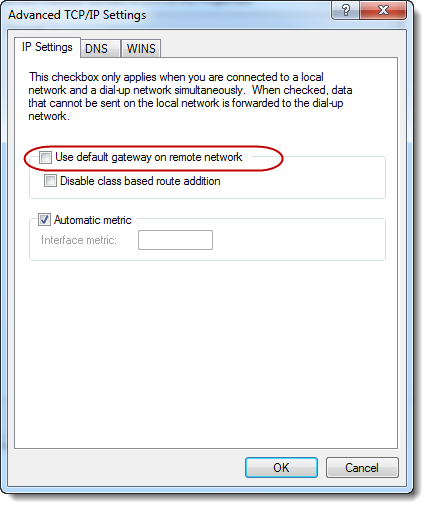
STEP
3
Uncheck
the [Use default gateway on remote
network] checkbox.
2.3.2 Configurations using Windows 10
STEP
1
Click the
Windows icon on the bottom left-hand side of the taskbar, select [All apps] from
the list, and scroll down to find [Windows Powershell].
Click on it to execute the program.

STEP
2
Issue
the ”Get-VpnConnection” command
to list the information of your existing VPN connections.
By
default, the value of the SplitTunneling parameter is False, which means all
network traffic of this VPN client will be forwarded to the VPN server’s
gateway.

STEP
3
Issue the “Set-VpnConnection
-Name “ASUSTOR VPN” -SplitTunneling $True”
command to change the value of the SplitTunneling parameter to True.
Note: The “ASUSTOR NAS” string in the example above
must be replaced to your own VPN connection name.

STEP
4
Issue the ”Get-VpnConnection” command again to verify that the change has been made successfully.

2.3.3 Configurations using a Mac
STEP
1
Open [Terminal] and
then enter the command “ifconfig-a”. You
will now be able to see your VPN server’s IP address. Note that the Mac operating
system only provides this gateway for connecting to a VPN server and cannot
connect to the Internet. Therefore, we will have to manually enter the IP
address for the ASUSTOR NAS.

STEP
2
Please
replace either 10.0.1.6 or 10.0.1.5 with the IP address of the ASUSTOR NAS.
Executing the commands below will allow you to connect to the Internet.
|
sudo route OR
sudo route |
2.4 Connecting to your VPN server via L2TP/IPsec
2.4.1 Connecting using Windows 7
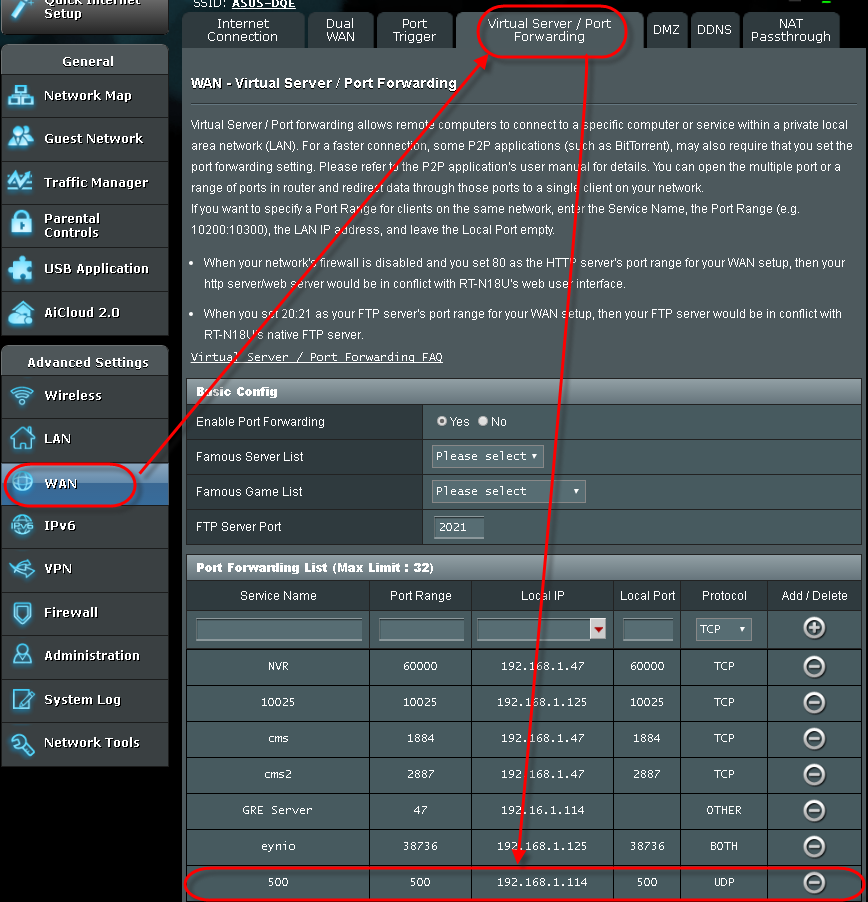
If you are using an ASUS router, please manually open port 500 under port forwarding. From the router configuration interface, select [WAN] [Virtual Server / Port Forwarding] tab [Port Forwarding List]. Add a new item to the Port Forwarding list by entering the following information:
Service Name: A name of your choice
Port Range: 500
Local IP: Your NAS’s IP address
Local Port: 500
Protocol: UDP
Click on the [Add] button after you have entered all the information. Port 500 should now be opened.
STEP 1
In Windows, go to [Control Panel] > [All Control Panel Items] > [Network and Sharing Center] and then click on [Set up a new connection or network].

STEP 2
Select [Connect to a workplace] then click [Next].
STEP 3
Select [No, create a new connection] and then click [Next].
STEP 4
Select [Use my Internet connection (VPN)]

STEP 5
In the [Internet address:] field enter your ASUSTOR NAS’s IP address or domain address.
STEP 6
Enter your [User name] and [Password] and then click on [Connect]. You will now be able to access the local network resources on your ASUSTOR NAS via Windows.

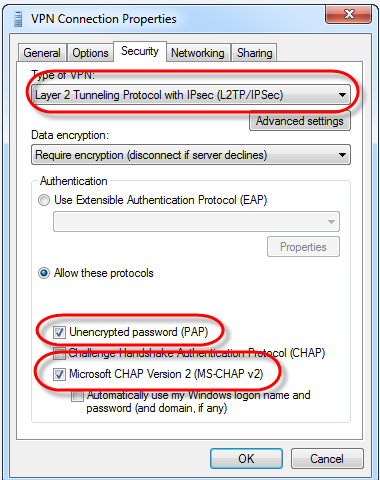
Note: If you are unable to connect to the VPN Server, please ensure that the [VPN Settings] and [VPN Server] settings are identical.
Using the graphic below as an example, we check that the [Type of VPN] is L2TP/IPSec, that the data encryption method is either PAP or MS-CHAP v2 and that [Allow these protocols] radio button has been selected.
STEP 7
Click on [Start] and run “regedit”.

STEP 8
Navigate to HKEY_LOCAL_MACHINE\SYSTEM\CurrentControlSet\Services\PolicyAgent and then right click and select [New] > [DWORD (32 bit) Value].

STEP 9
For the Value name enter “AssumeUDPEncapsulationContextOnSendRule”and set the Value data to “2” and then click [OK]. Restart your computer.

STEP 10
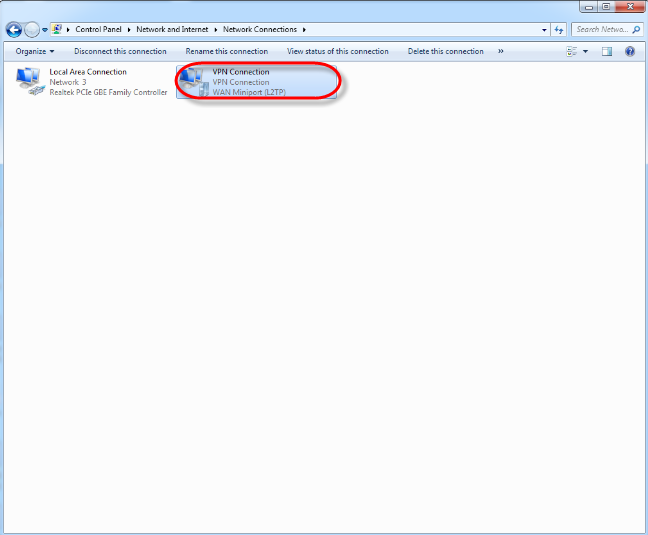
After restarting your computer, go to [Control Panel] > [Network and Internet] > [Network Connections] to see that your new connection is successful.
2.4.2 Connecting using Windows 10
If you are using an ASUS router, please manually open port 500 under port forwarding. From the router configuration interface, select [WAN] > [Virtual Server / Port Forwarding] tab > [Port Forwarding List]. Add a new item to the Port Forwarding list by entering the following information:
Service Name: A name of your choice
Port Range: 500
Local IP: Your NAS’s IP address
Local Port: 500
Protocol: UDP
Click on the [Add] button after you have entered all the information. Port 500 should now be opened.
STEP 1
Click on the [Network] icon in the system tray and then click on [Open Network and Sharing Center].

STEP 2
Click on [Set up a new connection or network].
STEP 3
Select [Connect to a workplace] then click [Next].
STEP 4
Click on [Use my Internet connection (VPN)].
STEP 5
Enter the Internet address, Destination name and then select the [Allow other people to use this connection] checkbox. Click on [Create] once you are done.

STEP 6
Click on [Change adapter settings]. Right-click on the VPN connection that you have just created and select [Properties]. Click on the [Security] tab and change the [Type of VPN] to L2TP/IPsec. Click on [Advanced settings], make sure the [Use preshared key for authentication] radio button is selected and then enter your key (Your key can be found from the ADM interface by selecting [VPN Server] > [Settings] > [L2TP]). Click on [OK] once you are done.
STEP 7
Click on [Start] and run “regedit”.

STEP 8
Navigate to HKEY_LOCAL_MACHINE\SYSTEM\CurrentControlSet\Services\PolicyAgent and then right click and select [New] > [DWORD (32 bit) Value].
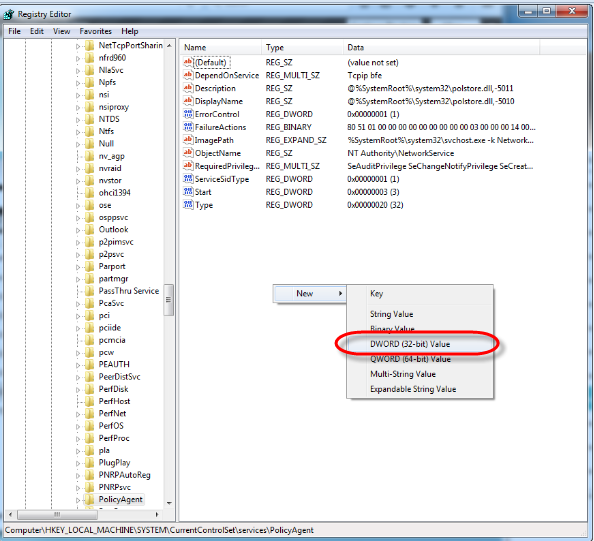
STEP 9
For the Value name enter “AssumeUDPEncapsulationContextOnSendRule”and set the Value data to “2” and then click [OK]. Restart your computer.
2.4.3 Connecting using a Mac
If you are using an ASUS router, please manually open port 500 under port forwarding. From the router configuration interface, select [WAN] > [Virtual Server / Port Forwarding] tab > [Port Forwarding List]. Add a new item to the Port Forwarding list by entering the following information:
Service Name: A name of your choice
Port Range: 500
Local IP: Your NAS’s IP address
Local Port: 500
Protocol: UDP
Click on the [Add] button after you have entered all the information. Port 500 should now be opened.
STEP 1
Click on the [Apple] icon and then select [System Preferences…].

STEP 2
Click on [Network].

STEP 3
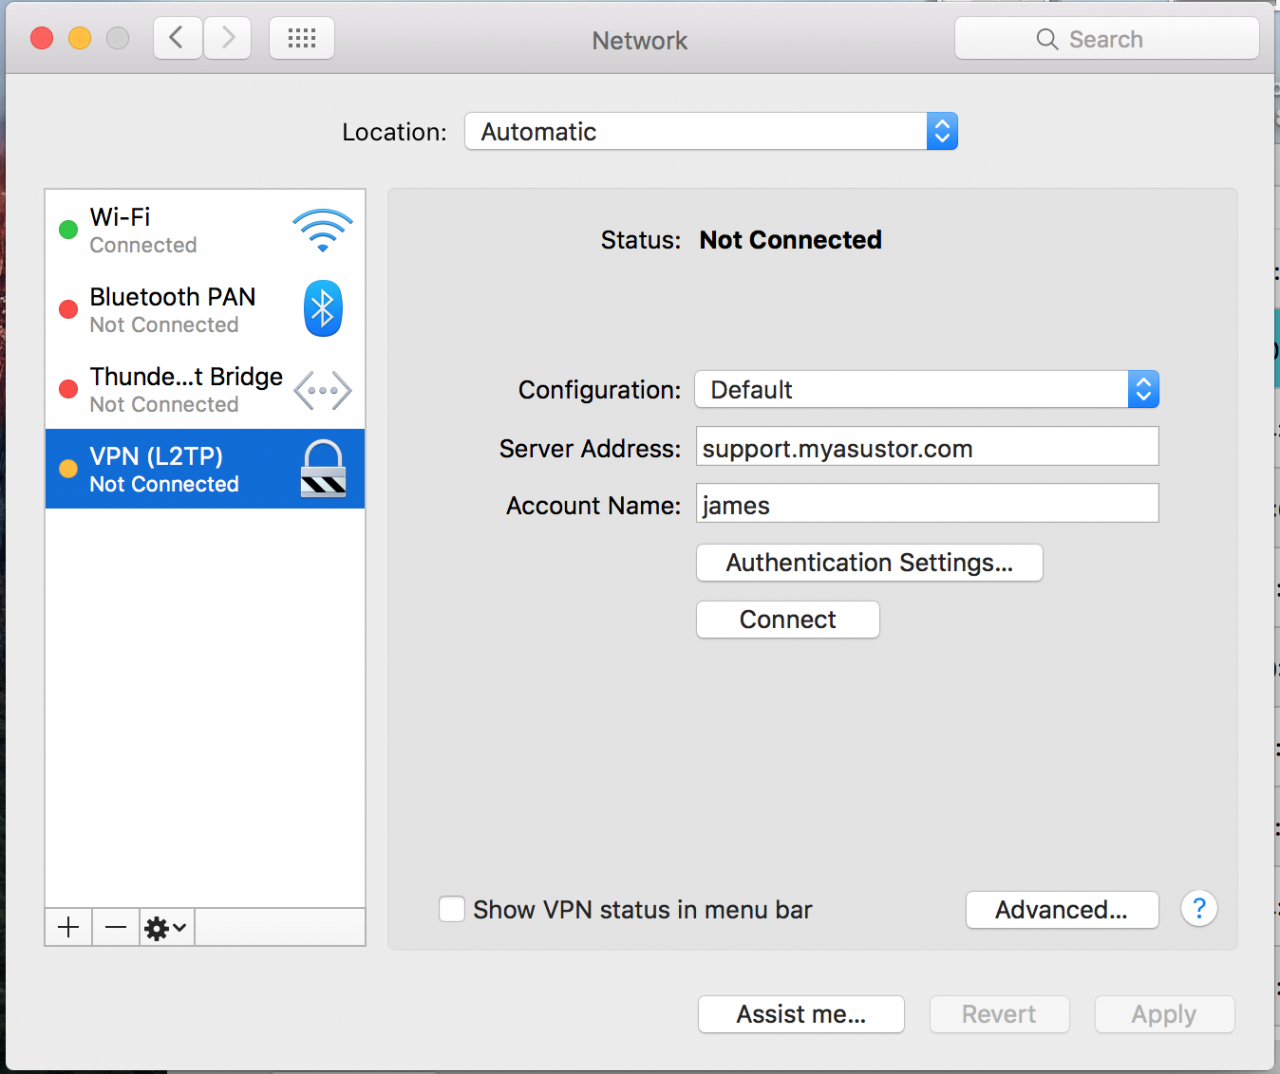
Click on the + button, select [VPN] for “Interface:”, [L2TP Over IpSec] for “VPN Type”, enter a Service Name and then click on [Create].

STEP 4
Enter your [Server Address] and [Account Name]. Click on [Authentication Settings…] and enter the User Account Password and Shared Secret (The Shared Secret is the key that can be found from the ADM interface by selecting [VPN Server] > [Settings] >[XL2TP]).
Click [OK] and then click on [Connect].

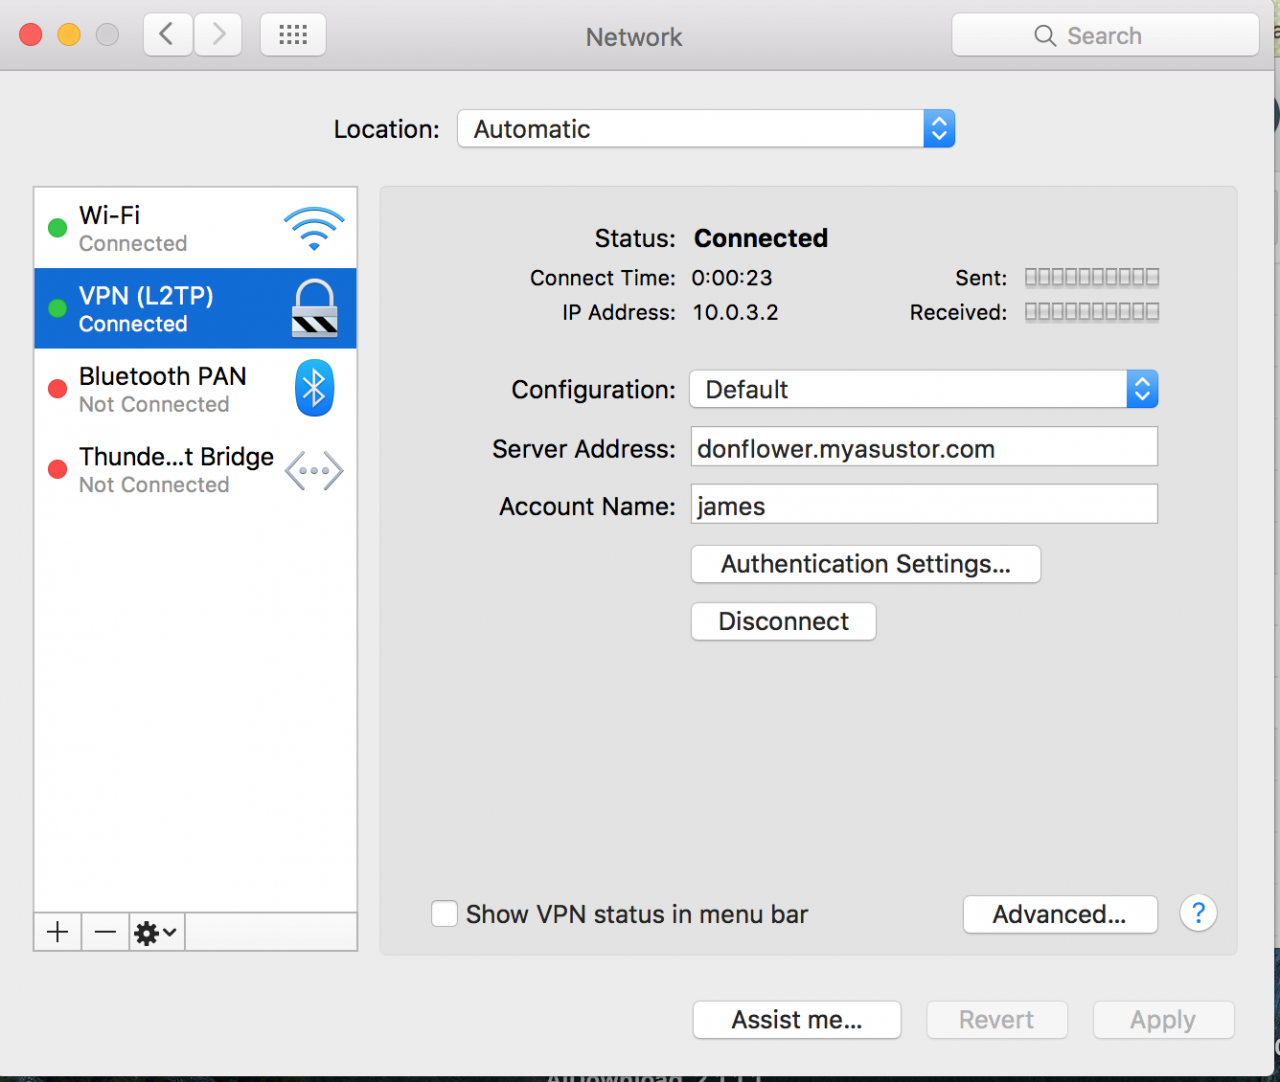
STEP 5
Enter the VPN Server account name and password and then click on [OK].

STEP 6
After successfully connecting, you will be able to access the resources on your ASUSTOR NAS local network. If you wish to disconnect the VPN connection, you can click on the [Disconnect] button.
2.4.4 Connecting using an Android device
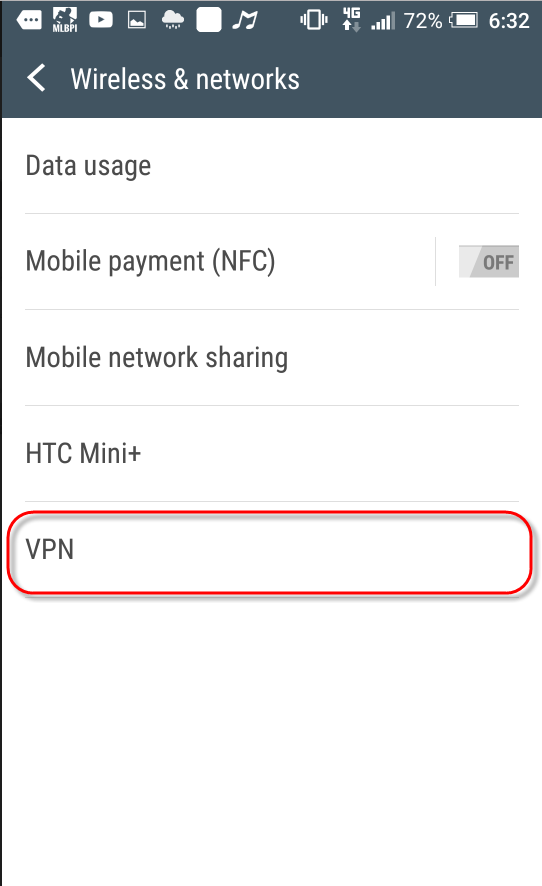
STEP 1
Select [Settings]>[More] > [VPN].

STEP 2
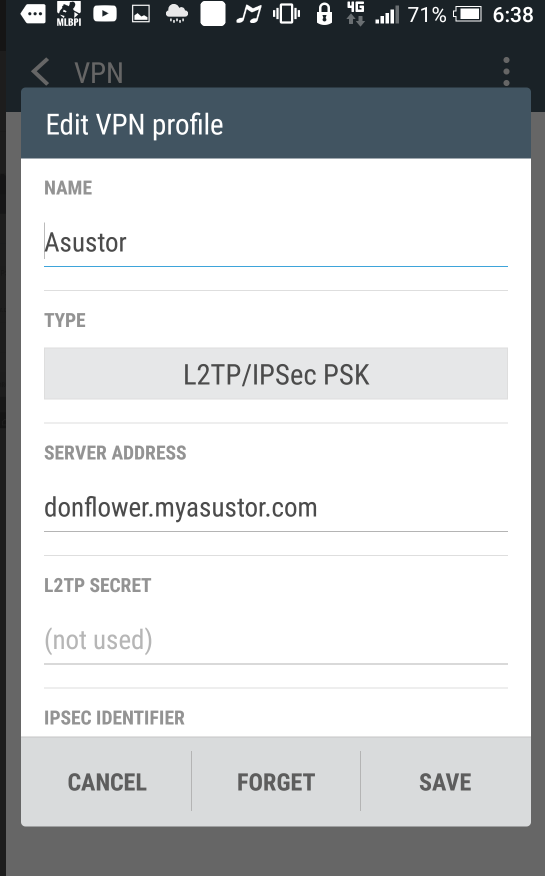
Click on [Add VPN profile], enter a name of your choice, select [L2TP/IPSEC PSK] for “Type” and enter your NAS’s IP address or URL into the [Server Address] field. Choose an encryption method and then select [Save] to complete configurations.
STEP 3
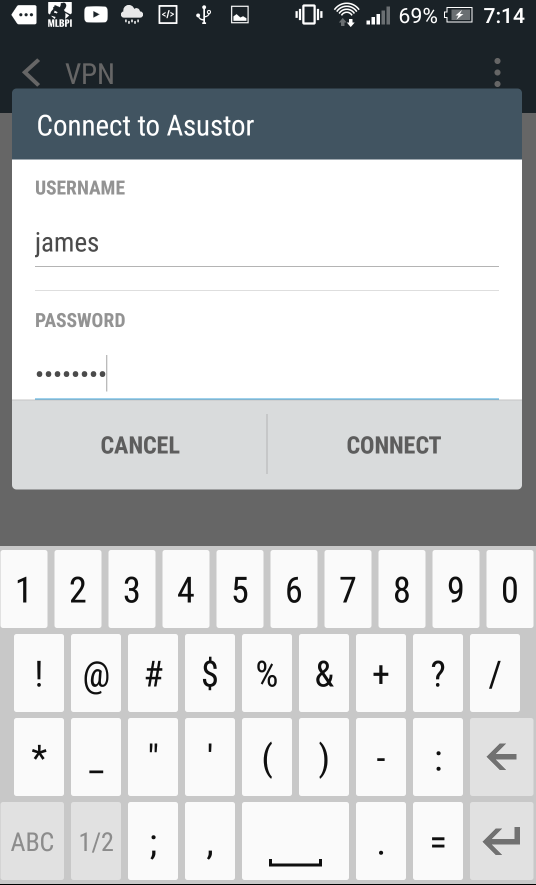
Select the created VPN profile. After entering the username and password, select [Connect] to create the VPN connection.
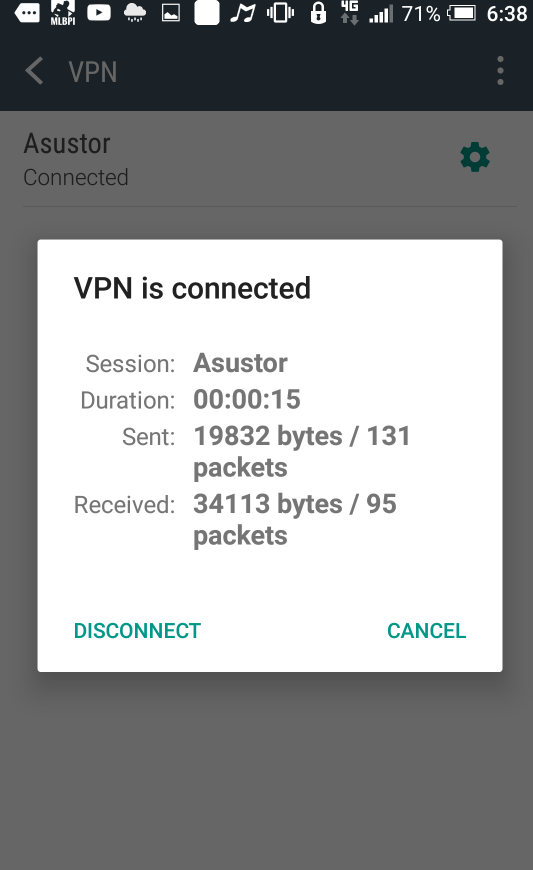
After creating the connection, selecting the profile again will allow you to view the associated information for the connection.
2.4.5 Connecting using an iOS device
The configurations in the following example were done using an iPhone 6.
STEP 1
In iOS, select [Settings] >[General] > [VPN].
STEP 2
Select [Add a VPN configuration…] and then enter the following information:
Type: L2TP
Description: A description of your choice
Server: Your NAS’s IP address or URL
Account: Your account name
Password: The password for the account
Secret: They key that can be found in ADM interface by selecting [VPN Server]> [Settings]>[XL2TP]
Once you have finished entering the information select [Done].

STEP 3
After completing the VPN profile you can select the status toggle to activate the VPN connection.
