
#4. Screenshot Tweaks
#1. Change default first name
By default, macOS names all screenshots with the word “Screenshot” at the beginning, right?

Screenshot of the screenshot by the author by the author
But, if you work on various projects that need screenshots, you might want to replace “Screenshot” with your current project’s name, for easy identification.
If so, before you start with the project, execute the below command after replacing “Project” with the project name.
defaults write com.apple.screencapture name Project
Now, any screenshots you take will get the project’s name as their first name.
How to revert back? Imagine your current project name is “Screenshot”. Now, read the above part again.
#2. Change default format
By default, macOS saves all screenshots in png format — which’s great at image quality, but tends to take up fairly large space. So,
If you need to change their format for a purpose, use
defaults write com.apple.screencapture type <format>
Supported formats: jpg, png, gif, pdf, tiff.
Example:
If you want your next screenshots as pdfs, use defaults write com.apple.screencapture type pdf
Why to use what
- jpg: Small file size. Easy to store and distribute, even in bulk.
- png: Great picture quality. Large file size. Suitable for images with lots of tiny text or details.
- gif: Clubs multiple images into a single file. You don’t need it here, as screenshot is always a single image.
- pdf: Non-editable. Safe to distribute.
- tiff: Suitable for high contrast colours. Supports both lossless and lossy compression.
Quick Fixes
- Launch Terminal, type
passwd, and hit return. - Now, type old password, new password, retype it, and BAM! You’ve just changed your Mac’s password.

Password masked (not by me, by macOS) for security.
Note: This doesn’t update iCloud keychain password. To do that, use security 'set-keychain-password'.
#2. Know how much free space is left in your Mac 🫙
Use df -h on Terminal, and sth like this will appear —
Showing the list of (left to right)
- all your Mac drives and partitions,
- their total capacities,
- used memory,
- available memory,
- % used in each disk.
And where they’re mounted (last one).
Unless you’re too particular, you can ignore ifree and iused. I don’t know them either.
Network Speed

Here,
- Uplink capacity indicates upload speed,
- Downlink capacity indicates download speed.
CPU HOGGERS
To list processes in the order of memory usage, use top -o rsize .+

- Use ⌃+C to exit
topcommand, - Now use
kill -9 <PID>to kill it. (Ex: If the PID is 27578, use*kill -9 27578*)
Note: Before you kill a process, make sure it isn't an essential process and you Mac can work perfectly even after killing it.
Disable Gatekeeper
Though you can bypass these from the System Settings on a per-app basis, here’s how you disable Gatekeeper COMPLETELY.
Use sudo spctl --global-disable on Terminal.
Gone.
Changed your mind?
To revert it back, use the command again by replacing disable with enable .
tldr – simplify man page
#3. tldr 📄
As you know, every command and HomeBrew tool comes with a *man page*.
It’s a highly descriptive page that explains everything a tool could do — often consisting of hundreds of lines.
The description could be too complex to read, especially for newbie folks who come to explore a tool’s basic functionality.
To help such people, an online community started tldr — a tool that simplifies man pages and offers practical examples for better eurekas.
For example:
The man page of tmux consists of over
5600 lines. So HUGE.
Now, see its tldr →

Image by the author
— Just 16 lines explaining its basic capabilities. How awesome! You NEED to use this.
- Install tldr:
brew install tldr - View tldr of a tool (sample):
tldr tmux - View its man page:
man tmux
#4. Pandoc 📑
Pandoc is a universal doc format converter that beats other similar apps in lightweight-ness — coz it’s not an app, it’s a HomeBrew tool.
It supports conversion across dozens of doc formats, ranging from
- most popular — .doc, .pdf, .csv, .epub to
- lesser-used — .ipynb, .odt, .tsv
with output quality on par with that of popular apps.
- Install Pandoc:
brew install pandoc - List all supported in/output formats:
pandoc --list-**in/out**put-formats - Convert file (sample):
pandoc -o output.pdf [DRAG INPUT FILE HERE]
#7. rar 🗜️
Ever heard about the app WinRAR? I know you did.
rar is its cmd-line version that (obviously) lacks a UI but is equally effective in compressing and extracting .rar files.
- Install rar:
brew install rar - *Compress file/s:
rar a archive.rar [DRAG FILE1 HERE] [DRAG FILE2 HERE] ... - Compress file/s with password:
rar a -p**Password** archive.rar [DRAG FILE1 HERE] ... - Extract a rar:
unrar x [DRAG RAR HERE]
*Note, the resulting .rar files will be stored in Home folder. To access, open Finder and use ⇧ + ⌘ + H.
9 — UTM

UTM (Source: https://mac.getutm.app/)
Need to run Kali Linux on an ARM-based Mac? UTM might be the solution for you. UTM is a free and open-source virtualization app that allows you to run other operating systems on your Mac. It is a bit tedious to set up, but there are many tutorials out there that can teach you how to install the OS of your choice in UTM. Download it here.

APPS
#3. Toggle Key Repeats
Unlike Windows, macOS doesn’t allow repeating characters by holding down a key. Rather, it lets you type a variation of it → like Ü for U.
But if that’s something you’ll never use (like me 🙋♂️), you may wanna set the action for key repeats only.
To do that, just trigger this app, and the secret ‘Key Repeats’ mode will be toggled on if off, off if on.
AppleScript code for geeks:
set currentValue to do shell script "defaults read NSGlobalDomain ApplePressAndHoldEnabled"

if currentValue is "1" then
  do shell script "defaults write NSGlobalDomain ApplePressAndHoldEnabled -bool false"
  display notification "Key Repeats enabled"
else
  do shell script "defaults write NSGlobalDomain ApplePressAndHoldEnabled -bool true"
  display notification "Key Repeats disabled"
end if
App based on *#1* of this article. Notification for confirmation enabled.
(• Screenshot Apps)
#4. Change Screenshot Prefix
By default, all your screenshots’ names are prefixed with “Screenshot”. But what if you’re working on a cat project, and want your next few screenshots prefixed with “Project Cat”?
Just try this:
- Trigger the app,
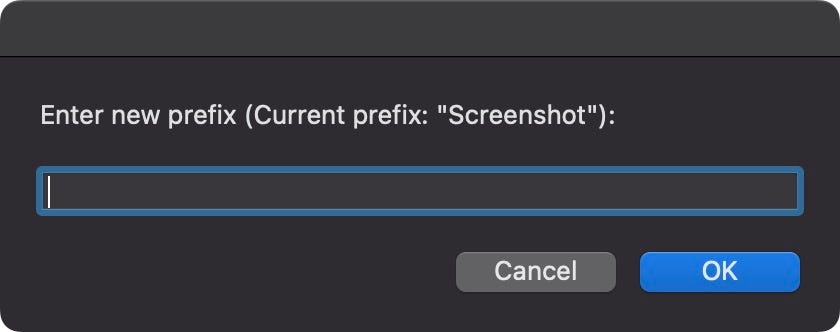
Image by the author
- Type your new prefix and hit OK. (Notice your old prefix given for reference 🙂
Now snap a screenshot and check if it’s got the new prefix.
AppleScript code for geeks:
set currentName to do shell script "defaults read com.apple.screencapture name"

set newName to text returned of (display dialog "Enter new prefix (Current prefix: \"" & currentName & "\"):" default answer "")

do shell script "defaults write com.apple.screencapture name " & quoted form of newName & ";killall SystemUIServer"

display notification "Screenshot prefix changed to \"" & newName & "\"" with title "Screenshot Prefix"
App based on *#4.1* of this article. Notification for confirmation enabled →

Image by the author
#5. Change Screenshot Format
Another default for macOS screenshots — their format, PNG.
Though PNGs are great at image quality and detailing, they tend to take up large space — which isn’t required for most purposes.
So if you wanna to change your screenshot formats regularly for various purposes, never let this app go.
Trigger the app, and you’ll see this:

Image by the author
(Observe the current format shown in the title for reference)
Now, choose the format you’d like your next screenshots to have, and hit OK. All done!
Now try taking a random screenshot and check its format to confirm if the changes are actually applied (Use ⌘ + I to visit their info).
(Why to use what format
- jpg: Small file size. Easy to store and distribute, even in bulk.
- png: Great picture quality. Large file size. Suitable for images with lots of tiny text or details.
- gif: Clubs multiple images into a single file. You don’t need it here, as screenshot is always a single image.
- pdf: Non-editable. Safe to distribute.
- tiff: Suitable for high contrast colours. Supports both lossless and lossy compression.)
AppleScript code for geeks:
set currentFormat to do shell script "defaults read com.apple.screencapture type"

set formatList to {"JPG", "PNG", "GIF", "PDF", "TIFF"}

set selectedFormat to choose from list formatList with title "Current format: " & currentFormat & "" default items {currentFormat}

if selectedFormat is false then
 return
end if

set screenshotFormat to item 1 of selectedFormat

do shell script "defaults write com.apple.screencapture type " & quoted form of screenshotFormat & ";killall SystemUIServer"

display notification "Screenshot format changed to \"" & screenshotFormat & "\"" with title "Screenshot Format"
App based on *#4.2* of this article. Notification for confirmation enabled →

Image by the author
(• Dock Apps)
#6. Add Dock Spacer
If you have a lot of apps on the dock (especially users with a secondary monitor), and would like to categorise them for easier identification, you’ll appreciate this.
Just trigger the app, and you’ll instantly see a space on the dock (that’s actually an null icon).

Image by the author
Now drag it across dock to segregate a set of apps. Trigger the app repeatedly to create more of such spaces and segregate more apps.

Image by the author
To remove a space, drag it to Trash, or right-click < Remove from Dock.
AppleScript code for geeks:
do shell script "defaults write com.apple.dock persistent-apps -array-add '{\"tile-type\"=\"spacer-tile\";}'; killall Dock"
App based on *#4* of this article.
#7. Dim Hidden Apps
App windows on macOS can be hidden (not minimised) with ⌘ + H. Remember if you didn’t know already 🙂
If you prefer such hidden apps’ icons dimmed on dock (maybe for easier identification) just trigger this app.
Now hide an app window and observe its dock icon dimmed.

Image by the author
To revert the action back, trigger it again.
AppleScript code for geeks:
set currentVal to (do shell script "defaults read com.apple.Dock showhidden")

if currentVal is equal to "0" then
 do shell script "defaults write com.apple.Dock showhidden -bool true"
 display notification "“Dim Hidden Apps” enabled"
else
 do shell script "defaults write com.apple.Dock showhidden -bool false"
 display notification "“Dim Hidden Apps” disabled"
end if

do shell script "killall Dock"
App based on *#5* of this article. Notification for confirmation enabled.
#8. Minimalist Dock
If you’re a minimalist who wants to keep their dock clean and only display active apps, this app is for you.
Trigger it, and all the mess on your dock gets cleaned up — only showing the apps you’re using. This helps avoid distractions.
“But how do I open new apps?” You’ve got to use App Launcher or Spotlight.
To revert the action back, trigger the app again.
AppleScript code for geeks:
set currentValue to do shell script "defaults read com.apple.dock static-only"

if currentValue is equal to "0" then
  do shell script "defaults write com.apple.dock static-only -bool TRUE; killall Dock"
  display notification "Minimalist dock enabled"
else
  do shell script "defaults write com.apple.dock static-only -bool FALSE; killall Dock"
  display notification "Minimalist dock disabled"
end if
App based on *#5.4* of this article. Notification for confirmation enabled.
#9. Toggle Single-app Mode
Not everyone will love this, but I know some folks who can’t imagine a life without this.
Single-app mode helps prevent distractions by limiting your desktop to one app at a time.
Trigger the app, and you’ll activate a mode that hides all other active apps when you click an app’s icon on the dock.
Try it for yourself!
If you really wanna work on multiple apps, click the new app’s icon by holding ⌥.
AppleScript code for geeks:
set singleAppMode to do shell script "defaults read com.apple.dock single-app"

if singleAppMode = "0" then
  do shell script "defaults write com.apple.dock single-app -bool true"
  display notification ""Single-app mode" enabled"
else
  do shell script "defaults write com.apple.dock single-app -bool false"
  display notification ""Single-app mode" disabled"
end if

do shell script "killall Dock"
App based on *#5.5* of this article. Notification for confirmation enabled.
(• Spotlight Apps)
#10. Disable Spotlight Indexing
Spotlight’s a powerful tool for quickly finding anything locally or on the web. However, it constantly needs to index itself to stay up-to-date with the latest info.
And that’s, a bit resource-hogging task.
If you regularly do heavy things (like video-editing, 3D modelling) on your Mac, turning off its indexing temporarily will help free up more CPU to your own tasks.
To do that, simply trigger this app, and Spotlight’s stops indexing. Don’t worry, all your previously indexed data remains safe and searchable.
*[Interestingly,*** I know some heavy Mac users who disable Spotlight indexing altogether, and choose to manually reindex their stuff once a week (Read next point to know how).]
AppleScript code for geeks:
do shell script "sudo mdutil -a -i off" with administrator privileges
display notification "Spotlight indexing is turned off"
App based on *#5* of this article. Notification for confirmation enabled.
#11. Enable Indexing and Reindex Spotlight
Triggering this app will re-enable and reindex Spotlight.
Even if you don’t wish to turn off Spotlight indexing, you can still use this if you encounter issues with indexing anytime.
AppleScript code for geeks:
do shell script "sudo mdutil -a -i on; sudo mdutil -E /" with administrator privileges
display notification "Spotlight is reindexing..."
App based on *#5* of this article. Notification for confirmation enabled.
Bonus Tip:
I keep all these apps handy on Dock like this →

Image by the author
You can try too. Keep all these apps in a folder, and drag it onto Dock.
For more a‘macOS’zing terminal commands, read these.