
https://www.rootandbranchgroup.com/google-tag-manager-data-layer/
What is the Google Tag Manager Data Layer?
January 29, 2021/0 Comments/in SEO Resources /by Zack Duncan
I’m progressing through a Google Tag Manager training series (as the student, not the teacher), and realized how much I didn’t know about the Data Layer. This blog explores the Google Tag Manager Data Layer from the viewpoint of a non-developer. The goal is to introduce some key concepts like JavaScript objects, key-value pairs, and dataLayer.push() that help us non-developers understand the Data Layer.
What is the Google Tag Manager Data Layer?
The Data Layer (also referred to as the dataLayer) is an intermediate data structure that exists between Google Tag Manager (GTM) and your website (with GTM on it). We can then use the information that gets sent to that intermediate data structure, the Data Layer.
Some data can’t go directly from a website to GTM. For example, purchase data related to the specific items purchased and purchase amount needs to be sent to the dataLayer before GTM can get that information. The Data Layer stores, processes, and passes data about the specific context in which it exists.
If we want Google’s definition, let’s try this:
A data layer is a JavaScript object that is used to pass information from your website to your Tag Manager container.
Thanks Google. That sounds smarter, but perhaps too smart for me right now. Help me out on this JavaScript Object business. Actually, back up before that and let’s chat JavaScript.
JavaScript Data Types, Objects, and Arrays
JavaScript is a programming language that enables complex features on web pages. So basically, anytime a web page is doing something other than sitting there and remaining completely static, JavaScript is probably doing something. If you’ve ever deployed Google Tag Manager or Google Analytics on a website, you’ve worked with JavaScript code.
There are two core types of data in JavaScript. The first type is a primitive data type, of which there are 6 specific types.
- String: text, an array of characters
- Number: you guessed it, a number
- Symbol: a unique value that’s not unique to any other value
- Boolean: true or false
- Undefined: a declared variable that exists, but that doesn’t have a value
- Null: no value
The second type of JavaScript data is an object. As you might expect, an object is more complex than something called a “primitive” data type.
An object is something called a reference data type. A reference type doesn’t store its value directly. Instead, it stores the address where the value is being stored (that part is the reference). In other words, a reference type holds the location to another place that actually holds the data.
One very important type of JavaScript object is something called an array. In fact, it’s perhaps more helpful to tweak Google’s definition of the Data Layer and say that it is an array.
What is a JavaScript Array and How Does it Relate to the Google Tag Manager Data Layer?
A JavaScript array contains two more objects. Arrays contain information stored as “variables” and we can access “the information” stored within the list. This helps us understand the concepts of key-value pairs, which is fundamental to understanding the Data Layer. Try reading the paragraph above again, but replace “variables” and “the information” with “key” and “value” as shown below.
- variables = key
- the information = value
That still may not make a ton of sense, so let’s keep rolling.
What Are Key Value Pairs in the Data Layer?
The Data Layer is made up of a collection of these key-value pairs. This is how developers.google.com describes it.
The dataLayer is a global object of key/value pairs passed to Google Tag Manager.
In the quote above, the “global object” is another way to say our object array. But let’s talk more about these key-value pairs.
The image below shows 6 pieces of information. It is compared of three distinct key-value pairs.

In this situation, the 3 variables (keys) are event, transactionId, and transactionTotal. The corresponding information (the values) that exists for each key is as follows:
- purchase – a String primitive data type corresponding to the event key (variable)
- 1234abc – a String primitive data type corresponding to the transactionId key (variable)
- 38.26 – a Number primitive data type corresponding to the transactionTotal key (variable)
With Google Tag Manager we can use Data Layer variables to access the information (the values) stored within these key-value pairs. To do that, we need something called a Data Layer variable that we create in Google Tag Manager.
Data Layer Variables
If we create a Data Layer variable for the variable (key) named transactionId, it would return the value 1234abc in the specific example above.
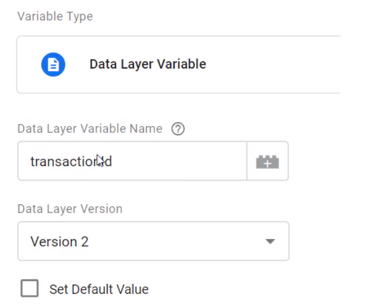
New information can get pushed to the Data Layer when new interactions occur. Every time new data is pushed to the Data Layer, GTM can access and use that information. In this example, the transactionId variable would allow us to capture all of the unique transactions identifiers (like 1234abc) when the defined event occurs.
I’m Still Confused About Key Value Pairs. Explain it Again, Please.
The key in a key-value pair is a variable name in String format. In JavaScript, a String type of data simply means text (unlike Number or Boolean, for example).
The value in a key-value pair can be in the format of any allowed JavaScript data type.
Let’s take some hypothetical Ecommerce product information as an example:
‘name’: ‘winter running shoes’
‘brand’: ‘adidas’
‘size’: ‘11.5’
‘price’: ‘89.99’
There are 4 keys (variables) identified: name, brand, size, and price. For each key, there is an associated value (winter running shoes, adidas, 11.5, and 89.99) of which 2 are Strings and 2 are Numbers.
Do all Websites Have a Data Layer?
No. A Data Layer is not a default part of a website. It usually exists in conjunction with Google Tag Manager. In fact, when a GTM container code loads, a Data Layer is automatically initiated.
So Does Google Tag Manager Take Care of This Data Layer Automatically?
Yes and no. Google Tag Manager will initiate a dataLayer when the GTM container code loads on a website. And when you use auto-event listeners in GTM to track things like, say, all link clicks, that event listener uses dataLayer.push() to send the link click data to the Data Layer. Some of those related click data variables that can be automatically configured are Click URL, Click Classes, and Click ID. This kind of data is all available to us automatically in GTM for our tags, triggers, and variables
However, the information you want to track may not be sent there automatically. For example, if you want to track that ECommerce transaction with product and purchase information, that transaction will need to be “pushed” to the dataLayer from your website. From there, you’ll have to configure your Google Tag Manager setup to capture that information so that it can then be sent to Google Analytics.
How is Data Pushed to the Google Tag Manager Data Layer?
Data can be sent to the Data Layer from a website through somethingt called a Data Layer push, or more accurately a dataLayer.push(). This “push” is what makes the corresponding data available to GTM, from which we can create our tags, triggers, and variables.
What Kind of Technical Stuff Do I Need to Know About this Push?
When data is pushed to the Data Layer via dataLayer.push(), Google Tag Manager updates its data model.
The technical name of the Data Layer is case sensitive. So dataLayer.push() is the only name that will work. If you want, you can certainly try datalayer.push(), DataLayer.push(), DATALAYER.push(), and etc, but they will not work. Lower case “d” and upper case “L” is the way to go.
Every single time a page loads or reloads, the information in the Data Layer is wiped out and reset.
How Can I Push Data to the Data Layer?
If you have a WordPress site and an online store, you can use a plugin to push data to the Data Layer.
You can add code to your website that uses the dataLayer.push(). In most cases, a developer will handle things like a dataLayer.push(), but marketers and analysts may have a role to play as well. Simo Ahava refers to the Data Layer as the “DMZ between developers and marketers” which is consistent with its technical nature and its importance to the business.
Where Do I Push The Data Layer and What Does it Look like?
So you want to put your developer hat on and do some dataLayer.push(). Good for you! First thing to know is where we want to deploy the push. The Data Layer should also be initiated before the GTM container code loads, which means the dataLayer.push needs to be above your GTM container code snippet in the head of your site.
The first line of code you’ll want to add is this:
window.dataLayer = window.dataLayer || [];
This will safely generate a new Data Layer. Then you’ll add your dataLayer.push() below that. Here’s what that will look like.
window.dataLayer = window.dataLayer || [];
dataLayer.push({
‘event’:’nameOfEvent’,
‘sampleKey’:’sampleValue’
}),
Here’s what that might look like if you wanted to send some specific purchase information to the dataLayer for your eComm site on a hypthetical event called purchaseComplete.
window.dataLayer = window.dataLayer || [];
dataLayer.push({
‘event’:’purchaseComplete’,
‘sampleKey’:’sampleValue’
}),
After I Initiate The Push Can I Get This Information Now in GTM?
Not yet! Remember those Data Layer variables we referred to before? The first thing you need is to create a Data Layer Variable. Here are the two things you need to keep in mind to make that happen.
- Create a Data Layer Variable (GTM Variable Type = Data Layer Variable) for each data point you’d like to access from your dataLayer.push().
- The Data Layer Variable Name must be the name of the key that you pushed to the dataLayer.
Now that we have the Data Layer Variable created, we need to actually make sure we can fire a tag so we can capture the data that pushed to dataLayer and then make it accessible in Google Analytics.
How to Fire a Tag When a Data Layer Push Event Happens?
To fire an event in GTM on dataLayer.push() events, we need to create a Custom Event Trigger. Here’s how we do that in 3 steps:
- First, we’ll need to create a new trigger.
- When we choose the type of trigger, it must be a Custom Event.
- When we name the event in GTM, the ‘Event name’ must be the exact value of the event key that we created. In our hypothetical example above from our eComm site, the ‘Event name’ will be purchaseComplete in order to grab the data sent to the Data Layer.
My Head Hurts. That’s Enough Data Layer for Now
Yea, me too. Big time headache. We’ll end things here for now, but we’ll be back at another time with more on the Data Layer.
If you’re interested in digital marketing training or SEO strategy support, get in touch through the contact page or feel free to hit me up on LinkedIn.
If you’re interested in a more technical perspective on the Data Layer, check out Simo Ahava or Analytics Mania.
Appendix: Some Vocabulary Related to Google Tag Manager Variables
- Built-in variables: These are helpful and commonly used variables within Google Tag Manager. You can enable them simply by toggling them on with a check box by hitting the blue “Configure” button within the Variables section of Tag Manager. Once a Built-in variable has been activated it is usable. Built-in variables can exist as Auto-event variables and Data Layer variables, but most are stored as Data Layer variables.
- Auto-event action: Auto-event actions are related to the trigger “listeners” that allow GTM to discern when specific interactions occur. For example, a link click listener is one of the most common (and most important) listeners you can configure. Generic click listeners, form submit listeners and error listeners are two other listeners.
- Auto-event variable: The Auto-event variable can access the target element of the Auto-event action (like a link click, generic click, form submission, or error). For example, a click on an image will create certain interaction data (perhaps the name of the alt text of the image), and an Auto-event variable could capture that information in Google Tag Manager.
Share this entry
https://developers.google.com/tag-manager/devguide
Developer Guide
On this pageUsing a Data LayerAdding Data Layer Variables to a PageUsing the Data Layer with HTML Event HandlersOne Push, Multiple VariablesHow the Asynchronous Syntax Works
This document describes details of how to implement Google tag Manager on your site.
Using a Data Layer
To ensure maximum flexibility, portability, and ease of implementation, Google Tag Manager functions best when deployed alongside a data layer. A data layer is an object that contains all of the information that you want to pass to Google Tag Manager. Information such as events or variables can be passed to Google Tag Manager via the data layer, and triggers can be set up in Google Tag Manager based on the values of variables (e.g., fire a remarketing tag when purchase_total > $100) or based on the specific events. Variable values can also be passed through to other tags (e.g., pass purchase_total into the value field of a tag).
Rather than referencing variables, transaction information, page categories, and other important signals scattered throughout your page, Google Tag Manager is designed to easily reference information that you put in this data layer. However, explicitly declaring the data layer is optional and if you choose not to implement the data layer, you can still access values from the page using the Variables feature, but you cannot use events without the data layer. Implementing the data layer with variables and associated values, as opposed to waiting for those variables to load throughout the page, ensures that they will be available as soon as you need them to fire tags.
Adding Data Layer Variables to a Page
To set up your data layer, add the following snippet of code to the head of your page above your container snippet:
<script>
  dataLayer = [];
</script>
The above snippet is an empty object that can be populated with information to pass to Google Tag Manager. For example, we might want to set data layer variables within the data layer to indicate that the page is a signup page and that the visitor has been identified as being a high-value customer. To do so, we'd populate our data layer as follows:
<script>
  dataLayer = [{
    'pageCategory': 'signup',
    'visitorType': 'high-value'
  }];
</script>
For example, Google Tag Manager can be configured to fire tags on all pages marked as signup and/or on which the visitor has been marked as high-value. It's important that this data layer snippet be set above the container snippet as described in the Quick Start Guide.
If the data layer code is called after the container snippet, any variables declared within will not be available for Google Tag Manager to selectively fire tags on page load. Here are some examples:
Incorrect
<!-- Google Tag Manager -->
...
<!-- End Google Tag Manager -->
<script>
  dataLayer = [{
    'pageCategory': 'signup',
    'visitorType': 'high-value'
  }];
</script>
Note: If you put the Google Tag Manager container snippet above the dataLayer array, Google Tag Manager may malfunction, and will not be able to read the variables defined in the array.
Correct
<script>
  dataLayer = [{
    'pageCategory': 'signup',
    'visitorType': 'high-value'
  }];
</script>
<!-- Google Tag Manager -->
...
<!-- End Google Tag Manager -->
Each of the variables declared within the data layer object will persist as long as the visitor remains on the current page. Data layer variables that are relevant across pages (e.g. visitorType) must therefore be declared in the data layer on each page of your website. While you don't need to put the same set of variables in the data layer on every page, you should use a consistent naming convention. In other words, if you set the page category on the signup page using pageCategory, to set a page category on a purchase page, you should do so using pageCategory as well.
Explicitly declaring a data layer is optional. Therefore, if you choose not to implement the data layer code and populate it with variables, the Google Tag Manager container snippet will initiate a data layer object for you.
Using the Data Layer with HTML Event Handlers
Google Tag Manager provides a special data layer variable called an event that is used within JavaScript event listeners to initiate tag firing when a user interacts with website elements such as a button. For example, you may want to fire a conversion tracking tag when a user clicks the Submit button on a newsletter signup form. Events may be called based on user interaction with website elements such as links, buttons, components of a menu system, or based on other JavaScript (e.g. time delays, etc.).
This functionality is accomplished by calling the push API as a method of the data layer on your page (e.g. attached to the particular elements to be tracked). The basic syntax for setting an event, then, is as follows:
dataLayer.push({'event': 'event_name'});
where event_name is a string indicating what the given event or element is.
As an example, to set an event when a user clicks a button, you might modify the button's link to call the push() API as follows:
<a href="#" name="button1" onclick="dataLayer.push({'event': 'button1-click'});" >Button 1</a>
Sometimes, the data you wish to collect or use to trigger certain tags may not load until after the user has interacted with the page. Using a combination of data layer variables and events, you may dynamically push this information to your data layer as necessary.
Data layer variables may be pushed dynamically to the data layer to capture information such as values entered or selected in a form, metadata associated with a video that the visitor is playing, the color of a product (e.g. a car) customized by the visitor, the destination URLs of clicked links, etc.
As with events, this functionality is accomplished by calling the push() API to add or replace data layer variables in the data layer. The basic syntax for setting dynamic data layer variables, then, is as follows:
dataLayer.push({'variable_name': 'variable_value'});
Where variable_name is a string indicating the name of the data layer variable to be set, and variable_value is a string indicating the value of the data layer variable to be set or replaced.
As an example, to set a data layer variable with a color preference when the visitor engages with a car customization widget, you might push the following dynamic data layer variable:
dataLayer.push({'color': 'red'});
One Push, Multiple Variables
Instead of using dataLayer.push() for each variable and event, you can push multiple variables and events at once. Here's an example of how to do this:
dataLayer.push({
  'color': 'red',
  'conversionValue': 50,
  'event': 'customizeCar'
});
You can use the same technique within a link event handler:
<a href="#"
   name="color"
   onclick="dataLayer.push({
     'color': 'red',
     'conversionValue': 50,
     'event': 'customizeCar'});">Customize Color</a>
It's important to note that pushing a variable of the same name as an existing variable to the data layer will cause the existing value to be overwritten by the new value. For example, if upon clicking the above link, there were already a variable named color with a value of blue declared within the data layer, that value would be overwritten moving forward with the new value of red.
How the Asynchronous Syntax Works
Google Tag Manager is an asynchronous tag, meaning that when it executes, it does not block other elements from rendering on the page. It also causes the other tags that are deployed via Google Tag Manager to be deployed asynchronously, meaning that a slow loading tag won't block other tracking tags.
The dataLayer object is what makes the asynchronous syntax possible. It acts as a queue, which is a first-in,first-out data structure that collects API calls and tags are fired according to those API calls. To add something to the queue, use the dataLayer.push method. The dataLayer.push method can be used to pass in extra metadata to Google Tag Manager via variables and can be used to specify events.
The creation of the dataLayer object can either be specified before the Google Tag Manager snippet, or it will be created by Google Tag Manager if the dataLayer object hasn't already been defined.
For more information on the asynchronous syntax, read the Tracking Reference for the dataLayer.push method.
Avoiding Common Pitfalls
When implementing Google Tag Manager, keep the following in mind:
Do not overwrite your dataLayer
When you use assignment to assign values to dataLayer e.g. dataLayer = [{'item': 'value'}], it will overwrite any existing values. It is best to declare your dataLayer as high up in your source code as possible, above your container snippet or any Optimize page hiding snippet. After your dataLayer has been declared, you can use dataLayer.push({'item': 'value'}) to add additional values to it later in your scripts.
The dataLayer object name is case-sensitive
If you try to push a variable or event without the proper casing, the push will not work. Examples:
datalayer.push({'pageTitle': 'Home'});    // Won't work
dataLayer.push({'pageTitle': 'Home'});    // Better
Variable names should be enclosed in quotes
While quotes are not strictly required for variable names that consist of only letters, numbers, and underscores, and which are not reserved words (e.g. function, export, native, etc.), to avoid issues, it's recommended that all variable names be enclosed in quotes. Examples:
dataLayer.push({new-variable: 'value'});      // Won't work
dataLayer.push({'new-variable': 'value'});    // Better
Variable names should be kept consistent across pages
If you use different variable names for the same variables on different pages, GTM will be unable to consistently fire tags in all desired locations. Examples:
Won't work
// Homepage:
dataLayer.push({'visitorType': 'low-value'});

// Checkout Page:
dataLayer.push({'visitor_type': 'high-value'});
Better
// Homepage:
dataLayer.push({'visitorType': 'low-value'});

// Checkout Page:
dataLayer.push({'visitorType': 'high-value'});
Any information needed to fire tags on a page load must be declared in the data layer above the container snippet
In order to fire tags on a page load matching some condition (e.g. on pages marked as having a pageCategory of sports), the pageCategory must be defined in the data layer above the container snippet (e.g. 'pageCategory': 'sports'). Variables pushed to the data layer (i.e. using dataLayer.push()) after the container snippet will not be able to fire tags on page loads with a matching condition.
Tags deployed with Google Tag Manager should not be left hard-coded or deployed by another tool as well
Any tags that are fired from Google Tag Manager should be migrated to Google Tag Manager, not just duplicated (for more information about migrating tags, see Migrating Tags to Google Tag Manager). Deploying tags both with Google Tag Manager and through other systems or hard-coded on your site may result in inflation of data (and other data integrity issues) resulting from those tags. For example, if you migrate your Google Analytics tracking code to fire from Google Tag Manager, the hard-coded Google Analytics tracking code should be removed from your site.
Renaming the Data Layer
By default, the data layer initiated and referenced by Google Tag Manager will be called dataLayer. If you'd prefer to use a different name for your data layer, you may do so by replacing the data layer parameter value (highlighted below) in your container snippet with the name of your choice.
<!-- Google Tag Manager -->
<script>(function(w,d,s,l,i){w[l]=w[l]||[];w[l].push({'gtm.start':
new Date().getTime(),event:'gtm.js'});var f=d.getElementsByTagName(s)[0],
j=d.createElement(s),dl=l!='dataLayer'?'&l='+l:'';j.async=true;j.src=
'https://www.googletagmanager.com/gtm.js?id='+i+dl;f.parentNode.insertBefore(j,f);
})(window,document,'script','myNewName','GTM-XXXX');</script>
<!-- End Google Tag Manager -->
Then, all references to your data layer (i.e. when declaring the data layer above the snippet and when pushing events or dynamic Data Layer Variables to the data layer with the push() API) should also be adjusted to reflect your custom data layer name:
<script>
  myNewName = [{
    // ...
  }];
  myNewName.push({'variable_name': 'variable_value'});
</script>
Migrating Tags to Google Tag Manager
In order to gain the most value from Google Tag Manager, we recommend that you migrate most of your existing tags into Google Tag Manager (tags that are not supported should not be migrated). This section describes a best practice migration workflow. The process has 5 main steps:
-
Map your site (optional)
To begin your migration, you'll want to think about which tags you currently have deployed on your site and what data you're trying to collect. For data collection think about what actions you want to track (events) and what additional data from the page you'll want to collect (variables). Create a map of tags, the data you want those tags to collect, and which events or pages you want to associate with those tags.
-
Implement standard Google Tag Manager snippet
Once you've mapped your site, you'll want to install just the single Google Tag Manager snippet on your site (empty) and deploy it. See Quick Start for more information.
-
Add Events and Variables
Customize your Google Tag Manager installation using the methods outlined in the Add Events and Variables section.
-
Add tags with associated triggers in Google Tag Manager's management interface
After you've completed setting up the site with the Google Tag Manager snippet and data collection APIs, you should add your site tags to the user interface. DO NOT publish at this time. Simply add and configure the tags from your site in the Google Tag Manager management interface using the appropriate templates and set up the triggers appropriately (more information about how to do this in our Help Center Triggers article).
-
Final migration swap
The last step is where you simultaneously swap out your old tags and publish your tags in Google Tag Manager. Within a few minutes of each other, you'll want to:
- Remove your site tags in a single code push
- Once you know this push is successful, press the "Publish" button for your container version.
This method might cause a small gap in data, but once the initial swap occurs, no more data gaps will appear. Alternatively, you could swap the order here and publish shortly before your site changes go live. This might cause minor, one-time data duplication instead of a small data gap.
After you've completed the initial migration to Google Tag Manager, any subsequent tagging needs you have can be handled without site code changes via the Google Tag Manager interface.
Multiple Domains
While you can use the same container for multiple websites it's recommended that each separate web property that you manage be deployed with its own container. This separation will prevent changes specific to one website from having undesired effects on other websites using the same container. In some situations, however, when multiple Top Level Domains or subdomains are considered to be members of the same website, it may be beneficial to manage their tags through the same Google Tag Manager container.
When choosing to use a single container across multiple domains, it's important to carefully configure your tags and triggers within Google Tag Manager. Using the default "All Pages" trigger in Google Tag Manager (i.e. $url matches RegEx .*) will fire tags on all pages of all domains on which your container snippet is deployed. Since some tags have configurations or purposes specific to the domain on which they're deployed, you may need to create custom triggers (or even remove the "All Pages" trigger) to fire tags on all pages of one or each domain individually.
For example, you may choose to deploy your Google Analytics tracking code through GTM with configurations to support GA tracking across multiple domains or subdomains.
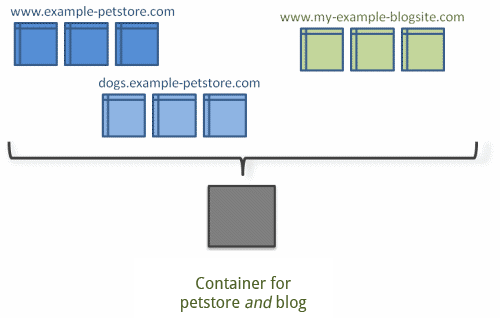
In such a case, you would add a line of code to your GA tracking code to manually set the first-party domain on which to set the GA cookies (e.g. on www.example-petstore.com and dogs.example-petstore.com, you might set the cookies to the common domain, .example-petstore.com). However, on the secondary site, www.my-example-blogsite.com, you might set the cookies to .my-example-blogsite.com. Therefore, you would want one of two GA tracking code tags (one set to .example-petstore.com, and one set to .my-example-blogsite.com) to fire on each of the two domains. If both domains were sharing a common GTM container, using the default "All Pages" trigger in Google Tag Manager, would cause each tag to fire on all pages of both domains.
Multiple Containers on a Page
For the best performance of a page, keep the number of Google Tag Manager containers on the page minimal.
If you use more than one container on a page, implement the container snippets with a common data layer object. For example, you may implement two container snippets as follows:
-
Copy the following JavaScript and paste it as close to the opening
<head>tag as possible on the page:
<!-- Google Tag Manager --> <script>(function(w,d,s,l,i){w[l]=w[l]||[];w[l].push({'gtm.start': new Date().getTime(),event:'gtm.js'});var f=d.getElementsByTagName(s)[0], j=d.createElement(s),dl=l!='dataLayer'?'&l='+l:'';j.async=true;j.src= 'https://www.googletagmanager.com/gtm.js?id='+i+dl;f.parentNode.insertBefore(j,f); })(window,document,'script','dataLayer','GTM-XXXX');</script> <script>(function(w,d,s,l,i){w[l]=w[l]||[];w[l].push({'gtm.start': new Date().getTime(),event:'gtm.js'});var f=d.getElementsByTagName(s)[0], j=d.createElement(s),dl=l!='dataLayer'?'&l='+l:'';j.async=true;j.src= 'https://www.googletagmanager.com/gtm.js?id='+i+dl;f.parentNode.insertBefore(j,f); })(window,document,'script','dataLayer','GTM-YYYY');</script> <!-- End Google Tag Manager --> -
Copy the following snippet and paste it immediately after the opening
<body>tag on the page:
<!-- Google Tag Manager (noscript) -->
<noscript><iframe src="//www.googletagmanager.com/ns.html?id=GTM-XXXX"
height="0" width="0" style="display:none;visibility:hidden"></iframe></noscript>

<noscript><iframe src="//www.googletagmanager.com/ns.html?id=GTM-YYYY"
height="0" width="0" style="display:none;visibility:hidden"></iframe></noscript>
<!-- End Google Tag Manager (noscript) -->
Note that you can use only a single common data layer for all Google Tag Manager containers on a page because using more than one data layer can cause some triggers to stop working and could have other implications. So don't rename the data layer for a subset of containers on the page. You can, if necessary, rename the data layer for all containers on the page.
Avoid implementing a Google Tag Manager container through a custom HTML tag in another Google Tag Manager container because it could add latency in the tags from the secondary container and could have other implications.
Adding Data Layer Variables for Devices without JavaScript Support
In order to accommodate visitors who have JavaScript disabled or are visiting from devices that don't support JavaScript, Google Tag Manager includes a <noscript> snippet to deploy non-JavaScript dependent tags even when the primary GTM JavaScript cannot load.
It's important to note, however, that the data layer (containing the data layer variables declared on page load) and any events or dynamic data layer variables pushed to the data layer all rely on JavaScript to function. Therefore, if any of the triggers to fire your non-JavaScript dependent tags (that you want to fire even when JavaScript can't load) depend on data layer variables, you must pass those Data Layer Variables to the <noscript> iframe as query parameters. For example, to fire a tag when the pageCategory is sports and the visitorType is returning, you would modify the container snippet on the given page as follows:
<!-- Google Tag Manager (noscript) -->
<noscript><iframe src="//www.googletagmanager.com/ns.html?id=GTM-XXXX&pageCategory=sports&visitorType=returning" height="0"
                  width="0" style="display:none;visibility:hidden"></iframe></noscript>
<!-- End Google Tag Manager (noscript) -->
Where each data layer variable is appended to the end of the iframe's source URL as plain text query parameters separated by ampersands.
Security
Google Tag Manager incorporates a host of features to help ensure the security of your websites and apps. In addition to the following code-level security features, you may also want to familiarize yourself with Tag Manager's access controls , 2-step verification, and malware detection.
Administrators can restrict tag deployment for their installations to allow only specific tags to be deployed. You can also configure Google Tag Manager to work with a CSP implementation.
Using a protocol-relative URL
By default, the Google Tag Manager container snippet always uses https to load containers (i.e., https://www.googletagmanager.com). This helps protect your container from malicious parties and snooping, and in many cases, also improves performance.
If you'd prefer to load your Google Tag Manager containers in a protocol-relative manner, you may do so by adjusting the source URL protocol (highlighted below) in your container snippet to be // instead of https://.
<!-- Google Tag Manager -->
<script>(function(w,d,s,l,i){w[l]=w[l]||[];w[l].push({'gtm.start':
new Date().getTime(),event:'gtm.js'});var f=d.getElementsByTagName(s)[0],
j=d.createElement(s),dl=l!='dataLayer'?'&l='+l:'';j.async=true;j.src=
'//www.googletagmanager.com/gtm.js?id='+i+dl;f.parentNode.insertBefore(j,f);
})(window,document,'script','dataLayer','GTM-XXXX');</script>
<!-- End Google Tag Manager -->
<!-- Google Tag Manager (noscript) -->
<noscript><iframe src="//www.googletagmanager.com/ns.html?id=GTM-XXXX"
height="0" width="0" style="display:none;visibility:hidden"></iframe></noscript>
<!-- End Google Tag Manager (noscript) -->
When using a protocol-relative URL, the container would be loaded using http on pages with an http:// URL; and, would be loaded using https on pages with an https:// URL.
Older versions of the Google Tag Manager container snippet always used a protocol-relative URL to load containers (i.e., //www.googletagmanager.com). These older protocol-relative versions of the Google Tag Manager container snippet will continue to work without being updated.
While most of the tag templates in Google Tag Manager are also protocol relative, it's important to make sure that, when setting up custom tags to fire on secure pages, those tags are also either protocol relative or secure.
Was this helpful?
Except as otherwise noted, the content of this page is licensed under the Creative Commons Attribution 4.0 License, and code samples are licensed under the Apache 2.0 License. For details, see the Google Developers Site Policies. Java is a registered trademark of Oracle and/or its affiliates.
Last updated 2020-12-18 UTC.
ConnectBlogFacebookMediumTwitterYouTubeProgramsWomen TechmakersGoogle Developer GroupsGoogle Developers ExpertsAcceleratorsDeveloper Student ClubsDeveloper consolesGoogle API ConsoleGoogle Cloud Platform ConsoleGoogle Play ConsoleFirebase ConsoleActions on Google ConsoleCast SDK Developer ConsoleChrome Web Store Dashboard
https://developers.google.com/tag-manager/enhanced-ecommerce
Ecommerce (GA4) Developer Guide
https://developers.google.com/tag-manager/ecommerce-ga4
On this pageMigration from legacy ecommerce data layer objectsClearing the ecommerce objectMeasure product/item list views/impressionsMeasure product/item list clicksMeasure views/impressions of product/item details
This guide describes how to implement Google Analytics 4 (GA4) ecommerce features using Google Tag Manager on a website.
GA4 ecommerce enables product list, impression, promotion, and sales data to be sent with a number of suggested Ecommerce events.
You have two options to enable ecommerce in the tag editor screen of the web interface:
- Implement with the data layer (Recommended)
- Implement with a Custom JavaScript Variable
These sections will show you how to use the data layer to measure the listed ecommerce activities:
- Product/Item List Views/Impressions
- Product/Item List Clicks
- Product/Item Detail Views
- Adds/Removes from Cart
- Promotion Views/Impressions
- Promotion Clicks
- Checkouts
- Purchases
- Refunds
Note: Each value included in a given data layer must also be captured in Google Tag Manager via a recommended event parameter and data layer variable. The examples below show how this must be done for the ecommerce items parameter and data layer variable, while additional parameters can be found in the GA4 event reference.
Enhanced Ecommerce (UA) Developer Guide
On this pageOverviewBefore you BeginEnabling Enhanced EcommerceUsing the Data LayerClearing the ecommerce object
This guide describes how to implement Universal Analytics Enhanced Ecommerce features using Google Tag Manager on a website.
Overview
Google Analytics Enhanced Ecommerce enables product impression, promotion, and sales data to be sent with any of your Google Analytics pageviews and events. Use pageviews to track product impressions and product purchases; and use events to track checkout steps and product clicks.
Before you Begin
We recommend reviewing the Enhanced Ecommerce Data Types and Actions section of the Enhanced Ecommerce Dev Guide to help you plan your implementation. The guide will help you understand which fields are required and optional for each of the ecommerce interactions you want to measure.
Enabling Enhanced Ecommerce
In most implementations, you should enable Enhanced Ecommerce on each of your Universal Analytics pageview or event tags. You have two options for enabling Enhanced Ecommerce in the tag editor screen of the web interface:
- Implement using the Data Layer (Recommended)
- Implement using a Custom JavaScript Macro
Although both methods provide equivalent ecommerce functionality, we recommend all websites that support a data layer use the Data Layer method. This guide presents the Data Layer method as the default, while Using a Custom JavaScript Macro is documented at the end of this guide.
Using the Data Layer
The following sections will show you how to use the data layer to measure the following enhanced ecommerce activities:
- Product Impressions
- Product Clicks
- Product Detail Impressions
- Add / Remove from Cart
- Promotion Impressions
- Promotion Clicks
- Checkout
- Purchases
- Refunds
Clearing the ecommerce object
It's recommended that you use the following command to clear the ecommerce object prior to pushing an ecommerce event to the data layer. Clearing the object will prevent multiple ecommerce events on a page from affecting each other.
dataLayer.push({ ecommerce: null }); // Clear the previous ecommerce object.
Measuring Product Impressions
- Ecommerce Measurement:
impressions - Accepts Data: array of
impressionFieldObjects
Measure product impressions by using the impression action and one or more impressionFieldObjects. The following example assumes details about the products displayed on a page are known at the time the page loads:
<script>
// Measures product impressions and also tracks a standard
// pageview for the tag configuration.
// Product impressions are sent by pushing an impressions object
// containing one or more impressionFieldObjects.
dataLayer.push({ ecommerce: null });  // Clear the previous ecommerce object.
dataLayer.push({
  'ecommerce': {
    'currencyCode': 'EUR',                       // Local currency is optional.
    'impressions': [
     {
       'name': 'Triblend Android T-Shirt',       // Name or ID is required.
       'id': '12345',
       'price': '15.25',
       'brand': 'Google',
       'category': 'Apparel',
       'variant': 'Gray',
       'list': 'Search Results',
       'position': 1
     },
     {
       'name': 'Donut Friday Scented T-Shirt',
       'id': '67890',
       'price': '33.75',
       'brand': 'Google',
       'category': 'Apparel',
       'variant': 'Black',
       'list': 'Search Results',
       'position': 2
     }]
  }
});
</script>
See the Tag Configuration for this Example
Measuring Product Clicks
- Ecommerce Measurement:
click - Accepts Data:
list, array ofproductFieldObjects
Measure clicks on product links by pushing a click action to the data layer, along with a productFieldObject to represent the clicked product, as in this example:
<script>
/**
 * Call this function when a user clicks on a product link. This function uses the event
 * callback datalayer variable to handle navigation after the ecommerce data has been sent
 * to Google Analytics.
 * @param {Object} productObj An object representing a product.
 */
function(productObj) {
  dataLayer.push({ ecommerce: null });  // Clear the previous ecommerce object.
  dataLayer.push({
    'event': 'productClick',
    'ecommerce': {
      'click': {
        'actionField': {'list': 'Search Results'},      // Optional list property.
        'products': [{
          'name': productObj.name,                      // Name or ID is required.
          'id': productObj.id,
          'price': productObj.price,
          'brand': productObj.brand,
          'category': productObj.cat,
          'variant': productObj.variant,
          'position': productObj.position
         }]
       }
     },
     'eventCallback': function() {
       document.location = productObj.url
     }
  });
}
</script>
See the Tag Configuration for this Example
Measuring Views of Product Details
- Ecommerce Measurement:
detail - Accepts Data:
list, array ofproductFieldObjects
Measure a view of product details by pushing a detail action to the data layer, along with one or more productFieldObjects representing the products being viewed:
<script>
// Measure a view of product details. This example assumes the detail view occurs on pageload,
// and also tracks a standard pageview of the details page.
dataLayer.push({ ecommerce: null });  // Clear the previous ecommerce object.
dataLayer.push({
  'ecommerce': {
    'detail': {
      'actionField': {'list': 'Apparel Gallery'},    // 'detail' actions have an optional list property.
      'products': [{
        'name': 'Triblend Android T-Shirt',         // Name or ID is required.
        'id': '12345',
        'price': '15.25',
        'brand': 'Google',
        'category': 'Apparel',
        'variant': 'Gray'
       }]
     }
   }
});
</script>
See the Tag Configuration for this Example
Measuring Additions or Removals from a Shopping Cart
- Ecommerce Measurement:
add,remove - Accepts Data:
list, array ofproductFieldObjects
Similarly, you can measure additions or removals from a shopping cart using an add or remove actionFieldObject and a list of productFieldObjects:
Adding a Product to a Shopping Cart
// Measure adding a product to a shopping cart by using an 'add' actionFieldObject
// and a list of productFieldObjects.
dataLayer.push({ ecommerce: null });  // Clear the previous ecommerce object.
dataLayer.push({
  'event': 'addToCart',
  'ecommerce': {
    'currencyCode': 'EUR',
    'add': {                                // 'add' actionFieldObject measures.
      'products': [{                        //  adding a product to a shopping cart.
        'name': 'Triblend Android T-Shirt',
        'id': '12345',
        'price': '15.25',
        'brand': 'Google',
        'category': 'Apparel',
        'variant': 'Gray',
        'quantity': 1
       }]
    }
  }
});
See the Tag Configuration for this Example
Removing a Product from a Shopping Cart
// Measure the removal of a product from a shopping cart.
dataLayer.push({ ecommerce: null });  // Clear the previous ecommerce object.
dataLayer.push({
  'event': 'removeFromCart',
  'ecommerce': {
    'remove': {                               // 'remove' actionFieldObject measures.
      'products': [{                          //  removing a product to a shopping cart.
          'name': 'Triblend Android T-Shirt',
          'id': '12345',
          'price': '15.25',
          'brand': 'Google',
          'category': 'Apparel',
          'variant': 'Gray',
          'quantity': 1
      }]
    }
  }
});
See the Tag Configuration for this Example
Measuring Promotions
You can measure both impressions and clicks on internal site promotions, such as banners displayed on the site itself advertising a sale on a particular subset of products, or an offer for free shipping.
Measuring Promotion Impressions
- Ecommerce Measurement:
promoView - Accepts Data: array of
promoFieldObjects
To measure a promotion impression, set the promoView key in your ecommerce data layer var to a promoFieldObject that describes the promotions displayed to users on the page:
<script>
// An example of measuring promotion views. This example assumes that
// information about the promotions displayed is available when the page loads.
dataLayer.push({ ecommerce: null });  // Clear the previous ecommerce object.
dataLayer.push({
  'ecommerce': {
    'promoView': {
      'promotions': [                     // Array of promoFieldObjects.
       {
         'id': 'JUNE_PROMO13',            // ID or Name is required.
         'name': 'June Sale',
         'creative': 'banner1',
         'position': 'slot1'
       },
       {
         'id': 'FREE_SHIP13',
         'name': 'Free Shipping Promo',
         'creative': 'skyscraper1',
         'position': 'slot2'
       }]
    }
  }
});
</script>
See the Tag Configuration for this Example
Note: Although it is acceptable to set an action with a promotion impression, the action cannot be a promoClick. If you intend to measure a promoClick action it should be done in a separate hit, after the promoView.
Measuring Promotion Clicks
To measure a click on a promotion, push the promoClick action to the data layer with an array containing a promoFieldObject describing the clicked promotion:
<script>
/**
 * Call this function when a user clicks on a promotion. This function uses the eventCallBack
 * datalayer variable to handle navigation after the ecommerce data is sent to Google Analytics.
 *
 * @param {Object} promoObj An object representing an internal site promotion.
 */
function onPromoClick(promoObj) {
  dataLayer.push({ ecommerce: null });  // Clear the previous ecommerce object.
  dataLayer.push({
    'event': 'promotionClick',
    'ecommerce': {
      'promoClick': {
        'promotions': [
         {
           'id': promoObj.id,                         // Name or ID is required.
           'name': promoObj.name,
           'creative': promoObj.creative,
           'position': promoObj.pos
         }]
      }
    },
    'eventCallback': function() {
      document.location = promoObj.destinationUrl;
    }
  });
}
</script>
See the Tag Configuration for this Example
Note: Use a separate hit to send product data, do not include it with a promo click.
Measuring a Checkout
To measure each step in a checkout process you need to:
- Measure each step of the checkout process using the
checkoutaction. - If applicable, measure checkout options using the
checkout_optionaction. - Optionally set user-friendly step names for the checkout funnel report by configuring Ecommerce Settings in the Admin section of the web interface.
1. Measuring Checkout Steps
- Ecommerce Measurement:
checkout - Accepts Data:
step, array ofproductFieldObjects
To measure the checkout process, which might include a checkout button and one or more checkout pages where users enter shipping and payment information, use the checkout action and the step field to indicate which stage of the checkout process is being measured. You can also use the option field to provide a piece of additional data about the page, such as the payment type that was selected by the user.
<script>
/**
 * A function to handle a click on a checkout button. This function uses the eventCallback
 * data layer variable to handle navigation after the ecommerce data has been sent to Google Analytics.
 */
function onCheckout() {
  dataLayer.push({ ecommerce: null });  // Clear the previous ecommerce object.
  dataLayer.push({
    'event': 'checkout',
    'ecommerce': {
      'checkout': {
        'actionField': {'step': 1, 'option': 'Visa'},
        'products': [{
          'name': 'Triblend Android T-Shirt',
          'id': '12345',
          'price': '15.25',
          'brand': 'Google',
          'category': 'Apparel',
          'variant': 'Gray',
          'quantity': 1
       }]
     }
   },
   'eventCallback': function() {
      document.location = 'checkout.html';
   }
  });
}
</script>
See the Tag Configuration for this Example
2. Measuring Checkout Options
- Ecommerce Measurement:
checkout_option - Accepts Data:
step,option
The checkout option is useful in cases where you've already measured a checkout step but you want to capture additional information about the same checkout step. For example, the shipping method selected by a user. To measure this use the checkout_option action along with the step and option fields.
<script>
/**
 * A function to handle a click leading to a checkout option selection.
 */
function onCheckoutOption(step, checkoutOption) {
  dataLayer.push({ ecommerce: null });  // Clear the previous ecommerce object.
  dataLayer.push({
    'event': 'checkoutOption',
    'ecommerce': {
      'checkout_option': {
        'actionField': {'step': step, 'option': checkoutOption}
      }
    }
  });
}
</script>
See the Tag Configuration for this Example
3. Checkout Funnel Configuration
Optionally, each step in your checkout process can be given a descriptive name that will be used in reports. To configure these names, visit the Admin section of the Google Analytics Web Interface, select the view (profile) and click on Ecommerce Settings. Follow the Ecommerce set-up instructions to label each checkout step you intend to track.
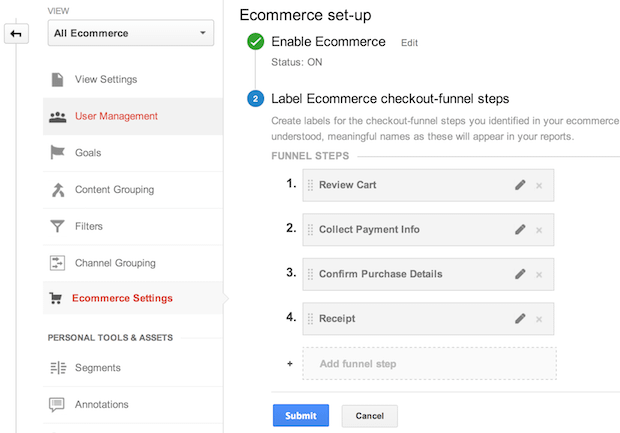 Figure1: Ecommerce setup, checkout funnel.
Note: If you do not configure check step names, they will appear simply as Step 1, 2, 3, etc.
Measuring Purchases
- Ecommerce Measurement:
purchase - Accepts Data:
id(Transaction ID), array ofproductFieldObjects
Push your transaction details into the Data Layer using the purchase action, along with an event that will fire an enhanced ecommerce-enabled tag. In this example, the transaction details are known at the time the page loads, and will be sent with a pageview when the gtm.js script returns:
<script>
// Send transaction data with a pageview if available
// when the page loads. Otherwise, use an event when the transaction
// data becomes available.
dataLayer.push({ ecommerce: null });  // Clear the previous ecommerce object.
dataLayer.push({
  'ecommerce': {
    'purchase': {
      'actionField': {
        'id': 'T12345',                         // Transaction ID. Required for purchases and refunds.
        'affiliation': 'Online Store',
        'revenue': '35.43',                     // Total transaction value (incl. tax and shipping)
        'tax':'4.90',
        'shipping': '5.99',
        'coupon': 'SUMMER_SALE'
      },
      'products': [{                            // List of productFieldObjects.
        'name': 'Triblend Android T-Shirt',     // Name or ID is required.
        'id': '12345',
        'price': '15.25',
        'brand': 'Google',
        'category': 'Apparel',
        'variant': 'Gray',
        'quantity': 1,
        'coupon': ''                            // Optional fields may be omitted or set to empty string.
       },
       {
        'name': 'Donut Friday Scented T-Shirt',
        'id': '67890',
        'price': '33.75',
        'brand': 'Google',
        'category': 'Apparel',
        'variant': 'Black',
        'quantity': 1
       }]
    }
  }
});
</script>
Note: The ecommerce.purchase.products array can be used to report purchases to Google Analytics and Floodlight Search, though the array elements supported by Floodlight Search are slightly different from those in the preceding example. See the example in the Requirements for the JSON format for reporting purchase details in Floodlight Search.
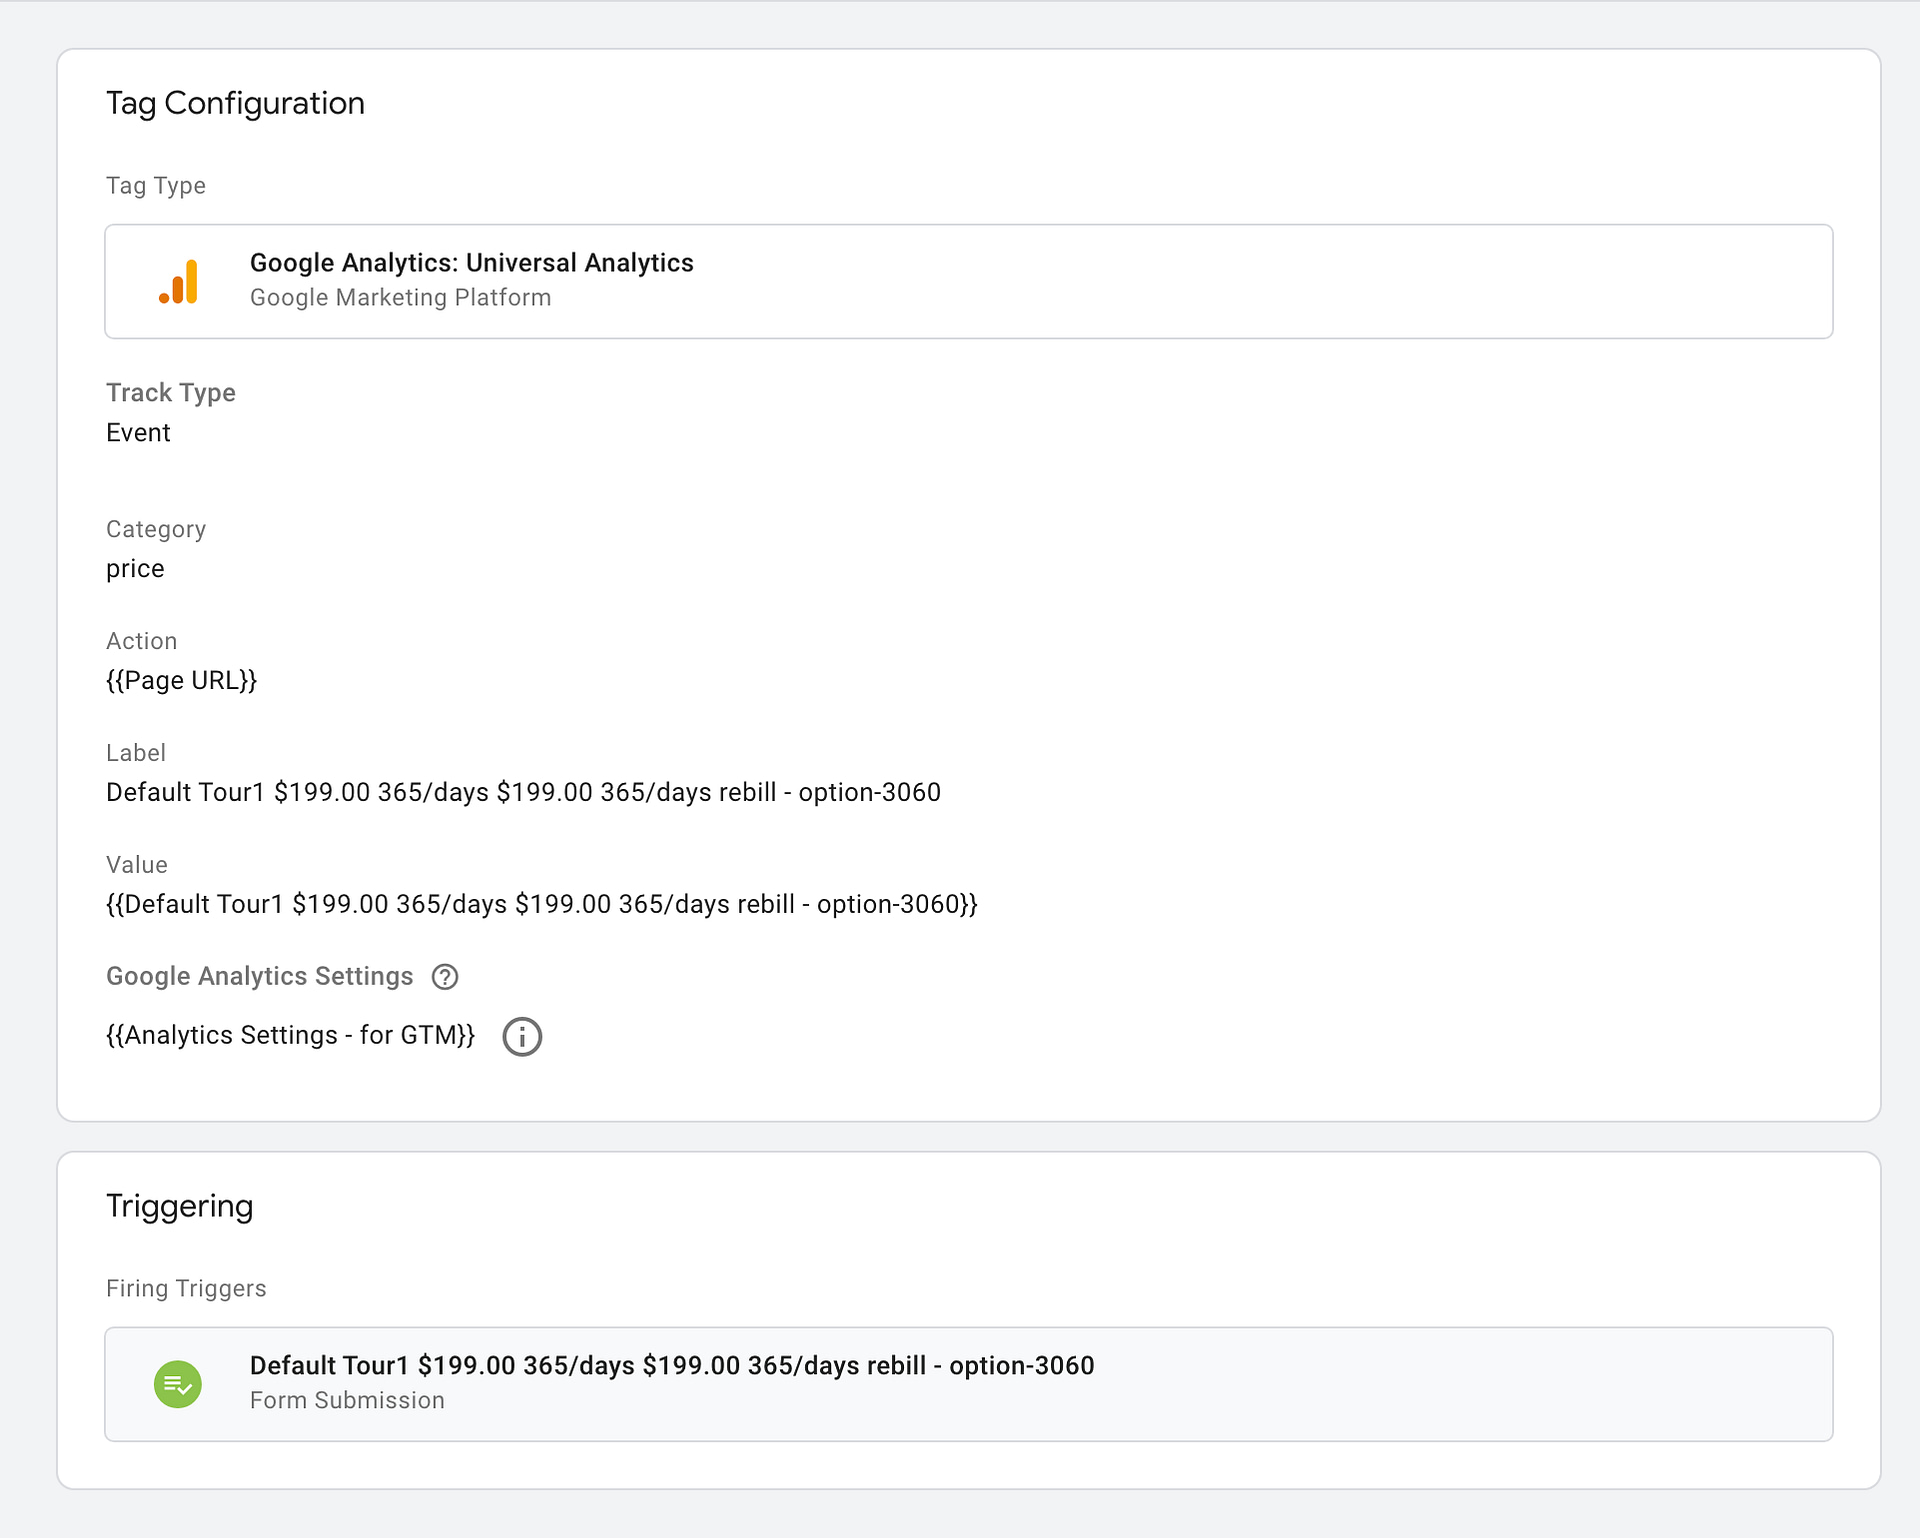
See the Tag Configuration for this Example.
Measuring Refunds
- Ecommerce Measurement:
refund - Accepts Data:
id(Transaction ID), array ofproductFieldObjects
To measure a full refund of a transaction, push a refund actionFieldObject along with the transaction ID of the transaction being refunded:
<script>
// Refund an entire transaction by providing the transaction ID. This example assumes the details
// of the completed refund are available when the page loads:
dataLayer.push({ ecommerce: null });  // Clear the previous ecommerce object.
dataLayer.push({
  'ecommerce': {
    'refund': {
      'actionField': {'id': 'T12345'}         // Transaction ID. Required for purchases and refunds.
    }
  }
});
</script>
See the Tag Configuration for this Example
To measure a partial refund, add a list of productFieldObjects, including product IDs and quantities being refunded:
<script>
// Measure a partial refund by providing an array of productFieldObjects and specifying the ID and
// quantity of each product being returned. This example assumes the partial refund details are
// known at the time the page loads:
dataLayer.push({ ecommerce: null });  // Clear the previous ecommerce object.
dataLayer.push({
  'ecommerce': {
    'refund': {
      'actionField': {'id': 'T12345'},        // Transaction ID.
      'products': [
            {'id': 'P4567', 'quantity': 1},   // Product ID and quantity. Required for partial refunds.
            {'id': 'P8901','quantity': 2}
       ]
     }
  }
});
</script>
See the Tag Configuration for this Example
Passing Product-scoped Custom Dimensions
To pass a product-scoped custom dimension to the ecommerce object, use the following notation to add it to the product:
dimensionn
where *n* is a natural number, for example:
<script>
dataLayer.push({ ecommerce: null });  // Clear the previous ecommerce object.
dataLayer.push({
  'ecommerce': {
    'purchase': {
      ...

      'products': [{
        'name': 'Triblend Android T-Shirt',
        'id': '12345',
        'price': '15.25',
        'brand': 'Google',
        'category': 'Apparel',
        'variant': 'Gray',
        'dimension1': 'Same day delivery'
       }]
     }
   }
});
</script>
Passing Product-scoped Custom Metrics
To pass a product-scoped custom metric to the ecommerce object, use the following notation to add it to the product:
metricn
where *n* is a natural number, for example:
<script>
dataLayer.push({ ecommerce: null });  // Clear the previous ecommerce object.
dataLayer.push({
  'ecommerce': {
    'purchase': {
      ...

      'products': [{
        'name': 'Goal Flow Garden Hose',
        'id': 'p001',
        'brand': 'Google Analytics',
        'category': 'Home Goods',
        'variant': 'Green',
        'price': '20',
        'quantity': 1,
        'metric3': '10'  // Custom metric 'Cost'
       }]
     }
   }
});
</script>
Combining Impressions and Actions
In cases where you have both product impressions and an action, it is possible to combine and measure them in a single hit.
Note: It is only possible to send one action per array of productFieldObjects in a single hit. However you can send impression data in the same hit.
The example below shows how to measure a product detail view with product impressions from a related products section:
<script>
dataLayer.push({ ecommerce: null });  // Clear the previous ecommerce object.
dataLayer.push({
  'ecommerce': {
    'impressions': [
     {
       'name': 'Triblend Android T-Shirt',        // Name or ID is required.
       'id': '12345',
       'price': '15.25',
       'brand': 'Google',
       'category': 'Apparel',
       'variant': 'Gray',
       'list': 'Related Products',
       'position': 1
     },
     {
       'name': 'Donut Friday Scented T-Shirt',
       'id': '67890',
       'price': '33.75',
       'brand': 'Google',
       'category': 'Apparel',
       'variant': 'Black',
       'list': 'Related Products',
       'position': 2
     }],
    'detail': {
      'actionField': {'list': 'Apparel Gallery'},  // 'detail' actions have an optional list property.
      'products': [{
        'name': 'Triblend Android T-Shirt',       // Name or ID is required.
        'id': '12345',
        'price': '15.25',
        'brand': 'Google',
        'category': 'Apparel',
        'variant': 'Gray'
       }]
     }
  }
});
</script>
See the Tag Configuration for this Example
Using a Custom JavaScript Macro
If your website does not support a data layer, you can use a custom JavaScript macro to call a function that returns the ecommerce data object. This object should use the data layer syntax shown earlier in this guide, for example:
// A custom JavaScript macro that returns an ecommerceData object
// that follows the data layer syntax.
function() {
  var ecommerceData = {
    'ecommerce': {
      'purchase': {
        'actionField': {'id': 'T12345'},
        'products': [
            // List of productFieldObjects
        ],
        ... // Rest of the code should follow the data layer syntax.
     }
  };
  return ecommerceData;
}
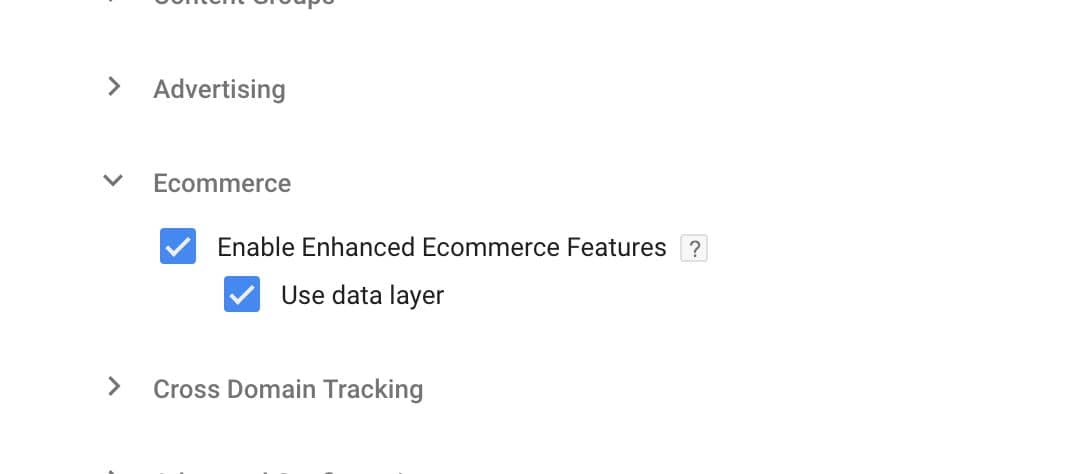
If you choose to use a custom JavaScript macro instead of the data layer, select Enable Enhanced Ecommerce Features and set the Read data from macro option.
See the Tag Configuration for this Example
Was this helpful?
Except as otherwise noted, the content of this page is licensed under the Creative Commons Attribution 4.0 License, and code samples are licensed under the Apache 2.0 License. For details, see the Google Developers Site Policies. Java is a registered trademark of Oracle and/or its affiliates.
Last updated 2021-04-21 UTC.
ConnectBlogFacebookMediumTwitterYouTubeProgramsWomen TechmakersGoogle Developer GroupsGoogle Developers ExpertsAcceleratorsDeveloper Student ClubsDeveloper consolesGoogle API ConsoleGoogle Cloud Platform ConsoleGoogle Play ConsoleFirebase ConsoleActions on Google ConsoleCast SDK Developer ConsoleChrome Web Store Dashboard

https://www.simoahava.com/analytics/enhanced-ecommerce-guide-for-google-tag-manager/
ENHANCED ECOMMERCE GUIDE FOR GOOGLE TAG MANAGER
September 19, 2018 in Analytics | 261 comments
Enhanced Ecommerce is certainly one of the finest reporting user interface features that Google Analytics has to offer. Enhanced Ecommerce, as the name implies, is a set of dimensions, metrics, and reports, which combine to provide you with a fairly complete view into how users are interacting with your products in your webstore. The main downside of Enhanced Ecommerce is, as with all good things, that it’s complicated to implement.
Luckily, there’s Google Tag Manager. Theoretically, you could implement Enhanced Ecommerce through Google Tag Manager without ever adding a single line of functional logic into the codebase of your web site. You could do everything by simply scraping the Document Object Model (DOM). However, as we have hopefully learned over the years – GTM is a tool with which fastidiousness trumps fast.
Whenever you’re working with dataLayer, for example, you’re investing into the stability of your data collection process. Thus, even though I will be talking about DOM scraping further on in the guide, the focus here will be on a setup where the front-end produces HTML documents and/or JavaScript that populates the Ecommerce values into the dataLayer without using DOM scraping or other client-side hacks to do the job.
There is a lot of information in this article. Much of it is already covered in Google’s excellent Enhanced Ecommerce Developer Guide, but there are plenty of gotchas that I might have covered in earlier articles (see the Further Reading chapter), or which I might not even have written down before.
NOTE! This is an implementation guide. If you want to know how Enhanced Ecommerce works or how to map your site into relevant interactions, you’ll want to look at Google’s support center documentation.
TABLE OF CONTENTS
[+show]
X The Simmer NewsletterSubscribe to the Simmer newsletter to get the latest news and content from Simo Ahava into your email inbox!
HOW TO READ THIS GUIDE
Obviously, it would make sense if you read the guide from top-to-bottom. However, I fully acquiesce that the loquaciousness of my rhetoric might be tedious to some in all its verbose glory. Also, sometimes I write douchy things like that.
So, depending on what your role is in the implementation project, there might be only some chapters that are relevant for you. However, don’t neglect to consult with all the stakeholders in the project! It doesn’t make sense for a developer to write code without understanding what the code is needed for. Similarly, it doesn’t make sense for the person operating Google Tag Manager to utilize the dataLayer structures without understanding the limitations of the back-end or front-end systems.
If you are a developer, tasked with implementing the
dataLayerobjects, you’ll want to read the following chapters (in order):
- Introduction
- Populate the Data Layer
- A word on scraping the DOM
- Combining different data types in a single EEC hit
- Product-scoped Custom Dimensions and Metrics
- Remember: be consistent
- Data types: Actions and all its sub-sections
- Data types: Impressions and all its sub-sections
- Data types: Promotions and all its sub-sections
If you are the person tasked with setting up EEC via the Google Tag Manager User Interface, you’ll want to focus on the following chapters (in order):
- Introduction
- Differences (and similarities) to Standard Ecommerce
- Send the data to Google Analytics using the Data Layer
- Send the data to Google Analytics using a Custom JavaScript variable
- Page View or Event tag
- Data types: Actions and all its sub-sections
- Data types: Impressions and all its sub-sections
- Data types: Promotions and all its sub-sections
- Debugging the setup
- Golden rules of Enhanced Ecommerce
As I said, I still wish you’d spend the time reading the entire guide. I don’t think there’s any irrelevant information to anyone working on the project, and it makes sense to understand the full complexity of the implementation rather than focus only on the things that are directly relevant to your work.
INTRODUCTION
Implementing Enhanced Ecommerce requires an overview of the following components:
- The various data types that can be sent to GA (Actions, Impression Views, Promotion Views).
- How the
'ecommerce'object is compiled and pushed todataLayer(or generated with a Custom JavaScript variable). - How this data is sent with a tag to Google Analytics.
All three of these components are necessary, and all three require some understanding of how Google Tag Manager works, how tags and triggers interact with dataLayer, and how the Enhanced Ecommerce data is sent to Google Analytics. These will all be covered in this guide.
Needless to say, if you want a robust implementation, interaction and co-operation with your site’s front-end developers is an absolute must. Typically, the front-end developers utilize page templates and server-side variables (using PHP or React.js, for example) to build the HTML structure of any given page. On Enhanced Ecommerce pages, it’s important that they integrate the front-end with whatever ecommerce system you have in use, so that this system produces the necessary values dynamically for the front-end developers to funnel through into the dataLayer.
For interactions that take place after the page load, such as cart interactions, the front-end developers might need update the site JavaScript to populate the dataLayer object with the necessary values in the client.
Or you can just throw caution to the wind and scrape everything off the HTML itself through Google Tag Manager. The purpose of this guide isn’t to recommend any specific course of action, but to highlight the different ways in which you can run the Enhanced Ecommerce implementation project.
DIFFERENCES (AND SIMILARITIES) TO STANDARD ECOMMERCE
If you’ve been running Standard Ecommerce through Google Tag Manager, there are mainly three major differences between that and Enhanced Ecommerce.
- Standard Ecommerce only collects transactions (i.e. “Purchase” hits in EEC) – there are no other components to its funnel (in fact, there is no funnel).
- Standard Ecommerce uses a different
categoryformat. - Standard Ecommerce doesn’t support Product-scoped Custom Dimensions and Metrics.
One thing to pay heed to is that you can collect both Standard Ecommerce and Enhanced Ecommerce hits to an Enhanced Ecommerce -enabled Google Analytics view! This means that if you leave your “old” tracking in place and run an Enhanced Ecommerce implementation in parallel, you might end up double-counting transactions.
Google Analytics does deduplicate identical transactions sent in a session, but it’s enough for some component in the two different tracking methods to differ for GA to collect the data twice.
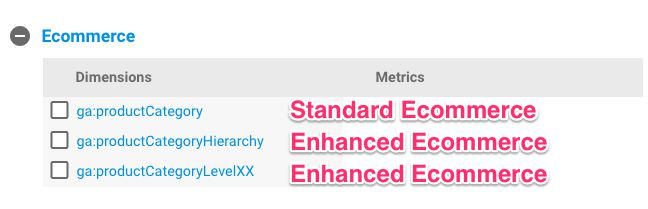
Product Category is collected to a different dimension, depending on which method you are using. So if you populate the category key for a product using either method, the dimension you’re looking for in GA is going to be different.
IMPLEMENTATION GUIDELINES
The following chapters will cover certain aspects of an Enhanced Ecommerce implementation. As I stated in the Introduction, how the values are populated into dataLayer depend on the integration between your site’s front-end and the Ecommerce platform you use. Some platforms such as WooCommerce for WordPress introduce this integration using a plugin, others such as Magento provide it out-of-the-box as a feature.
However, there are plenty of custom Ecommerce platforms and setups out there which require tinkering for them to produce the values into variables that your front-end developers can then utilize.
The next chapter, for example, simply instructs what the generic dataLayer object needs to look like. How you end up populating the values into the required keys is up to you, but typically it’s done in one of the following ways:
- The
dataLayer.push()is written directly into the page template by whatever server-side mechanism you have for producing the templates. - The
dataLayer.push()is generated dynamically by your web server or the Ecommerce platform using typically a combination of JavaScript and HTTP requests. - The key-value pairs are populated by scraping the page HTML using Google Tag Manager.
POPULATE THE DATA LAYER
Enhanced Ecommerce requires a specific syntax for the objects pushed to dataLayer or generated with a Custom JavaScript variable. For example, a dataLayer.push() with the minimum required Ecommerce object for a Purchase looks like this:
window.dataLayer = window.dataLayer || [];
window.dataLayer.push({
  event: 'eec.purchase',
  ecommerce: {
    purchase: {
      actionField: {
        id: '1'
      },
      products: [{
        id: 'p'
      }]
    }
  }
});
Do note that Google Tag Manager only reacts to dataLayer.push() commands. No other array methods will do anything in GTM, so it’s imperative that you do not improvise with this. All the interactions with dataLayer must be done with push().
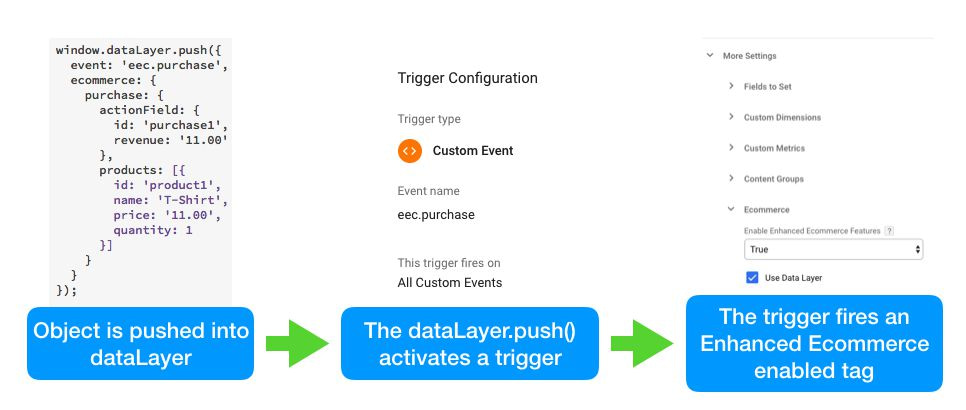
Within the push, all the keys listed under and including ecommerce are required. The event key is something I strongly recommend to add to every single dataLayer.push() object.
Now, you will need to populate the keys in the object with relevant values. For example, the value for ecommerce.purchase.actionField.id would need to be a unique identifier of the order itself. You could generate one randomly using JavaScript, but typically you’ll want to use the same order ID that was included in the actual transaction. That way you can later augment details about this transaction using Data Import, for example.
Similarly, you’ll need to collect details about the products in the transaction, and send any variant, brand, and category information as metadata, too.
How you do this really depends on what the integration to your Ecommerce system is like. It’s impossible to give generic instructions, because each Ecommerce platform differs in how it provides the values for you to exploit in other on-site code. But if you already have an Ecommerce system in place, I recommend you read through its documentation and try to find out how you can request or access these values and variables from this system.
SEND THE DATA TO GOOGLE ANALYTICS USING THE DATA LAYER
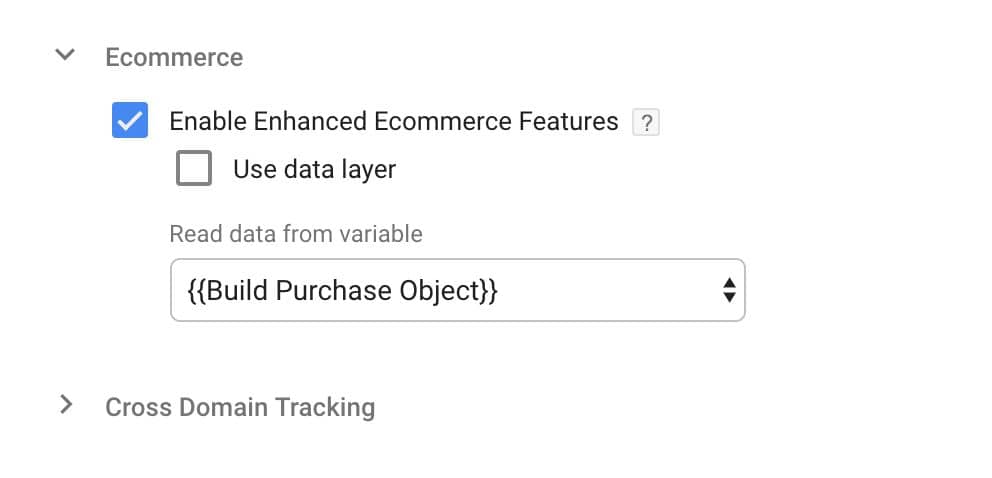
When you select the Use data layer option in the Enhanced Ecommerce settings of a Google Analytics Page View or Event tag (or a Google Analytics Settings variable), you instruct the tag to look into the Data Layer and pull the key-value pairs from the ecommerce object pushed most recently into dataLayer.
This sounds pretty straight-forward. All you need to do is make sure the object pushed into dataLayer follows the exact correct syntax, and that it’s pushed into dataLayer before (or in the same push as) the tag that accesses the data via Use data layer fires.
However, there are two important things to note here.
- The
dataLayer.push()must be perfectly formed. There’s no way to modify it on-the-go if you activate the “Use data layer” option. So it’s absolutely vital that you specify and audit the object that is being pushed intodataLayerfor Enhanced Ecommerce data collection. - When a tag with “Use data layer” fires, it really only accesses the most recent
ecommercepush. So, if you’ve split Product Impressions into multiple pushes and then fire the tag when the last one is done, if the tag has “Use data layer” checked, only the last impressions object is sent to Google Analytics.
Point (2) might sound counter-intuitive, but it actually makes sense. If GTM didn’t exhibit this behavior, then all ecommerce pushes done on a single page would tag along with all the subsequent Enhanced Ecommerce payloads. By sending only the most recently pushed object, this behavior can be avoided.
It’s precisely because of this behavior that I again strongly recommend to always include the event key in every single Enhanced Ecommerce object. Why? Because then you can use Custom Event triggers to fire your Enhanced Ecommerce tags at precisely the correct time, and the most recent object they access will always be the one that triggered the tag. That way you won’t lose any data because of pushes that didn’t trigger any tags.
However, you might want to take a look at the next section, too.
SEND THE DATA TO GOOGLE ANALYTICS USING A CUSTOM JAVASCRIPT VARIABLE
One of my main issues with the dataLayer object syntax for Enhanced Ecommerce in Google Tag Manager is its rigidity. The “Use data layer” option requires that you follow a very specific, unwieldy syntax.
This means that it might be a huge effort to get the data into the correct format in the first place. But then you also need to have a process in place so that you can update it with minimal delay, and so that you can audit it to make sure no data is lost.
So, thankfully, Google Tag Manager also lets you send the data using a Custom JavaScript variable.
Using the variable has a very simple logic. All the variable needs to do is return a valid ecommerce object. In other words, the variable needs to return exactly the same thing that the developers would push into dataLayer in a perfect world.
And how is this useful? Well, you could have the Ecommerce data pushed into dataLayer in any format, and then use the Custom JavaScript variable to transform it into a valid ecommerce object. This way, you don’t need to confuse matters with a rigid dataLayer specification, but rather the Ecommerce platform can push the data into dataLayer in whatever format suits it best. Then, with some JavaScript magic, you can pull this data through the Custom JavaScript variable into your tag.
Or, if you want to go the DOM scraping route, you can do all the scraping in the Custom JavaScript variable, and have it return a valid ecommerce object with all the key-value pairs in place.
You can also modify a valid ecommerce object in the dataLayer in case you need to add some dynamic updates to it (such as Product-scoped Custom Dimensions). For example, here’s me adding a Product-scoped Custom Dimension to all the products in a Purchase object:
function() {
  // Create a copy of the variable to avoid
  // modifying the source object by reference
  var ecom = JSON.parse(JSON.stringify({{Data Layer Variable - ecommerce}}));
  try {
    ecom.purchase.products.forEach(function(prod) {
      prod.dimension10 = {{get discount}}(prod.id);
    });
  } catch(e) {}
  return {
    ecommerce: ecom
  };
}
With this simple example, I’m updating a perfectly valid ecommerce object (represented by {{Data Layer Variable – ecommerce}}), by adding a new field to every single product.
As you can see, I’m making a copy of the original variable with the JSON.parse(JSON.stringify(obj)) method. Because JavaScript copies objects by reference, any changes you make to the ecom variable would reflect in the original object stored in dataLayer. This might have adverse effects if the variable is run more than once, especially if you’re running calculations on any fields (the calculations would be done over and over again).
One additional important thing to note. Data Layer Variables are, by default, Version 2. This means that they will merge all the existing ecommerce pushes into one big ecommerce object. So when you create the variable for ecommerce, you might want to use Version 1. Read this article for more information.
PAGE VIEW OR EVENT TAG
Whether you want to use a Page View or Event tag and how you setup your Custom Event triggers is completely up to you.
Personally, I always use Event tags. Why? Because if you use a Page View tag, you lack insight into what Enhanced Ecommerce events have been collected in Google Analytics. This might make debugging a broken implementation difficult. By using events, I can always look at the Top Events report to see all the Enhanced Ecommerce hits sent to GA.
You can even add things like order ID as the Event Label of these hits, so that you can really start debugging if the event for the order was sent but no transaction was actually received in the Ecommerce reports.
If you do use an Event tag, setting the nonInteraction field is, again, up to you. Personally, I set it to true when the event is sent with the page load, and false in all other instances.
But you do exactly what works best for you. Sometimes you might want to avoid events if you’re approaching the 500 hits per session limit. Not a good reason, but a reason nonetheless.
A WORD ON SCRAPING THE DOM
Scraping the DOM refers to the habit of accessing the dynamic HTML representation of the page (the Document Object Model) directly with JavaScript and populating the Enhanced Ecommerce key-value pairs with values found on the page. On a receipt page, for example, you often see the order ID, the total value of the transaction, all products, shipping costs, and so forth. So you could just as well scrape these from the page rather than going through a complicated specification project with your front-end developers.
function() {
  var orderId = document.querySelector('#order span.id').textContent,
      revenue = document.querySelector('#order span.total').textContent,
      products = [].map.call(document.querySelectorAll('#order .product'), function(prod) {
    return {
      id: prod.getAttribute('data-id'),
      name: prod.innerText
    };
  });
  return {
    ecommerce: {
      purchase: {
        actionField: {
          id: orderId,
          revenue: revenue
        },
        products: products
      }
    }
  };
}
It’s not pretty, and it comes with a lot of baggage and technical debt. For one, you’re introducing a huge weak link in your tracking. If anything changes on the page, e.g. due to an A/B-test, it’s possible your scraper will break.
Furthermore, it’s fairly common to not include all details about products on the receipt page. Typically, just the name, ID, price, and tax of the line item is enough. This means you’ll miss all the other vital metadata such as product category, brand, variant, etc.
In other words, scraping might be the easy way to get some data quick, and for that it’s a great tool. But used on its own to carry the data quality of your entire Enhanced Ecommerce process? Not so much.
COMBINING DIFFERENT DATA TYPES IN A SINGLE EEC HIT
Enhanced Ecommerce in Google Tag Manager allows you to send more than one data type in a single Enhanced Ecommerce hit. This is because all the data types are deconstructed into parameters of the Google Analytics request, and as long as each parameter only has a single value, you can combine them to your heart’s content.
However, you can’t combine them in any way you like. The rule of thumb is that each hit can only contain one Action, one Impression, and one Promotion object. But it gets a bit more complicated than that, since there are more shared fields between the different data types, invalidating certain combinations. Here are the valid combinations you can send:
- Impression View with Promotion View and Action
- Impression View with one of Promotion View or Action
- Promotion View with one of Impression View or Action
See the chapter titled Data types: Actions to understand what Actions comprise. Note that Impression Click and Promotion Click are Actions even if they’re listed in a different chapter (it was more logical to group them with impression and promotion views, respectively).
A typical mistake is to try to send a Product Detail View and a Product Add To Cart in the same push, or a Product Add To Cart and a Product Checkout in the same push. This isn’t valid, since these objects occupy many of the same parameter names (e.g. all the product keys), so by trying to populate them twice in the same hit, you end up making a royal mess of things.
PRODUCT-SCOPED CUSTOM DIMENSIONS AND METRICS
With Enhanced Ecommerce, Google Analytics introduced Product-scoped Custom Dimensions and Metrics. These are extra metadata that can be added directly into the objects within a products array.
The dataLayer syntax is, again, fairly rigid. They must be named dimensionN and metricN (where N is the index number), and they must be embedded in the product object that is included in the products array. For example, this is a valid way to send a Product-scoped Custom Dimension into index 5:
{
  ecommerce: {
    purchase: {
      actionField: {
        id: 't1'
      },
      products: [{
        id: 'p1',
        dimension5: 'Black' // Product-scoped Custom Dimension in index 5
      }]
    }
  }
}
As you can see, dimension5 is in the object within in the products array.
Because of this rather rigid way of adding the dimensions and metrics, I suggest taking a look at the Custom JavaScript variable option for mutating the object pushed into dataLayer into a valid Enhanced Ecommerce object.
THE PRODUCT LIST
Product List is a very important attribute in Enhanced Ecommerce tracking. For one, it’s really one of the only places in Enhanced Ecommerce where some sort of attribution takes place. But also, it’s a great way to look at how different parts of the site contribute to the success of your ecommerce efforts.
The Product List is a key that you can add into the actionField object of all Action data types. You can also add it to Impression View objects directly.
The attribution works in a very specific way. When you send the list attribute in one of your Enhanced Ecommerce actions or impressions, then after that every single subsequent Enhanced Ecommerce action will be credited to that list as long as the product IDs in those subsequent actions match those of the one where you sent the list.
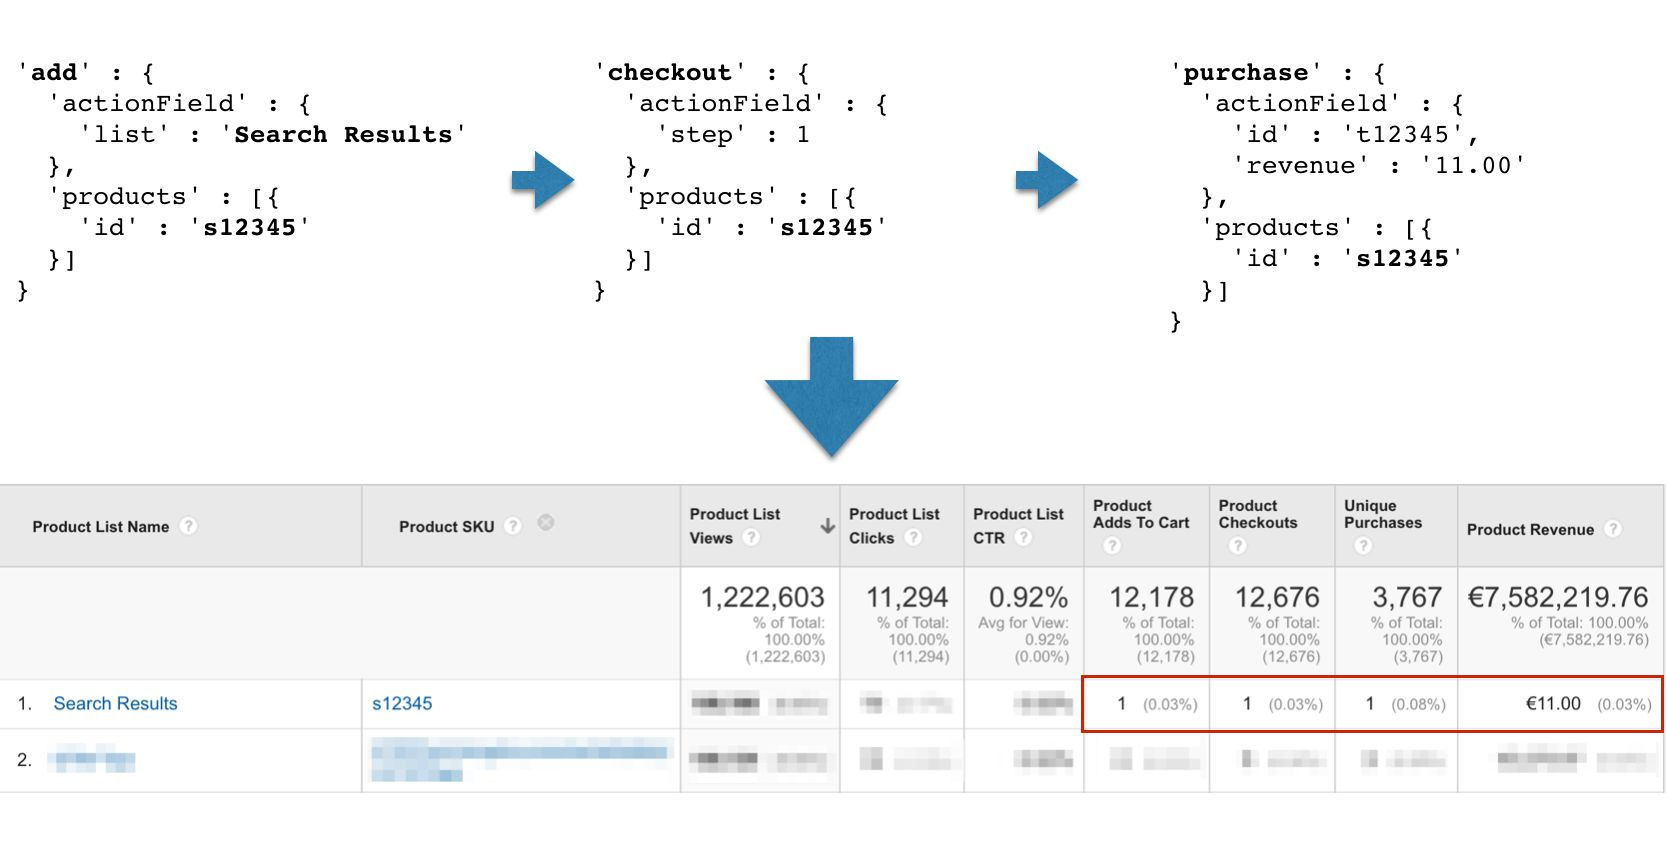
In other words, if you send a Product Detail View for a product with ID 123, and you use the list value “discount”, then every single subsequent Enhanced Ecommerce action for a product with ID 123 within that session will be attributed to that list.
As soon as the Product ID changes or you send some other list value, this funnel will break and a new one will start.
You’ll also see plenty of (not set) product lists in your reports. This is due to sessions expiring and new ones starting without any Product List information. Naturally, if your funnel doesn’t include a Product List for all possible interactions, you’ll see (not set) due to this, too.
Do note that attribution is always session-scoped, so if the session timeout is reached or the session is broken for some other reason, attribution will break, too.
If this sounds confusing, please read my article on the topic.
LOCAL CURRENCY
If visitors to your site can choose to shop with different currencies, you can utilize Google Analytics’ Local Currency feature to normalize these values once they hit your GA reports. All you need to do is specify the currency code either directly in the dataLayer object, or as a field in the tag which sends the Enhanced Ecommerce data to GA.
For example, here’s what a dataLayer.push() for a purchase made with Euros would look like:
window.dataLayer = window.dataLayer || [];
window.dataLayer.push({
  event: 'eec.purchase',
  ecommerce: {
    currencyCode: 'EUR',
    purchase: {
      actionField: {
        id: 'order_id',
        revenue: '11.00'
      },
      products: [{
        id: 'product_id',
        price: '11.00',
        quantity: 1
      }]
    }
  }
});
Note that if you use a local currency, remember to set keys like revenue and price in that local currency (so no need to do any conversions in the client).
GA will then convert these local currencies to whatever currency you have configured in the Google Analytics view.
If you want to add this currency code as a field in the tag (or Google Analytics Settings variable), you can add it by browsing to Fields to Set, and adding a new field:
Field name: currencyCode
Value: EUR
Instead of “EUR”, you can use a variable that pulls the currency code from e.g. the Data Layer or a browser cookie.
REMEMBER: BE CONSISTENT
One very important thing about Enhanced Ecommerce is that it’s (mostly) hit-scoped. The only exception is the minimal attribution with Product Lists and promotions.
In other words, if you send a Product Category of T-Shirt with a product in a Product Detail View, that information will only be available to queries involving Product Detail Views and that particular product. Nothing carries over or persists to the subsequent hits.
You’ll need to include all metadata about all products and all actions in all Enhanced Ecommerce objects.

This is one of the reasons why DOM scraping is not a good idea. It’s rare to see the same information on every single page where you have Enhanced Ecommerce actions.
This is also one of the reasons why implementing Enhanced Ecommerce might be a headache to developers. It’s possible that the different parts of the funnel are governed by different systems. For example, a fairly typical CMS setup could handle Product Detail Views, but then cart additions are done using a SaaS cart service, checkout is done using PayPal, and purchase receipt page is yet another system.
In order to persist all product data from one page to another, you might need to introduce client-side persistence using cookies or browser storage, for example.
DATA TYPES: ACTIONS
Actions are Enhanced Ecommerce events that include some type of user-initiated action. This isn’t always a clear definition, and e.g. Product Detail Views could arguably not be user-initiated actions. But that’s the definition that Google uses.
The following chapters will depict what the dataLayer object for each action should look like, and what a typical tag/trigger combination would be.
PRODUCT DETAIL VIEWS
Product Detail Views are typically sent when the user views details about a product. This is, again typically, on a dedicated product page, but it could just as well be expanded content in a search results list, or something else.
Data Layer composition
Available fields in the ecommerce object:
| Key | Type | Example | Comment |
|---|---|---|---|
actionField.list |
String | 'Expanded content' |
Where the Product Detail View occurred. Useful if you want to see how different “lists” contribute to funnel success. |
products[].id |
String | 'P12345' |
The SKU of the product. I recommend sending any variant IDs using a Product-scoped Custom Dimension. |
products[].name |
String | 'T-Shirt' |
The name of the product. Any variant name can be sent with the variant key. |
products[].category |
String | 'clothes/shirts/t-shirts' |
Product category of the item. Can have maximum five levels of hierarchy. |
products[].variant |
String | 'Large' |
What variant of the main product this is. |
products[].brand |
String | 'NIKE' |
The brand name of the product. |
products[].dimensionN |
String | 'Blue' |
A Product-scoped Custom Dimension for index number N. |
products[].metricN |
Integer | 3 |
A Product-scoped Custom Metric for index number N. |
This is what the dataLayer.push() for a Product Detail View would look like with all the relevant keys populated:
window.dataLayer = window.dataLayer || [];
window.dataLayer.push({
  event: 'eec.detail',
  ecommerce: {
    detail: {
      actionField: {
        list: 'Search Results'
      },
      products: [{
        id: 'product_id',
        name: 'MY PRODUCT',
        category: 'guides/google-tag-manager/enhanced-ecommerce',
        variant: 'Text',
        brand: 'SIMO AHAVA',
        dimension3: 'Ecommerce',
        metric5: 12,
        metric6: 1002
      }]
    }
  }
});
Remember, if you want to use a Custom JavaScript variable instead, the variable must return the
ecommerceobject from thedataLayer.push()above.
Tag configuration example
Typical Event tag:

The trigger would be a Custom Event trigger with the following setting:
Event name: eec.detail
ADD TO CART
The Add to Cart hit is sent whenever a product (or products) are added to cart. The quantity of each product needs to reflect the number of items that were added to the cart in this action, and not the final tally of each item in the cart.
Data Layer composition
Available fields in the ecommerce object:
| Key | Type | Example | Comment |
|---|---|---|---|
actionField.list |
String | 'Search results' |
Where the Add to Cart happened. If there are multiple places on the site where products can be added to cart, it’s a good idea to differentiate between them using the Product List attribute. |
products[].id |
String | 'P12345' |
The SKU of the product. |
products[].name |
String | 'T-Shirt' |
The name of the product. |
products[].category |
String | 'clothes/shirts/t-shirts' |
Product category of the item. Can have maximum five levels of hierarchy. |
products[].variant |
String | 'Large' |
What variant of the main product this is. |
products[].brand |
String | 'NIKE' |
The brand name of the product. |
products[].quantity |
Integer | 1 |
The quantity of this product added to cart. |
products[].dimensionN |
String | 'Blue' |
A Product-scoped Custom Dimension for index number N. |
products[].metricN |
Integer | 3 |
A Product-scoped Custom Metric for index number N. |
This is what the dataLayer.push() for an Add to Cart would look like with all the relevant keys populated:
window.dataLayer = window.dataLayer || [];
window.dataLayer.push({
  event: 'eec.add',
  ecommerce: {
    add: {
      actionField: {
        list: 'Shopping cart'
      },
      products: [{
        id: 'product_id',
        name: 'MY PRODUCT',
        category: 'guides/google-tag-manager/enhanced-ecommerce',
        variant: 'Text',
        brand: 'SIMO AHAVA',
        quantity: 2,
        dimension3: 'Ecommerce',
        metric5: 12,
        metric6: 1002
      },{
        id: 'another_product_id',
        name: 'MY ADD-ON',
        quantity: 1
      }]
    }
  }
});
Remember, if you want to use a Custom JavaScript variable instead, the variable must return the
ecommerceobject from thedataLayer.push()above.
Tag configuration example
Typical Event tag:

The variable in Event Label is a Data Layer Variable that points to ecommerce.add.actionField.list. This returns the Product List of the hit, if any.
The trigger would be a Custom Event trigger with the following setting:
Event name: eec.add
REMOVE FROM CART
Remove from Cart is what you would send when items are removed from the cart. The quantity you send for each item needs to reflect the quantity that was removed in the action, and not the quantity of items remaining in the cart.
Data Layer composition
The Data Layer composition for Remove from Cart is identical to that of Add to Cart.
Similarly, the dataLayer.push() example would be identical, except the first key under ecommerce is named remove rather than add, and the event name is different:
window.dataLayer = window.dataLayer || [];
window.dataLayer.push({
  event: 'eec.remove',
  ecommerce: {
    remove: {
      actionField: {...},
      products: [...]
    }
  }
});
Remember, if you want to use a Custom JavaScript variable instead, the variable must return the
ecommerceobject from thedataLayer.push()above.
Tag configuration example
Typical Event tag:
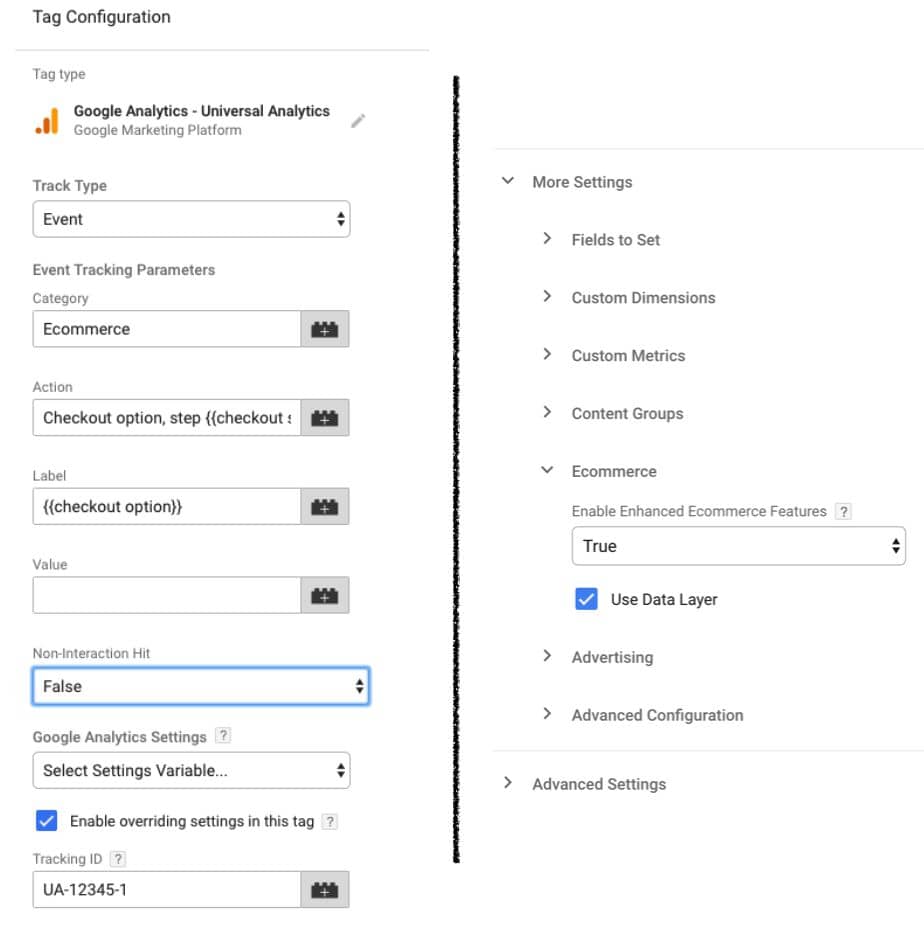
The variable in Event Label is a Data Layer Variable that points to ecommerce.remove.actionField.list. This returns the Product List of the hit, if any.
The trigger would be a Custom Event trigger with the following setting:
Event name: eec.remove
CHECKOUT
A Checkout is sent when the user enters the checkout funnel. For every discrete step in the funnel, you send a checkout hit to GA. Steps are typically pages (on a multi-page checkout) or sections of the form (on a single-page checkout).
The products array should only be sent with the first step. Sending it with any other step will do nothing.
You can also add an option key to the checkout hit, in case you want to send extra details about the checkout step itself (such as selected payment method or shipment method). Alternatively, you can use the Checkout Option action to send the option information after the step has first been sent-
Data Layer composition
Available fields in the ecommerce object:
| Key | Type | Example | Comment |
|---|---|---|---|
actionField.step |
Integer | 1 |
The number of the checkout step. These should be sent in order, where the first step is 1. You can define what these steps mean in the Google Analytics Admin user interface. |
actionField.option |
String | 'Visa' |
You can send the option key if there is extra metadata (e.g. shipping or payment method) you want to send with the step hit itself. |
products[].id |
String | 'P12345' |
The SKU of the product. |
products[].name |
String | 'T-Shirt' |
The name of the product. |
products[].category |
String | 'clothes/shirts/t-shirts' |
Product category of the item. Can have maximum five levels of hierarchy. |
products[].variant |
String | 'Large' |
What variant of the main product this is. |
products[].brand |
String | 'NIKE' |
The brand name of the product. |
products[].quantity |
Number | 3 |
The quantity of the given product checked out. |
products[].dimensionN |
String | 'Blue' |
A Product-scoped Custom Dimension for index number N. |
products[].metricN |
Integer | 3 |
A Product-scoped Custom Metric for index number N. |
This is what the dataLayer.push() for the first Checkout step would look like with all the relevant keys populated:
window.dataLayer = window.dataLayer || [];
window.dataLayer.push({
  event: 'eec.checkout',
  ecommerce: {
    checkout: {
      actionField: {
        step: 1
      },
      products: [{
        id: 'product_id',
        name: 'MY PRODUCT',
        category: 'guides/google-tag-manager/enhanced-ecommerce',
        variant: 'Text',
        brand: 'SIMO AHAVA',
        quantity: 2,
        dimension3: 'Ecommerce',
        metric5: 12,
        metric6: 1002
      },{
        id: 'another_product_id',
        name: 'MY ADD-ON',
        quantity: 1
      }]
    }
  }
});
The dataLayer.push() for the second Checkout step where you also send the payment method would look like this:
window.dataLayer = window.dataLayer || [];
window.dataLayer.push({
  event: 'eec.checkout',
  ecommerce: {
    checkout: {
      actionField: {
        step: 2,
        option: 'MasterCard'
      }
    }
  }
});
Remember, if you want to use a Custom JavaScript variable instead, the variable must return the
ecommerceobject from thedataLayer.push()above.
Tag configuration example
Typical Event tag:

The variables {{checkout step}} and {{checkout option}} are Data Layer variables for ecommerce.checkout.actionField.step and ecommerce.checkout.actionField.option, respectively. They return the corresponding values from the checkout hit.
The trigger would be a Custom Event trigger with the following setting:
Event name: eec.checkout
CHECKOUT OPTION
A Checkout option hit is always sent after the corresponding Checkout Step has already been sent. So you can’t send a Checkout option hit for step 2 if you haven’t first sent a regular Checkout hit for step 2.
Use the Checkout option hit to send extra information about a checkout step. For example, if Checkout step 2 is where the user chooses the payment method, you’ll want to send Checkout step 2 when the user first lands on the payment method selection page, and then the Checkout option hit after they’ve clicked or selected the payment method.
Data Layer composition
The dataLayer.push() is very simple. In actionField, you indicate with step to which Checkout step this option should be attached (Integer), and option is the option value itself.
window.dataLayer = window.dataLayer || [];
window.dataLayer.push({
  event: 'eec.checkout_option',
  ecommerce: {
    checkout_option: {
      actionField: {
        step: 2,
        option: 'Expedited delivery'
      }
    }
  }
});
Remember, if you want to use a Custom JavaScript variable instead, the variable must return the
ecommerceobject from thedataLayer.push()above.
Tag configuration example
Typical Event tag:

The trigger would be a Custom Event trigger with the following setting:
Event name: eec.checkout_option
PURCHASE
The Purchase hit is, arguably, the most important hit in the Enhanced Ecommerce funnel. Without a reliable Purchase hit being collected, all the funnels, attribution models, goal values, conversion calculations, and transaction data become fairly unusable.
In other words, make sure most of the resources is invested in getting the Purchase hit right.
Data Layer composition
Available fields in the ecommerce object:
| Key | Type | Example | Comment |
|---|---|---|---|
actionField.id |
String | order_12345 |
The unique order ID of the transaction. Should match the actual ID of the order. |
actionField.affiliation |
String | 'Simo Shop' |
Extra details about where the purchase happened. |
actionField.revenue |
String | '11.00' |
Total transaction value. You can include tax and shipping, or you can choose to send the revenue without tax and shipping. The value must not include anything else except number separated by a decimal point. Don’t use a comma as the separator, and don’t include any currency symbols. |
actionField.tax |
String | '1.00' |
Tax paid. Same formatting instructions as with revenue. |
actionField.shipping |
String | '2.00' |
Cost of shipping. Same formatting instructions as with revenue. |
actionField.coupon |
String | 'SUMMER2019' |
The coupon code that was used for the entire transaction. |
products[].id |
String | 'P12345' |
The SKU of the product. |
products[].name |
String | 'T-Shirt' |
The name of the product. |
products[].category |
String | 'clothes/shirts/t-shirts' |
Product category of the item. Can have maximum five levels of hierarchy. |
products[].variant |
String | 'Large' |
What variant of the main product this is. |
products[].brand |
String | 'NIKE' |
The brand name of the product. |
products[].quantity |
Number | 3 |
The quantity of the given product purchased. |
products[].price |
String | '10.00' |
The price of one item. Same formatting instructions as with revenue. |
products[].coupon |
String | 'SHIRTSOFF' |
The coupon code used for this particular product. |
products[].dimensionN |
String | 'Blue' |
A Product-scoped Custom Dimension for index number N. |
products[].metricN |
Integer | 3 |
A Product-scoped Custom Metric for index number N. |
This is what the dataLayer.push() for a Purchase hit would look like with all the relevant keys populated:
window.dataLayer = window.dataLayer || [];
window.dataLayer.push({
  event: 'eec.purchase',
  ecommerce: {
    currencyCode: 'EUR',
    purchase: {
      actionField: {
        id: 'ORDER12345',
        affiliation: 'Simo\'s shop',
        revenue: '11.00',
        tax: '1.00',
        shipping: '2.00',
        coupon: 'SUMMER2019'
      },
      products: [{
        id: 'product_id',
        name: 'MY PRODUCT',
        category: 'guides/google-tag-manager/enhanced-ecommerce',
        variant: 'Text',
        brand: 'SIMO AHAVA',
        quantity: 2,
        price: '3.50',
        dimension3: 'Ecommerce',
        metric5: 12,
        metric6: 1002
      },{
        id: 'another_product_id',
        name: 'MY ADD-ON',
        price: '1.00',
        quantity: 1,
        coupon: 'ADD-ONS OFF'
      }]
    }
  }
});
Remember, if you want to use a Custom JavaScript variable instead, the variable must return the
ecommerceobject from thedataLayer.push()above.
Tag configuration example
Typical Event tag:
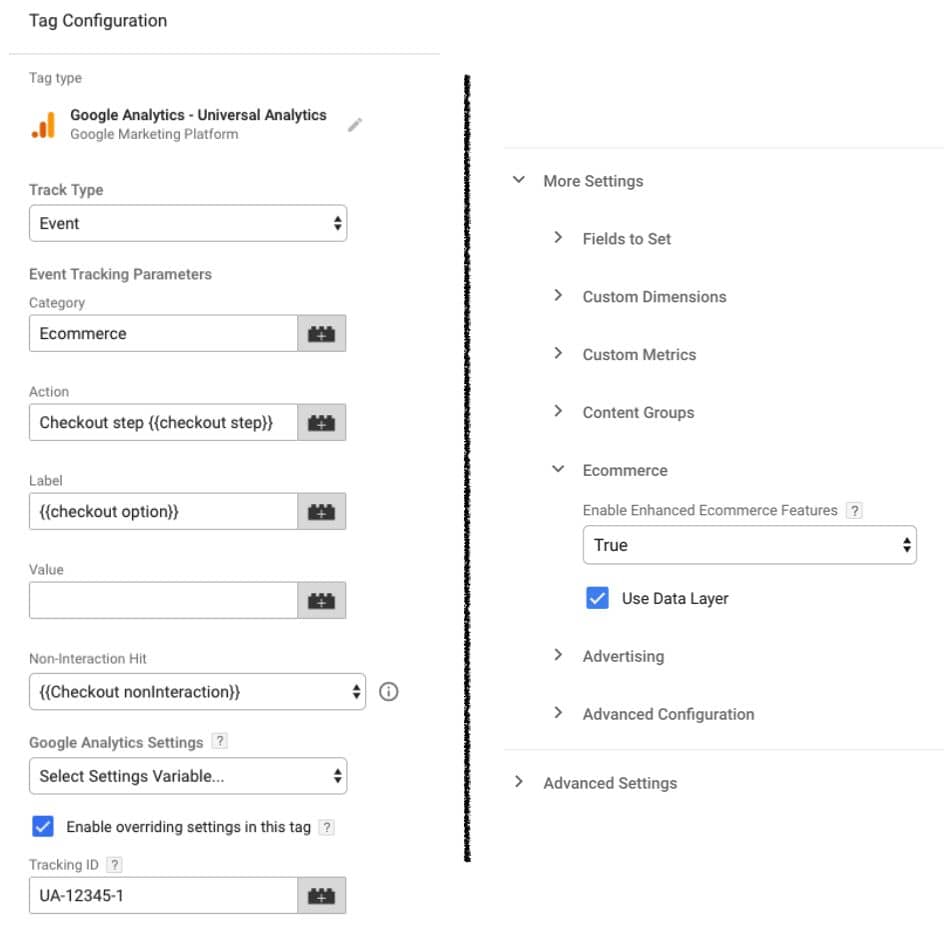
The variable {{order id}} is a Data Layer variable for ecommerce.purchase.actionField.id, and it returns the transaction ID. The variable {{revenue}} is a Data Layer variable for ecommerce.purchase.actionField.revenue, and it returns the revenue of the transaction.
The trigger would be a Custom Event trigger with the following setting:
Event name: eec.purchase
REFUND
The Refund hit should be sent if the user requests a refund of the product through the website.
Important: this does NOT remove the original transaction or negate it in any way. The Refund hit is a hit of its own, and will be used to populate metrics like “Refund Amount” and “Product Refund Amount”. This makes the Refund hit type fairly useless, in my opinion, but it might have its uses if you simply want to know whether refunds are requested via the website.
Data Layer composition
Available fields in the ecommerce object:
| Key | Type | Example | Comment |
|---|---|---|---|
actionField.id |
String | order_12345 |
If the user requested a full refund of the order, then you only need to send the transaction ID with the hit. |
products[].id |
String | 'P12345' |
If the user only wanted a refund for some items, you need to also send the id of each along with the quantity refunded. |
products[].quantity |
Number | 3 |
The quantity of the given item refunded. |
This is what the dataLayer.push() would look like for a completely refunded transaction:
window.dataLayer = window.dataLayer || [];
window.dataLayer.push({
  event: 'eec.refund',
  ecommerce: {
    refund: {
      actionField: {
        id: 'ORDER12345'
      }
    }
  }
});
This is what the dataLayer.push() would look like for a partially refunded transaction:
window.dataLayer = window.dataLayer || [];
window.dataLayer.push({
  event: 'eec.refund',
  ecommerce: {
    refund: {
      actionField: {
        id: 'ORDER12345'
      },
      products: [{
        id: 'another_product_id',
        quantity: 1
      }]
    }
  }
});
Remember, if you want to use a Custom JavaScript variable instead, the variable must return the
ecommerceobject from thedataLayer.push()above.
Tag configuration example
Typical Event tag:

The variable {{order id}} returns the transaction ID that was refunded. The variable {{total quantity refunded}} is a Custom JavaScript variable which returns the total quantity of all items that were refunded.
The trigger would be a Custom Event trigger with the following setting:
Event name: eec.refund
DATA TYPES: IMPRESSIONS
Impressions are what you send when the user sees a listing of products in a Search Results page, for example. Basically, wherever you show a listing of products without going into enough detail for that to count as a Product Detail View, use impressions.
Impressions comprise of a “view”, where the user sees the product in a listing, and a “click”, where the user clicks a product in the listing (to go to its Product Detail page, for example).
Note that you might be tempted to send all the products on the listing page as impressions in a single hit. This might get you into trouble with Google Analytics’ maximum payload size of 8KB (that’s typically around 30-50 product impressions). To avoid this, you can do a number of things, such as automatically reduce the payload length, or split the impressions into multiple hits.
The best thing you can do, but also the most complicated thing to implement, is to create a true view listener, where impressions are sent in batches depending on what the user actually sees in the viewport. So when the user scrolls to a new set of product impressions, you send only those impressions in a hit once they’ve all entered the viewport. This requires a lot of coordination with your developers, but it’s well worth the effort.
IMPRESSION VIEWS
Impression Views are collected when the user sees a product impression in some listing, such as Search Results, Recently Viewed Products, or Related Products.
With Impression Views, it’s important to populate the list field with a label that describes the listing where the impression view happened.
Data Layer composition
Available fields in the ecommerce object:
| Key | Type | Example | Comment |
|---|---|---|---|
impressions[].id |
String | product_id |
The SKU of the product. |
impressions[].name |
String | 'T-Shirt' |
The name of the product. |
impressions[].category |
String | 'clothes/shirts/t-shirts' |
Product category of the item. Can have maximum five levels of hierarchy. |
impressions[].variant |
String | 'Large' |
What variant of the main product this is. |
impressions[].brand |
String | 'NIKE' |
The brand name of the product. |
impressions[].list |
String | 'Related products' |
The list name where the impression was viewed. |
impressiosn[].position |
Integer | 3 |
The position of the item in the list (e.g. was it the first item in the list, the second, the third, etc.). |
impressions[].dimensionN |
String | 'Blue' |
A Product-scoped Custom Dimension for index number N. |
impressions[].metricN |
Integer | 3 |
A Product-scoped Custom Metric for index number N. |
This is what the dataLayer.push() would look like for a set of product impressions with all the relevant keys included:
window.dataLayer = window.dataLayer || [];
window.dataLayer.push({
  event: 'eec.impressionView',
  ecommerce: {
    impressions: [{
      id: 'product_1',
      name: 'Great article',
      category: 'guides/google-tag-manager/javascript',
      list: 'Related products',
      position: 1,
      dimension3: '500 pages'
    },{
      id: 'product_2',
      name: 'Greater article',
      category: 'guides/google-tag-manager/java',
      list: 'Related products',
      position: 2,
      dimension3: '1500 pages'
    }]
  }
});
Remember, if you want to use a Custom JavaScript variable instead, the variable must return the
ecommerceobject from thedataLayer.push()above.
Tag configuration example
Typical Event tag:

The trigger would be a Custom Event trigger with the following setting:
Event name: eec.impressionView
IMPRESSION CLICKS
Impression Clicks (or Product Clicks) are technically Actions, but I decided to group them under Impressions since that’s where they belong.
An Impression Click is sent when an impression that the user has viewed is clicked. It’s an important metric to follow in case you are measuring Impression Views, because once you start collecting Impression Clicks, too, you can measure things like click-through-rates per product list, position, and individual impression.
Data Layer composition
Available fields in the ecommerce object:
| Key | Type | Example | Comment |
|---|---|---|---|
actionField.list |
String | 'Related products' |
The list where the user first viewed the product and then clicked it. Make sure the value of the list attribute matches that sent with the Impression View. |
products[].id |
String | 'P12345' |
The SKU of the product. |
products[].name |
String | 'T-Shirt' |
The name of the product. |
products[].category |
String | 'clothes/shirts/t-shirts' |
Product category of the item. Can have maximum five levels of hierarchy. |
products[].variant |
String | 'Large' |
What variant of the main product this is. |
products[].brand |
String | 'NIKE' |
The brand name of the product. |
products[].position |
Integer | 1 |
The position of the impression that was clicked. |
products[].dimensionN |
String | 'Blue' |
A Product-scoped Custom Dimension for index number N. |
products[].metricN |
Integer | 3 |
A Product-scoped Custom Metric for index number N. |
This is what the dataLayer.push() for an Impression Click would look like with all the relevant keys populated:
window.dataLayer = window.dataLayer || [];
window.dataLayer.push({
  event: 'eec.impressionClick',
  ecommerce: {
    click: {
      actionField: {
        list: 'Related products'
      },
      products: [{
        id: 'product_2',
        name: 'Greater article',
        category: 'guides/google-tag-manager/java',
        position: 2,
        dimension3: '1500 pages'
      }]
    }
  }
});
Remember, if you want to use a Custom JavaScript variable instead, the variable must return the
ecommerceobject from thedataLayer.push()above.
Tag configuration example
Typical Event tag:

The trigger would be a Custom Event trigger with the following setting:
Event name: eec.impressionClick
DATA TYPES: PROMOTIONS
Promotions are similar to impressions in that they, too, comprise a View and a Click. However, unlike any of the other Enhanced Ecommerce data types, promotions do not involve products. Rather, you are measuring the promotions themselves. These would typically be banners, product category highlights or something similar.
With promotion tracking, you can measure the success of your site marketing efforts, by seeing if viewing and clicking individual banners and advertisements lead to ecommerce success.
PROMOTION VIEWS
Promotion Views are sent when the user sees a promotion on the site. As with impressions, you can send more than one Promotion View in a hit, but as with impressions, you need to be careful not to group too many views into one hit, as you might be in danger of breaching the 8KB size limit for the Google Analytics payload.
Data Layer composition
Available fields in the ecommerce object:
| Key | Type | Example | Comment |
|---|---|---|---|
promotions[].id |
String | 'summer_campaign' |
Unique identifier for the promotion. |
promotions[].name |
String | 'Summer Campaign 2019' |
The name of the promotion. |
promotions[].creative |
String | 'front_page_banner_1' |
A name for the creative where the promotion is showing. |
promotions[].position |
String | 'slot_2' |
Some way to distinguish the position of the promotion in the creative (e.g. second slide of a carousel). |
This is what the dataLayer.push() would look like for a set of Promotion Views with all the relevant keys included:
window.dataLayer = window.dataLayer || [];
window.dataLayer.push({
  event: 'eec.promotionView',
  ecommerce: {
    promoView: {
      promotions: [{
        id: 'summer_campaign',
        name: 'Summer Campaign 2019',
        creative: 'Front Page Carousel',
        position: 'Slide 1'
      },{
        id: 'fall_campaign',
        name: 'Fall Campaign 2019',
        creative: 'Front Page Carousel',
        position: 'Slide 2'
      }]
    }
  }
});
Remember, if you want to use a Custom JavaScript variable instead, the variable must return the
ecommerceobject from thedataLayer.push()above.
Tag configuration example
Typical Event tag:
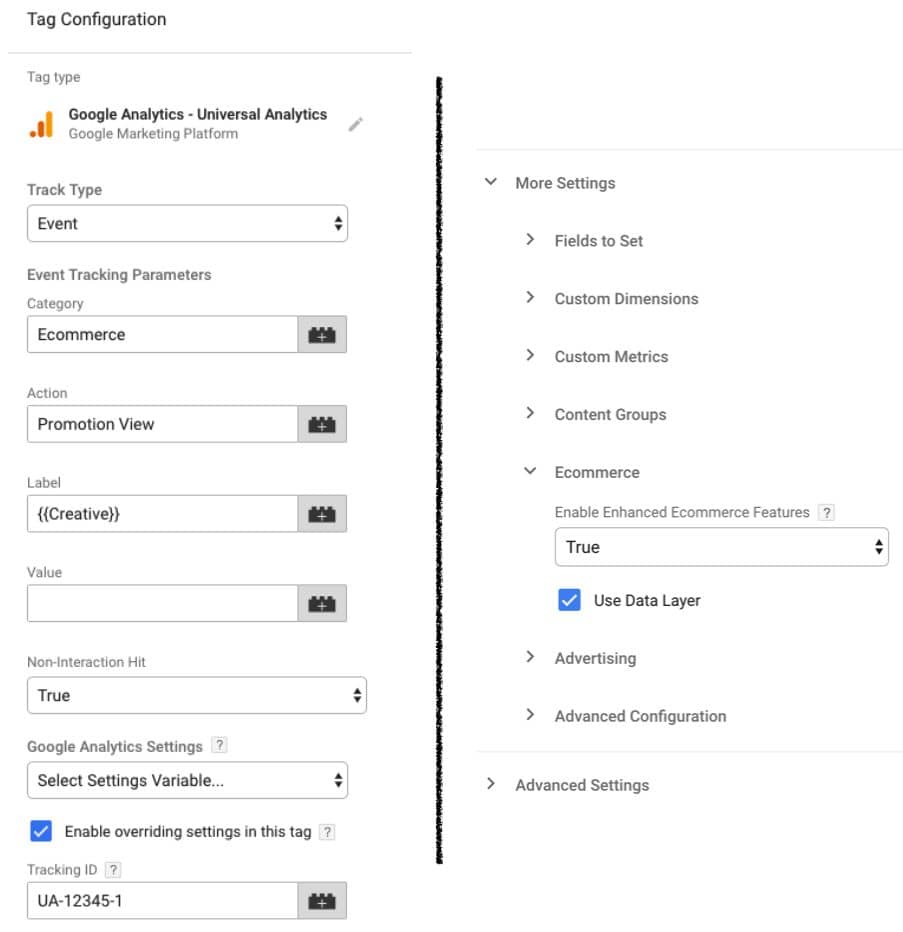
The trigger would be a Custom Event trigger with the following setting:
Event name: eec.promotionView
PROMOTION CLICKS
A Promotion Click is collected when an individual promotion is clicked. It’s important to measure these if you are also measuring Promotion Views, because this way you’ll get a solid understanding of the click-through rate of individual promotions and how these promotions are involved in generating revenue in your webstore.
Available fields in the ecommerce object:
| Key | Type | Example | Comment |
|---|---|---|---|
promotions[].id |
String | 'summer_campaign' |
Unique identifier for the promotion. |
promotions[].name |
String | 'Summer Campaign 2019' |
The name of the promotion. |
promotions[].creative |
String | 'front_page_banner_1' |
A name for the creative where the promotion was clicked. |
promotions[].position |
String | 'slot_2' |
Some way to distinguish the position of the promotion in the creative (e.g. second slide of a carousel). |
This is what the dataLayer.push() would look like for a Promotion Views with all the relevant keys included:
window.dataLayer = window.dataLayer || [];
window.dataLayer.push({
  event: 'eec.promotionClick',
  ecommerce: {
    promoClick: {
      promotions: [{
        id: 'fall_campaign',
        name: 'Fall Campaign 2019',
        creative: 'Front Page Carousel',
        position: 'Slide 2'
      }]
    }
  }
});
Remember, if you want to use a Custom JavaScript variable instead, the variable must return the
ecommerceobject from thedataLayer.push()above.
Tag configuration example
Typical Event tag:
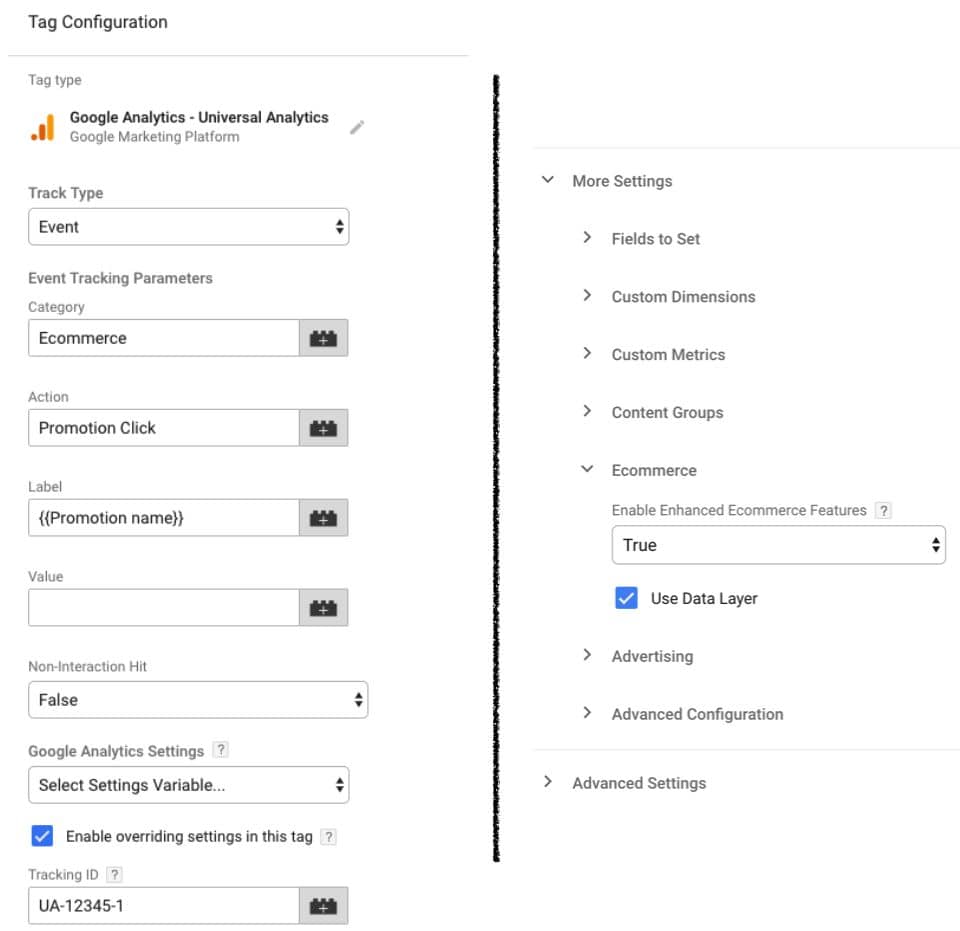
The trigger would be a Custom Event trigger with the following setting:
Event name: eec.promotionClick
DEBUGGING THE SETUP
Once you have everything in place, you’ll want to debug your setup. The things you are looking for are:
- Are all the keys configured in the
dataLayer.push()(or the Custom JavaScript variable) getting picked up and being sent to Google Analytics? - Is the payload length too long?
- Is there a risk of data duplication with some hits?
To debug these, you really only need three tools: GTM’s own Preview mode, the Google Analytics Debugger browser extension, and Google Chrome browser’s DevTools. Yes, there are plenty of other tools you can use, but these have proven to be more than enough in my own experience.
PREVIEW MODE
With Preview mode, you can analyze what fields were sent with your Enhanced Ecommerce -enabled Google Analytics tag. You can also compare these fields with what was originally pushed into dataLayer, or what the Custom JavaScript variable returned.
Once you have your ecommerce object either pushed into dataLayer or generated by a Custom JavaScript variable, the next step is to go to Preview mode, then browsing the site and generating the action that sends the ecommerce data to GA.
Here’s what you’re looking for in the Preview mode:

In the left-hand side, you’re looking for the Event name that you pushed into dataLayer with the 'event' key. Remember, you should add one in to every single push?
Click that event, and you should see your Enhanced Ecommerce tag in the list tags that fired. If you don’t, it means there’s something wrong with its trigger. So find the tag in the list of tags that did not fire, select it, and scroll down to its triggers. You’ll see a red X next to each trigger condition that failed, so double-check them and make sure the conditions pass when they should.
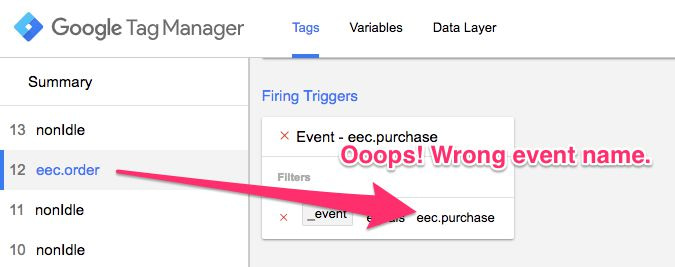
Anyway, if the tag DID fire and if it sent an event (or page view) hit to Google Analytics successfully, you’ll see Succeeded as its Firing Status. Double-check that the Enhanced Ecommerce settings are correct, too.
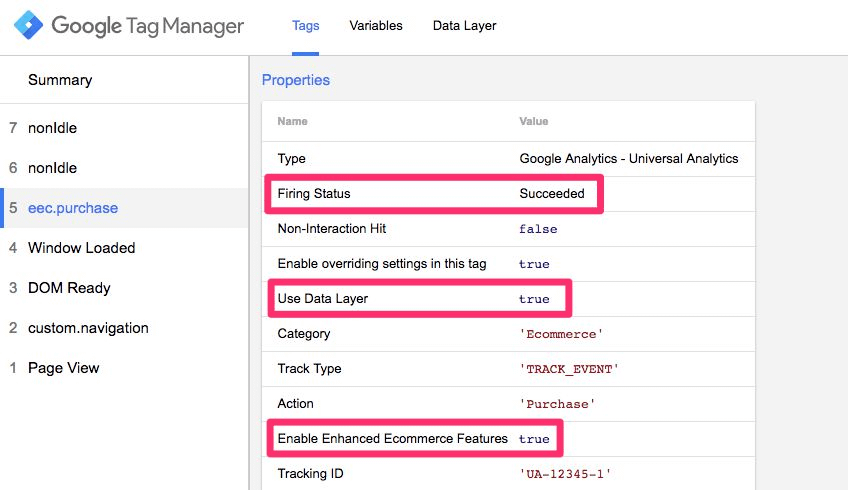
GOOGLE ANALYTICS DEBUGGER AND CHROME DEVTOOLS
Now you know that your tag fired and that it sent the event/pageview to GA successfully. But what about the Enhanced Ecommerce payload? Were all the keys and values you configured included?
For this, you have plenty of options. You can use a tool like Google Tag Assistant which will tell you what parameters were included in the hit. Or you can use David Vallejo’s excellent GTM Debug Chrome extension, which has a great visualization of the Enhanced Ecommerce data.
The key is to see what data was included in the hit and to compare that against what was pushed into dataLayer or what the Custom JavaScript variable returned.
Personally, I simply use the Google Analytics Debugger extension. It uses the JavaScript Console of the web browser to output a log of all the interactions with Google Analytics trackers on the page.
For example, in my Purchase example above, this is what the GA debugger will tell me:

Here, you can see that the hit is missing the tax that I pushed into dataLayer. The key I used was orderTax, as you can see in the screenshot.
So now I open this guide again, scroll all the way to the Purchase hit, look at the Data Layer Composition example, and see my mistake. It shouldn’t be orderTax, it should be just tax.
I fix the dataLayer.push(), re-run the test and now I can see that everything works.

Here’s the most important thing about debugging Enhanced Ecommerce hits:
Never be satisfied with using Preview mode alone. Preview mode will only tell you if a tag fired, NOT if it sent the correct data to Google Analytics. You must debug the actual payload sent to Google Analytics, too. For this, Chrome’s DevTools are a great tool, but there are plenty of extensions out there that outline the data in a clear and concise manner.
GOLDEN RULES OF ENHANCED ECOMMERCE
Now follow some Enhanced Ecommerce tips that I consider absolutely vital for any implementation. I’ve accumulated them over years of practice, and I don’t hesitate to call them “rules” even if I’m typically very cautious to give any kind of recommendations to anyone.
So read through them, and if you have more suggestions for golden rules, let me know in the comments!
DO WHATEVER YOU WANT
This is important. You can use Enhanced Ecommerce however you want. There’s no law that forces you to use the data types in the way that Google recommends you to.
For example, not all websites have a shopping cart. You directly buy products from product pages. In those cases, don’t send the Add to Cart event. Or, alternatively, send a dummy Add to Cart whenever the user moves to the checkout funnel.
It’s entirely up to you.
Heck, you can even use Enhanced Ecommerce for something completely unrelated to ecommerce. For example, you can use it to track content engagement on your site.
THE PURCHASE ACTION IS MOST IMPORTANT
The Purchase action is absolutely the most important part of Enhanced Ecommerce. You can ignore or mess up all the other steps in the funnel, but you will never want to screw up the purchase hit. So many metrics and dimensions rely on the transaction data to be accurate.
When you’re calculating the investment for implementing Enhanced Ecommerce, add some extra buffer to getting the purchase right. It’s that important.
ONLY ONE ACTION PER HIT
Remember to only send one action per hit. There are other limitations, too, but this is the most common mistake.
You might be tempted to send multiple Checkout steps, for example, but this would violate this rule.
You can only include a single action in a dataLayer.push (or in the returned object from a Custom JavaScript variable), so make sure to debug this thoroughly.
INCLUDE ALL THE NECESSARY DETAILS IN EVERY HIT
Consistency is key. If you send product details such as product variant, brand and category in a Product Detail View, you’ll want to send these with all the subsequent actions (Add to Cart, Checkout, Purchase), too. Otherwise when analyzing the funnel using any of these dimensions as the primary dimension of analysis, you’ll only see data for Product Detail Views and not for any of the other steps.
There is no automatic persistence or attribution of product metadata – you must send them with every single hit.
Also, the metadata must be in the same format in every step. You can’t send brand: 'NIKE' in one step, brand: 'Nike' in another, and brand: 'nike' in another, and expect Google Analytics to treat these as the same value. They will generate three different rows with their own funnels when analyzed using Product Brand as the dimension.
THERE IS SOME ATTRIBUTION
Note that there is some attribution in Enhanced Ecommerce; in Product Lists and Promotions, specifically.
When a product is purchased, this purchase will be attributed to the last promotion the user clicked (or viewed if there was no click) in the session.
Similarly, when any Ecommerce action is taken, this action is also attributed to the last Product List that was included in an earlier action, as long as the Product ID in these two actions match.
In other words, if you send a Product Detail View for product with ID my_shirt, using product_page as the Product List attribute value, then any subsequent action that also involves my_shirt will be attributed to the product_page list. Useful, right?
Just remember that attribution is session-scoped. If the session timeout is reached, or if the session cuts off for some other reason, any Product List and Promotion attribution information is lost. That’s why you might see (not set) in the corresponding reports.
BE WARY OF THE PAYLOAD SIZE LIMIT
Remember that the maximum payload length of a Google Analytics request is 8192 bytes. If you’re collecting Product Impressions, or if the typical cart size in your store is 30+ products, you’ll want to see if you’re approaching this limit.
The Google Analytics Debugger will output an error into the console in case you are trying to send hits that are longer than this limit.
See this article for information how to track payload length, and this for a little tool that automatically reduces the payload length.
FURTHER READING
I’ve written a lot about Enhanced Ecommerce. The easiest way to find this content is to simply do a search on my site.
As for other content, here is a random selection of goodies found on the web:
- Google’s Enhanced Ecommerce Developer Guide for Universal Analytics
- Google’s Enhanced Ecommerce Developer Guide for Google Tag Manager
- Google’s Enhanced Ecommerce Demo Store
- Bounteous’ Enhanced Ecommerce Guide
- Bounteous’ Enhanced Ecommerce Variable Pack
- Google Tag Manager For WordPress Enhanced Ecommerce Guide
SUMMARY
I hope this guide is useful! It is written as an implementation manual rather than a guide for Enhanced Ecommerce in general.
Google’s own documentation is excellent, but there are places where it’s a bit misleading. With this guide, I wanted to get all the relevant information into one place.
Note that I don’t mention Google Tag Manager For Firebase at all. There’s a reason for that: it’s still underdeveloped. There is basic support for Enhanced Ecommerce, but nothing for Product-scoped Custom Dimensions or Metrics, for example. Hopefully these will be introduced soon into the SDKs.