
RESOURCES
- Highlights
- https://github.com/drduh/macOS-Security-and-Privacy-Guide
- filevault – on | firmware password
- Still best key creation breakdown: https://confluence.atlassian.com/bitbucketserver/ssh-access-keys-for-system-use-776639781.html
- brew install neovim
MAC OS INSTALL: https://github.com/neovim/neovim/wiki/Installing-Neovim
nvim – :help-nvim – tutor
- .
The following commands will greatly increase the accessibility of your Mac during development.
Show Library folder:
[code]chflags nohidden ~/Library[/code]
Show hidden files:
[code]defaults write com.apple.finder AppleShowAllFiles YES[/code]
SShow path bar:
[code]defaults write com.apple.finder ShowPathbar -bool true[/code]
SShow status bar:
[code]defaults write com.apple.finder ShowStatusBar -bool true[/code]
SGo to System Preferences for the following:
Keyboard > Text > Disable “Correct spelling automatically”
Security and Privacy > Firewall > On
Security and Privacy > General > Allow App Store and identified developers
File Sharing > Off
https://www.stuartellis.name/articles/mac-setup
Security –
Overall Security / Privacy Info
https://github.com/drduh/macOS-Security-and-Privacy-Guide
How to Set up an Apple Mac for Software Development
December 23, 2020
A guide to setting up an Apple Mac for DevOps and software development. This is current for macOS 10.14 (Catalina).
Do This First!
Log in once, run Software Update, and ensure that the operating system is at the latest point release. After all of the updates have been applied, restart the computer.
Log in again and create an Admin user account for your use. If other people will be using the machine, create Standard accounts for them. Log out of the initial account, and log in to the Admin account that you have just created.
Always log in with this new Admin account. The benefit of leaving the initial account untouched is that it ensures that you always have a working account to login with.
Admin accounts have sudo privileges: All Admin accounts on a Mac may use sudo to run command-line utilities with administrative (root) privileges.
You should also find an external hard drive. Begin using Time Machine as soon as possible, as it provides the most easy method for backing up your system.
Configuring a User Account
Configuring The Trackpad
To make the trackpad behave correctly, ensure that these settings are enabled:
- System Preferences > Trackpad > Tap to click
- System Preferences > Accessibility > Mouse & Trackpad > Trackpad Options… > Enable dragging
Creating a Private Applications Folder
Once you have logged into your account, create a folder called Applications within your home folder. Whenever you are prompted to drag a new applications into the global Applications folder, put it in this private Applications folder instead. Some applications have to be installed to global folders, but in most cases you can keep the system directories clean by storing third-party products in your private Applications folder.
Securing the Safari Browser
Whether or not you regularly use Safari, you should open it once, and adjust the settings in case that you use it later.
First, choose Safari > Preferences > General and deselect the option Open “safe” files after downloading.
Second, go to Safari > Preferences > Search. Decide which search engine that you want to use. Ensure that Safari Suggestions is not enabled.
Then, check the plug-in settings. Go to Safari > Preferences > Security > Plug-in Settings… and review the plug-ins and settings.
Configuring Security
Apple provide quite secure operating systems, but unfortunately convenience has won out over security in a few places. These can easily be corrected by changing a few settings. If you are using a laptop then you should probably make all of these changes as soon as possible.
Basic Settings
Select System Preferences > Security & Privacy, and set the following:
- Under General, set require a password after sleep or screen saver begins to immediately
- Click Advanced… and select Require an administrator password to access system-wide preferences
- Under Firewall, click Turn Firewall On.
- Under Privacy, select Analytics and ensure that the options are not enabled.
Disable Spotlight
By default, Spotlight sends queries to Apple. Unless you want this feature, turn it off.
Select System Preferences > Spotlight > Search Results, and ensure that Spotlight Suggestions is not enabled.
Enable File Vault NOW
Current versions of macOS include File Vault 2, a full-disk encryption system that has little in common with the much more limited File Vault 1. You should enable File Vault NOW, because it is the only protection against anyone with physical access to your computer. All other security measures will be completely bypassed if someone with physical access simply restarts the computer with a bootable pen drive.
File Vault really is secure, which means that you can permanently lose access to your data if you lose the passwords and the recovery key.
Set a Firmware Password
Set a password to stop access to the Recovery mode. Otherwise, any malicious individual can change the firmware settings to boot from a disc or device of their choosing. If you did not enable File Vault, then the attacker will have complete access to all of the files on the system.
Apple Knowledge Base article HT204455 provides full details.
Setting Up Time Machine Backups
Time Machine is simple to set up. Just take a suitably large external hard drive, plug it in to your Mac, and agree when prompted. The drive setup process will reformat the hard drive. The only settings that may need to change are the exclusions.
Choose System Preferences > Time Machine, and click Options. Add to the exclusions list any folders that contain ISO disk images, virtual machines, or database files (such as Entourage). If the external hard drive is short of space, exclude the System folder.
Setting Up for Development
The first step is to install a compiler. The easiest way to install one is with the Xcode Command Line Tools package.
Once you have the compiler that is provided by Xcode, you can use Homebrew to install everything else that you need.
Getting Xcode
Apple now provide the Xcode suite as a free download from the App Store. To install Xcode Command Line Tools, install Xcode from the App Store, then open a Terminal window and enter the following command:
xcode-select --install
Setting Up Homebrew
Homebrew provides a package management system for macOS, enabling you to quickly install and update the tools and libraries that you need. Follow the instructions on the site.
You should also amend your PATH, so that the versions of tools that are installed with Homebrew take precedence over others. To do this, edit the file .zshrc in your home directory to include this line:
export PATH="/usr/local/bin:/usr/local/sbin:~/bin:$PATH"
You need to close all terminal windows for this change to take effect.
To check that Homebrew is installed correctly, run this command in a terminal window:
brew doctor
To update the index of available packages, run this command in a terminal window:
brew update
Once you have set up Homebrew, use the brew install command to add command-line software to your Mac, and brew cask install to add graphical software. For example, this command installs the Slack app:
brew cask install slack
Enabling Auto Completion of Commands
Many command-line tools provide automatic completion of commands. These include Git, curl and the AWS command-line tool. Homebrew installs the files for each command-line tool that provides completion, but it does not enable automatic completion in your shell.
To enable auto completion, edit the file .zshrc in your home directory to include this line:
autoload bashcompinit && bashcompinit
Close all of the Terminal windows. Every new Terminal window will support autocompletion.
To use auto completion, type the name of the command, and press the Tab key on your keyboard. You will see a list of possible completions. Press the Tab key to cycle through the completions, and press the Enter key to accept a completion.
Installing the Git Version Control System
The Xcode Command Line Tools include a copy of Git, which is now the standard for Open Source development, but this will be out of date.
To install a newer version of Git than Apple provide, use Homebrew. Enter this command in a terminal window:
brew install git
If you do not use Homebrew, go to the Web site and follow the link for Other Download Options to obtain a macOS disk image. Open your downloaded copy of the disk image and run the enclosed installer in the usual way, then dismount the disk image.
Always set your details before you create or clone repositories on a new system. This requires two commands in a terminal window:
git config --global user.name "Your Name"
git config --global user.email "you@your-domain.com"
The global option means that the setting will apply to every repository that you work with in the current user account.
To enable colors in the output, which can be very helpful, enter this command:
git config --global color.ui auto
Text Editors
Installations of macOS include older command-line versions of both Emacs and vim, as well as TextEdit, a desktop text editor. TextEdit is designed for light-weight word processing, and has no support for programming. Add the code editors or IDEs that you would prefer to use.
If you do not have a preferred editor, consider using a version of Visual Studio Code. Read the next section for more details.
To work with a modern Vim editor, install Neovim.
Visual Studio Code
Visual Studio Code is a powerful desktop editor for programming, with built-in support for version control and debugging. The large range of extensions for Visual Studio Code enable it to work with every popular programming language and framework. It is available free of charge.
The Microsoft releases of Visual Studio Code are proprietary software with telemetry enabled by default. To avoid these issues, use the packages that are provided by the vscodium project instead.
Once you have installed Visual Studio Code or VSCodium, read this article for more information about using the editor.
Neovim
If you would like a modern Vim editor with a good default configuration, set up Neovim.
Setting The EDITOR Environment Variable
Whichever text editor you choose, remember to set the EDITOR environment variable in your ~/.zshrc file, so that this editor is automatically invoked by command-line tools like your version control system. For example, put this line in your profile to make Neovim (nvim) the favored text editor:
export EDITOR="nvim"
Setting Up A Directory Structure for Projects
To keep your projects tidy, I would recommend following the Go developer conventions. These guidelines may seem slightly fussy, but they pay off when you have many projects, some of which are on different version control hosts.
First create a top-level directory with a short, generic name like code. By default Go uses a directory called go, but you can change that when you set up a Go installation.
In this directory, create an src sub-directory. For each repository host, create a subdirectory in src that matches your username. Check out projects in the directory. The final directory structure looks like this:
code/
  src/
    bitbucket.org/
      my-bitbucket-username/
        a-project/
    gitlab.com/
      my-gitlab-username/
        another-project/
Creating SSH Keys
You will frequently use SSH to access Git repositories or remote UNIX systems. macOS includes the standard OpenSSH suite of tools.
OpenSSH stores your SSH keys in a .ssh directory. To create this directory, run these commands in a terminal window:
mkdir $HOME/.ssh
chmod 0700 $HOME/.ssh
To create an SSH key, run the ssh-keygen command in a terminal window. For example:
ssh-keygen -t rsa -b 4096 -C "Me MyName (MyDevice) <me@mydomain.com>"
Use 4096-bit RSA keys for all systems. The older DSA standard only supports 1024-bit keys, which are now too small to be considered secure.
Programming Languages
JavaScript Development: Node.js
Homebrew provides separate packages for each version of Node.js. To ensure that you are using the version of Node.js that you expect, specify the version when you install it. For example, enter this command in a Terminal window to install the Node.js 12, the current LTS release:
brew install node@12
Add the bin/ directory for this Node.js installation to your PATH:
/usr/local/opt/node@12/bin
If you need yarn, enter this command in a Terminal window to install it:
brew install yarn
Go Development
Use Homebrew to install Go:
brew install golang
This provides the standard command-line tools for Go.
The current version of Go includes support for dependency management with modules. Use modules for new projects. Some existing projects still use dep, or an older tool.
Setting a GOPATH
Current versions of Go do not require a GOPATH environment variable, but you should set it to ensure that third-party tools and Terminal auto-completion work correctly.
Set a GOPATH environment variable in your ~/.zshrc file:
export GOPATH="$HOME/go"
Then, add this to your PATH:
$GOPATH/bin
Close the Terminal and open it again for the changes to take effect.
Java Development: AdoptOpenJDK
Which Version of Java?
Many vendors provide a JDK. To avoid potential licensing and support issues, use the JDK that is provided by the AdoptOpenJDK project. The versions of Java on the OpenJDK Website are for testers, and the Oracle JDK is a proprietary product that requires license fees.
Use the LTS version of the OpenJDK, unless you need features that are in the latest releases.
Once you have installed a JDK, get the Apache Maven build tool. This is provided by the Maven project itself, and is not part of the OpenJDK.
Use jEnv if you need to run multiple JDKs, such as different versions of the same JDK.
Setting up Java with Homebrew
Run these commands in a terminal window:
brew tap adoptopenjdk/openjdk
brew cask install adoptopenjdk11
This installs version 11 of the OpenJDK, from the AdoptOpenJDK project.
Run this command in a terminal window to install Maven:
brew install maven
Setting up jEnv
Run this command in a terminal window to install jEnv:
brew install jenv
Next, add this to your PATH:
$HOME/.jenv/bin
Add this to your ~/.zshrc file:
eval "$(jenv init -)"
Open a new terminal window, and run this command:
jenv enable-plugin export
This enables jEnv to manage the JAVA_HOME environment variable.
To avoid inconsistent behaviour, close all the terminal windows that you currently have open. The jEnv utility will work correctly in new terminal windows.
Lastly, run this command to register your current JDK with jEnv:
jenv add $(/usr/libexec/java_home)
To see a list of the available commands, type jenv in a terminal window:
jenv
Manual Set up of AdoptOpenJDK
To manually install a copy of the JDK:
- Download the version of the JDK that you need from AdoptOpenJDK
- Unzip the download
- Copy the JDK directory to /usr/local/lib
- Edit your ~/.zshrc file to set environment variables. For example, to use jdk-11.0.3+7 as the Java version:
JAVA_HOME=/usr/local/lib/jdk-11.0.3+7/Contents/Home
PATH=$PATH:/usr/local/lib/jdk-11.0.3+7/Contents/Home/bin
To manually install a copy of Apache Maven:
- Download the latest version of Maven
- Unzip the download
- Copy the Maven directory to /usr/local/lib/
- Add /usr/local/lib/MAVEN-DIRECTORY to your PATH environment variable
Replace MAVEN-DIRECTORY with the name of the directory that Maven uses, such as apache-maven-3.6.0.
Maven is written in Java, which means that the project provides one package, which works on any operating system that has a supported version of Java.
Python Development: pipenv
Current versions of macOS include a copy of Python 3, but this will not be the latest version of Python. Use Homebrew to install the latest release of Python.
To maintain current and clean Python environments, you should also use pipenv. This builds on two features of Python: the virtual environments and the pip utility.
Enter this command to install Python 3 and pipenv using Homebrew:
brew install python3 pipenv
Use pipenv to manage your Python projects. The pipenv tool itself will automatically work with the copy of Python 3 from Homebrew.
To use the Python 3 interpreter outside of projects that are managed by pipenv, specify python3 on the command-line and in your scripts, rather than python:
python3 --version
If you need to run the pip utility, rather than setting up a development environment with pipenv, always use the command pip3:
pip3 --version
The Python Guide tutorial shows you how to work with pipenv.
Rust Development: rustup
The official rustup utility enables you to install the tools for building software with the Rust programming language. Click on the Install button on the front page of the Rust Website, and follow the instructions.
By default, the installer adds the correct directory to your path. If this does not work, add this to your PATH manually:
$HOME/.cargo/bin
This process installs all of the tools into your home directory, and does not add any files into system directories.
Ruby Development: RVM
All macOS systems include a copy of Ruby, but it is outdated. To maintain current and clean Ruby environments, use the RVM system.
RVM relies on Git, so you must have a working installation of Git before you can set up RVM.
By default, RVM downloads copies of Ruby that have been compiled for your operating system. If there is no compiled version, RVM then falls back to downloading the source code and then compiling it on your computer. Enter this command to ensure that the requirements for compiling Ruby are on your system, using Homebrew:
brew install autoconf automake gdbm gmp libksba libtool libyaml openssl pkg-config readline
Finally, you can speed up installation of gem packages by disabling the generation of local documentation. To do this, create a file in your home directory with the name .gemrc and put this line in it:
gem: --no-ri --no-rdoc
Kubernetes: Minikube
Minikube sets up and manages Kubernetes on a single system, so that you can develop and test without needing a set of servers.
To install Minikube with Homebrew, run these commands in a terminal window:
brew install kubernetes-cli
brew cask install minikube
By default, Minikube uses a virtual machine manager. If you do not need VirtualBox, install hyperkit, which provides a minimal virtual machine manager.
brew install hyperkit
To install Helm with Homebrew, run this command in a terminal window:
brew install kubernetes-helm
To install Skaffold with Homebrew, run this command in a terminal window:
brew install skaffold
This article explains Minikube in more detail.
SQL Databases
Consider using containers to run the databases that you need. If you prefer to install services directly on to your workstation, Homebrew provides packages for PostgreSQL, MariaDB and MySQL.
Installing PostgreSQL
To install PostgreSQL using Homebrew, enter this command in a terminal window:
brew install postgresql
This command installs the server, the command-line tools, and the client libraries that are needed to compile adapters for programming languages.
Homebrew also provides some commands for managing your PostgreSQL installation. For example, to start the server, follow the instructions that are displayed after the installation process is completed. If you upgrade your copy of PostgreSQL, you should use the postgresql-upgrade-database command that Homebrew gives you.
Installing MariaDB or MySQL
To install MariaDB using Homebrew, enter this command in a terminal window:
brew install mariadb
To install MySQL using Homebrew, enter this command in a terminal window:
brew install mysql
These commands install the server, the command-line tools, and the client libraries that are needed to compile adapters for programming languages. To start the server, follow the instructions that are displayed after the installation process is completed.
For compatibility, MariaDB uses the same names for command-line tools as MySQL.
Remember to set a password for the root accounts. First, login with the mysql command-line utility:
mysql -u root -q
The -q Option Disables Command History: By default, the command-line client stores the full text of every command in a history file. If you know that you are going to run statements that include passwords or other sensitive data, use the -q option.
Run these statements to change the password for root access:
UPDATE mysql.user SET password = PASSWORD('yourpassword') WHERE user
LIKE ‘root’;
FLUSH PRIVILEGES;
EXIT;
You now need a password to login to the installation as root. To login with root again, use this command:
mysql -u root -p
Enter the password when prompted.
You should also remove the anonymous accounts and test database that MySQL automatically includes:
DROP DATABASE test;
DELETE FROM mysql.user WHERE user = ’’;
FLUSH PRIVILEGES;
If you intend to duplicate a production environment for testing, create a configuration file on your Mac. Production installations of MySQL should be configured with appropriate SQL modes to enable data integrity safeguards. By default, MySQL permits various types of invalid data to be entered.
Database Management Tools
- Azure Data Studio for Microsoft SQL Server
- MySQL Workbench
- Oracle SQL Developer
- pgAdmin for PostgreSQL
Other Useful Desktop Applications for Developers
- LibreOffice suite: brew cask install libreoffice
- VirtualBox virtual machine management: brew cask install virtualbox
- Docker container management: brew cask install docker
Online Resources
Apple offer overviews and task-orientated help on their support Web site for new macOS users.
Every new user should probably read How to switch to the Mac, by Rui Carmo.
The macOS Privacy and Security Guide by Dr Doh provides extensive information about those topics.
https://sourabhbajaj.com/mac-setup/
Highlights
- Remove workspace auto-switching by running the following command:g
[code]
defaults write com.apple.dock workspaces-auto-swoosh -bool NO
killall Dock # Restart the Dock process
[/code] -
User Defaults
-
Enable repeating keys by pressing and holding down keys:
-
defaults write NSGlobalDomain ApplePressAndHoldEnabled -bool false(and restart any app that you need to repeat keys in)
-
-
Change the default folder for screenshots
- Open the terminal and create the folder where you would like to store your screenshots:
mkdir -p /path/to/screenshots/- Then run the following command:
-
defaults write com.apple.screencapture location
-
- Homebrew: https://sourabhbajaj.com/mac-setup/Homebrew/
- ZSH: https://sourabhbajaj.com/mac-setup/iTerm/zsh.html
New info on there – check it out!
Oh My Zsh Aliases
Often-used commands can be abbreviated with an alias.alias tf=”tail -f”makes it so you can runtfinstead of typingtail -f.You can add as many aliases as you want to your
.zshrc.Plugins like Git and Common Alias add a lot of aliases that’ll make you type less. But it can be hard to learn them all. That’s what the
alias-finderplugin is for.If you want to know what aliases exist for, it’s
git commit:
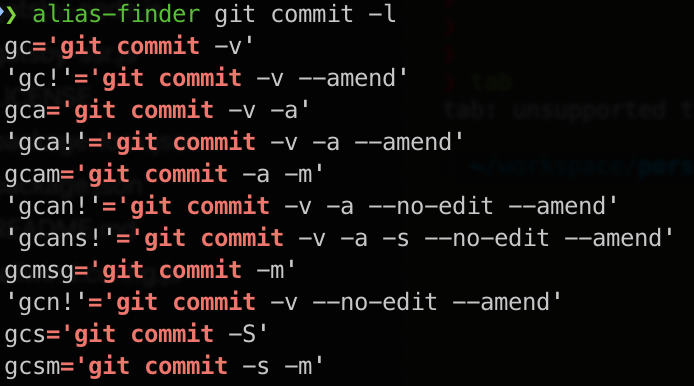
‘alias-finder’ example
You can also set
ZSH_ALIAS_FINDER_AUTOMATIC=”true”in your.zshrcto have it run automatically before each command.There are three types of aliases:
- command aliases: just like the
tfexample above - global aliases: which are substituted anywhere on a line. For example, the
Galias added by the common-aliases plugin gets replaced by| grep.
ls G foobar=>ls | grep foobar - suffix aliases: These are special aliases that are triggered when a file name is passed as the command. For example:
alias -s pdf=acroreadinvokes acroread when you runfile.pdf.
Command aliases can also access the original command’s arguments by using the array
$:loop() { for x in {1..$1}; do $@[2,-1]; done }This alias runs a given command x times. For example:
loop 10 echo ‘hello’will printhello10 times. - command aliases: just like the
- VIM tool: https://sourabhbajaj.com/mac-setup/Vim/
- JETBRAINS: https://sourabhbajaj.com/mac-setup/JetBrainsIDEs/
- POSTSQL: https://sourabhbajaj.com/mac-setup/PostgreSQL/
- PYTHON: application specific: https://sourabhbajaj.com/mac-setup/Python/
- MYSQL: https://sourabhbajaj.com/mac-setup/MyySQL/
- NODE.js – download specific version: https://sourabhbajaj.com/mac-setup/Node.js/
- DOCKER: come commands – https://sourabhbajaj.com/mac-setup/Docker/UsefulCommands.html
- OTHER APPS (diff / merge) – https://sourabhbajaj.com/mac-setup/Apps/
- SECURITY: https://sourabhbajaj.com/mac-setup/Security/
- iTerm2 – Settings
Tab content
https://clickety-clack.click/development-toolkit-2021
Other useful apps
https://taoofmac.com/space/howto/switch
- 1Password for keeping track of all my passwords (on desktop
and mobile) - Dropbox and OneDrive for sharing files transparently across all of my
Macs and PCs. - OneNote for syncing my notes not just across all of my
Macs, but also to my iPhone and other devices. - VLC for occasional video playback.
- MenuMeters to keep track of network traffic and CPU usage –
they’re simple, unobtrusive and very, very effective. - Pixelmator for image editing. There are plenty of similarly-priced
alternatives out there, but I happen to like its feature set. - Chrome as an alternate browser. I use Safari for everything
(and it is my default browser), but Chrome is a necessity these days. - Little Snitch to keep track of what apps are doing.
- Jump Desktop for remote desktop to Windows machines and VMs.
- Colloquy (if you happen to hate IRC as much as I do, this makes
it bearable). - Skype for the occasional conference call and file transfer
(Adium works too, but IM is mostly dead these days). - Textastic as an all-singing, all-dancing text editor with a
built-in mini- IDE. Visual Studio Code is amazing, but sometimes I want something faster that isn’tvim. - ExpanDrive for mounting remote file systems over FTP and SSH.