

+ DEV SERVER
Spiffberrypi Setup
ON MAC:
sudo nano /etc/hosts

add: IPAddressOfPi hostname
      10.0.0.000   spiffberrypi
ON Pi
sudo nano /etc/hosts

add: IPAddressOfPi hostname
      10.0.0.000   spiffberrypi
– AND –
sudo nano /etc/hostname

 spiffberrypi
Then you can navigate to http://hostname e.g. http://spiffberrypi – and see web server
Additionally:
ssh spiffy@spiffberrypi
(will work now locally)
How to set a Raspberry Pi with a static ip address?
A static IP address, as opposed to a dynamic IP address, doesn’t change. The single-board computer Raspberry Pi always needs a static IP address if you want to access it with other devices over a long period of time. This refers to the private IP address of the Raspberry IP that is located by a computer within the local network as well as the public IP address of the network via which the Raspberry Pi is accessible on the internet (for example, if it’s being used as a server). But how do you provide Raspberry Pi with an IP address that always remains the same? This guide explains which options you have for linking a static IP address to your Raspberry Pi.
Contents
- Addressing Raspberry Pi via a static IP address
- Assign a static private IP address to Raspberry Pi with a router
- Assign a static private IP address to Raspberry Pi with DHCPCD
- Static IP addresses for Raspberry Pi are sometimes vital
Assign a static private IP address to Raspberry Pi with a router
Many routers support the ability to provide individual devices within the local network with a static IP address. With a Linksys router, the Linksys app allows you to manage multiple devices and handle all of the router assignments remotely. Various other routers also support similar functions, and so can be used for linking Raspberry Pi with a static IP address.
A static IP address for Raspberry Pi is set up somewhat differently for each router. The basic principle is always the same, though: You open the user interface of the router in your browser; Link the MAC address of Raspberry Pi with your LAN’s IPv4 address via the manual IP configuration. Most of the time, a checkbox exists for this in the router interface. This enables you to always automatically use the IP address assigned to you.
Assign a static private IP address to Raspberry Pi with DHCPCD
Raspbian Jessie, or Jessie Lite – the current Raspbian operating systems at the moment – have a DHCP client daemon (DHCPCD) that can communicate with the DHCP servers from routers. The configuration file of a DHCP client daemon allows you to change the private IP address of a computer and set it up in the long term. The following instructions will assign a static IPv4 address with 32 bits (not to be confused with an IPv6 address, which has 128 bits available) to the Raspberry Pi.
Before you begin with the assignment of a private IP address for Raspberry Pi, check whether DHCPCD is already activated using the following command:
sudo service dhcpcd status
In case it’s not, activate DHCPCD as follows:
sudo service dhcpcd start
sudo systemctl enable dhcpcd
Now make sure that the configuration of the file /etc/network/interfaceshas the original status. For this, the ‘iface’ configuration needs to be set at ‘manual’ for the interfaces.
For the editing of the activated DHCPCDs, start by opening the configuration file */etc/dhcpcd.conf*and running the following command:
sudo nano /etc/dhcpcd.conf
You’ll now carry out the configuration of the static IP address. If your Raspberry Pi is connected to the internet via an Ethernet or network cable, then enter the command ‘interface eth0’; if it takes place over Wi-Fi, then use the ‘interface wlan’ command.
To assign an IP address to Raspberry Pi, use the command ‘static ip_address=’ followed by the desired IPv4 address and the suffix ‘/24’ (an abbreviation of the subnet mak 255.255.255.0). For example, if you want to link a computer with the IPv4 address 192.168.0.4, then you need to use the command ‘static ip_address=192.168.0.4/24’. It goes without saying that the address used here is not yet used anywhere else. As such, it also can’t be located in the address pool of a DHCP server.
You still then need to specify the address of your gateway and domain name server (usually both are the router). Raspberry Pi turns to the gateway address if an IP address to which it wants to send something is outside of the subnet mask (in the example, this would mean outside of the range 192.168.0). In the following command, the IPv4 address 192.168.0.1 is used as an example as both the gateway and DNS server. The complete command looks like this in our example (where a network cable is used for the internet connection):
interface eth0
static ip_address=192.168.0.4/24
static routers=192.168.0.1
static domain_name_servers=192.168.0.1
The command lines above match the IPv4 addresses that you want to use for your Raspberry Pi, or where your router is assigned. Save the changes with ‘Ctrl + O’ and then press the enter key. Close the configuration file with ‘Ctrl + X’. Restart to adopt the newly assigned static IP address in the network:
sudo reboot
Now use a ping command to check whether the Raspberry Pi is accessible in the network with its new IP address:
Ping raspberrypi.local
If the connection of the IP address was successful, you’ll see that you can reach it under the new IP address with a ping.
Static IP addresses for Raspberry Pi are sometimes vital
In summary, it should be noted that there are basically two different IP addresses that are relevant for Raspberry Pi (and projects using it): the private IP address of the Raspberry Pi within the local network, and the public IP address of its internet connection.
A static private IP address is primarily necessary if you want to use Raspberry Pi as a server. But if you access the minicomputer via SSH more frequently, you should assign in a static address in the same way. The possibilities outlined above detail how this can be achieved with relatively simple means.
Assigning a fixed public address that allows your Raspberry Pi to be accessed via the internet is somewhat more complicated. This is necessary, for example, when attempting to make your server installed on Raspberry Pi remain constantly available online. Most internet access is available only via a dynamic public IP address, which isn’t possible here. Since a static address isn’t offered by all internet providers (and if it is, then it’s usually relatively expensive), a DDNS service presents the best solutions. But for this, you have to know which forms of dynamic DNS are supported by your router.
Addressing Raspberry Pi via a static IP address
For many projects with the small computer, it’s either useful or necessary to provide Raspberry Pi with a static IP address. But before we talk more specifically about the use of such a static IP address with Raspberry Pi, we’ll first outline the differences between addressing a computer in a private (local) network or on the publicly accessible internet. Private and public IP addresses are not to be confused with each other.
Addressing Raspberry Pi in the LAN via a private IP address
Within a local network (also called a Local Area Network, or LAN for short), a router distributes data to various devices. The router is also responsible for IP address assignment – more specifically, the DHCP server integrated in the router is responsible. For example, the DHCP (Dynamic Host Configuration Protocol) automatically assigns free IP addresses to the corresponding devices. Computers, smart TVs, smartphones, or a Raspberry Pi each receive such an address via which they can communicate with other devices. Therefore, all devices are uniquely identifiable via their so-called MAC address.
Since IP addresses in a private network are individually assigned by the DHCP and the coupling of devices to an IP address is only valid within your local network, here we’re talking about private IP addresses. In the default settings, Raspberry Pi also receives its IP address via the DHCP server. The private IP addresses of individual devices can change though, depending on the configuration of the DHCP server.
To be able to reach Raspberry Pi on the same address in your own LAN, you have to provide it with a static, private IP address. One such static IP address for Raspberry Pi can be used, for example, for the remote maintenance of a computer within the network protocol SSH (Secure Shell): If you have an SSH program installed, you can control the Raspberry Pi via another computer using the SSH client. This has the advantage that you don’t have to connect a monitor and input device separately for operation anymore. But if the minicomputer only has a dynamic private IP address, then you have to reselect the current IP address for every SSH access and link it to the SSH client – you bypass this step with a static private IP address.
A static private IP address is essential for your Raspberry Pi if you want to set it up as a server in the LAN. If the Raspberry Pi server is also to continue being available outside of the local network, then you have to assign it another static address via which the server can be accessed on the internet. For example, an internet connection with a static public IP address or a DDNS service.
Addressing the Raspberry Pi on the internet via a public IP address or DDNS
If the Raspberry Pi is to be used as a server accessible over the internet, then the public IP address of your internet connection comes into play. Most internet access is available via dynamic IP addresses that are changed every time they start and at the latest every 24 hours. This changes the public IP address with which the Raspberry Pi server can be reached.
If you want to set up your Raspberry Pi as an ownCloud server or in another server form, the following problem occurs: As soon as the server receives a new IP address, it can only be traced in the LAN. If you want to be found outside of the local network, you no longer know which address the server can be reached on. The solution to this is a fixed IP address. The simplest variation here would be to use an internet connection with a static public IP address. But this is usually quite expensive, and isn’t offered by all internet service providers.
Another solution is the application of dynamic DNS (DDNS). This links your dynamic public IP address with a domain name. Every time, as soon as your IP address changes, a program redirects the new address to the domain name and makes it permanently available on the internet. Now if you link a server on Raspberry Pi with the domain name, it’s permanently accessible online.
There are both free and paid DDNS services. Before you decide on one for yourself, you should first test which DDNS providers your router supports, and whether it supports any at all. Find the DDNS support tutorial for whichever individual router your DDNS server is intended to operate on, such as this tutorial for Linksys routers.
This article explains how to set up a static IP address on Ubuntu 20.04.
Typically, in most network configurations, the IP address is assigned dynamically by the router DHCP server. Setting a static IP address may be required in different situations, such as configuring port forwarding or running a media server .
Configuring Static IP address using DHCP
The easiest and recommended way to assign a static IP address to a device on your LAN is to configure a Static DHCP on your router. Static DHCP or DHCP reservation is a feature found on most routers which makes the DHCP server to automatically assign the same IP address to a specific network device, each time the device requests an address from the DHCP server. This works by assigning a static IP to the device’s unique MAC address.
The steps for configuring a DHCP reservation vary from router to router. Consult the vendor’s documentation for more information.
Netplan
Ubuntu 17.10 and later uses Netplan as the default network management tool. The previous Ubuntu versions were using ifconfig and its configuration file /etc/network/interfaces to configure the network.
Netplan configuration files are written in YAML syntax with a .yaml file extension. To configure a network interface with Netplan, you need to create a YAML description for the interface, and Netplan will generate the required configuration files for the chosen renderer tool.
Netplan supports two renderers, NetworkManager and Systemd-networkd. NetworkManager is mostly used on Desktop machines, while the Systemd-networkd is used on servers without a GUI.
Configuring Static IP address on Ubuntu Server
On Ubuntu 20.04, the system identifies network interfaces using ‘predictable network interface names’.
The first step toward setting up a static IP address is identifying the name of the ethernet interface you want to configure. To do so, use the ip link command, as shown below:
ip linkCopy
The command prints a list of all the available network interfaces. In this example, the name of the interface is ens3:
1: lo: <LOOPBACK,UP,LOWER_UP> mtu 65536 qdisc noqueue state UNKNOWN mode DEFAULT group default qlen 1000
    link/loopback 00:00:00:00:00:00 brd 00:00:00:00:00:00
2: ens3: <BROADCAST,MULTICAST,UP,LOWER_UP> mtu 1500 qdisc fq_codel state UP mode DEFAULT group default qlen 1000
    link/ether 08:00:27:6c:13:63 brd ff:ff:ff:ff:ff:ff
Copy
Netplan configuration files are stored in the /etc/netplan directory. You’ll probably find one or more YAML files in this directory. The name of the file may differ from setup to setup. Usually, the file is named either 01-netcfg.yaml, 50-cloud-init.yaml, or NN_interfaceName.yaml, but in your system it may be different.
If your Ubuntu cloud instance is provisioned with cloud-init, you’ll need to disable it. To do so create the following file:
sudo nano /etc/cloud/cloud.cfg.d/99-disable-network-config.cfgCopy
/etc/cloud/cloud.cfg.d/99-disable-network-config.cfg
network: {config: disabled}
To assign a static IP address on the network interface, open the YAML configuration file with your text editor :
sudo nano /etc/netplan/01-netcfg.yamlCopy
/etc/netplan/01-netcfg.yaml
network:
  version: 2
  renderer: networkd
  ethernets:
    ens3:
      dhcp4: yes
Before changing the configuration, let’s explain the code in a short.
Each Netplan Yaml file starts with the network key that has at least two required elements. The first required element is the version of the network configuration format, and the second one is the device type. The device type can be ethernets, bonds, bridges, or vlans.
The configuration above also has a line that shows the renderer type. Out of the box, if you installed Ubuntu in server mode, the renderer is configured to use networkd as the back end.
Under the device’s type (ethernets), you can specify one or more network interfaces. In this example, we have only one interface ens3 that is configured to obtain IP addressing from a DHCP server dhcp4: yes.
To assign a static IP address to ens3 interface, edit the file as follows:
- Set DHCP to
dhcp4: no. - Specify the static IP address. Under
addresses:you can add one or more IPv4 or IPv6 IP addresses that will be assigned to the network interface. - Specify the gateway.
- Under
nameservers, set the IP addresses of the nameservers.
/etc/netplan/01-netcfg.yaml
network:
  version: 2
  renderer: networkd
  ethernets:
    ens3:
      dhcp4: no
      addresses:
        - 192.168.121.221/24
      gateway4: 192.168.121.1
      nameservers:
          addresses: [8.8.8.8, 1.1.1.1]
When editing Yaml files, make sure you follow the YAML code indent standards. If the syntax is not correct, the changes will not be applied.
Once done, save the file and apply the changes by running the following command:
sudo netplan applyCopy
Verify the changes by typing:
ip addr show dev ens3Copy
2: ens3: <BROADCAST,MULTICAST,UP,LOWER_UP> mtu 1500 qdisc mq state UP group default qlen 1000
    link/ether 08:00:27:6c:13:63 brd ff:ff:ff:ff:ff:ff
    inet 192.168.121.221/24 brd 192.168.121.255 scope global dynamic ens3
       valid_lft 3575sec preferred_lft 3575sec
    inet6 fe80::5054:ff:feb0:f500/64 scope link
       valid_lft forever preferred_lft forever
Copy
That’s it! You have assigned a static IP to your Ubuntu server.
Configuring Static IP address on Ubuntu Desktop
Setting up a static IP address on Ubuntu Desktop computers requires no technical knowledge.
In the Activities screen, search for “settings” and click on the icon. This will open the GNOME settings window. Depending on the interface you want to modify, click either on the Network or Wi-Fi tab. To open the interface settings, click on the cog icon next to the interface name.
In “IPV4” Method" tab, select “Manual” and enter your static IP address, Netmask and Gateway. Once done, click on the “Apply” button.

To verify the changes, open your terminal either by using the Ctrl+Alt+T keyboard shortcut or by clicking on the terminal icon and run:
ip addrCopy
The output will show the interface IP address:
...
2: wlp1s0: <BROADCAST,MULTICAST,UP,LOWER_UP> mtu 1500 qdisc noqueue state UP group default qlen 1000
    link/ether 50:5b:c2:d8:59:7d brd ff:ff:ff:ff:ff:ff
    inet 192.168.121.221/24 brd 192.168.31.255 scope global dynamic noprefixroute wlp1s0
       valid_lft 38963sec preferred_lft 38963sec
    inet6 fe80::45e3:7bc:a029:664/64 scope link noprefixroute
Copy
Conclusion
We’ve shown you how to configure a static IP address on Ubuntu 20.04.
If you have any questions, please leave a comment below.
What Does a Reverse Proxy Do?
A reverse proxy serves as a sort of dispatcher by acting as a central contact point for clients. Based on the information requested by the client, it then routes the request to the appropriate backend server and makes sure the backend server’s response makes it back to the appropriate client.

Prototypical NGINX reverse proxy diagram
What are these dividends you speak of?
A reverse proxy can give you additional flexibility, security, and even a performance bump. It can also greatly simplify your deployment:
- Flexibility: An NGINX reverse proxy can allow you to host multiple sites/domains with only one IP address. It accomplishes this by listening on a port (usually port 80 for HTTP traffic) and parsing the http request header for the host. Based on the host specified in the header, NGINX can route a request to the proper backend server (in a reverse proxy, this is also known as an upstream server).
- Security: By standing between the client and the backend server, the reverse proxy provides a degree of separation.
- Improved performance: NGINX can be used to cache static content which means that not only is content returned faster to the client, but since it often means that the upstream server doesn’t even need to be contacted, it can take a lot of the load off your backend servers.
- Simplifies your deployment: If you’re hosting multiple sites, an NGINX reverse proxy can greatly simplify your implementation by giving you a single point to manage your traffic. This means you only have to set up port forwarding once and whenever you create a new site, all you have to do is add an additional configuration listing to NGINX. When you implement HTTPS (and you should), instead of having to implement it on every individual web server you have setup, you can handle it all on your NGINX reverse proxy.
Installing NGINX:
Now that I’ve hopefully convinced you to implement an NGINX reverse proxy, let’s get started. I recommend using a dedicated device for this (again, it need not be expensive, even a Raspberry Pi will do) but it helps keep everything clean and compartmentalized. With a clean install of Ubuntu (if using an x86-64/AMD64 device) or Raspbian (if on the RPi), do the following:
\1. Update your package list and make sure your device is updated:
sudo apt-get update
sudo apt-get upgrade
\2. Depending on what Linux distro you’ve picked, it might have Apache already installed. We don’t want that so uninstall it with:
sudo apt-get remove apache2
\3. Install NGINX:
sudo apt-get install nginx
\4. NGINX should start automatically, but just in case, you can start it manually with:
sudo systemctl start nginx
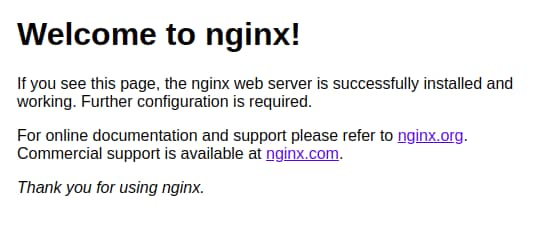
\5. Confirm that NGINX is up and running by opening your browser and visiting your IP address. You should be able to get the default page to display by visiting your loopback IP address (127.0.0.1) or the actual IP assigned to your device (available by running the command ‘hostname -I’ in the terminal):
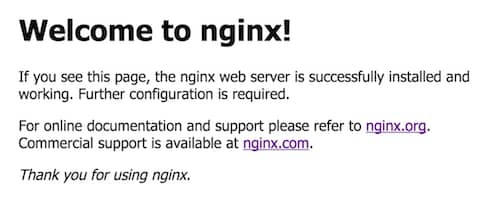
\6. Good! Now we have NGINX up and running! If you don’t have a backend web server running yet, then we’re done since you don’t have anywhere for us to send traffic. Come back to this point when you do. But if you do have a web server for us to proxy traffic to/from, continue on!
Configuring the Reverse Proxy:
So you’ve made it this far and you now have an NGINX server running. Let’s set up the reverse proxy part to make this an NGINX reverse proxyand not just a simple NGINX web server:
\1. Go to our NGINX sites-available directory:
cd /etc/nginx/sites-available/
\2. Create the configuration file. You’ll eventually accumulate a lot of these, so I recommend naming it based on the site that you’re reverse proxying so you can easily find it again:
sudo nano example.com.conf
\3. In nano, add the following:
server {
	listen 80;
	server_name example.com;
	location / {
	proxy_pass http://192.x.x.2;
	}
}
server_name is going to contain the domain name of the website clients are going to be requesting. proxy_pass is going to be the local (internal) IP address of the web server that you’re forwarding traffic to. You can also specify a particular port if your web server is running on a non-standard port (example: proxy_pass http://192.x.x.2:82300).
\4. For NGINX to actually serve your site with your new configuration, you need to link it to /sites-enabled/ with:
ln -s /etc/nginx/sites-available/example.com.conf /etc/nginx/sites-enabled/example.com.conf
\5. Test your configuration to make sure you aren't getting any errors:
sudo nginx -t
\6. Reload NGINX to tell it that the configuration has been updated:
sudo systemctl reload nginx
That's all there is to it!
https://engineerworkshop.com/blog/connecting-your-raspberry-pi-web-server-to-the-internet/
Connecting Your Raspberry Pi Web Server To The Internet: A Beginner's Guide to Port Forwarding and Dynamic DNS
A tutorial on connecting a Raspberry Pi/Ubuntu web server to the internet. Includes how to set up ddclient for dynamic DNS and how to configure port forwarding on a router/pfSense.
In a previous post, we learned about what a reverse proxy web server is, why you would want one, and how to install the NGINX reverse proxy web server on a Raspberry Pi. Many of you have asked for additional updates on that article and it's high time I did them. In today's tutorial, I will guide you the rest of the way to getting your new RPi web server on the internet.
In order to connect our RPi web server to the internet, we need to do two things:
- Set up Dynamic DNS with ddclient on Raspberry Pi and Ubuntu so that web browsers can find us on the internet
- Enable port forwarding so that web traffic can access our web server
The Domain Name System (DNS)
What is the Domain Name System?
If you think of the internet as a giant ocean, your web server is but a small boat in its waters. When you visit a URL, how in the heck does the browser find your web server to connect to it? That is, how does it find that small boat in such a giant ocean? That's the job of domain name servers (DNS).
When you type a URL into your web browser, a domain name server is contacted which returns the IP address of the web server for that URL. It's for this reason that DNS is often described as the "phone book" of the internet- it's a registry that tracks the IP address of the web server for a given URL.
In order for visitors to visit our website, we therefore need to register our web server with a DNS. Since we're running a homelab, presumably we're using a residential ISP, which means we face one additional challenge: our IP address is not fixed and our ISP can (and will) change your IP address from time to time. This situation can be described as having a dynamic IP address.
Dynamic DNS with ddclient on Raspberry Pi and Ubuntu
As a consequence of having a dynamic IP address, we will need to notify the domain name servers when our IP address changes. Thankfully this can be easily accomplished with a tool called ddclient which we can install on our RPi (or any other Debian-based OS such as Ubuntu). ddclient is a service that runs on our server and retrieves our public (WAN) IP address. It then automatically publishes our IP address to the domain name server to keep it in sync so browser clients can find us.
Prerequisite:
To begin, you'll first need to purchase a domain name from Google Domains. Google Domains is simple to register, relatively cheap at <$20/yr, and since it's Google, you gain access to the most prolific domain name server in the world. Note that this isn't strictly necessary as there are free dynamic DNS providers out there but, since this is an introduction, I like to keep things simple and maximize our chances of success.
- Create a Dynamic DNS record in Google Domains by going to DNS > Synthetic records > Dynamic DNS. For the subdomain field you can either leave it blank or put @ in it to have Google track your web server on the root domain name:
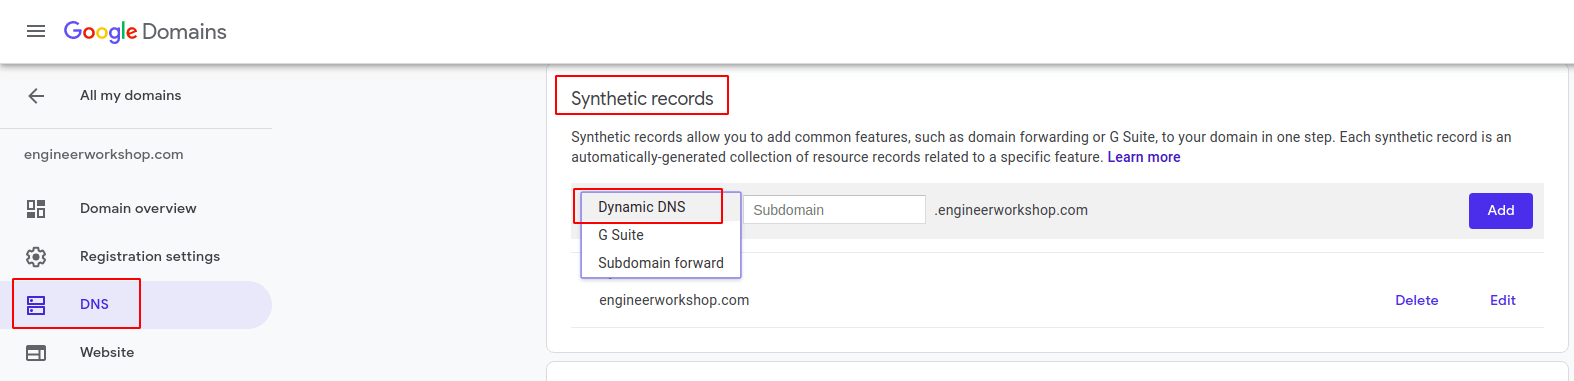
Adding a Dynamic DNS record to the Google DNS
- Retrieve the credentials generated:
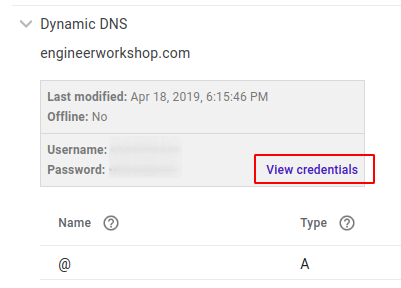
We'll need these for ddclient later.
- Install ddclient on your RPi NGINX reverse proxy server with:
sudo apt install ddclient
- If this is your first time installing ddclient, you'll be prompted to set up your dynamic DNS throughout the installation. Select "other" for your Dynamic DNS Provider:
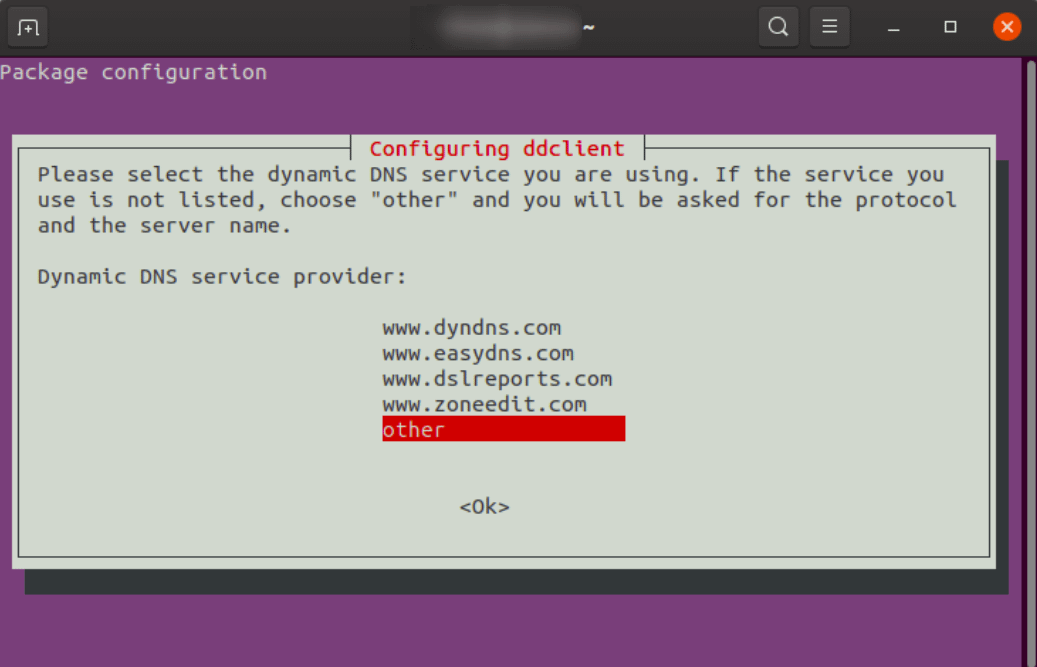
- Enter google.domains.com as your Dynamic DNS Server:
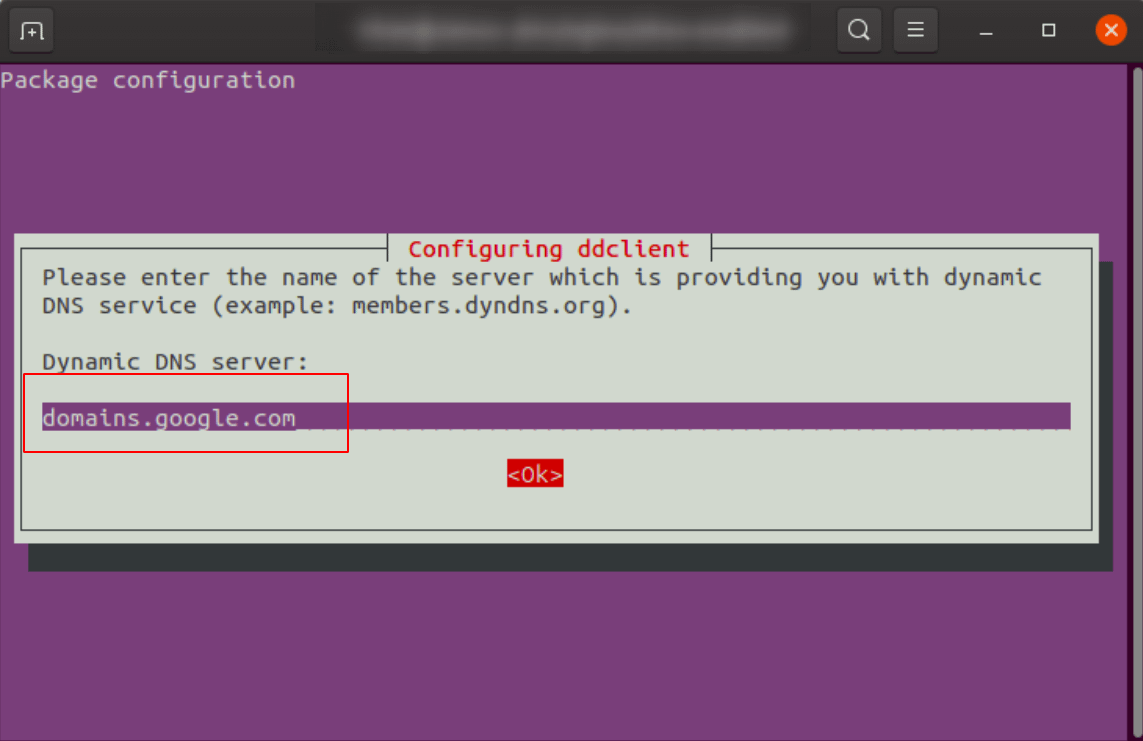
Honestly, these prompts don't matter too much since we're going to modify the config file directly anyway, but they give us a good starting point.
- Once installation completes, let's edit our ddclient config with:
sudo nano /etc/ddclient.conf
- Edit /etc/ddclient.conf:
# Configuration file for ddclient generated by debconf
#
# /etc/ddclient.conf

daemon=300
protocol=dyndns2
use=web
server=domains.google.com
ssl=yes
login=<insert username from Step #2 (Google Domains) here>
password='<insert password from Google Domains here- KEEP SINGLE QUOTES'
<your domain name here>
Don't forget that last part with your domain name. In my case it simply ends with engineerworkshop.com:
# Configuration file for ddclient generated by debconf
#
# /etc/ddclient.conf

daemon=300
protocol=dyndns2
use=web
server=domains.google.com
ssl=yes
login=
password=''
engineerworkshop.com
Now, I think a little explanation is in order for the lines we've added:
- The daemon line simply tells the ddclient daemon how often to check for changes in our public IP address and notify the domain name server (if necessary). I think 5 minutes is a reasonable value.
- use=web tells ddclient to retrieve our public WAN address using one of the many "what is my IP address" websites.
- ssl=yes tells ddclient to use SSL when connecting to Google Domains (always a good idea to use SSL when you can).
- Open the ddclient defaults with:
sudo nano /etc/default/ddclient
- Set ddclient to run in daemon mode by updating this file to:
run_daemon="true"
daemon_interval="300"
- Make sure that the ddclient service is running:
sudo systemctl start ddclient
- Test our ddclient configuration with the following command:
sudo ddclient -daemon=0 -debug -verbose -noquiet
You should receive the following message:
SUCCESS: engineerworkshop.com: skipped: IP address was already set
Going back to Google Domains and looking at your Dynamic DNS record should also show your public IP address.
Port Forwarding
Great, now clients can find us on the internet and be routed to our web server via the IP address. Now, if they visit your new domain name URL or just type in the IP address, they'll splatter against your router like a bug on a windshield if we don't make any additional changes.
Why? Because the web traffic ports on your router are closed. By default, web traffic is carried on port 80 (for http traffic) and 443 (for https traffic). When you access a web site, you are accessing the server not only on an IP address, but also on these two ports.
For security reasons, these ports are closed to outside WAN traffic on your router. We need to not only open these ports, but we also need to tell your router where to send this traffic on your internal network. More specifically, we need to tell it to forward the traffic to your web server- this is known as port forwarding.
- Find your RPi's internal (private) IP address. This can be found with the following command:
ifconfig
Note: You will need to install net-tools to use this command which is simple enough with:
sudo apt install net-tools

- Forward outside web traffic to this IP address.
This is accomplished on the router. How you actually do this is specific to your manufacturer and router, but in general what you're trying to do is say this:
Take all traffic FROM port 80 and FORWARD it to port 80 on your reverse proxy server's IP address (so in my case this would be written at 10.0.10.3:80).
I think the way pfSense lays out its port forward rules illustrates this best:
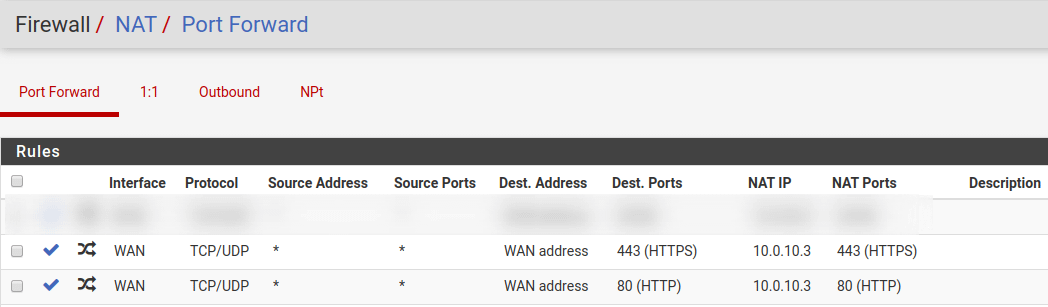
pfSense Port Forward Rules
What these port forward rules literally say is that, on the WAN interface, for any IP address on any port (* source address and * source ports) bound for our public IP address (WAN address) and HTTP/HTTPS ports (80 and 443 destination ports), forward that traffic along to 10.0.10.3 on ports 80 and 443 respectively.
If you are in fact using pfSense as your firewall/router, to create the above rules, we simply need to add an entry to the port forward settings found under Firewall > NAT. An individual entry will look like so:
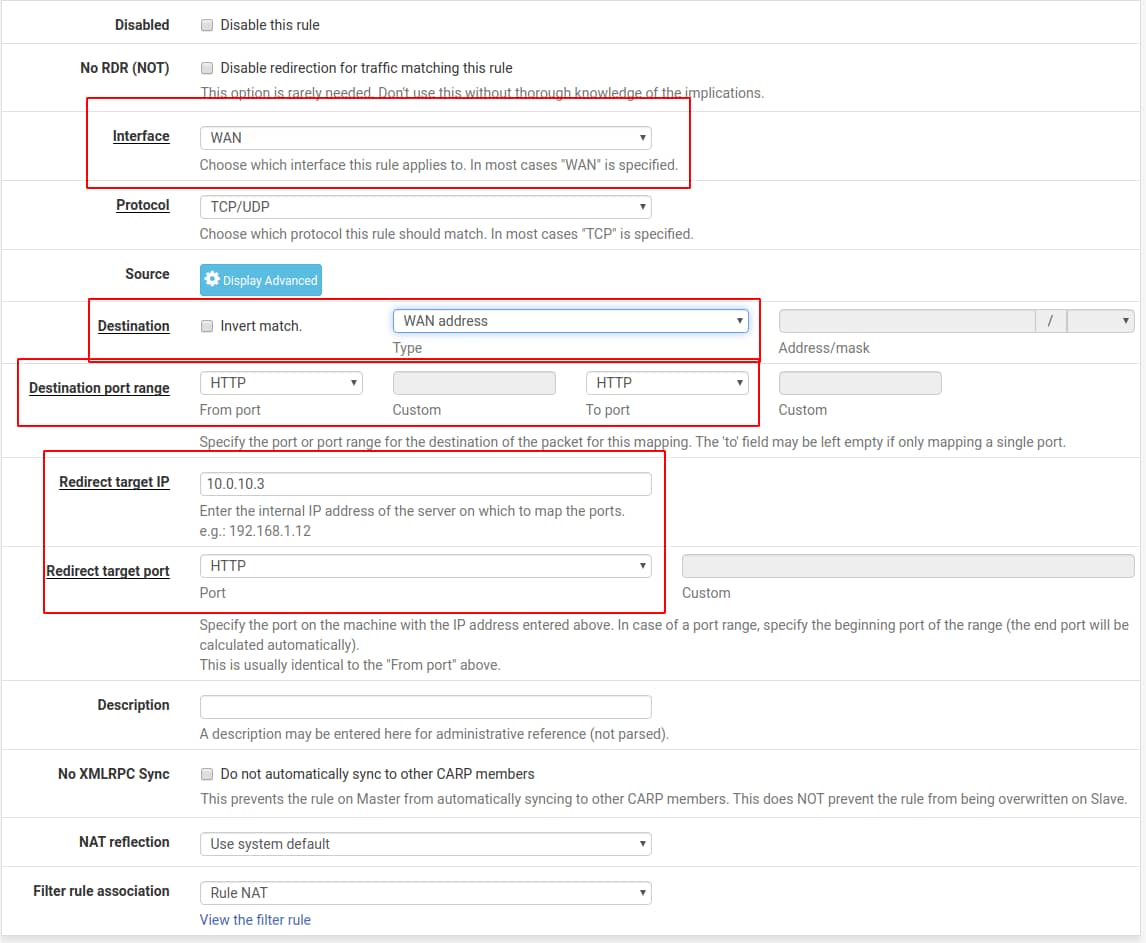
pfSense Port Forward Entry for HTTP (Port 80) Traffic
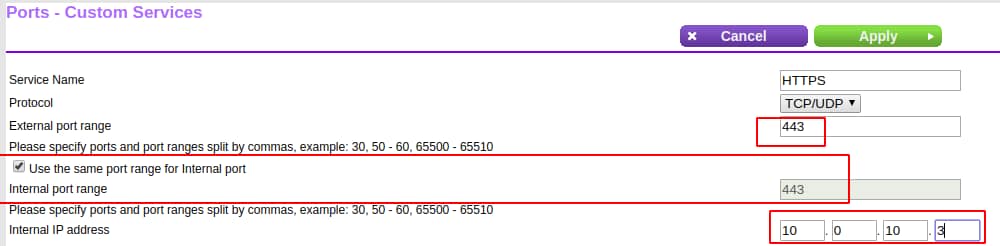
If you're on a regular consumer router, such as a Netgear Nighthawk, you will navigate to the Port Forwarding settings (found under the Advanced tab) and add the following entry to forward HTTP (port 80) traffic to port 80 on your web server:
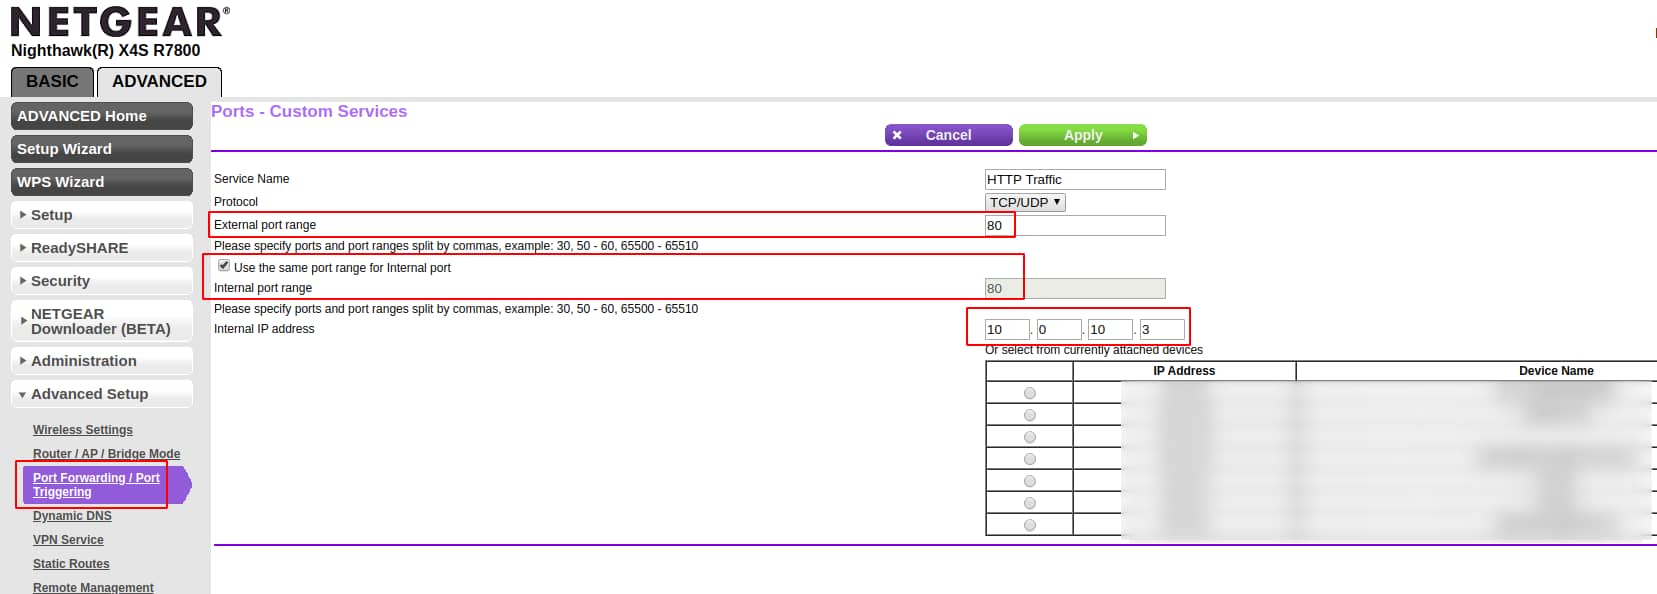
While you're at it, you might as well do the same for HTTPS (port 443) traffic:
That's it! Your NGINX web server is now on the internet. You can test this by typing in your public IP address into your browser and, if everything is working, you should be presented with the default NGINX page:
If you already have a web server serving actual content, don't forget to add your new domain name as an entry in the NGINX reverse proxy!