DISABLE CHROME EXTENSIONS / #REINSTALL CHROME: / STOP SYNCHRONISATION WITH GOOGLE ACCT
SSl ToolsFirefox Errors / FixesFirefox- Record Too LongChrome ErrorsChrome - Connection RefusedChrome - Version Interference
Some SSL Tools
SSL Checker
When you insert your domain name, and press on “check now” button, it will show your SSL certificate’s details. It briefly specifies serial no, certificate issuer name, certificate’s starting and expiry date. You can check the security status of any domain.
CSR (Certificate Signing Request) contains an encoded text. Decoder will convert your encoded language and verify the details of the SSL certificate. CSR Decoder reveals the details of certificate owner and the SSL public key.
New to SSL? Find the right SSL Certificate for your eCommerce business to avoid unnecessary hassle and confusions. Use our SSL Finder tool and get the best match SSL product for your organization and it won’t require your contact details as well.
SSL certificate is developed on CSR (Certificate Signing Request). An encrypted text is generated on the server that carries organization details like common name, legal name of enterprise, division of the enterprise, city, state, country, email address, public key, etc.
In most cases, if individual has access of his server via control panel, then CSR can be generated, which is a combination of private and public key. How you generate CSR depends on your server type therefore; we have categories method list for CSR generation on different web servers.
When you visit website sometimes, a warning pop up on your screen stating, “The certificate is revoked”. Certificate revocation is intended to alert users about an untrusted website and to save user against fraud and threats. Why Does It Happen? A Certificate can be revoked if user has
Browser warnings occurs only when a browser find a problem in site either related to Malware, phishing warning or SSL certificate warning. In a study prepared by Google and Berkeley University showed that majority users avoid such warnings and become victim of cyber attacks. It is in the int
The security certificate presented to this website has expired or is not yet valid. Explanation: As mentioned earlier, SSL certificates issued by the Certificate Authorities have an expiry date which is written in the certificate, itself. For example, a standard SSL certificate named Rapi
The security certificate presented to this website was issued for a different website’s address. Reason 1: This error is widely known as the ‘name mismatch error’. In this error, the common name of the domain recorded in the SSL certificate does not matches the address typed in the
Having an SSL certificate is must nowadays for all those who wish their business remains safe from the unexpected circumstances. SSL not only secures your data and communication through encryption but also preserves your business’s integration. But only purchasing the certificate is not enough
Step-by-Step Guide to Fix Secure Connection Failed in Firefox
Solution #1: Check your Security Software for SSL Scanning
Every security software on the market has a feature called SSL Scanning or SSL filtering. This is a feature that is designed to make sure that you do not accidentally visit a website with expired SSL Certificate (this is an algorithm that is supposed to protect your data on any website it is installed on). However, sometimes your security software could prevent you from visiting a website because it has tagged the SSL Certificate of that website as expired or invalid.
To fix this, you need to visit the settings option of whichever security software that you are using and locate the SSL scanning feature of the software. Once you find it uncheck the box that indicates if it is enabled. Once you disable this feature on your security software, you should try visiting the website again.
If this error persists then you should try the next solution.
Solution #2: Change the SSL Setting of Your Firefox browser
Step #1: The first thing you need to do is type in the address bar of your Firefox browser the command “About:Config”
Step #2: A pop-up box should show up with the warning “This might void your warranty!” click on the option I accept the risk!
Step #3: In the search box that comes up, type the words “security.ssl.enable_ocsp_stapling”.
Step #4: The value of the new result that pops up will indicate “true.” Double click on the value to change it to “false”.
Step #5: Try connecting to the website that you are trying to visit and see if this has fixed the error. If this doesn’t work, go to the next solution.
Solution #3: The Proxy Setting of Your Firefox Browser
When the proxy setting of your computer is not properly set to surf the internet, then you might also get this error. To solve this problem, please consider the below steps.
Step #1: On our Firefox menu bar, navigate through Tools Menu and click on the option tab.
Step #2: On the new page that shows up, navigate to the advance panel and click on the tab that is labeled Network.
Step #3: In the connection field that is open, click on the button labelled as Setting.
Step #4: A new pop-up box should appear on your screen with the title Connection Setting.
Step #5: In the connection window that you now have opened, look for Manual Proxy Connection and check if it is selected.
Step #6: If the Manual Proxy Connection is selected, then it means you will have to verify all the protocol fields by yourself. However, if you are not sure what to do about anything in this window, it is strongly recommended that you contact your network administrator.
Step #7: If the Manual Proxy Connection is not selected, then leave it as it is and close the Connection Setting Window and call your network administrator.
Finally, you should check If SSL is installed properly or not. If SSL is not configured properly then it may throw such type of error. Moreover, you should update the Firefox timely as new updates may revoke old algorithm support or other security changes.
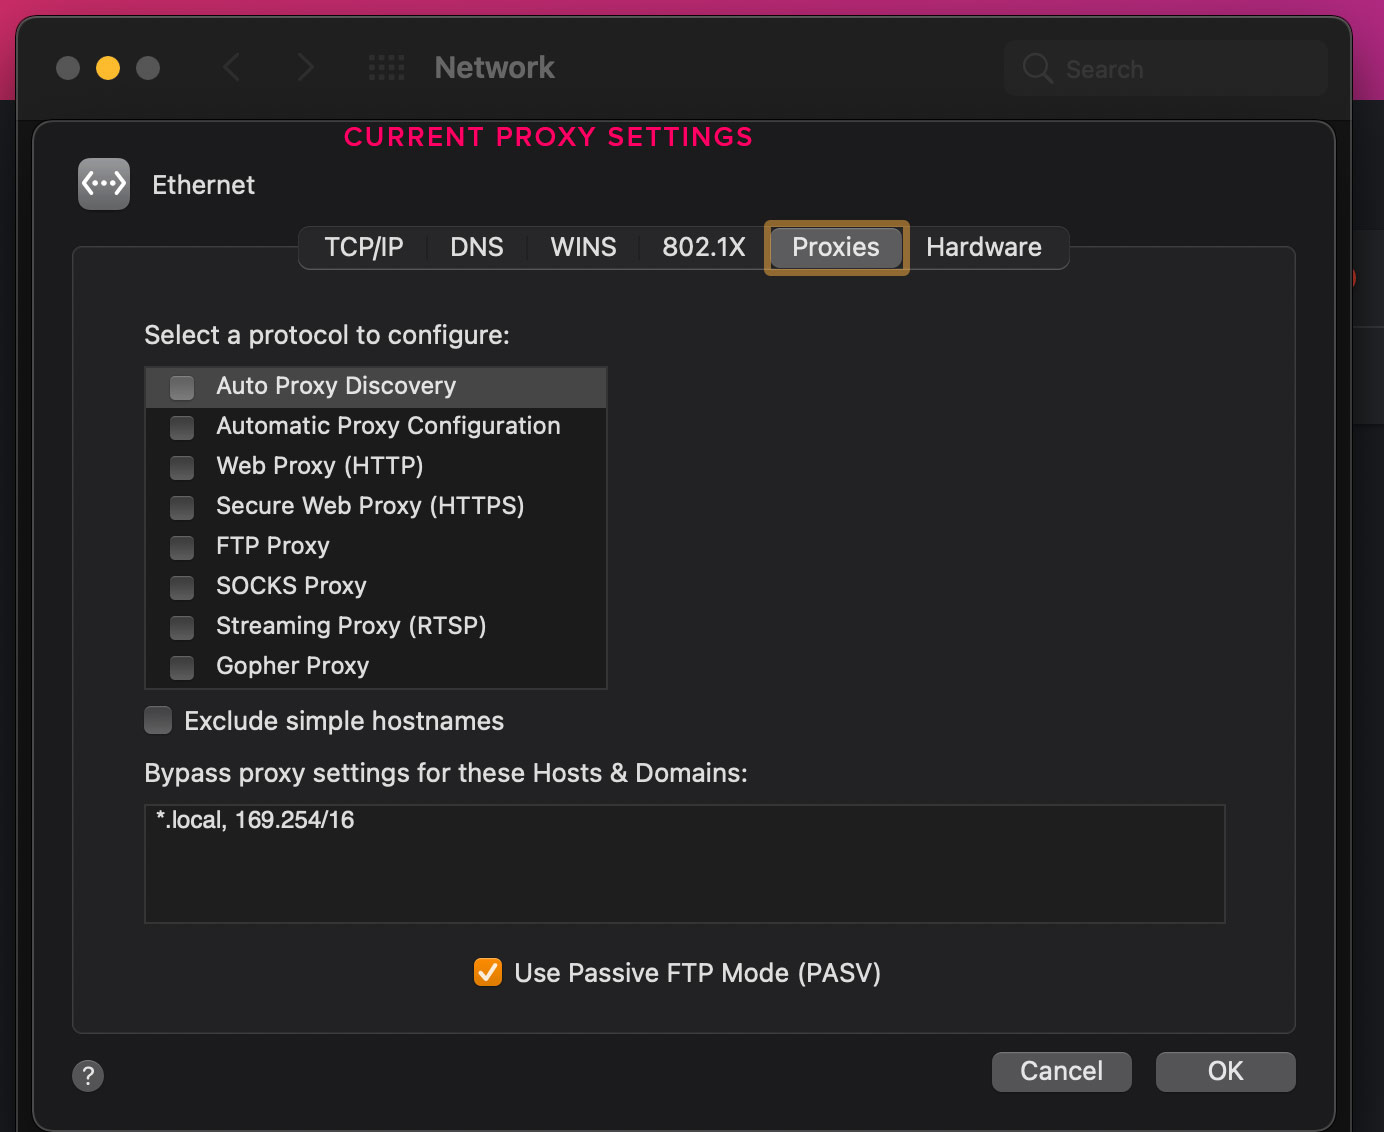
MAC HARDWARE PROXY SETTINGS
Enter proxy server settings on Mac
If your computer is connected to a local network that’s protected from the internet by a firewall, you may need to specify proxy servers or use the FTP passive mode (PASV) to access some internet sites. A proxy server is a computer on a local network that acts as an intermediary between a single computer user and the internet so that the network can ensure security, administrative control, and caching service.
On your Mac, choose Apple menu
> System Preferences, then click Network.
In the list, select the network service you use—for example, Ethernet or Wi-Fi.
Click Advanced, then click Proxies.
If you want to configure your proxy server settings automatically, do one of the following:
To automatically discover proxy servers, select Auto Proxy Discovery.
If your network administrator provided you with the address of a proxy auto-configuration (PAC) file, select Automatic Proxy Configuration, then enter the address of the PAC file in the URL field.
If you want to configure your proxy settings manually, do the following:
Select a proxy server, such as FTP Proxy, then type its address and port number in the fields on the right.
Select the “Proxy server requires password” checkbox if the proxy server is protected by a password. Enter your account name and password in the Username and Password fields.
You can also choose to bypass proxy settings for specific computers on the internet (hosts) and segments of the internet (domains) by adding the address of the host or domain in the “Bypass proxy settings for these Hosts & Domains” field. This might be useful if you want to make sure you’re receiving information directly from the host or domain and not information that’s cached on the proxy server.
To bypass a single domain, enter the domain name—for example, apple.com.
To bypass all websites on a domain, use an asterisk before the domain name—for example, *apple.com.
To bypass a specific part of a domain, specify each part—for example, store.apple.com.
Step by Step Guide to Fix SSL_ERROR_RX_RECORD_TOO_LONG Firefox Error
If you’ve faced the “SSL_ERROR_RX_RECORD_TOO_LONG” Firefox error, and are confused about it, don’t worry. Most of the people who use Firefox have experienced this at one point or the other.
What is an SSL_ERROR_RX_RECORD_TOO_LONG?
First, the problem is unique to Firefox users. You won’t find someone who uses a different browser but has faced the same problem. So, if someone says they don’t know about it, chances are they don’t use Firefox.
This error is a common one. As you’ve probably already guessed, most of the time it’s related to the improper configuration of an SSL certificate.
Most online businesses nowadays have a separate client portal. When a client tries to open a port on your server, many times they’re unsuccessful. The error code: ‘SSL_ERROR_RX_RECORD_TOO_LONG’ flashes up. This basically signals that the SSL certificate isn’t properly configured.
As a safeguard against data breach and cyber-attacks, most online businesses of today don’t authorize a connection unless there is a properly configured SSL certificate, even if a connection has been established. Usually, you need a configuration that will enable it to use Port 443.
There could be other reasons related to the Transport Layer Security (TLS). Whenever new versions of TLS are released in the market, some systems display this problem. The current version is TLS 1.3, and the most recent problems started when it was first released. A similar problem was experienced by many users when TLS 1.2 was first released, nearly a decade back.
How to Fix SSL_ERROR_RX_RECORD_TOO_LONG Firefox Error?
There are multiple ways to solve SSL_ERROR_RX_RECORD_TOO_LONG error. Let’s look at some of them:
1. HTTP vs HTTPS
HTTP works on the application layer, and HTTPS works on the transport layer and is concerned with Port 443. If https:// doesn’t work, you probably need to work on the transport layer, on Port 80. Therefore, it’s a good idea to give http:// a try and check it out.
It is human nature to keep forgetting things, so you may find the problem occurring if you haven’t updated your Firefox version lately.
There’s a quick way to check it out, too:
Click on ‘Menu,’ then click ‘Help’ and ‘About’
A new window will display if you’re on the latest version or not
If you’re not, simply click on ‘restart to update’
The chances are that this step will solve the problem right away.
3. Disable Add-ons
If you’ve enabled add-ons, it may sometimes interfere with the smooth functioning of Firefox. Try to start Firefox after disabling the add-ons.
4. SSL certificate
As you already know, the problem may sometimes occur due to the improper configuration of the SSL certificate.
Even if you do manage a connection, the server won’t allow the link if the SSL certificate doesn’t meet the standards.
In such a case, you can either ensure proper configuration of the SSL certificate to meet all the needs of the server or get a new certificate that does it.
Cache – another common phenomenon that might be at the root of all this. Computers tend to store cache to provide faster service the next time someone makes a similar request for the same data.
But delaying clearance of cache can cause your system to slow down and make you face problems like these. So clear cache and check if the problem persists.
6. Disable proxy
This problem can take place even if your proxy settings aren’t correctly set. When your proxy settings are turned on, such a message can flash across. You need to check after disabling the proxy settings.
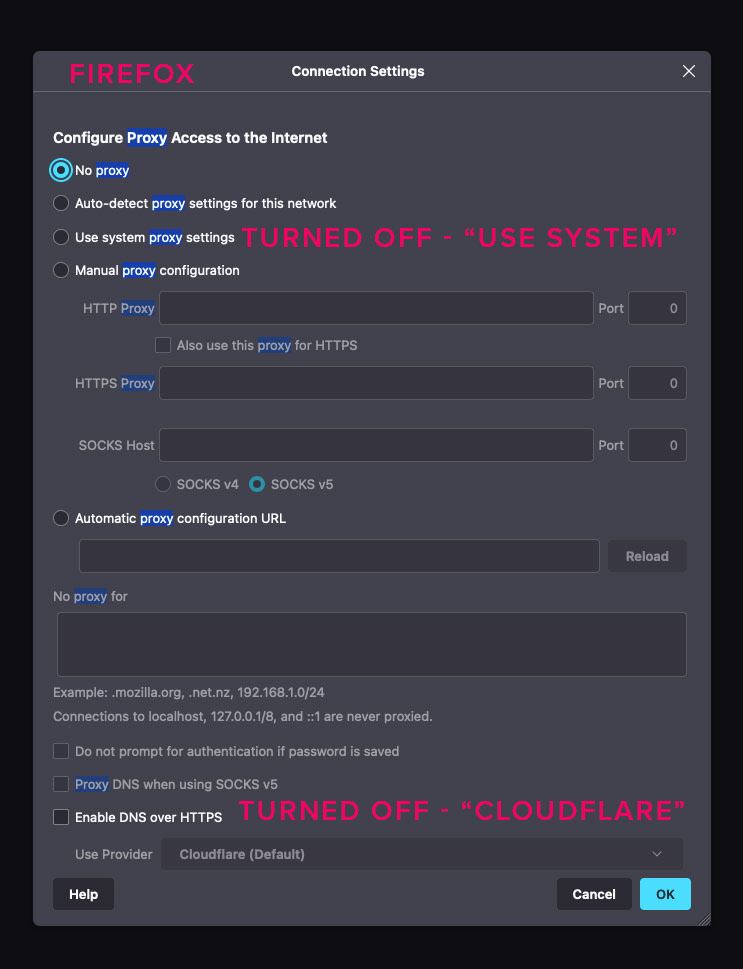
Simply go to the ‘menu,’ click open and select the ‘options’ button
Go to ‘Network proxy section’
Select ‘No proxy’ from ‘settings’
Restart Firefox
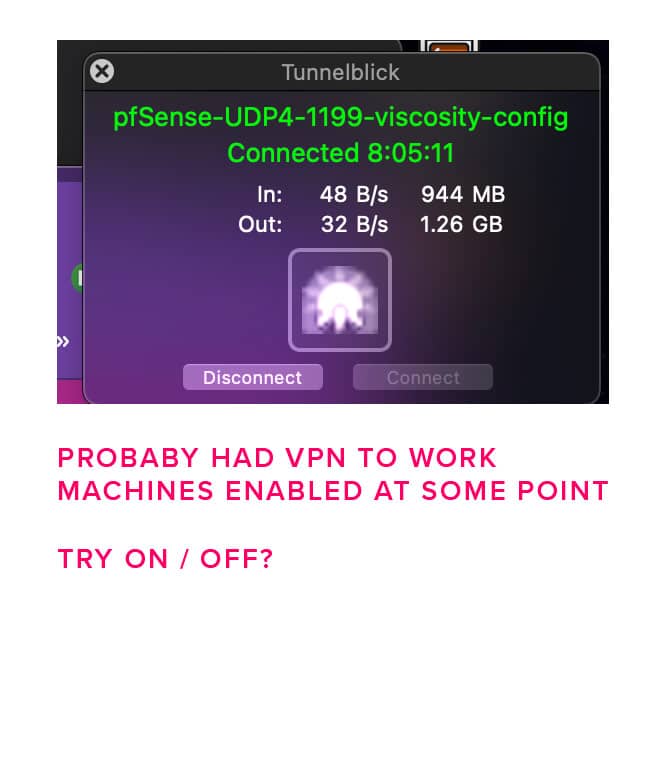
7. VPN use
Many users have reported that using a VPN has helped them solve the problem of ‘SSL_ERROR_RX_RECORD_TOO_LONG.’ Although there isn’t any guarantee it always will, it’s worth a try. You can use any VPN to test it out.
8. Uninstall & reinstall
If you find that the problem persists, you may take the radical route of uninstalling your Firefox browser and downloading it once more. In all probability, the problem would be gone when you restart Firefox now.
9. Windows Firewall
This acts as a safeguard for your server and system and prevents unauthorized access.
However, sometimes, the firewall may end up causing some problems like this.
Turning it off and disabling it, at least temporarily, has been found to solve the issue at times. However, it isn’t advisable, since it exposes your server to criminals.
10. TLS update
A large majority of servers and systems use the Open SSL library, which upgraded a few months back, and now supports the TLS 1.3.
Many people are yet to follow suit and upgrade to 1.3, but you need to make sure you’re on at least version 1.2.
TLS 1.0 is now as good as defunct, and TLS 1.1 is on the same road. To overcome this problem, you now need at least 1.2, and preferably 1.3.
There are many websites that may suggest some specific other ways of getting rid of the message. However, not all of them are safe, and most should be downright avoided. Here are some examples:
11. Turn off your anti-virus
This is a method suggested by many websites. The danger of such an act cannot be stressed enough, especially considering the exponential increase in cyber-crime.
All the criminals need is a window of opportunity to hack into your system. Although turning off anti-virus may sometimes help with this problem, it must never be done at any cost.
12. HTTP or HTTPS
While changing from http:// to https:// can sometimes solve the problem for you, it isn’t always advisable.
This is because the ‘https://’ is updated with the latest security patches and provides a relatively fail-safe way to browse the internet. ‘http://’ is a much older and insecure version and doesn’t provide the security when it comes to browsing. Therefore, it’s best not to use it, even if advised.
Winding-Up
So, these were some of the ways that can help you fix the SSL_ERROR_RX_RECORD_TOO_LONG Firefox Error.
The chances are that you would be successful in eliminating the error after the first try. If not, you can try out all the methods one after another and see what clicks for you.
Google Chrome is a widely used browser and people who are using may have faced “ERR_SSL_PROTOCOL_ERROR” or “this site can’t provide a secure connection” on Google Chrome at least once.
Most of people these days prefer to use Google Chrome for their daily browsing activities. After all, Google Chrome is a fast, secure, and reliable web browser with a better and user-friendly interface.
However, Google Chrome can show its fair share of errors sometimes.
ERR_SSL_Protocol_Error is one such error message that Google Chrome shows on websites. Most of people are aware of this error message that appears on some websites when we try to open them.
Mostly this error occurs due to server issues and a lack of client authentication. There are some other reasons for this error as well for this error.
But do not worry, if you are facing this issue then you are not alone, and it can be fixed easily.
Come to think of it, ERR_SSL_Protocol_Error is not even such a drastic issue to worry over.
In this article, we will discuss some quick ways to help you fix this error right away, without any hassle.
Why are you getting ERR_SSL_PROTOCOL_ERROR?
There are many reasons for not connecting with the server or any website. However, we cannot always find all the reasons behind this.
Some of the most common reasons for this error are:
A firewall blocking the browser extension
Inaccurate date & time
The cache of the Browser
SSL state of the system
The main trouble occurs when it remains even after reloading the page or clearing the cache. You cannot ignore this error, but you can eliminate it from Google Chrome.
We will be discussing all these issues and how to overcome them in this article.
How to Fix ERR_SSL_PROTOCOL_ERROR?
Let’s discuss some of the best ways to remove this error from Google Chrome.
1. Sync the System Date
The most common reason for this error is the incorrect date on your system. The date of your system should always be synched with the date of the website’s server.
When the system date is not synced with the server date, then you might expect the ERR_SSL_Protocol_Error to occur. This situation can easily be fixed by adjusting the date of your system.
You can adjust it manually or auto-sync the date and time with the internet.
Now, after fixing the date and time issue, reload the website, and you will see this error disappear.
2. Clear Cache of Browser
If you know about IT stuff or are aware of the web development know-how, then you must already know about the cache of the browser.
Web developers are aware of the situation that CSS changes do not reflect if the cache is not clear.
The process of removing cache is exceedingly simple, as mentioned below:
Step #1: Press Shift, Ctrl, and Delete
Step #2: Set “AA Time” in the time range section
Step #3: Skip browsing history checkbox and select rest all
Step #4: Press Enter
Now, the cache is cleared, and you can check whether the issue is fixed or not by reloading the page.
3. Delete Hosts File or Restore to Default
You can restore the host file in two different ways.
First, it can be done by downloading the host file store tool. This tool will fix the ERR_SSL_Protocol_Error automatically in the web browser.
The second method entails creating the host file manually.
You will find the host file at the following location:
“C:\Windows\System32\drivers\etc.”
This file sometimes gets infected and thus shows incorrect information. Delete this host file and update it with the correct code. This will help you eliminate the ERR_SSL_Protocol_Error quickly.
4. Clear the SSL State of System
Clearing the SSL state of the system can also help you remove this issue quickly.
Here are the simple steps to clear the SSL state:
Step #1: Open Google Chrome settings by clicking on the three dots that appear on the top-right side of the browser.
Step #2: Then, from the navigation menu, select “Settings” on the top-left side corner of the screen. Next, select the “System” option from the advanced drop-down menu.
Step #3: Now, click on the “open proxy settings” option and a new window of Internet Properties will pop-up.
Step #4: Finally, select the “Clear SSL State” option by navigating the Content Tab.
Now, reload the website, and you will witness that the issue has now disappeared.
5. Adjust Antivirus Settings
Navigate the antivirus settings of your system’s antivirus software. Since the navigation settings are different in all antiviruses, it is difficult to demonstrate the exact system of all antiviruses.
Simply check the setting of your antivirus and find the SSL protocol in the “advanced settings” option.
In the settings section, check whether the antivirus software is scanning the SSL protocols. If the antivirus software is scanning, then disable the feature and change it to “Ask about non-visited sites.”
Something like this:
However, if the error is still appearing, then set the settings back to default.
6. Disable the QUIC Protocol
QUIC stands for Quick UDP Internet Connections that created a secure connection to the server.
QUIC is almost the same as the TLS and SSL protocol and is always enabled in Chrome by default.
However, it sometimes conflicts with the SSL protocol of the websites and therefore displays the ERR SSL error message.
You can get rid of this by simply typing “chrome://flags/#enable-quic” in the address bar and press the “Enter” button.
Next, check the QUIC protocol on the top of the screen and disable it.
Now when you reload your website, you will see that the ERR_SSL_Protocol_Error has been duly eliminated.
7. Change Internet Security and Privacy Settings
Security of systems and information is a great concern for everyone while browsing on the internet.
Most internet users usually set their privacy and security level as “high.” However, this high level of security and privacy setting could sometimes block the SSL connection.
Here are the steps required to change the setting:
Step #1: Open Control Panel
Step #2: Navigate to “Internet Options”
Step #3: Go to the “Security” tab and change the security level to “medium.”
Step #4: Similarly, click on the Privacy tab and set your privacy level to “medium.”
Now, finally, reload the page to check whether the issue has been eliminated or not.
8. Activate all TLS/SSL Versions
This is the last method that you can use to fix this issue if all other methods fail.
However, activating all TLS/SSL versions means that even the sites with outdated or insecure SSL protocols will also get loaded, which can be hazardous in some cases. That’s why this method is not particularly recommended.
However, if all other measures fail, then you can try this one out as your last resort.
Here is the way to activate all TLS/SSL versions:
Step #1: Open the Advanced Settings of Chrome and then select “System.”
Step #2: Select “Open Proxy Settings.”
Step #3: Open the “Advanced” tab
Step #4: Go to “Security”
Step #5: Check the boxes of all TLS/SSL Versions.
Now, restart the browser to check whether the issue is fixed or not.
Conclusion
I hope all these above-mentioned solutions will help you to fix the ERR_SSL_Protocol_Error on your Google Chrome browser.
Start with the first method and then move on to the next one. If all else fails, you can try activating all the TLS/SSL versions, but as mentioned in the last point itself, it’s better to avoid this solution if possible.
Step by Step Guide to Fix ERR_CONNECTION_REFUSED in Chrome
Google Chrome is one of the most popular browsers in this digital era. Though there are many other browsers like Mozilla Firefox, Internet Explorer, Safari etc. who are tough competitors, Chrome still tops the list due to fast browsing speed, quick page load and display, and easy-to-use functions.
Though Chrome has its list of advantages, sometimes this browser displays titled or untitled errors due to various reasons. One such error displayed by this browser on an unresponsive page is “ERR_CONNECTION_REFUSED”.
“ERR_CONNECTION_REFUSED” – This error appears in the Chrome browser, mainly when Chrome is struggling to open a web page, but is unable to do so.
Reasons for ERR_CONNECTION_REFUSED in Chrome
Site refused to connect
Browser extensions or software clashing with browser
Downtime in internet connection
DNS Cache Issues
Cookies Issues
Outdated version of browser
Firewall or Antivirus interferences with browser
Many of you may have faced this error once in a while, but you needn’t worry because fixing this error is quite simple.
Let’s have a look at some simple and easy solutions to fix this error.
ERR_CONNECTION_REFUSED in Chrome – How to Fix
#1. Check the website status:
Most of the times, “err connection refused” error occurs when Chrome is unable to load the website.
Check whether the same website is opening on another server or in mobile.
Check whether other websites are opening in Chrome browser or not.
“Down for everyone or me” is a service which shows the website status, once you enter the site name
If all the above checks show that the site is down, you need to wait till the website status is online and working.
#2. Check your Internet/Wi-Fi Connection:
If there are any issues with your internet connection or Wi-Fi routers, then the above error message is triggered by the browser.
Reset your Wi-Fi router by switching it off for a few moments before switching it on again and re-check if the error has been resolved or not.
#3. Clear Browser’s Cache & Cookies:
Browser’s Cache is the storage of images, videos, and logins, etc. which are stored in the memory of the browser. This helps to load repeat pages very quickly thus saving time.
But when the browser gets overloaded with all this stored data, its speed and efficiency reduce. Sometimes old cache memory interferes with new pages, causing ERR_CONNECTION_REFUSED error.
Instructions to clear browser’s cache:
Open Chrome
In top right corner click More
Later click More Tools>Clear Browsing Data
Select All time – to delete everything
Click Clear data.
Another alternate method is to write “Chrome://settings/clearBrowserData” in the address bar and later click clear data by selecting the above options.
Check if the error still exists after clearance or not.
#4. Check Proxy Server Settings:
You may have used a proxy server sometimes to remain anonymous and protect your sensitive data against security thefts. The main function of a proxy is that it allows you to surf online with a different IP address and acts as an intermediary between browser and website.
Reasons of ERR_CONNECTION_REFUSED error:
Webserver can reject the IP address attached with proxy server, and hence display the browsing error
You have forgotten to remove the unavailable proxy server from internet settings
Incorrect proxy configuration
To remove the error, re-check your proxy settings.
Instructions:
Open the Chrome Browser. Go to Settings>System>Open Proxy Settings>Go to Connections>Click on LAN settings button.
Ensure that “Automatically detect settings” is disabled.
Under “Proxy server” section, ensure “Use a proxy server for your LAN” is disabled.
Click OK and restart.
#5. Disable Antivirus Software/Firewall:
Firewalls and Antivirus software protect the users, their operating systems and other sensitive data against malware or any other malicious activity, thus keeping hackers away from your website. After regular scans and updates, they block any suspicious activity in their peripheral area. But sometimes these securities may lead to site connection errors.
Antivirus or firewall may sometimes detect secured traffic as an unsecured one, causing the error. Disabling these securities may perhaps solve your problem.
Instructions:
Windows Firewall: Go to Control Panel > Windows Firewall, click on the “Turn Windows Firewall on or off” link on the left side, to turn off your firewall.
Later disable Antivirus software on a temporary basis. Check if the error is solved and after accessing your safe site, don’t forget to enable these securities again.
#6. Reset your IP address & Clear DNS Cache:
Many users are unknown about the fact that DNS Resolver Cache is temporary storage made by the computer’s operating system, which keeps records of all recently visited websites, webpages as well as domains. Its function is the same as browser cache, quick loading of websites and hence the occurrence of error occurs when DNS Cache is overloaded. Reset IP and Flush DNS Cache to flush out the error.
Instructions:
Open the command prompt programme by clicking on Start>type cmd.exe
Right click cmd.exe and select “Run as administrator”>Yes.
Then type the DNS flush command “netsh winsock reset catalog” and then hit an enter button.
Note: This administrative command is a must to enter.
Later type the next command ipconfig/flushdns and then click Enter button.
This will complete your DNS clearance process. Start Over your computer to test the result.
#7. Change DNS address:
A loaded DNS server or an incorrect DNS address can cause “ERR_CONNECTION_REFUSED” error. Mostly DNS server address is directly obtained from ISP, but if you are using a third-party DNS, you need to reset that DNS with your ISP.
Instructions:
Browse “Control Panel”> “Network and Sharing Centre”.
Right click on the active Network Adapter and open properties in the context menu.
Click on the “Internet Protocol Version 4 (TCP/IPv4)” and click on the “Properties” button.
A new window will open which will show you the place of entering custom DNS
Inside the popup box, you can enter DNS servers of Google; 8.8.8.8 for the Preferred DNS server and 8.8.4.4 for Alternate DNS server
Click OK and restart your browser
#8. Disable Chrome Extensions:
Chrome extensions customize user requirements and help in automating other processes with additional features. There are many extensions available for the Chrome browser; of which the majority of them are developed by third-party developers. Hence the changes of them being updated on a regular basis are remote and unnoticed.
Outdated or expired extensions lead to many errors like
net::err_connection_refused
err_connection_refused android
err_connection_refused localhost
err_connection_refused chrome
localhost refused to connect chrome
err_connection_refused in chrome
Auditing extensions on a regular basis will help solve most of the errors. Go for a check as to which extensions are necessary, and which are unused. Remove all unused ones for a smooth browsing experience.
Also, check whether the remaining extensions are updated regularly in the last couple of months or not.
Instructions:
Open the extensions menu by typing: chrome://extensions
Toggle to the left to deactivate individual extensions
#9. Reinstall Chrome:
Even the Chrome browser may be outdated or expired to show the above error. In this case, you need to completely uninstall the Chrome browser and later re-install chrome. You should check the latest chrome version and update it timely.
#10. Stop Synchronisation with Google Account:
Chrome and Google account synchronization may sometimes lead to this error. To stop this synchronization,
type chrome://settings/people in the browser search bar.
Your name and email id come up on the screen once you click enter after typing. There is a “Turn Off” button near your name.
Click that and reaffirm for errors.
Conclusion:
Various reasons can cause ERR_CONNECTION_REFUSED error in Chrome browser but can be fixed with the above solutions mentioned. Check out for each solution one by one until your browser becomes error-free. Hope this article has given you answers to all your queries, enabling you to have a smooth browsing experience.
ERR_SSL_VERSION_INTERFERENCE is an SSL error that usually appears in Google Chrome when a site (server) uses TLS1.3. Know how to fix it.
Getting the ERR_SSL_VERSION_INTERFERENCE error on your screen is one of the most frustrating experiences–especially when you’re searching for crucial info on the web or when you’re navigating on your favorite sites. To make it even worse, Google sometimes tries to ‘scare you off’ by suggesting that the website you’re trying to access is unsafe.
What Caused the ERR_SSL_VERSION_INTERFERENCE error on my computer?
Now, this is a common error, and the most surprising thing about it is that it’s usually not easy to discern its root cause. From incorrectly set dates and times to cache data, TLS problems, antivirus software problems, and corrupt or incomplete file installations, etc. it can be mind-numbing trying to find the root cause of this error.
Don’t worry, though, because we’ll help you find your way out. Read on as we explore with you some of the foolproof options for clearing this error.
How to Fix ERR_SSL_VERSION_INTERFERENCE Error?
Let’s discuss step by step ways to fix this error on Google chrome.
1. Clear Your Browsing Data
When you use Chrome to access the internet, it saves (Caches) the web pages and files on the sites you visit most often. This is done to ensure that the next time you visit the pages, they load quickly.
After some time, the cached data can eat your disk space, making it difficult to browse websites because of shallow disk space. If this is the cause of the ERR_SSL_VERSION_INTERFERENCE warning on your browser, it’s advisable that you clear Chrome’s cached data.
Here’s how to clear Google Chrome browsing/cached data in two options.
Option 1
Step 1: Start Google Chrome.
Step 2: Press Cntrl+Shift+Delete to clear the browsing data.
Option 2
Step 1: Start Google Chrome.
Step 2: Open the Menu icon then select History.
Step 3: Check browsing history, cached images, and file boxes then select ‘Clear browsing data.’
This will clear the browsing history and cached data to increase your browsing speed and get rid of the error message. This action is safe and will not interfere with data you stored on your browsers like bookmarks and home page etc. Don’t miss to read about How to View SSL Certificate Details in Every Browser.
2. Disable TLS 1.3
If you’re blocked from accessing the internet via Google Chrome due to TLS 1.3 (Transport Layer Security), you must disable it.
It may happen that TLS 1.3 security features are incompatible with the SSL installed on Google Chrome. To disable TLS 1.3, open Chrome then type chrome://flags/#tls13-variant on the address bar.
Locate TLS 1.3 then open the drop-down menu next to it. Disable it by setting it as ‘Disabled.’ Relaunch your browser and try accessing the internet to see if the problem is solved.
3. Setting Dates and Times Correctly
The Security certificates used on the websites are usually only valid for a specific period. After the elapse of that period, they’re deemed expired, and Google blocks you from accessing the sites because of the risks due to a lack of updated security certificates.
Now, the site you visit may be valid, but its validity dates don’t match your computer’s clock making it difficult for Google Chrome to verify if the site is authentic or not.
This could be the reason why you’re landing on the error page. Solve this problem by updating the dates and time zone of your computer.
4. Flush DNS Cache
The DNS cache helps streamline the process of DNS lookup to resolve domain names of specific IP addresses. However, if it isn’t managed well, it may compromise network security and web page access.
To avoid this, you’ll have to flush your computer DNS cache using these steps.
Step 1: Open your computer.
Step 2: Press the Windows key+S to open the search box.
Step 3: Type Command Prompt on the search box and from the resulting options, right-click command prompt, then select ‘Run as Administrator’.
Step 4: Check when the command prompt is up then run this command:
ipconfig /flushdns.
Once the process is finished, there will be a message stating that Windows IP configuration is success for flushing DNS Resolver Cache.
5. Remove Conflicting Browser Extensions
From helping you safeguard your online privacy to utilizing Chrome to meet your business preferences, etc., browser extensions are some of the must-have tools for business owners today. Not all of them may work with Chrome anyway, and in case of a miss-match, the extensions may clash with the browser rendering internet access impossible.
This shouldn’t be the case. If it’s the extensions that are blocking you from accessing some web pages, you must get rid of them.
Ideally, it’s recommendable that you disable all of them then check if the problem is resolved. If it’s fixed, begin installing the extensions one by one to spot the one causing the issues and get rid of it.
Here’s how to remove browser extensions in Chrome;
Step 1: Start Chrome.
Step 2: Open Menu and select More.
Step 3: Navigate to Tools, and then select extensions.
Step 4: Select the extensions you wish to remove then click ‘Remove.’
6. Disabling Third Party-Antivirus
The role of an antivirus is to keep you safe from threats and any malicious web pages. It achieves this by scanning the SSL/TLS protocols used on the websites you visit.
If it deems such protocols to be unsafe, it blocks you from accessing the sites. An unreliable antivirus may, however, conflict even with legit SSL/TLS protocols.
To check if your third-party antivirus is interfering with your online activity, it’s advisable that you temporarily disable it. If the problem resolves, your best bet would be to switch to more reputable antivirus software.
If the problem persists, enable the antivirus software and check other issues like internet connectivity, etc.
QUIC (Quick UDP Internet Connections) protocol was designed by Google to make the internet more effective and faster. It’s still in experimental stages where it’s also being used to try and boost the graphics of online games.
Because of still being in experimental stages, this protocol can be unstable and bar you from accessing some web pages. To fix this, check first if your Google Browser has this feature enabled then disable it.
Here’s how to find and disable it;
Step 1: Launch Google Chrome.
Step 2: On the address bar, type/paste chrome://flags/#enable-quick
If it’s enabled, you’ll see at the top of your screen that Experimental Quick Protocol was enabled by default. Be sure to disable it, then relaunch your browser and try visiting your favorite web pages.
Bottom Line
Any of these options should help fix the ERR_SSL_VERSION_INTERFERENCE error on your screen. If all of them fail, the problem may be with your browser. Reset then launch it again.
The first thing to do is click the “Trust” button next to the “SSL” section of the “Site Overview” page.
Even if this isn’t working in terms of getting the site to load over HTTPS, clicking the button directs Local to generate a certificate with the correct information about this site and attempt to register the certificate with macOS.
Clicking the “Trust” button so that Local can generate and register the certificate with the system.
Step 2: Keychain Access
In macOS, most secrets are stored in “Keychains.” This includes things like passwords, ssh keys, and importantly for us, SSL certificates.
Using the “Keychain Access” application that comes with macOS, we can search for the SSL certificate that Local created. Once found, you can manage all sorts of settings for that specific certificate.
In our case, we want to update the “When using this certificate” setting from “Use System default” to “Always Trust“. This means that for this certificate, for this site, macOS will always trust the connection and stop annoying you with warnings about the certificate.
The “Keychain Access” application can be found in the /Applications folder or by searching with an application launcher like Spotlight or Alfred.
Search for the Local site’s domain and instruct the system to “Always Trust” the certificate.
The whole process of creating the certificate and manually setting it to be “Always Trusted” within the Keychain Access app.
Set 3: Verify the certificate is trusted
Now that the certificate is set to “Always Trust,” how can you verify that everything is working?
Open the site in a browser again and ensure that there is a ‘lock’ in the address bar. If the lock is missing, the first thing to check is if the address bar has https:// at the beginning of the domain.
Verifying that the certificate is trusted in the browser.
Step 4: Update the URLs within the Database
Once you’ve got the Local site’s SSL certificate trusted with macOS, and have verified that the site can be successfully loaded over HTTPS, all that’s left to do is to update the urls within the Local site’s database!
You can use a plugin like Better Search Replace to search for the regular HTTP version of the url and replace it with the HTTPS version of the url.
Another option is to use WPCLI which comes bundled with Local. To do this, all you have to do is:
Right-click on the site in Local and select “Open Site Shell”
Within the terminal window that opens, use the wp search-replace command to update http:// to https://. Using the above site as an example, the command would look something like:


