
RESOURCES
- PDFs
- canakit-raspberry-pi-quick-start-guide-3.2.pdf
- raspberrypi-getting-started-with-pico.pdf
- BUY
- https://www.canakit.com/raspberry-pi-pico.html?cid=usd&src=raspberrypi
https://github.com/raspberrypi/pico-sdk
Raspberry Pi Pico SDK
The Raspberry Pi Pico SDK (henceforth the SDK) provides the headers, libraries and build system necessary to write programs for the RP2040-based devices such as the Raspberry Pi Pico in C, C++ or assembly language.
The SDK is designed to provide an API and programming environment that is familiar both to non-embedded C developers and embedded C developers alike. A single program runs on the device at a time and starts with a conventional main() method. Standard C/C++ libraries are supported along with C level libraries/APIs for accessing all of the RP2040's hardware include PIO (Programmable IO).
Additionally the SDK provides higher level libraries for dealing with timers, synchronization, USB (TinyUSB) and multi-core programming along with various utilities.
The SDK can be used to build anything from simple applications, to fully fledged runtime environments such as MicroPython, to low level software such as RP2040's on-chip bootrom itself.
Additional libraries/APIs that are not yet ready for inclusion in the SDK can be found in pico-extras.
Documentation
See Getting Started with the Raspberry Pi Pico for information on how to setup your hardware, IDE/environment and for how to build and debug software for the Raspberry Pi Pico and other RP2040-based devices.
See Raspberry Pi Pico C/C++ SDK to learn more about programming using the SDK, to explore more advanced features, and for complete PDF-based API documentation.
See Online Raspberry Pi Pico SDK API docs for HTML-based API documentation.
Example code
See pico-examples for example code you can build.
Quick-start your own project
These instructions are extremely terse, and Linux-based only. For detailed steps, instructions for other platforms, and just in general, we recommend you see Raspberry Pi Pico C/C++ SDK
-
Install CMake (at least version 3.13), and GCC cross compiler
sudo apt install cmake gcc-arm-none-eabi libnewlib-arm-none-eabi -
Set up your project to point to use the Raspberry Pi Pico SDK
-
By cloning the SDK locally (most common)
-
git clonethis Raspberry Pi Pico SDK repository -
Copy pico_sdk_import.cmake from the SDK into your project directory
-
Set
PICO_SDK_PATHto the SDK location in your environment, or pass it (-DPICO_SDK_PATH=) to cmake later. -
Setup a
CMakeLists.txtlike:cmake_minimum_required(VERSION 3.13) # initialize the SDK based on PICO_SDK_PATH # note: this must happen before project() include(pico_sdk_import.cmake) project(my_project) # initialize the Raspberry Pi Pico SDK pico_sdk_init() # rest of your project
-
-
With the Raspberry Pi Pico SDK as a submodule
-
Clone the SDK as a submodule called
pico-sdk -
Setup a
CMakeLists.txtlike:cmake_minimum_required(VERSION 3.13) # initialize pico-sdk from submodule # note: this must happen before project() include(pico-sdk/pico_sdk_init.cmake) project(my_project) # initialize the Raspberry Pi Pico SDK pico_sdk_init() # rest of your project
-
-
With automatic download from github
-
Copy pico_sdk_import.cmake from the SDK into your project directory
-
Setup a
CMakeLists.txtlike:cmake_minimum_required(VERSION 3.13) # initialize pico-sdk from GIT # (note this can come from environment, CMake cache etc) set(PICO_SDK_FETCH_FROM_GIT on) # pico_sdk_import.cmake is a single file copied from this SDK # note: this must happen before project() include(pico_sdk_import.cmake) project(my_project) # initialize the Raspberry Pi Pico SDK pico_sdk_init() # rest of your project
-
-
-
Setup a CMake build directory. For example, if not using an IDE:
$ mkdir build $ cd build $ cmake .. -
Write your code (see pico-examples or the Raspberry Pi Pico C/C++ SDK documentation for more information)
About the simplest you can do is a single source file (e.g. hello_world.c)
#include <stdio.h>
#include "pico/stdlib.h"

int main() {
    setup_default_uart();
    printf("Hello, world!\n");
    return 0;
}
And add the following to your
CMakeLists.txt:add_executable(hello_world hello_world.c ) # Add pico_stdlib library which aggregates commonly used features target_link_libraries(hello_world pico_stdlib) # create map/bin/hex/uf2 file in addition to ELF. pico_add_extra_outputs(hello_world)Note this example uses the default UART for stdout; if you want to use the default USB see the hello-usb example.
-
Make your target from the build directory you created.
$ make hello_world -
You now have
hello_world.elfto load via a debugger, orhello_world.uf2that can be installed and run on your Raspberry Pi Pico via drag and drop.
Coding on Raspberry Pi remotely with Visual Studio Code
https://www.raspberrypi.org/blog/coding-on-raspberry-pi-remotely-with-visual-studio-code/
Like a lot of Raspberry Pi users, I like to run my Raspberry Pi as a ‘headless’ device to control various electronics – such as a busy light to let my family know I’m in meetings, or my IoT powered ugly sweater.
The upside of headless is that my Raspberry Pi can be anywhere, not tied to a monitor, keyboard and mouse. The downside is programming and debugging it – do you plug your Raspberry Pi into a monitor and run the full Raspberry Pi OS desktop, or do you use Raspberry Pi OS Lite and try to program and debug over SSH using the command line? Or is there a better way?
Remote development with VS Code to the rescue
There is a better way – using Visual Studio Code remote development! Visual Studio Code, or VS Code, is a free, open source, developer’s text editor with a whole swathe of extensions to support you coding in multiple languages, and provide tools to support your development. I practically live day to day in VS Code: whether I’m writing blog posts, documentation or Python code, or programming microcontrollers, it’s my work ‘home’. You can run VS Code on Windows, macOS, and of course on a Raspberry Pi.
One of the extensions that helps here is the Remote SSH extension, part of a pack of remote development extensions. This extension allows you to connect to a remote device over SSH, and run VS Code as if you were running on that remote device. You see the remote file system, the VS Code terminal runs on the remote device, and you access the remote device’s hardware. When you are debugging, the debug session runs on the remote device, but VS Code runs on the host machine.
For example – I can run VS Code on my MacBook Pro, and connect remotely to a Raspberry Pi 4 that is running headless. I can access the Raspberry Pi file system, run commands on a terminal connected to it, access whatever hardware my Raspberry Pi has, and debug on it.
Remote SSH needs a Raspberry Pi 3 or 4. It is not supported on older Raspberry Pis, or on Raspberry Pi Zero.
Set up remote development on Raspberry Pi
For remote development, your Raspberry Pi needs to be connected to your network either by ethernet or WiFi, and have SSH enabled. The Raspberry Pi documentation has a great article on setting up a headless Raspberry Pi if you don’t already know how to do this.
You also need to know either the IP address of the Raspberry Pi, or its hostname. If you don’t know how to do this, it is also covered in the Raspberry Pi documentation.
Connect to the Raspberry Pi from VS Code
Once the Raspberry Pi is set up, you can connect from VS Code on your Mac or PC.
First make sure you have VS Code installed. If not, you can install it from the VS Code downloads page.
From inside VS Code, you will need to install the Remote SSH extension. Select the Extensions tab from the sidebar menu, then search for Remote development. Select the Remote Development extension, and select the Install button.
Next you can connect to your Raspberry Pi. Launch the VS Code command palette using Ctrl+Shift+P on Linux or Windows, or Cmd+Shift+P on macOS. Search for and select Remote SSH: Connect current window to host (there’s also a connect to host option that will create a new window).

Enter the SSH connection details, using user@host. For the user, enter the Raspberry Pi username (the default is pi). For the host, enter the IP address of the Raspberry Pi, or the hostname. The hostname needs to end with .local, so if you are using the default hostname of raspberrypi, enter raspberrypi.local.
The .local syntax is supported on macOS and the latest versions of Windows or Linux. If it doesn’t work for you then you can install additional software locally to add support. On Linux, install Avahi using the command sudo apt-get install avahi-daemon. On Windows, install either , or .
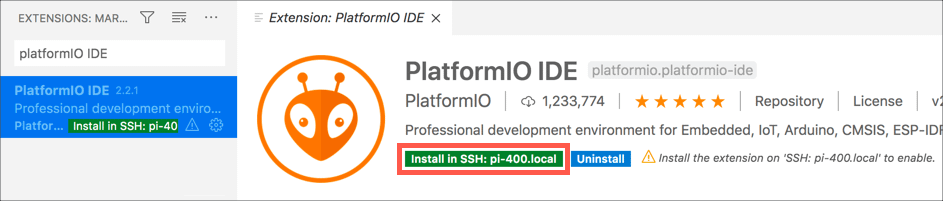
For example, to connect to my Raspberry Pi 400 with a hostname of pi-400 using the default pi user, I enter pi@pi-400.local.

The first time you connect, it will validate the fingerprint to ensure you are connecting to the correct host. Select Continue from this dialog.

Enter your Raspberry Pi’s password when promoted. The default is raspberry, but you should have changed this (really, you should!).

VS Code will then install the relevant tools on the Raspberry Pi and configure the remote SSH connection.
Code!
You will now be all set up and ready to code on your Raspberry Pi. Start by opening a folder or cloning a git repository and away you go coding, debugging and deploying your applications.
In the remote session, not all extensions you have installed locally will be available remotely. Any extensions that change the behavior of VS Code as an application, such as themes or tools for managing cloud resources, will be available.
Things like language packs and other programming tools are not installed in the remote session, so you’ll need to re-install them. When you install these extensions, you’ll see the Install button has changed to Install in SSH:< hostname > to show it’s being installed remotely.

VS Code may seem daunting at first – it’s a powerful tool with a huge range of extensions. The good news is Microsoft has you covered with lots of hands-on, self-guided learning guides on how to use it with different languages and development tools, from using Git version control, to developing web applications. There’s even a guide to learning Python basics with Wonder Woman!
Meet Raspberry Silicon: Raspberry Pi Pico now on sale at $4
Today, we’re launching our first microcontroller-class product: Raspberry Pi Pico. Priced at just $4, it is built on RP2040, a brand-new chip developed right here at Raspberry Pi. Whether you’re looking for a standalone board for deep-embedded development or a companion to your Raspberry Pi computer, or you’re taking your first steps with a microcontroller, this is the board for you.
You can buy your Raspberry Pi Pico today online from one of our Approved Resellers. Or head to your local newsagent, where every copy of this month’s HackSpace magazine comes with a free Pico, as well as plenty of guides and tutorials to help you get started with it. If coronavirus restrictions mean that you can’t get to your newsagent right now, you can grab a subscription and get Pico delivered to your door.
Microcomputers and microcontrollers
Many of our favourite projects, from cucumber sorters to high altitude balloons, connect Raspberry Pi to the physical world: software running on the Raspberry Pi reads sensors, performs computations, talks to the network, and drives actuators. This ability to bridge the worlds of software and hardware has contributed to the enduring popularity of Raspberry Pi computers, with over 37 million units sold to date.
But there are limits: even in its lowest power mode a Raspberry Pi Zero will consume on the order of 100 milliwatts; Raspberry Pi on its own does not support analogue input; and while it is possible to run “bare metal” software on a Raspberry Pi, software running under a general-purpose operating system like Linux is not well suited to low-latency control of individual I/O pins.
Many hobbyist and industrial applications pair a Raspberry Pi with a microcontroller. The Raspberry Pi takes care of heavyweight computation, network access, and storage, while the microcontroller handles analogue input and low-latency I/O and, sometimes, provides a very low-power standby mode.
Until now, we’ve not been able to figure out a way to make a compelling microcontroller-class product of our own. To make the product we really wanted to make, first we had to learn to make our own chips.
Raspberry Si
It seems like every fruit company is making its own silicon these days, and we’re no exception. RP2040 builds on the lessons we’ve learned from using other microcontrollers in our products, from the Sense HAT to Raspberry Pi 400. It’s the result of many years of hard work by our in-house chip team.

We had three principal design goals for RP2040: high performance, particularly for integer workloads; flexible I/O, to allow us to talk to almost any external device; and of course, low cost, to eliminate barriers to entry. We ended up with an incredibly powerful little chip, cramming all this into a 7 × 7 mm QFN-56 package containing just two square millimetres of 40 nm silicon. RP2040 has:
- Dual-core Arm Cortex-M0+ @ 133MHz
- 264KB (remember kilobytes?) of on-chip RAM
- Support for up to 16MB of off-chip Flash memory via dedicated QSPI bus
- DMA controller
- Interpolator and integer divider peripherals
- 30 GPIO pins, 4 of which can be used as analogue inputs
- 2 × UARTs, 2 × SPI controllers, and 2 × I2C controllers
- 16 × PWM channels
- 1 × USB 1.1 controller and PHY, with host and device support
- 8 × Raspberry Pi Programmable I/O (PIO) state machines
- USB mass-storage boot mode with UF2 support, for drag-and-drop programming
And this isn’t just a powerful chip: it’s designed to help you bring every last drop of that power to bear. With six independent banks of RAM, and a fully connected switch at the heart of its bus fabric, you can easily arrange for the cores and DMA engines to run in parallel without contention.
For power users, we provide a complete C SDK, a GCC-based toolchain, and Visual Studio Code integration.
As Cortex-M0+ lacks a floating-point unit, we have commissioned optimised floating-point functions from Mark Owen, author of the popular Qfplib libraries; these are substantially faster than their GCC library equivalents, and are licensed for use on any RP2040-based product.
With two fast cores and and a large amount of on-chip RAM, RP2040 is a great platform for machine learning applications. You can find Pete Warden’s port of Google’s TensorFlow Lite framework here. Look out for more machine learning content over the coming months.
For beginners, and other users who prefer high-level languages, we’ve worked with Damien George, creator of MicroPython, to build a polished port for RP2040; it exposes all of the chip’s hardware features, including our innovative PIO subsystem. And our friend Aivar Annamaa has added RP2040 MicroPython support to the popular Thonny IDE.
Raspberry Pi Pico
Raspberry Pi Pico is designed as our low-cost breakout board for RP2040. It pairs RP2040 with 2MB of Flash memory, and a power supply chip supporting input voltages from 1.8-5.5V. This allows you to power your Pico from a wide variety of sources, including two or three AA cells in series, or a single lithium-ion cell.

Pico provides a single push button, which can be used to enter USB mass-storage mode at boot time and also as a general input, and a single LED. It exposes 26 of the 30 GPIO pins on RP2040, including three of the four analogue inputs, to 0.1”-pitch pads; you can solder headers to these pads or take advantage of their castellated edges to solder Pico directly to a carrier board. Volume customers will be able to buy pre-reeled Pico units: in fact we already supply Pico to our Approved Resellers in this format.
The Pico PCB layout was co-designed with the RP2040 silicon and package, and we’re really pleased with how it turned out: a two-layer PCB with a solid ground plane and a GPIO breakout that “just works”.
 Reely good
Whether Raspberry Pi Pico is your first microcontroller or your fifty-first, we can’t wait to see what you do with it.
Raspberry Pi Pico documentation
Our ambition with RP2040 wasn’t just to produce the best chip, but to support that chip with the best documentation. Alasdair Allan, who joined us a year ago, has overseen a colossal effort on the part of the whole engineering team to document every aspect of the design, with simple, easy-to-understand examples to help you get the most out of your Raspberry Pi Pico.
You can find complete documentation for Raspberry Pi Pico, and for RP2040, its SDK and toolchain, here.

To help you get the most of your Pico, why not grab a copy of Get Started with MicroPython on Raspberry Pi Pico by Gareth Halfacree and our very own Ben Everard. It’s ideal for beginners who are new (or new-ish) to making with microcontrollers.
Our colleagues at the Raspberry Pi Foundation have also produced an educational project to help you get started with Raspberry Pi Pico. You can find it here.
Partners
Over the last couple of months, we’ve been working with our friends at Adafruit, Arduino, Pimoroni, and Sparkfun to create accessories for Raspberry Pi Pico, and a variety of other boards built on the RP2040 silicon platform. Here are just a few of the products that are available to buy or pre-order today.
Adafruit Feather RP 2040
RP2040 joins the hundreds of boards in the Feather ecosystem with the fully featured Feather RP 2040 board. The 2″ × 0.9″ dev board has USB C, Lipoly battery charging, 4MB of QSPI flash memory, a STEMMA QT I2C connector, and an optional SWD debug port. With plenty of GPIO for use with any FeatherWing, and hundreds of Qwiic/QT/Grove sensors that can plug and play, it’s the fast way to get started.
 Feathery goodness
Adafruit ItsyBitsy RP 2040
Need a petite dev board for RP2040? The Itsy Bitsy RP 2040 is positively tiny, but it still has lots of GPIO, 4MB of QSPI flash, boot and reset buttons, a built-in RGB NeoPixel, and even a 5V output logic pin, so it’s perfect for NeoPixel projects!
 Small is beautiful
Arduino Nano RP2040 Connect
Arduino joins the RP2040 family with one of its most popular formats: the Arduino Nano. The Arduino Nano RP2040 Connect combines the power of RP2040 with high-quality MEMS sensors (a 9-axis IMU and microphone), a highly efficient power section, a powerful WiFi/Bluetooth module, and the ECC608 crypto chip, enabling anybody to create secure IoT applications with this new microcontroller. The Arduino Nano RP2040 Connect will be available for pre-order in the next few weeks.
 Get connected!
Pimoroni PicoSystem
PicoSystem is a tiny and delightful handheld game-making experience based on RP2040. It comes with a simple and fast software library, plus examples to make your mini-gaming dreams happen. Or just plug it into USB and drop the best creations from the Raspberry Pi-verse straight onto the flash drive.
 Pixel-pushing pocket-sized playtime
Pimoroni Pico Explorer Base
Pico Explorer offers an embedded electronics environment for educators, engineers, and software people who want to learn hardware with less of the “hard” bit. It offers easy expansion and breakout along with a whole bunch of useful bits.
 Go explore!
SparkFun Thing Plus – RP2040
The Thing Plus – RP2040 is a low-cost, high-performance board with flexible digital interfaces featuring Raspberry Pi’s RP2040 microcontroller. Within the Feather-compatible Thing Plus form factor with 18 GPIO pins, the board offers an SD card slot, 16MB (128Mbit) flash memory, a JST single-cell battery connector (with a charging circuit and fuel gauge sensor), an addressable WS2812 RGB LED, JTAG PTH pins, mounting holes, and a Qwiic connector to add devices from SparkFun’s quick-connect I2C ecosystem.
 Thing One, or Thing Two?
SparkFun MicroMod RP2040 Processor
The MicroMod RP2040 Processor Board is part of SparkFun’s MicroMod modular interface system. The MicroMod M.2 connector makes it easy to connect your RP2040 Processor Board with the MicroMod carrier board that gives you the inputs and outputs you need for your project.
 The Mighty Micro
SparkFun Pro Micro – RP2040
The Pro Micro RP2040 harnesses the capability of RP2040 on a compact development board with the USB functionality that is the hallmark of all SparkFun’s Pro Micro boards. It has a WS2812B addressable LED, boot button, reset button, Qwiic connector, USB-C, and castellated pads.
 Go Pro
Credits
It’s fair to say we’ve taken the long road to creating Raspberry Pi Pico. Chip development is a complicated business, drawing on the talents of many different people. Here’s an incomplete list of those who have contributed to the RP2040 and Raspberry Pi Pico projects:
Dave Akerman, Sam Alder, Alasdair Allan, Aivar Annamaa, Jonathan Bell, Mike Buffham, Dom Cobley, Steve Cook, Phil Daniell, Russell Davis, Phil Elwell, Ben Everard, Andras Ferencz, Nick Francis, Liam Fraser, Damien George, Richard Gordon, F Trevor Gowen, Gareth Halfacree, David Henly, Kevin Hill, Nick Hollinghurst, Gordon Hollingworth, James Hughes, Tammy Julyan, Jason Julyan, Phil King, Stijn Kuipers, Lestin Liu, Simon Long, Roy Longbottom, Ian Macaulay, Terry Mackown, Simon Martin, Jon Matthews, Nellie McKesson, Rod Oldfield, Mark Owen, Mike Parker, David Plowman, Dominic Plunkett, Graham Sanderson, Andrew Scheller, Serge Schneider, Nathan Seidle, Vinaya Puthur Sekar, Mark Sherlock, Martin Sperl, Mike Stimson, Ha Thach, Roger Thornton, Jonathan Welch, Simon West, Jack Willis, Luke Wren, David Wright.
We’d also like to thank our friends at Sony Pencoed and Sony Inazawa, Microtest, and IMEC for their help in bringing these projects to fruition.
Buy your Raspberry Pi Pico from one of our Approved Resellers today, and let us know what you think!
FAQs
Are you planning to make RP2040 available to customers?
We hope to make RP2040 broadly available in the second quarter of 2021.