
NAS 224
Remote Access – Manual Connect
Manually configuring your NAS's connection to the Internet
2021-10-19
Course Objectives:
After completing this course you will be able to:
- Configure your network equipment to setup remote access to your NAS via the Internet.
PREREQUISITES
*Course Prerequisites:* NAS 221: Remote Access – Using EZ-Connect
*Students are expected to have a working knowledge of:* Signing up for DDNS services and setting up routers
OUTLINE
1.1 Accessing your ASUSTOR NAS using the Internet
1. Remote Access
*1.1 Accessing your ASUSTOR NAS using the Internet*
ASUSTOR provides users with quick and convenient solutions that allow them to use their NAS through the internet and remotely access their files, creating an exclusive private cloud. You can use any of the following methods to set up remote access to your NAS.
- Directly connecting your NAS to the internet
If you have a static IP address, you can choose to directly connect your NAS to the Internet, without having to go through any routers or firewalls. Please note that this method will directly expose your NAS to the Internet and you may be more likely to experience malicious attacks.

- Connect your NAS to your router and then use ASUSTOR EZ-Connect
ADM’s built-in EZ-Connect function can help you to complete the necessary router configurations for setting up remote access to your NAS. For more information please see: NAS 221: Remote Access – Using EZ-Connect.

- Connect your NAS to the internet and manually configure your connection If you are using an incompatible router and cannot use EZ-Connect to complete your remote connection settings, the instructions below will explain how to manually configure your router to give you remote access to your NAS.
*1.2 Configuring your router*
Ports are like telephone extension numbers in that they allow you to quickly find the person or service that you are looking for. To let the NAS on your local area network allow access from devices on the internet, you must first set up the correct port forwarding on your router. This way, when connection requests are received from the internet asking for the appropriate port, the router will know where to direct them. Before configuring port forwarding please first note your router’s IP address, administrator username and password. Usually port forwarding settings are located under one of the following headings on your router’s settings page:
- Advanced Settings
- Firewall Settings
- Port Forwarding
- Virtual Server
In the following example, we will demonstrate how to set up port forwarding on a router made by ASUS.
STEP 1
- Enter the router’s LAN IP address into a Web browser. The ASUS router’s default IP address is 192.168.1.1.
- Enter the administrator username and password. The default username and password for the ASUS router is “admin”.
- In the [Advanced Settings] panel on the left hand side, click on [WAN].
- Click on the [Virtual Server/Port Forwarding] tab.
STEP 2
- Enable port forwarding by clicking on the [Yes] radio button beside the [Enable Port Forwarding] heading.
- Under the [Service Name] field enter a name of your choice, and then enter the number of the external port you want to open, your NAS’s IP address and port number in the corresponding fields. If you want to use your Web browser to access your NAS, you will need to open ADM’s Web page service (default port: 8000). The table below shows you the information that you will need to fill out for each field.
| Service Name | Port Range | Local IP | Port | Protocol |
|---|---|---|---|---|
| ADM | 8000 | 192.168.2.6 | 8000 | TCP |
As mentioned previously, the IP address of the NAS in our example is 192.168.2.6.

- If you wish to open up other services in order to access them through the internet, please refer to: List of ports used by ASUSTOR applications.
*1.3 Configuring DDNS service*
STEP 1
- Sign up for DDNS service.
- For instructions please see section 1.2 of NAS 321: Hosting Multiple Websites with a Virtual Host.
STEP 2
- Enable DDNS service on the NAS.
- For instructions please see section 2.2 of NAS 321: Hosting Multiple Websites with a Virtual Host.

*1.4 Activate EZ-Router*
EZ-Connect will open a connection for ADM’s Web server to allow for remote access from the Internet. If you wish to open additional services for remote access, the instructions below will help you to do so.
STEP 1
- In ADM click on [Settings].
- Select [Manual Connect] and then click on the [Activate] button to enable EZ-Router.

STEP 2
- Click on [Edit]. You can now select the services that you wish to open for remote access from the Internet.
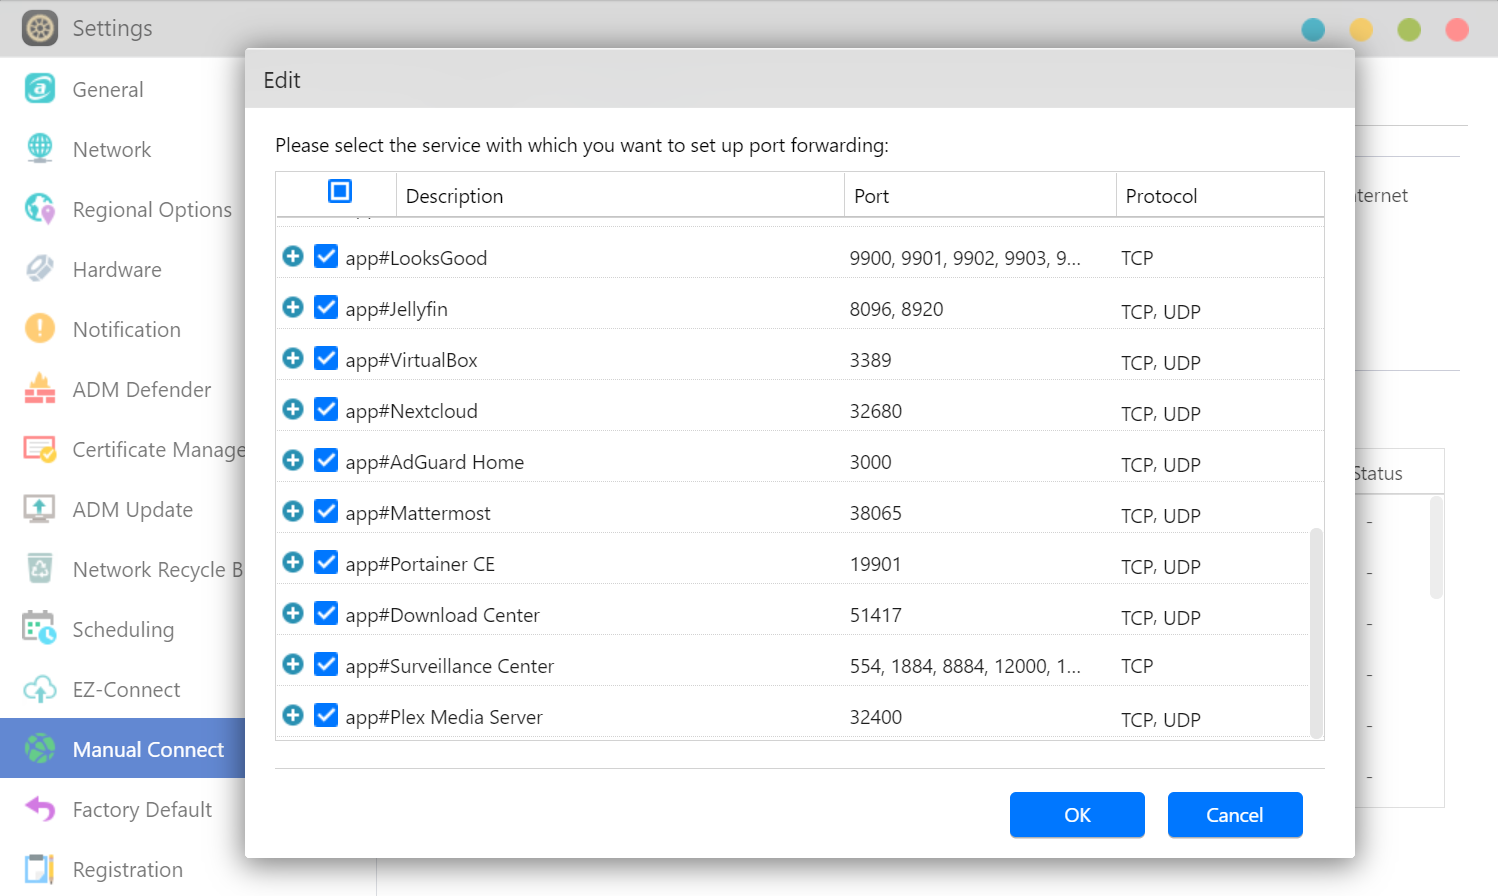
- If the service that you wish to open is not on the list or you wish to set up self-defined port forwarding, you can click on [Self define].

- Fill out the required fields and then click on [OK] once you are finished.

- Please refer to: List of ports used by ASUSTOR applications.
*1.5 Additional notes*
- The Internet uses ports to exchange data; each specific port can only be assigned to be used by one specific application or service. Two computers cannot simultaneously use the same port to access data.
- Settings and configuration methods will differ between routers. If you require more detailed information on port settings please see the instruction manual for your router or visit the following website: https://portforward.com/routers.htm
- A list of compatible routers may be found here: https://www.asustor.com/service/router?id=router
[WAN] Port Trigger introduction and set up
Last Update : 2020/08/27 18:40
SEND TO EMAIL OPEN ON YOUR SMART PHONE
[WAN] Port Trigger introduction and set upWhat is Port trigger?
Port Trigger allows you to temporarily open data ports when LAN devices require unrestricted access to the Internet. There are two methods for opening incoming data ports: port forwarding and port trigger. Port forwarding opens the specified data ports all the time and devices must use static IP addresses. Port trigger only opens the incoming port when a LAN device requests access to the trigger port. Unlike port forwarding, port trigger does not require static IP addresses for LAN devices. Port forwarding allows multiple devices(client) to share a single open port and port trigger only allows one client at a time to access the open port.
The following example discusses port triggering with an IRC server.


When connecting to an IRC server, a client PC, illustrated by PC2 in the figure, makes an outgoing connection using the port range 66660-7000.
The IRC server responds by verifying the username and creating a new connection to the client PC using Port 113.
The "Non-working Port Trigger" figure illustrates a failed IRC connection.
In this scenario, the router drops the connection because it is unable to determine which PC is requesting for IRC access.
The "Working Port Trigger" figure illustrates a successful outgoing connection using the port range 6660-7000 and an inbound connection using port 113.
In this scenario, the router's port trigger settings assigns port 113 to receive inbound data.
For example, PC2 makes an outgoing connection using port 6767, but will temporarily receive all incoming connections using port 113.
How to setup Port Trigger?
Take FTP server as an example.
\1. Set up a FTP server on a PC behind a router
\2. Launch a browser and access router settings by keying in http://192.168.1.1 on the address bar. Click "WAN" on the Advanced Settings menu on the left panel and then click on "Port Trigger".

\3. Tick "Yes" to "Enable Port Trigger" and input "80" as the Trigger Port and "21" as the Incoming Port. Click on"Edit" and then "Apply" to save settings.

\4. Connect to the Internet by launching a browser or Internet application. This will trigger port 80 and open the incoming port 21.
\5. You will need a PC outside your LAN but has Internet access (hereafter referred to as "Internet PC"). This PC should not be connected to the ASUS router in any way.
\6. On the Internet PC, use the router's WAN IP to access the FTP server using a FTP application or FTP browser. If port triggering has been successful, you should be able to access the files on the FTP server.
To set up a Port Trigger Test:
In this scenario, a PC behind a router serves as an FTP server. Port 80 will be used as a trigger port while port 21 will be an incoming port. This configuration allows a web browser to create an outgoing connection using port 80, triggering port 21 to open as an incoming port. This setup allows any PCs on the Internet to connect to the FTP server on the LAN. Note: This test is only for checking the functionality of a port trigger and is not intended for practical use.
How to get the (Utility / Firmware)?
You can download the latest drivers, software, firmware and user manuals in the ASUS Download Center.(LINK)
If you need more information about the ASUS Download Center, please refer this link.
Related Topics
- [WAN] How to set up an Internet Connection?
- [WAN] DMZ introduction and set up
- [WAN] How to set up Virtual Server/ Port Forwarding on ASUS Router?
- [WAN] Dual WAN introduction and setup
- [WAN] Virtual Server/ Port Forwarding Introduction
- [WAN] NAT Passthrough Introduction
- [Wireless Router] DDNS introduction and set up
- Category Windows Setting/ Operation
- Type Product Knowledge
https://www.xfinity.com/support/articles/wireless-gateway-port-triggering
What is Port Triggering on the Xfinity Gateway?
Port triggering is an advanced setting for your Wireless Gateway that is typically used to improve online gaming and online chat applications. By configuring this setting, your WiFi network will be able to communicate with a designated server, and you will have greater control over what inbound traffic is coming into your WiFi network over the open port used for that communication.
Benefits of Port Triggering
In many cases, if you wish to connect a gaming console to your WiFi network, you will need to open communication between your WiFi network and the gaming server. You can enable port forwarding as a method for establishing this communication; however, this can leave your WiFi network exposed to random inbound traffic, not just the specific servers with which you want your WiFi device (e.g., computer, laptop) to interact. Port triggering offers a more secure alternative. The advantage is a rule put in place that has the inbound port open only when you initiate a session on that port. Once the session is dropped, the port is closed to random inbound traffic, and your WiFi network is closed to any potential hacker.
How to Set Up Port Triggering
Open a web browser, type in http://10.0.0.1 to go to the Admin Tool, and sign in. If you haven’t changed your login, the default settings are: Username: admin Password: password (case sensitive)
If you have not changed your password for the Admin tool, you will be asked to change it. Please change the password and, if required, log in to the Admin Tool with the new password.
Navigate to Advanced > Port Triggering on the left side of the page.
Ensure that port triggering is Enabled.
Click the
ADD PORT TRIGGER
button on the right side of the page.
Consult your gaming console manufacturer's guidelines for assistance in entering values for the fields on this page (or visit these
Xbox
and
PlayStation
pages for additional information); the below values are for illustrative purposes only.
Note:
The trigger and target port numbers you enter will need to be different from each other for each port trigger rule you add. Once you know which ports are required to communicate over your WiFi network, enter values for the fields on this page, including:
- Service Name: Enter a name for the port triggering rule you are creating.
- Service Type: Set the format for the port, where you can choose from options of TCP, UDP or TCP/UDP.
- Trigger Port From/To: Enter the inbound port range for the port trigger.
- Target Port From/To: Enter the target port range for the port trigger.
When finished entering these values, click ADD to complete the process.
https://pimylifeup.com/raspberry-pi-port-forwarding/
Raspberry Pi Port Forwarding & Dynamic DNS
In this guide, I will take you through on how to setup Raspberry Pi port forwarding on the router and also setting up Raspberry Pi Dynamic DNS. Both of these complement each other, but port forwarding is very important if you want web applications accessible over the internet.

I have prepared a video further down the page that takes you through everything you need to know about setting up both of these.
It’s important to remember that opening up ports will have an increased security risk. Tools such as Fail2ban will help protect your Raspberry Pi from intrusion. Also, make sure you pick strong, secure passwords.
If you enjoy this tutorial, then please subscribe so you can stay up to date on all the latest awesome Raspberry Pi projects, guides and much more.
Video
It’s important to know that the video goes through an older method than the text version provided below does.
Both methods will work just fine but if you’re looking for the latest, then be sure to check out the full-text version.
Setting Up Raspberry Pi Port Forwarding
Raspberry Pi port forwarding is a method where can allow external access to the Pi. To do this, we will need to change some settings on the router.
All routers are different but I will try and make this as generic as possible however there could still be a lot of differences between these instructions and your router. The router I am using for this tutorial is the TP-Link AC1750 wireless dual band gigabit router.
1. On a computer that is connected to the local network, connect to the router admin page via a web browser.
A router IP typically is 192.168.1.1 or 192.168.1.254
2. Enter the username and password for the router. By default, this is typically admin & admin.
3. In the router admin page head to forwarding->virtual server.
4. On this page enter the following
- Service Port: This is the external port.
- IP Address: This is the IP of the Pi.
- Internal Port: Set this to Pi’s application port. (A web server runs on port 80 for example)
- Protocol: Set this to ALL unless specified.
- Status: Set this to enabled.
5. These settings will route traffic destined for the port specified to the port on the Raspberry Pi.
6. You should now be able to connect to the application on the Raspberry Pi outside your network. The best way to check if you have port forwarded correctly would be to either get a friend to connect or go somewhere outside your local network (A VPN could achieve this).
Below is an example of setting up access to a web server that is running on port 80 with the Raspberry Pi having an IP of 192.168.1.103.

Troubleshooting
There are a few issues that might occur when attempting to set up your Pi for external access. Below are just a few issues you might come into when setting up Raspberry Pi port forwarding.
- Double check your router settings and confirm they are correct.
- Check that your external IP hasn’t changed. ISP’s will provide you with a dynamic IP rather than a static IP.
- Restarting the router might clear problems.
- Restarting the Raspberry Pi might also clear any problems.
Setting up Raspberry Pi Dynamic DNS
If your ISP supplies you with a dynamic IP (An IP that changes often), then it will probably be worth setting up the Raspberry Pi dynamic DNS (Sometimes Routers has this feature in them). This method means you will always be able to connect to the application on the Pi even if your external IP changes.
To get started we will need to install the DDclient, and it’s a pretty straightforward process that won’t take too long to get installed.
1. To begin, run the following lines to install the DDclient. Please note, just skip through the install, we will override these settings.
sudo apt-get update
sudo apt-get install ddclient libjson-any-perl libdata-validate-ip-perl
2. After all of that, we will now need to replace that version of DDclient with a more recent one. This newer version will enable better support for services such as Cloudflare. To download the latest version enter the following commands.
wget https://files.pimylifeup.com/portforwarding/ddclient-3.9.1.tar.gz
tar -zxvf ddclient-3.9.1.tar.gz
3. Once that has finished downloading and extracting, we will make use of the newer binary by copying it over the current one using the following command:
sudo cp -f ddclient-3.9.1/ddclient /usr/sbin/ddclient
4. Due to changes made in the most recent version of DDclient, the location of the configuration file has moved. We will use the following commands to reposition the one that came with the first install.
sudo mkdir /etc/ddclient
sudo mv /etc/ddclient.conf /etc/ddclient
5. Once the ddclient has completed installing, we will now go and directly edit the configuration file to make a few crucial changes. Use the command below to launch an editor for the file.
sudo nano /etc/ddclient/ddclient.conf
6. We will need to add a few lines to this file, and we will use these same lines throughout every different configuration. They define whether to use SSL and how to obtain the external IP address of the Raspberry Pi.
7. Add the following to below the commented header in the file, also remove anything else in the file.
We will add more to the file later on with our guides on using No-IP or Cloudflare.
use=web, web=checkip.dyndns.com/, web-skip='IP Address'
ssl=yes

8. OK, now that this is done we can proceed to the next couple of steps on how to setup ddclient with a Dynamic DNS provider.
Just to quickly point out that the main difference between CloudFlare and No-IP is that you need to own a domain name to make use of CloudFlare. No-IP However offers free subdomains, meaning it’s a costless service to use.
It’s important to note that while Cloudflare isn’t truly a Dynamic DNS provider, we can use it the same way thanks to its API. Cloudflare also offers more protection such as free SSL, anonymized IP, DDOS protection and more. You can turn off the Cloudflare features and just use it as a DNS provider if you want. You may find that you need to do this anyway.
Dynamic DNS using Cloudflare
1. Before you start using Cloudflare as a Dynamic DNS provider, you will need to purchase a domain name. If you have a domain name already, you can skip ahead to the next step in this guide. Otherwise, you can purchase a domain name from somewhere such as NameCheap.
2. Now you will need to sign up to Cloudflare, don’t worry as it won’t cost you anything.
3. Sign up and follow the steps given for updating your domain name to point towards Cloudflare’s DNS (Domain Name Servers).
4. Next, you will need the Cloudflare API-key that you’re able to find on the account page. You want the global API key, copy and paste this somewhere safe for now.

5. Now we need to enter the Cloudflare details into the DDclient configuration file. Open it by running the following command.
sudo nano /etc/ddclient/ddclient.conf
6. Update or add the following lines to the bottom of the file, making sure to replace the username, api-key, zone and the hostname with the ones you used to setup your Cloudflare account.
The zone is the domain name itself and then underneath is the record/domain you wish to update. Either enter a subdomain or the primary domain itself. Make sure the record exists within Cloudflare on the DNS page, it will need to be an “a” record.
protocol=cloudflare
server=api.cloudflare.com/client/v4
login=your_email
password=your_api-key
zone=your_domain.com
anything.your_domain.com
7. Once you have updated the file, you can save and quit by using CTRL + X.
8. Now, all we need to do is restart DDclient, as long as you have entered the correct information in step 3. everything should work correctly. Use the following command to restart the dynamic DNS client. (Sometimes you need to restart twice for the changes to take place)
sudo /etc/init.d/ddclient restart
9. The IP should now be updated within Cloudflare, and you should now be able to use your chosen domain name to connect to your Raspberry Pi. You may need to turn off the Cloudflare proxy for it to work, you can do this by going to the DNS page within Cloudflare and clicking the cloud next to the domain record, so it becomes grey.

You will now want to continue to the “Running ddclient as a Daemon” section of this guide so that you can have the IP automatically update otherwise you will need to restart the ddclient manually every time you want to update the IP.
Dynamic DNS using NOIP
1. To setup Raspberry Pi Dynamic DNS with NOIP, you will need to create a free account over at their website. Make sure you keep note of the username, password and the hostname that you pick as we will need them in the next step.

2. After you have finished creating your account, it’s time to enter these into the DDclient configuration file. You can open up the config file by running the following command.
sudo nano /etc/ddclient/ddclient.conf
3. Now, either update or add the following lines to the bottom of the file, making sure to replace the username, password and the hostname with the ones you used to create your No-IP account.
protocol=dyndns2
server=dynupdate.no-ip.com
login=your_username
password=your_password
your_domain.com
4. Once you have updated this file, save it and quit by using CTRL + X.
5. Now, all we need to do is restart ddclient, as long as you have entered the correct information in step 3. everything should work just fine. Use the following command to restart the client.
sudo /etc/init.d/ddclient restart
6. Your IP address should now be updated, and you will be able to use your chosen domain name to connect to your Raspberry Pi given that the correct ports are open.
Continue the tutorial below to ensure that the ddclient automatically updates the IP.
Running ddclient as a Daemon
Since we don’t just want the IP address to update once, we still need to setup ddclient to run as a daemon so it can check for a change of IP address periodically and notify the chosen dynamic DNS provider if necessary.
1. To make DDclient runs as a Daemon, we need to make a change to a configuration file. Run the following command to begin editing the file.
sudo nano /etc/default/ddclient
2. In the file, you will need to change run_daemon so that it matches the line below.
This change basically tells it to run ddclient in daemon mode.
run_daemon="true"
3. You will also need to check two other lines in this file to make sure that they are false. Otherwise, ddclient will not run in daemon mode correctly.
Ensure the following two lines are matching, if they are set to true then change them to false.
run_dhclient="false"
run_ipup="false"
4. Press CTRL + X and then Y to save the changes to the configuration file.
5. Now enter the following command to startup ddclient as a service.
sudo service ddclient start
6. To ensure the service has properly started, you can use the following command to check its status.
sudo service ddclient status
7. Some dynamic DNS providers require you to update your IP address quite frequently. We can help ensure that you don’t get timed out by forcing ddclient to update your IP address once a week. We achieve this by first opening up the weekly crontab by using the following command.
sudo nano /etc/cron.weekly/ddclient
8. To that file, add the following lines.
#!/bin/sh
/usr/sbin/ddclient -force
9. Save the changes by pressing CTRL + X and then Y to accept the changes.
10. Lastly, we need to allow our new script to execute, and we can do this quickly by doing the following.
sudo chmod +x /etc/cron.weekly/ddclient
11. ddclient should now be successfully running as a daemon, use the following command to make sure that it is running correctly.
sudo service ddclient status
12. That should be all you need to do to have everything running smoothly.
If you find that something isn’t working correctly, then the following line is great for debugging. It will spit a ton of lines just look for anything that might look like an error or a hint at why it is not working.
sudo ddclient -daemon=0 -debug -verbose -noquiet
As long as you have Raspberry Pi port forwarding setup correctly, you should now be able to access your Pi outside your local network using a domain name. If the above instructions do not work for you, then you can always try out the old method which is detailed below.
Setting up Dynamic DNS (Old Method)
This next part is an old process that I replaced with the method above. It should still work, but the one above should be much easier to get up and running.
1. First, you will need to create an account over at No-IP (Make sure “create a hostname later” is unticked)
2. Now on the Raspberry Pi enter the following commands
sudo bash
cd /usr/local/src/
wget http://www.no-ip.com/client/linux/noip-duc-linux.tar.gz
tar xf noip-duc-linux.tar.gz
cd noip-2.1.9-1/
make install
- You will be now presented with a few settings you will need to set.
- Enter the email and password for the account you wish to connect the Pi to.
- Next set the update interval with the default being 30 minutes. (This checks to see if the IP has changed)
- You can now also set something to run whenever the IP updates.

3. Now add a new line into the rc.local file just before the last line exit 0 this ensures that no-ip will automatically start on reboot.To do this enter the following commands:
nano /etc/rc.local
4. Enter the following line right above the exit 0 line.
/usr/local/bin/noip2
5. Use CTRL + X to exit (Make sure you save)
6. You can start no-ip with the following command:
sudo /usr/local/bin/noip2
7. Check the status with the following command:
sudo /usr/local/bin/noip2 -S
8. You can close it using the following command. Replace pid with the pid from the -S command.
sudo /usr/local/bin/noip2 -K 'pid'
9. You’re able to recreate the default config file if required by entering the following command:
sudo /usr/local/bin/noip2 -C
Now you should have a Raspberry Pi dynamic DNS server setup and be able to connect with a domain name rather than an IP. This name will remain the same even if your IP address changes.
This setup means you will always be able to connect to the Pi or other home network devices without needing to find out your new external IP.
If you’re looking for a project that requires access to the internet, then you should check out either the Raspberry Pi Web Server, mumble server or even the webcam server.
Raspberry Pi: Dummy tutorial on port forwarding and SSH to Pi remotely
This is a continuation of my series on setting up Raspberry Pi to be a remote jupyter notebook code editor. In the last chapter Raspberry Pi was set up and could be accessed by SSH at your home network. In this chapter I will guide you how to set up port forwarding and access the Pi remotely from the internet, so you could write command under CLI just like at home.

Left: SSH via home wifi // Right: SSH via open internet
First time Pi user and first time reader? Check out the first part here.
But once your Pi is accessible from the internet, you need to be 100x cautious about potential security vulnerability. Most of the content you could find on Google Search should guide you to a term “Port Forwarding”, while in the Raspberry Pi official documentation it explicitly told you that port forwarding exposes a known security problem and you should consider altnerative ways to do it. I am going to introduce both ways in this series. And I promise we will get to host website soon, but let’s make sure it’s safe to do so first.
Table of Content
- Increase your security before exposing your Pi to the internet
- Port Fowarding
- What’s next: Cloud Proxy Connections
Increase your security before exposing your Pi to the internet
There are two things you should do before exposing your Pi to the internet.
- Change the password of default user Pi
To change the password, simply type in passwd and follow the text instructions by re-typing your old password, your new password and re-tpying your new password.
\2. Create a new user without sudo access and use that user to access your pi remotely
sudo: similar to system admin preveilage in windows, which user can run command that is defined as superuser level, including rebooting your computer and installing any software. You can check out more here. A good practice, for example, is to use sudo at home to install the software needed and give normal user read/write access to only some sub-folders, then use normal user to remotely login the Pi and only work on these sub-folders.


Let’s create a new user without sudo access, type in sudo adduser normal_user.
You will be asked a series of questions, including the password, basic information of the user and enter Y to confirm all information is correct.
Now we have created a new user normal_user.
To check whether this user have sudo access, we could simply type in sudo -l -U normal_user. And the text should show you ‘User normal_user is not allowed to run sudo on raspberrypi.’
So next time, you could try out SSH connection by not using pi as the login, but normal_user .
Want to know more about user access and organizing user? Check out the tutorial on digitalocean.
Port Forwarding
First, I want to reiterate that setting up port forwarding without any safety add-on to block malicious traffic is not recommended, and this article does not provide enough guidance to set that up. What I would recommend is to set up a cloud proxy server, which we will go through in the next chapter.
With all said, let’s go through a dummy example.
Your home network is known as Private LAN in that no external device could connect to your devices at home. This is controlled by firewall, which by default denies all incoming traffic.

Who needs port fowarding if you have LAN party and tape.
But you don’t always spend your life in Raspberry Pi (me neither, just to be clear), you also love to play Diablo II, a classic rpg game which you could coop with other players. And you play it on another home device, PC. Turns out Diablo II is an old game which requires a direct connection between you and other players in order to hack-and-slash-and-loot the monsters. When you guys are in the game, data package including player’s location, level and action will need to be continuously streamed between players.
Your home PC has an internal IP address of 192.168.1.4. Diablo II automatcially configures a port 1033 for other players to get your data pacakge.
As I mentioned in last chatper, each device at your home will be automatically assigned an IP address by the router (e.g. my Pi’s address is at 192.168.1.50) and each internet application will use up one port number (e.g. 22). A quick refresher example: 192.168.1.50:22 represents
<my Raspberry Pi>:<SSH Application>.
Finally, you do a google search and know that your external IP address is 50.247.207.5.
Turns out, if you were able to open a port on the external IP address, and map(point) that port to one set of <Internal IP Address>:<Port>, then you can tell your friends to enter your <External IP Address>:<Port your opened> to route their connection to your <PC's internal IP Address>:<Dialbo II data package application (1033)>.
This is what referred as Port Fowarding and you basically pinhole on your firewall to finally allow incoming traffic to a specific internal IP address and port.
Risk with Port Fowarding
Before I teach you how to forward a port, I want to crystalize what could happen at the worst case.
First, Port Forward won’t expose all your devices at your home. It only allow external user to connect to device you’ve pointed it at. In Diablo II, that’s perfectly fine. As the only application you opened is for other player to receive data package from your game. But for Raspberry Pi, the SSH application represents full access to your Pi’s CLI, and able to run any command including communication with your other home devices. And this is why opening Port for Diablo and XBox are generally safe and trivial but for Raspberry Pi it could be very dangerous.
The chance for any hacker to hide in the brush and wait til you open a port is nearly impossible, let alone to say that hacker needs to know a user / password pair in order to login. So it isn’t really a huge security problem for most of home users. But the possibility is there.
Edit July 04, 2020: I received enormous comments saying that Port Forwarding is dangerous and I am wrong to write about how to do this. I want to stress that using proxy server is by all means a more secure way and I do write a story about this. You could check it out here. Thank you.
Port Forwarding your Pi to external network
Let’s clarify things we know before we started. From last chatper, we know how to check the internal IP address of our Pi, external IP address of our network and we also know that port 22 is opened for SSH from our Pi.
1~ Enter your router configuration page
Router configuration page is usually a website hosted inside your home network. The url should be printed on the router itself, and definitely shown in the router manual. If you still cannot find it, simply try http://192.168.1.1/ as most of the routers occupied this IP as their configuration page.
2~ Go to port forwarding configuration page
The page location will vary for different brands. Try your best to look for keywords including
- Advanced Setting, Security Setting, Port Forwading, Virtual Server, Wan Setting
And you should be able to get to the port forwarding page.
3 ~ Configure rules


For some routers, they will require an extra step to enable port forwarding. Make sure to enable that!
Then, you will probably see a list of inputs, including
- *Service Name*: text to describle the port foward service.
- *Source Target [optional]*: Whitelist of external IP. Only IPs that are whitelisted could be able to connect to this port. Therefore, if you already know the IP where you are going to make the connection. Adding the whitelist IP here could tremendously increase your security. But this is only available for newer models of router. Leave it blank if you allow all IP to make connection.
- *Port Range*: Port that is opened up from your router. In the above example, I open a port on 10300. Let’s say my external IP is 50.247.207.5, using 50.247.207.5:10300 could redirect me to the Pi later.
- *Local IP*: IP address of your Pi in your private LAN. Check out last chapter if you don’t know how to find it. In this case it’ 192.168.1.50.
- *Port*: Port / Application you want to open from the device specified in the local IP. In this case its 22, since Pi configure port 22 as the SSH application.
- *Protocol*: TCP / UDP are usually available. You should also be able to select both. If only one of them can be selected. Please select TCP.
Once you apply the change, you are able to ssh to your Pi anywhere in the world! In this example, we can access our Pi by visiting 50.247.207.5:10300.
Accessing your Pi with windows
Same as last chatper, we could use Putty to connect to our Pi. But this time you could finally try this in a safe network (aka not Starbucks) outside your home wifi.


On Putty, type in your external IP address and Port you open up from the port forwarding setting. In this example it is 50.247.207.5:10300. Keep the connection type as SSH.
And you should be able to login with the CLI pop-up! This time let’s try out our normal_user username and password, so even if hackers get your credential, it’s just a non-sudo user.
And…. we are in! Now you can write and run any program in your Pi from anywhere!


What’s next: Cloud Proxy Connections
Port forwarding is always associated with risk. And we should consider other options like cloud proxy connections. Unfortunately on Raspberry Pi documentation there is no concreted instruction on how to do so, though it does recommend some free services we could use.
In next story, I am going to demonstrate how to use one of the cloud proxy connection service listed in the official documentation to connect to your Pi with SSH, remotely and securely. Stay tuned!