
RESOURCES
- SECURITY HTTP HEADERS – Added Apr 1, 2021
- Header set Strict-Transport-Security "max-age=31536000" env=HTTPS
- Header set X-XSS-Protection "1; mode=block"
- Header set X-Content-Type-Options nosniff
- Header always append X-Frame-Options SAMEORIGIN
- (others on list caused 501 error)
-
- securityheaders.com
- Test Site / Give Advice
https://digital.com/web-hosting/wordpress/security/
WordPress powers 26.4% of all websites on the Internet. Being so popular, it attracts a lot of attention. Not all of that attention is good. The negative attention that WordPress gets often comes from hackers who want to exploit various WordPress security vulnerabilities.
Unfortunately there are quite a few WordPress vulnerabilities.
According to WPScan (a WordPress vulnerability database) there are 4,284 known WordPress vulnerabilities. WordPress plugins are the biggest source of vulnerabilities. 50% of exposures come from WordPress plugins. 10% are from WordPress themes and the remaining 40% are WordPress core vulnerabilities.
This is confirmed by findings from Wordfence, they go on and say if you can protect yourself against plugin vulnerabilities and brute force attacks, you are accounting for over 70% of the problem.
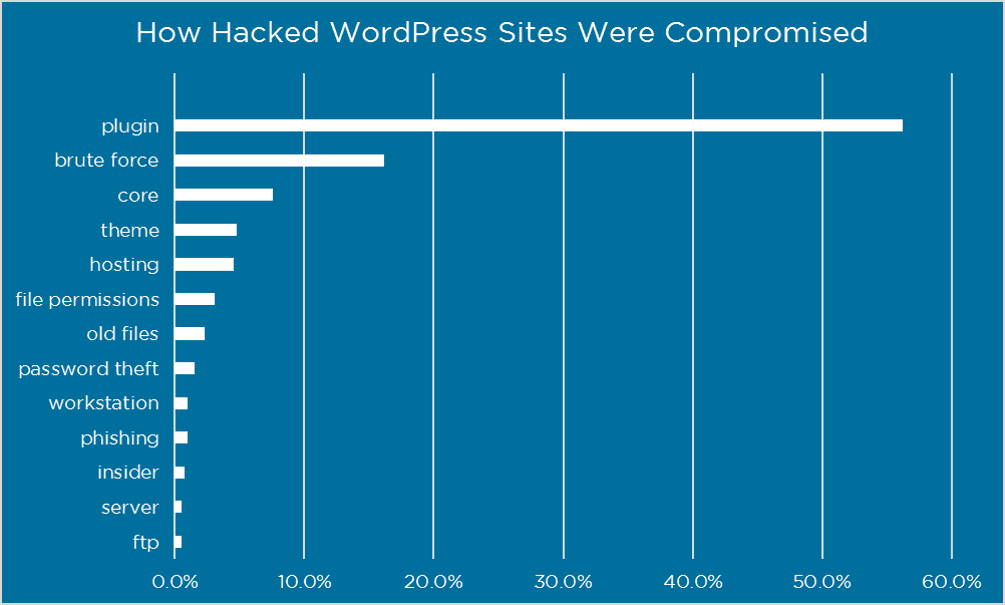 Plugin vulnerabilities and brute force attacks are the two most common ways to hack a WordPress site (from: wordfence.com).
When it comes to WordPress security, most people make the same common mistakes: they still use “admin” as their username, most of them use an easy to guess password or worse use the same password for every other site.
And finally, a good majority of people completely ignore updates – be it for WordPress core, themes, or plugins. Needless to say, this leads to a whole slew of problems down the road and a lot of headaches for you as the website owner.
21 ways to secure your WordPress site
WordPress.org’s own security czar Nikolay Bachiyskis tips on securing a WordPress site is to
“always complete updates as soon as you can and make sure to use strong passwords. Those two steps go a long way in keeping your site safe. If possible, I recommend enabling auto-updates. Also, when choosing plugins, check to make sure you are using a plugin that is regularly updated! You can confirm this by checking the changelog for a plugin”.
Here we will do a deep dive and examine how you can “Fort Knox-ify” your WordPress site and make sure your WordPress website is safe, hardened and secure because security is must for every WordPress website owner.
Click the internal links and use these symbols to navigate this tutorial.
Dashboard
Plugin
Third-Party
Code Snippet
» Basic WordPress Security Tips
1. Make sure your username is NOT admin
To this day, there are still plenty of people who use admin as their username. However, this is the username that hackers go with first when trying to break into your site.
In case you are still using admin as your username, it’s not too late to change it.
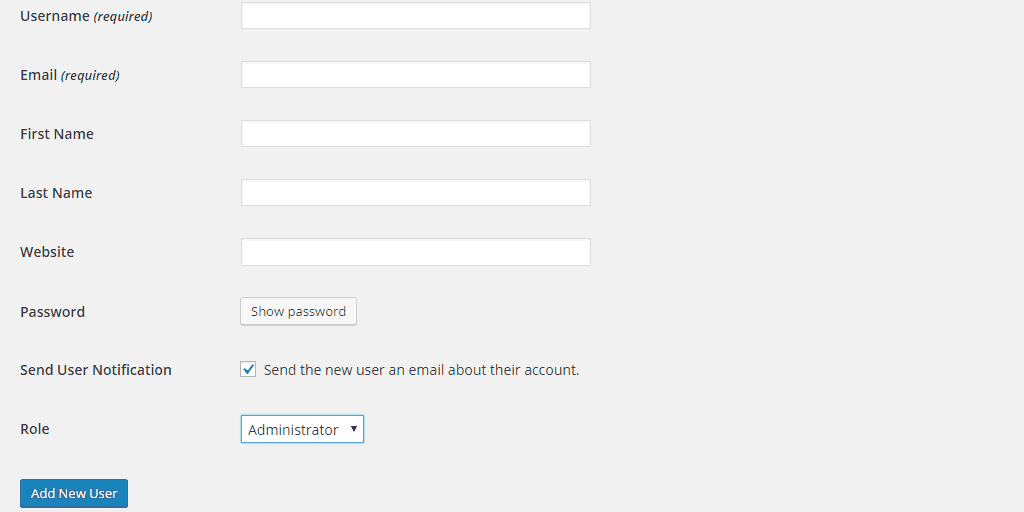
Simply log in to your WordPress dashboard and go to Users > Add New to create a new user. Choose a username that is not so obvious like your first name/last name combination and fill out the rest of the details.
Don’t forget to use a different email address than the one you used for your original admin account and make sure to set the role to Administrator.
After that’s done, log out of your dashboard and login with your new user information. Go back to Users > All and delete your old admin account. Before you click on the final delete button don’t forget to assign all your old posts to your new admin user.
Alternatively, use the plugin Admin Renamer Extended to change the username directly through your WordPress admin area.
2. Use an Editor account
The Add New User interface.
Speaking of admin accounts, many people make the mistake of using an administrator account to publish their blog posts. This is bad because the information that a hacker needs, such as your username, will be visible when you publish a post.
Now all they need is to guess your password and when they do, you just handed them your site on a silver platter.
An admin account is not needed to publish blog posts and that mistake can easily be fixed by creating a new user with the Editor role.
3. Choose a strong password
Every year, SplashData compiles a list of the most common passwords. And every year the same three ones appear as the most commonly used (and very insecure) passwords, they are 123456, password and 12345678.
Your password should ideally have 8 characters at the very least. You should also use both lowercase and uppercase letters mixed with numbers and special characters.
You can use a , , or Keepass is a wise decision.
4. Enable two-factor authentication
Two factor authentication (2FA) adds an extra layer of security to your WordPress site to prevent against phishing and brute force attacks. As the name suggests, 2FA requires two sets of authentication methods to be able to log into your WordPress.
This means you’ll need an username and password PLUS an one-time passcode that is sent to your phone in order to log in to your site. Several plugins can be used here including Authy Two Factor Authentication, Google Authenticator, and Duo Two-Factor Authentication.
5. Backup and update regularly
WordPress updates bring new functionality as well as patch important security holes, making it that much harder for hackers to exploit vulnerabilities. That’s why it’s important to keep your WordPress installation up-to-date. That also includes keeping your plugins and themes up-to-date as well.

Before any major update is applied to your site, WordPress will warn you to backup your database. This not only prevents data loss in case something goes wrong during the update but it’s also a good practice to adopt in case the worst happens and your site does get hacked.
The easiest way to backup your site is with a plugin like BackupBuddy, WordPress Backup to DropBox, or VaultPress. BackupBuddy and VaultPress are paid solutions which automatically backup your entire website and allow you to easily restore it.
WordPress Backup to DropBox is a free plugin which allows you to backup your site to your DropBox account. Setting it up is as easy as installing the plugin, activating it, and then linking it with DropBox. After you have successfully authorized your DropBox account, you can select how often the backup should be performed.
While using plugins is an easy solution, there are times when even plugins fail. That’s why it’s a good idea to perform your backup manually as well:
- The first thing you need to do to manually backup your site is to download all your WordPress files into a folder on your computer. If it’s the first time you’re performing a backup, download the entire WordPress folder.
- After that’s done, you have to backup your database, which contains all the information related to your site.Since phpMyAdmin is one of the most widespread applications for managing MySQL databases, let’s see how we can manually backup our database using phpMyAdmin.
- Log in to your web host’s cPanel and then click on phpMyAdmin. In some cases, you won’t need to enter the username and password but if it asks you for the login information use the information provided by your web host.
- Once you are logged in, choose the database that contains your WordPress data by selecting it in the left panel. You can recognize by the default wp_ prefix in the name. You will see the list of the tables forming your database.
- At the top of the screen, you should see a few tabs. Click on the one labeled Export.
- You should be able to see two methods: ‘Quick’ and ‘Custom’. If your website is relatively new, select Quick. Otherwise, choose the Custom option.

- A list will then allow you to select the tables you want to export. If you’ve never done a backup of your site before, select all the tables and then select the default option: Save output to a file. Make sure to select the SQL format.
- Once your options are chosen, hit the Go button to generate a file containing your database. The time it takes to do this will vary depending on the size of your database.
6. Limit the number of plugins and themes
Using too many plugins can slow down your site but it can also leave it vulnerable to attacks if you stop using certain plugins and ignore their updates.
It’s not enough to simply deactivate the plugin if you are no longer using it. The same goes for themes. All the inactive themes and plugins which are still on your server can easily be used to inject all sorts of malicious code.
Do yourself a favor and delete any and all plugins and themes you are currently not using.
7. Be careful of free WordPress themes and plugins
There are loads of awesome free WordPress themes and plugin out there. However free is not always free, and when it comes to WordPress plugins and themes sometimes free comes packed with malicious code, viruses and encrypted links.
Use a common sense approach. WordPress.org is the safest place when you are looking for free themes and plugins. Most plugin and theme creators and major marketplaces like Themeforest and CodeCanyon are safe too but if you are installing a premium/paid theme or plugin which someone made available for free (or nulled) then you are asking for trouble.
You can use these plugins to look for suspicious code; Theme Authenticity Checker (TAC) and Exploit Scanner
» Intermediate WordPress Security Tips
8. Limit Login Attempts
By default, WordPress allows users to enter passwords as many times as they want which makes it easy for hackers to exploit this by using scripts until they find the right combination.
To prevent this, install and activate the Login LockDown plugin. After activation, go to Settings > Login LockDown to configure the plugin’s settings.

Define how many login attempts can be made. After that choose how long a user will be unable to retry if they exceed the failed attempts. You can also define the lockout period for IP range blocks as well as prevent hackers from entering different invalid usernames.
It’s a good idea to also disable the message which lets the user know whether they entered an invalid username or invalid password on failed logins. After configuring the settings, click on Update Settings to save your changes.
9. Change your wp_ database prefix
WordPress applies a table prefix to all database tables which is wp_. Changing the table prefix can help prevent SQL injection vulnerabilities as hackers will need to guess the prefix which makes their job harder.
You will find the table prefix in your wp-config.php file:
$table_prefix = 'wp_';
Simply change it to something that isn’t guessed easily like:
$table_prefix = 'wp_34CS($';
Bear in mind that you will still need to update the prefix of your tables manually for an existing installation of WordPress.
One of the easiest ways to do this is to install the plugin iThemes Security. The plugin can automatically do all the necessary changes for you with a click of a button. You can find this setting under the Advanced tab.
 Changing the database prefix in iThemes.
Alternatively, you can do this manually, by using an SQL query to rename each table. Below is an example of how this is done:
RENAME table `wp_links` TO `newprefix_links`;
Make sure to change the new prefix in the above example to the prefix you have defined in wp-config.php.
You need to run the above query for each database table including all core tables and any additional tables added by plugins.
Next, you need to update the references to the table prefix in the usermeta and options tables, again by using an SQL query.
To update the usermeta table, enter the following SQL query through the PHPMyAdmin SQL tab:
UPDATE `newprefix_usermeta` SET `meta_key` = REPLACE( `meta_key`, 'wp_', 'newprefix_' )
Finally, to update the options table, enter the following SQL query through the PHPMyAdmin SQL tab:
UPDATE `newprefix_options` SET `option_name` = 'newprefix_user_roles' WHERE `option_name` = 'wp_user_roles'
10. Rename the login page
The WordPress admin dashboard default login URL is /wp-login.php (or you can just type in /wp-admin/ and it will redirect you).
Changing the URLs for WordPress dashboard areas add an extra layer of security. You can do this with the above mentioned iThemes Security plugin.
11. Protect Your .htaccess file
The .htaccess file is used to redirect URLs, configure pretty permalinks, and it can also be used to harden WordPress security.
The code snippets below will strengthen the security of your WordPress website. Note that the code has to be placed outside of the # BEGIN WordPress and # END WordPress tags, as anything between those tags can be updated by WordPress, thus overriding your changes.
First, let’s make sure we protect the most important file: wp-config.php.
The wp-config.php file is an important file as it contains your database connection settings, table prefix, security keys, and other sensitive information.
Add this to your .htaccess file:
order allow,deny
deny from all
Next, let’s protect .htaccess itself by adding the following to it:
order allow,deny
deny from all
Finally, let’s limit the access to wp-login.php:
order deny,allow
Deny from all
# allow access from my IP address
allow from 111.111.1.1
Make sure to replace the IP address with your own IP address.
Using .htaccess you can also restrict access to your entire WordPress dashboard to a specific IP address:
order deny,allow
allow from 111.111.1.1
deny from all
Again, replace the IP address with your own.
You can learn more here or in case you don’t want to do this manually, then using a security plugin such as iThemes Security is your best option as it allows you to perform all these modifications with a click of a button.
12. Use Correct File Permissions
Incorrect file permission such as 777 could allow a hacker to upload a file or modify an existing file. To change your file permissions you will have to log in to your cPanel, navigate to File Manager and make the necessary changes.
According to WordPress, these are the correct permissions to use on a WordPress website:
- All directories should be 755 or 750
- All files should be 644 or 640
- wp-config.php should be 600
For a thorough guide on setting the correct file permissions, take a look at the Changing File Permissions guide on WordPress.org.
» Advanced WordPress Security Tips
13. Move Your wp-config.php file
As mentioned before, your wp-config.php file is a very important file as it contains your database connection settings, table prefix, security keys, and other sensitive information.
Move the wp-config.php file into the folder above your WordPress installation. For example if your folder structure is this and where WordPress is installed /home/yoursite/public_html/ you would move wp-config.php into /home/yousite/.
14. Tweak Your wp-config.php file
Your wp-config.php file contains all of the confidential details for your WordPress site. Luckily there are a few tweaks you can make to make your website more secure.
Change the default secret keys to something else
WordPress Security Keys handle the encryption of information stored in the user’s cookies. Those keys need to be generated randomly for each WordPress install. If you are unsure how to change them you can randomly generate them with the help of the WordPress Salts Key Generator.
Alternatively, you can generate new security keys using a security plugin:

Disable error reporting
If a plugin or theme causes an error, the error message may display your server path, which can be abused by hackers. Therefore, it’s better to disable error reporting altogether by adding the following code to your wp-config.php file:
error_reporting(0);
@ini_set(‘display_errors’, 0);
Alternatively, you can add the following single line of code to your functions.php file.
add_filter('login_errors',create_function('$a', "return null;"));
Disable the plugin and theme editor
Unless you are a developer who likes to make changes to your theme/plugin files on the fly, there is no real reason for being able to to access the plugin and theme editor. You can disable it by adding the following to your wp-config.php file:
define( 'DISALLOW_FILE_EDIT', true );
15. Disable WordPress login hints
When logging into WordPress and typing in an incorrect or non-existent password or username, a detailed error message is shown saying either the username is wrong, or the password doesn’t match with that username.
This can be used to guess a username or password. To override default WordPress login errors and disable login hints add this code to the functions.php, instead a custom error message will be shown.
function no_wordpress_errors(){
return 'Nothing to see here, move along!';
}
add_filter( 'login_errors', 'no_wordpress_errors' );
16. Remove the WordPress version number
By default, WordPress places a meta tag in your website’s code that states the version of WordPress you are using. This information is useful to hackers because it makes it easy to know which security holes they can abuse.
You can easily prevent this by adding the following code to the top of your theme’s functions.php file:
remove_action('wp_head', 'wp_generator');
An easier method of doing this is using a plugin like Remove Version.
17. Implement HTTP header security
HTTP security headers help mitigate attacks and security vulnerabilities.

There are a total of 6 HTTP security headers which you can implement on your website by adding the following lines to your functions.php file.
» Content Security Policy (CSP)
CSP helps mitigate XSS attacks by whitelisting the allowed sources of content such as scripts, styles, and images. A content security policy can prevent the browser from loading malicious assets.
Unfortunately there isn’t an one size fit all approach to CSP’s. Before you create your CSP you need to evaluate the resources you’re actually loading. Once you think you have a handle on how resources are loading you can set up a policy based on those requirements.
When you got your CSP ready add it to your functions.php file like this (below is the actual one we’re using on digital.com):
header('Content-Security-Policy: default-src 'self' 'unsafe-inline' 'unsafe-eval' https: data:');
FYI: This uses single quote marks and you need to escape the single quote marks otherwise you will see a PHP parse error message. You escape a character by typing a backslash before it.
Let’s break it down. Our CSP allows all resource types from the current domain, ‘self’. ‘Unsafe-inline’ tells that inline style and script tags are allowed and ‘unsafe-eval’ tells that unsafe dynamic code evaluation such as JS is allowed. ‘https:’ and ‘data:’ tell that loading resources only over HTTPS and data scheme are allowed.
CSP’s can also be implemented via a meta tag in your HTML. Like this:
» X-Frame-Options
This header helps prevent clickjacking by indicating to a browser that it shouldn’t render the page in a frame (or an iframe or object).
Include it in your functions.php like so:
header('X-Frame-Options: SAMEORIGIN');
» X-XSS-Protection and X-Content-Type-Options
The X-XSS-Protection helps mitigate Cross-site scripting (XSS) attacks and X-Content-Type-Options header instructs IE not to sniff mime types, preventing attacks related to mime-sniffing.
Include them in your functions.php with the following snippet:
header('X-XSS-Protection: 1; mode=block');
header('X-Content-Type-Options: nosniff');
» HTTP Strict Transport Security (HSTS)
HSTS is a way for the server to instruct the browser that the browser should only communicate with the server over HTTPS.
Add it to your functions.php like this:
header('Strict-Transport-Security:max-age=31536000; includeSubdomains; preload');
» Implement Cookie with HTTPOnly and Secure flag in WordPress
This instructs the browser to trust the cookie only by the server and that cookie is accessible over secure SSL channels.
Add this to your functions.php file:
@ini_set('session.cookie_httponly', true);
@ini_set('session.cookie_secure', true);
@ini_set('session.use_only_cookies', true);
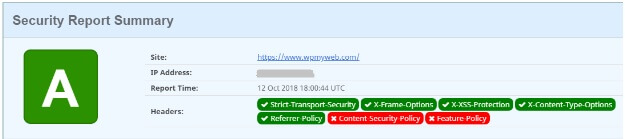
You can and should test your HTTP security headers by going to https://securityheaders.io.
Another way to secure HTTP Headers manually is via your .htaccess file. Here’s how to set it up in .htaccess:
Header set Strict-Transport-Security "max-age=31536000; includeSubDomains"
Header set X-XSS-Protection "1; mode=block"
Header set X-Frame-Options "sameorigin"
Header set X-Content-Type-Options "nosniff"
Header set Content-Security-Policy "default-src 'self' 'unsafe-inline' 'unsafe-eval' https: data:";
Alternatively, you can use a plugin such as Security Headers if you don’t want to implement them manually.
18. Add Google Search Console (GSC)
There are lots of benefits to adding your WordPress site to Google Search Console (formerly Google Webmaster Tools). Not only is GSC useful for SEO and how Google understands your site but another important feature is the “security issues” dashboard.
If Google detects issues with your site and if it has been compromised you will get an alert via email.
19. Consider using SSL
SSL (Secure Sockets Layer) is a technology that allows you to encrypt the connection between your web server and your visitors’ browsers. This is especially useful if your WordPress website is e-commerce oriented and it can also play a role in the search engine rankings.
To enable the SSL for your site, you need to get the SSL certificate itself which may be provided by your hosting provider or you could get it for free from sites like Let’s Encrypt or WoSign.
Finally, you need to integrate it with your WordPress site with a plugin like Verve SSL or WP Force SSL.
20. Use a managed WordPress host
If you can afford it go with a managed WordPress host. In a 2014 study WP White Security reported that 41% of WordPress sites were hacked due to a security vulnerability on the web host itself, so don’t simply go for the cheapest available.
There are several companies offering managed WordPress hosting and whilst you pay a premium for managed WP hosting compared to more traditional shared or unmanaged hosting, it’s worth it.
However, some shared hosting companies like SiteGround offer security features such as SSLs & HTTP/2, custom WAF rules, automatic updates of WordPress and its plugins, and free daily backups and restores of your hosting account.
Their bread and butter is WordPress, a managed WP host only does WordPress and they look after all the WordPress technical aspects such as security, speed, WordPress updates, daily backups, website uptime, scalability and more.
21. Consider using third-parties
If you can afford it you should consider using a third party WordPress security protection service.
Companies like Sucuri and WPWSS offer both subscription based and one-off services like malware and blacklist scanning, DDoS protection, malware cleanup, firewall protection and those extra layers to keep your WordPress site safe and secure.
WordPress security resources:
» http://w3techs.com/technologies/details/cm-wordpress/all/all
» http://codex.wordpress.org/Hardening_WordPress
» https://wordpress.org/plugins/search.php?q=security
» https://www.wordfence.com/learn/
» https://www.owasp.org/index.php/OWASP_Wordpress_Security_Implementation_Guideline
» https://www.keycdn.com/blog/http-security-headers/
What are HTTP Security Headers?
When a user visits a website through a web browser, the server reacts with HTTP Response Headers. These headers inform the web browser how to act throughout its interaction with the website. These headers generally consist of metadata such as cache control, status error codes, content-encoding, etc.
By utilizing HTTP response headers, you can harden your website security and also prevent/mitigate attacks.
For example, by adding the strict-transport-security, you can force all the latest web browsers like Google Chrome, Firefox and Safari to communicate with your website over HTTPS only.
Let’s have a look at 6 HTTP security headers,
- HTTP Strict Transport Security (HSTS)
- X-Frame-Options
- X-XSS-Protection
- X-Content-Type-Options
- Referrer-Policy
- Feature-Policy
HTTP STRICT TRANSPORT SECURITY (HSTS)
Let’s say you have a site example.com, and you set up an SSL/TLS certificate to move from HTTP to HTTPS.
Now you know that your website is accessible with HTTPS only.
What if I tell you that your website is still accessible over HTTP? Yes, you heard it right. There are several scripts available that hackers use to open a website over HTTP.
By utilizing the strict-transport-security, you can force all the latest web browsers like Google Chrome, Firefox and Safari to communicate with your website over HTTPS only. So if an attacker tries to open your WordPress site over HTTP, the web browser wouldn’t load the page.
X-XSS PROTECTION
X-XSS, also known as cross-site scripting, is a security header that protects sites against cross-site scripting.
By default, this security header is built in and enabled into modern web browsers. Implementing it will force your browser to load it. This security header wouldn’t let a page load if it detects a cross-site scripting attack.
X-CONTENT-TYPE-OPTIONS
The X-Content-Type-Options is a kind of security header with the value of nosniff that prevents Google Chrome, Internet Explorer and Firefox from MIME-Sniffing a response away from the declared content type.
This security header protects the content and reduces the risk of drive-by downloads.
X-FRAME OPTIONS
The x-frame-options header protects sites against clickjacking by not enabling iframes to fill on your website. It is supported by IE 8+, Chrome 4.1+, Firefox 3.6.9+, Opera 10.5+ and Safari 4+.
In this method, an attacker fools a user into clicking something that isn’t there. A user may believe that he/she is on the main site; however, something else is running in the background. This way, hackers can steal information from your web browser.
REFERRER-POLICY
When a user visits a website, immediately a “Referrer” header is included that informs the server where the visitor is originating from. This header is utilized for analytical functions.
As you comprehend, this presents a personal privacy issue. This can be prevented by adding Referrer-Policy to your WordPress site.
FEATURE-POLICY
Feature Policy is a kind of security header that allows website owners to allow and disallow specific web platform functions on their own pages and those they embed.
Utilizing the Feature-Policy header, you as a site owner can restrict the web browser functions for a site.
For every single function, you must specify what’s allowed and what’s not. Here are the Feature Policies:
- geolocation
- midi
- notifications
- push
- sync-xhr
- microphone
- camera
- magnetometer
- gyroscope
- speaker
- vibrate
- fullscreen
- payment
For example, if you want to disable geolocation and camera in your WordPress site, you need to define a feature policy this way:
Feature-Policy: geolocation ‘none’ ; camera ‘none’
By specifying the ‘none’ word for the origin list, the specific feature(s) will be disabled for all browsers contexts.
Note:
- Before you add HTTP security headers in your WordPress site, make sure you have an SSL certificate installed or else your site wouldn’t be accessible.
- Before you edit any of your files, make sure to take a full backup.
How to Add HTTP Response Headers in WordPress
To add HTTP response headers in WordPress, you just need to add the following lines into your .htaccess file.
First, log in to your WordPress hosting cPanel account and from there go to the root folder of your WordPress site. Then, find the .htaccess file and edit it.
As it is a (.) file, it can be hidden. If you can’t find the .htaccess file inside the root folder, go to settings and click on “show hidden files”.
Now add the following piece of lines at the end:
Header set Strict-Transport-Security "max-age=31536000" env=HTTPS

Header set X-XSS-Protection "1; mode=block"

Header set X-Content-Type-Options nosniff

Header always append X-Frame-Options SAMEORIGIN

Header Referrer-Policy: no-referrer-when-downgrade
Once added, save the file.
Now, go to securityheaders.com to check whether the code is working or not.
Note: We haven’t added the Feature Policy and Content Security Policy because they are more complicated to set up and may break your site. But these are enough to harden your WordPress security.
TabContentThree