
https://dev.to/simonholdorf/10-tips-tricks-that-will-make-you-a-better-reactjs-dev-4fhn
10 Tips & Tricks that will make you a better ReactJS Dev
 Simon Holdorf Originally published at thesmartcoder.dev ・Updated on ・9 min read
Introduction
Alright folks, it is time for another article providing with you some knowledge you can immediately use to improve your React game to help you become better React devs, write better code or excel at coding interviews.
Use React Hooks In Functional Components
Hooks have been introduced with React v16.8 and are a huge boost for functional programming within React. With hooks, you can and should now make use of functional components instead of class components. But wait…functional components and state? And what’s with lifecycle methods?
Have no fear – React Hooks have that covered for you. Let’s see some examples:
class myComponent extends React.Component {
  constructor(props) {
    super(props);
    this.state = {
      value: '',
    };
  }
  onChange = event => {
    this.setState({ value: event.target.value });
  };
  render() {
    return (
      <div>
        <h2>This is a random class component</h2>
        <input
          value={this.state.value}
          type="text"
          onChange={this.onChange}
        />
        <p>{this.state.value}</p>
      </div>
    );
  }
}
This was the traditional way using a class. But with hooks we can now do it like this using the useState Hook:
const myComponent = () => {
  const [value, setValue] = React.useState('');
  const onChange = event => setValue(event.target.value);
  return (
    <div>
      <h2>This is a random functional component with state!</h2>
      <input value={value} type="text" onChange={onChange} />
      <p>{value}</p>
    </div>
  );
};
Looks simpler? It is! We are using the useState Hook to set the initial state to an empty String (”) and it returns an array with the current state(value) and a method to mutate that state(setValue). We are also using array destructuring to get access to [value, setValue].
Functional components don’t have access to lifecycle methods by default. But now we got hooks and the useEffect Hook comes to our rescue. First the traditional way using a class:
class myComponent extends React.Component {
  constructor(props) {
    super(props);
    this.state = {
      value: localStorage.getItem('someRandomValue') || '',
    };
  }
  componentDidUpdate() {
    localStorage.setItem('someRandomValue', this.state.value);
  }
  onChange = event => {
    this.setState({ value: event.target.value });
  };
  render() {
    return (
      <div>
        <h2>Just some random class component!</h2>
        <input
          value={this.state.value}
          type="text"
          onChange={this.onChange}
        />
        <p>{this.state.value}</p>
      </div>
    );
  }
}
And here is the same example making use of the useEffect Hook:
const myComponent = () => {
  const [value, setValue] = React.useState(
    localStorage.getItem('someRandomValue') || '',
  );
  React.useEffect(() => {
    localStorage.setItem('someRandomValue', value);
  }, [value]);
  const onChange = event => setValue(event.target.value);
  return (
    <div>
      <h2>Some random functional component with state and side Effects!</h2>
      <input value={value} type="text" onChange={onChange} />
      <p>{value}</p>
    </div>
  );
};
How awesome is that? useEffect will aways run when one of the values in the passed array [value] changes.
These are just two examples of using React Hooks. There are more out there and you can even create you own custom hooks. Every ReactJS Dev should learn this concept in my opinion!
Use The React Context API For Passing Props
Maybe you have already experienced a situation where you have deeply nested components with a need to pass down props from the higher tier to the lower tier with some components sitting in the middle that are just letting those props pass. Instead of editing each component in the chain you can make use of the React Context API.
In this example, we create a new context in a separate file like:
import React from 'react'

const AuthContext = React.createContext({})

export const AuthProvider = AuthContext.Provider
export default AuthContext
Then we need to wrap the parent element, hence the highest tier from where we want to distribute props with the provider we created:
import React from 'react'
import ChildComponent from './components/ChildComponent'
import { AuthProvider } from './context/AuthContext'

function ParentComponent() {
  const auth = { userId: '123456', loggedIn: true }

  return (
    <AuthProvider value={auth}>
      <ChildComponent />
    </AuthProvider>
  )
}
Now all of the ParentComponent’s children have access to auth as a prop. How cool is that?
Now all we have to do is to consume the context in a child component. I’ll make use of functional components and the useContext Hook to do so:
import React, { useContext } from 'react'
import AuthContext from './context/AuthContext'

function ChildComponent() {
  const auth = useContext(AuthContext)

  console.log(auth) // { userId: '123456', loggedIn: true }

  return null
}
If there were more child components nested they would have access to the context as well. Awesome!
Styled-Components
Styled-Components belong effectively to the CSS-in-JS libraries that abstract the CSS to component level using only JavaScript to describe styles. They can be created via the ES6 Template Literal Notation using back-ticks like so:
// install styled components with npm install styled-components

import styled from 'styled-components';

const MyButton = styled.button`

  background: ${props => props.primary ? "green" : "white"};
  color: ${props => props.primary ? "white" : "green"};

  font-size: 1em;
  margin: 1em;
  padding: 0.25em 1em;
  border: 2px solid green;
  border-radius: 3px;
`;

render(
 return {
  <div>
    <MyButton>Normal</MyButton>
    <MyButton primary>Primary</MyButton>
  </div>
 }
)
Now you have a custom styled Button Component that you can use all over in your application instead of the normal HTML button. All styles are encapsulated and won’t interfere with other styles in the DOM. That’s pretty sick, right?
React Fragments
For a long time you would have to wrap everything in a return statement into a single div for react to render it correctly into the DOM or make use of array notation. Examples:
const myComponent1 = () => {
  return
   <div>
    <Card key="1" />,
    'Some Text',
    <Card key="2" title="someTitle" content="Just some Content" />
   </div>
}

const myComponent2 = () => {
  return [
    <Card key="1" />,
    'Some Text',
    <Card key="2" title="someTitle" content="Just some Content" />
  ]
}
With the introduction of react Fragments you no longer have to use either of this two methods but can instead do something like this:
const myComponent1 = () => {
  return
   <Fragment>
    <Card key="1" />,
    'Some Text',
    <Card key="2" title="someTitle" content="Just some Content" />
   </Fragment>
}
or even this since Babel 7:
const myComponent1 = () => {
  return
   <>
    <Card key="1" />,
    'Some Text',
    <Card key="2" title="someTitle" content="Just some Content" />
   </>
}
That’s cool, right?
Use Error Boundaries
Having errors in your application is one thing but if they appear in the View at least they should not break the whole application. For this case “Error Boundaries” have been implemented into React. These are basically components that you can use to to wrap other components. They will then catch errors during rendering and in lifecycle methods down the tree. Via the componentDidCatch method (note that there is no React Hook for this yet so you have to youse a class based component) you can then react to the error and render a fallback or log the error. Here is a short example:
class ErrorBoundary extends React.Component {
  constructor(props) {
    super(props);
    this.state = { hasError: false };
  }
componentDidCatch(error, info) {
    // using state to initiate a fallback UI render
    this.setState({ hasError: true });
    // You can also log the error, for example to a service
    logErrorToMyService(error, info);
  }
render() {
    if (this.state.hasError) {
      // Rendering the actual fallback UI
      return <h2>This error is unknown - too bad!.</h2>;
    }
    return this.props.children;
  }
}
You can now use this ErrorBoundary component like so:
<ErrorBoundary>
  <MyComponent />
</ErrorBoundary>
React & Typescript
Typescript is a really hot topic and one of the developers top choice to learn in the near future. With the newer versions of create-react-app (CRA) it comes with built-in Support for Typescript. You just have to add the –typescript flag when creating a new project with CRA like so:
npm create-react-app my-app --typescript
The key benefits of using Typescript with React are:
- Latest JavaScript features available
- Interfaces for complex type definitions
- VS Code was made for TypeScript
- Readability and Validation to avoid bugs during development
Here is a simple example of using TypeScript in a functional React Component:
import * as React from 'react';

const MyComponent: React.FunctionComponent<{
  name: string
}> = (props) => {
  return <h2>{props.name}</h2>
}

export default myComponent;
or with an interface:
interface Props {
  name: string
}

const MyComponent: React.FunctionComponent<Props> = (props) => {
  return <h2>{props.name}</h2>
}
If you want to learn something new in 2020, definitely give TypeScript a go!
Jest + Enzyme for Testing
Testing your applications is something every dev should do and it is mandatory in many corporations. Testing React apps can be really cool with the right setup. A widely-used setup consists of Jest + Enzyme. Have a look!
Jest comes bundles with create-react-app by default and is a test runner, assertion library and mocking library. It also provides snapshot testing which basically creates a rendered snapshot of a component that will automatically be compared to previous snapshots. If those two don’t match the test will fail.
This is really cool for unit tests, integrations tests but what is with real components of your React App? Enter Enzyme, a testing library for React Components developed and maintained by Airbnb and the ideal partner for Jest.
With these libraries in place we can do neat tests like:
it("will render correctly", () => {
  const wrapper = shallow(
    <MyComponent />
  )
  expect(wrapper).toMatchSnapshot();
})
to test the basic rendering behaviour of one of our components. But we can do even more stuff, for example testing for props:
// We need to mock zum props first

const user = {
  name: 'ThePracticalDev',
  email: 'TPD@dev.to',
  username: 'tpd',
  image: null
}

// Then the tests

describe ('<UserProfile />', () => {
  it ('contains h3', () => {
    const wrapper = mount(<UserProfile user={user} />)
    const value = wrapper.find('h3').text()
    expect(value).toEqual('ThePracticalDev')
  })
  it ('accepts user props', () => {
    const wrapper = mount(<UserProfile user={user} />);
    expect(wrapper.props().user).toEqual(user)
  })
})
This looks awesome, right? And there is so much more you can do with this setup like mocking API calls or testing lifecycle methods…
Conditionals in JSX
Writing JSX is really cool and one of the main features of React. To improve your capabilities you can make use of this little trick:
Instead of using
{ return loginAttempts < maxAttempts ? <MyComponent/> : null }
you can do a short-circuit evaluation
{ return loginAttempts < maxAttempts && <MyComponent/> }
Higher Order Components
Higher Order Components (HOC) are an advanced React concept used to abstract shared code to make it accessible where needed. This concept is similar to higher-order functions in JavaScript so HOCs basically take components and return components but are not components themselves but functions. On an abstract level this looks like:
const MyNewComponent = (MyBaseComponent) => {
  // ... copy old component, add additional data/functionality and update
  return UpdatedComponent
}
A good example is “connect” from Redux. And a more practical example could look like this:
const colorizeElement = Element => props => <Element {...props} color="blue" />
At first we create the HOC (colorizeElement) with an element that keeps all its props and gets a new prop for the color (blue). Wen can use that HOC to create a new, blue-colored button like:
const MyButton = () => {
  return <button>I am a Button</button>
}

const ColoredButton = colorizeElement(MyButton)

function MyComponent() {
  return (
    <div className="MyComponentClass">
      <h2>Hello you colored Button</h2>
      <ColoredButton />
    </div>
  )
}
Looks really cool, right?
React DevTools
React DevTools is a cool browser extension available for Chrome and Firefox and maintained by the Facebook React Core Team. Version 4 came out in August 2019 and this extension is really useful for any React dev.
It works well with react and React Native and really helps you understand what happens inside your react App.
Whats really cool and you may not be aware of this – some big companies like Airbnb and Netflix are using React if you visit their websites you can find information about their sites in your browser console if you have the React DevTools installed:
It is always nice to see what the big players are doing. The same thing can be applied to Redux DevTools!
Bonus: Must-have VS Code Extensions for React Devs
Alright, you have made it all the way down to this point. Time for a little bonus. I have identified some of the best VS Code Extensions for React Devs:
ES7 React/Redux/GraphQL/React-Native snippets
A really cool extensions with almost 4 million downloads that brings you tons of code snippets for everything React, Redux and GraphQL.
Jest / Jest Snippets
Two extensions that harmonize perfectly with Jest and provide you snippets for better testing
Typescript React code snippets
A cool extension that helps you if you work with Typescript + React.
While these are some extensions specifically for React development you should also use the more general ones. If have written an article about the 10 best VS Code Extensions for Frontend Devs in 2020, make sure to check those out as well!
Conclusion
Well, everything comes to an end and this is it for this article. I hope I could give you some insights to become better React Devs regardless if you are just starting out or are an experienced developer already. If you are also into Vue development like me you should really check out my other post about 10 Tips & Tricks to make you a better VueJS Developer I would love to hear your opinions and other important aspects so feel free to leave a comment and also follow me for more upcoming posts!
How you will learn
We will look at a React component, that has been written by a developer like you. And we will step by step refactor it to the superior level. Expect to receive lots of insights, that will boost your React coding speed.
Refactor, refactor and refactor — it’s normal; you’ll have to change your code many, many times; it’s a natural learning process.
—
,
The most important lessons I’ve learned after a year of working with React
- This article will contain lots of React code. Do not be afraid of the code. Take your time reading and understanding it. If you have any questions feel free to ask them in the comments, I will reply 10 times of 10.
- It’s a big article. The content is comprehensive. Feel free to save this article in your tabs and read it in several attempts.
- Even tho the code will be in React Native you can easily use this article to boost your React skills.
Good luck and have fun!
The original React component we will refactor
A simple component, that has been written by a developer like you. What does it do:
- Fetches a list of browsers from a backend
- Shows “loading” state on a screen while is loading
- Shows the loaded browsers as a list of cards
- When a user presses on a card it shows a modal window with a detailed browser description
Does this code look like your code?
What is good about this component
- It works, eg: the list will be downloaded and shown to a user with all the described above features.
- It uses React Hooks.
What is bad about this component
This component is a monolith, eg: this component was designed and built to be used in 1 place in 1 app only once.
Remember this mantra:
The art of being a fast developer is an art of writing reusable building blocks.
The more reusable your components and function are, the faster you are. This gives you enormous leverage:
- You spend less time typing code. Reusable components/functions can hide tons of code inside of them and can be used 100 times. And you will need to implement them only once. Imagine implementing HTTP protocol each time you’re using “fetch(URL)”, that would slow you down.
- You spend even less time typing code. It is faster to add new features into one place than to add them into 10 different places. If you reuse your building blocks, you have that one place to add your features. Add a feature in one place and get results everywhere.
- You spend less time catching bugs. You will use already tried and tested building blocks. New code needs to be tested, but the old code can be trusted.
- You spend less time reading code. If you reuse a building block, it saves you time on code comprehension. It is easy to build programs from familiar pieces.
- You spend even less time reading code. Separated reusable building blocks could be moved in different files, thus you will work with smaller modules, and there will be less code clutter on your screen. This will boost your code comprehension.
As a developer, it is common to spend more time figuring out what the code does rather than actually writing code.
–
,
Why React developers should modularize their applications?
- You write fewer tests for your reusable building blocks. Tests make your life sweet as honey, but with a monolith, you will find yourself testing the same logic again and again. More reusable building blocks = fewer tests.
Monolith = slow coding
Reusable building blocks = fast coding
How to make these 100 lines of code more reusable
Let’s try something really basic and simple first and then move to advanced stuff. How can we enable the use of these 100 lines in multiple places?
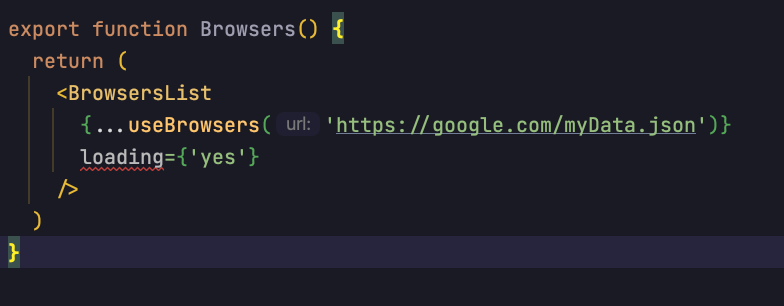
Move constants to props of your component
We moved the URL constant to props and already we can reuse the Browser component with a different URL. Small reuse impact for sure, but is very easy to implement.
Warmed up? Let’s try something really cool then.
Split apart business logic and view logic
Life is simpler when UI components are unaware of the network, business logic, or app state. Given the same props, always render the same data.
—
,
The Missing Introduction to React
This is the most important part of this article. If you can learn only one thing, let it be:
The art of being a fast React developer is an art of separating business logic from view logic.
Wow, such a spike of complexity! Fear not, I will guide you.
Business logic: The stuff that makes decisions and stores state, eg: everything in
View logic: Everything that displays the state on a screen and reads the user’s input, eg: everything in return (…)
Let’s make a small step forward and split our component into 2 parts and then check how it will make our code more reusable.
What we will do:
- Created a custom React hook useBrowsers() for our business logic
- Created a React component
with lots of props for our view logic
Ok, we are moving somewhere, our code is far from perfect, but it became a bit more reusable:
- We can use
with a different data source. Before we were bound to use data only from a remote HTTP endpoint; but now we can get it from memory/disc/or any other place. - We can use useBrowsers() with a different screen, or even without any screen. For example, we can use useBrowsers() in a different app with a different design.
But this split is far from perfect! We still can make this code much more reusable.
Reusable building blocks = fast coding
Split your code into many small reusable files
First things first. Splitting the monolith into 2 parts opened new possibilities for refactoring. We can make our program more readable (and you faster) if split our code into different files/modules. This will allow us to think about each module in isolation. And make each module more readable and reusable.

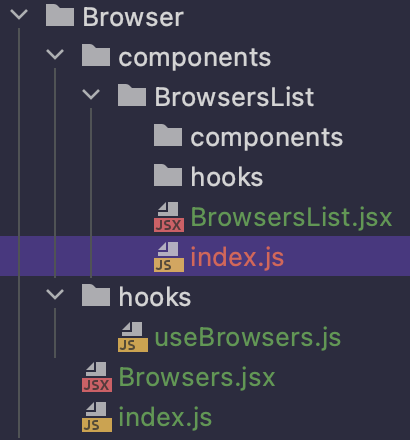
Typical React project file structure
This is a typical React project file structure:
- index.js exports
from Browsers.jsx - “components” and “hooks” folders store building blocks related to
component. - BrowsersList.jsx can also evolve into a folder with related “hooks”, “components” and index
React project file structure is a recursive tree.
Possible recursive React project structure
Read more about React project structure in an article by
:
Let’s check our BrowsersList.jsx
Ah, yeah, much less code. Feels much less cluttered. Now we can focus our minds on refactoring this part of the code.
Less clutter on screen = fast coding
But before we make this component more reusable let me address a big issue of the current design.
The BIG issue with many small reusable files
Check our
- If we rename some props, for example, ‘changeDescription’ to ‘setSelectedBrowser’, or ‘description’ to ‘browser’
- Or if will delete some props
- Or will add new props
Then each place where we use
Each time you change a signature of a component you break each place of your code that uses this component. And you will change signatures a lot, it’s hard to make a perfect signature on day one, eg: design often emerging from your typing code. And because we are focusing on making lots of highly reusable components we will get breaks in many places.
Your IDE can’t rename such props via automated refactoring. You will need to do it by hand. Manually check every place of use. This is slow coding.
And the worst part is that we will get a break and will not know it. The only way to catch that break is to:
- Run our app
- Manually navigate to the broken component and
- Get a crash
- Read the crash text
- Fix the bug and try again
It a slow and tedious task. This is how nasty bugs get to production. And this happens a lot.
Check our Browsers.jsx, is it broken?
Who knows! To be sure we need to open BrowsersList.jsx and useBrowsers.js and manually compare arguments.
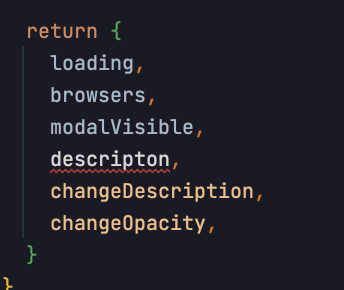
Is this code broken?
Yes. “descripton” in useBrowsers.js is missing “i”, it’s a typo.
Many Junior developers spend hours and hours debugging their apps and trying to find which prop has been broken, or which prop received incorrect data (string instead of a number). But there is a fast solution to this issue.
Stop slow coding with JavaScript, start fast coding with TypeScript
It’s 2021 and every React / React Native developer should use TypeScript. There are literally zero reasons not to use TypeScript.
It Might Look Scary
To us, the benefits of TypeScript dramatically outweigh the downsides — which do exist. Most notable to us is the additional training cost.
The most obvious solution to that problem is to phase features in slowly — you can simply enable TypeScript without changing any code, add some simple type declarations. In the end, our experience is that one can reap a lot of benefits with the most basic use of TypeScript.
—
,
TypeScript at Slack
Cool TypeScript features
Fewer bugs. Fewer bugs = faster coding
TypeScript saves you from bugs
We found our “i” typo:
TypeScript Magic highlights errors
Your IDE will receive an autocomplete feature for React props. This especially saves you time when you are using third party components with unknown props:
TypeScript Magic autocompletes props
Your idea will receive a “refactor name” feature. This will save you time on renaming props. All use of a prop will be automatically renamed in one click.
You will never again forget to add null/undefined check.
? — means that the parameter can be undefined
And of course, we will get an error highlight if we try to put invalid data into our prop:
TypeScript Magic checks if props are correct
TypeScript easily saves you tons of hours and the stress of debugging code.
JavaScript = slow coding
TypeScript = fast coding
The first step in fast system design: define your types.
This is not a comprehensive TypeScript tutorial. If you feel stuck, please, refer to and then come back.
Let’s return to our
And update our useBrowsers() signature:
Now TypeScript will validate that useBrowsers() and BrowsersList are compatible. If we ever change BrowsersList props, we will get an error. This alone guarantees far fewer bugs in production.
Fewer bugs = faster coding
Rapid system architecture
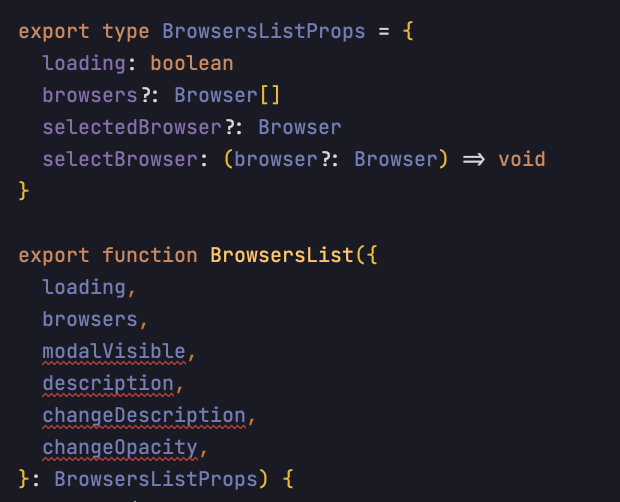
BrowsersListProps currently looks messy:
- The component should show a loading state. Uses 1 line in the type definition.
- Should display a list of Browser[]. Uses 1 line in the type definition.
- Should show a modal window with a detailed browser description. Uses 4 lines in the type definition. These lines limit us to show the “description” field in our modal window. And it feels that chances are that we will need to display more fields of a Browser in this modal. Remember, it is very expensive/slow to change a component signature.
We can make a lucky guess and get our type definition shorter and refactor the “modal window” feature to use Browser type.
This will reduce props complexity:
TypeScript Magic checks if a signature is correct
This small refactoring exercise should demonstrate to you one more remarkable feature of TypeScript: fast system design.
It is very easy to write types. They are physically small (4 lines of types vs 60 lines of an actual component) but contain lots of information about your system. Thus you can write some types and design your program without actually writing any code. This saves you lots and lots of architecture time. This allows your design to emerge from use, and emerge fast.
The first step in any system design: define your types.
Architecture and planning with TypeScript types = fast coding
After you have defined your types you can start fill component’s body
Let’s fix our
If your component has lots of props its a nice hint for a possible refactor
This component already looks a lot readable and less frightful.
Less clutter on screen = fast coding
Extracting reusable
Just by observing a component, a developer gets lots of different feels. For example, I feel that “display loading state for a list” in
Now we are getting somewhere. We found some gold. This is potentially a very useful and reusable feature of our app. But currently, it is coupled with the
We want to make a new
As always we start by defining some types:
-
“T” is a type argument. Types with arguments called
Generic
. “T” for a “UIFriendlyList
” is the same, as “arg” for a function “foo(arg)”. If you want to construct your type from another type you use a Generic. For more info check this article by :
- “&” is Intersection. “type X = A & B” means, that X will contain A and B.
Check this power move:
- We define the type for our props UIFriendlyListProps.
- We define a Generic type, eg: the list can contain inside items of any type.
- UIFriendlyListProps extend FlatListProps from the React Native library with our “loading state” feature
- So we define UIFriendlyListProps type as Intersection Type from FlatListProps and {loading?: boolean}
How cool is that?
I’m happy with this design, lets make a body of this component and move it into a different file UIFriendlyList.jsx
We also added an empty state. So a user would be sure that the list is empty and is not waiting for data to arrive. Very friendly UI feature.
is a highly reusable component, and will save us time in the future for sure. With this component, we became a faster React developer.
Now, let's check our
That is what I’m talking about. This component is much easier to understand, compare with the original BrowsersList. And we got a reusable
This process of “extracting reusable parts”, is endless and consumes time. You should stop yourself if feel that you can spend time more productive in another place.
We humans tend to write code as a form of procrastination. Delaying solving the hard problems we have now, by solving the hypothetical problems of the future.
—
,
Stop Writing Reusable React Components
We are finished with view logic, it’s time to check business logic in useBrowsers() hook.
Refactoring the business logic in useBrowsers() hook
Just like components, we can create custom reusable Hooks. This makes the code more readable because the code base is divided into smaller, reusable chunks
–
,
How To Write Better Functional Components in React
Let’s refactor useBrowsers() to return a valid BrowsersListProps object. I also refactored “loading”: now it will set to “true” before fetch and set to “false” after.
Looks actually nice but we can go deeper and extract a reusable building block. This “fetch URL and store the result in a state while showing loading” thing looks like a highly reusable building block. We want to decouple it from useBrowsers().
As always let’s start by defining some types. We want to make useFetch() hook that can store fetched data in a state and also indicate loading. We also want to define the shape of data we are getting from our endpoint as FetchBrowsersResults:
Looking good, now let's define useFetch() body and move it to a dedicated file useFetch.ts:
I also added an Alert on fetch exception. Thus a user would see an error description.
useFetch() is a highly reusable function and will save us time in the future for sure. With this function, we became a faster React developer.
Now let’s refactor useBrowsers() hook:
Compare to the original useBrowsers() it is so much smaller and easy to understand.
I can’t see any more reusable logic to extract from this component. So let’s move further.
4 easy tips on how to become a faster React developer.
We have finished with the main part, let’s relax a bit. I will give you 4 easy tips.
1. Never format your code by hand
Your IDE should provide you with an “auto reformat code” feature. Your React project should contain .eslintrc.js and .prettierrc.js files. They configure linting (red lines) and code style. You should be able to apply these stiles by pressing a hotkey:

Auto reformat feature
2. Never import modules by hand
Your IDE should provide you with an “auto import” feature. Never type “../../../” by hand, or waste your time by manually typing/deleting imports.
Check this “auto import” feature in action:
Add all missing imports feature
3. Jump around like a pro
If you build your project from small reusable parts, you will have lots of small reusable files and components. It will soon become clear for you, that navigation with “mouse and opened tabs” and “picking a file in a files list” becomes almost impossible.
Check this huge file structure of a tiny mobile app:
The huge file structure of a React app
Do you know the pain of trying to find the correct file in your tabs?

10 tabs open, where is the file I’m looking for?
Your IDE should provide you with these helpful tools:
- jump to file by a search string
- jump to a component by a search string
- jump to the previously opened file
- jump to a definition of a component under your cursor
- jump to component usage
Study your IDE’s hotkeys. This will make your developer’s experience smooth as butter.
4. Use ESLint linting
Every React developer knows the pain of a wrong useEffect/Memo/Callback hook dependency. They are always hard to find errors:
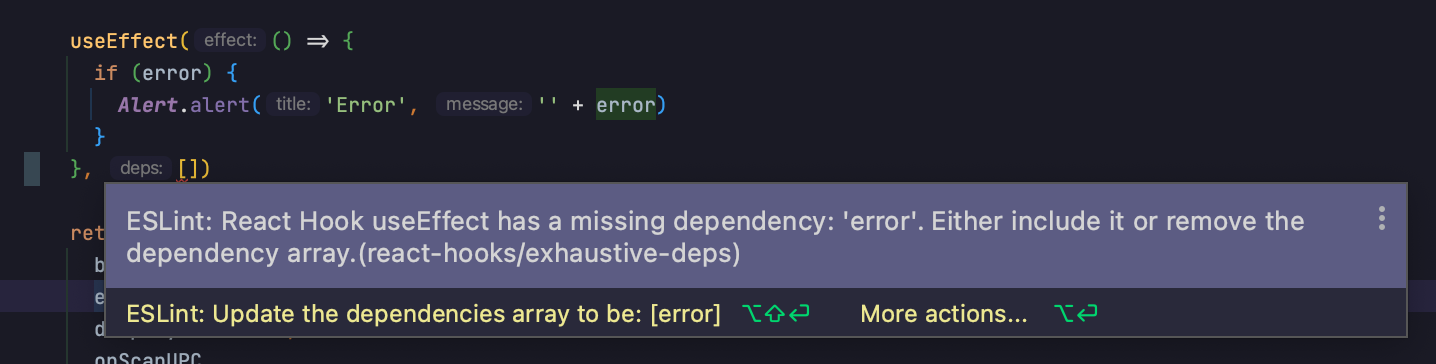
Finding these errors without linting is very hard
ESLint allows caching these errors with no effort.
Development tools such as eslint and typescript helps with maintaining the codebase within a large team. A good developer knows how to code. A great developer knows how to work in a team.
—
,
Architecting your React application. The development and business perspective of what to be aware of
All these features are available in Webstorm IDE. I recommend you to use Webstorm for TypeScript React development.
Conclusion: The art of making reusable building blocks
The art of being a fast developer is an art of writing reusable building blocks.
To be fast you need:
- Separate business logic from the view logic
- Use TypeScript to experiences fewer bugs
- Use TypeScript to enable powerful IDE features: linting, name refactoring, autocompletion
- Define TypeScript types before writing code for the rapid architecture design
- Split your code into many small reusable files to reduce clutter
- Ask your IDE to format code and import modules
- Jump around files with hotkeys
- Practice refactoring
We have successfully refactored our
Look at this light as feather beauty:
We have made an easy to understand component + extracted 2 very handy highly reusable parts:
- useFetch()
We can use these parts in different places of our app and maybe even in different apps. This will speed up our development process for sure.
Play around with the code from the article
Check the Final Results in the Codesandbox playground to play around and learn even more. This code is written in React, expect it a bit to defer from the React Native code in the article.
What's next
- Read a lot
- Practice a lot
- Ask questions. Especially under this article in the comment section
And the last but the MOST important:
- Automatically test React components
- Practice TDD
The testing part will feel confusing to jump in, but it will make your life sweet as a lollipop. Check this article by
, it’s a good place to start your testing journey:
Train your craft daily, and with time you will become a master.
Good luck and have fun!