
REACT Routing
Official Doc:
https://reach.tech/router/TUTORIAL: https://reach.tech/router/tutorial/01-intro
GOOD NOTES:
https://bestofreactjs.com/repo/reach-router-react-router
https://reach.tech/router/api/Match
KEEPERS:::::
/weekends
/pride2020
/mrman2020
/20thparty
/mask4mask2020
/misspineapple2021
ALL TO BE REDIRECTED::::
weekends-talesfromthelockerroom / weekends-share-talesfromthelockerroom
weekends-spokes / weekends-share-spokes
weekends-basicplumbing / weekends-share-basicplumbing
weekends-seedmoney / weekends-share-seedmoney
If url contains
<script src="https://cdnjs.cloudflare.com/ajax/libs/jquery/3.3.1/jquery.min.js"></script>
<script type="text/javascript">
  $(document).ready(function() {
    if (window.location.href.indexOf("franky") > -1) {
      alert("your url contains the name franky");
    }
  });
</script>
2 simple redirects
import { Route, Redirect } from 'react-router'

<Route exact path="/" render={() => (
  loggedIn ? (
    <Redirect to="/dashboard"/>
  ) : (
    <PublicHomePage/>
  )
)}/>
state = { redirect: null };

render() {
  if (this.state.redirect) {
    return <Redirect to={this.state.redirect} />
  }
  return(
  // Your Code goes here
  )
}

// update the redirect
 this.setState({ redirect: "/someRoute" });
Using setState to render
You have to use setState to set a property that will render the
E.g.
class MyComponent extends React.Component {
  state = {
    redirect: false
  }

  handleSubmit () {
    axios.post(/**/)
      .then(() => this.setState({ redirect: true }));
  }

  render () {
    const { redirect } = this.state;

     if (redirect) {
       return <Redirect to='/somewhere'/>;
     }

     return <RenderYourForm/>;
}
You can also see an example in the official documentation: https://reacttraining.com/react-router/web/example/auth-workflow
That said, I would suggest you to put the API call inside a service or something. Then you could just use the history object to route programatically. This is how the integration with redux works.
But I guess you have your reasons to do it this way.
Share Follow
https://reach.tech/router/api/Match
Match
using url string
props.match[param]: string
Any params in your the path will be parsed and passed as match[param] to your callback.

<Match path="events/:eventId">
  {props => (
    <div>
      {props.match
        ? props.match.eventId
        : "No match"}
    </div>
  )}
</Match>
props.match.uri: string
The portion of the URI that matched. If you pass a wildcard path, the wildcard portion will not be included. Not sure how this is useful for a Match, but it’s critical for how focus managment works, so we might as well pass it on to Match if we pass it on to Route Components!

// URL: /somewhere/deep/i/mean/really/deep
<Match path="/somewhere/deep/*">
  {props => (
    // props.match.uri === "/somewhere/deep"
    <div>{props.match.uri}</div>
  )}
</Match>
Javascript to redirect
https://love2dev.com/blog/ways-to-use-javascript-redirect-to-another-page/
JavaScript Redirect in a Single Page App (SPA)
A core principle of Single Page Web Applications (SPA) is things that used to live on the server now live in the browser. One of those responsibilities is managing redirections. For example when you make an AJAX call to a secure service and without a valid authorization token. The service should return a 401 status code. When receiving a 401 status code the application should redirect the user to the login address.
In classic web development the AJAX request would have been a page request or post back. The server recognizes the unauthorized state and performs the proper redirect server-side. In ASP.NET we do this with the response.redirect function.
In a SPA the client application's code needs to manage the redirect. I have encountered two common scenarios; redirecting to an external party or (secure token server) STS or to the application's login view. The internal redirection is fairly easy, change the hash fragment's route to the login view.
window.location.hash = "#!login";
If you are familiar with single page applications you will recognize this as how to use JavaScript to redirect to another page.
Remember when redirecting to a new page due to stale or missing authentication token you are most likely using active authentication and need to persist the authentication token somewhere, like IndexedDB.
If you are using passive authentication the page will post back to the authentication server and the token returned, typically in the header.
Redirecting to an STS normally involves changing the browser's address from the SPA URL to the authentication URL. The STS URL is most likely on a completely different domain, server, etc.
Whatever the case may be the location must change. Most developers', me included, first reaction was to look for a location.redirect method.
It does not exist.
To change the browser's address you should use the location.href property. Changing this value triggers the browser to load the new URL.
window.location.href = myLoginUrl;
Now the browser loads the new target. In this scenario the user then logins using the STS and return to the application authenticated.
Authentication is one scenario you might find yourself needing to programmatically redirecting the user. Of course there are many other scenarios where you might need to redirect a user either internally or externally in the course of normal application usage.
Many URLs are redirected to new locations, typically using a server configuration and HTTP header properties. But there are many scenarios where you may need to use JavaScript to redirect or navigate to another URL.
There are many reasons why you might want to redirect to a new page or URL.
- You changed your domain or URL structure
- You wan to redirect based on language, location or viewport
- The user has submitted a form and you want to direct them to the next page in the sequence
- The page may require authorization
- Redirect from HTTP to HTTPS
- You need to trigger a new page in a single page application
The window.location object manages the address loaded by the browser. Manipulating the location object is how you manage page redirects using JavaScript. The location object has properties and methods to trigger a JavaScript page redirect.
The location object properties you need to familiarize yourself with are:
- hash: used for single page apps and single page websites
- host: the URL's domain
- hostname: similar to host
- href: the full URL
- origin: the URL's protocol and domain
- pathname: the URL slug or page after the origin
- port: if a port is included in the URL
- protocol: http, https, ftp, ftps, etc
Each of these properties are strings and support all the standard string methods like replace, which we will use in this tutorial.
The location object methods are:
- assign: sets the location object to the new URL
- reload: forces the page to reload using the same URL
- replace: triggers a redirect, which we will explore in depth
- search: allows you to interrogate the queryString
Assign and replace look similar, but have a different constraints. The assign method loads the resource at the new URL and preserves the previous entry in the browser's navigation history.
This means the user can hit the back button and go to the original page.
The replace method does the same thing, except the original or 'current' resource is not retained in the browser's history.
This means the user cannot hit the back button to go to the original page.
Both may fail if there are security restrictions. For example, third party scripts cannot trigger a redirect. This is a good thing because so many sites use third party scripts without verifying their code.
- Redirect to a New Address
- Use JavaScript to Refresh a Page
- Redirect On A Form Submission
- JavaScript Redirect in a Single Page App (SPA)
- Summary
Redirect to a New Address
When you have changed an address, for example a new domain name, you should perform a 301 redirect. This is where the server sends an HTTP status code of 301, with the new address.
A 301 status code tells the user agent: i.e. the browser or search engine spider, there is a new address. This is sort of like when you move and submit an address change to the post office. Your mail is forwarded.
A 301 redirect allows you to keep the traffic and hopefully your search engine ranking.
Normally you would do this from the server. There are times when this is not possible and you would need to use a JavaScript redirect to a URL.
This is pretty simple, just include one of the following snippets:
window.location.assign("new target URL");
//or
window.location.replace("new target URL");
I would recommend using replace because the original URL is not valid. So retaining it in their session history might confuse them and trigger an automatic redirect anyway.
location.replace is useful for any 301 redirect scenario, including when you need to redirect from HTTP to HTTPS. But a more succinct way to redirect from HTTP to HTTPS using JavaScript is the following code snippet:
if (location.protocol !== "https:"){
 location.replace(window.location.href.replace("http:", "https:"));
}
I do recommend configuring your server to send the proper HTTP redirection headers because they are much more efficient. This applies to both new addresses and HTTP to HTTPS.
Use JavaScript to Refresh a Page
There are times when you will want to programatically refresh or reload a page using JavaScript. Typically you would place a button or action element on the page for the user to initiate the refresh. Automatically performing a page refresh can be a confusing and jarring experience for your user, so minimize that tactic.
The location.reload method reloads the current document, just like the user pressed F5 or the browser reload button.
The default setting reloads the page from browser cache, if it is available. You can force the method to bypass local cache and retrieve the document from the network by passing true to the method.
location.reload();
//refreshes from cache
//or
location.reload(true);
//to force a network request
I think the best etiquette is to use JavaScript to refresh the page in response to a user action. This is typically in response to a click or touch event handler. I also think in this scenario you are also intending to retrieve from the network, so you will also want to force this action.
Here is an over simplified example:
var btn = document.querySelector(".btn-reload");

btn.addEventListener("click", function(e){
 e.preventDefault();
 location.reload(true);
});
You should be aware, if the user has scroll the page the browser may not retain their current scroll position. Most modern browsers seem to handle this well, but this is not always the case.
You are refreshing a page, and the content and document structure has most likely changed from what their originally rendered. In these cases the browser may not be able to determine where to reliably place the scroll position. In these cases the browser does not scroll the page and the positioning is the top.
There is also a security check in place with this call to prevent external scripts from using this method maliciously. This relates to the Same origin Policy. If this happens a DOMException is thrown with a SECURITY_ERROR.
Redirect On A Form Submission
Another time where using the location.replace method is useful is submitting forms.
This is not the right choice 100% of the time, but should be a consideration. A good example is checking out of a shopping cart.
Once the user clicks the button to submit payment it is typically not a good idea for them to go back to the cart. This can cause all sorts of confusion and potential duplicate orders.
In response to the cart or any form being submitted you need to add a click or pointer event handler to intercept the action. In the handler method you should include a return false to prevent the form from being submitted to the server.
submitBtn.addEventListener("click", function (evt) {
 evt.preventDefault();
 window.location.replace("new target URL");
 return false;
});
You would do this normally when you create a client-side form handler, so don't forget this when you are adding JavaScript code to redirect to a new another page.
Just a helpful note to this process: You may want to include a queryString parameter in your URL to pass along a reference to the user's state. This might help you render or hydrate the new target URL.
Summary
There are different reasons why you might need to redirect from one page to another. Try to configure these on the server as much as possible. But there are many common scenarios where you need to use JavaScript to perform a page redirect.
The window.location object has properties and methods you can manipulate using JavaScript to redirect to different URLs. The location.replace and location.assign can be very helpful. The replace method keeps the session history clean, and the assign method allows the user to back track through the URL history.
REDIRECTS
https://medium.com/@anneeb/redirecting-in-react-4de5e517354a
Redirecting in React
Sometimes you just want to get away…
Single page websites are great because they dynamically update as the user interacts with application, thus allowing for shorter loading times between pages. Although the page never actually reloads or sends you to a new route, the app mimics this behavior by manipulating the window’s history or location objects. Using a link to navigate to a new page with is pretty straightforward: a user interacts with an element, and that event triggers the history or location change. Redirecting proves to be more difficult, as the routing action needs to be fired based on the state of the application.
Redirect Component
If you have routes in your React app, you’re probably using React Router (or React Router DOM) to set up your routes. Considering you’ve already installed the React Router library, the easiest way to redirect to a new location is by using its Redirect component. When the component is rendered, the existing location of the history object is replaced with a new location. If you don’t want to override the existing history location, including the push property will push a new entry onto the history.
import React from 'react'
import { Redirect } from 'react-router-dom'class MyComponent extends React.Component {  state = {
    redirect: false
  }  setRedirect = () => {
    this.setState({
      redirect: true
    })
  }  renderRedirect = () => {
    if (this.state.redirect) {
      return <Redirect to='/target' />
    }
  }  render () {
    return (
       <div>
        {this.renderRedirect()}
        <button onClick={this.setRedirect}>Redirect</button>
       </div>
    )
  }}
This route (haha) is not the best if you’re not a fan of controlled components, that is, it has and is responsible for its own state. Luckily, we can still accomplish this behavior manually by passing props!
Route Component Props
The Route component provides three props to whatever component it renders: location, match and history. Passing down these props to a nested component gives us access to the history object, which we can then push a new location onto.
import React from 'react'
import { BrowserRouter, Route } from 'react-router-dom'class MyRouter extends React.Component {  render () {
    return (
      <BrowserRouter>
        <Route
          path='/'
          render={ props => <MyComponent {...props} />}
        />
      </BrowserRouter>
    )
  }}class ParentComponent extends React.Component {  render () {
    return <ChildComponent {...this.props} />
  }}class ChildComponent extends React.Component {  redirectToTarget = () => {
    this.props.history.push(`/target`)
  }  render () {
    return (
       <div>
        {this.renderRedirect()}
        <button onClick={this.redirectToTarget}>Redirect</button>
       </div>
    )
  }}
But what if the component that needs the redirect functionality is nested super deep? Passing these props through all the components between the route and your child component is not ideal, so here is a third (but not recommended) option: Context and PropTypes
Context and PropTypes
In order to add the context parameter to a React component, we need to define context types as a PropTypes.object. This passes the props directly from the Router component to our child component. Now that we have access to the router props, we also have access to the history, and can push a new entry onto it with a new target location.
import React from 'react'
import { BrowserRouter, Route } from 'react-router-dom'
import PropTypes from 'prop-types'class MyRouter extends React.Component {  render () {
    return (
      <BrowserRouter>
        <Route path='/' component={MyComponent} />
      </BrowserRouter>
    )
  }}class ParentComponent extends React.Component {  render () {
    return <ChildComponent />
  }}class ChildComponent extends React.Component {  static contextTypes = {
    router: PropTypes.object
  }  redirectToTarget = () => {
    this.context.router.history.push(`/target`)
  }  render () {
    return (
       <div>
        {this.renderRedirect()}
        <button onClick={this.redirectToTarget}>Redirect</button>
       </div>
    )
  }}
Examples / Inspiration
LOGIN:
import React, { useState } from 'react';
import './styles/index.scss';
import Login from './components/Login.jsx';
import Home from './components/Home.jsx'
import About from './components/About.jsx';
import Contact from './components/Contact.jsx';
import render } from 'react-dom':
import Router from '@reach/router';
function App(
const [isAuth, setAuth] useState(false);
return
<Router>
<Login
callback={( ) =>
setAuth(!isAuth)
1}
path="/" />
<Home path="/home" isAuth={isAuth} />
<About path="/about" isAuth={isAuth} />
<Contact path="/contact" isAuth={isAuth} />
<Login default />
</Router>

const root = document.getElementById('root');
render( <App />, root);
MATCH EXAMPLES:
// URL: /somewhere/deep/i/mean/really/deep
<Match path="/somewhere/deep/*">
  {props => (
    // props.match.uri === "/somewhere/deep"
    <div>{props.match.uri}</div>
  )}
</Match>
import React from 'react';
import { Match } from '@reach/router';
export default function RenderIfAbout(){
return (
<Match path="/about">
{props =>
props.match ? (
<div>The Path is "About"</div>
) : (
<div>The Path is not "About"</div>
)
}
</Match>
)
}
useLocation Hook
Reach Router has a useLocation hook you can use:
import { useLocation } from "@reach/router"
// then
const location = useLocation()
In location.search is the search field, containing all the query parameters (query strings) from your URL. In your example, /home?init=true would return location.search: "?init=true", which is a query string.
You can use query-string – https://github.com/sindresorhus/query-string – library (yarn add query-string) to parse this:
import { parse } from "query-string"
// then
const searchParams = parse(location.search)
which would give you object {init: "true"} you could also parse booleans with queryString.parse('foo=true', {parseBooleans: true})
So the full example would be
import { useLocation } from "@reach/router"
import { parse } from "query-string"
// and
const location = useLocation()
const searchParams = parse(location.search) // => {init: "true"}
https://reach.tech/router/api/RouteComponent
Route Component
Any component passed as a child to <Router> is called a “Route Component”. There are three types of props for Route Components.
- Matching Props – You provide these props where the
<Router>is rendered. They are used byRouterto match the component against the location to see if the component should be rendered. But, they’re not really all that important to the component itself. Think of these like thekeyprop in React. Your component doesn’t really care about it, but it’s information React needs in the parent. - Route Props – These props are passed to your component by
Routerwhen your component matches the URL: URL parameters andnavigateare a couple of them. They are all documented on this page. - Other Props – Route Components are your own components so go ahead and pass them whatever props they need.
path: string
matching prop
Used to match your component to the location. When it matches, the component will be rendered.
<Router>
  <Home path="/" />
  <Dashboard path="dashboard" />
</Router>
At “/”, Router will render <Home/>. At “/dashboard”, Router will render <Dashboard/>.
URL Parameters with Dynamic Segments
You can make a segment dynamic with :someName. Router will parse the value out of the URL and pass it to your component as a prop by the same name.
<Router>
  <Dashboard path="dashboard" />
  <Invoice path="invoice/:invoiceId" />
</Router>
At “invoice/10023”, Router will render <Invoice invoiceId="10023"/>.
Reserved Names: You can name your parameters anything want except uri and path. You’ll get a warning if you try, so don’t worry if you didn’t actually read these docs (… 🤔).
Trailing Wildcard
If you’d like to match a path with optional extra segments, use the wild card on the end of your path: /*.
<Router>
  <Admin path="admin/*" />
</Router>
This is useful for embedded Routers. Perhaps Admin renders its own router, we use the wildcard to make sure the deeper routes in the parent router match the Admin component.
render(
  <Router>
    <Admin path="admin/*" />
  </Router>
)

const Admin = () => (
  <div>
    <p>A nested router</p>
    <Router>
      <AdminGraphs path="/" />
      <Users path="users" />
      <Settings path="settings" />
    </Router>
  </div>
)
The wildcard portion of the url will be found on props["*"] in your Route Component.
render(
  <Router>
    <FileBrowser path="files/*" />
  </Router>
)

const FileBrowser = props => {
  let filePath = props["*"]
  // URL: "/files/taxes/2018"
  // filePath === "taxes/2018"
}
You can also name the wildcard portion with suffix.
render(
  <Router>
    <FileBrowser path="files/*filePath" />
  </Router>
)

const FileBrowser = props => {
  let filePath = props.filePath
  // URL: "/files/taxes/2018"
  // filePath === "taxes/2018"
}
path: “/” (Index Routes)
matching prop
If you pass / as the path to a route component, we call this an “Index Route”. It will match at the parent’s path. Much like an index.html on a static file server.
// at the url "/orders"
// `OrderSummary` will render inside of `Orders`
<Router>
  <Orders path="orders">
    <OrdersSummary path="/" />
    <Order path=":orderId" />
  </Orders>
</Router>
At “/orders” Router will render <Orders><OrdersSummary /></Orders>. At “/orders/33” Router will render <Orders><Order orderId="33" /></Orders>.
default: bool
matching prop
When no children match, a route component with a default prop will render. Think of this like a 404 on the server.
<Router>
  <NotFound default />
  <Orders path="orders" />
  <Settings path="settings" />
</Router>
children: elements
route prop
When Route Components are nested, the matching child is passed in as props.children. If ever you think Router isn’t working, make sure you rendered props.children!
// note that `Root` has child routes
const App = () => (
  <Router>
    <Root path="/">
      <Orders path="orders" />
      <Settings path="settings" />
      <NotFound default />
    </Root>
  </Router>
)

// so we need to render `props.children` to see them
const Root = props => (
  <div>
    <Nav />
    <main>{props.children}</main>
  </div>
)
[:param]: string
route prop
Any params in your component’s path will be parsed and passed to your component as a prop by the same name.
const App = () => (
  <Router>
    <Event path="events/:eventId" />
  </Router>
)

// at /events/taco-party
// props.eventId will be "taco-party"
const Event = props => <div>{props.eventId}</div>
location: object
route prop
The location of the app. Typically you don’t need this, but you can log it and see what there is to look at!
navigate(to, { state={}, replace=false })
route prop
A version of navigate that supports relative paths.
const NewInvoice = props => (
  <form
    onSubmit={event => {
      event.preventDefault()
      // do stuff w/ the form
      props.navigate("somewhere-relative")
    }}
  >
    {/* ... */}
  </form>
)

const App = () => (
  <Router>
    <NewInvoice path="invoices/new" />
  </Router>
)
uri: string
route prop
The portion of the URL that matched a parent route.
// URL: /user/napoleon/grades

const App = () => (
  <Router>
    <User path="user/:userId">
      <Grades path="grades" />
    </User>
  </Router>
)

const User = props => (
  // props.uri === "/user/napoleon"
  <div>{props.children}</div>
)

const Grades = props => (
  // props.uri === "/user/napoleon/grades"
  <div>...</div>
)
Other
These are your own components, so you can pass whatever props you’d like to pass to them, even stuff from the state of the owner component.
class App extends React.Component {
  state = { tacos: null }

  componentDidMount() {
    fetchTacos().then(tacos => {
      this.setState({ tacos })
    })
  }

  render() {
    return (
      <Router>
        <User path="users/:userId" />
        <User
          path="users/:userId/edit"
          // can use the User component for both
          // the viewing and editing screens
          edit={true}
        />
        <User
          path="users/me"
          // what would be a param for
          // "/users/:userId" can be passed
          // as a normal prop for special
          // urls
          userId={window.USER_ID}
        />
        <Tacos
          path="tacos"
          // can pass your state and things will
          // update as expected
          allTacos={this.state.tacos}
        />
      </Router>
    )
  }
}
https://serverless-stack.com/chapters/create-a-route-that-redirects.html (react router)
Let’s first create a route that will check if the user is logged in before routing.
 Add the following to
 src/components/AuthenticatedRoute.js.
COPYimport React from "react";
import { Route, Redirect, useLocation } from "react-router-dom";
import { useAppContext } from "../lib/contextLib";

export default function AuthenticatedRoute({ children, ...rest }) {
  const { pathname, search } = useLocation();
  const { isAuthenticated } = useAppContext();
  return (
    <Route {...rest}>
      {isAuthenticated ? (
        children
      ) : (
        <Redirect to={
          `/login?redirect=${pathname}${search}`
        } />
      )}
    </Route>
  );
}
This simple component creates a Route where its children are rendered only if the user is authenticated. If the user is not authenticated, then it redirects to the login page. Let’s take a closer look at it:
- Like all components in React,
AuthenticatedRoutehas a prop calledchildrenthat represents all child components. Example child components in our case would beNewNote,NotesandSettings. - The
AuthenticatedRoutecomponent returns a React RouterRoutecomponent. - We use the
useAppContexthook to check if the user is authenticated. - If the user is authenticated, then we simply render the
childrencomponent. And if the user is not authenticated, then we use theRedirectReact Router component to redirect the user to the login page. - We also pass in the current path to the login page (
redirectin the query string). We will use this later to redirect us back after the user logs in. We use theuseLocationReact Router hook to get this info.
We’ll do something similar to ensure that the user is not authenticated.
Add the following to src/components/UnauthenticatedRoute.js.
COPYimport React, { cloneElement } from "react";
import { Route, Redirect } from "react-router-dom";
import { useAppContext } from "../lib/contextLib";

export default function UnauthenticatedRoute(props) {
  const { children, ...rest } = props;
  const { isAuthenticated } = useAppContext();

  return (
    <Route {...rest}>
      {!isAuthenticated ? (
        cloneElement(children, props)
      ) : (
        <Redirect to="/" />
      )}
    </Route>
  );
}
Here we are checking to ensure that the user is not authenticated before we render the child components. Example child components here would be Login and Signup. And in the case where the user is authenticated, we use the Redirect component to simply send the user to the homepage.
The cloneElement above makes sure that passed in state is handled correctly for child components of UnauthenticatedRoute routes.
Next, let’s use these components in our app.
Flavio Copes – @reach-router
https://flaviocopes.com/react-reach-router/
In the last project I did I used Reach Router and I think it’s the simplest way to have routing in a React app.
I think it’s much easier than React Router, which is another router I used in the past.
Here’s a 5 minutes tutorial to get the basics of it.
Installation
First, install it using
npm install @reach/router
If the
@syntax is new to you, it’s an npm feature to allow a scoped package. A namespace, in other words.
Next, import it in your project.
import { Router } from '@reach/router'
Basic usage
I use it in the top-level React file, index.js in a create-react-app installation, wrapping all components that I want to appear:
ReactDOM.render(
  <Router>
    <Form path="/" />
    <PrivateArea path="/private-area" />
  </Router>,
  document.getElementById('root')
)
The path attribute I add to the components allows me to set the path for them.
In other words, when I type that path in the browser URL bar, Reach Router shows that specific component to me.
The / path is the index route, and shows up when you don’t set a URL / path beside the app domain. The “home page”, in other words.
The default route
When a user visits an URL that does not match any route, by default Reach Router redirects to the / route. You can add a default route to handle this case and display a nice “404” message instead:
<Router>
  <Form path="/" />
  <PrivateArea path="/private-area" />
  <NotFound default />
</Router>
Programmatically change the route
Use the navigate function to programmatically change the route in your app:
import { navigate } from '@reach/router'
navigate('/private-area')
Link to routes in JSX
Use the Link component to link to your routes using JSX:
import { Link } from '@reach/router'
<Link to="/">Home</Link>
<Link to="/private-area">Private Area</Link>
URL parameters
Add parameters using the :param syntax:
<Router>
  <User path="users/:userId" />
</Router>
Now in this hypothetical User component we can get the userId as a prop:
const User = ({ userId }) => (
  <p>User {userId}</p>
)
Nested routes
I showed you how routes can be defined in this way in your top level React file:
<Router>
  <Form path="/" />
  <PrivateArea path="/private-area" />
</Router>
You can define nested routes:
<Router>
  <Form path="/" />
  <PrivateArea path="/private-area">
    <User path=":userId" />
  </PrivateArea>
</Router>
So now you can have your /private-area/23232 link point to User component, passing the userId 23232.
You can also choose to allow a component to define its own routes inside it. You use the /* wildcard after the route:
<Router>
  <Form path="/" />
  <PrivateArea path="/private-area/*" />
</Router>
then inside the component you can import Router again, and define its own set of sub-routes:
//component PrivateArea
<Router>
  <User path="/:userId" />
</router>
Any route using /private-area/something will be handled by the User component, and the part after the route will be sent as its userId prop.
To display something in the /private-area route now you also need to add a / handler in the PrivateArea component:
//component PrivateArea
<Router>
  <User path="/:userId" />
  <PrivateAreaDashboard path="/" />
</router>
Watch my latest YouTube video!
Download my free React Handbook!
Tab contentAs mentioned, <Redirect from="" to="" noThrow /> will solves for the error being thrown 😊Error with RedirectTo
Uncaught
RedirectRequest
uri: "/redirecttopage"
[[Prototype]]: Object
import React from 'react';
import { redirectTo } from '@reach/router';

export default WrapperComponent => class CheckPrivate extends WrapperComponent
{
    componentDidMount()
    {
        if (WrapperComponent.private)
            redirectTo('/auth');

        super.componentDidMount();
    }
}
This decorator i apply to my react component
import React, { Component } from 'react';
import CheckAuth from '~/utils/checkAuth';

@CheckAuth
export default class extends Component
{
    static private = true;
    static redirect = '/auth';

    render()
    {
        return (
            <h1>Hello</h1>
        );
    }
}
I have error: Uncaught (in promise) RedirectRequest { uri: '/auth' }
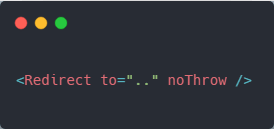
@bhanuka-diff @Rutulpatel7077 @joserocha3 I faced same issue, but I found that reach-router explicitly throw error if Redirect comopnent used, so if you want to suppress the error, pass 'noThrow' props like below.
<Redirect noThrow={true} to="/foo/bar/baz"/>
Throwing an error on redirect is intended behavior, and explained in the docs:
https://reach.tech/router/api/Redirect
Redirect works with
componentDidCatchto prevent the tree from rendering and starts over with a new location.
Because React doesn’t swallow the error this might bother you. For example, a redirect will trigger Create React App’s error overlay. In production, everything is fine. If it bothers you, add
noThrowand Redirect will do redirect without using componentDidCatch.
If you’re using React < 16 Redirect will not throw at all, regardless of what value you put for this prop.
If you’re using componentDidCatch in your app please read the
isRedirectdoc!
noThrow
<Redirect noThrow />
As mentioned, <Redirect from="" to="" noThrow /> will solves for the error being thrown 😊
We had a similar issue only we had issues using the Redirect component as well as the navigate and redirectTofunctions when sending from a reach routed component to a static page on gatsby.
The solution was to just use window.location inside of an effect hook. It looked similar to this:
 const [shouldRedirect, setShouldRedirect] = useState();
  const [linkTo, setLinkTo] = useState("/some/location");
  const handleClick = () => {
    setShouldRedirect(true);
  };

  useEffect(() => {
    if (shouldRedirect && linkTo) {
      window.location.replace(linkTo);
    }
  }, [shouldRedirect]);
Fixing Redirect Does nothing
https://stackoverflow.com/questions/67631315/redirect-does-nothing-in-react-router-dom
You can't redirect like that from a function. You will need to use props.history.push('/') or something similar
Issues
- You can't just return JSX from a function callback like that and expect it to be rendered, you will need to use the
historyobject and issue an imperative redirect, i.e.history.replace("/");. - The redirect won't work from the
signIncallback since theAppcomponent is outside the routing context provided byRouterbeing rendered byApp. - You are using the
Route'scomponentprop to render components but you are using an inline function, this will actually unmount and remount the components anytimeApprerenders.
Solution
Move the
Routercomponent higher in the React tree in order forAppto be able to access the same routing context theRoutes are. You will need to also pass thehistoryobject toApp. This would be trivial ifAppwere a functional component where you could use the useHistory React hook, but since it isn't you will need to use the slightly less trivial withRouter Higher Order Component and inject the route props.Access
historyfrom injected props:signIn = (data) => { if (data) { this.setState({user: { id: data.id, name: data.name, email: data.email }}); this.props.history.replace("/"); } }Decorate
AppwithwithRouterHOC:export default withRouter(App);Wrap
Appin theRouter.<Router> <App /> </Router>Fix the routes by using the
componentprop correctly, and using therenderprop when you need to pass additional props.<Switch> <Route path="/about" component={About} /> <Route path="/contact" component={Contact} /> <Route path='/catalogue' component={Catalogue} /> <Route path='/login' render={() => <Login signIn={this.signIn} onRouteChange={this.onRouteChange}/>} /> <Route path="/" component={Home} /> </Switch>
React Router vs Reach Router
https://dev.to/macmacky/reach-router-an-easy-alternative-way-to-react-router-4mgn
Using React Router
Using Reach Router
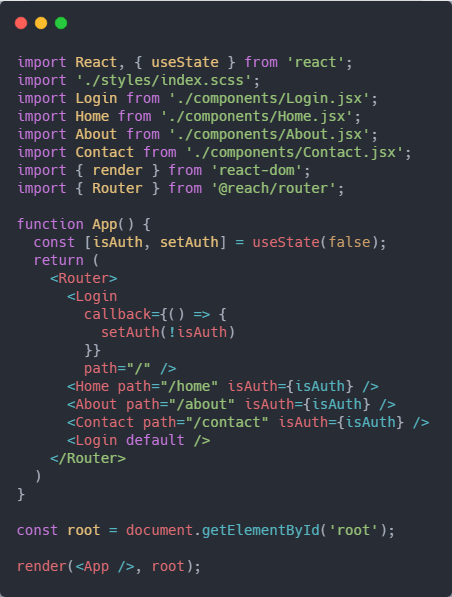
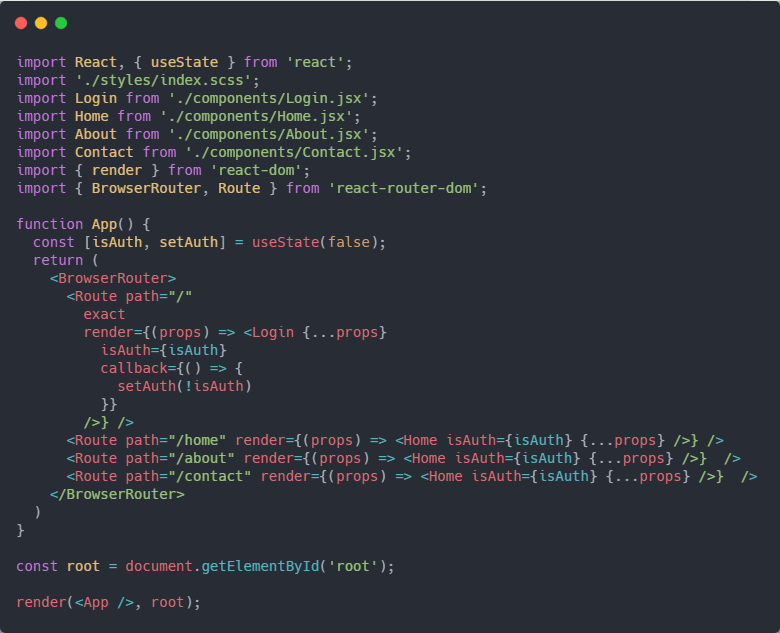
Ok, First look at the first picture and the second picture.
The first difference is that we the first pic we have to import two Components BrowserRouter and Route. In the second picture, we only import the Router component that Reach Router package provides us.
The second difference is that in the first pic we use the Route component to specify our configuration routes and used the render method to specify the components that will be used to those routes but in the second pic, we only specify the path property to the component and Reach Router automatically renders the component base on that path. Needless to say, we don't necessarily specify the path prop in our component declaration, Reach Router handles that for us.
The third difference is we don't have an exact prop in our route configurations in the second pic. The Reach Router already knows what component to render base on the URL or path.
Ok, I'm gonna explain some useful components that Reach Router provides us.
Link
This component has almost the same functionality with the Link component in React Router but has useful differences.
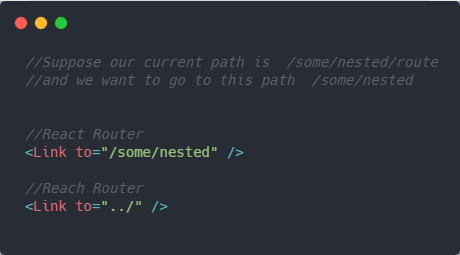
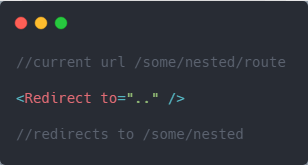
This feature is called relative paths. We're navigating to the upper route of /some/nested/route so we want to go to /some/nested. It's like navigating between different directories in your file system.
Match
This component basically matches a path to the location and returns a callback if the path rendered is a match or not.
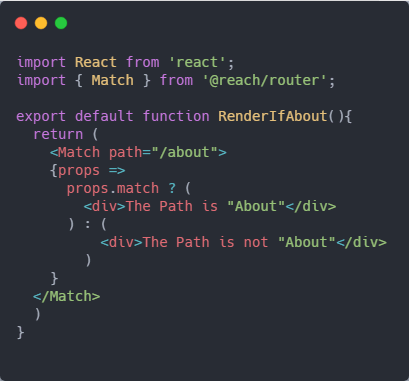
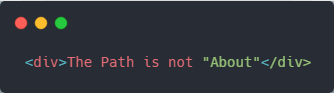
Basically, what does component does it only renders
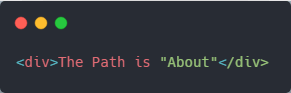 this JSX if the path is /about. Otherwise, it renders this JSX
Redirect
This component is similar to React Router's Redirect component but the two differences are that we can use a relative path in Reach Router's Redirect.
and the second difference is that this component calls the componentDidCatch lifecycle method in a class component by default so that we can prevent a new tree from rendering and avoid a new location if you want to avoid this you should use the noThrow prop.
navigate
The navigate prop is almost the same as history.push but the key difference again is that we can navigate using relative path.
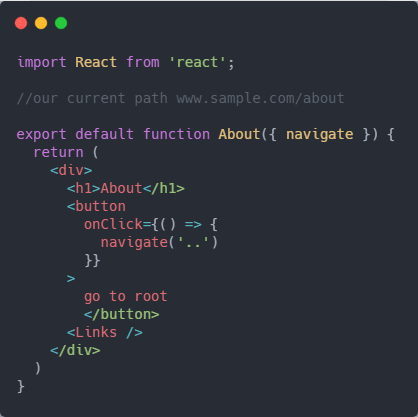
If we click the button it navigates to www.sample.com.
Btw, this package is written by one of the original authors of the React Router package so give it a try!