RESOURCES
- API References
- https://developers.google.com/sheets/api/guides/concepts
-
- Guides
- https://github.com/theoephraim/node-google-spreadsheet
- **https://dev.to/calvinpak/how-to-read-write-google-sheets-with-react-193l
- https://reactjsexample.com/react-hook-for-using-google-spreadsheet-as-a-data-table/
- https://stackoverflow.com/questions/71019543/fetch-data-from-google-sheet-using-react
You need to use the Google Sheets API to connect to the Sheet and fetch the data.
The application would need to be authorised to run as the person who owns or is an editor of the sheet. Check out the node.js quickstart for setting up an application in the cloud console. The method you need to get data is spreadsheets.values.get.
https://developers.google.com/sheets/api/quickstart/
https://developers.google.com/sheets/api
https://developers.google.com/sheets/api/reference/rest/v4/spreadsheets.values/get
Setup Article
https://w3collective.com/react-google-sheets/
Google Sheets can be used to provide a makeshift database that’s easy to modify for non-developers. It’s not the best solution for high traffic sites but works well for internal websites or when prototyping an app.
In this tutorial we’ll use Papa Parse to fetch data from a Google Sheet into React.
Let’s start by installing Papa Parse into our React application using NPM:
npm install papaparse
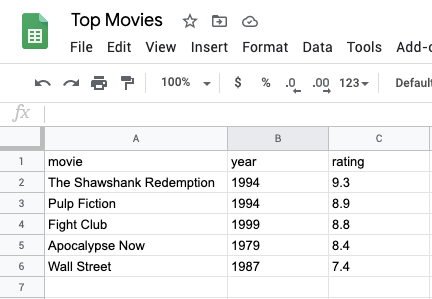
For this tutorial I’ve created a simple spreadsheet with the following data:
There are some requirements for the structure of this data:
- All columns must have a “label” in the first row and not contain any weird characters.
- Google assumes an empty row is the end of the sheet and stops returning data.
Once the sheet is complete select “File” -> “Publish to web” so it’s publicly visible.
Now for the component, create a new MovieData.js file with the following imports:
import React, { useState } from "react";
import Papa from "papaparse";
Next create a MovieData() function and declare a data variable that will store the data:
const MovieData = () => {
  const [data, setData] = useState({});
}
export default MovieData;
We can now fetch the data from the Google Sheet, we just need to supply the spreadsheet URL to Papa Parse. If successful the results are saved to the data State. We then convert this data into an array so we can parse it into our HTML:
const MovieData = () => {
  const [data, setData] = useState({});
  Papa.parse("https://docs.google.com/spreadsheets/d/1SJ8LxWmaxKBTgDJLvfD9NZLctBT931x19--qH2yLxck/pub?output=csv", {
    download: true,
    header: true,
    complete: (results) => {
      setData(results.data);
    },
  });
  const movies = Array.from(data);
  return (
    // TODO: Output data as HTML
  );
};
export default MovieData;
Replace the URL with your Spreadsheet URL ensuring pub?output=csv remains.
Finally lets return the movie data by adding the following to the return statement:
...
return (
  <ul>
    {movies.map((data) => (
      <li key={data.movie}>
        {data.movie} ({data.year}) - Rating {data.rating}
      </li>
    ))}
  </ul>
);
...Code language: HTML, XML (xml)
You’ll notice movie, year, and rating all correspond with text in the columns of the first row of the spreadsheet. If you’re using this code with a different spreadsheet you’ll simply need to modify this as required inline with the different data.
That’s all for this tutorial. You should now be able to fetch data in a React application from Google Sheets. As always you can download the full working source code for this tutorial from GitHub.
https://dev.to/michaelburrows/build-a-react-component-that-pulls-data-from-google-sheets-5237
Build a React component that pulls data from Google Sheets
After some updates this tutorial no longer works – an updated working tutorial can be found here.
Google Sheets can be used to provide a makeshift database that’s easy to modify for non-developers.
It’s not the best solution for high traffic sites but works well for internal websites or when prototyping an app.
In this tutorial we’ll be using Tabletop.js to load data from a Google Sheet into a React component.
Let’s start by installing Tabletop.js into our React project using NPM:
npm install tabletop
For this tutorial I’ve created a simple spreadsheet with the following data:
- All columns must have a “name” in the first row and not contain any weird characters (%).
- Google assumes an empty row is the end of the data and doesn’t return any rows thereafter.
Once the sheet is complete select “File” -> “Publish to web” so it becomes publicly visible.
Now for the code, create a file named MovieData.js and import React (we’ll be using hooks) and Tabletop:
import React, { useEffect, useState } from "react";
import Tabletop from "tabletop";
Next create a MovieData() function and declare a variable that will store the data in a useState hook:
function MovieData() {
  const [data, setData] = useState({});
}
export default MovieData;
We can now fetch the data using Tabletop inside a useEffect hook by adding the following to MovieData():
...
useEffect(() => {
  Tabletop.init({
    key: "1SJ8LxWmaxKBTgDJLvfD9NZLctBT931x19--qH2yLxck",
    simpleSheet: true,
  }).then(function (data) {
    setData(data);
  });
}, []);
const movies = Array.from(data);
...
key: is taken from the following section of the Google Sheet URL:
Finally lets return the movie data in an unordered list by adding the following to the end of MovieData():
...
return (
  <ul>
    {movies.map((el) => (
      <li key={el.movie}>
        {el.movie} ({el.year}) - Rating {el.rating}
      </li>
    ))}
  </ul>
);
...
Top comments (1)
https://thenewstack.io/how-to-use-google-sheets-as-a-database-with-react-and-ssr/
How to Use Google Sheets as a Database with React and Serverless
How to use Google Sheets as a database. Choose this method over a more traditional Database solution for one reason: Data retrieval.
Oct 15th, 2022 7:00am by Paul Scanlon
TNS DAILY
We've launched a new daily email newsletter! You can now receive a free roundup of the most recent TNS articles in your inbox each day. Register now, never miss a story, always stay in-the-know.
SUBSCRIBE
In this tutorial I’ll be explaining how to use Google Sheets as a database, to store the results of a user poll. I’ve used this Google Sheets approach for a number of marketing campaigns. I chose this method over a more traditional Database solution for one reason: Data retrieval.
It does of course entirely depend on your requirements, but having the ability to simply share a Google Sheet with a technical or non-technical member of my team — so they can easily see captured data — has, on more than one occasion, proved really valuable.
Screenshots of Gatsby and Next.js example User Poll apps with bar chart results.
Data is sent from the browser to a Serverless Function that securely posts to a Google Sheet, which stores the data. To use Serverless Functions in React you can use either Next.js or Gatsby.
On the following links, you will find a Live Preview and GitHub Repository for the completed User Polls, using both frameworks.
- Gatsby
- Next.js
I won’t be covering how to get started with either framework, so please consult the docs if you’re not familiar with these technologies.
What Are Serverless Functions?
Serverless functions enable frontend developers to add powerful “backend” logic to our apps just by writing JavaScript — no DevOps, no servers, just results. — Jason Lengstorf
Using Serverless Functions allows you to “post” data from your frontend to your “backend” in the same project. The Serverless Function can then securely “post” to a Database to store data.
ScyllaDB is the database for data-intensive apps that require high throughput and low latency. It harnesses the ever-increasing computing power of modern infrastructures–eliminating barriers to scale as data grows. Game-changing companies use ScyllaDB for their toughest database challenges.
Learn More
THE LATEST FROM SCYLLADB
When to Use ScyllaDB vs MongoDB: Lessons Learned From 5+ Years in Production
13 June 2023
The Data Modeling Behind Social Media “Likes”
6 June 2023
Build your First ScyllaDB Application: New Rust, Python & PHP Tutorials
31 May 2023
Since all the business logic is on the “backend”, the API keys or secrets required to make the database connection are never exposed to the frontend/user/(the browser).
The way to achieve this differs slightly between the frameworks, but the general idea is to have a “Page” that handles sending the request to the “API”.
Example Gatsby Serverless Function
The “Page” is saved in src/pages/some-page.js and sends a request to the “API” saved in src/api/some-endpoint.js.
You can see the src for the Gatsby example using the following links.
some-page.js
import React, { useState } from 'react';


const Page = () => {
  const [response, setResponse] = useState(null);


  const handlePost = async () => {
    try {
      const response = await fetch('/api/some-endpoint?name=Paul');
      if (!response.ok) {
        throw new Error(response.statusText);
      }
      const data = await response.json();
      setResponse(data);
    } catch (error) {
      setResponse(error.message);
    }
  };


  return (
    <div>
      <button onClick={handlePost}>Post</button>
      <pre>{JSON.stringify(response, null, 2)}</pre>
    </div>
  );
};


export default Page;
some-endpoint.js
export default async function handler(req, res) {
  const {
    query: { name }
  } = req;


  try {
    if (!name) {
      throw new Error();
    }
    res.status(200).json({ message: 'A ok!', data: `Hello ${name} from the server` });
  } catch (error) {
    res.status(500).json(error);
  }
}
A successful “post” would display the following, returned in Jsx using an HTML <pre /> element.
{
  "message": "A ok!",
  "data": "Hello Paul from the server"
}
Example Next.js Serverless Function
The “Page” is saved in pages/some-page.js and sends a request to the “API” saved in pages/api/some-endpoint.js
You can see the src for the Next.js example using the following links.
The code for the Page and API are the same for both frameworks; the difference between the two is the directory structure.
In these examples, the Serverless Function simply returns a string using the name value it receives as a query parameter. In the User Poll example apps, the Serverless Function is used to send data on to a Google Sheet to be saved and securely stored. More about that in a moment.
How to Setup Google Sheets
Before you get going with the Google Sheet, you’ll first need to set up what Google refers to as a Service Account. You can read more about Service Accounts in the Google docs: Understanding Google Service Account
Create a Google Cloud Project
Step one is to create a project. You’ll configure this project so that it contains access to the Google Sheets API, via a Service Account user/email address, and use it to generate the required API keys needed to “post” data to the Google Sheet.
The steps to create a Google Cloud project are outlined in the following guide: Grant an IAM role by using the Google Cloud console.
- From the above link start by clicking the Go to Project Selector button.

- Now click CREATE PROJECT.

- Give your project a name and click CREATE.

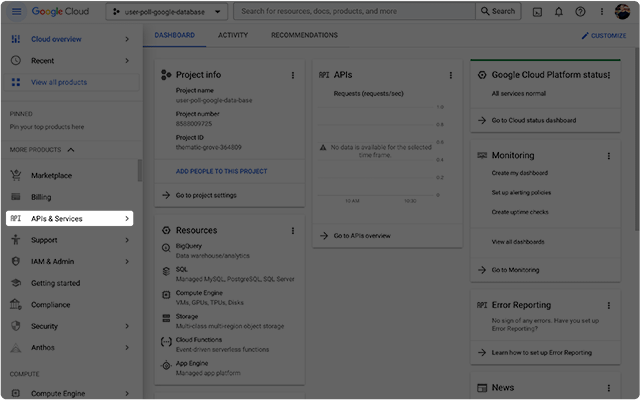
- You should now be redirected to the Project dashboard. Click on the API’s & Services navigation item in the sidebar.

- Now you can enable access to the Google Sheets API. Click the + ENABLE APIS AND SERVICES button.

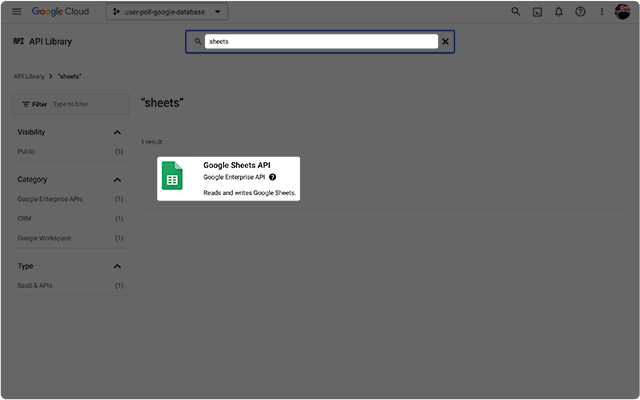
- Search for “sheets” and select the Google Sheets API.

- To enable access to the Google Sheets API, click the “ENABLE” button.

- To create the necessary credentials for the Google Sheets API, click the CREATE CREDENTIALS button.

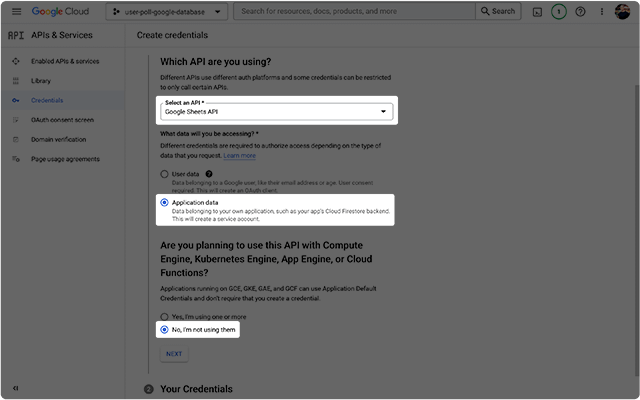
- Select the Google Sheets API and check the Application Data radio button. For the purposes of this tutorial you can answer No to the last question.

- You can skip the Your Credentials step and click the DONE button when you’re ready.

- Click on the Service Accounts navigation item in the sidebar. Create a service account for your project and give it a Service Account ID.

- Set the Role to Owner. You can skip the last step. Click DONE when you’re ready.

- Click on the IAM navigation item in the sidebar. Check that the permissions for service account details are correct.

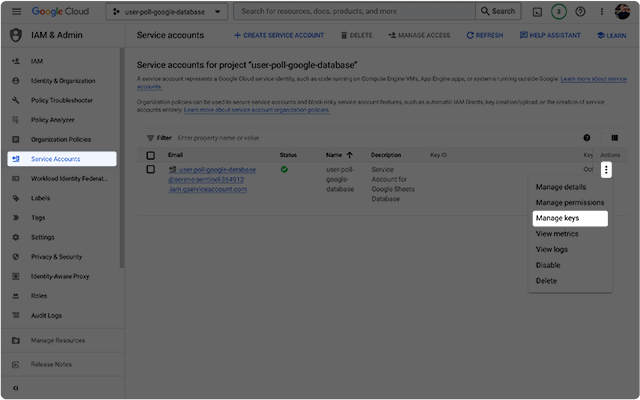
- Click on the Service Accounts navigation item in the sidebar. Then click the more dots and select Manage Keys.

- On the KEYS tab, click the ADD KEY button then click Create new key.

- Select JSON as the key type, then click the CREATE button to download a .json file containing your keys.

- The .json file you’ve just downloaded will look a little like the below. The two keys you’ll need to save as environment variables are. priviate_key and client_email.

In the example projects, I created the following environment variables.
GOOGLE_SERVICE_ACCOUNT_EMAIL=
GOOGLE_PRIVATE_KEY=
GOOGLE_SHEET_ID=
You can read more about configuring environment variables for both Gatsby and Next.js on the following links.
Creating a Google Sheet
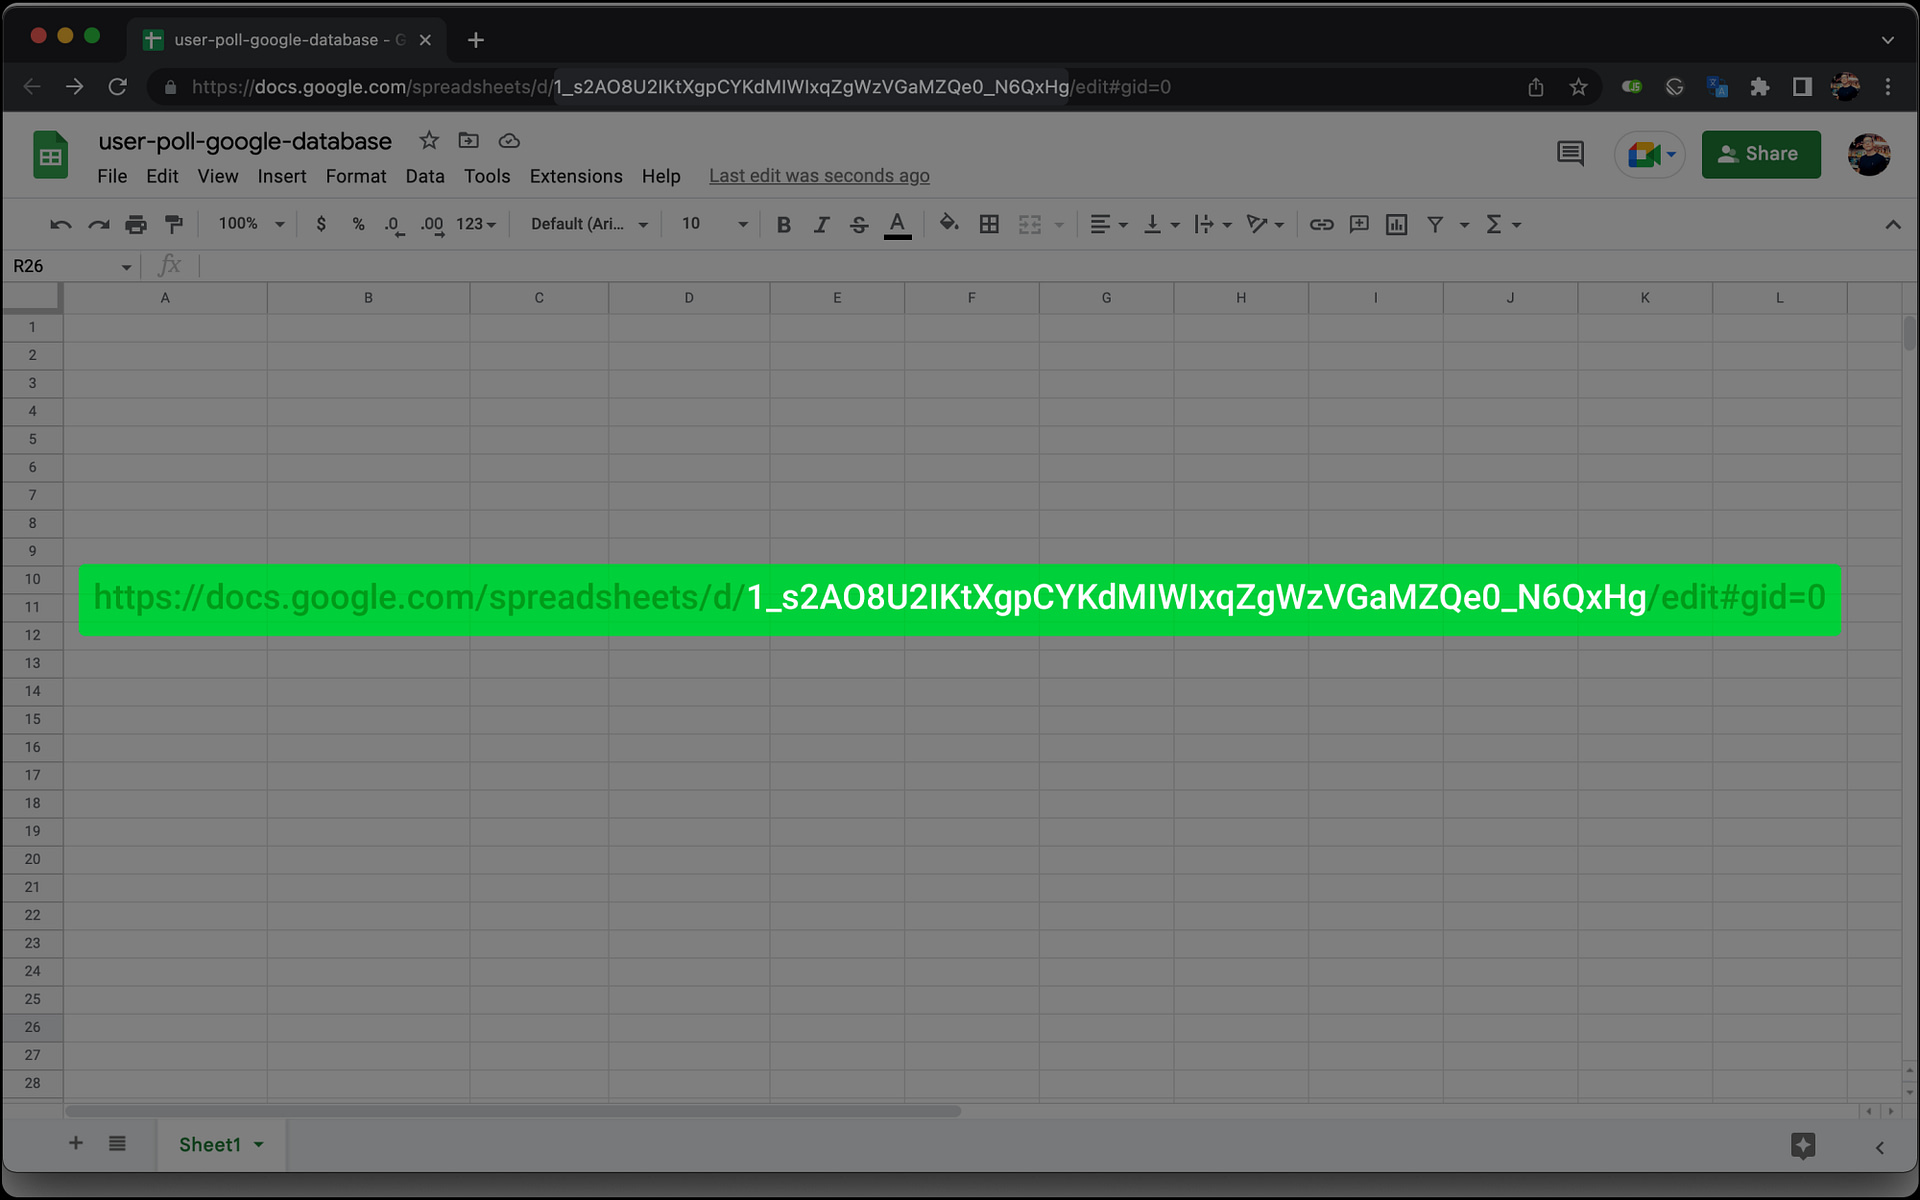
Create a new Google Sheet and make a note of the id in the URL address bar.
Screen shot of Google Sheet with highlighted Sheet Id from URL address bar
Add Column Headings To Google Sheet
You can add as many headings as you like. It’s worth noting that spaces are replaced with underscores. I’ll explain why in a later step.
Screenshot of Google Sheet with highlighted heading rows.
Share The Google Sheet
With your new Sheet created, share it with your Service Account email address / the client_email from the .json file. Make sure the Service Account has Editor access.
Screenshot of Google Sheet “Share” modal.
Creating a User Poll
There are two parts to creating the User Poll; The Page, and the API.
- The page contains the UI elements to allow the user to vote and the visuals to display the store values from the Google Sheet.
- The API receives requests from the page, posts to the Google Sheet and performs some minor calculations before returning the data.
Creating the Page
Create a new Page and add the following.
Page Config and useState Values
import React, { useState } from 'react';


const config = [
  {
    name: 'Frontend Development',
    id: 'frontend_development'
  },
  {
    name: 'Software Development',
    id: 'software_development'
  },
  {
    name: 'Cloud Services',
    id: 'cloud_services'
  },
  {
    name: 'Machine Learning',
    id: 'machine_learning'
  }
];


const Page = () => {
  const [hasVoted, setHasVoted] = useState(false);
  const [error, setError] = useState(false);
  const [isSubmitting, setIsSubmitting] = useState(false);
  const [results, setResults] = useState(null);


  return null;
};


export default Page;
In this step, you’re creating a config that is used for the text on the voting buttons and an id that you’ll use later to target the correct cell in the Google Sheet. As mentioned earlier, the id’s shouldn’t contain spaces.
There are also a number of useState values that will hold the state of the application before, during and after a request has been made to the API.
Adding the ‘Click’ Handler Function
This function accepts an id and passes it on to the API request as a query parameter; also called id.
If the response is ok, you store the result in the useState value. The other states for isSubmitting and hasVoted are also updated.
If the response errors, the error state is updated.
import React, { useState } from 'react';


...


const Page = () => {


...


+  const handleClick = async (id) => {
+    setIsSubmitting(true);
+    try {
+      const response = await fetch(`/api/create-vote?id=${id}`);
+      if (!response.ok) {
+        throw new Error(response.statusText);
+      }
+      const result = await response.json();
+      setResults(result);
+      setIsSubmitting(false);
+      setHasVoted(true);
+    } catch (error) {
+      setIsSubmitting(false);
+      setError({
+        error: true,
+        message: error.message
+      });
+    }
+  };


  return null;
};


export default Page;
Adding the Interface
The interface has two states. The first are the buttons that allow a user to vote, the second are the results. You can use the hasVoted state value to determine which state to render.
To create the buttons you can iterate over the config options. The name is the text that appears on the button and the id is used as an argument for the onClick function.
To create the results you can iterate over the results from the API, display each of the values and scale the “bar chart” using the percent. Additional styling could be added by using the isMax value, which will either be true or false (depending on the amount of votes).
import React, { Fragment, useState } from 'react';


...


const Page = () => {


...


-  return
+  return (
+    <section>
+      <div>
+        {!hasVoted ? (
+          <Fragment>
+            {config.map((item, index) => {
+              const { name, id } = item;
+              return (
+                <button key={index} onClick={() => handleClick(id)} disabled={isSubmitting || error}>
+                  <span>{name}</span>
+                </button>
+              );
+            })}
+          </Fragment>
+        ) : (
+          <Fragment>
+            {results.data.map((result, index) => {
+              const { percent, isMax } = result;
+              const name = config[index].name;
+              return (
+                <div key={index}>
+                  <span
+                    style={{
+                      backgroundColor: isMax ? 'blue' : 'gray',
+                      width: `${percent}%`
+                    }}
+                  />
+                  <span>{name}</span>
+                  <span>{`${percent}%`}</span>
+                </div>
+              );
+            })}
+          </Fragment>
+        )}
+      </div>
+      {hasVoted ? <p>{`${results.total} votes`}</p> : null}
+      {error ? <p>{error.message}</p> : null}
+    </section>
+  );
};


export default Page;
Creating the API
Install the google-spreadsheet Dependency
npm install google-spreadsheet
Create the Serverless Function
- Import (require) the google-spreadsheet dependency.
- Create a new const called doc and using the GoogleSpreadsheet constructor provide the
GOOGLE_SHEET_IDenvironment variable. - Destructure the
idfrom the query parameter and add a try catch. You can throw an error if theidis omitted from the request. awaitthe doc authorisation usinguseServiceAccountAuth. Similar to the above, provide the required environment variables.- Add the success and error responses.
You can read more about the basic configuration options in the google-sheet docs.
const { GoogleSpreadsheet } = require('google-spreadsheet');


const doc = new GoogleSpreadsheet(process.env.GOOGLE_SHEET_ID);


export default async function handler(req, res) {
  const {
    query: { id }
  } = req;


  try {
    if (!id) {
      throw new Error();
    }


    await doc.useServiceAccountAuth({
      client_email: process.env.GOOGLE_SERVICE_ACCOUNT_EMAIL,
      private_key: process.env.GOOGLE_PRIVATE_KEY.replace(/\\n/gm, '\n')
    });


    res.status(200).json({ message: 'A ok!' });
  } catch (error) {
    res.status(500).json(error);
  }
}
Read and Update the Google Sheet
- Create a new const called sheet. This will read data from the first tab defined in your Google Sheet.
- Create a new const called
rows. This will read the available rows from the sheet. - Create a new const called
raw_data. These are the values from the first row in the sheet. - Create a new const called
header_values. These are the values from the header row defined in the sheet. - Create a new const called
row_value. This is the value for the specific cell. Theidfrom query parameter is used to target the correct cell.
You can now update the value in the cell by incrementing its value by +1, and then save the data back to the sheet.
...


export default async function handler(req, res) {


  ...


  try {

    ...

+    await doc.getInfo();
+    const sheet = doc.sheetsByIndex[0];
+    const rows = await sheet.getRows();
+    const raw_data = rows[0]._rawData;
+    const header_values = rows[0]._sheet.headerValues;
+    const row_value = rows[0][id];
+
+    rows[0][id] = Number(row_value) + 1;
+    await rows[0].save();
+
    ...


  } catch (error) {
    ...
  }
}
Calculating the votes
In this step, you will calculate some new values to return, based on the values from the sheet.
- Create a new const called
total. This sums up the total votes across all cells. This value is used to calculate the percentage value for each cell. - Create a new const called
max. This is the highest-value cell from the sheet. This is used to determine if the cell value is the highest value in the sheet. - Create a new const called
resultsand iterate over theheader_values. You can “look up” theraw_datausing the index value to determine the count, and then return the calculated values.
You can now send the results and total back to the browser in the response.
...


export default async function handler(req, res) {

    ...


    try {


      ...

+      const total = raw_data.reduce((values, value) => Number(values) + Number(value), 0);
+      const max = Math.max(...raw_data.map((item) => item));

+      const results = header_values.map((result, index) => {
+        const count = raw_data[index];
+        return {
+          value: result,
+          count: count,
+          percent: Number((count * 100) / total).toFixed(1),
+          isMax: count >= max
+        };
+      });


+      res.status(200).json({ message: 'A ok!', total: total, data: results });


    } catch (error) {
      ...
    }
  }
Finished
The finished Page API can be found on the following links for both frameworks.
- Gatsby
- Next.js
All of the values returned from the Serverless Function help determine and populate the application state you defined earlier.
All errors should be handled to ensure the application doesn’t crash, should the Google API fail for any reason.
Thanks for reading, and if you have any questions please come and find me on Twitter: @PaulieScanlon or check out my site paulie.dev, where I have more React/Jamstack tutorials.

