

+ DEV SERVER
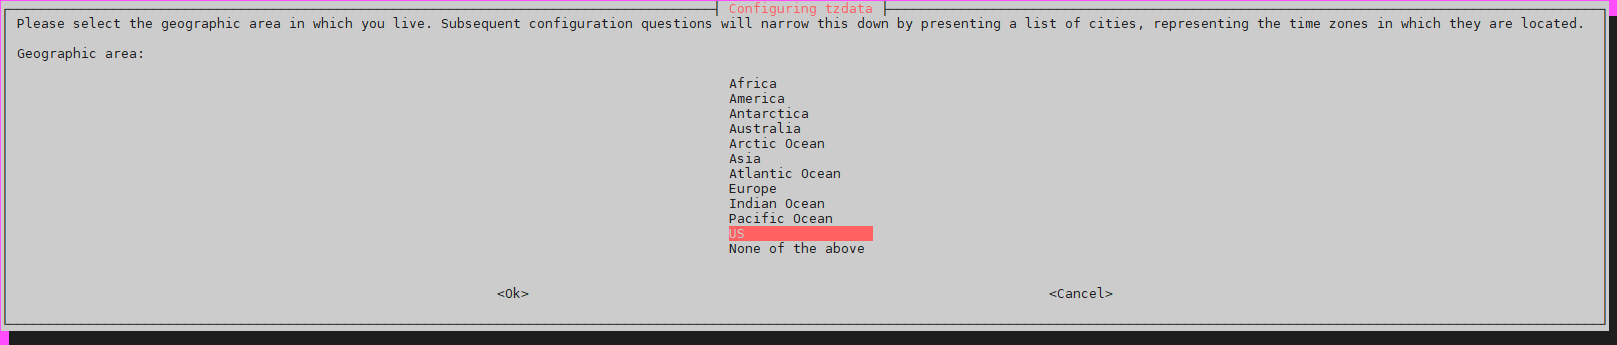
Set up Ubuntu Server
https://ubuntu.com/download/raspberry-pi
PART 1: Configure static IP – comcastic
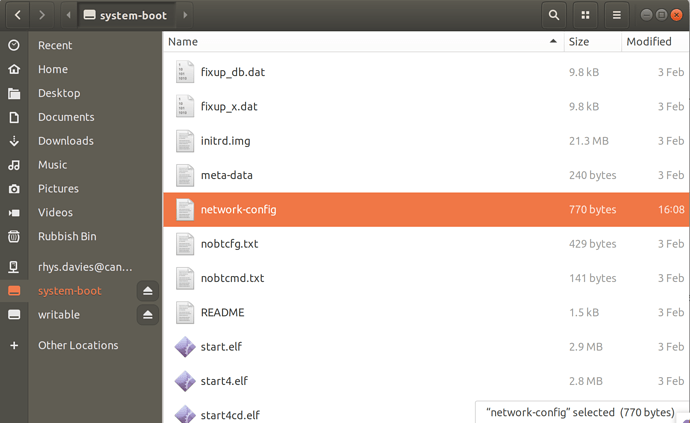
PART 2: Configure static IP – ubuntu
https://netplan.io/examples/
https://www.serverlab.ca/tutorials/linux/administration-linux/how-to-configure-networking-in-ubuntu-20-04-with-netplan/
PART 3: Username / Hostname
BREAK FOR BACKUP
- how to backup raspberrypi
https://www.tomshardware.com/how-to/back-up-raspberry-pi-as-disk-image
Making Backups –
-
format card correctly
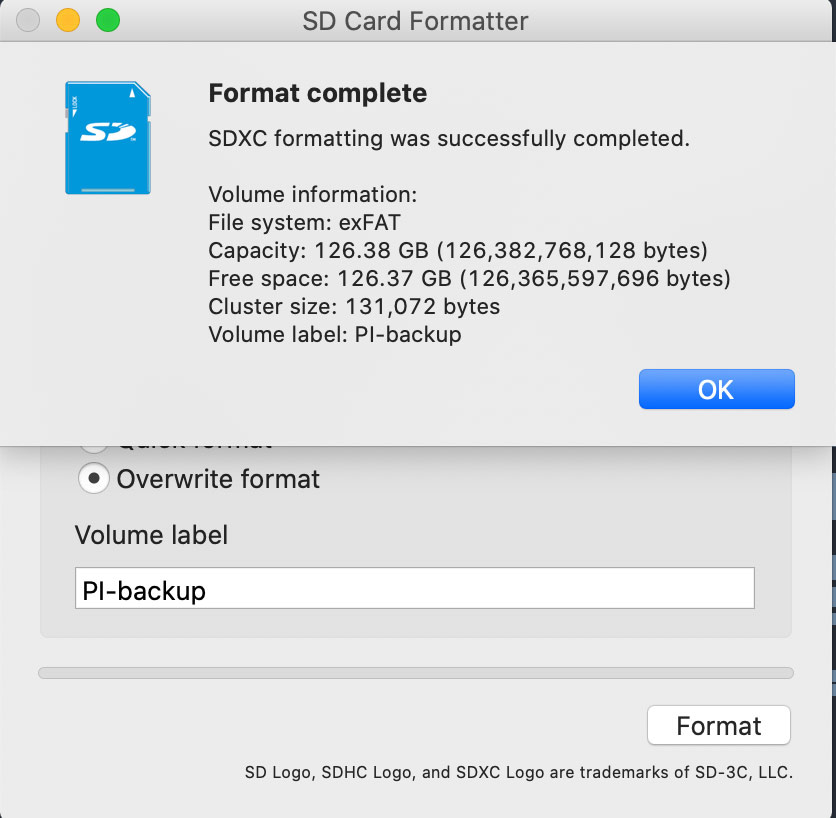
Always use the SD card formatter to ensure your card is completely reset to its initial state. Use the "FULL (OverWrite):" setting, and also set size adjustment to on! Its better to also label the card to something instead of leaving the label name field empt

-
Cards that are 64GB or larger are normally formatted using the exFAT format, instead of the normal FAT32 format, and the Pi cannot boot from an exFAT formatted card. The solution is to convert the exFAT formatted card into FAT32, using a free utility like FAT32FORMAT.
-
Convert with Terminal
Method 2: Convert/Format USB Drive to FAT32/ExFAT via Terminal
Step 1: Connect the USB drive to your Mac computer.
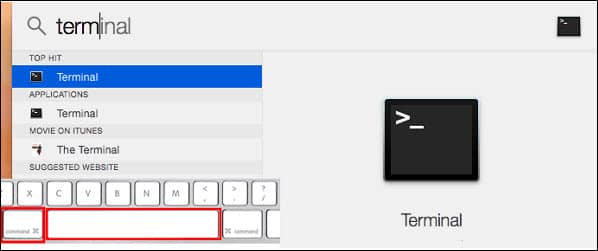
Step 2: Click on cmd + space to run Spotlight, input terminal then tap Enter key.

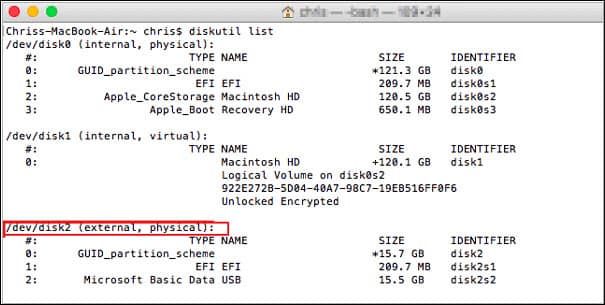
Step 3: Type diskutil list to find the location of your USB drive (eg: dev/disk2 is the USB drive in the below picture).

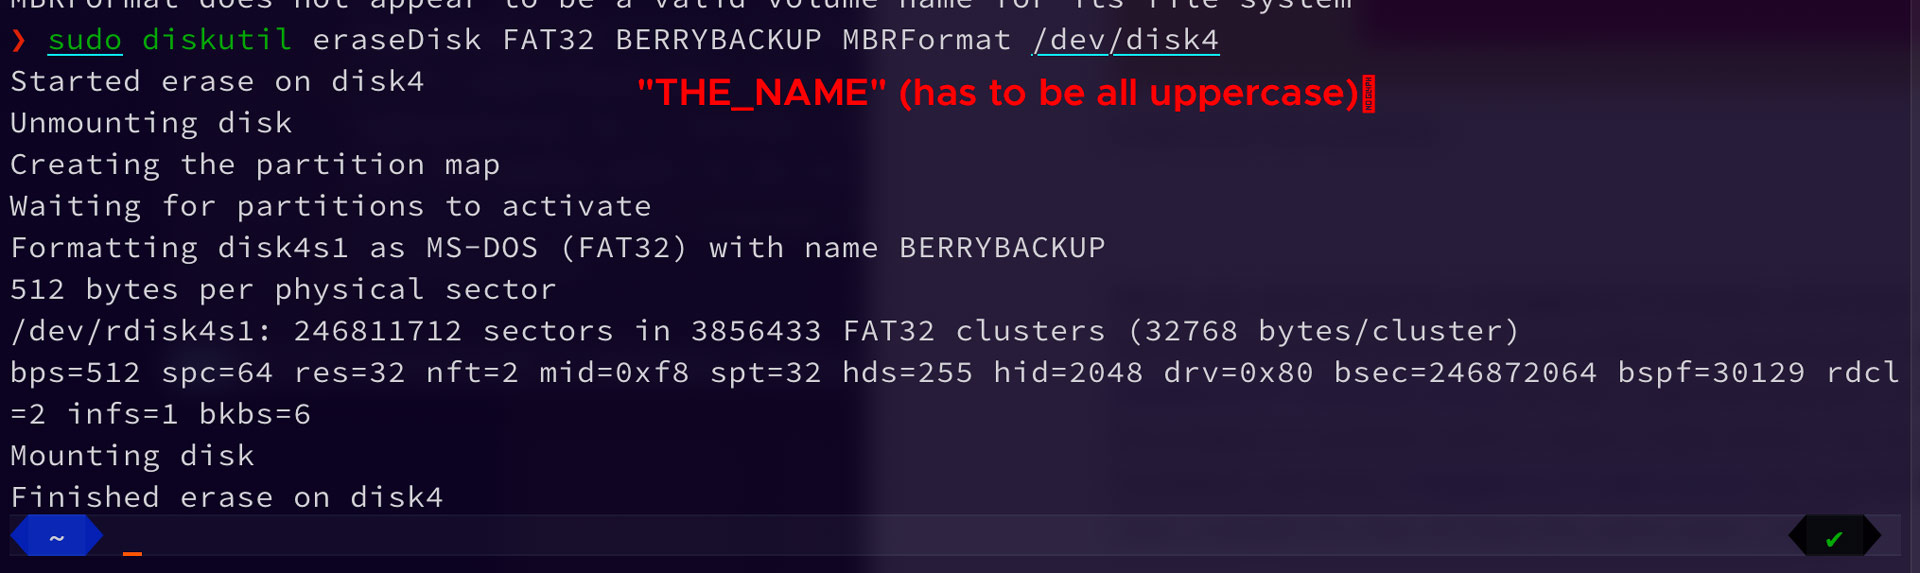
Step 4: Type *sudo diskutil eraseDisk FAT32 THE_NAME MBRFormat /dev/disk2*.
- *sudo* gives you user right.
- *Diskutil* calls disk utility program.
- *eraseDisk* commands the formatting.
- *FAT32* sets the file system.
- *NAME* give name to flash drive – all uppercase user “_” for spaces
- *MBRFormat* tells disk utility to format with a Master Boot Record.
- */dev/disk2* is the location of the USB drive.

Note: You can replace FAT32 with ExFAT in the command, and your USB drive will be formatted in that way.
After the process completes, type *diskutil list* in command once more to check if the USB drive has been formatted successfully.
FORMAT YOUR CARD CORRECTLY
4. IF USING NOOBS REMEMBER TO FORMAT YOUR SD CARD FULLY BEFORE USE, OR INSTALLING NOOBS MIGHT NOT WORK
One pitfall people who want to program their own SD card with NOOBS often encounter is that, for programming to be successful, the card must be really and completely empty, and reset to a initial state.
IF YOU IMAGE A CARD USING AN IMAGE WRITER SUCH AS ETCHER, HOWEVER THERE IS NO NEED TO FORMAT THE CARD BEFOREHAND!
As Etcher, and other similar programs, simply change every bit in every sector of the card and therefore will overwrite everything that formatting the card has done. The only reason you would want to still run the SD card formatter is because it does some sanity checks on the internal card controller.
But for normal card write operations, it is advantageous to know that SD cards do not behave the same as the floppy disks of the past did. A floppy disk could be wiped using a quick format process, which only wiped the disk's directory. SD cards are rather different: their internal electronic controller must be reset to its factory condition, and the flash must be wiped to the factory state. This also means than all the partitions on the floppy must be removed, and the card must be reset to an initial state.
If that is not done, the card may behave as if it is empty, and installing an OS (including NOOBS) on it may appear to work, but booting, or expanding the filing system may fail.
Always use the SD card formatter to ensure your card is completely reset to its initial state. Use the "FULL (OverWrite):" setting, and also set size adjustment to on! Its better to also label the card to something instead of leaving the label name field empty
Cards that are 64GB or larger are normally formatted using the exFAT format, instead of the normal FAT32 format, and the Pi cannot boot from an exFAT formatted card. The solution is to convert the exFAT formatted card into FAT32, using a free utility like FAT32FORMAT.
cards that behave like they are read only may contain a flash memory controller that has decide its flash memory is corrupted, and has permanently set an internal read only flag, some people have found that formatting in a camera helps, and there are some instructions here: https://thepihut.com/blogs/raspberry-pi … d-sd-cards that might help recover "dead cards".
Method 2: Zip the Home Directory
RSYNC
https://help.ubuntu.com/community/rsync
spiffberrypi settings
- start: sda1
- mounted: /media/spiffy/BERRYBACKUP
tar
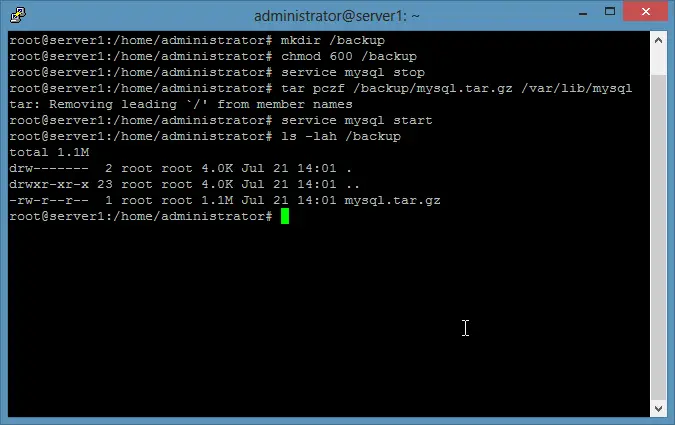
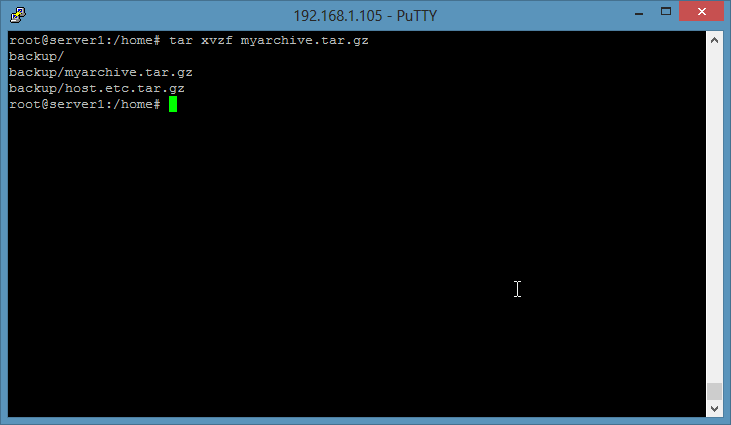
https://www.howtogeek.com/248780/how-to-compress-and-extract-files-using-the-tar-command-on-linux/
The main drawback of the first method is that you need to create regular backups. This involves removing the SD card from your Pi, inserting it into your computer, take the back, and reinserting it into the Pi. This is kind of a boring thing. This method comes with a fix for the issue. It lets you backup raspberry pi without removing sd card.
In this method, we will take the backup of only the home folder as a compressed file. Uncompressing this file lets you browse and restore every file and directory.
For this use the terminal and issue the following commands.
1. cd /home/  (to see all users homes)
2. sudo tar czf homewsamba.tar.gz spiffy
3. sudo mv homesamba.tar.gz spiffy   (move file into the folder set up with samba to mac)
4. cd spiffy
5. ls (check it is there)
6. you can grab it using finder now that samba is set up
7. then you can remove it from user: sudo rm 2homesamba.tar
This will create a file named pi_home.tar.gz and you can copy this file to a USB drive or other devices for safekeeping.
Moreover, if you want to backup raspberry pi while running, the is one of the best methods that you can follow.
copy files to usb from ubuntu
- Plug in the device
lsblkto find the device name of your usb device. Naming is/dev/sdXY. Where X is any english letter and Y is integer, typically 1.
If the device was mounted, you will see the mountpoint, for example:
NAME         MAJ:MIN RM  SIZE RO TYPE MOUNTPOINT
sdb            8:0    1 15.2G  0 disk
└─sdb1         8:1    1 15.2G  0 part /media/me/4C45-110F
If not, mount it. Follow to the step #3
-
udisksctl mount -b /dev/sdXY, device name same as in previous step. (/dev/sdb1in my example) The mount folder will be reported back to you to use in the next step. For example, supposelsblktells me this:sdc 8:32 1 7.5G 0 disk └─sdc1 8:33 1 7.5G 0 part
Then I will do the following:
$ udisksctl mount -b /dev/sdc1
Mounted /dev/sdc1 at /media/xieerqi/A669-34EF.
You can see it automatically created /media/xieerqi/A669-34EF folder and mounted my pen drive there. Also , big advantage is that you do not need sudo.
-
Use
rsyncorcpormvto get your files to the folder reported in step 3. Consult manual pages on usage of these commands.cpandmvare simplest.mv FILE DESTINATION– in my example (where FILE is the thing you want to move to the drive)mv FILE /media/me/4C45-110F
rsync is the best for backup however.
For example, to backup TESTDIR to my usb drive, I can do this:
$ rsync -av /home/xieerqi/TESTDIR/ /media/xieerqi/A669-34EF/~
sending incremental file list
created directory /media/xieerqi/A669-34EF/~
./
file1
file2
file3

sent 228 bytes  received 125 bytes  706.00 bytes/sec
total size is 0  speedup is 0.00
udisksctl unmount -b /dev/sdXY. Remove the device
Example
$ udisksctl unmount -b /dev/sdc1
Unmounted /dev/sdc1.
NOTE: some drives mount to directories that have names with spaces. If you run rsync or mv with not quoted names like that, your data will not be copied to correct destination. Always quote pathnames that have spaces in them.
https://askubuntu.com/users/295286/sergiy-kolodyazhnyy)
95.2k1818 gold badges244244 silver badges443443 bronze badges
-
What is purpose of
udisksctlcommand? I just saw several examples withoutudisksctl. Also, what is-boption?– minto
udisksctlis part ofudiskspackage, and comes by default with Ubuntu. Basically , it's a utility for doing all the basic actions like mounting , unmounting , checking info about a disk, but without need for runningsudo. Such utilities asmountrequire superuser privilleges to work.-boption stands forblock-device, which is what/dev/sdXYis classified as. Every hard-drive or usb drive is classified as block device -
No need to use
sudo mkdir /media/usbstickcommand before mounting? Some manuals use this command.– minto
-
@minto
udisksctldoes it automatically for you. I will be adding more examples later, so you will see how it works -
One important note: if USB stick inserted into USB port, it already mounted , I assume. Command
lsblkshow sdb -> sdb1. In this case, if I runudisksctl mount -b /dev/sdb1, it return error"device already mounted..."
How to Make a Raspberry Pi Disk Image
\1. Format a USB Flash or hard drive as either NTFS (if you are using Windows on your PC and plan to read this drive on a PC) or EXT4 (for Linux). Make sure the Flash drive is larger than the capacity of the used space. Make sure to give the drive a volume name that you remember (ex: “pibkup” in our case). You can also format the drive directly on the Raspberry Pi if you like.
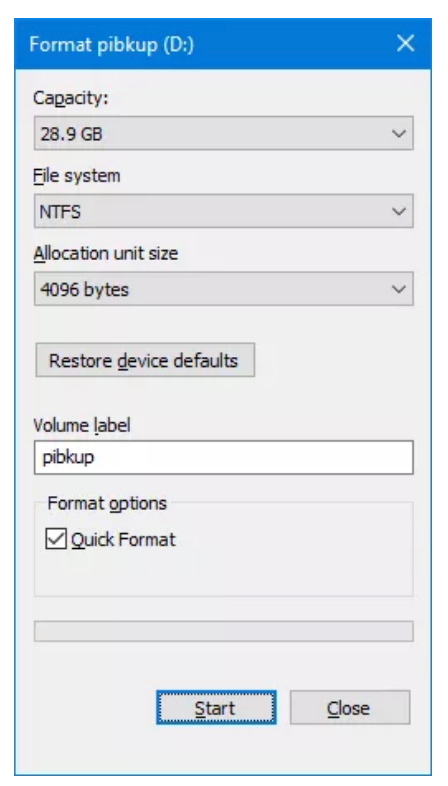
(Image credit: Tom's Hardware)
\2. Connect the USB drive to your Raspberry Pi.
3. Install pishrink.sh on your Raspberry Pi and copy it to the /usr/local/bin folder by typing:
wget https://raw.githubusercontent.com/Drewsif/PiShrink/master/pishrink.sh
sudo chmod +x pishrink.sh
sudo mv pishrink.sh /usr/local/bin
\4. Check the mount point path of your USB drive by entering
lsblk
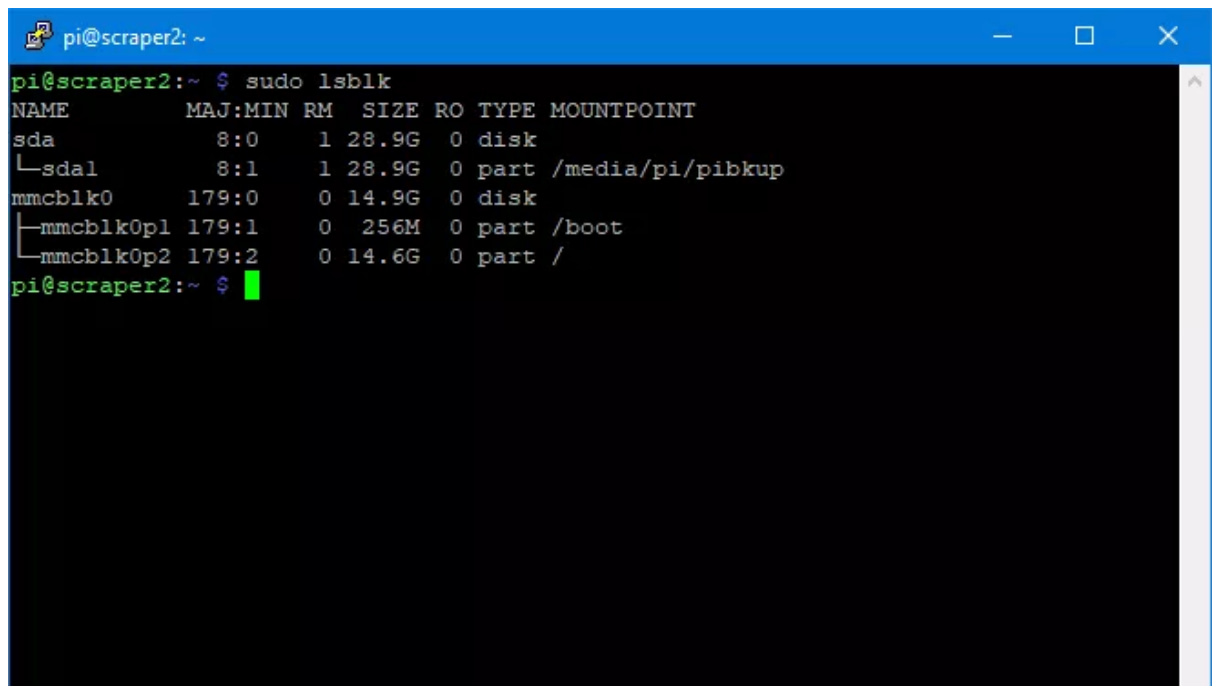
(Image credit: Tom's Hardware)
You’ll see a list of drives connected to the Raspberry Pi and the mount point name of each. Your USB drive will probably be mounted at /media/pi/[VOLUME NAME]. In our case, it was /media/pi/pibkup. If your drive isn’t mounted, try rebooting with the USB drive connected or you can mount it manually by typing sudo mkdir /dev/mysub to create a directory and sudo mount /dev/sda1 /dev/myusb to mount it. However, you can’t and shouldn’t do that if it’s already mounted.
5. Copy all your data to an img file by using the dd command.
sudo dd if=/dev/mmcblk0 of=[mount point]/myimg.img bs=1M
However, if you shrank a partition on the source microSD card, you’ll need to use the count attribute to tell it to copy only as many MBs as are in use. For example, in our case, we had had a 16GB card, but after shrinking the rootfs down to 6.5GB, the card only had about 6.8GB in use (when you count the /boot partition). So, to be on the safe side (better to copy too much data than too little), we rounded up and set dd to copy 7GB of data by using count=7000. The amount of data is equal to count * block size (bs) so 7000 * 1M means 7GB.
sudo dd if=/dev/mmcblk0 of=[mount point]/myimg.img bs=1M count=7000

(Image credit: Tom's Hardware)
Only do this if you have previously shrunk the partition. If you use count and copy less than the full partition you could have an incomplete image that's missing data or won't boot.
\6. Navigate to the USB drive's root directory.
cd /media/pi/pickup
\7. Use pishrink with the -z parameter, which zips your image up with gzip.
sudo pishrink.sh -z myimg.img
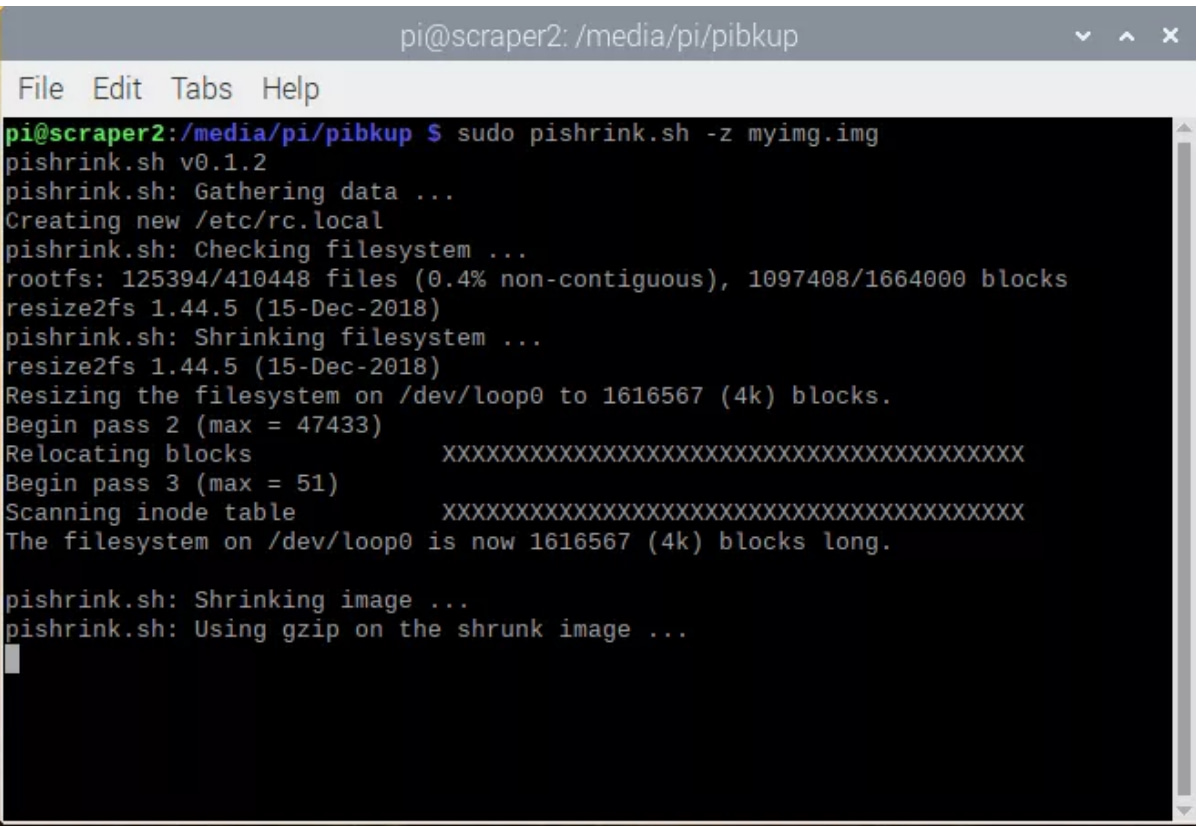
(Image credit: Tom's Hardware)
This process will also take several minutes but, when it is done, you will end up with a reasonably sized image file called myimg.img.gz. You can copy this file to your PC, upload it to the cloud or send it to a friend.
How to Shrink a Partition on Raspberry Pi
If you want to make a disk image of a microSD card, but don’t have an external USB drive of a greater capacity, you have a problem. Even though the eventual .img.gz file you create in the tutorial above should be much smaller than your source card, you still need enough space to accommodate the uncompressed .img file as part of the process.
What’s particularly frustrating is that, by default, the dd file copy process makes an image out of ALL the space on your microSD card, even the unused space.For example, you might have a 64GB microSD card, but only be actually using 6GB of space. If you don’t shrink the rootfs partition, you will end up copying all 64GB over to your external drive, which will take a lot more time to complete and will require that you have at least 65GB of free space.
So the solution is to shrink the rootfs partition of your microSD card down to a size that’s just a little bit bigger than the amount of used space. Then you can copy just your partitions over to the USB drive.
To do the shrinking, you’ll need a USB microSD card reader and a second microSD card with Raspberry Pi OS on it.
\1. Put your source microSD card (the one you want to copy) in a reader and connect to your Raspberry Pi.
\2. Boot your Raspberry Pi off a different microSD card.
\3. Install gparted on your Raspberry Pi.
sudo apt-get install gparted -y
\4. Launch gparted from within the Raspberry Pi OS GUI. It’s in the System Tools section of the start menu.
)
(Image credit: Tom's Hardware)
\5. Select your external microSD card from the pull down menu in the upper right corner of the gparted window.
(Image credit: Tom's Hardware)
\6. Unmount the rootfs partition if it is mounted (a key icon is next to it) by right clicking it and selecting Unmount from the menu. If the option is grayed out, it’s not mounted.
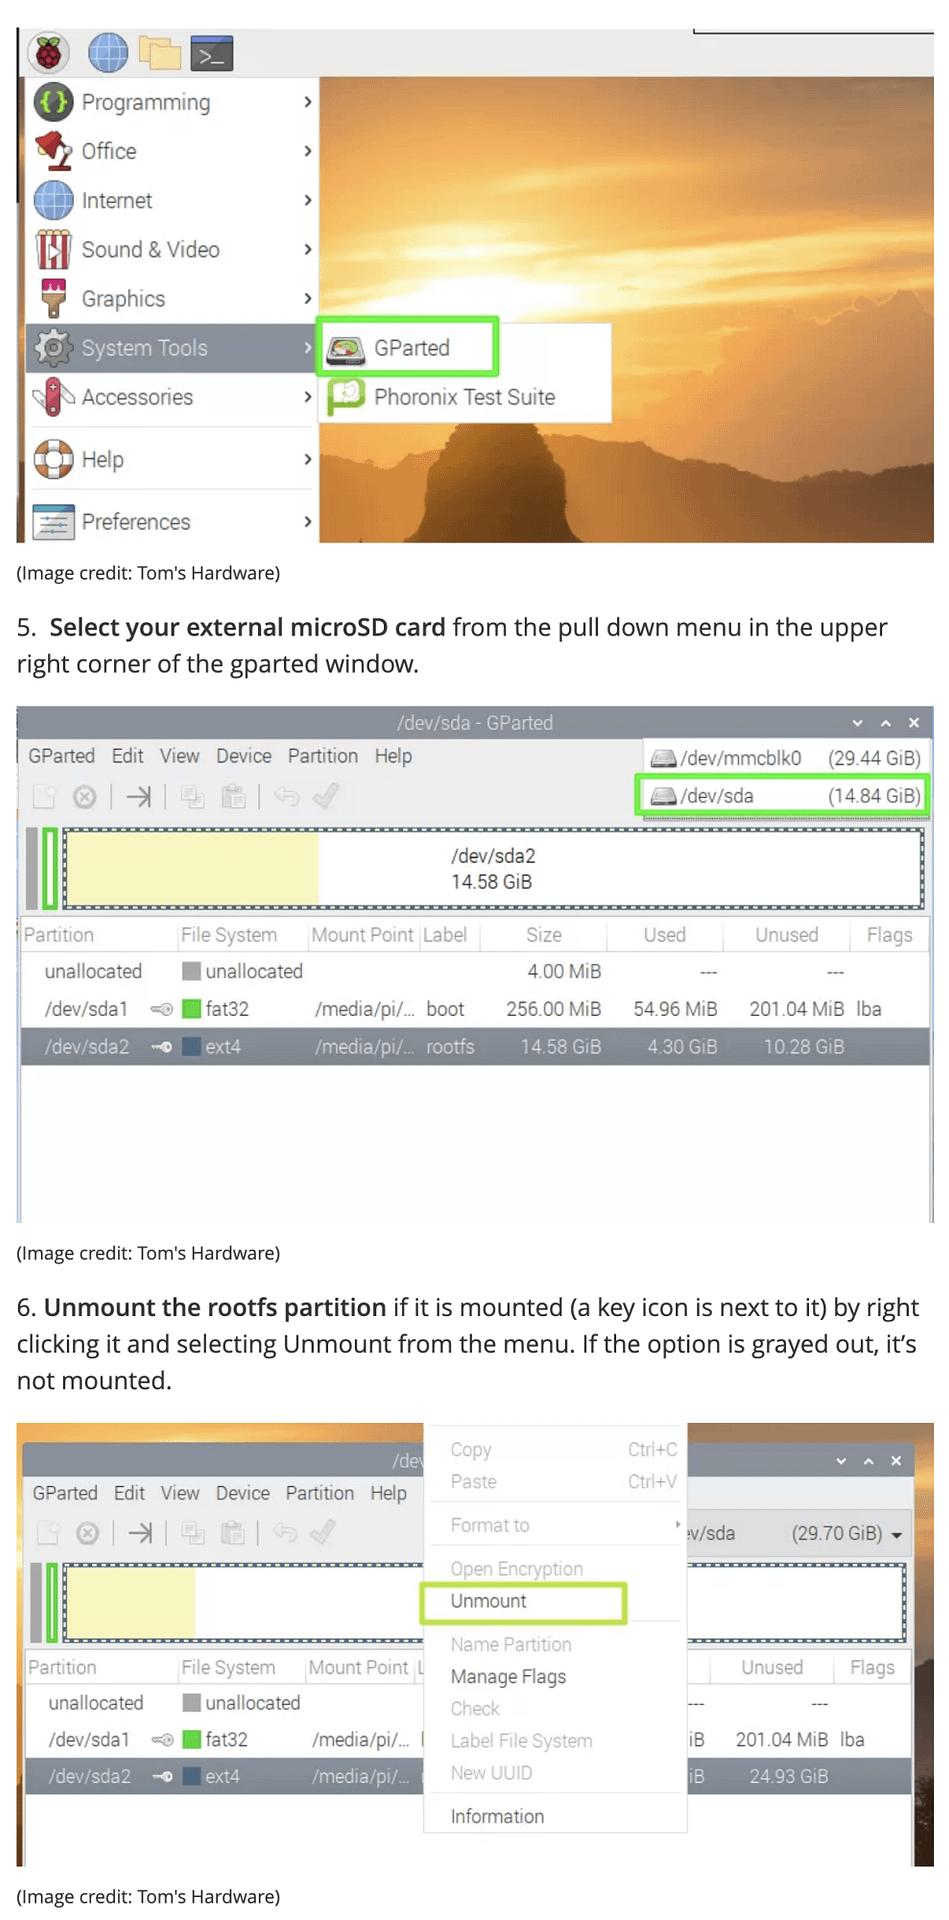
(Image credit: Tom's Hardware)
\7. Right click rootfs and select Resize / Move.
(Image credit: Tom's Hardware)
\8. Set the new size for the partition as the minimum size or slightly larger and click Resize.. Note that gparted may overreport the amount of used space (when we unmounted a partition with 4.3GB used, it changed to say 6GB were in use), but you have to go with at least its minimum.

(Image credit: Tom's Hardware)
\9. Click the green check mark in the gparted window and click Apply (when warned) to proceed.
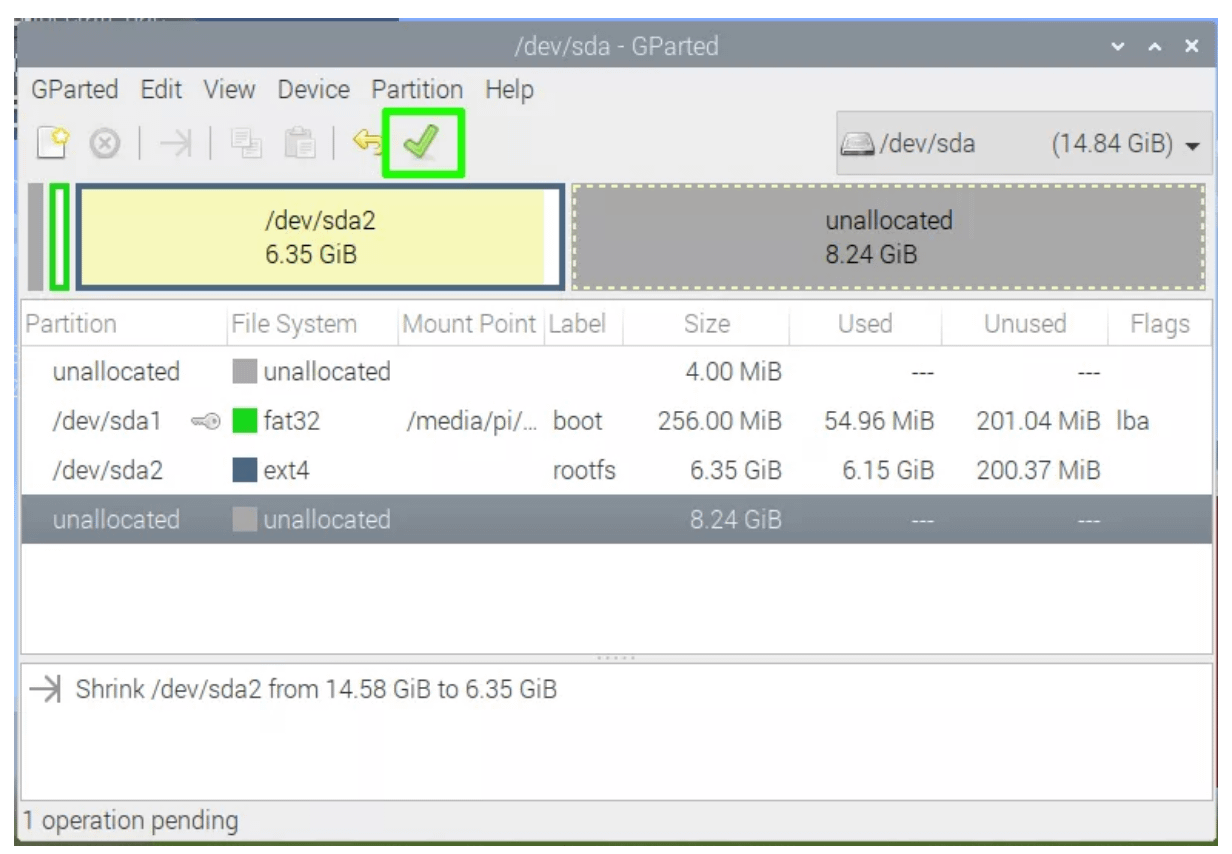
(Image credit: Tom's Hardware)
\10. Shutdown the Raspberry Pi.
\11. Remove the source microSD card from the USB card reader and insert it into the Raspberry Pi to boot from.
\12. Follow the instructions in the section above on creating a disk image. Make sure to use the count attribute in step 5.
Writing Your Raspberry Pi Disk Image to a Card
Once you’re done, you’ll have a file with the extension .img.gz and you can write or “burn” it to a microSD card the same way you would any .img file you download from the web. The easiest way to burn a custom image is to:
\1. Launch Raspberry Pi Imager on your PC. You can download Raspberry Pi Imager if you don’t have it already.
(Image credit: Tom's Hardware)
\2. Select Use custom from the Choose OS menu.
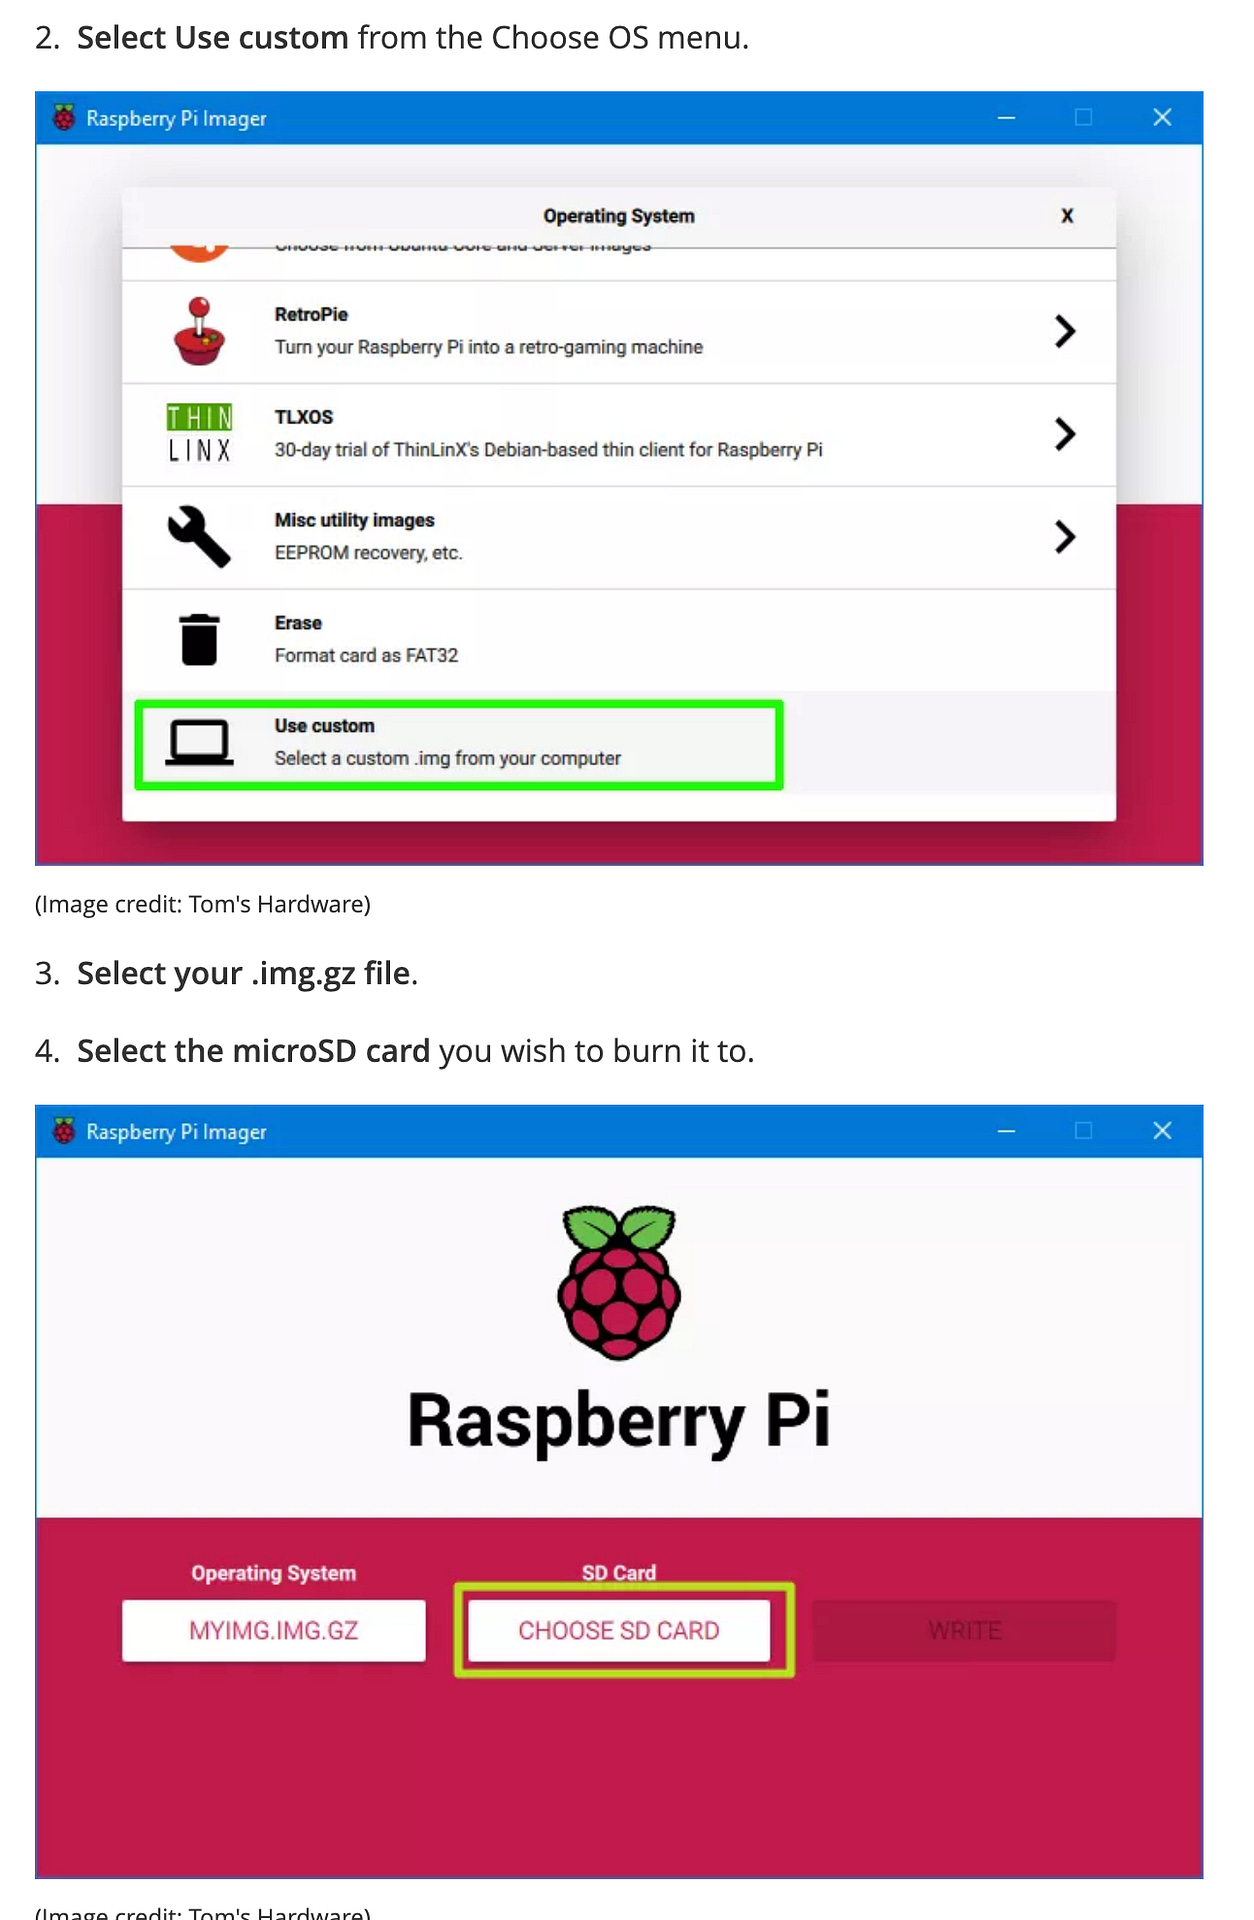
(Image credit: Tom's Hardware)
\3. Select your .img.gz file.
\4. Select the microSD card you wish to burn it to.
(Image credit: Tom's Hardware)
\5. Click Write.

(Image credit: Tom's Hardware)
Sharing Raspberry PI w/ Mac - directories - or SCP files
https://clickety-clack.click/spiffberrypi-as-a-nas-installing-samba/ -
https://ubuntu.com/tutorials/install-and-configure-samba#4-setting-up-user-accounts-and-connecting-to-share
Shared Drive - Setting up SAMBA
QUICK NOTES::
sudo apt update && sudo apt upgrade
To install Samba - on UBUNTU, we run:
sudo apt install samba
We can check if the installation was successful by running:
whereis samba
The following should be its output:
samba: /usr/sbin/samba /usr/lib/samba /etc/samba /usr/share/samba /usr/share/man/man7/samba.7.gz /usr/share/man/man8/samba.8.gz

SAMBA TO SHARE /home/spiffy directory
cifs-utils
If you want to access other network computers from your Raspberry Pi, e.g., when you use it as a desktop computer, you will also need to install the CIFS tools. They were initially part of the Samba package but later split into their own package.
For an application like a digital picture frame where you don’t need to see other computers but just be visible in the network yourself, you won’t need to install this.
sudo apt install samba-client cifs-utils
INSTALLING A USER
This is very easy. If your username is “pi”, type
sudo smbpasswd -a pi
Just replace pi with whatever your user name is, set a password, and confirm it. You can add as many users as you like.
THE SAMBA CONFIG FILE
SAMBA comes with an elaborate config file that allows you to specify your network sharing exactly as you want it, but it can be a bit overwhelming.
First Backup SAMBA config
scp spiffy@10.0.0.205:/etc/samba/smb.conf .
then to restore - you can copy it back over:
scp smb.conf spiffy@10.0.0.205
This will overwrite the existing file of smb.conf with the smb.conf.backup file.
Open the SAMBA config file with
sudo nano /etc/samba/smb.conf
I have heard from a few users who had issues with this configuration file and given all the comments in the file, it is not always easy to know your way around.
This is why I have slimmed down this file to a minimum which you can just and paste in your config file.
To delete lines in the config file, hit CTRL+K. With this command, you will be able to quickly empty the editor window completely before pasting in this text:
[global]
client min protocol = SMB2
client max protocol = SMB3
vfs objects = catia fruit streams_xattr
fruit:metadata = stream
fruit:model = RackMac
fruit:posix_rename = yes
fruit:veto_appledouble = no
fruit:wipe_intentionally_left_blank_rfork = yes
fruit:delete_empty_adfiles = yes
security = user
encrypt passwords = yes
workgroup = WORKGROUP
server role = standalone server
obey pam restrictions = no
map to guest = never
[pi]
comment = Pi Directories
browseable = yes
path = /home/pi
read only = no
create mask = 0775
directory mask = 0775
This config file creates a Sharing Directory in /home/pi with rights only for the logged-in user and includes some optimization for macOS computers. You can probably make it even shorter if you are a real networking expert!
You can restrict access to your folders in many ways. “0700” only allows the user to modify the files. For further study on this subject, I recommend this article.
For all full overview of the various settings in this segment, I recommend a look at this page.
When you are done pasting, hit CTRL + O to write the file to disk and CTRL + X to exit the editor.
To test the syntax of your config file or see a summary of the settings, enter
testparm /etc/samba/smb.conf
You should see something along these lines:
rlimit_max: increasing rlimit_max (1024) to minimum Windows limit (16384)
Load smb config files from /etc/samba/smb.conf
rlimit_max: increasing rlimit_max (1024) to minimum Windows limit (16384)
Processing section "[pi]"
Loaded services file OK.
Server role: ROLE_STANDALONE
Press enter to see a dump of your service definitions
Pressing “Enter” will just show you again what you have entered in the config file.
Finally, restart SAMBA:
sudo /etc/init.d/smbd restart
firewall on ubuntu
sudo ufw allow samba
You should now see the name of your Raspberry Pi in your network. Connect to it using your username “pi” (in our example) and your password.
Whenever you reboot your Raspberry Pi, file sharing will automatically start.
Networking is sometimes a bit slow to recognize changes. If you are using macOS and you don’t see your Raspberry Pi after you made some changes, I recommend relaunching the Finder (Apple Menu > Force Quit).
ERROR
Load smb config files from /etc/samba/smb.conf
lpcfg_do_global_parameter: WARNING: The "encrypt passwords" option is deprecated
Loaded services file OK.
Weak crypto is allowed
Server role: ROLE_STANDALONE
https://forums.unraid.net/topic/25064-user-share-problem/?tab=comments#comment-228392
Setting up specific Shared Directory for Samba
3. Setting up Samba
Now that Samba is installed, we need to create a directory for it to share:
mkdir /home/<username>/sambashare/
The command above creates a new folder sambashare in our home directory which we will share later.
The configuration file for Samba is located at /etc/samba/smb.conf. To add the new directory as a share, we edit the file by running:
sudo nano /etc/samba/smb.conf
At the bottom of the file, add the following lines:
[sambashare]
    comment = Samba on Ubuntu
    path = /home/username/sambashare
    read only = no
    browsable = yes
Then press Ctrl-O to save and Ctrl-X to exit from the nano text editor.
What we’ve just added
-
- comment: A brief description of the share.
-
path: The directory of our share.
-
read only: Permission to modify the contents of the share folder is only granted when the value of this directive is
no. -
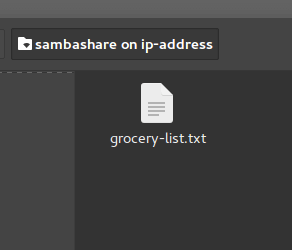
browsable: When set to
yes, file managers such as Ubuntu’s default file manager will list this share under “Network” (it could also appear as browseable).
Now that we have our new share configured, save it and restart Samba for it to take effect:
sudo service smbd restart
Update the firewall rules to allow Samba traffic:
sudo ufw allow samba
4. Setting up User Accounts and Connecting to Share
Since Samba doesn’t use the system account password, we need to set up a Samba password for our user account:
sudo smbpasswd -a username
Note
Username used must belong to a system account, else it won’t save.
Connecting to Share
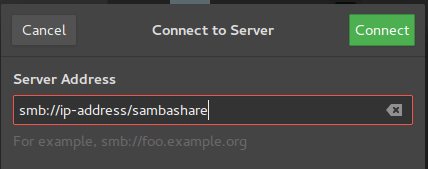
On Ubuntu: Open up the default file manager and click Connect to Server then enter: 
On macOS: In the Finder menu, click Go > Connect to Server then enter: 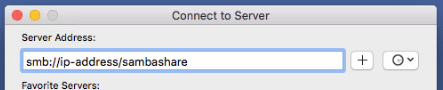
On Windows, open up File Manager and edit the file path to:
\\ip-address\sambashare
Note: ip-address is the Samba server IP address and sambashare is the name of the share.
You’ll be prompted for your credentials. Enter them to connect! 
If you’d like to take your configuration further…
https://spellfoundry.com/docs/copying-files-to-and-from-raspberry-pi-and-mac/
CopyING FILES TO AND FROM RASPBERRY PI AND MAC
Table of Contents
- Copying Files From Raspberry Pi To A Mac
- Copying Files From A Mac To A Raspberry Pi
Copying Files From Raspberry Pi To A Mac
 ON MAC - open terminal window - navigate to the desktop folder - then the "." at end will  file there -

 scp spiffy@10.0.0.205:/home/home.tar.gz .
SCP
The simplest way is to use Secure CoPy from a Terminal Window (see also “Article on Using SSH On A Mac”).
Open a terminal window and use the following command:
scp pi@<IP Address of Raspberry Pi>:<Path to File> .
Using a “.” at the end copies it to your current directory (you can find this out by typing “pwd”). NOTE there is a space between the filename and the “.”
If you want to specify a destination directory, just put it at the end, for example:
scp pi@192.168.1.180:Sleepy-Pi-Setup.sh /users/Jon
An example of Copying the Sleepy-Pi-Setup.sh from the “Pi” user’s home directory /home/pi to the current directory on the Mac.
scp pi@192.168.1.180:Sleepy-Pi-Setup.sh . (note the dot on the end)
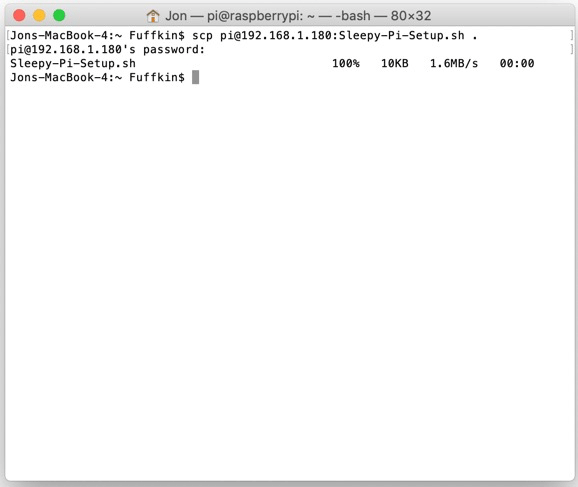
Using SCP to Copy a file RPi -> Mac
NOTE: This is done from the Mac Terminal window *without* being logged in to the Raspberry Pi over SSH. I am forever forgetting this and try doing it from an SSH session.
Copying Files From A Mac To A Raspberry Pi
SCP
You can do this with the following syntax:
scp <Path to File To Copy> pi@<IP Address of Raspberry Pi>:<Path that File will Go>
An example of Copying the Sleepy-Pi-Setup.sh to the “Pi” user’s home directory /home/pi from the current directory of the Mac:
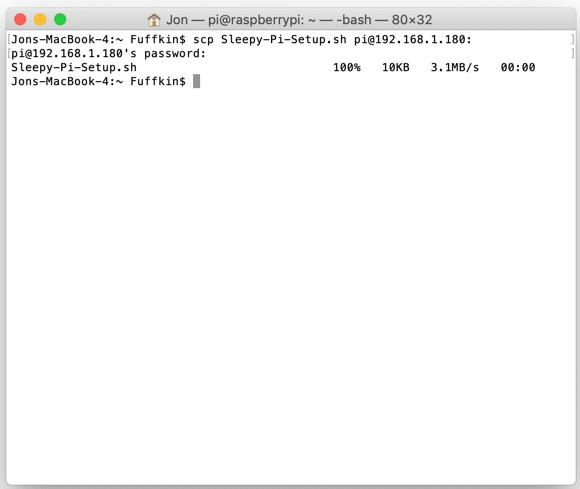
Using SCP to a file Mac -> Rpi
scp <Path to File To Copy> pi@<IP Address of Raspberry Pi>:<Path that File will Go>

to get to a user home directory - scrp pathtofiletocopy spiffy@ipaddress: - it will automatically copy file to spiffy/home