GPIO and the 40-pin Header
Edit this on GitHub
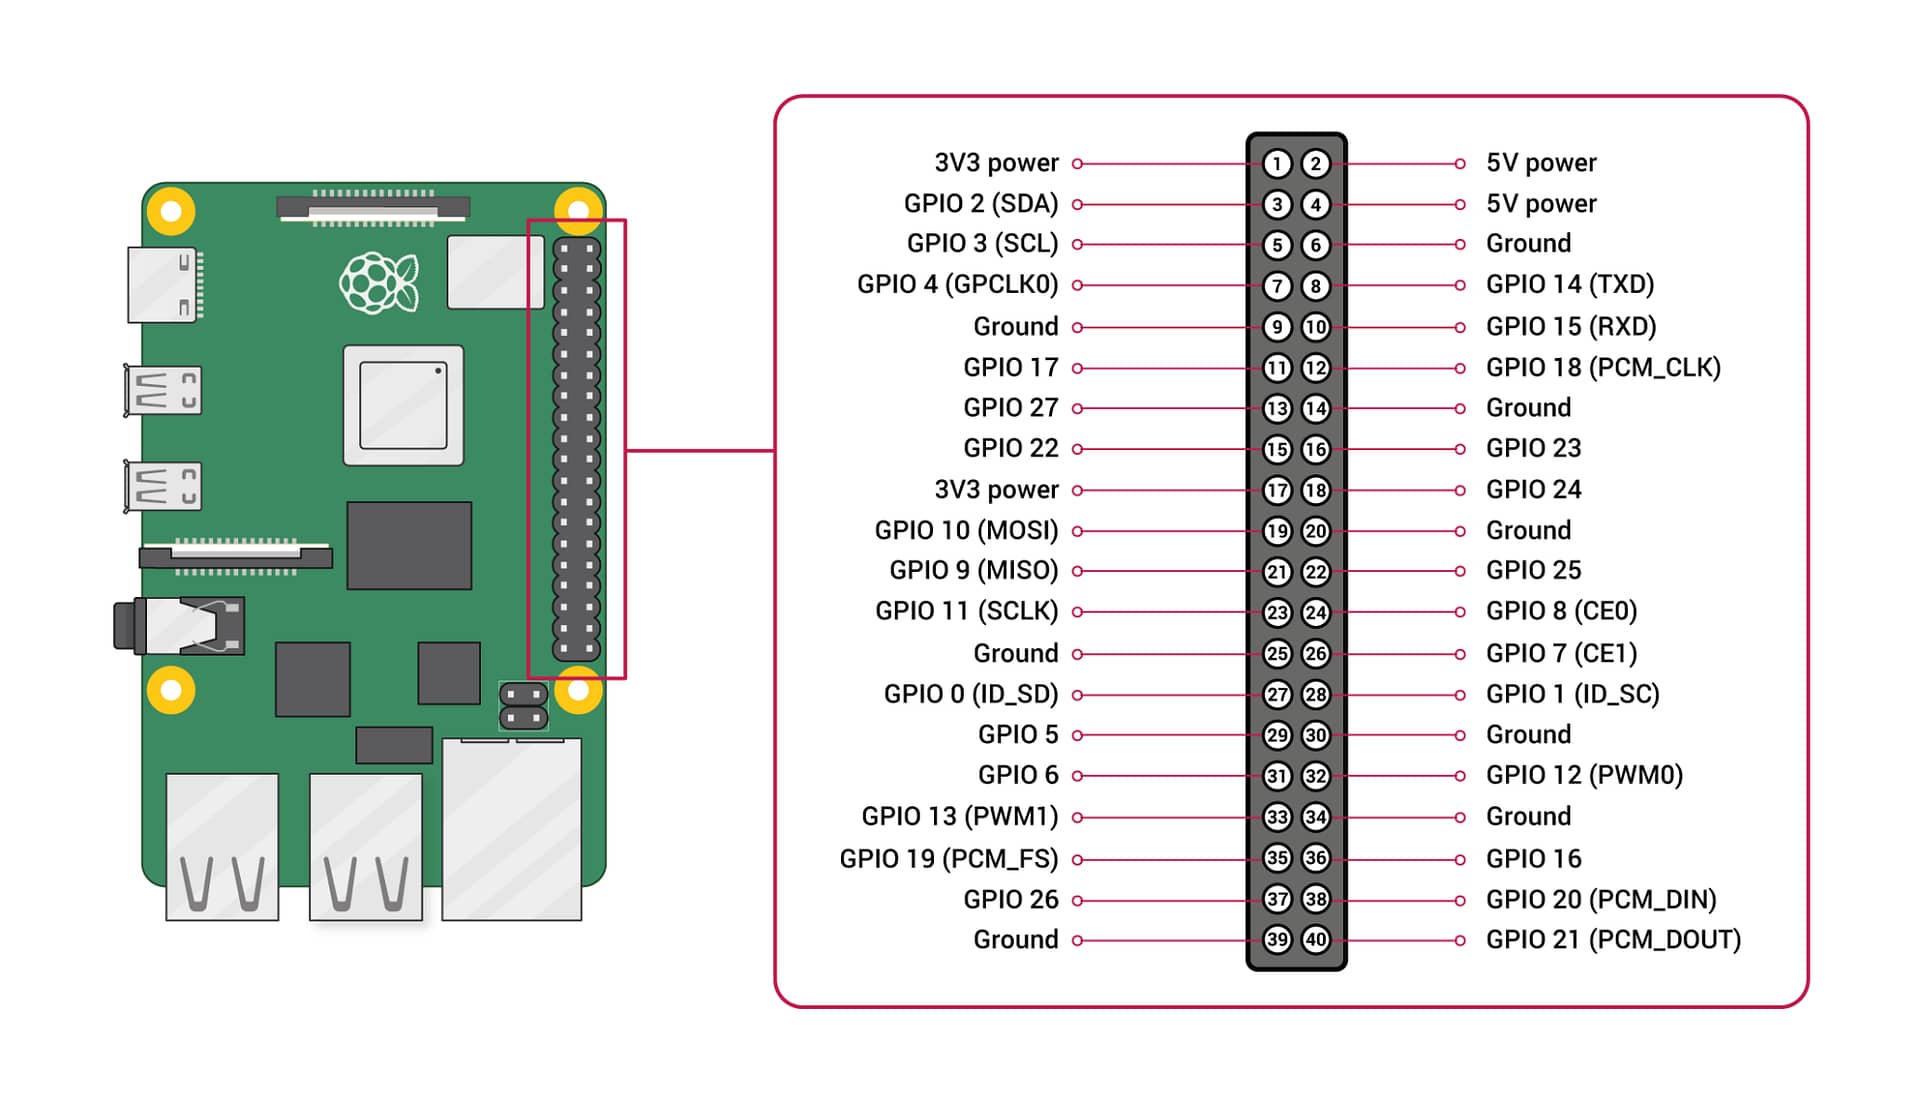
A powerful feature of the Raspberry Pi is the row of GPIO (general-purpose input/output) pins along the top edge of the board. A 40-pin GPIO header is found on all current Raspberry Pi boards although it is unpopulated on Raspberry Pi Zero, Raspberry Pi Zero W, and Raspberry Pi Zero 2 W. The GPIO headers on all boards have a 0.1-inch (2.54 mm) pin pitch.
Any of the GPIO pins can be designated in software as an input or output pin and used for a wide range of purposes.
| NOTE | The GPIO pin numbering scheme is not in numerical order. GPIO pins 0 and 1 are present on the board (physical pins 27 and 28), but are reserved for advanced use. |
|---|---|
Voltages
Two 5V pins and two 3.3V pins are present on the board, as well as a number of ground pins (GND), which can not be reconfigured. The remaining pins are all general-purpose 3.3V pins, meaning outputs are set to 3.3V and inputs are 3.3V-tolerant.
Outputs
A GPIO pin designated as an output pin can be set to high (3.3V) or low (0V).
Inputs
A GPIO pin designated as an input pin can be read as high (3.3V) or low (0V). This is made easier with the use of internal pull-up or pull-down resistors. Pins GPIO2 and GPIO3 have fixed pull-up resistors, but for other pins this can be configured in software.
Other functions
As well as simple input and output devices, the GPIO pins can be used with a variety of alternative functions, some are available on all pins, others on specific pins.
PWM (pulse-width modulation)
- Software PWM available on all pins
- Hardware PWM available on GPIO12, GPIO13, GPIO18, GPIO19
SPI
- SPI0: MOSI (GPIO10); MISO (GPIO9); SCLK (GPIO11); CE0 (GPIO8), CE1 (GPIO7)
- SPI1: MOSI (GPIO20); MISO (GPIO19); SCLK (GPIO21); CE0 (GPIO18); CE1 (GPIO17); CE2 (GPIO16)
I2C
- Data: (GPIO2); Clock (GPIO3)
- EEPROM Data: (GPIO0); EEPROM Clock (GPIO1)
Serial
- TX (GPIO14); RX (GPIO15)
GPIO pinout
A GPIO reference can be accessed on your Raspberry Pi by opening a terminal window and running the command pinout. This tool is provided by the GPIO Zero Python library, which is installed by default in Raspberry Pi OS.
| WARNING | While connecting up simple components to the GPIO pins is perfectly safe, it’s important to be careful how you wire things up. LEDs should have resistors to limit the current passing through them. Do not use 5V for 3.3V components. Do not connect motors directly to the GPIO pins, instead use an H-bridge circuit or a motor controller board. |
|---|---|
Permissions
In order to use the GPIO ports, your user must be a member of the gpio group. The default user account is a member by default, other users need to be added manually.
sudo usermod -a -G gpio <username>
GPIO in Python
Using the GPIO Zero library makes it easy to control GPIO devices with Python. The library is comprehensively documented at gpiozero.readthedocs.io.
LED
To control an LED connected to GPIO17:
from gpiozero import LED
from time import sleep

led = LED(17)

while True:
    led.on()
    sleep(1)
    led.off()
    sleep(1)
Run this in an IDE like Thonny, and the LED will blink on and off repeatedly.
LED methods include on(), off(), toggle(), and blink().
Button
To read the state of a button connected to GPIO2:
from gpiozero import Button
from time import sleep

button = Button(2)

while True:
    if button.is_pressed:
        print("Pressed")
    else:
        print("Released")
    sleep(1)
Button functionality includes the properties is_pressed and is_held; callbacks when_pressed, when_released, and when_held; and methods wait_for_press() and wait_for_release.
Button and LED
To connect the LED and button together, you can use this code:
from gpiozero import LED, Button

led = LED(17)
button = Button(2)

while True:
    if button.is_pressed:
        led.on()
    else:
        led.off()
Alternatively:
from gpiozero import LED, Button

led = LED(17)
button = Button(2)

while True:
    button.wait_for_press()
    led.on()
    button.wait_for_release()
    led.off()
or:
from gpiozero import LED, Button

led = LED(17)
button = Button(2)

button.when_pressed = led.on
button.when_released = led.off
Going further
You can find more information on how to program electronics connected to your Raspberry Pi with the GPIO Zero Python library in the Raspberry Pi Press book Simple Electronics with GPIO Zero. Written by Phil King, it is part of the MagPi Essentials series published by Raspberry Pi Press. The book gets you started with the GPIO Zero library, and walks you through how to use it by building a series of projects.
You can download this book as a PDF file for free, it has been released under a Creative Commons Attribution-NonCommercial-ShareAlike 3.0 Unported (CC BY NC-SA) licence.


