
https://developer.apple.com/library/archive/documentation/MacOSX/Conceptual/BPFrameworks/Tasks/InstallingFrameworks.html
Uninstalling all python version except pre-shipped
https://stackoverflow.com/questions/22774529/what-is-the-safest-way-to-removing-python-framework-files-that-are-located-in-di
'll self-answer. I went through steps and it's straight forward. Pycharms (the IDE I'm use) automatically found the new libraries too. Here are the steps I followed to remove the extra Python libraries on Mavericks that were not native to it and not installed by brew.
Step 1: The native Python 2.7.x version lives here /System/Library/Frameworks/Python.framework/Versions/2.7 (or 2.6, etc), so you can remove any Python that got installed elsewhere.
sudo rm -rf /System/Library/Frameworks/Python.framework/
Or, according to this article, you should brew install both python 2.7 and python 3.x, and avoid using system python in Mavericks.
Step 2: Remove python in Applications directory (the one where all your apps are).
cd into folder /Applications and ls | grep Python to see what have.
Then remove: sudo rm -rf "Python 3.3"
Step 3:
>>> brew prune
sample output:
Pruned 0 dead formula Pruned 46 symbolic links from /usr/local
Step 4: Run steps recommended by brew doctor
sudo brew link python3
Sample output
Linking /usr/local/Cellar/python3/3.4.0… 19 symlinks created
Pyenv
Install Python3 ad default on MAC
00:00 Now that you’ve installed pyenv, installing a specific version of Python is the next step. You have many versions of Python to choose from and to see all available Python versions, you can run the command pyenv install –list.
00:19 This is a very long list that might be tough to scroll through, so let’s use the power of grep to see all available CPython versions for version 3.8 and 3.9.
00:33 Let’s type pyenv install –list | grep with a certain filter. And if you would like to know which versions of Jython can be installed by pyenv, you can figure that out just as easy by typing pyenv install –list | grep “jython”.
00:57 Once you’ve figured out which version you want, you can install it with a single command, pyenv install -v 3.9.1. The -v flag is added so pyenv will show what it is doing.
01:16 Installing a version might take awhile because pyenv is building from source, but I have fast-forwarded so you don’t have to wait until the installation is finished.
then add links in ~/.zshrc
https://opensource.com/article/19/5/python-3-default-mac
I've been dipping my toe back into Python development as I get ready to head to PyCon US. (If you're headed there as well and want to share your Python story, let me know!) When I installed a module to tinker around with, I got a reminder that I needed to install Python 3 soon.
$ pip install todoist-python
DEPRECATION: Python 2.7 will reach the end of its life on January 1st, 2020. Please upgrade your Python as Python 2.7 won't be maintained after that date. A future version of pip will drop support for Python 2.7.
So, I did what any of us would do and googled around looking for a guide to update my development environment, which runs on Mac (the macOS operating system, formerly known as OS X). To my surprise, I found only a handful of StackOverflow posts, and they pointed me to partial solutions. Here's the full story of how to set up your environment without breaking anything built into the macOS operating system.
1. Install pyenv
Moshe Zadka cautions that doing this wrong could result in an unreliable idea of which Python is running that depends too closely on shells loading aliases. I knew Moshe was familiar with Python, but what I didn't know is that he is an author of many Python tutorials as well as an upcoming book on Python development on macOS. He helped 40 colleagues develop Python safely and consistently on macOS systems following one core principle:
"The basic premise of all Python development is to never use the system Python. You do not want the Mac OS X 'default Python' to be 'python3.' You want to never care about default Python."
How do we stop caring about the default? Moshe recommends using pyenv to manage Python environments (for a deeper dive on configuring pyenv, see this article). This tool manages multiple versions of Python and is described as "simple, unobtrusive, and follows the Unix tradition of single-purpose tools that do one thing well."
While other installation options are available, the easiest way to get started is with Homebrew:
$ brew install pyenv
🍺  /usr/local/Cellar/pyenv/1.2.10: 634 files, 2.4MB
2. Install Python
Now let's install the latest Python version (3.7.3 as of this writing):
$ pyenv install 3.7.3
python-build: use openssl 1.0 from homebrew
python-build: use readline from homebrew
Downloading Python-3.7.3.tar.xz...
-> https://www.python.org/ftp/python/3.7.3/Python-3.7.3.tar.xz
Installing Python-3.7.3...
## further output not included ##
3. Set your global default
Now that Python 3 is installed through pyenv, we want to set it as our global default version for pyenv environments:
$ pyenv global 3.7.3
# and verify it worked
$ pyenv version
3.7.3 (set by /Users/mbbroberg/.pyenv/version)
The power of pyenv comes from its control over our shell's path. In order for it to work correctly, we need to add the following to our configuration file (.zshrc for me, possibly .bash_profile for you):
$ echo -e 'if command -v pyenv 1>/dev/null 2>&1; then\n eval "$(pyenv init -)"\nfi' >> ~/.zshrc
After that command, our dotfile (.zshrc for zsh or .bash_profile for Bash) should include these lines:
if command -v pyenv 1>/dev/null 2>&1; then
  eval "$(pyenv init -)"
fi
Now we know for certain that we're using Python 3.7.3 and pip will update alongside it without any manual aliasing between versions. Using Moshe's recommendation to use a version manager (pyenv) enables us to easily accept future upgrades without getting confused about which Python we are running at a given time.
Success
As you get comfortable with this workflow, you can use pyenv to manage multiple versions of Python. It's also essential, for dependency management, to use virtual environments. I mention how to use the built in venv library in the article, and Moshe recommends virtualenvwrapper for managing virtual environments.
Understanding Python runtimes
Now that you have your Python versions fixed, it's safe to explore why this problem confuses so many people.
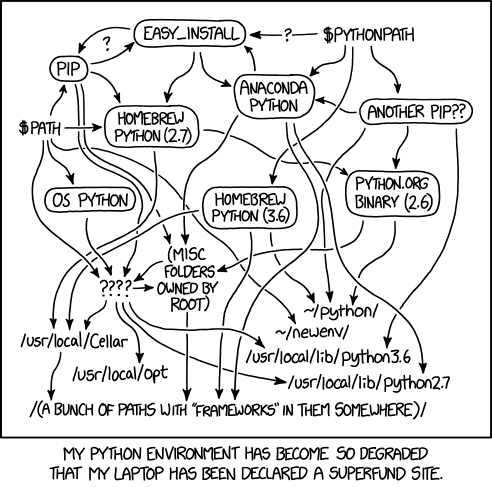
The version of Python that ships with macOS is well out of date from what Python recommends using for development. Pondering Python runtimes can be comically challenging at times, as noted by XKCD.
python_environment_xkcd.png
Many users have dozens of Python interpreters on their computer already, but have no idea how to manage them effectively. Too often, people just download the latest Python release, move it to their path, and call it a day (or use brew install python3, which would do something similar). This can cause breakages down the line in frustrating ways that can be difficult to troubleshoot.
What NOT to do
My first idea on how to make Python 3 the default Python on my system was to move the old version and add the new one:
# what I thought would work
# first, I'll find my python binary
$ which python
/usr/bin/python
# next, I'll move it to an unused name
$ sudo mv /usr/bin/python /usr/bin/python2
# lastly, I'll move the new binary to the previous path
$ sudo mv $PATHTOBINARY/python3 /usr/bin/python
The pattern followed what /usr/bin/ usually does between major releases of Python, but I quickly learned it was the wrong move:
$ sudo mv /usr/bin/python /usr/bin/python2
mv: rename /usr/bin/python to /usr/bin/python2: Operation not permitted
Thankfully, macOS protected me from breaking something I don't fully understand. Further research proves this is exactly what we shouldn't do.
Another thing not to try
Programming and development
- Red Hat Developers Blog
- Programming cheat sheets
- Try for free: Red Hat Learning Subscription
- eBook: An introduction to programming with Bash
- Downloadable guide: 7 essential PyPI libraries and how to use them
- What is an IDE?
Now that we know what not to do, let's look at what we could do. There are a couple options when we think about common installation patterns for applications on macOS.
Use Python 3 as the macOS default
Python's website has a macOS Python 3 installer we can download and use. If we use the package installation, a python3 fill will be available in /usr/local/bin/.
Aliasing is a must since the Python binary stored in /usr/bin/ can't be changed. What's nice about an alias is that it's specific to our command-line shell. Since I use zsh by default, I put the following into the .zshrc file:
$ echo "alias python=/usr/local/bin/python3.7" >> ~/.zshrc
If you are using the default Bash shell, you can append this same text to your .bashrc:
$ echo "alias python=/usr/local/bin/python3.7" >> ~/.bashrc
This strategy works, but it isn't ideal for making future updates to Python. It means we have to remember to check the website and download the new files since Python doesn't include a command-line way to update.
Have Homebrew manage Python 3
The Homebrew project provides a free and open source package manager for macOS that many people rely on. It gives Apple users a power similar to apt-get or yum. If you are a Homebrew user, you may already have Python installed. To quickly check, run:
$ brew list | grep python
python
If Python shows up under the command, it's installed. What version is it? Let's check:
$ brew info python
python: stable 3.7.3 (bottled), HEAD
Interpreted, interactive, object-oriented programming language
https://www.python.org/
/usr/local/Cellar/python/3.7.2_1 (8,437 files, 118MB) *
## further output not included ##
Okay, great! The Homebrew maintainers have updated the default Python bottle to point to the latest release. Since the Homebrew maintainers are more dependable at updating the release than most of us, we can use Homebrew's version of Python 3 with the following command:
$ brew update && brew upgrade python
Now we want to point our alias (from above) to the copy of Python that Homebrew manages:
# If you added the previous alias, use a text editor to update the line to the following
alias python=/usr/local/bin/python3
To make sure the path above points to where Homebrew installed Python in our environment, we can run brew info python and look for the path information.
This method, of using Homebrew to manage our Python environment, is a good starting place, and it made sense to me at the time.
What if we still need Python 2?
It makes sense for anyone new to Python to begin with Python 3. But those of us who still need Python 2—for example, to contribute to a Python project that's only available in Python 2—can continue to use the default macOS Python binary available in /usr/bin/python:
$ /usr/bin/python
>>> print("This runtime still works!")
This runtime still works!
Homebrew is so wonderful, it even offers a different formula for Python 2:
# If you need Homebrew's Python 2.7 run
$ brew install python@2
At any time, we can remove the aliases from our shell's configuration file to go back to using the default copy of Python on the system.
Don't forget to update pip to pip3!
The pip command is the default package manager specifically for Python packages. Although we changed our default Python command to be version 3, we have to alias our pip command separately if it's on the previous version. First, we need to check what version we're on:
# Note that this is a capital V (not lowercase)
$ pip -V
pip 19.0.3 from /Library/Python/2.7/site-packages/pip-19.0.3-py2.7.egg/pip (python 2.7)
To ensure we're installing packages compatible with our new version of Python, we'll use another alias to point to the compatible version of pip. Since we're using Homebrew as our package manager in this situation, we know it installed pip3 when we installed Python 3. The default path should be the same as Python 3, but we can confirm this by asking the shell to find it:
$ which pip3
/usr/local/bin/pip3
Now that we know the location, we will add it to our shell configuration file, as we did before:
$ echo "alias pip=/usr/local/bin/pip3" >> ~/.zshrc
# or for Bash
$ echo "alias pip=/usr/local/bin/pip3" >> ~/.bashrc
Last, we can confirm that running pip points to pip3 by opening a new shell or by resetting our current shell and seeing what we point to:
# This command reloads the current shell without exiting the session
# Alternatively, exit the shell and start a new one
$ exec $0
# Now we can look to see where pip points us
$ which pip
pip: aliased to /usr/local/bin/pip3
We can avoid using Homebrew to update pip, but that requires a much longer tutorial from the Python documentation.
Do it right from the start
If you are just getting started with Python development on a macOS, do the necessary configurations to make sure you're using the right version of Python from the start. Installing Python 3, with or without Homebrew, and using alias will let you start coding, but it's not a good strategy for the long run. Using pyenv as a simple version management solution to get you off to a good start.
It should be safe to install
pythonpackages using/usr/local/bin/pipbecause they will be installed in/usr/local/lib/python2.7/site-packages. The/usr/localpath is specifically for local software. Also,brewinstalls its files to/usr/local, so if you are usingbrew, you are already installing files there.
MAC VERSION: /usr/bin/python (do not remove)
To uninstall using brew use this command brew uninstall <package>.
Mac OS X has python preinstalled so there is no need to install another Python instance unless it's necessary.
You can run brew install python to install Python using Homebrew.
Even though python is preinstalled as @jgritty hinted in comments, you may consider not to rely on it for development purposes.
So you should brew uninstall python then brew install python.
In order to remove an installed Python (2.7) instance, you need to run the following commands in your terminal;
sudo rm -rf /Library/Frameworks/Python.framework/Versions/2.7sudo rm -rf "/Applications/Python 2.7"- remove the symbolic links in
/usr/local/binthat point to this python version seels -l /usr/local/bin | grep '../Library/Frameworks/Python.framework/Versions/2.7' - if necessary, edit your shell profile file(s) to remove adding
/Library/Frameworks/Python.framework/Versions/2.7to your PATH environment file. Depending on which shell you use, any of the following files may have been modified:~/bash_login, ~/bash_profile, ~/cshrc, ~/profile, ~/tcshrc, and/or ~/zprofile.
A reference by @Ned Deily available at this link.
https://stackoverflow.com/users/6381711/nyedidikeke)
https://stackoverflow.com/users/3549629/iprogram)
-
OS X does not install a python to /Library. The python.org dmg installer does. This is therefore safe but I beg you, with all of my heart, to never try to remove something that the OS has installed. In particular, do not remove /usr/bin/python.
-
Yes, these instructions will remove a user-installed Python and will not remove the Python
MacOS comes with python2, which is installed in /usr/bin. From Catalina onward, macOS also comes with a 'stub' for python3, which is also in /usr/bin.
The first time you run this, it will ask to install the Xcode Command Line Tools, which contain python3, if you don't have Xcode installed already.
/usr/bin just contains the 'command': the libraries and meat of the installation is in /Library/Frameworks/Python.framework. You can't delete the system pythons without doing all sorts of tricks, so if you can delete it, it's not the system one.
/usr/bin is restricted to system software only. Third-party installations will be in /usr/local, though I believe homebrew also uses /opt.
So anything in /usr/local will be a third-party python. The 'meat' of the package is usually installed in /Library/Frameworks/. "If you can delete it, it's not system installed."
Unless you intend to install and use multiple pythons at the same time, I find using the python installer directly from https://www.python.org/downloads/ to be much easier than Homebrew, which seems to complicate matters. (Others may disagree.)
PYTHON (do a time machine backup first)
The default Python on OS X shouldn’t be messed with as it’s used by the OS itself. If your default is 2.6.1 then you must have Snow Leopard.
If you just install from the contains a of the currently supported specifiers. Below are some examples.
To install the latest version of “SomeProject”:
Unix/macOS
python3 -m pip install "SomeProject"Windows
To install a specific version:
Unix/macOS
python3 -m pip install "SomeProject==1.4"Windows
To install greater than or equal to one version and less than another:
Unix/macOS
python3 -m pip install "SomeProject>=1,<2"Windows
To install a version that’s with a certain version: compliant index format, and use the --extra-index-url flag to direct pip to use that index.
./s3helper --port=7777python -m pip install --extra-index-url http://localhost:7777 SomeProjectand support was released in setuptools v8.0 and pip v6.0
Easy Install
Windows
Easy Install (easy_install) is a package manager for Python bundled with setuptools. It automatically downloads, builds, installs and manages Python packages for you. For download links and installation instructions for each of the supported platforms, head over to the setuptools PyPI page.
For basic use of easy_install, you only need to supply the filename or URL of a source distribution. Easy Install accepts URLs, filenames, PyPI package names (distutils “distribution” names), and package+version specifiers. It will attempt to locate the latest available version that meets your criteria. When downloading or processing downloaded files, Easy Install recognizes distutils source distribution files with extensions of .tgz, .tar, .tar.gz, .tar.bz2, or .zip. It also handles already-built .egg distributions as well as .win32.exe installers built using distutils.
By default, packages are installed to the running Python installation’s site-packages directory. site-packages is by default part of the python search path and is the target directory of manually built python packages. Modules installed here can be imported easily afterwards. You can override this using the -s or --script-dir option.
Let’s see some commands to download, install, upgrade or even delete a package using easy_install:
-
Install a package by name, searching PyPI for the latest version. This automatically downloads, builds, and installs the package:
>>easy_install PackageName -
Install or upgrade a package by name and version by finding links on a given download page:
>>easy_install -f URL PackageName -
Upgrade an already-installed package to the latest version listed on PyPI:
>>easy_install --upgrade PackageName -
Else to upgrade to a specific version, you can type the package name followed by the required version:
>>easy_install "PackageName==2.0" -
If you have upgraded a package, but want to revert to a previously installed version, you can use the command:
>>easy_install PackageName==1.3.4 -
To uninstall a package, first run the command:
>>easy_install -m PackageNameThis ensures that Python will not search for a package you are planning to delete. After you’ve done this, you can safely delete the .egg files or directories, along with any scripts you wish to remove. If you have replaced a package with another version, then you can just delete the package(s) you don’t need by deleting the PackageName-versioninfo.egg file or directory (found in the installation directory).
Deprecated/abandoned tools
Distribute
Distribute was a fork of setuptools and merged back into setuptools 0.7. It shared the same namespace, so if you had distribute installed, import setuptools would actually import the package distributed with Distribute. You don’t need to use Distribute any more. In fact, the version available on Pypi is just a compatibility layer that installs setuptools.
Distutils2
Distutils2 was an attempt to take the best of Distutils, Setuptools and Distribute and become the standard tool included in Python’s standard library. The idea was that Distutils2 would be distributed for old Python versions, and that Distutils2 would be renamed to packaging for Python 3.3, which would include it in its standard library. These plans did not go as intended and currently Distutils2 is an abandoned project. The latest release was in March 2012, and its Pypi home page has finally been updated to reflect its death with a tl;dr: “keep using setuptools and pip for now, don’t use distutils2”.
Pip
Pip is one of the most famous and widely used package management system to install and manage software packages written in Python and found in Python Package Index (PyPI). Pip is a recursive acronym that can stand for either “Pip Installs Packages” or “Pip Installs Python”. Alternatively, pip stands for “preferred installer program”.
Python 2.7.9 and later (on the python2 series), and Python 3.4 and later include pip (pip3 for Python 3) by default. It is an explicit replacement and indirect successor to easy_install that you saw earlier. Check out Python Packaging User Guide’s page on pip vs easy_install for a detailed discussion.
To ensure you can run pip from the command line, type:
>>pip --versionIf pip isn’t installed, you can do so through the system package manager or by invoking cURL (a client-side data transfer tool):
>>curl https://bootstrap.pypa.io/get-pip.py | pythonWhile you are at it, it is a good idea to update pip, setuptools and wheel:
>>python -m pip install --upgrade pip setuptools wheelWhile pip alone is sufficient to install from pre-built binary archives (the end file(s) that are ready to be executed. The output is the machine instructions that are loaded into the CPU and executed), updated copies of the setuptools and wheel projects are useful to ensure you can also install from source archives.
Let’s check out some handy commands to use pip:
-
To install the latest version of a package:
>>pip install 'PackageName' -
To install a specific version, type the package name followed by the required version:
>>pip install 'PackageName==1.4' -
To upgrade an already installed package to the latest from PyPI:
>>pip install --upgrade PackageName -
Uninstalling/removing a package is very easy with pip:
>>pip uninstall PackageName
Pip has a feature to manage full lists of packages and corresponding version numbers through a requirements file: requirements.txt. Typically, this file outlines all the pip packages that that project uses. You can install everything in that file by using:
>>pip install -r requirements.txtYou can read more about the requirement files here.
Packaging formats: Egg and Wheel
There has been a substantial amount of mentions of the two terms: ‘Python egg’ and ‘wheel’. They are both packaging formats that aim to support the use case of needing an install artifact that doesn’t require building or compilation. Building and compilations can be costly in testing and production workflows.
The egg format (.egg) was introduced by setuptools in 2004. It is a logical structure embodying the release of a specific version of a Python project, comprising its code, resources, and metadata. Basically, a .zip folder with metadata. They follow the same concept as .jar file in Java.
A wheel is a ZIP-format archive with a specially formatted filename and the .whl extension. The Wheel format was introduced by PEP 427 in 2012. Earlier, installing a python package using pip or easy_install could require you to compile a bunch of underlying code, making the import longer. Wheels provide the option to pre-compile the code for a target architecture and operating system. Wheels are the new standard of Python distribution and are intended to replace eggs. Support is offered in pip >= 1.4 and setuptools >= 0.8.
You can read the important differences between Wheel and Egg here.
Conda
Conda is an open source package management system and environment management system. It is maintained by Continuum Analytics. Conda can quickly install, run and update packages and their dependencies. It is also an environment manager and can easily create, save, load and switch between environments on your local computer.
And although Conda was created for Python programs, it can package and distribute software for many language. The conda package and environment manager is included in all versions of Anaconda – a free and open source distribution of the Python and R programming languages for data science and machine learning related applications. Additionally, Anaconda still has the useful interaction with pip that allows you to install any additional libraries which are not available in conda.
Hence, it is a good idea to download and work with Anaconda. This page will walk you through Anaconda installation, the whole process is pretty straightforward. Once you successfully have Anaconda installed, if you are working on Windows – head to the Start menu and search for, open Anaconda Prompt. If you are working on the MacOS or Linux, open the terminal window. Then go ahead and type:
>>conda --versionThis will verify that conda is installed and running on your system and displays the version number that you have installed. To update conda to the current version, type the following:
>>conda update condaConda allows you to to create separate environments containing files, packages and their dependencies that will not interact with other environments. When you begin using conda, you already have a default environment named base. But don’t put programs into your base environment. Rather, create separate environments to keep your programs isolated from each other. You can learn more about creating environment and managing python and python packages in Conda here.
Packaging it all up
You have been introduced to quite a lot of terminologies and tools in this tutorial. Take a break and let it all sink in. This is a general overview of all the tools there are to manage your Python packages, what you finally use depends a lot on the task at hand and the environment you are working on. In the end, there isn’t one package manager that suits everyone and you have to pick your own poison.
Be sure to check out DataCamp’s Intermediate Python for Data Science course, to learn more about Python.