
cron job attempts
[code]
wget -q -O – https://clickety-clack.click/wp-cron.php?doing_wp_cron >/dev/null 2>&1
[/code]
[code]
/usr/local/bin/ea-php74 /home/u794423734/domains/clickety-clack.click/public_html/wp-cron.php?doing_wp_cron
[/code]
[code]
wget -q -O – /home/u794423734/domains/clickety-clack.click/public_html/wp-cron.php?doing_wp_cron >/dev/null 2>&1
[/code]
[code]
wget -q -O – https://clickety-clack.click/wp-cron.php?doing_wp_cron >/dev/null 2>&1
– or –
wget -q -O – https://clickety-clack.click/wp-cron.php?doing_wp_cron
(does it send email?)
<br><br></p>
</div>
<p>command:<br>
[code]
wget -q -O – https://clickety-clack.click/wp-cron.php?doing_wp_cron >/dev/null 2>&1
[/code]
by path –
[code]
wget -q -O – /home/u794423734/domains/clickety-clack.click/public_html/wp-cron.php?doing_wp_cron >/dev/null 2>&1
[/code]
[code]
wget -q -O – /home/u794423734/domains/clickety-clack.click/public_html/wp-cron.php?doing_wp_cron >/dev/null 2>&1
[/code]
cronjobreporting@shawneee.com
[code]
wget -q -O – /home/u794423734/domains/clickety-clack.click/public_html/wp-cron.php?doing_wp_cron >/dev/null 2>&1
[/code]
[code]
wget -q -O – /home/u794423734/domains/clickety-clack.click/public_html/wp-cron.php?doing_wp_cron //
mail -e -s "task #1 report" postmaster@example.com
[/code]
/usr/local/bin/php /home/u794423734/domains/clickety-clack.click/public_html/wp-cron.php?doing_wp_cron
> is for redirect
/dev/null is a black hole where any data sent, will be discarded
2 is the file descriptor for Standard Error
> is for redirect
& is the symbol for file descriptor (without it, the following 1 would be considered a filename)
1 is the file descriptor for Standard Out
Therefore >/dev/null 2>&1 redirects the output of your program to /dev/null. Include both the Standard Error and Standard Out.
Much more information is available at The Linux Documentation Project’s I/O Redirection page.
cron will only email you if there is some output from you job. With everything redirected to null, there is no output and hence cron will not email you.
replace-wordpress-cron-real-cronjob
Under Add New Cron Job, enter the following line in the command field:
[code]
/usr/local/bin/php /home/user/public_html/wp-cron.php
[/code]
Replace /home/user/public_html/wp-cron.php with the actual path to your wp-cron.php file. Head back to cPanel File Manager if you need to check the path.

Bluehost info
PHP command examples:
General example:
/usr/local/bin/php /home3/shawnef8/public_html/path/to/cron/scriptDomain-specific example:
/usr/local/bin/ea-php99 /home3/shawnef8/domain_path/path/to/cron/script
In the above example, replace “ea-php99” with the PHP version assigned to the domain you wish to use. Look in the MultiPHP Manager for the actual PHP version assigned to a domain.
ea-php74
Shared
You MAY NOT run a Cron Job more often than every 15 minutes.
If you are getting errors when using the GET command, please contact us and request access.
- The initial working directory for the process is your home directory.
- Because the processes are run in a non-interactive shell, .bashrc and other startup files are not read.
- Only /usr/bin and /bin will be checked for the specified executable. Executables in other directories must be specified as absolute paths, such as /ramdisk/bin/php5 or relative paths, such as ./my_program.
- When running a script, the interpreter must be specified either in a valid #! line using a full path or at the command line.
- File arguments must be specified with absolute paths, or paths relative to the current working directory.
https://premium.wpmudev.org/blog/set-up-cron-job-cpanel-wp-cron/
How to Set Up a Cron Job in cPanel Hosting (+ WP Cron)
Cron Jobs allow you to run scripts and automate repetitive tasks that can take up considerable time if done manually. In this post, we show you how to set up a cron job in cPanel and how to configure a real cron for WordPress.
This tutorial covers the following:
-
WordPress Cron (WP-Cron)
What is a Cron Job?
A cron job allows you to automate commands or scripts on your site that require being triggered at regular intervals or whenever specific events happen to complete repetitive tasks.
cPanel includes a software utility called cron (from the Greek word for time, Chronos). This utility lets you schedule tasks that your system runs repeatedly. These tasks are called cron jobs or cron schedules and they are run from a file called crontab (CRON TABle) that lists all the tasks that cron needs to execute.
You can set a command or script using cron jobs to run at a specific time every day, week, etc. For example, you could set a cron job to run a backup or delete temporary files to free up disk space on your server every week (or every two hours, or on a specific day of the month, or at 2:36 pm every Wednesday).
Once a cron job is set up, it then runs automatically as per your schedule.
Parts of a Cron Command
A Cron Command typically consists of four parts:
- Timing: this part lets you set when you’d like your script to run by specifying regular intervals in terms of minutes, hours, days, months, and weekdays.
- Execute: this part calls the PHP your cron job needs run, which is normally located in the path
/usr/bin/php. - Script Path: this is the full path of the file you want to run (e.g.
/home/user/public_html/index.php) - Output: this optional part lets you write the cron output to a file or discard it. For example, to discard the output may require adding something like this:
/dev/null 2>&1.
Normally, any script that requires a cron job will provide you with the path or command you need to use that script. Your hosting provider may also supply or give you specific instructions for structuring your cron job commands. You then create a cron job using the path or command provided (and replace any placeholder strings in the line or command with your site’s details, if required).
In the screenshot below, for example, my cPanel dashboard has automatically provided some PHP command examples with my site’s username (helpservices) and a sample PHP version included in the command path.
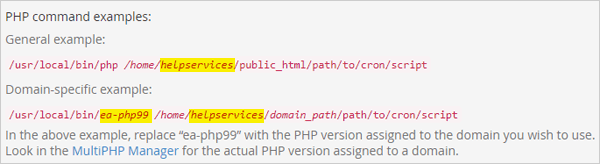 PHP command examples.
Note: cPanel recommends having good knowledge of Linux commands to use cron jobs effectively and running your script past your hosting administrator before adding a cron job to avoid running into problems.
How to Set Up A Cron Job in cPanel
To set up a cron job in cPanel, log into your cPanel dashboard, then scroll down to the Advanced section and click on Cron Jobs.
 Select Cron Jobs in cPanel’s Advanced section.
This brings up the Cron Jobs screen. Here, you can set up email notifications (see next section), add new cron jobs, and view a list of all the cron jobs you have set up and are currently running.
Scroll down to the Add New Cron Job section. You can either select select a preset interval for your cron job to run from the Common Settings drop-down menus or enter your own custom values using the following options:
- Minute: The number of minutes between each time the cron job runs, or the minute of each hour on which you wish to run the cron job.
- Hour: The number of hours between each time the cron job runs, or the hour of each day on which you wish to run the cron job.
- Day: The number of days between each time the cron job runs, or the day of the month on which you wish to run the cron job.
- Month: The number of months between each time the cron job runs, or the month of the year in which you wish to run the cron job.
- Weekday: The days of the week on which you wish to run the cron job.
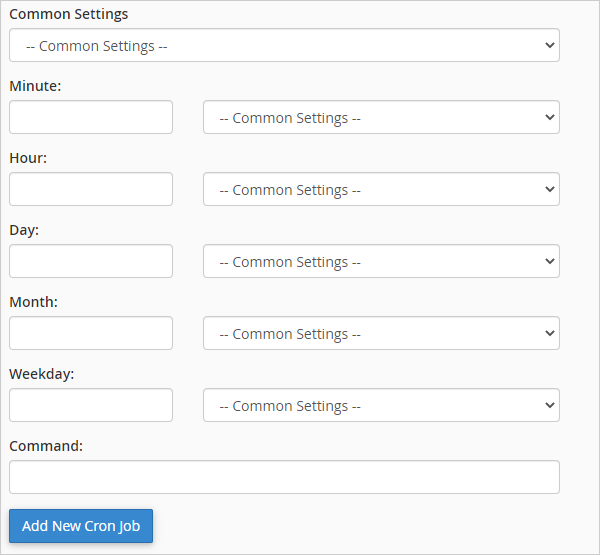 Cron – Common Settings text boxes.
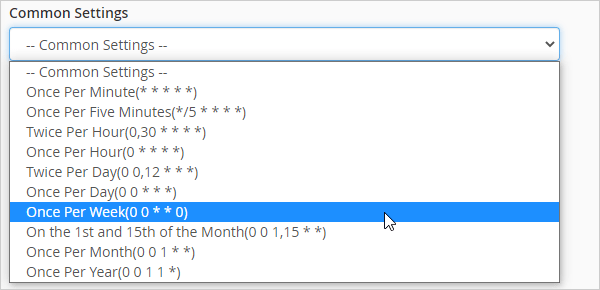
The Common Settings menu contains typical cron job configuration settings with numbers or asterisks in parentheses indicating when the cron job should run.
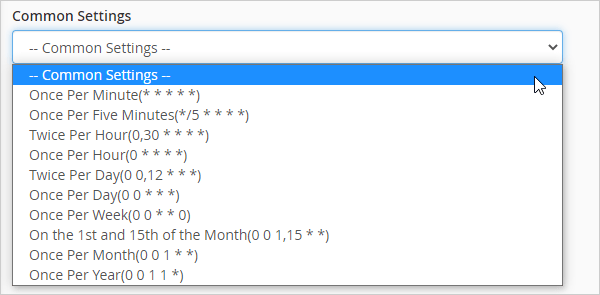 Cron – Common Settings menu.
If you select one of these settings, the system automatically populates the text boxes below with your selected settings.
So, for example, if we select the option to set up a cron job to run a script once per week…
 Let’s set our cron job to run once a week.
The text boxes will be automatically populated with the values of our selected setting.
 Cron Job text boxes auto-populated with values to run once a week.
In the example above, our cron job is scheduled to run every Sunday of every month at exactly midnight.
However, you can use the sub-drop-down menus to enter custom values into the text boxes. This lets you easily modify and adjust your cron job’s scheduled intervals.
 Adjust the settings of your cron job using the sub-drop-down menus and text boxes.
The last step is to enter the actual command you want your cron job to run. You must specify the absolute path to the command you wish to run.
Type or paste in the command into the Command: text box and click Add New Cron Job.
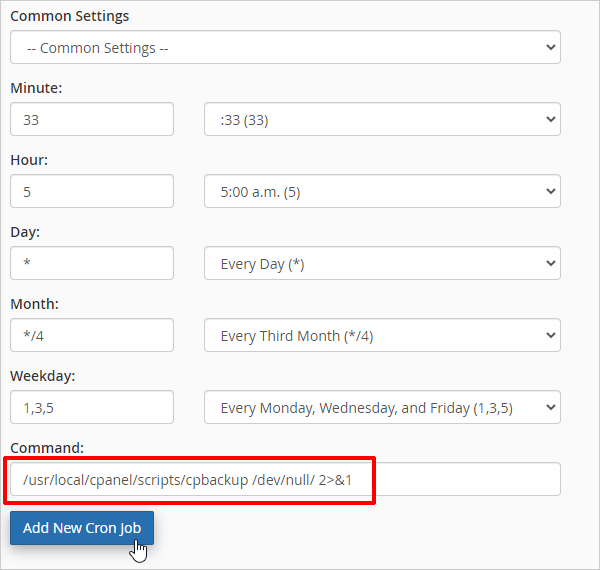 Type or paste in the cron job command.
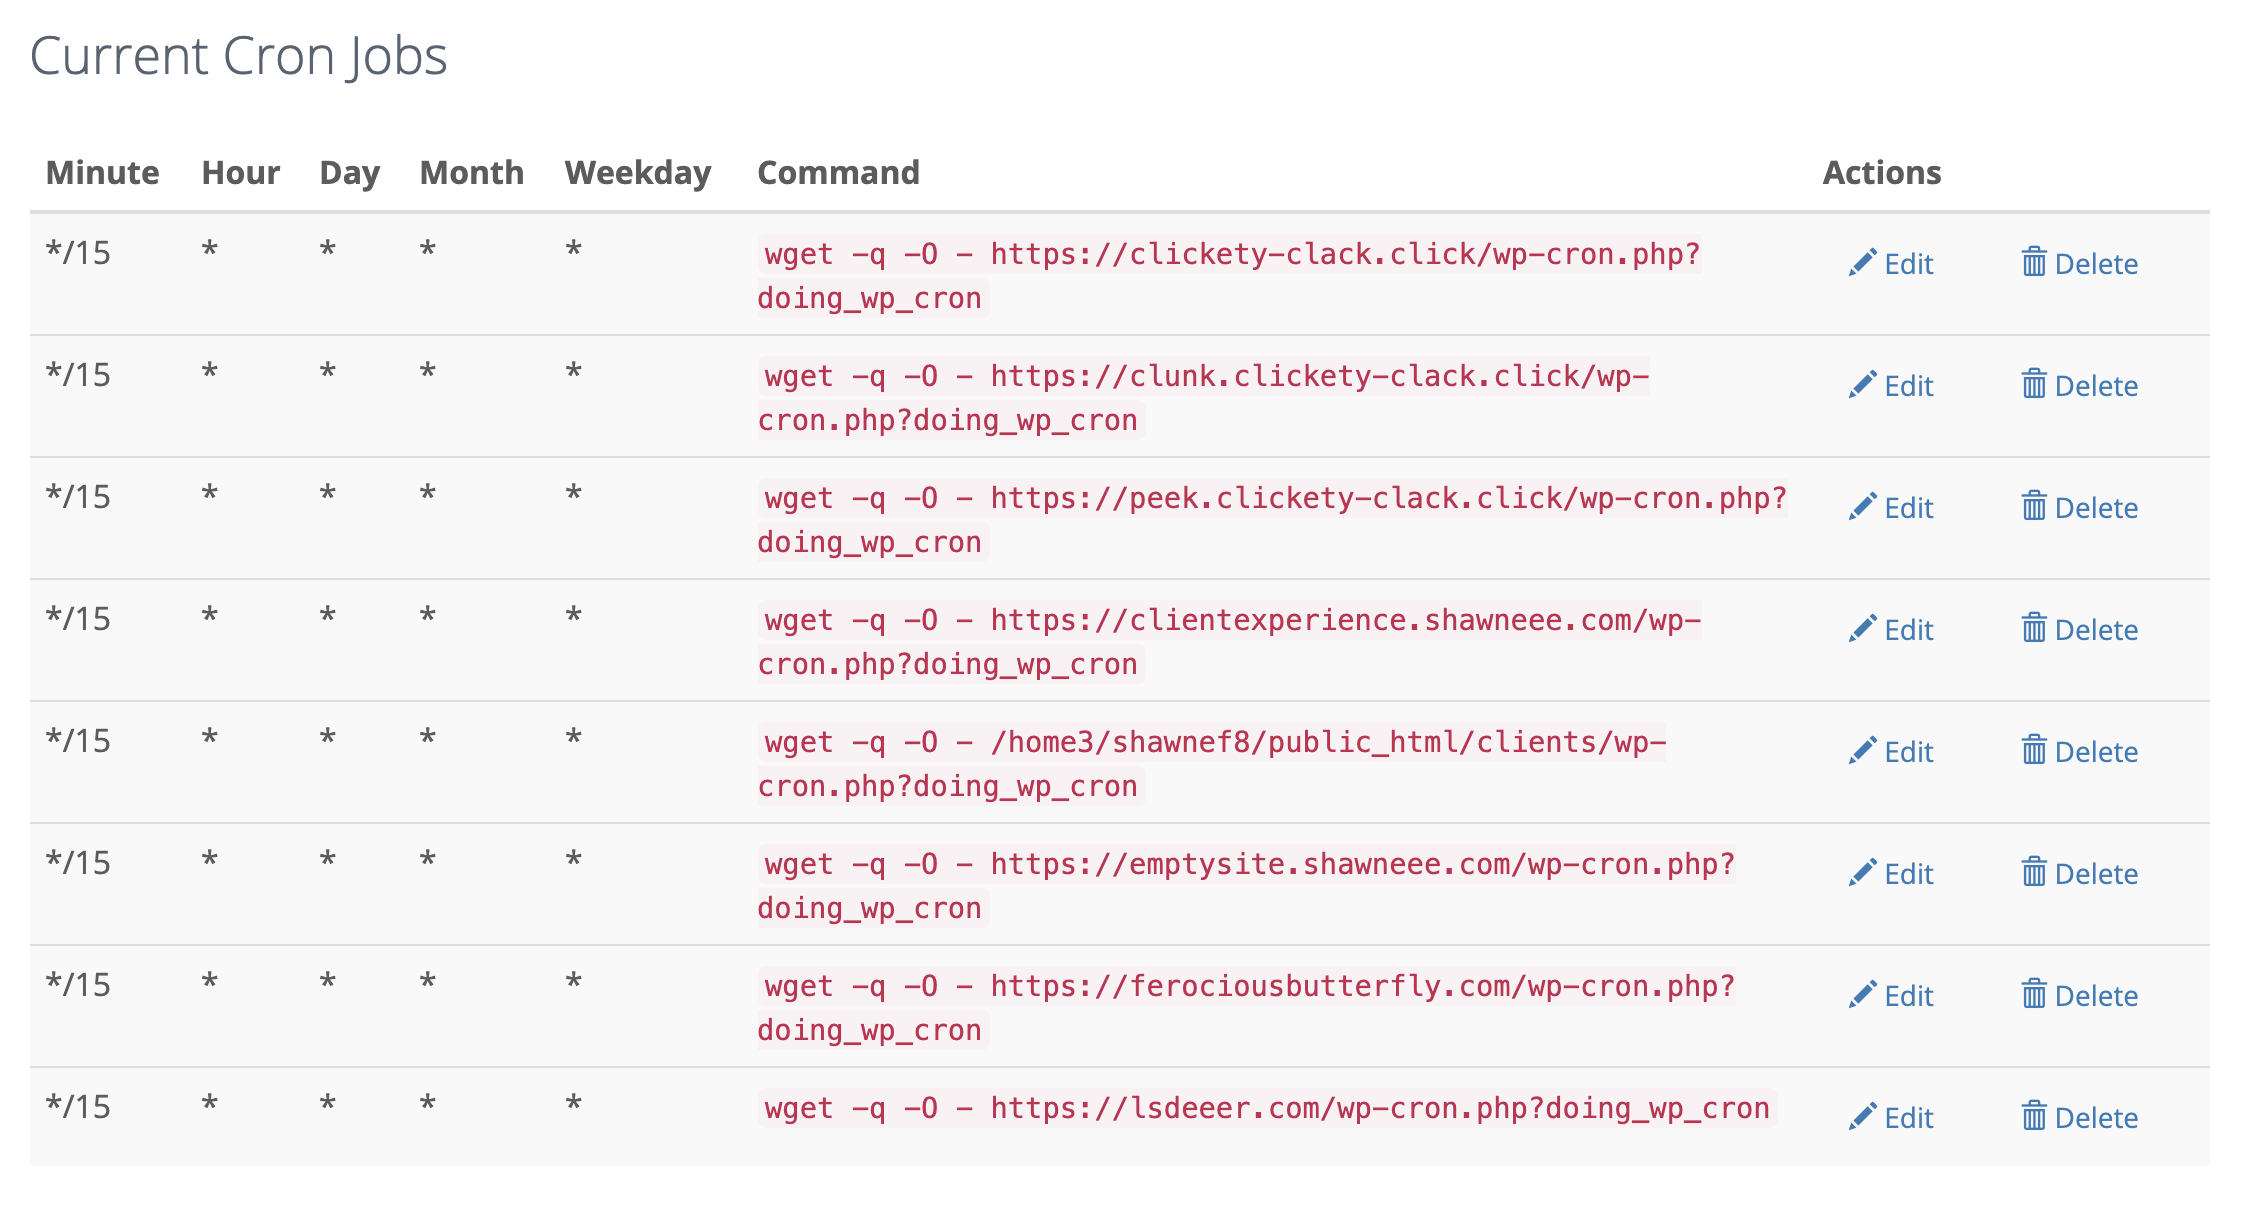
This will add your cron job to the Current Cron Jobs list.
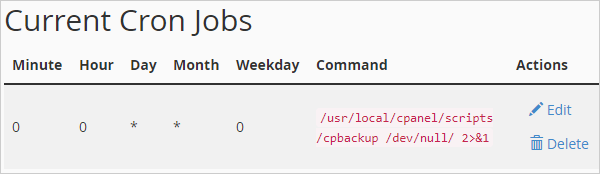 Your cron job has been added to the Current Cron Jobs list.
How to Get Email Notifications After Running Cron Jobs
You can opt to receive (or stop receiving) emails every time a cron job runs a command that produces an output.
This is useful if you want to know when one of your jobs fails to run and you want to review the errors.
Just scroll down to the Cron Email section, enter an email address, and click the Update Email button.
 Get notified via email after a cron job is run.
You can also elect not to receive emails after cron jobs are run:
- To disable email notifications for all cron jobs, remove the email address. To do this, leave the Email field blank and click the Update Email button. The current email address should display as
(none). - To disable email notifications for a single cron job, add the information supplied by your host (see above screenshot) to redirect the command’s output to
/dev/null. (e.g./usr/local/cpanel/bin/is_script_stuck /dev/null 2>&1)
How to Edit a Cron Job
To edit your cron job settings, go to the Current Cron Jobs section and click the Actions > Edit link.
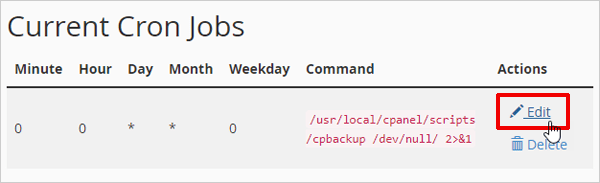 Edit cron job.
Change the values in the text boxes and click the Edit Line button to update your settings.
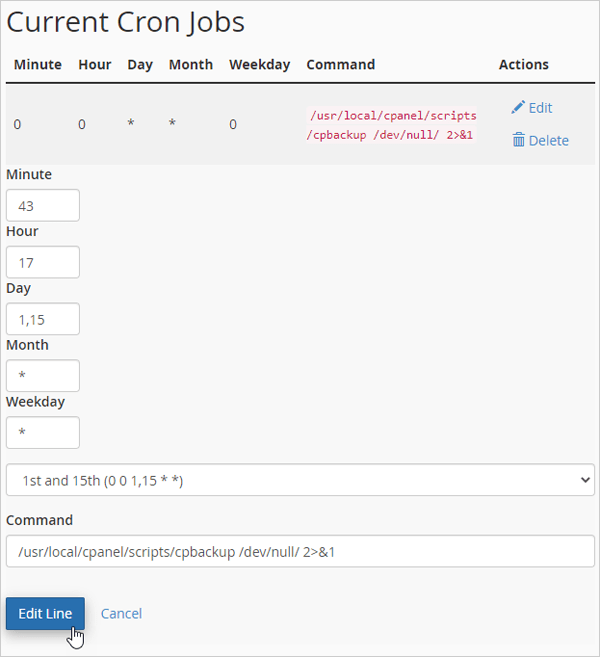 Edit cron job settings.
Your cron job settings are now updated.
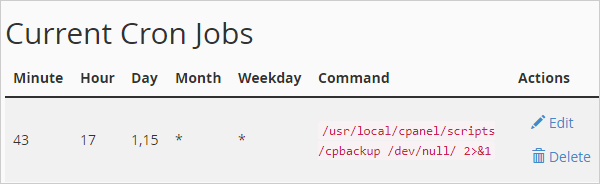 Updated cron job settings.
How to Delete a Cron Job
To delete a cron job, go to the Current Cron Jobs section and click the Actions > Delete link.
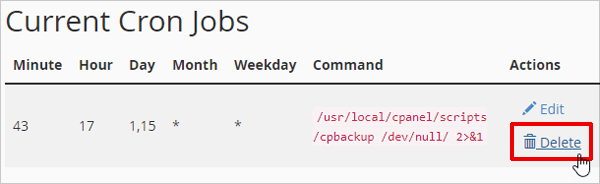 Delete cron job.
Confirm your deletion by pressing the Delete button.
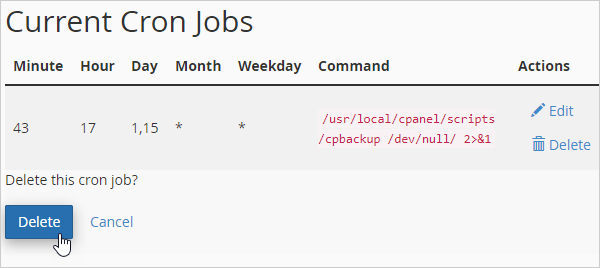 Confirm cron job deletion.
The selected cron job will be removed from the Current Cron Jobs section.
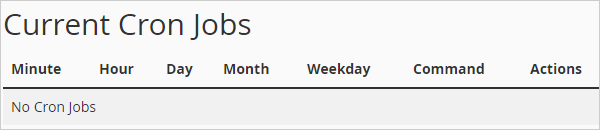 No current cron jobs.
Useful Tips and Additional Information on Using Cron Jobs
Here are some additional tips and useful information on using cron jobs:
If Cron Jobs Are Not Available in Your cPanel Dashboard
Some hosts do not allow users to run cron jobs. If your host has not made cron jobs available in your cPanel dashboard, you can still create and run cron jobs using external services like the ones listed below:
How to Check if Your Cron Job Has Run
Some cron jobs produce output (e.g. a file, email, or web page) and others do not. It is easier to check if the cron ran for jobs that produce output.
For cron jobs that perform tasks behind the scene and don’t produce output, you will need to have root access to your server to check the logs and determine if the job has run as scheduled.
You can check your server logs using an SSH client. Your host should provide the command to check the log for the cron script and the output will normally include the date and time the cron job has run, plus the server name, cron ID, cPanel username, and the command that ran. The name of the script should display at the end of the command.
How to Avoid Cronflicts
cPanel recommends exercising caution when scheduling cron jobs. You should allow enough time between cron jobs for the previous cron job to complete. If you schedule them to run too often, the server could start another cron job before the last cron job ends. This duplication can slow down your server and degrade its performance.
Additionally, many hosts recommend not setting crons to run at regular intervals smaller than 5 minutes apart (some hosts won’t even allow you to run them less than 15 minutes apart).
WordPress Cron (WP-Cron)
In addition to running cron jobs from your hosted server, WordPress also has an internal built-in function it uses to run scheduled tasks on WordPress sites, called WordPress Cron (WP-Cron, wp-cron.php).
WordPress core and many plugins need a scheduling system to perform time-based tasks. These rely on WP-Cron to run backend functions like checking for updates, creating backups, deleting old comments from trash, etc.
Many hosting services are shared, however, and do not provide access to the system scheduler. WP-Cron allows WordPress to run on just about any hosting environment.
Note: you can view and control cron events in the WP-Cron system using a plugin like WP Crontrol.
How To Configure a Real Cron For WordPress
Although the WordPress built-in Cron handler is a really useful feature, WP-Cron is not a real cron job. It only simulates what a system cron does. However, WP-Cron does not run continuously. It is only triggered whenever someone visits your website.
On high-traffic sites, WP-Cron is not an issue. As pointed out in the comments section of this post by one of our members (DavidAnderson of UpdraftPlus.com):
- The code in WordPress core is invoked on page loading only if there is an overdue cron job (i.e. only if needed).
- In a high traffic site, a cron job will run precisely on schedule. If you switch to an external cron caller, your cron job will only run when that schedule is hit.
- High-traffic sites tend to be more complicated and so have more cron jobs. On WP-Cron, jobs run precisely when needed. Switching to an external cron vastly increases the chances of your cron jobs not running on time, as they will now only run to whatever frequency you set their task (every 10 minutes, 5 minutes, 1 minute, etc.).
On low-traffic sites, however, cron schedules can be missed if not enough frequent users visit the site to load a page.
While experts from both our team and member community maintain that you should not disable WP-Cron and use an external cron scheduler unless you know exactly what you are doing, if you are ever asked to disable WP-Cron, here’s how to do it:
To disable WP-Cron, open the wp-config.php file for editing and add the following before the “That’s all, stop editing! Happy publishing.” line:
define('DISABLE_WP_CRON', true);
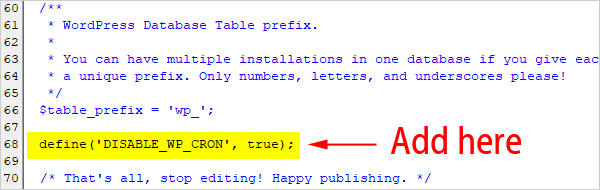 Disable WP-Cron.
Note: This disables WP-Cron from running on page load, not when called directly via wp-cron.php.
You can then, set up your system’s task scheduler to make a web request to the wp-cron.php file by creating a cron job and adding the following command (remember to replace yourdomain.com with your actual domain):
wget -q -O - http://yourdomain.com/wp-cron.php?doing_wp_cron >/dev/null 2>&1
One last point to mention here (once again, thanks to DavidAnderson for raising this):
The only real case for moving to an external cron is if you are on a very low-traffic site, you can’t schedule external visits for some reason (e.g. your site is password protected), and it’s important that those jobs run on time. Otherwise, just leave it alone and all will be well.
We agree with this. Hence, if your sites run on WPMU DEV hosting, we automatically run WP-Cron every 5 minutes. Having a default preset cron helps low traffic sites, as it guarantees scheduled tasks to run every 5 minutes at least.
Finally, as DavidAnderson also points out, if you have a lot of cron jobs, then even every 1 minute may not be enough to process them all. A number of popular plugins have jobs that are scheduled to run every minute. If those take significant time, they can delay others from running.
Cronfused Yet?
Don’t be! And if this seems too cronplicated, don’t worry. Fortunately, our team is here to provide 24/7 expert help and support with anything you need.
https://www.siteground.com/tutorials/wordpress/real-cron-job/
How to Replace the WordPress Cron with a Real Cron Job Tutorial
Because WordPress has to work on all sort of different platforms, OS’s and configurations, it can’t rely that there will be a cronjob service on the server that can handle scheduled tasks. This is why WordPress developers have created a workaround – the wp-cron.php file in your main WordPress folder is executed every time someone loads a page. It then checks if there’s a scheduled task to be done and executes it if necessary.
However, in some cases, this file may become a target of a DOS attack, or caching plugins can interfere with its execution which can cause either a lot of server load or the scheduled tasks may not execute properly and timely. This is why you can substitute this constant file execution with a real cron job.
First, you need to disable the script to be executed every time someone loads one of your pages. To do this, open the wp-config.php file in your main WordPress folder and add the following line before the “/* That’s all, stop editing! Happy blogging. */” line:
define('DISABLE_WP_CRON', true);
Once you do that, you need to set up a real cron job and execute the wp-cron.php file with it. You don’t want to trigger it too often – 30 minutes should be fine for most of the websites. To do this, go to your .

Then, add the following command to be executed every 30 minutes:
wget -q -O - http://yourdomain.com/wp-cron.php?doing_wp_cron >/dev/null 2>&1
Replace yourdomain.com with your actual domain name. The Cron jobs tool has some of the most common schedules preset, so you can just select Twice Per Hour from the interval drop-down menu.

Asustor Nas CronJob
- https://stackoverflow.com/questions/37305576/can-t-get-cron-job-working-on-asustor-nas-model-as-302t
- https://stackoverflow.com/questions/36885909/cronjob-does-not-execute-a-script-that-works-fine-standalone
How to set up a WordPress cron job
This article describes how to configure a cron job for WordPress.
Table of Contents
The virtual WordPress “cron job”
A cron job is a task scheduled to run automatically at specific intervals. For example, a cron job could automatically back up a file every six hours.
In its default configuration, WordPress does not use a real cron job for scheduling and other related tasks. Instead, whenever a page is loaded on a WordPress site, WordPress runs the wp-cron.php file. Although this “virtual” cron job is convenient, it has a few disadvantages:
- Running the wp-cron.php file every time WordPress loads a page is unnecessary, and can negatively affect server performance, particularly on sites that receive a lot of traffic.
- For a site that does not receive a lot of traffic on the other hand, it can be a significant amount of time before a visitor loads a page (and triggers the cron task). This can cause missed schedules for publishing posts and other unintended effects.
To resolve these issues, you can disable the default virtual WordPress cron job, and configure a real cron job. To do this, follow the procedures below.
Disabling the virtual WordPress cron job
To disable the default virtual WordPress cron job, follow these steps:
-
Using the
cPanel File Manager
or the command line, open the
wp-config.php
file in a text editor.
The wp-config.php file is located in the directory where you installed WordPress. Usually, this is the public_html directory.
-
Add the following line to the
wp-config.php
file:
define('DISABLE_WP_CRON', true);Make sure you add the previous line before the following line in the wp-config.php file:
/* That's all, stop editing! Happy publishing. */ -
Save the changes to the wp-config.php file and then exit the text editor. The virtual WordPress cron job is now disabled.
Configuring a real cron job for WordPress
After you have disabled the default WordPress cron configuration in the wp-config.php file, you are ready to set up a real cron job that runs at fixed intervals regardless of site traffic.
If your account includes cPanel access, you can use it to configure the cron job. Otherwise, you can configure the cron job from the command line.
Method #1: Use cPanel
To set up a WordPress cron job using cPanel, follow these steps:
-
Log in to cPanel.
-
In the Advanced section of the cPanel home screen, click Cron jobs.
-
Under
Cron Email
, type the e-mail address that you want to receive notifications, and then click
Update Email
. Every time the cron job runs, the e-mail account will receive a message.
If you do not want to receive e-mail notifications for the cron job, you can append >/dev/null 2>&1 to the command, which redirects all output to /dev/null.
-
Under
Add New Cron Job
, in the
Common Settings
list box, select
Twice an hour
.
You can run cron jobs a maximum of every 15 minutes on shared and reseller accounts. A 30-minute interval for the WordPress cron job should be more than sufficient.
-
In the
Command
text box, type the following line:
cd ${HOME}/public_html; /usr/local/bin/php -q wp-cron.phpThis line assumes that you installed WordPress in the document root (public_html) directory. If you installed WordPress in another directory, modify the cd command to change to that directory instead.
-
Click Add New Cron Job. The new cron job settings take effect immediately.
Method #2: Use the command line
To set up a WordPress cron job using the command line, follow these steps:
-
Log in to your account using SSH.
-
At the command prompt, type the following command:
crontab -e -
Type o to enter editing mode and start a new line of text.
-
Type the following line, replacing username with your own A2 Hosting account username:
*/30 * * * * cd ${HOME}/public_html; /usr/local/bin/php -q wp-cron.php- This line sets the cron job to run every 30 minutes. If you are on an unmanaged platform you can run cron jobs as frequently as you want. On shared and reseller accounts, however, you can only run cron jobs a maximum of every 15 minutes. A 30-minute interval for the WordPress cron job should be more than sufficient.
- This line assumes that you installed WordPress in the document root (public_html) directory. If you installed WordPress in another directory, modify the cd command to change to that directory instead.
-
Press Esc, type :wq and then press Enter. The new cron job settings take effect immediately.
https://askubuntu.com/questions/1020965/how-do-i-set-cron-to-send-emails
For this purposes you system should be able to send emails. So you could install and configure postfix:
sudo apt install postfix
-
For General type of mail configuration choose *Internet Site*, if you want to do more detailed configuration use the command:
sudo dpkg-reconfigure postfix
At this stage Cron will start to send emails. Everything that usually will be outputted to the STDOUT (if you are execute a command in the command line), including all error messages, will be sent to the local mailbox of the user that runs the Cronjob.
The default location of local user's mail boxes is /var/mail/. You can install the command-line email client mutt to read your user's email box via the command line in a convenient way:
sudo apt install mutt
- Note
muttinstallation process will involve installation and configuration ofpostfixif it isn't done before.
You can change the default destination mailbox by changing the value of the envvar MAILTO within crontab, before the definition of the Cronjob.
Please note: unless you haven't enabled SSL/TLS certificate within you send mail configuration, most of the public mail servers will ignore your emails in some way. For example mail.google.com will put them into the spam. If this is a server instance and you already have SSL/TLS certificate for your primary domain follow this nice manual to attach it to Postfix.
Once your system is able to send emails you must make your Cronjob more verbose (for e.g. add -v to the rm command) and must set proper value of MAILTO. So your crontab should look as this:
MAILTO="example.email@gmail.com"
* * * * * find /nfs/rpiggott/complete -mtime +45 -exec rm -v {} \;
Another approach is to create a script (which will be executed via crontab) that includes your command and uses mail, mutt, ssmtp or sendmail to send emails. See the bottom of the references for mor details.
References and further reading: