
RESOURCES
- TAG MANAGER
- https://clickety-clack.click/piifind-fix-in-tag-manager/
https://www.bounteous.com/insights/2020/05/15/excluding-url-query-parameters-google-analytics/
How To Exclude URL Query Parameters in Google Analytics
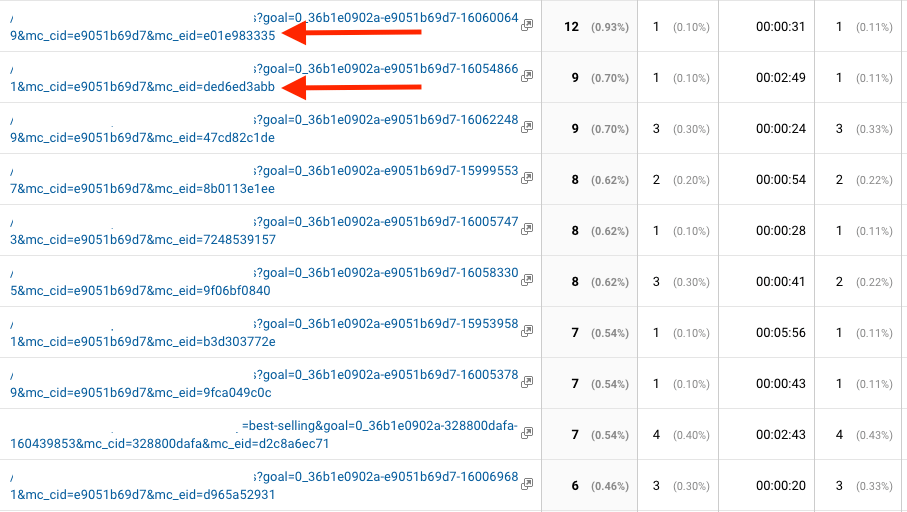
Query parameters can sometimes store useful pieces of information in our URLs, but they can cause problems in our Google Analytics data. Query parameters can break apart our pages and make them hard to analyze in our All Pages report. The same page may have several variations depending on query values.
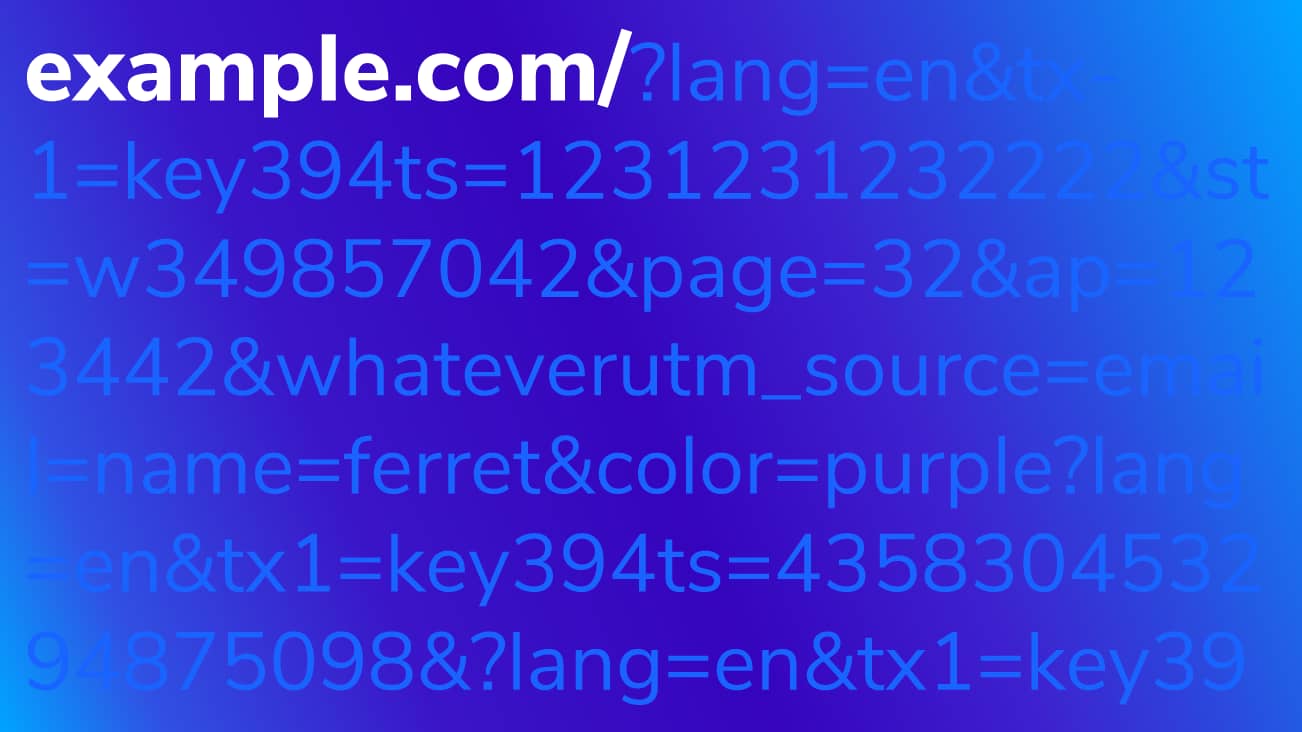
These query parameters make it difficult to measure our page performance because we have to sum across multiple variations of the same page. For Standard Google Analytics customers, this can also be a huge problem if you're reaching high cardinality, in which case you'll start to see your pages grouped into (other). Excluding query parameters can significantly help to streamline reporting.
An important note before we get started: Personally Identifiable Information (PII) can not be removed with View Settings or filters. Data is collected at the property level, so the View Settings and filters do not stop the data from being collected and violates Google's Terms of Service. Your developers should remove these parameters from your URLs, or skip ahead to the Google Tag Manager (GTM) solutions in this post.
View Settings
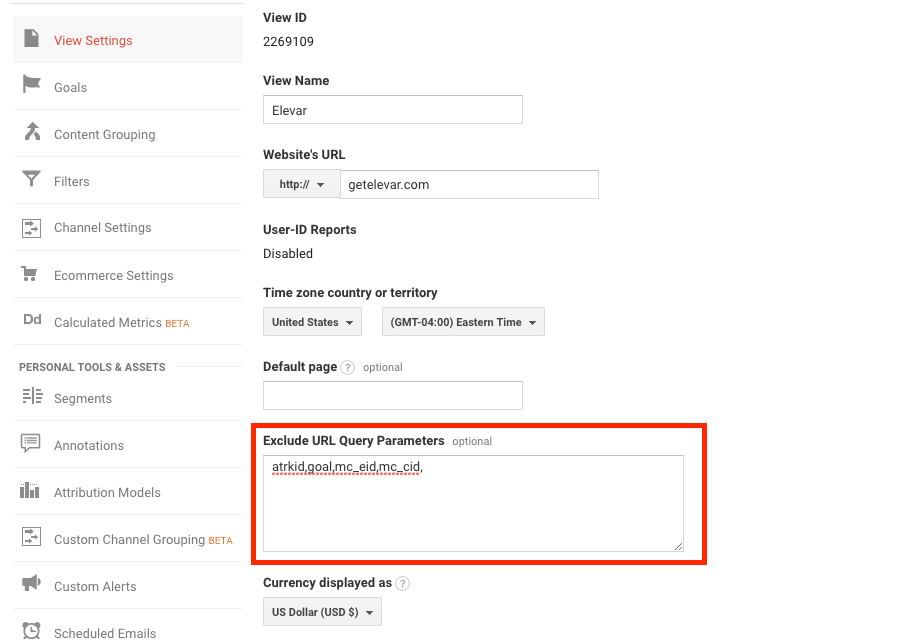
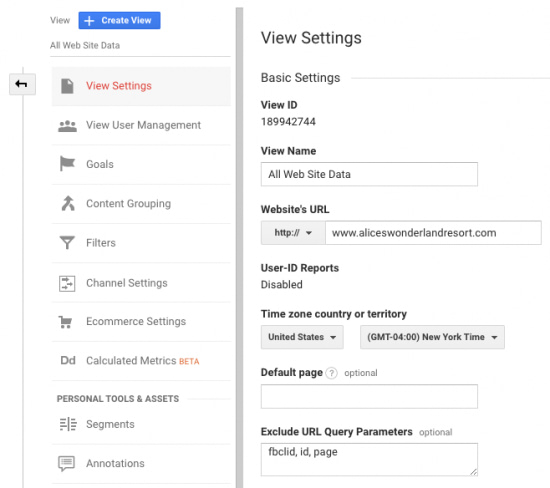
One way to remove query parameters from pages is through the View Settings. Under Admin > View Settings > Exclude Query Parameters, list the query parameters that you want to exclude from your page paths. This is a quick and easy way to exclude query parameters and can be a good option if you have a handful to exclude, but there are some limitations.
The text box is limited to 256 characters, so if you have a long list of query parameters to exclude, this will not be the best option for you. This setting is also at the view level, so you will need to copy this for all views where you want to exclude query parameters.

Filters
We can also use filters to remove some or all query parameters from our pages. Filters are configured at the account level and can be applied to multiple views at once, so this is likely a better option if you are working with several views.
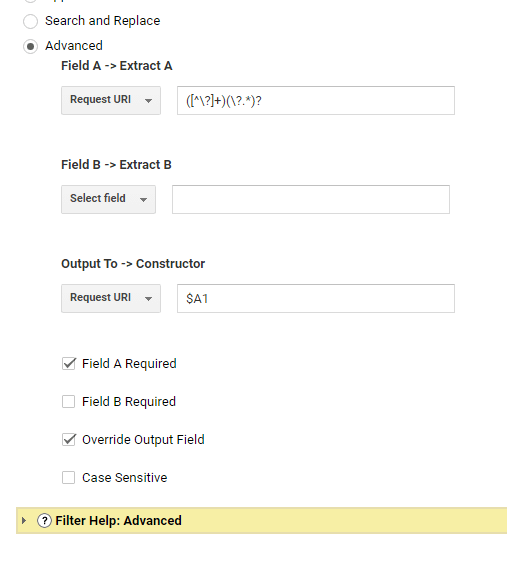
To remove query parameters with filters, we'll want to use a Search and Replace filter. Go into your Admin panel and find "All Filters" under your account. Click to add a new filter and change the filter type to "Custom" and choose "Search and Replace." The filter field should be “Request URI” to tell Google Analytics that we want to look in our page paths.

We will use the Search String to identify the query parameter to remove.
Remove Some Queries with Filters
To remove a specific query parameter from our page paths, we'll use a regular expression to identify them in the Search String field of our filter. For example, if we want to filter out fbclid from all of our pages, we can use the following regular expression:
(**^#?***\?(**#*&)?)(fbclid(=&#***)?&?**)**
After you've entered your Search String, you'll need to add \1 in the Replace String before saving. If you have multiple parameters you want to remove, you'll need to apply another filter for each query.
Once you've set up filters for all of the queries you want to remove, you'll need to apply a "clean up" filter to remove the trailing "?" or "&." Create a new Search and Replace filter and insert the following into the Search String field:
(**[?&]$)**
This filter will look for a question mark or ampersand at the end of the page path and remove it. Remember that the order of your filters does matter! The cleanup filter will need to rank below all of the query filters in the filter list.
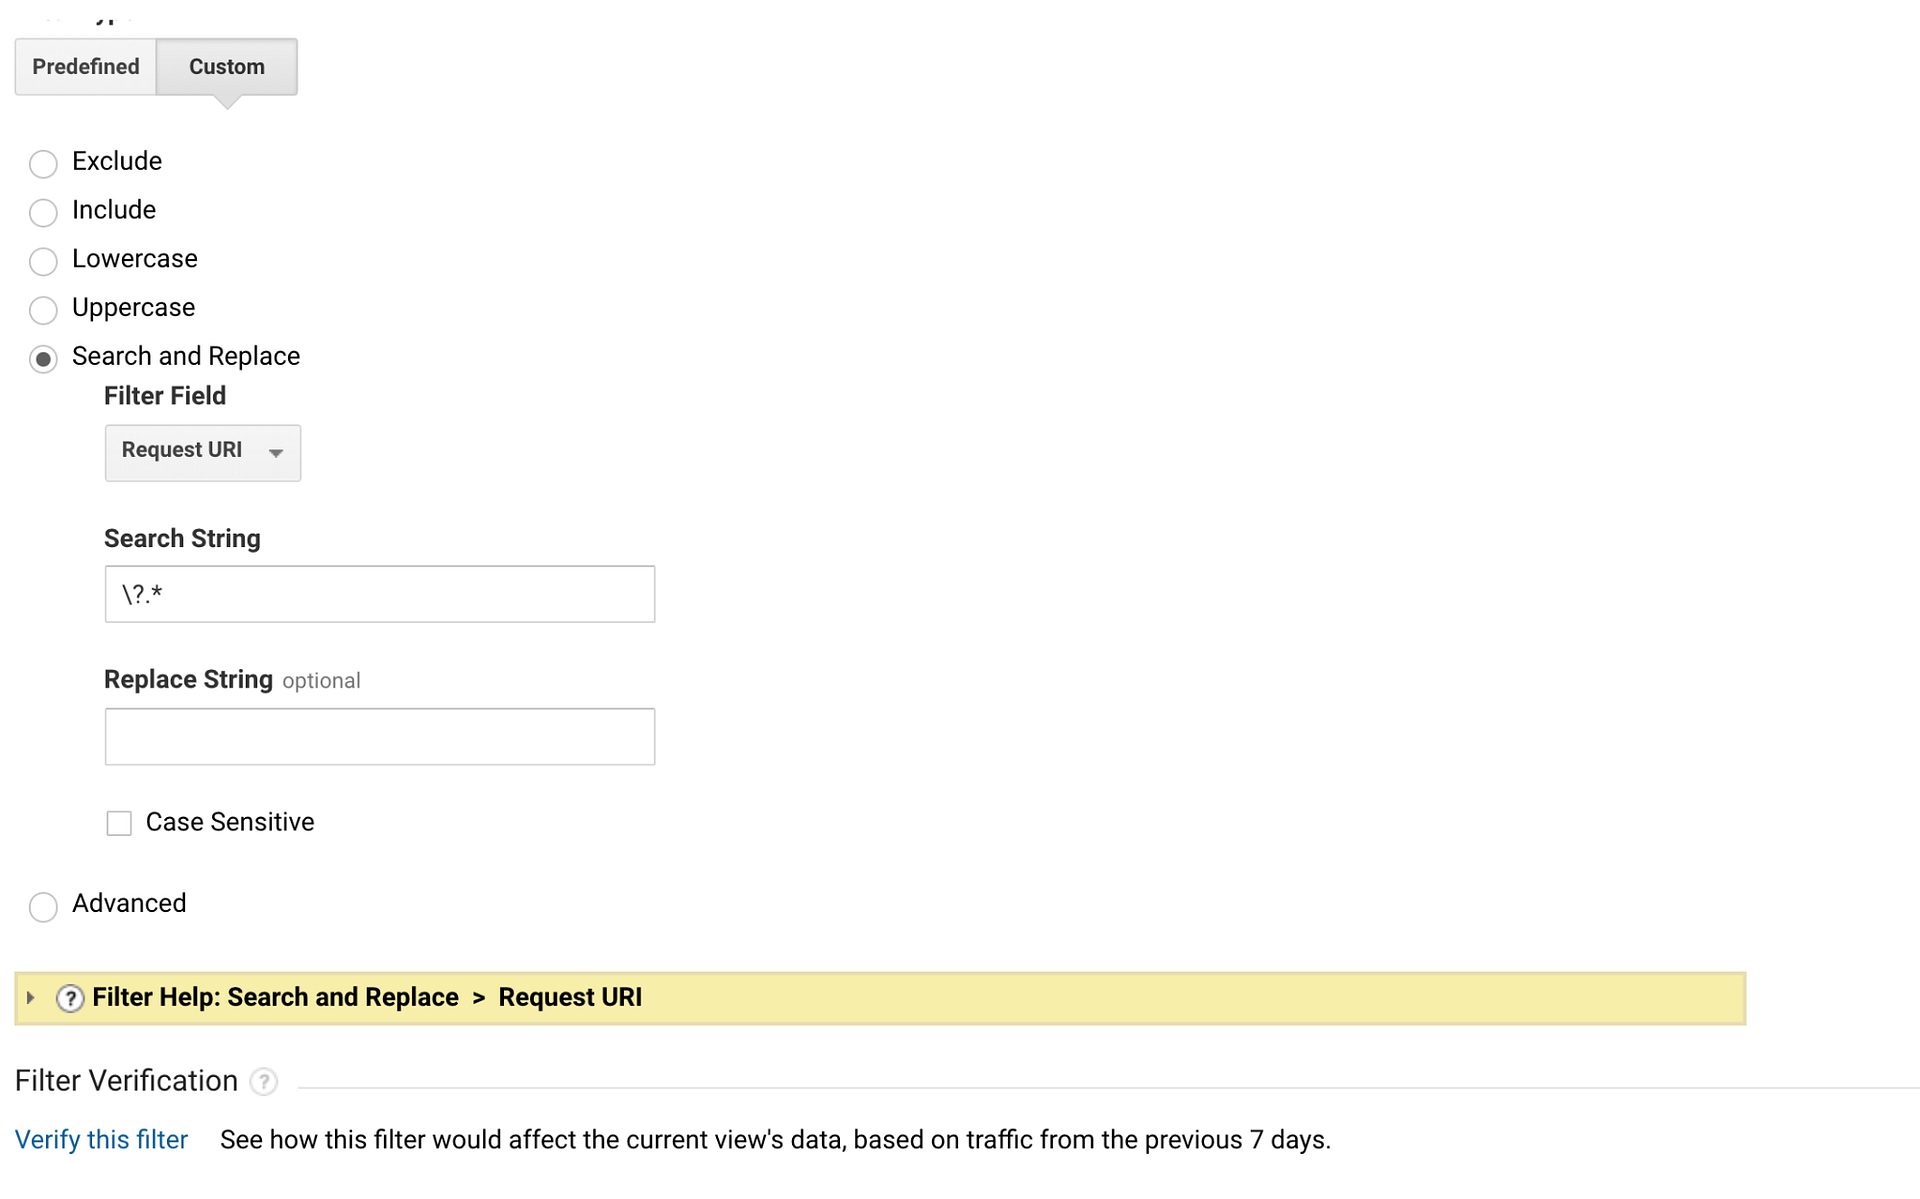
Remove All URL Queries
We can remove all query parameters with one filter. In our Search and Replace filter, add the following in the Search String field:
\?**.***
This regular expression will remove the first "?" in the page path and everything after it. Note that Google Analytics will process UTM parameters before the filter is applied, so don't worry about losing your campaign parameters.
Remove Queries with Google Tag Manager
Removing query parameters through GTM prevents them from ever being sent to Google Analytics, which makes this a better solution if you need to remove Personally Identifiable Information. GTM may also be a better option if you have A LOT of parameters.
Remove Some Queries through Google Tag Manager
If we need to remove specific query parameters through GTM, we can do so with a Custom Javascript variable. Note that this variable does use the built-in {{Page URL}} variable, so be sure to have it enabled.
In a new Custom Javascript variable paste the following:
function() {

  //Update params with queries to be removed from URL
  var params = ['name', 'email'];
  var a = document.createElement('a');
  var param,
      qps,
      iop,
      ioe,
      i;

  a.href = {{Page URL}};

  if (a.search) {

    qps = '&' + a.search.replace('?', '') + '&';

    for (i = 0; i < params.length; i++) {

      param = params[i];
      iop = qps.indexOf('&' + param + '=');

      if(iop > -1) {

        ioe = qps.indexOf('&', iop + 1);
        qps = qps.slice(0, iop) + qps.slice(ioe, qps.length);

      }

    }

    a.search = qps.slice(1, qps.length - 1);

  }

  return a.href;

}
This Javascript will remove the parameters that you designate in the params variable. Next, go to your Google Analytics Settings variable > Fields to Set. Add the field name 'location' and set the value to your Custom Javascript variable to overwrite your page URL.
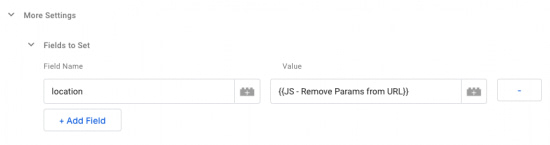
Be sure to test your changes in preview mode, especially if you are using this method to remove PII!
Remove all Queries through Google Tag Manager
Removing all queries in GTM is a simple solution. In our Google Analytics Settings variable, we'll use Fields to Set, but this time use the field name 'page' and set the value to the built-in variable {{Page Path}}.
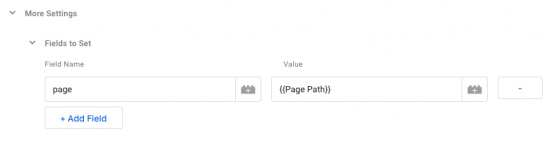
The {{Page Path}} variable returns the document.location.pathname which doesn't include query parameters. Don't worry—your UTMs will still be passed back to Google Analytics! Campaign parameters come from the location, not the page field. Do be careful about search terms getting lost though. Google Analytics will look at your search parameter in the page path from your site search set up, so if it doesn't find one you're Site Search reports won't have any data.
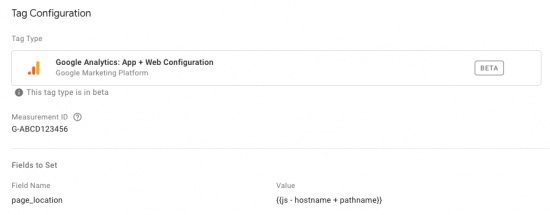
App + Web Properties from Google Analytics
Query parameter removal with App + Web is a bit different because of the automatic pageview tracking. If you need to remove parameters from your page paths, you can use the page_location field in your Configuration tag in GTM. Keep in mind that there are no filters or view settings to strip query parameters in the Google Analytics interface as we saw for Universal Analytics.
If you need to remove specific query parameters, perhaps those storing PII, use the Custom Javascript variable from above and designate the parameters that need to be removed. Instead of setting this variable in your Google Analytics settings variable, we'll do so in your App + Web Configuration Tag.

If you want to remove all query parameters from your page path, we'll use the same method but a different Custom Javascript Variable.
In a new Custom Javascript variable paste the following:
function(){

  return document.location.hostname + document.location.pathname;

}
Better Reporting on Page Performance
There are multiple ways to tackle query parameters in your URLs depending on your set up and implementation. If your queries do contain valuable information about your users or content, you may choose to store them as custom dimensions. Stripping query parameters from page paths can streamline reporting and help to mitigate (other) in your content reports. Clean up your pages with one of these methods for better reporting on your page performance.
Regular Expressions for Beginners: How to Get Started Discovering Sensitive Data
BlogSecurity & ComplianceRegular Expressions for Beginners: How to Get Started Discovering Sensitive Data
Any data discovery and classification solution heavily relies on regular expressions (sometimes called RegExes, REs or RegEx patterns) to identify sensitive data. But what are RegExes and how can they be used to discover sensitive data? Let’s find out.
Handpicked related content:
- Data Classification: What It Is, Why You Should Care and How to Perform It
- Data Classification for Compliance: Looking at the Nuances
Regular expressions are a small but highly specialized programming language; they are basically wildcards on steroids. Using this little language, you specify rules that define the strings you want to match. For example, you can define a RegEx that will match email addresses, PII, PHI or credit card numbers.
Regex Components
A RegEx can include literals and metacharacters.
Literals
Any single character, except for those reserved as metacharacters, is already a regular expression itself. For example, www is a match for www.netwrix.com but wwz is not. Note that regular expressions are case sensitive, so www will not match WWW or wWw.
Metacharacters
The following single characters are not interpreted as literals but instead have special meanings:
- . ^ $ * + ? { } [ ] \ | ( )
The following table describes how each of these metacharacters functions.
| Type | Meta-characters | Description | Examples | |
|---|---|---|---|---|
| The dot | . | The period means any character. | net.rix will match both www.netwrix.com and www.netfrix.com. | |
| Character class | [] | Matches for anything inside the square brackets. The one exception is the ^ character. Inside a class, at the beginning, the ^ means exception from the search. For example [^n] will match any character except n; this is called a negated character class. Note that metacharacters (with one exception) are not active inside classes. For example, [net$] will match any of the characters n, e, t or $ ($ is a metacharacter, but inside a character class it matches only $). The one exception is the ^ character. Inside a class, at the beginning, the ^ means exception from the search. For example [^n] will match any character except n; this is called a negated character class. | You can list characters individually; for instance, net[wrx] will match netw , netr and netx but not netz. Or you can look for a range of characters by giving two characters and separating them by a hyphen; for example, net[a-z] will match neta, netw and netf but not net1. | |
| Anchors | ^ | Used to match characters at the beginning of a string | ^https will match https://netwrix.com but not www.netwrix.com or http://netwrix.com | |
| $ | Used to match characters at the end of a string | com$ will match www.netwrix.com or telecom but not computer. | ||
| Iteration / quantifiers | ? | Matches the preceding element zero or one time (it will always match if the character was not found). It is great for finding optional characters. | colou?r will match both color and colour. | |
| * | Matches the preceding element zero or more times instead of zero or once. It is great for finding optional series of characters. | ne*t will match nt (zero e characters), net (one e ), neeet (three e characters), and so forth. | ||
| + | Matches the preceding element one or more times. Pay careful attention to the difference between * and +. * matches zero or more times, so whatever’s being repeated may not be present at all; + requires at least one occurrence. | ne+t will match net and neeet but not nt. | ||
| | | The choice operator matches either the expression before or the expression after the operator. | net|wrix will match net and wrix. | ||
| {} | {x} matches if the element that precedes it is found exactly x times. {x,y} matches if the preceding element is found at least x times but not more than y times. | n{3} will match nnn , nnnn and nnnd (because they all include n three times in a row), but it will not match nnw. 9{3} will match 999, 1234999124 and text999text, but not 84299238, 9909, or page992. n{3,5} will match nnn, nnnn and nnnnn. | ||
| Blocking and capturing | () | Defines a subexpression that can be recalled later using shorthand: The first subexpression in parentheses can be recalled by \1, the second can be recalled by \2 and so on. Parentheses are normally used either with | (the choice operator) inside or with quantifiers on the outside. | Gr(a|e)y will match Gray or Grey. 0-9[0-9]\1[0-9] will match 3-4-2 and 4-6-1, but not 1-23, 42-1 or 234. | |
| Escape sequence | ** | The metacharacter that follows the slash will be used as a literal. Note that some sequences beginning with \ are not escape sequences. Instead, they represent predefined sets of characters that are often useful, such as the set of digits, the set of letters, or the set of anything that isn’t whitespace. The most popular ones are listed below as “special metacharacters.” | www.netwrix.com will match www.netwrix.com but not www,netwrix,com. | |
| Special metacharacters | \s | Matches any whitespace character (a space, a tab, a line break or a form feed). | Netwrix\sAuditor will match Netwrix Auditor, and Netwrix(tab)Auditor, but not Netwrix Auditor or NetwrixAuditor. | |
| \S | Matches any non-whitespace character. | \Snetwrix will match Xnetwrix and 1netwrix. | ||
| \w | Matches any alphanumeric character. | \w\w\w will match net, dfw and Netwrix. | ||
| \W | Matches any non-alphanumeric character. | netwrix\W will match netwrix! and netwrix?. | ||
| \d | Matches any decimal digit. | Netwrix\d\d will match Netwrix80 and Netwrix90. | ||
| \D | Matches any non-digit character. | Netwrix\D will match Netwrix) and Netwrix-. | ||
| \a | Matches any single alphabetic character, either capital or lowercase. | net\arix will match netWrix, netfrix and netarix. | ||
| \b | Defines a word boundary. | \brix will match rix and rixon but not netwrix. | ||
| \B | Defines a non-word boundary. | \Brix will match Netwrix and trix but not rixon. |
Metacharacter combinations
Now we know almost all the metacharacters and are ready to combine them.
Example: Looking for license plate numbers
Suppose we need to find a license number in the format aaa-nnnn — the first three digits must be alphanumeric and the last four must be numeric. The hyphen can be replaced with any character or missing altogether.
The RegEx for this will be:
- \b[0-9A-Z]{3}( 0-9A-Z|\s)?[0-9]{4}\b
Let’s dissect this RegEx:
- \b requires a word boundary, so matching strings cannot be part of a larger string.
- [0-9A-Z]{3} means that the first three characters must be alphanumeric.
- ( 0-9A-Z|\s)? means the next part of the string must be either a delimiter — a non-alphanumeric character or a whitespace character — or nothing at all.
- [0-9]{4} means the next part of the string must be 4 digits.
- \b specifies another word boundary.
This RegEx will match the following license numbers: NT5-6345, Gh4 9452, XS83289
However, it will not match these license numbers: ZNT49371, HG3-29347, nt4-9371
Example: Looking for Social Security numbers
Another good example is U.S. Social Security number (SSN), which always takes the form nnn-nn-nnnn.
The easiest RegEx is the following:
- [0-9]{3}-[0-9]{2}-[0-9]{4}
However, this will generate false positives, since not all numbers that have this form are legitimate SSNs. Moreover, it will miss some actual SSNs, including any that are written without the hyphens. To get more accurate results, we should build more complex one. We know that:
- No digit group can be all zeroes.
- The first block cannot be 666 or 900-999.
- SSNs can be written with whitespace characters instead of hyphens, or without any delimiters at all.
- If the first block starts with a 7, it must be followed by a number between 0 and 6 and then any third digit.
Therefore, the advanced RegEx will look like this:
- \b(?!000|666|9\d{2})([0-8]\d{2}|7([0-6]\d))([-]?|\s{1})**(?!00)\d\d\2(?!0000)\d{4}\b**
As before, \b at the beginning and end specify a word boundary. Let’s look more deeply at each number block in between.
The first block
- (?!000|666|9\d{2}) is a negative look-ahead that specifies the number must not begin with 000, 666, or 9 followed by any two digits.
- ([0-8]\d{2} specifies that the string has to start with a digit between 0 and 8 and have two more digits (0-9) after it.
- |7[0-6]\d)) says that it happens to begin with 7, the next digit must be between 0 and 6, followed by any digit.
- ([-]?|\s{1}) specifies that after the three digits, there should be either a hyphen, a whitespace character or nothing at all to mark the end of the first block.
The second block
- (?!00) is another negative look-ahead that specifies there must not be 00 in the second block.
- \d\d specifies that there must be any two digits in the second block.
- \2 matches the same text as the second capturing group, which is ([-]?|\s{1}), so it specifies that the second block can end with a hyphen, a whitespace character or no additional character at all.
The third block
- (?!0000) is another negative look-ahead that specifies there cannot be four zeroes in the third block.
- \d{4} requires any four digits in the third SSN block.
Examples of popular RegExes
| To find | Use this RegEx | Example of match |
|---|---|---|
| Email addresses | ^[\w.=-]+@[\w.-]+.[\w]{2,3}$ | T.Simpson@netwrix.com |
| U.S. Social Security numbers | \b(?!000|666|9\d{2})([0-8]\d{2}|7([0-6]\d))([-]?|\s{1})(?!00)\d\d\2(?!0000)\d{4}\b | 513-84-7329 |
| IPV4 addresses | ^\d{1,3}[.]\d{1,3}[.]\d{1,3}[.]\d{1,3}$ | 192.168.1.1 |
| Dates in MM/DD/YYYY format | ^([1][12]|[0]?[1-9])\/-\/-$ | 05/05/2018 |
| MasterCard numbers | ^(?:5[1-5][0-9]{2}|222[1-9]|22[3-9][0-9]|2[3-6][0-9]{2}|27[01][0-9]|2720)[0-9]{12}$ | 5258704108753590 |
| Visa card numbers | \b([4]\d{3}[\s]\d{4}[\s]\d{4}[\s]\d{4}|[4]\d{3}[-]\d{4}[-]\d{4}[- ]\d{4}|[4]\d{3}[.]\d{4}[.]\d{4}[.]\d{4}|[4]\d{3}\d{4}\d{4}\d{4})\b | 4563-7568-5698-4587 |
| American Express card numbers | ^3[47][0-9]{13}$ | 34583547858682157 |
| U.S. ZIP codes | ^((\d{5}-\d{4})|(\d{5})|([A-Z]\d[A-Z]\s\d[A-Z]\d))$ | 97589 |
| File paths | \\\+$ | \fs1\shared |
| URLs | (?i)\b((?:[a-z][\w-]+:(?:\/{1,3}|[a-z0-9%])|www\d{0,3}[.]|[a-z0-9.-]+[.][a-z]{2,4}\/)(?:\s()+|((\s()+|((\s()+)))))+(?:((\s()+ |((\s()+))))|\s`!()\[\]{};:'".,?«»“”‘’)) | www.netwrix.com |
Helpful Regex web resources
- https://regexr.com and https://regex101.com will help you to check your RegExes by highlighting syntax and tooltips.
- https://regexcrossword.com is a crossword puzzle game in which the clues are defined using regular expressions.
- https://www.regular-expressions.info a great site with information about regular expressions. In addition, the Notepad++ tool has a RegEx helper extension that will serve you well while you’re working with regular expressions.
Handpicked related content:
https://www.practicalecommerce.com/removing-personal-data-from-google-analytic
DATA STUDIO REPORT:
https://datastudio.google.com/u/0/reporting/1MI0l7m79xrEo6HnSiVtvsX9yx_q9fE_w/page/Reo0
https://www.practicalecommerce.com/removing-personal-data-from-google-analytics
Removing Personal Data from Google Analytics
JANUARY 10, 2020 • MORGAN JONES
Google Analytics prohibits the collection of personally identifiable information. If detected, Google could delete PII from your reports. Users of Google Analytics should therefore be proactive to detect and then delete the PII if necessary.
I’ll explain how to do that in this post.
The best way to remove PII is not to send it to Analytics to begin with. For more, see “Best practices to avoid sending Personally Identifiable Information (PII),” a Google post.
Detecting PII
In the article above, Google explains where to search for PII in your reports. The main areas are:
- User ID settings,
- Content settings (pages and page titles),
- Event settings (category, action, label),
- Ecommerce settings (credit card, customer name, shipping and billing address, phone number),
- Campaign dimensions (source, medium, campaign, ad content, term fields),
- Site-search settings (search term or category),
- Custom dimensions.
The screenshot below is an example of PII data. The Source field contains an email address, and the Medium field contains a phone number, which I’ve partially obscured.
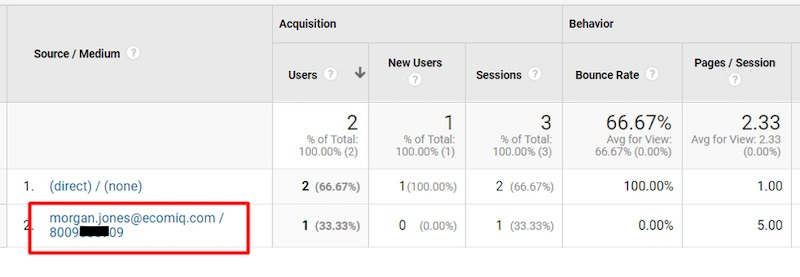
This sample Acquisition report includes a personal email address and phone number in, respectively, the Source and Medium fields. Click image to enlarge.
I’ve created a Google Data Studio report to detect PII. It should not be your only method of detecting, but it should work in most cases. Monitor this report regularly. Modify the filters to fit your setup and take action if PII is detected.
Deleting PII
Google provides a process for removing PII. Navigate to Admin > Property > Data Deletion Requests > Create Data Deletion Request.
Enter the “Start Date,” “End Date,” and “Fields to Delete.” In the below example, I am deleting “All” fields because my campaign URL parameters contained PII, and “All” is required to remove this data.
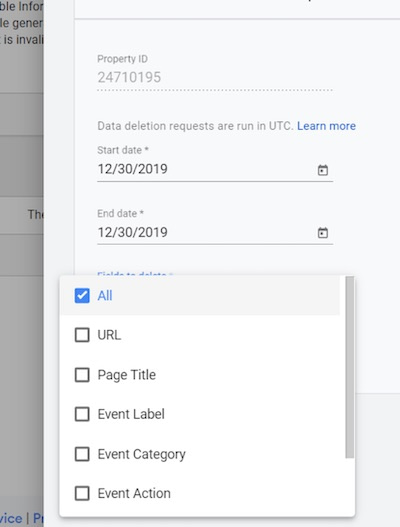
Enter the “Start Date,” “End Date,” and “Fields to Delete.” To delete PII in campaign URL parameters, select “All.”
After clicking “Submit,” the status is “In Grace Period.” It takes at least seven days for Google to remove the data. Check after a week or so to confirm.
You can cancel the deletion request in the interim. To do this, click on “In grace period” in the table and reach the “Data Deletion Request Review” page (below), which includes the status, details, and option to cancel.

To cancel a deletion request, click on “In grace period” in the table and reach the “Cancel Deletion” button on the “Data Deletion Request Review” page. Click image to enlarge.
When it completes the Data Deletion Request, Google will notify you in an email. Also, the status will update to “Completed.”
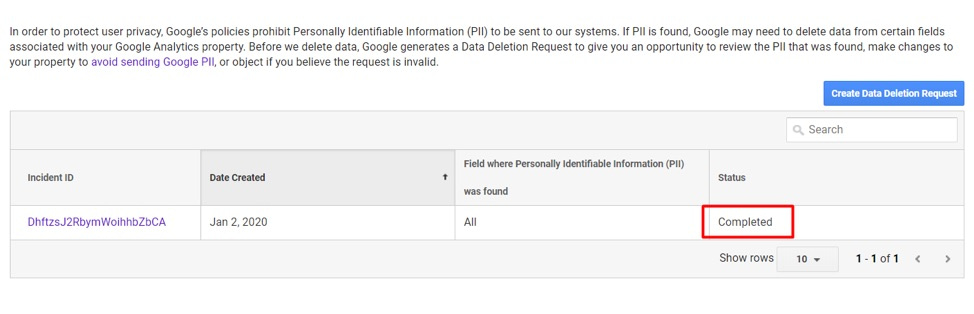
When finalized, the Data Deletion Request status will change to “Completed.” Click image to enlarge.
Finally, confirm that Google has removed the PII in your reports. The example Acquisition report, above, included my email address and phone number, respectively, in the Source/Medium fields. Note, below, that both are now gone.

Confirm in your reports that Google has removed the PII. This Acquisition report no longer contains a personal email address and phone number in the Source/Medium fields. Click image to enlarge.
Removing PII
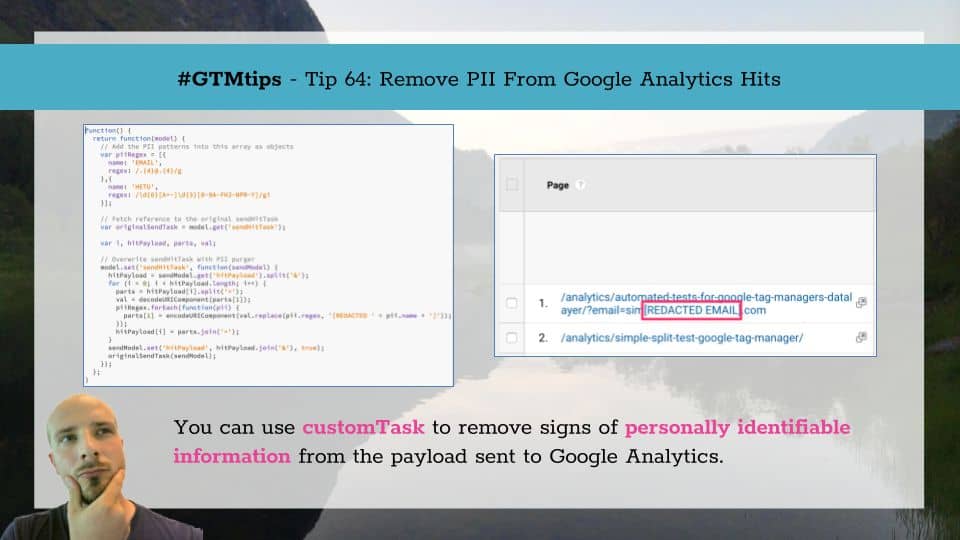
GTMTIPS: REMOVE PII FROM GOOGLE ANALYTICS HITS
August 31, 2017 in GTM tips | 131 comments
Sending personally identifiable information (PII) to Google Analytics is one of the things you should really avoid doing. For one, it’s against the terms of service of the platform, but also you will most likely be in violation of national, federal, or EU legislation drafted to protect the privacy of individuals online.
In this #GTMTips post, I’ll show you a way to make sure that any tags you configure this solution with will not contain strings that might be construed as PII. The tip is for Google Tag Manager, but with very little modifications it will work with Universal Analytics, too.
(UPDATE 8 September 2017: Check out Brian Clifton’s great extension of this solution: Remove PII from Google Analytics)
X The Simmer NewsletterSubscribe to the Simmer newsletter to get the latest news and content from Simo Ahava into your email inbox!
TIP 64: REMOVE PII FROM HITS TO GOOGLE ANALYTICS
The solution hinges around customTask, which has fast become my favorite new feature in the analytics.js library. See the following articles to understand why I think so:
- #GTMTips: Use customTask To Access Tracker Values In Google Tag Manager
- #GTMTips: Send Google Analytics Tag To Multiple Properties
- Track Users Who Are Offline In Google Analytics
Anyway, to make the whole thing run, create the following Custom JavaScript variable:
function() {
  return function(model) {
    // Add the PII patterns into this array as objects
    var piiRegex = [{
      name: 'EMAIL',
      regex: /.{4}@.{4}/g
    },{
      name: 'HETU',
      regex: /\d{6}[A+-]\d{3}[0-9A-FHJ-NPR-Y]/gi
    }];

    var globalSendTaskName = '_' + model.get('trackingId') + '_sendHitTask';

    // Fetch reference to the original sendHitTask
    var originalSendTask = window[globalSendTaskName] = window[globalSendTaskName] || model.get('sendHitTask');

    var i, hitPayload, parts, val;

    // Overwrite sendHitTask with PII purger
    model.set('sendHitTask', function(sendModel) {
      hitPayload = sendModel.get('hitPayload').split('&');
      for (i = 0; i < hitPayload.length; i++) {
        parts = hitPayload[i].split('=');
        // Double-decode, to account for web server encode + analytics.js encode
        try {
          val = decodeURIComponent(decodeURIComponent(parts[1]));
        } catch(e) {
          val = decodeURIComponent(parts[1]);
        }
        piiRegex.forEach(function(pii) {
          val = val.replace(pii.regex, '[REDACTED ' + pii.name + ']');
        });
        parts[1] = encodeURIComponent(val);
        hitPayload[i] = parts.join('=');
      }
      sendModel.set('hitPayload', hitPayload.join('&'), true);
      originalSendTask(sendModel);
    });
  };
}
Once you add this variable to your Universal Analytics tags as the customTask field, any hits sent by these tags will be parsed by this variable, which replaces the instances of PII with the string [REDACTED pii_type].

At the beginning of the code snippet, you’ll see the configuration object piiRegex. It’s an array of object literals, where each object has two properties: name and regex. The first is what will be used in the replace string after “REDACTED”. So if name is “EMAIL”, you’ll see “[REDACTED EMAIL]” in your Google Analytics reports wherever PII data was removed.
The second parameter, regex, is where you’ll add the regular expression literal for whatever PII pattern you want to redact. In the example above, I have two patterns:
/.{4}@.{4}/g– this matches all @ symbols plus the four preceding and four following characters. So if ANY part of the payload (URL, Custom Dimension, Event Label, etc.) has the @ symbol, then the string will be obfuscated. Thus,simo.s.ahava@gmail.combecomessimo.s.a[REDACTED EMAIL]l.com./\d{6}[A+-]\d{3}[0-9A-FHJ-NPR-Y]/gi– this is a reasonably good abstraction of the Finnish personal identity code. It’s not perfect, because the personal identity code is actually a calculation, so you can’t use simple pattern matches to only find valid codes. This regular expression will probably result in many false positives, especially if your GA hits include UUIDs or any type of alphanumeric hashes. But it’s still better than collecting this sensitive data.
You can add your own regular expression patterns as new objects of the array.
When you add this variable into the customTask field of a Universal Analytics tag, the code will run through the entire payload, looking for matches to the regular expressions you provide in the configuration array. If any matches are made, they are redacted.
Do you have other, useful regular expressions for finding and weeding out personally identifiable information?
One subset of information that particularly requires security is a class of data called personally identifiable information (PII). Our employers, schools and other organizations all collect and retain PII data about us inside the applications they use. This data includes fields like:
- Social security number
- Driver’s license number
- Passport number
- Date of birth
- Home address
- Phone number
- Employee number
How to Find and Purge Personally Identifiable Information from Your Google Analytics
Reading Time: 5 minutes
Google policies mandate that no data be passed to them that could be recognized as personally identifiable. This post aims to provide an easy-to-follow, structured approach to identifying Personally Identifiable Information (PII) that might exist in your or your client’s Google Analytics account, as well as different methods for preventing further collection of such information. In this post I will outline what constitutes as PII, and how to avoid potentially passing this information to Google when implementing Analytics on a property.
The approaches outlined below aim to help alert you that PII is being captured. Ultimately however, Google requires that:
“You will not and will not assist or permit any third party to, pass information to Google that Google could use or recognize as personally identifiable information.”
This means that if you find PII in your data collection, simply filtering out the data from your Google Analytics property is only half the battle. Ultimately no PII should make it into Google Analytics at all.
What constitutes PII according to Google?
Any name, email address, billing information, social security numbers, or other data which can be reasonably linked to such information by Google, or data that permanently identifies a particular device (such as a mobile phone’s unique device identifier), even in hashed form.
“The Google Analytics terms of service, which all Google Analytics customers must adhere to, prohibits sending personally identifiable information (PII) to Google Analytics … Your Google Analytics account could be terminated and your data destroyed if you use any of this information**.”
Possible trouble areas
So you suspect that you might be collecting PII, but are not sure of where to look or what to look for? Then this post is for you! Below are some of the major areas where users can run into trouble with PII within their Google Analytics Data. Oftentimes, the inclusion of PII in any of these different areas is unintentional, which is why performing a PII audit is so important.
Looking for PII during the setup and testing phase of your Google Analytics implementation is recommended as a best practice in order to avoid running into any PII collection issues further down the line.
Places where PII can be found
- Query string parameters located in URLs
- Data imports
- Event parameters (category, action, label)
- Custom dimensions
- Social event dimensions
- Campaign tags
Common PII types (as defined by Google)
- Email address
- First name / last name
- Billing Information
- Social security number
- Credit card number
- IP address
- Device ID
- Any other information that would identify a specific individual
Common Regular Expressions
So, now we know where and what to look for in our Google Analytics reporting interface. But before we dive into the various auditing methods, I wanted to take a moment to highlight one of the techniques we will use to assist us in our task. According to Jan Goyvaerts over at www.regular-expressions.info:
“A regular expression (regex or regexp for short) is a special text string for describing a search pattern. You can think of regular expressions as wildcards on steroids.”
Below you can view an assortment of regular expressions for matching some of the different types of PII. These expressions will allow you to search for some common PII types. There are probably many other variations of these regular expressions or even regular expression types that would fit in here and essentially do the same thing, but these are some of the more common ones:
*Caveat: not every type of PII can be searched for in this way due to the complexity of the text (e.g. a physical home address, or first/last name).
| PII Type | RegEx |
|---|---|
| Email address | ([a-zA-Z0-9_.-]+)@([\da-zA-Z.-]+).([a-zA-Z.]{2,6}) |
| Social security number | ^\d{3}-?\d{2}-?\d{4}$ |
| IP address | ^(?:[0-9]{1,3}.){3}[0-9]{1,3}$ |
Auditing Methods
This is an overview of the two main methods you will be using to identify potential PII within the common trouble areas, and their limitations. Here you can use the regular expressions listed above, as well as your own personal sleuthing skills to look for PII. Since regular expressions won’t help you when it comes to things like physical address or first/last name combinations, you will need to manually scan the different reports for those types of PII.
Inline Filter
The inline filter method will be your first, and likely best approach for identifying PII in your data. It will allow you to quickly scan your standard reports for the presence of the most common types of PII. As previously mentioned, some of the most common places where PII lives include: query string and event parameters. The most common reports where this auditing technique can be used:
- Reporting > Behavior > Site Content
- Reporting > Behavior > Events
- Reporting > Behavior > Site Search
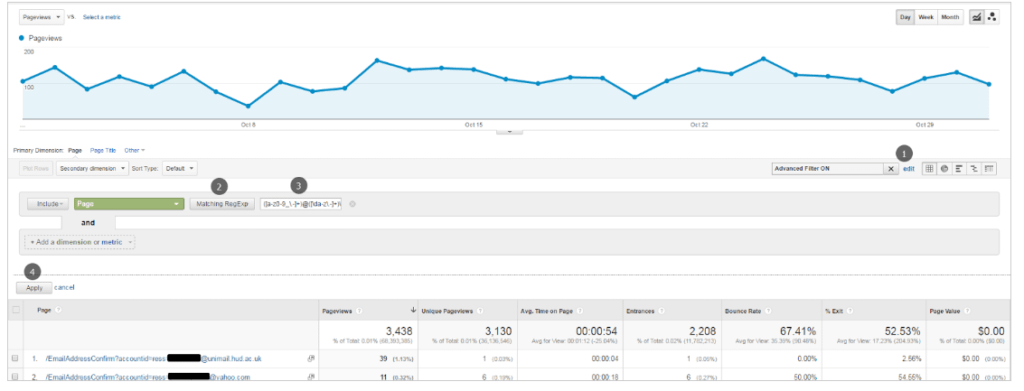
The process is simple, and consists of four easy steps:
- Click on the “Advanced” button next to the inline filter input box at the top of your chosen report
- From the filter type drop-down, select the “Matching RegExp” option
- In the input field, copy and paste your desired regular expression from the table above (or use a custom one designed by you)
- Click on ‘Apply’
Your chosen report will now be filtered to only show you data which includes PII according to which regular expression you have chosen. If you don’t see any records this is GREAT NEWS! It means that your data does not contain the type of PII you are searching for. If you do see results, then this means that your data contains PII and you will need to take some action to address the issue (more on this later).
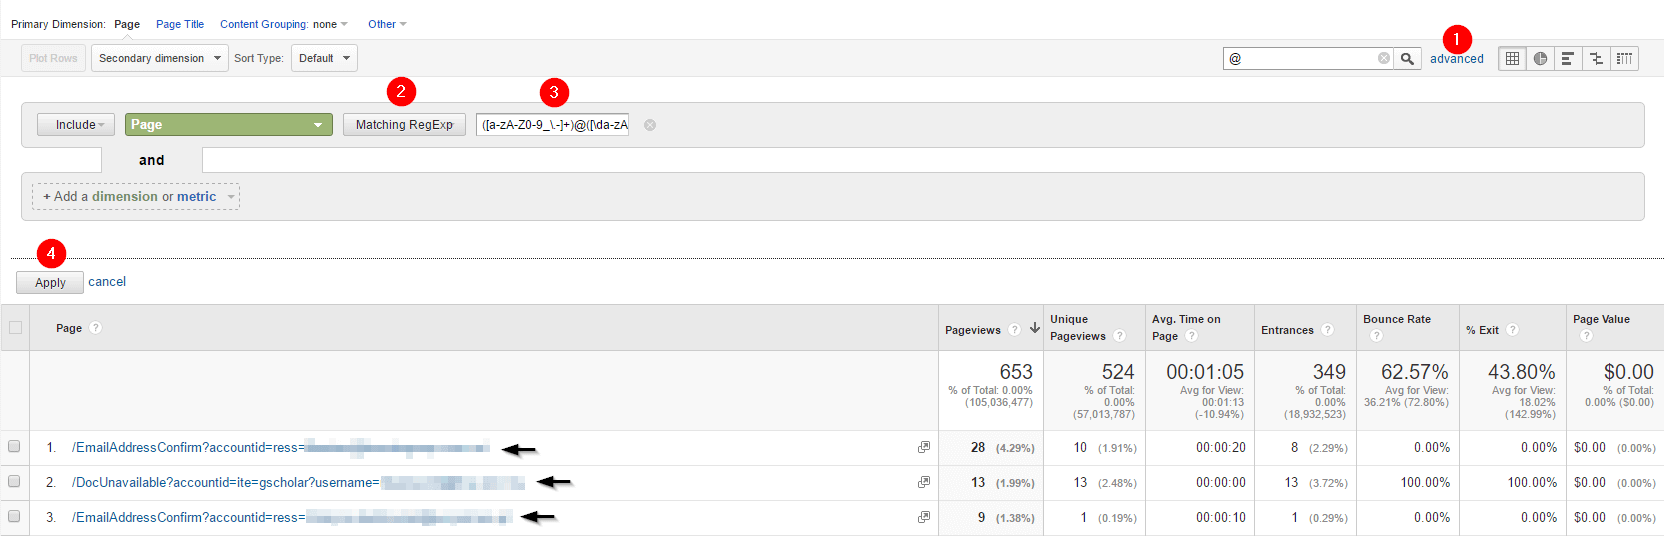
Figure 1.0
Advanced Segment
The advanced segment method is similar to the inline filter method with the major difference being that the segment applies to all reports automatically once it is created. We will be using the Regular Expressions listed above to create a segment which will identify any sessions which contained different types of PII.
The example segment setup below (Figure 2.0) looks for sessions which contained pageviews containing PII in the URL, however this approach could also be applied to event parameters (event category, event action, event label), as well as custom dimensions, site search terms, or social events.
Using this approach also displays the number of users and the number of sessions (Figure 2.1) as a percentage of the total.
As with the inline filter approach, the most common reports where your newly created segment will identify PII are:
- Reporting > Behavior > Site Content
- Reporting > Behavior > Events
- Reporting > Behavior > Site Search

Figure 2.0
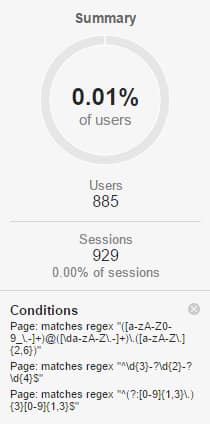
Figure 2.1
Conclusion
So now that you’ve gone through and checked for PII and haven’t found anything then congratulations, you can stop reading here!
If you have found some form of PII, don’t panic. You will just need to take the following steps:
-
Work with your implementation team and stop the collection of PII (simply filtering out PII in the Google Analytics interface will not be sufficient, as Google requires that you stop sending any PII to their servers, even if it is being filtered out)
-
Once PII collection has ceased, backup your data (Analytics 360 customers can export unsampled reports to an Excel spreadsheet, or Google Sheets. They can also migrate their data into Google BigQuery, a service which does not have PII limitations)
-
Create copies of the views in which you found PII (copy over all configuration settings: filters, goals, view settings, etc), and start collecting PII free, fresh data.
-
Work with Google Support and inform them that your web property has been collecting PII.
- It is better to be proactive here, as Google Support is much more likely to remove only offending data if they are informed ahead of time.
- Should the Google Support team discover PII in your account on their own volition, they are much more likely to purge the entire account of all data.
Look Version 2
How to Look for PII in Your Google Analytics
There are a few different methods to accomplish this.
The easiest way to do this is go to:
Google Analytics > Behavior > Site Content > All Pages
And then filter with @ so it looks something like this:
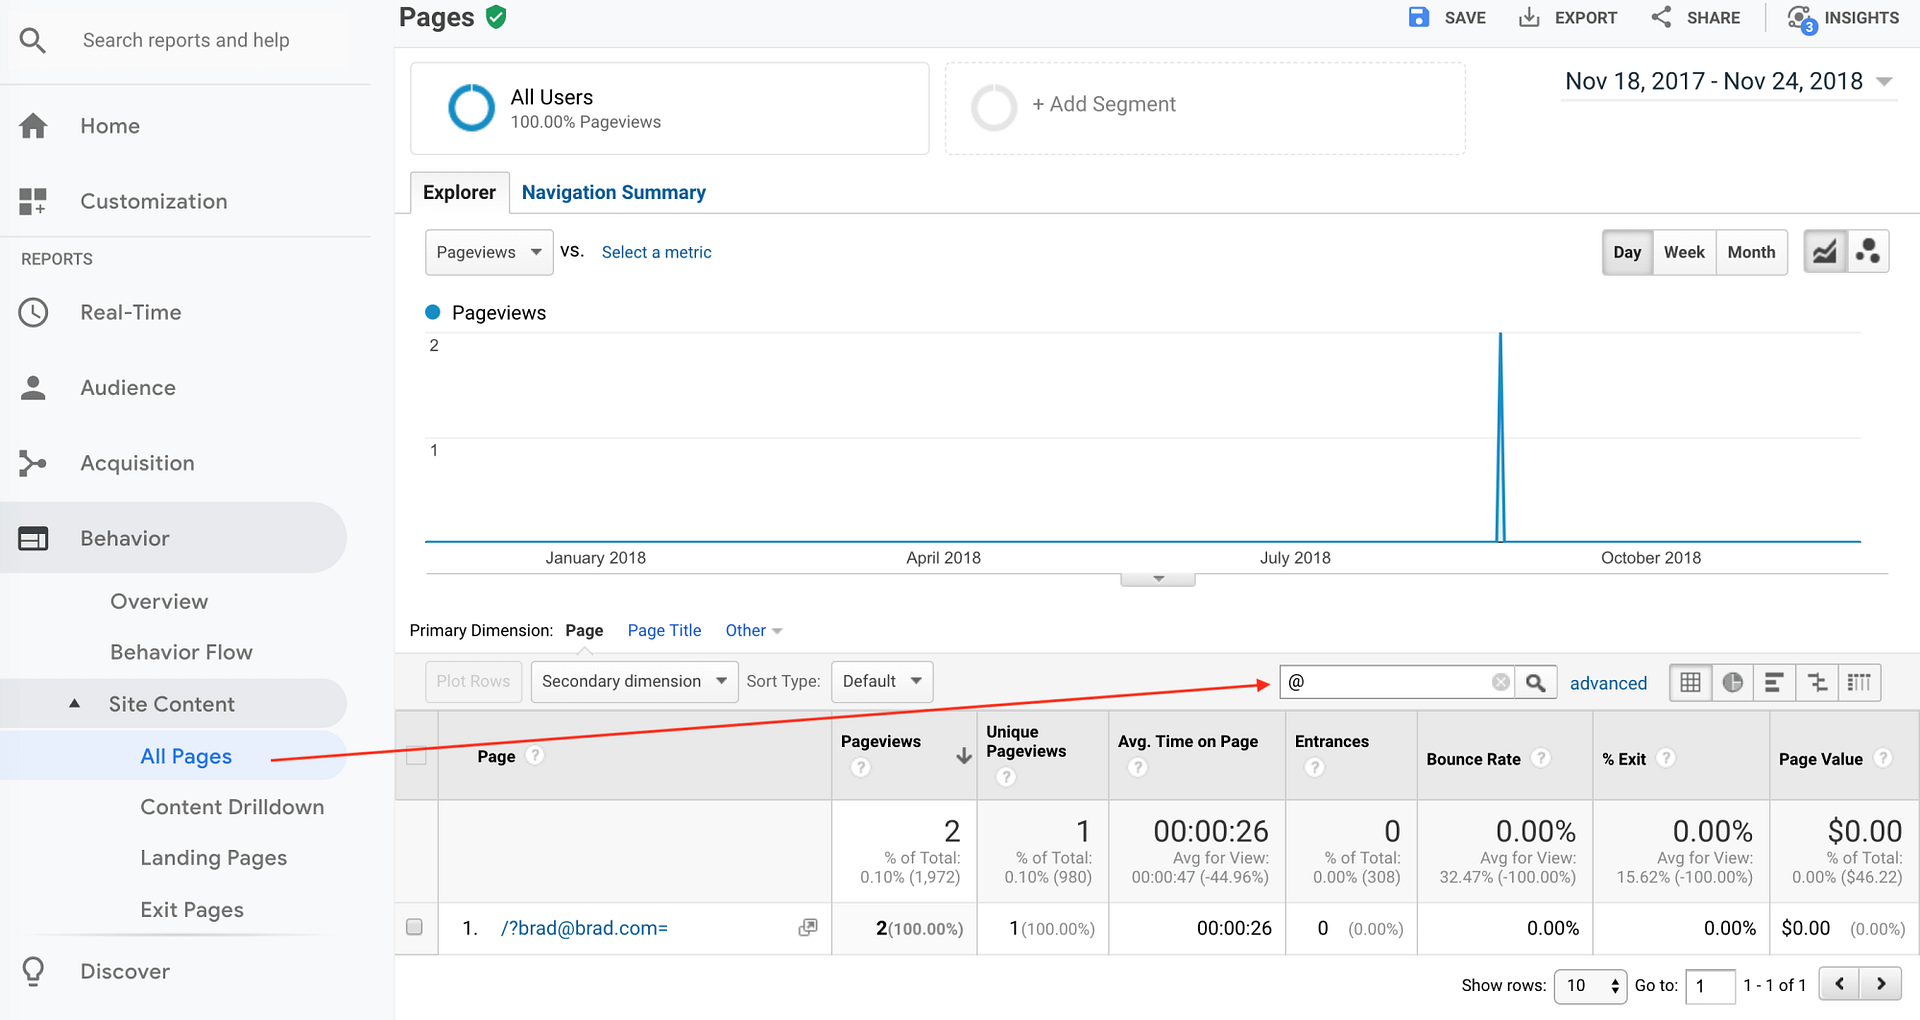
This will bring up any pageviews that have common emails in them.
Another option is to use the GA Debugger Google Chrome Extension and
Look for email addresses
If you need a more robust method to ensure you are looking for data like: email@domain.com (instead of just the @ symbol) then insert this regex into the filter field:
([a-zA-Z0-9_\.-]+)@([\da-zA-Z\.-]+)\.([a-zA-Z\.]{2,6})
This is a bit more strict in looking for the full email format.
Look for social security #’s
This regex looks for common social security # format of 111-11-1111:
(\d{3}-?\d{2}-?\d{4})
Look for addresses
This regex looks for common address inclusions but is very subjective so it will need to be adapted to your own needs. The pipe symbol | is an OR condition.
(drive|street|road|dr.|po box|rd.)
Look for phone numbers
This is very similar to your social security regex but can be modified:
(\d{3}-?\d{3}-?\d{4})
This matches the format of 800-867-5309. If you wanted to remove the – then it would look like this:
(\d{3}\d{3}\d{4})
Look for names
This one is a bit more difficult to nail down but you can start with a regex like this that looks for names that are labeled:
(fn|ln|lastname|firstname|name|fullname)
How to Remove PII from Pageview Hits
The only real way to remove PII from your own Google Analytics pageview hits is preventing this PII data from being sent to GA in the first place.
And the only way to fully protect yourself is by putting a safeguard in place that strips out this data from your hits being sent to GA via Google Tag Manager.
NOTE: Filters do not constitute removing this data. Do not put filters in place and think this fixes your issue.
If you are on Shopify then you can use our Google Tag Manager Suite App which has this PII redaction tag already in place.
This redaction was made possible by the GTM guru Simo Ahava by utilizing the customTask function via a custom HTML tag that redacts this data within the pageview hit send to Google Analytics.
Once you’ve implemented one of these methods:
- Installing GTM Suite App and migrating Google Analytics hit data to GTM
- Implementing Simo’s method of sitewide GA tracking via GTM
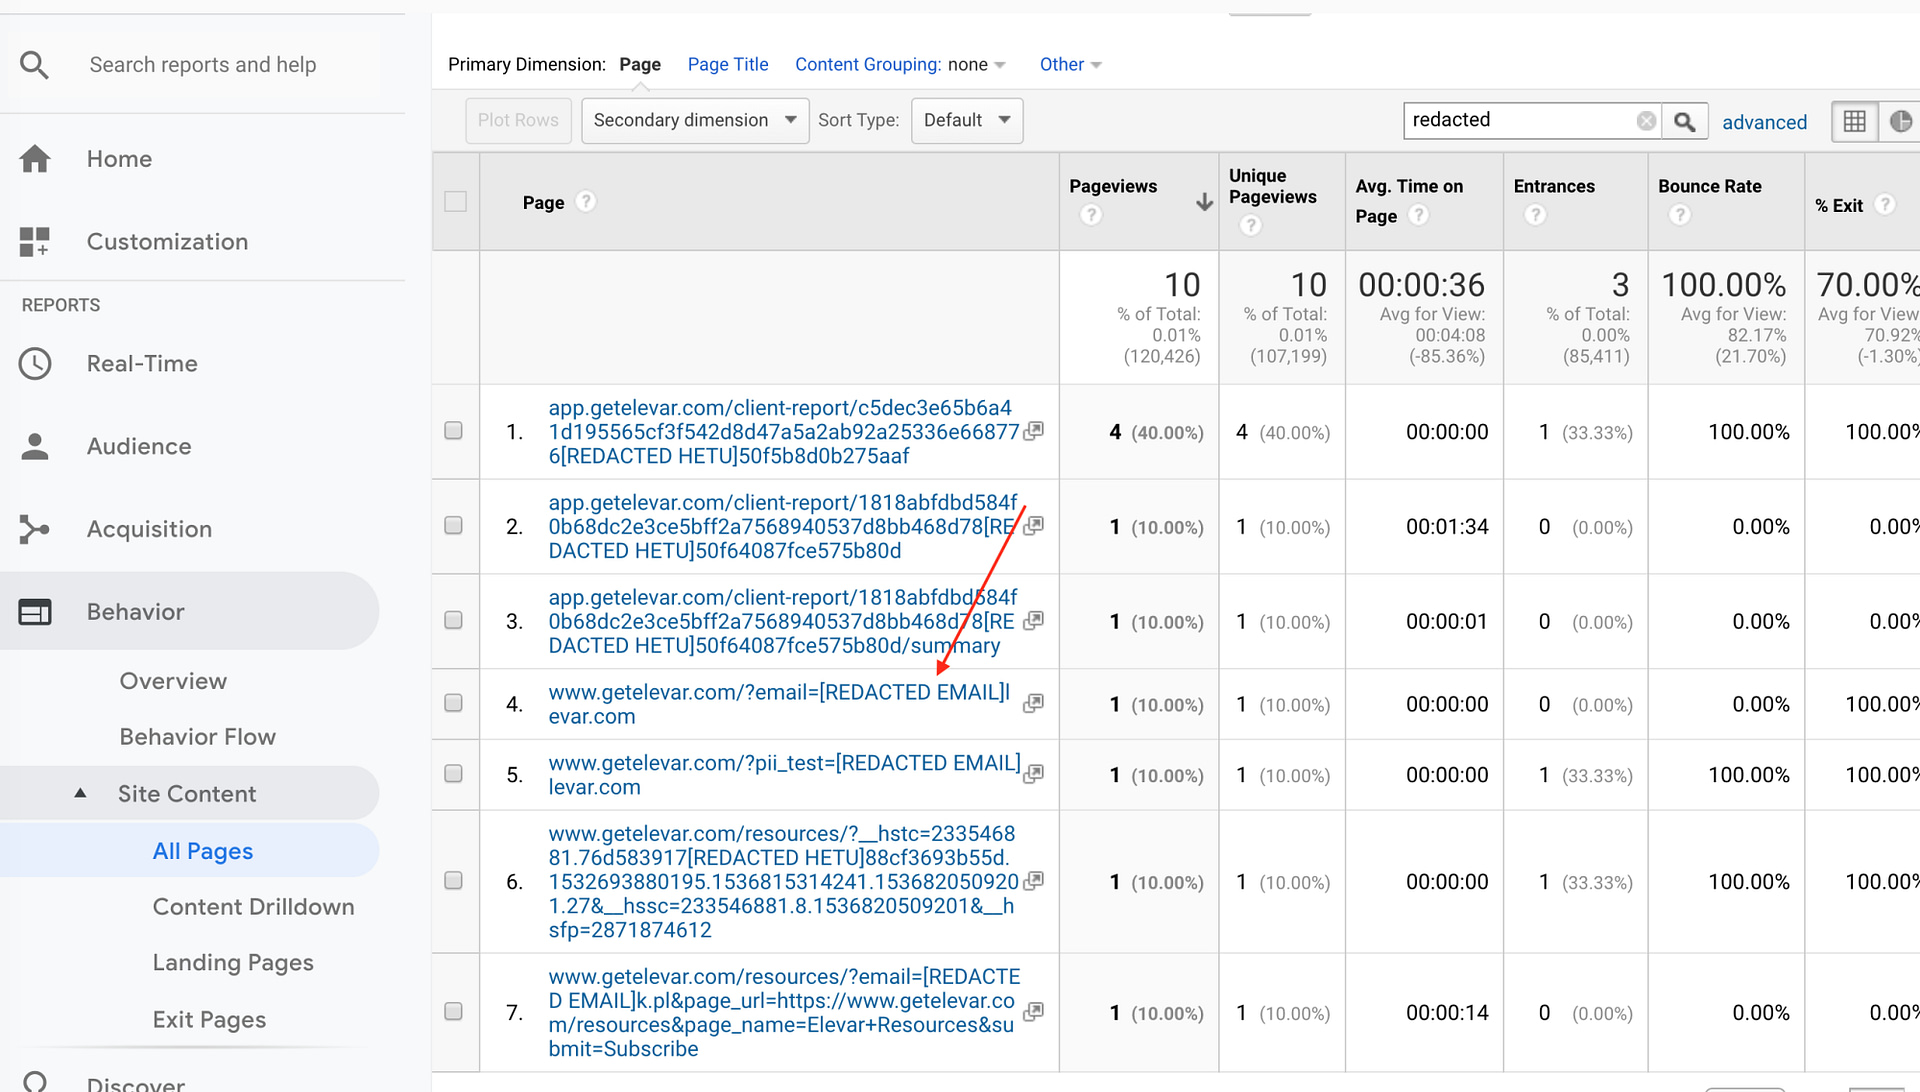
Then it’s time to test.
It’s pretty simple to test this. All you have to do is go to your website and put an email into your URL like this:

Then you should start seeing the REDACTED EMAIL within your pageview hits like this:
Removing PII
GTMTIPS: REMOVE PII FROM GOOGLE ANALYTICS HITS
August 31, 2017 in GTM tips | 131 comments
Sending personally identifiable information (PII) to Google Analytics is one of the things you should really avoid doing. For one, it’s against the terms of service of the platform, but also you will most likely be in violation of national, federal, or EU legislation drafted to protect the privacy of individuals online.
In this #GTMTips post, I’ll show you a way to make sure that any tags you configure this solution with will not contain strings that might be construed as PII. The tip is for Google Tag Manager, but with very little modifications it will work with Universal Analytics, too.
(UPDATE 8 September 2017: Check out Brian Clifton’s great extension of this solution: Remove PII from Google Analytics)
X The Simmer NewsletterSubscribe to the Simmer newsletter to get the latest news and content from Simo Ahava into your email inbox!
TIP 64: REMOVE PII FROM HITS TO GOOGLE ANALYTICS

The solution hinges around customTask, which has fast become my favorite new feature in the analytics.js library. See the following articles to understand why I think so:
- #GTMTips: Use customTask To Access Tracker Values In Google Tag Manager
- #GTMTips: Send Google Analytics Tag To Multiple Properties
- Track Users Who Are Offline In Google Analytics
Anyway, to make the whole thing run, create the following Custom JavaScript variable:
function() {
  return function(model) {
    // Add the PII patterns into this array as objects
    var piiRegex = [{
      name: 'EMAIL',
      regex: /.{4}@.{4}/g
    },{
      name: 'HETU',
      regex: /\d{6}[A+-]\d{3}[0-9A-FHJ-NPR-Y]/gi
    }];

    var globalSendTaskName = '_' + model.get('trackingId') + '_sendHitTask';

    // Fetch reference to the original sendHitTask
    var originalSendTask = window[globalSendTaskName] = window[globalSendTaskName] || model.get('sendHitTask');

    var i, hitPayload, parts, val;

    // Overwrite sendHitTask with PII purger
    model.set('sendHitTask', function(sendModel) {
      hitPayload = sendModel.get('hitPayload').split('&');
      for (i = 0; i < hitPayload.length; i++) {
        parts = hitPayload[i].split('=');
        // Double-decode, to account for web server encode + analytics.js encode
        try {
          val = decodeURIComponent(decodeURIComponent(parts[1]));
        } catch(e) {
          val = decodeURIComponent(parts[1]);
        }
        piiRegex.forEach(function(pii) {
          val = val.replace(pii.regex, '[REDACTED ' + pii.name + ']');
        });
        parts[1] = encodeURIComponent(val);
        hitPayload[i] = parts.join('=');
      }
      sendModel.set('hitPayload', hitPayload.join('&'), true);
      originalSendTask(sendModel);
    });
  };
}
Once you add this variable to your Universal Analytics tags as the customTask field, any hits sent by these tags will be parsed by this variable, which replaces the instances of PII with the string [REDACTED pii_type].

At the beginning of the code snippet, you’ll see the configuration object piiRegex. It’s an array of object literals, where each object has two properties: name and regex. The first is what will be used in the replace string after “REDACTED”. So if name is “EMAIL”, you’ll see “[REDACTED EMAIL]” in your Google Analytics reports wherever PII data was removed.
The second parameter, regex, is where you’ll add the regular expression literal for whatever PII pattern you want to redact. In the example above, I have two patterns:
/.{4}@.{4}/g– this matches all @ symbols plus the four preceding and four following characters. So if ANY part of the payload (URL, Custom Dimension, Event Label, etc.) has the @ symbol, then the string will be obfuscated. Thus,simo.s.ahava@gmail.combecomessimo.s.a[REDACTED EMAIL]l.com./\d{6}[A+-]\d{3}[0-9A-FHJ-NPR-Y]/gi– this is a reasonably good abstraction of the Finnish personal identity code. It’s not perfect, because the personal identity code is actually a calculation, so you can’t use simple pattern matches to only find valid codes. This regular expression will probably result in many false positives, especially if your GA hits include UUIDs or any type of alphanumeric hashes. But it’s still better than collecting this sensitive data.
You can add your own regular expression patterns as new objects of the array.
When you add this variable into the customTask field of a Universal Analytics tag, the code will run through the entire payload, looking for matches to the regular expressions you provide in the configuration array. If any matches are made, they are redacted.
Do you have other, useful regular expressions for finding and weeding out personally identifiable information?
One subset of information that particularly requires security is a class of data called personally identifiable information (PII). Our employers, schools and other organizations all collect and retain PII data about us inside the applications they use. This data includes fields like:
- Social security number
- Driver’s license number
- Passport number
- Date of birth
- Home address
- Phone number
- Employee number
How to Find and Purge Personally Identifiable Information from Your Google Analytics
Reading Time: 5 minutes
Google policies mandate that no data be passed to them that could be recognized as personally identifiable. This post aims to provide an easy-to-follow, structured approach to identifying Personally Identifiable Information (PII) that might exist in your or your client’s Google Analytics account, as well as different methods for preventing further collection of such information. In this post I will outline what constitutes as PII, and how to avoid potentially passing this information to Google when implementing Analytics on a property.
The approaches outlined below aim to help alert you that PII is being captured. Ultimately however, Google requires that:
“You will not and will not assist or permit any third party to, pass information to Google that Google could use or recognize as personally identifiable information.”
This means that if you find PII in your data collection, simply filtering out the data from your Google Analytics property is only half the battle. Ultimately no PII should make it into Google Analytics at all.
What constitutes PII according to Google?
Any name, email address, billing information, social security numbers, or other data which can be reasonably linked to such information by Google, or data that permanently identifies a particular device (such as a mobile phone’s unique device identifier), even in hashed form.
“The Google Analytics terms of service, which all Google Analytics customers must adhere to, prohibits sending personally identifiable information (PII) to Google Analytics … Your Google Analytics account could be terminated and your data destroyed if you use any of this information**.”
Possible trouble areas
So you suspect that you might be collecting PII, but are not sure of where to look or what to look for? Then this post is for you! Below are some of the major areas where users can run into trouble with PII within their Google Analytics Data. Oftentimes, the inclusion of PII in any of these different areas is unintentional, which is why performing a PII audit is so important.
Looking for PII during the setup and testing phase of your Google Analytics implementation is recommended as a best practice in order to avoid running into any PII collection issues further down the line.
Places where PII can be found
- Query string parameters located in URLs
- Data imports
- Event parameters (category, action, label)
- Custom dimensions
- Social event dimensions
- Campaign tags
Common PII types (as defined by Google)
- Email address
- First name / last name
- Billing Information
- Social security number
- Credit card number
- IP address
- Device ID
- Any other information that would identify a specific individual
Common Regular Expressions
So, now we know where and what to look for in our Google Analytics reporting interface. But before we dive into the various auditing methods, I wanted to take a moment to highlight one of the techniques we will use to assist us in our task. According to Jan Goyvaerts over at www.regular-expressions.info:
“A regular expression (regex or regexp for short) is a special text string for describing a search pattern. You can think of regular expressions as wildcards on steroids.”
Below you can view an assortment of regular expressions for matching some of the different types of PII. These expressions will allow you to search for some common PII types. There are probably many other variations of these regular expressions or even regular expression types that would fit in here and essentially do the same thing, but these are some of the more common ones:
*Caveat: not every type of PII can be searched for in this way due to the complexity of the text (e.g. a physical home address, or first/last name).
| PII Type | RegEx |
|---|---|
| Email address | ([a-zA-Z0-9_.-]+)@([\da-zA-Z.-]+).([a-zA-Z.]{2,6}) |
| Social security number | ^\d{3}-?\d{2}-?\d{4}$ |
| IP address | ^(?:[0-9]{1,3}.){3}[0-9]{1,3}$ |
Auditing Methods
This is an overview of the two main methods you will be using to identify potential PII within the common trouble areas, and their limitations. Here you can use the regular expressions listed above, as well as your own personal sleuthing skills to look for PII. Since regular expressions won’t help you when it comes to things like physical address or first/last name combinations, you will need to manually scan the different reports for those types of PII.
Inline Filter
The inline filter method will be your first, and likely best approach for identifying PII in your data. It will allow you to quickly scan your standard reports for the presence of the most common types of PII. As previously mentioned, some of the most common places where PII lives include: query string and event parameters. The most common reports where this auditing technique can be used:
- Reporting > Behavior > Site Content
- Reporting > Behavior > Events
- Reporting > Behavior > Site Search
The process is simple, and consists of four easy steps:
- Click on the “Advanced” button next to the inline filter input box at the top of your chosen report
- From the filter type drop-down, select the “Matching RegExp” option
- In the input field, copy and paste your desired regular expression from the table above (or use a custom one designed by you)
- Click on ‘Apply’
Your chosen report will now be filtered to only show you data which includes PII according to which regular expression you have chosen. If you don’t see any records this is GREAT NEWS! It means that your data does not contain the type of PII you are searching for. If you do see results, then this means that your data contains PII and you will need to take some action to address the issue (more on this later).
Figure 1.0
Advanced Segment
The advanced segment method is similar to the inline filter method with the major difference being that the segment applies to all reports automatically once it is created. We will be using the Regular Expressions listed above to create a segment which will identify any sessions which contained different types of PII.
The example segment setup below (Figure 2.0) looks for sessions which contained pageviews containing PII in the URL, however this approach could also be applied to event parameters (event category, event action, event label), as well as custom dimensions, site search terms, or social events.
Using this approach also displays the number of users and the number of sessions (Figure 2.1) as a percentage of the total.
As with the inline filter approach, the most common reports where your newly created segment will identify PII are:
- Reporting > Behavior > Site Content
- Reporting > Behavior > Events
- Reporting > Behavior > Site Search
Figure 2.0
Figure 2.1
Conclusion
So now that you’ve gone through and checked for PII and haven’t found anything then congratulations, you can stop reading here!
If you have found some form of PII, don’t panic. You will just need to take the following steps:
-
Work with your implementation team and stop the collection of PII (simply filtering out PII in the Google Analytics interface will not be sufficient, as Google requires that you stop sending any PII to their servers, even if it is being filtered out)
-
Once PII collection has ceased, backup your data (Analytics 360 customers can export unsampled reports to an Excel spreadsheet, or Google Sheets. They can also migrate their data into Google BigQuery, a service which does not have PII limitations)
-
Create copies of the views in which you found PII (copy over all configuration settings: filters, goals, view settings, etc), and start collecting PII free, fresh data.
-
Work with Google Support and inform them that your web property has been collecting PII.
- It is better to be proactive here, as Google Support is much more likely to remove only offending data if they are informed ahead of time.
- Should the Google Support team discover PII in your account on their own volition, they are much more likely to purge the entire account of all data.
Look For V3
How to Look for PII in Your Google Analytics
There are a few different methods to accomplish this.
The easiest way to do this is go to:
Google Analytics > Behavior > Site Content > All Pages
And then filter with @ so it looks something like this:
This will bring up any pageviews that have common emails in them.
Another option is to use the GA Debugger Google Chrome Extension and
Look for email addresses
If you need a more robust method to ensure you are looking for data like: email@domain.com (instead of just the @ symbol) then insert this regex into the filter field:
([a-zA-Z0-9_\.-]+)@([\da-zA-Z\.-]+)\.([a-zA-Z\.]{2,6})
This is a bit more strict in looking for the full email format.
Look for social security #’s
This regex looks for common social security # format of 111-11-1111:
(\d{3}-?\d{2}-?\d{4})
Look for addresses
This regex looks for common address inclusions but is very subjective so it will need to be adapted to your own needs. The pipe symbol | is an OR condition.
(drive|street|road|dr.|po box|rd.)
Look for phone numbers
This is very similar to your social security regex but can be modified:
(\d{3}-?\d{3}-?\d{4})
This matches the format of 800-867-5309. If you wanted to remove the – then it would look like this:
(\d{3}\d{3}\d{4})
Look for names
This one is a bit more difficult to nail down but you can start with a regex like this that looks for names that are labeled:
(fn|ln|lastname|firstname|name|fullname)
How to Remove PII from Pageview Hits
The only real way to remove PII from your own Google Analytics pageview hits is preventing this PII data from being sent to GA in the first place.
And the only way to fully protect yourself is by putting a safeguard in place that strips out this data from your hits being sent to GA via Google Tag Manager.
NOTE: Filters do not constitute removing this data. Do not put filters in place and think this fixes your issue.
If you are on Shopify then you can use our Google Tag Manager Suite App which has this PII redaction tag already in place.
This redaction was made possible by the GTM guru Simo Ahava by utilizing the customTask function via a custom HTML tag that redacts this data within the pageview hit send to Google Analytics.
Once you’ve implemented one of these methods:
- Installing GTM Suite App and migrating Google Analytics hit data to GTM
- Implementing Simo’s method of sitewide GA tracking via GTM
Then it’s time to test.
It’s pretty simple to test this. All you have to do is go to your website and put an email into your URL like this:
Then you should start seeing the REDACTED EMAIL within your pageview hits like this: