
BE SURE TO CREATE TO MS-DOS DRIVE
https://blog.greggant.com/posts/2023/01/23/opencore-legacy-patcher-quick-instructions.html
This guide also exists in video format as "How to install OpenCore Legacy Patcher in 5 minutes".
Requirements:
- 16 GB+ USB flash drive
- Supported Mac, see OCLP's website,
Before you install OpenCore Legacy Patcher on your Mac, go to the OCLP website and confirm your old Intel Mac is supported. Some Macs may not support the latest version of macOS. OCLP's team is chipping away at support for older Macs. Most Macs post 2010 are well-supported but with caveats such as non-functioning Bluetooth. Also, compatibility differs between OS versions, generally with the latest OS having the least amount of support. Users likely will have better results running a semi-recent OS vs the most recent.
Next, you will need a 16 GB or larger USB flash drive. Not all USB flash drives are bootable but most are. I used a SanDisk 128GB Ultra Fit USB 3.1 as can often be bought for15 (the 64 GB version generally is 10), and while not the fastest drive, it's made by a reputable company and will be faster than most $10 USB flash drives.
Lastly, always check OpenCore's website when updating the very latest OS release. I highly recommend waiting a few weeks for point releases, ones that are a major revisions like 13.3 (Not 13.3.1) for the OpenCore community to test and vet the OS update with various hardware configurations.
Step 1) Format Drive

Plug your USB flash drive into your Mac (or a PC). Open up disk utility on your Mac. This is located in Utilities folder in your Applications folder, or easily found using spotlight. Highlight your USB thumb drive and select format. Format your flash drive to Fat 32. macOS lists this as MS-DOS (Fat). As a friendly reminder, Formatting will erase all the contents of your flash drive. If you have any important information, back it up before performing this step.
This is required so the OCLP utility will be able to recognize the drive, and will format it again later.
Step 2) Download OCLP

Confirm the support for your Mac, at OCLP's website, Download OpenCore Legacy Patcher from the OCLP GitHub page. As a general rule, you should download the latest version of OCLP. OCLP does receive semi-regular updates which may improve your Mac if you are already using OCLP you can upgrade it in the future.
Step 3) Launch OCLP
Depending on your OS/Browser settings you may need to decompress the zip file by double clicking it. Launch OCLP and select Create macOS installer.
Step 4) Download macOS

On the "Create macOS installer" screen, select Download macOS if you do not already have a version downloaded on your Mac, and then select the version of macOS you'd like to download. Downloading will take some time as the installer is 12 GB.
Step 5) Select your OS

The installer should forward you to the select macOS screen and select your downloaded OS. If the OCLP utility does not automatically take you to this screen, return OpenCore's first screen and select create the installer, and select existing macOS.
Step 6) Install to USB drive

On the Format USB screen, select your USB drive. This will likely require your admin password. Enter it. This will take a significant amount of time, depending on your flash drive's speed and your Mac. This is a two-stage process as after it's copied over it will verify. You can leave this process in the background of your Mac while you perform other tasks or leave your computer unattended while this process completes. The installer will warn that it will take roughly a half hour although I found it took less time.
Step 7) Install OpenCore To Disk
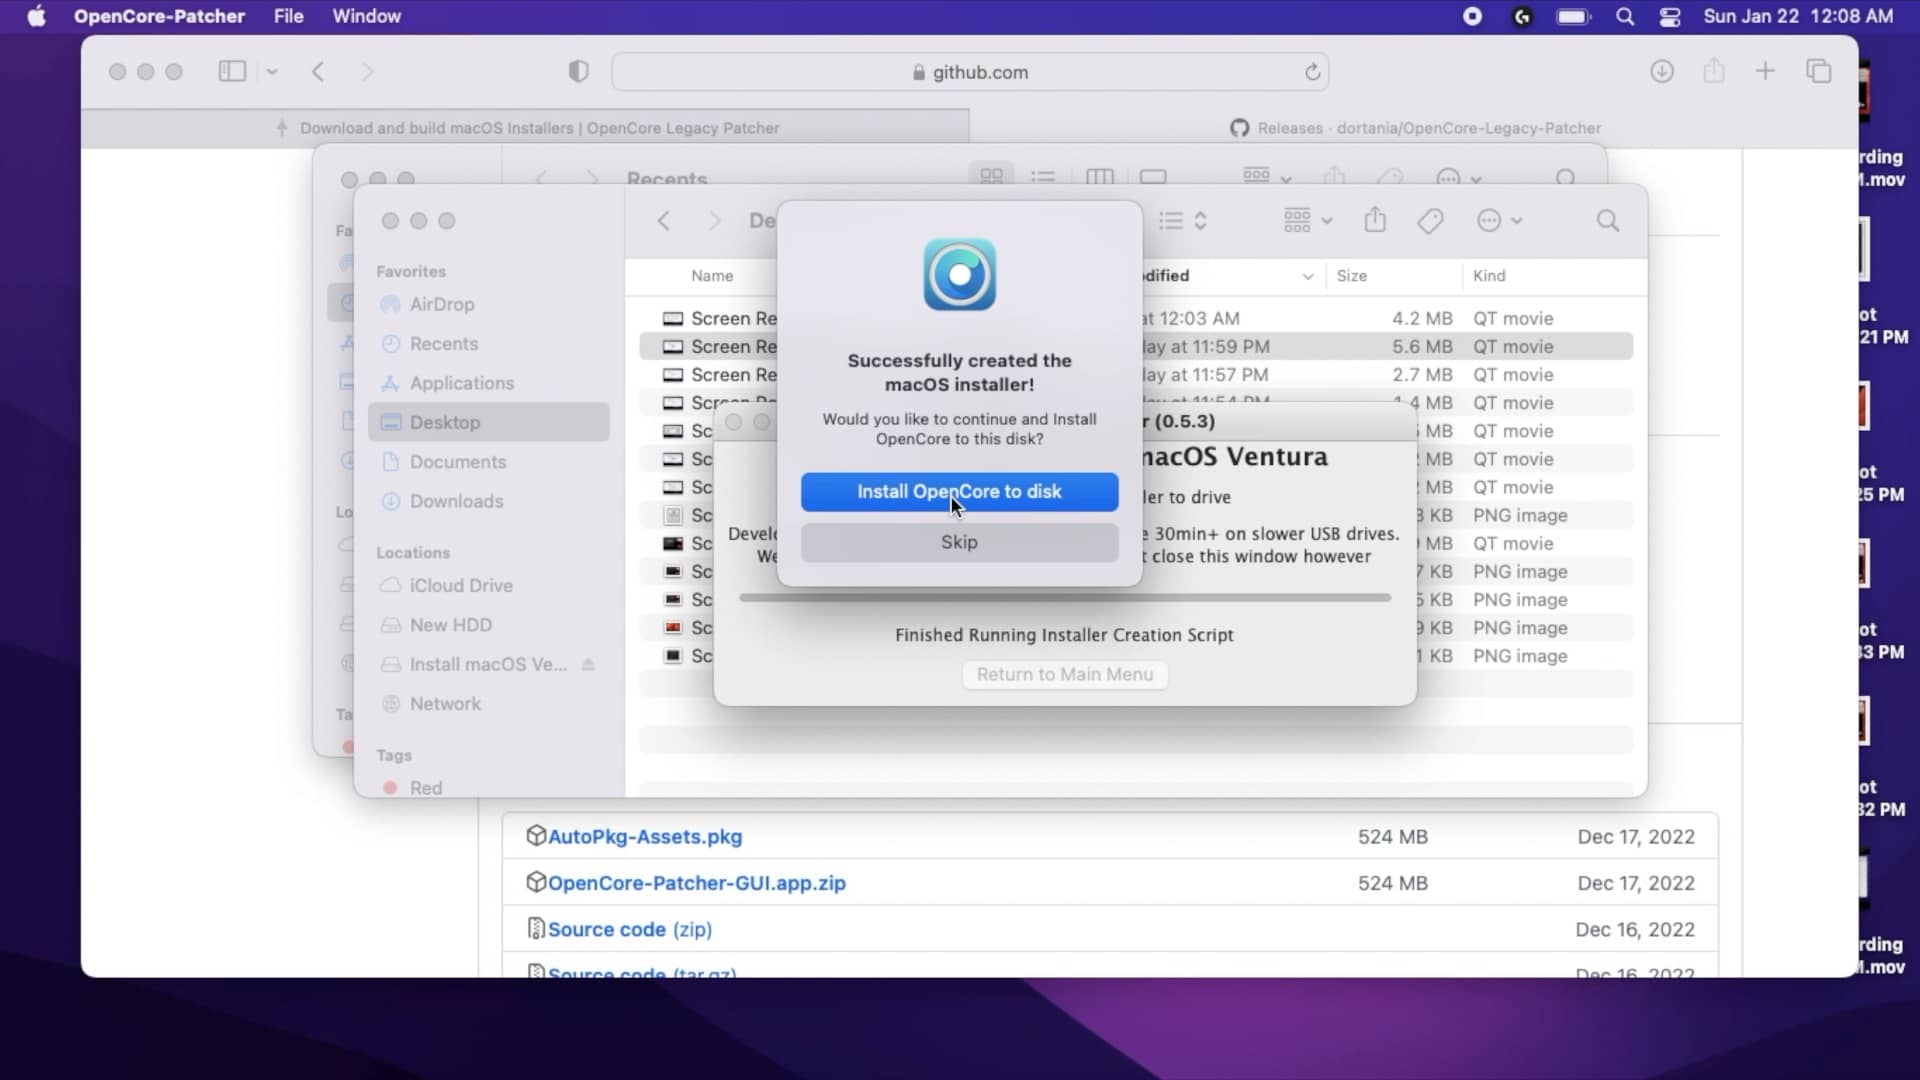
Once the installer has copied the installer to disk, it should ask you if you'd like to install OpenCore to disk. Select install OpenCore to disk. It'll build the OpenCore settings for your Mac. Select install to disk again, and select your USB drive.
Step 8) Reboot

Once the installer has finished, it should ask you if you'd like to reboot. It should display the following: "You will need to reboot and hold the Option key and select OpenCore/Boot EFI's Option". Holding down the option key while your Mac is booting will cause it to boot into the boot picker.

You can reboot now or later. When you reboot, you will need to hold down the option key on your computer and then select the OpenCore EFI partition. This will be the icon with the OpenCore logo behind it.
Step 9) Select OpenCore from the bootpicker and then the installer

Once you've selected the OpenCore EFI you'll be taken to another boot picker. Select the installer. At this point, you have booted into OpenCore, and thus all the configured hacks are loaded in that will enable your Mac to be able to install macOS.

Step through the installer as normal. With modern macOS installs, the installer will need to reboot several times. It may reboot and bring you back to the beginning of the install process. If this happens, you'll need to restart your computer and from the OpenCore boot picker, select the incomplete install and not the USB installer. This will resume your install.

Step 10) Post Install

Finish setting up your Mac. Run OpenCore Legacy Patcher one last time and confirm that post-install modifications have been installed.
https://www.easeus.com/mac-file-recovery/format-usb-flash-drive-to-fat32-on-mac.html
[2 Working Ways] How to Format USB to FAT32 on Mac Without Losing Data
For Apple Mac users, there are two ways to format a USB flash drive to FAT32, including Disk Utility and Terminal command line. Refer to the detailed steps of using both tools for FAT32 format. If you lose data after formatting, turn to EaseUS Mac data recovery software.
Download for MacmacOS 14 – 10.9 Also Available for Windows
Table of Contents
- How to Format a USB Flash Drive with Mac to FAT32
- Method 1. Format USB to FAT32 on Mac with Disk Utility
- Method 2. Format USB to FAT32 on Mac with Terminal Command Line
- Bonus Tip: How to Recover Data from Formatted USB
- Conclusion
- Format FAT32 Mac FAQs
Updated by Tracy King on Nov 08, 2023
Categories
Are you looking for a secure way to format USB to FAT32 on Mac? You are at the right place. Follow here, and you can find two methods to assist you in doing so on your storage device. And if you lost data during the formatting, reliable Mac file recovery software is ready to help anytime:
| Workable Solutions | Step-by-step Troubleshooting |
|---|---|
| Method 1. Use Disk Utility | Connect USB to Mac > Go to Applications > Utilities > Disk Utility > Select USB and click "Erase"…Full steps |
| Method 2. Use Terminal Command | Connect USB to Mac > Hit cmd + space keys > Type terminal and hit Enter…Full steps |
| Bonus Tip. Recover Formatted Data | If you lost data due to formatting, run EaseUS file recovery software > Scan and recover formatted data…Full steps |
How to Format a USB Flash Drive with Mac to FAT32
Computer users who use a USB might have the demand for formatting it to the FAT32 file system. Compared with the other commonly used NTFS file systems on a flash drive, FAT32 has a compatibility advantage across many operating systems.
It's a universal format compatible with Mac OS X/macOS, Windows, Linux, and DOS systems. So, if users anticipate using the flash drive with more than one operating system, they will benefit from the FAT32 file system. For Apple Mac users, there are two ways to format a USB flash drive to FAT32: Disk Utility and Terminal command line. Below are the detailed steps of the FAT32 format with both methods.
Method 1. Format USB to FAT32 on Mac with Disk Utility
To format USB to FAT32 with Disk Utility will erase all data on the flash drive, so before you do so, please do remember to check whether you have saved useful data to another secure device in advance.
To format the USB drive to FAT32, follow the next steps:
Step 1. Connect the USB flash drive to your Mac computer.
Step 2. Go to "Applications > Utilities", and open "Disk Utility".
Step 3. Select your USB flash drive on the sidebar, and choose "Erase".
Step 4. Rename the USB flash drive (optional).
Step 5. Choose the format as MS-DOS (FAT) for Format, Master Boot Record for Scheme. Then click "Erase".

Wait for the process to complete, then you'll get an empty new USB flash drive with FAT32 as the file system. You can use it to save data again.
Method 2. Format USB to FAT32 on Mac with Terminal Command Line
The command-line behavior does the same way to erase USB data with the Disk Utility. Again, create a backup before taking this action.
To format FAT32 on Mac with Terminal, follow the next steps:
Step 1. Connect the USB flash drive to your Mac computer.
Step 2. Hit cmd + space to run Spotlight, type: terminal, and hit Enter.

Step 3. Type: diskutil list and find out which disk is your USB drive.
Step 4. Type: sudo diskutil eraseDisk FAT32 MBRFormat /dev/disk2.
- sudo gives you user right.
- Diskutil calls disk utility program.
- eraseDisk commands to format.
- FAT32 sets the file system.
- MBRFormat tells disk utility to format with a Master Boot Record.
- /dev/disk2 is the location of the USB drive.

Wait for the process to complete. After this, you can type diskutil list in the command again to check if the formatting has been successful. If you can't format the USB manually, you can use a FAT32 format tool to make it.
In addition to the step-by-step guide, you can also refer to this video to format FAT32 on Mac.
- 0:22 Check the drives in Finder
- 2:47 Check/eject the external hard drives
- 3:03 Format USB to FAT32 on Mac
Bonus Tip: How to Recover Data from Formatted USB
Formatting the USB would erase the data, so please make sure you have a backup. If you don't, you can count on data recovery software to retrieve lost data.
EaseUS Data Recovery Wizard has both Windows and Mac versions, so it's a good choice for data recovery, whether you're using a PC or Mac. For Mac users, it only takes a few clicks for the software to scan and display the formatted data. To guarantee an effective data recovery without spending money to no avail, you can install EaseUS Data Recovery Wizard for Mac for the first trial. You can preview all the found data before the final recovery.
Download for MacmacOS 14 – 10.9 Also Available for Windows
To recover data from a formatted USB flash drive on Mac, follow the next steps:
Step 1. Connect your USB drive to your Mac
Correctly connect your USB flash drive to your Mac. Launch EaseUS Data Recovery Wizard for Mac. Start selecting the flash drive and click "Search for lost files" to let the software scan for lost files on it.
Note: Before data recovery, you'd better click "Disk Backup" from the left sidebar to create a backup of your USB drive to avoid further data loss. After backing up the USB drive, the software can recover data from your USB drive backup, and you can remove the USB flash drive and use it again.

Step 2. Find lost data on the USB drive
After the scan, all files will be presented in the left panel in the scan results.

Step 3. Recover data from flash drive
Select the files you want to recover and click the "Recover" button. Don't save the recoverable files to the USB drive itself in case of data overwriting.

Conclusion
To sum up, formatting USB to FAT32 on Mac is a piece of cake. Either Disk Utility or Terminal command can do you a great favor. You should back up your USB drive in advance to avoid Mac USB data loss. If you want to recover deleted files on Mac, a USB, an external hard drive, SSD, and more, turn to EaseUS Mac data recovery software. This Mac USB recovery software can help you a lot.
Download for MacmacOS 14 – 10.9 Also Available for Windows
Format FAT32 Mac FAQs
This part provides additional help on Mac FAT32 format. Read the questions and answers below if necessary.
1. What is the maximum USB size for FAT32?
2TB. A drive formatted with FAT32 can hold 2TB files containing separate files under 4GB. But FAT32 doesn't support partitions under 512MB. So you cannot format a drive as a single FAT32 partition if it is larger than 2TB or smaller than 512MB.
2. Why Is FAT32 greyed out on Mac?
Here's the reason – the option is unavailable for the USB drive you are formatting. For example, Mac doesn't allow you to format 32GB and smaller SD cards as MS-DOS (FAT32).
3. How to format a 64GB USB to FAT32 on Mac?
Here are the steps to format a 64GB USB to FAT32 on Mac:
- Insert the USB to be formatted to a Mac PC.
- Navigate to Applications > Utilities, and click it twice to open.
- Select the drive you want to format and click on Erase.
- Rename the USB drive (optional), and choose the MS-DOS(FAT) format.
4. Is FAT32 compatible with Mac?
Yes, FAT32 is compatible with Mac.