
Local Ip Configuration – Self Assigning NATS AN IP
covers network settings more thoroughly
[3d-flip-book mode=”fullscreen” id=”105191″ ][/3d-flip-book]
Beginner Guide to Networking
NAS 105 – Networking: A Beginner’s Guide
[3d-flip-book mode=”fullscreen” id=”105193″ ][/3d-flip-book]
Link Aggregation
NAS 307 – Networking: Link Aggregation
[3d-flip-book mode=”fullscreen” id=”105195″ ][/3d-flip-book]
<p≥https://www.asustor.com/online/online_help?id=4
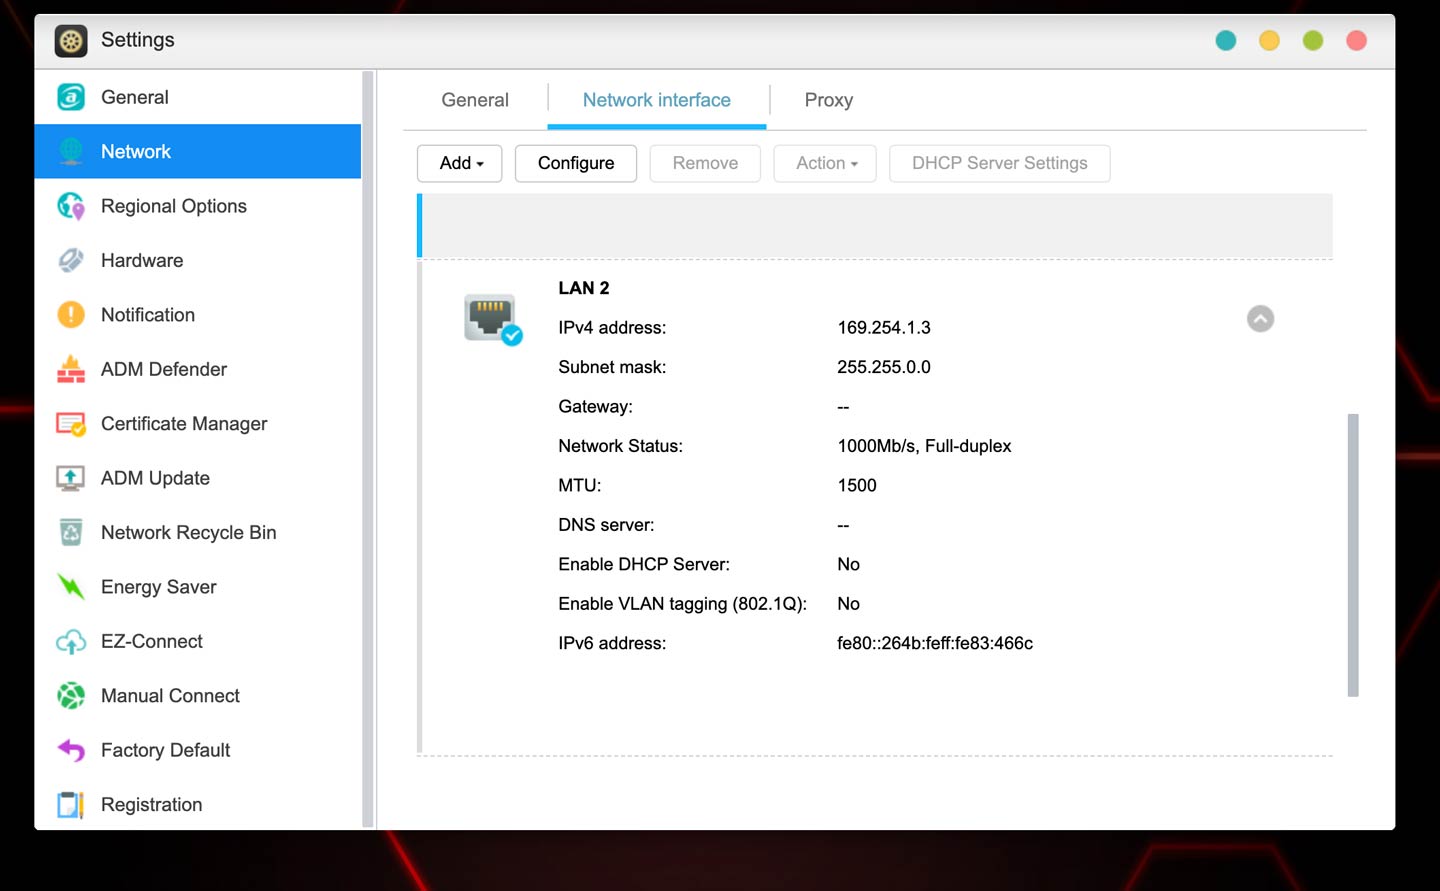
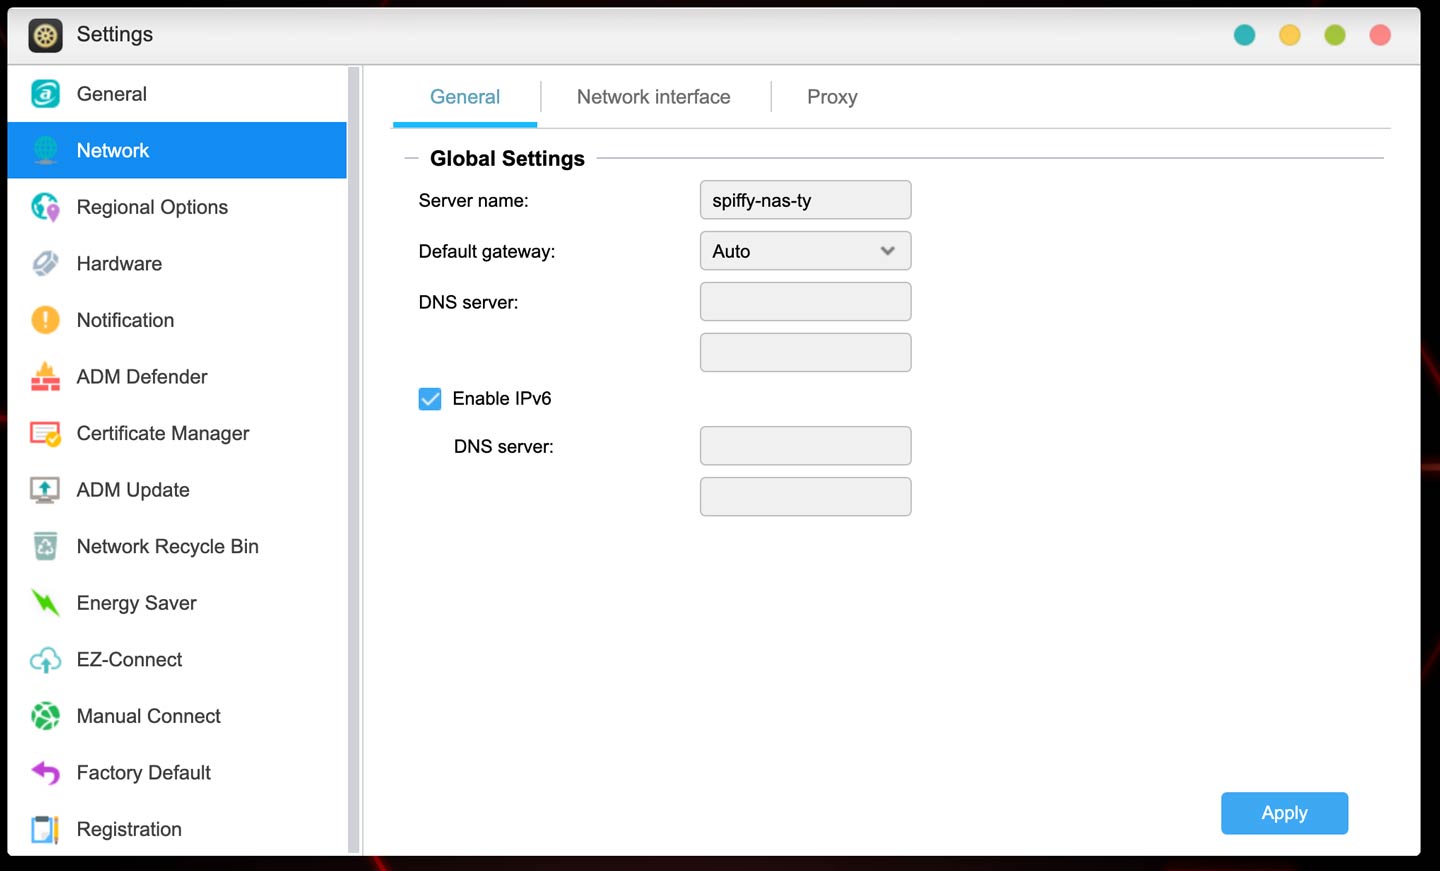
Network
Note: This function may differ depending on the NAS model in use. Here you can configure the server name, LAN and Wi-Fi settings. Other settings include IP address, DNS server and default gateway.
- Server Name: An online name for your NAS.
- Default Gateway: The default gateway that you wish to use.
-
DNS Server: Here you can set the DNS server that you wish to use. Should you choose to obtain your IP address via DHCP the system will automatically obtain the available DNS servers for you. If you choose to manually enter an IP address then you will have to manually enter a DNS server as well.
Reminder: Using an invalid DNS server will affect some network related functions. (i.e., Download Center). If you are uncertain about how to proceed, please choose to obtain your IP address automatically. - Sign In Page: Under Sign In Page Style you will be able to configure the following
- Lease time (hr): Enter a value (1-720) to set the DHCP lease time (in hours) for IP addresses assigned to DHCP clients.
- Primary/Secondary DNS: Enter the Primary/Secondary DNS address for DHCP clients.
- Domain Name: Set the domain name for the DHCP server.
- Subnet List: You can add subnets here.
- DHCP Client List: Here you can check the list of DHCP clients and their network configurations (e.g. MAC address, IP address, hostname, and the amount of time left before the DHCP lease expires).
- DHCP Reservations: If you want a client to always receive the same IP address during DHCP lease renewal, you can add the client to the DHCP reservation list.
- Proxy: Here you can enable proxy server connections, allowing the NAS to connect to the internet via a proxy server.
- Proxy Server: The address of the proxy server you wish to connect to. (Supports HTTP and HTTPS
- Port: The communications port of the proxy server.
- Proxy Server: The address of the proxy server you wish to connect to. (Supports HTTP and HTTPS
- PPPoE
- If you are using DSL or a cable modem to connect to the Internet and your Internet service provider uses PPPoE (Point to Point Protocol over Ethernet), you can go to [Settings] > [Network] > [PPPoE] and enter your account information to allow the system to connect to the Internet without having to go through a router. If you wish to get more information about PPPoE, please contact your Internet service provider or network administrator.
- VPN
- Here you can let your ASUSTOR NAS become a VPN client, and via PPTP or Open VPN, connect to a VPN server to access a virtual private network. ASUSTOR NAS supports the use of different connection settings files, allowing you to connect to the VPN server of your choice. The ASUSTOR VPN client currently supports the two most common connection protocols: PPTP and OpenVPN.
- Link Aggregation
- Link aggregation (a.k.a. trunking, bonding or teaming) combines two or more network connections into one. To use link aggregation, your Ethernet cables must be connected to the same network switch and your network switch must support link aggregation.
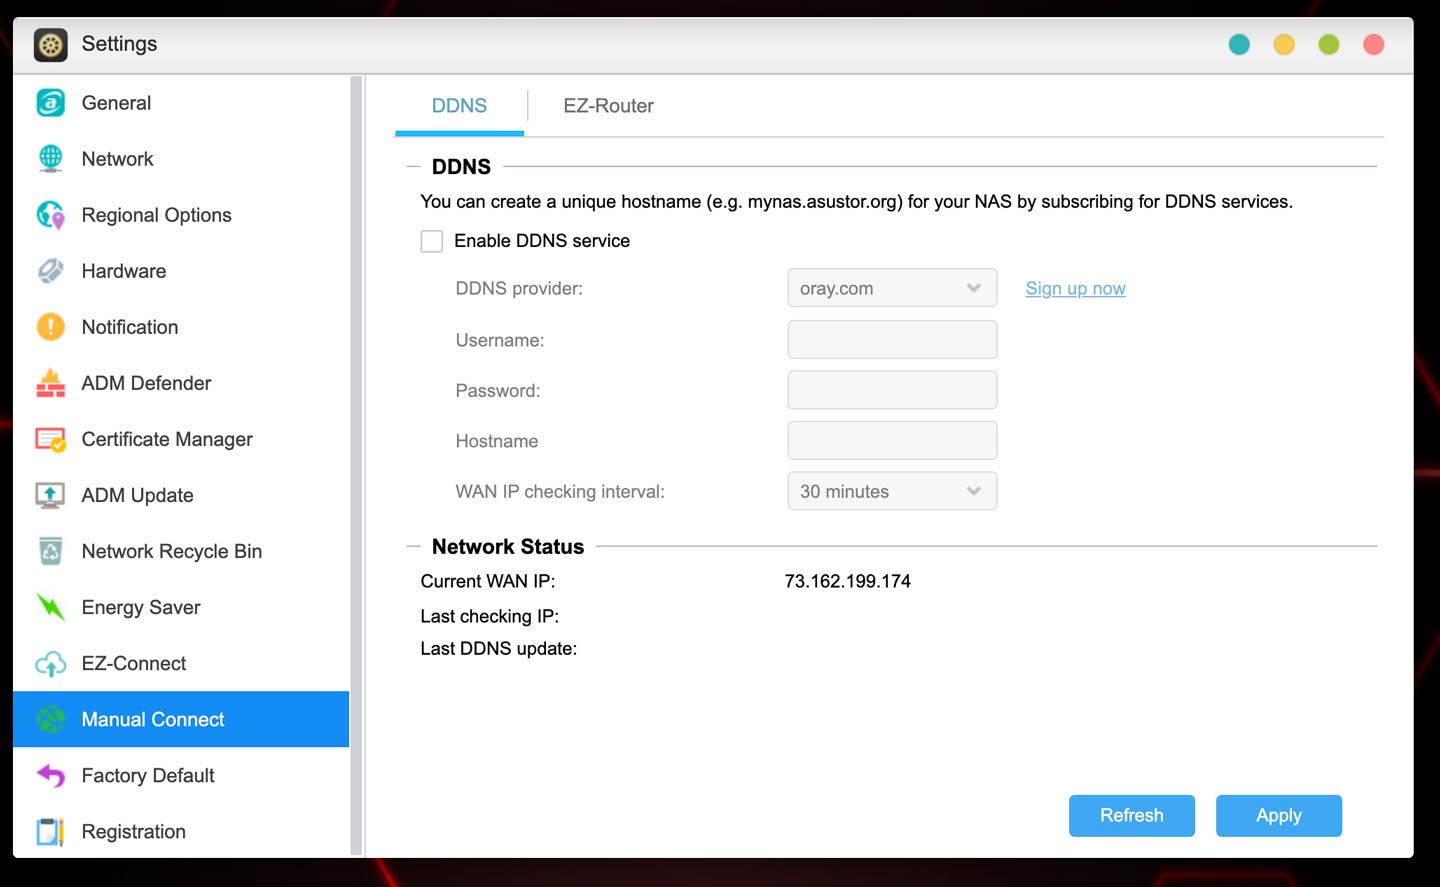
Dynamic DNS for NAS
1. YDNS
https://ydns.io/
Based out of Germany, YDNS is a freeDdynamic DNS provider that only asks for you to sign up with your email address and password before you start using it. Unless you’re using a custom domain name, you’re restricted to using the “ydns.eu” domain, but for many people that will suffice.
DHCP / ETHERNET CONNECTION ARTICLES
- https://support.apple.com/lv-lv/guide/mac-help/mh21939/mac
- https://support.apple.com/guide/mac-help/use-dhcp-or-a-manual-ip-address-on-mac-mchlp2718/mac
https://www.synology.com/en-us/knowledgebase/DSM/help/DSM/AdminCenter/connection_routerconf
Comcast Connected Devices
http://10.0.0.1/connected_devices_computers.php
Change the IP address assignment method for Online Devices.
If DHCP is selected, the Gateway’s DHCP server will automatically assign the IP address.
If Reserved IP is selected, the IP address will be fixed without DHCP operation and you’ll need to manually enter the IP address. The IP address must be within the DHCP IP address pool. To find your IP address range, go to Gateway > Connection > Local IP Network.
Reserved IP addresses can be assigned to any device that acts as a server or that requires a fixed IP address.
Gateway > Connection > Local IP Configuration
Manage your home network settings.
Gateway address: Enter the IP address of the Gateway.
Subnet Mask: The subnet mask is associated with the IP address. Select the appropriate subnet mask based on the number of devices that will be connected to your network.
DHCP Beginning and Ending Addresses: The DHCP server in the Gateway allows the router to manage IP address assignment for the connected devices.
DHCP Lease time: The lease time is the length of time the Gateway offers an IP address to a connected device. The lease is renewed while it is connected to the network. After the time expires, the IP address is freed and may be assigned to any new device that connects to the Gateway.
Managing your home network settings is now easier than ever. Visit xfinity.com/myxfi to view and manage your list of connected/offline devices. You can block access to your home network for any device, among many other features and settings.
CURRENT SETTINGS
spiffy-nas-ty
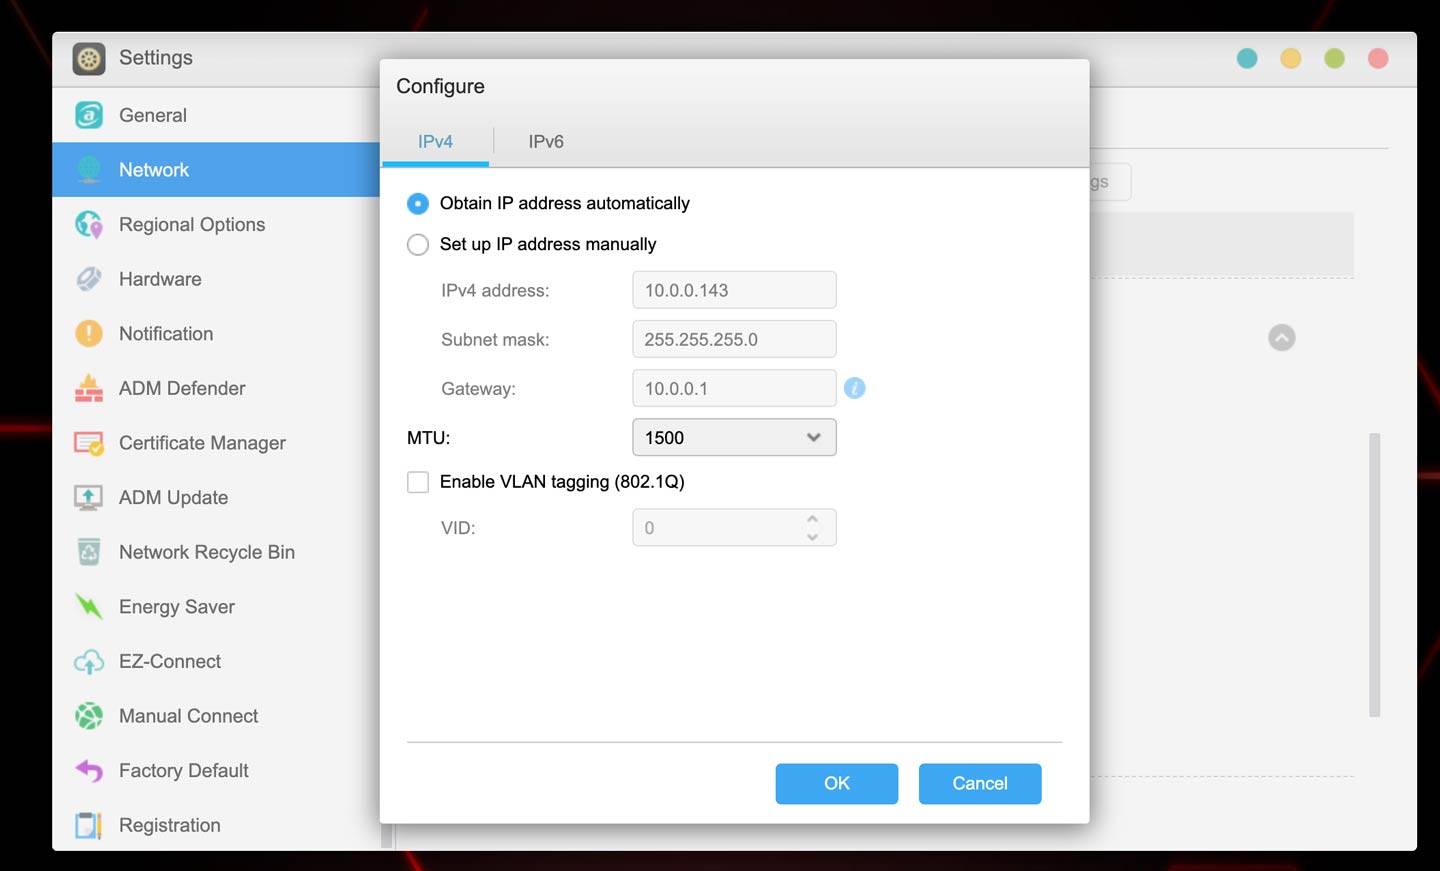
IPv4 Address
10.0.0.143
Local Link IPv6 Address
fe80::264b:feff:fe83:466b
MAC Address
24:4B:FE:83:46:6B
10.0.0.2 – 10.0.0.253
Lease 2 days
NAS – Network Panel In Settings
Assign IP
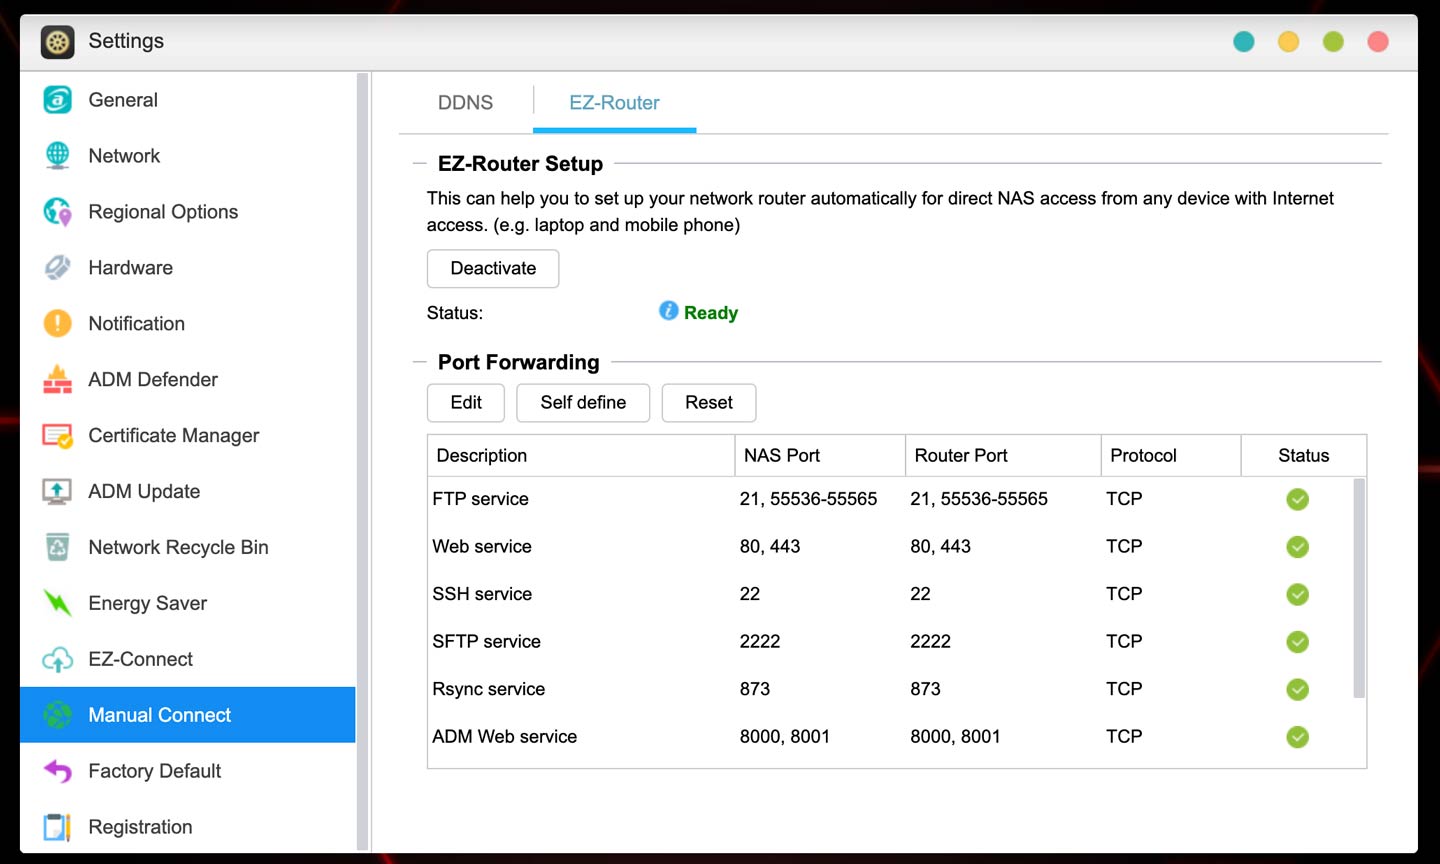
ddns – ezrouter
How to set up a static IP Address
https://www.pcmag.com/how-to/how-to-set-up-a-static-ip-address
When you have a lot of devices on your network—computers, , and —it can be annoying to constantly look up their IP addresses when you need to access them remotely. Make your life easier with a set of unchanging, static IP addresses for those machines.
Your router assigns IP addresses to devices on your network using , or Dynamic Host Configuration Protocol. As you connect new devices to the network, they’ll be assigned the next IP address in the pool, and if a device hasn’t connected in a few days, its IP address will “expire” so it can be assigned to something else.
For everyday use, this is perfectly fine, and you’ll never even notice it happening in the background. But if you regularly , to turn your computer on from across the house, or perform other advanced networking tasks, DHCP can become an annoyance.
It’s hard to remember which IP address is assigned to which device, and if they ever expire, you have to look it up all over again. That’s where a static IP address comes in handy.
Understanding Static IP Addresses
Instead of letting your router assign whatever IP address is free at any given time, you can assign specific IP addresses to the devices you access frequently. For example, I have my home server set to 192.168.1.10, my main desktop to 192.168.1.11, and so on—easy to remember, sequential, and unchanging.
You can assign these static IP addresses on the device itself—using, say, Windows’ network settings on each computer—or you can do it at the router level. Doing it at the router level is called assigning a DHCP reservation, though many people (and even some routers) still refer to it as a “static IP address.”
DHCP reservations allow you to easily set everything up in one place with all your computers left at their default settings. Your computer will ask for an IP address via DHCP, and your router will assign it the one you’ve reserved, with your computer being none the wiser.
How to Set Up a DHCP Reservation
To set up a DHCP reservation, —usually by typing its IP address in your browser’s navigation bar—and log in. (If you’re using a mesh Wi-Fi system with an app instead of a config page, you’ll find these settings in the app.)

The location is different for every config page, but you’re looking for something called “DHCP reservations,” “static IP addresses,” or something similar—on my Asus router, it’s in the LAN settings category.
To assign a reservation, you’ll need the MAC address of the device in question. This is a unique string of characters that identifies a particular network adapter, and you can usually find it in your router’s list of connected devices. Make sure you’re getting the MAC address for the correct network adapter—if you have both Ethernet and Wi-Fi on your computer, you’ll have one MAC address for each.
On your router’s config page, enter an easy-to-remember label for the device (like “Whitson’s Desktop PC”), the MAC address, and your desired IP address. Save your changes, and repeat the process for any other IP addresses you want to reserve.
From then on, those devices should have your reserved IP addresses assigned to them, and you’ll never have to look them up again.


working around disabled UPnP
Why Is UPnP A Problem?
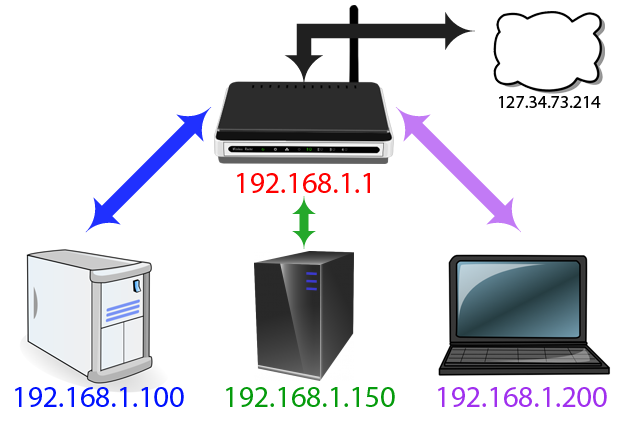
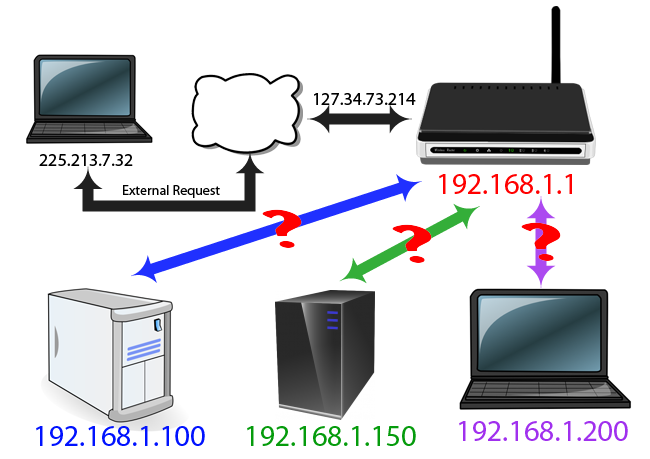
UPnP was originally designed only to work within the local network in your home, but it was sloppily enhanced to facilitate communications over the Internet. Occasionally a local device needs to allow incoming access to itself from a person or device located outside the local network. For security reasons, this is normally not allowed. The router/firewall on your home network only allows devices inside to access the Internet but doesn’t allow devices outside your home to come into your network.
So to override this and allow incoming access, the local device has to first make an outbound connection and ask your router to allow the incoming connection. This gets complicated quickly, so I’m going to use a simplified example to try and make it simpler. Please understand this isn’t exactly how it works, but it should be enough to explain what is going on.
Think of your home network like a secure fortress with only one way in or out — the front door. That door is guarded by your Wi-Fi router/firewall. In order to get into your house, the router has to open the front door — no one else can do it. The device that wants to let someone come in to your house (remote access from the Internet) uses UPnP to ask the router to automatically open the front door. The router will always obey a UPnP request and open the door.
What’s The Problem?
The problem is there is no identification needed. The router receives a command from another device inside your home network and trusts that the device is legit and always opens the door without any questions. This is the security hole — malicious software such as a computer virus or malware that infects your computer can take control of a device on your own network. This malware then asks the router/gateway to open the door to let its criminal friends come in the “front door”, and the router obeys.
Easy Solution — Lock the Front Door
The simplest solution is to simply bolt the front door. Almost every modern Wi-Fi router has a setting that allows you to disable Universal Plug and Play. When you turn off UPnP, the router simply ignores all requests from any devices on your local network to unlock and open the front door. The requests are ignored and the door stays shut to unwanted incoming visitors.
This works, but it also blocks all incoming remote access. There are many legitimate uses for incoming remote access. In home automation, one of the common uses is to view the live video stream from your security camera. Another typical use is to “dial in” to your home computer when you are away and want to retrieve some important files or operate your home automation system from afar.
How To Allow Limited Remote Access
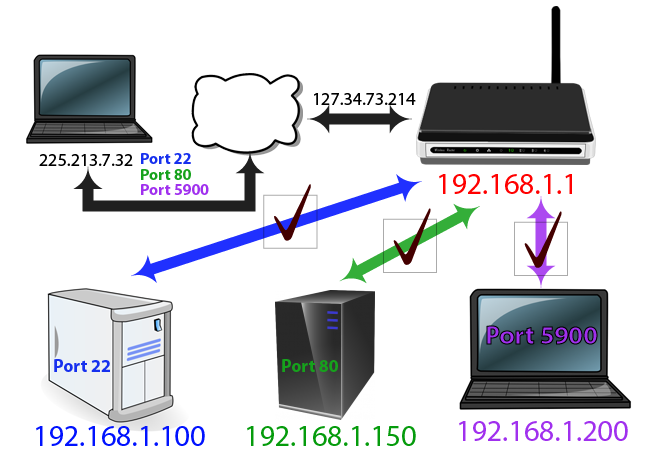
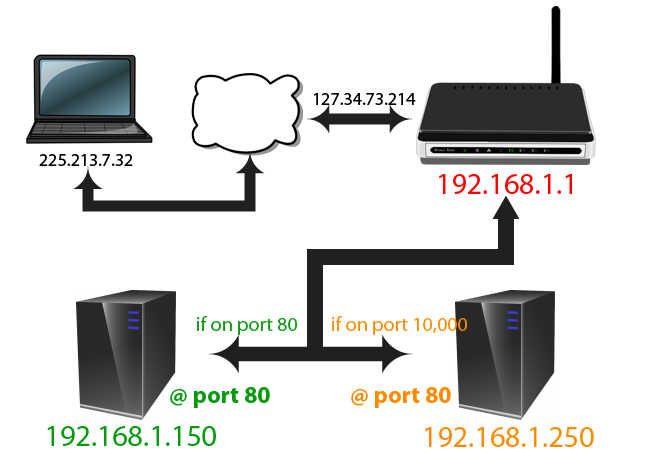
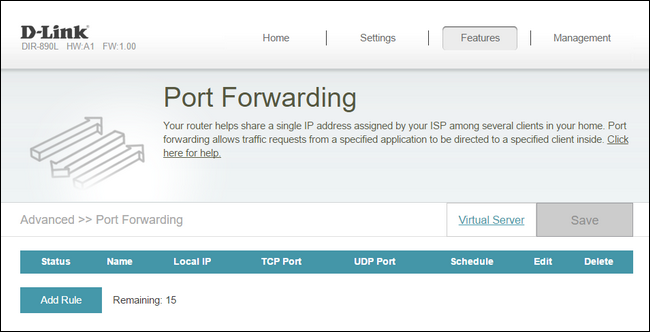
The solution is to go “old school” and use the manual configuration procedure that existed before UPnP made it easy and automatic. Using a configuration option in your router, you have to identify which device needs remote access and manually change the configuration to allow that particular device to have remote access. In technical terms, this is called “port forwarding” and you will specify the local device (by listing its IP address) and the door that will be used (the TCP/IP or UDP “port”).
Just about every router nowadays supports manually configuring port forwarding. The specific steps are different for each brand of router, but the concept is the same. For help with configuring your own router, the following website provides a list of many popular routers and the specific instructions you will need: www.portforward.com
Is It Safe?
This is a permanent setting so you will be allowing that particular device to have incoming remote access whenever it likes. By doing this you are limiting remote access to only that device. Only that device will be allowed incoming access. A typical home network might have between 5 and 10 devices (when you count all the smartphones, tablets, smart TV’s, computers, laptops, etc.) and the count can easily be 50 to 100 when you add home automation and larger houses. By manually configuring port forwarding only for the devices that truly need it, you reduce the potential devices that can be attacked to gain a remote door from 50 or 100 down to 1 or 2. (In computer security lingo, this is called “reducing the attack surface”.)
An Even Better Solution
Disabling UPnP and manually configuring port forwarding when needed is a straightforward security step that you can do now. If you want to up your game even more, consider completely disabling all port forwarding and use a newer technology called a virtual private network (VPN). Incoming VPN’s are a lot more secure way to provide remote access to your network.
Adding an incoming VPN to your home network can be a bit more complicated. You might need to replace your router with a more advanced and more powerful model. Then you need to configure the VPN software which can be confusing.
What do you think about home network security? Will you disable UPnP on your network? Let me know what you think.
For More Information and Assistance:
If you would like to learn more about setting up VPN routers and automating your home, visit our website at www.DoItForMe.Solutions
Robert E. Spivack, SmartHome Specialist
I design, install, & retrofit home automation solutions at www.DoItForMe.Solutions
VPN and ICSIS
Using NAS as a VPN server
Using NAS as a VPN server
https://www.asustor.com/en/online/College_topic?topic=323
COURSE OBJECTIVES
Upon
completion of this course you should be able to
1. Be able to use your ASUSTOR NAS as a VPN
server and connect to it using Windows and Mac.
PREQUISITES
Course Prerequisites:
None
Students are
expected to have a working knowledge of:
N/A
OUTLINE
1.1 Enabling and configuring PPTP
connections
1.2 Enabling and configuring OpenVPN
connections
1.3 Enabling
and configuring L2TP connections
2.1.1 Connecting using
Windows 7
2.2.1 Connecting using
Windows 7
2.3 Configuring the gateway and routing for the
VPN client
2.3.1 Configurations
using Windows 7
2.3.3 Configurations
using a Mac
2.4 Connecting to your VPN server via L2TP/Ipsec
1. Configuring Your VPN Server
In the following example, we wil configure
ASUSTOR NAS’s VPN Server.
Before you begin, log in to ADM from your
Web browser and then search for and install [VPN Server] from [App
Central].
1.1 Enabling and configuring PPTP connections
STEP
1
Enabling
PPTP service: You can use the toggle found under [PPTP] to enable PPTP service.

STEP
2
Adding
a new user: Select [Privilege] → [User] → [Add]. In the graphic
below, we have chosen to add the account “vpn” as an example. After you have
chosen the user that wish to add, click on [Save].
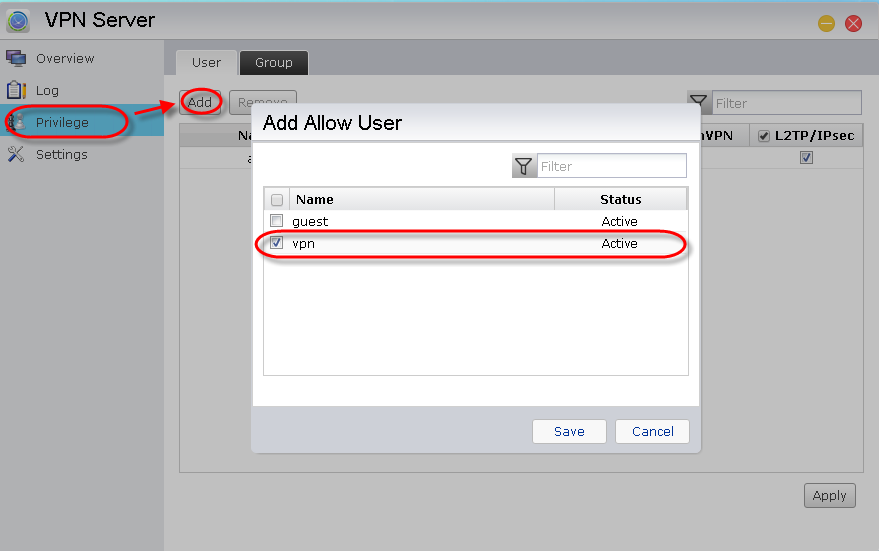
Select the [PPTP] checkbox and then click on [Apply]. Now, the “vpn” user account
will be able to utilize PPTP connections.

STEP
3
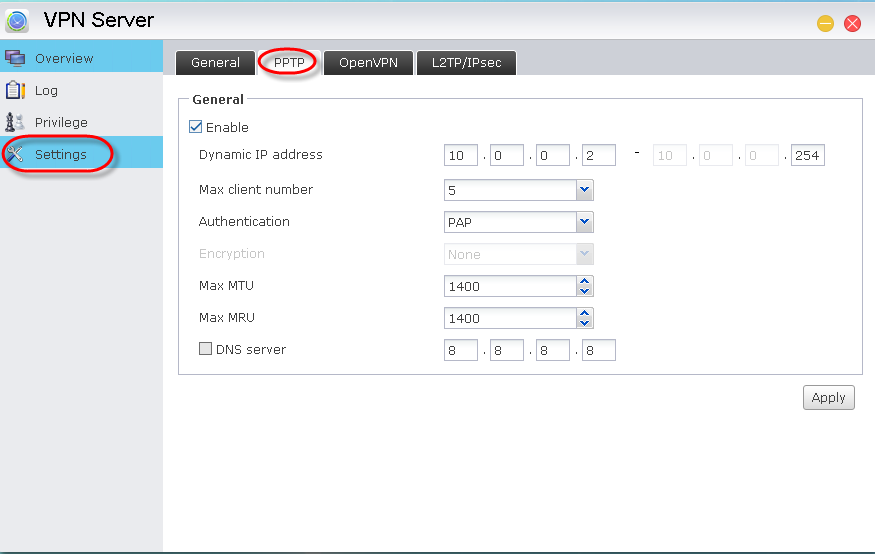
Configuring
advanced settings: Select [Settings] → [PPTP]. Here, you will be
able to configure settings for [Dynamic
IP address], [Max. client number], [Authentication], [Max. MTU], [Max. MRU] and [DNS server].
Make sure to click on [Apply] after
you have made any changes to the settings.
1.2 Enabling and configuring OpenVPN connections
STEP
1
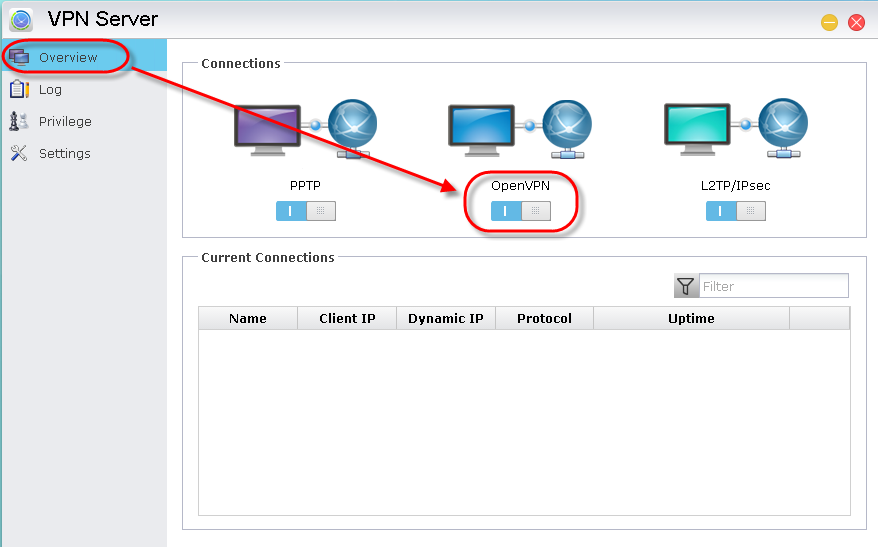
Enabling
OpenVPN service: You can use the toggle found under [OpenVPN] to enable OpenVPN service.
STEP
2
Adding
a new user: Select [Privilege] → [User] → [Add]. In the graphic
below, we have chosen to add the account “vpn” as an example. After you have
chosen the user that wish to add, click on [Save].

Select the [OpenVPN] checkbox and then click on [Apply]. Now, the “vpn” user account
will be able to utilize PPTP connections.
STEP
3
Configuring
advanced settings: Select [Settings] → [OpenVPN]. Here, you will be
able to configure settings for [Dynamic
IP address], [Transmission Protocol], [Port], [Max. client number], [Checksum
(Digest)], [Encryption (Cipher)], [DNS server], [Redirect gateway] and [VPN
link compression]. Make sure to click on [Apply] after you have made any changes to the settings.

Note: Click on the [Download
configuration file] button to download the configuration file for
OpenVPN clients. You must import this file to your VPN client in order to
successfully create OpenVPN connections.
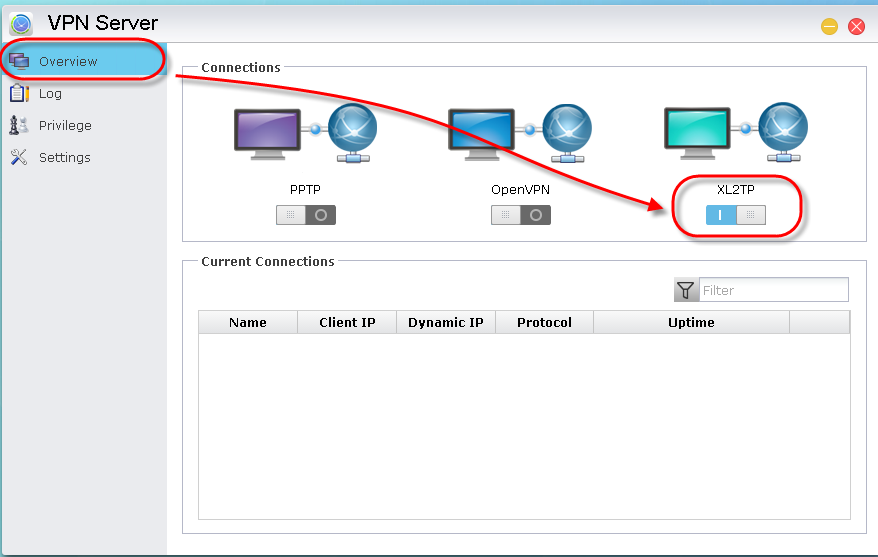
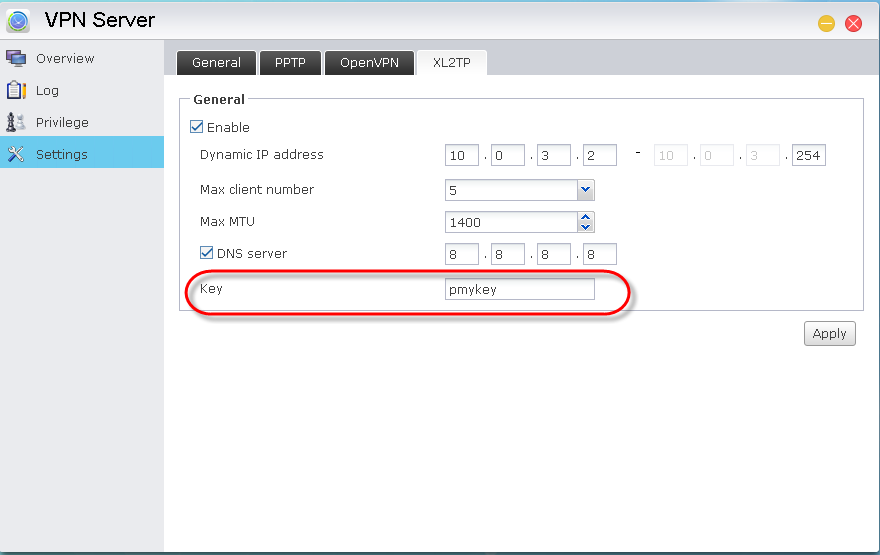
1.3 Enabling and configuring L2TP connections
STEP 1
Enabling L2TP service: Enable XL2TP service by using the provided toggle button.
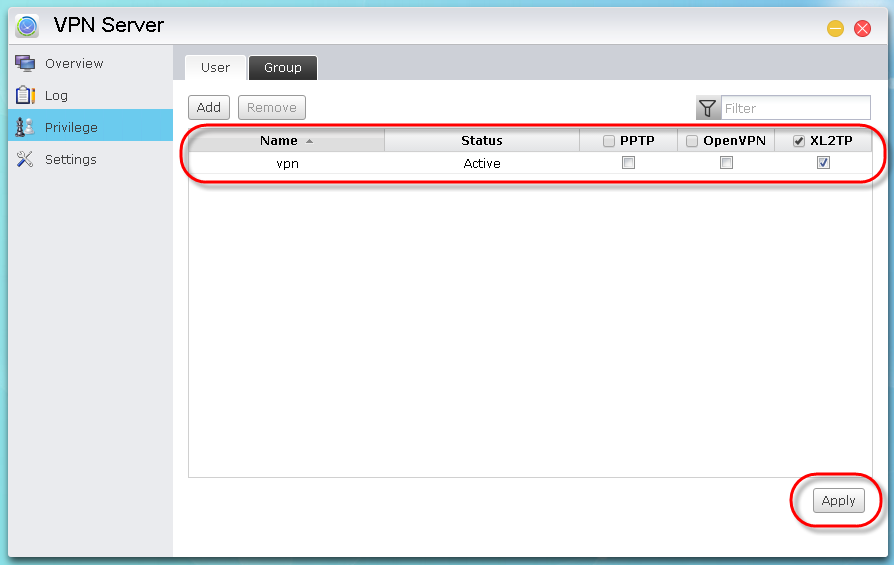
STEP 2
Add new users: Select [Privilege] > [User] > [Add]. In this example we add the user “vpn” by selecting its checkbox and then clicking on [Save].
For the added user, select the [XL2TP] checkbox and then click on [Apply]. This will allow the user to use XL2TP connections.

STEP 3
Modifying advanced settings: Click on [Settings] >[XL2TP]. Here you will be able to configure settings such as the dynamic IP address, max client number, max MTU, DNS server and key. Make sure to click on [Apply] once you are done modifying the settings.

2. Connecting to Your VPN
Server Using Windows and Mac
2.1 Connecting to your VPN server via
PPTP
2.1.1 Connecting using Windows 7
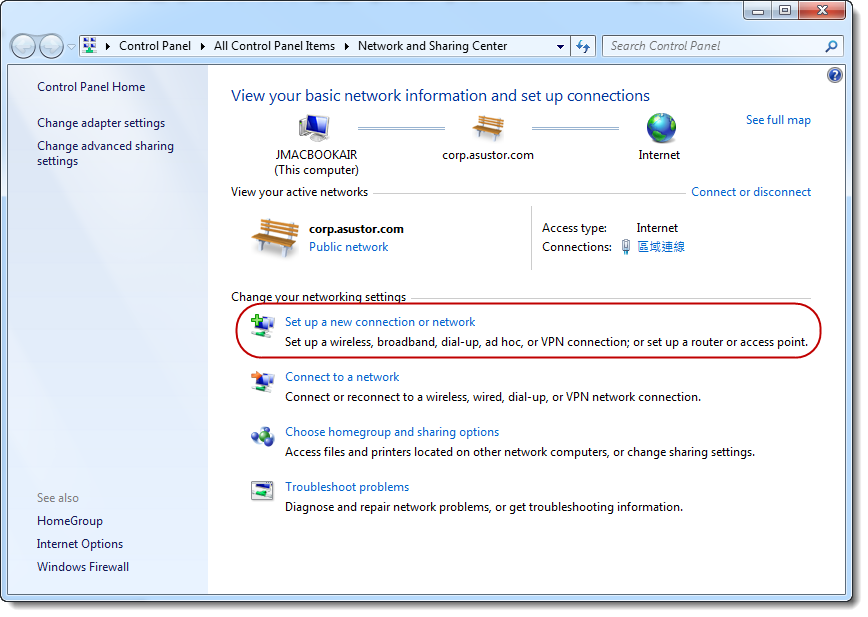
STEP
1
Select [Control
Panel] → [All
Control Panel Items] → [Network and Sharing Center] → [Set
up a new connection or network].
STEP
2
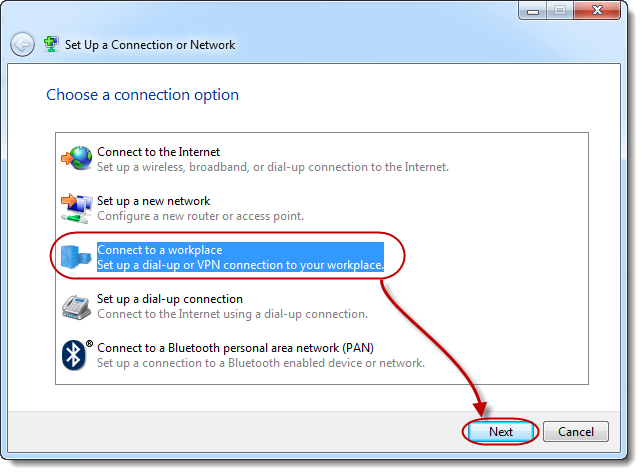
Select [Connect
to a workplace] → [Next].

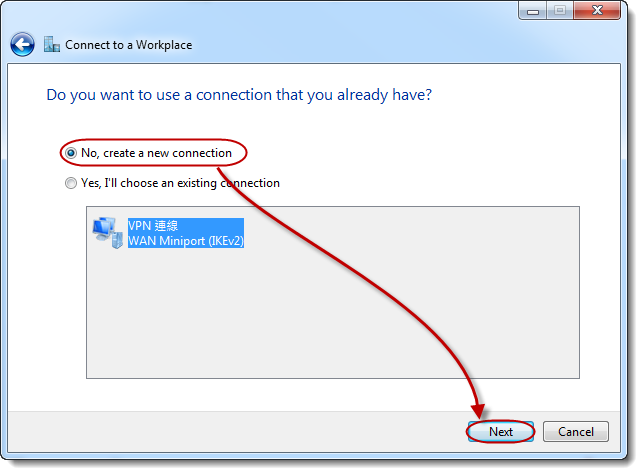
STEP
3
Select [No, create a new connection] → [Next].
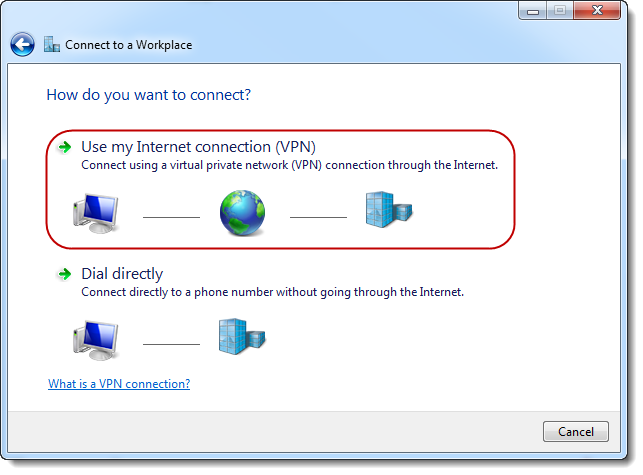
STEP
4
Select [Use my Internet connection (VPN)].
STEP
5
Enter
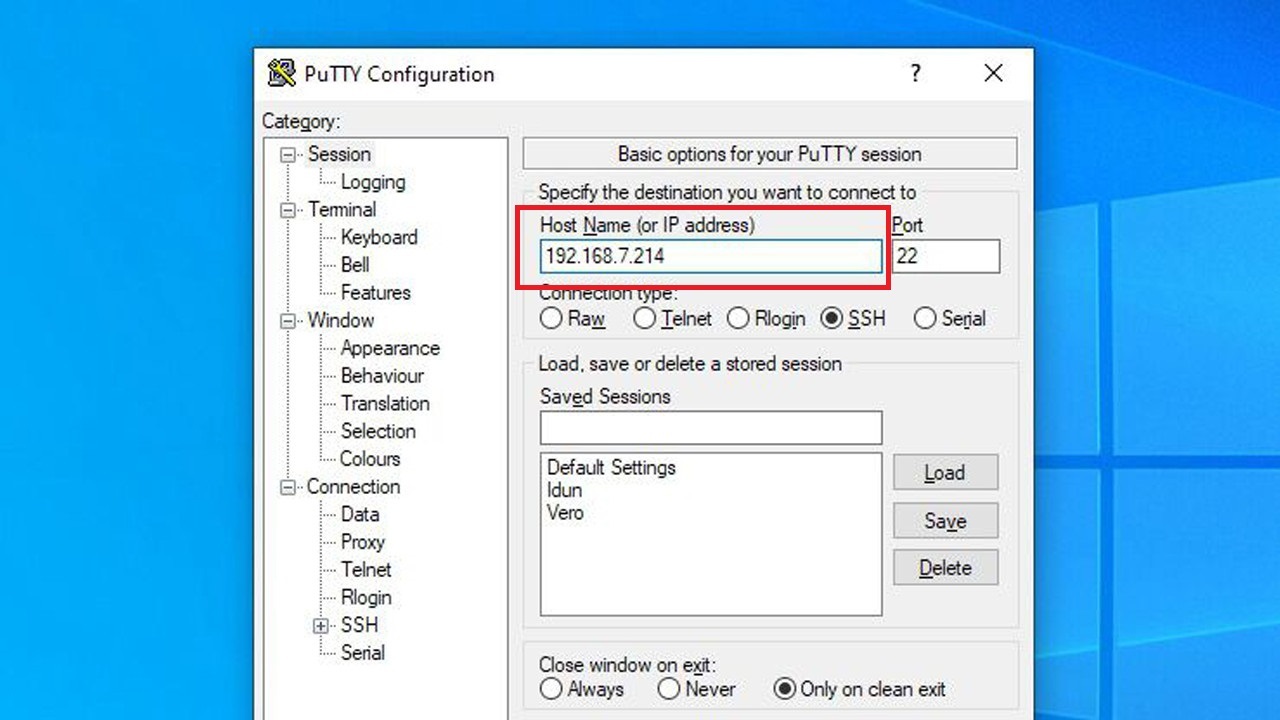
the IP address of your ASUSTOR NAS into the [Internet address] field and then click on [Next].

STEP 6
Enter a username and password in the appropriate fields and then click
on [Connect]. You will now be able
to access your ASUSTOR NAS through Windows.

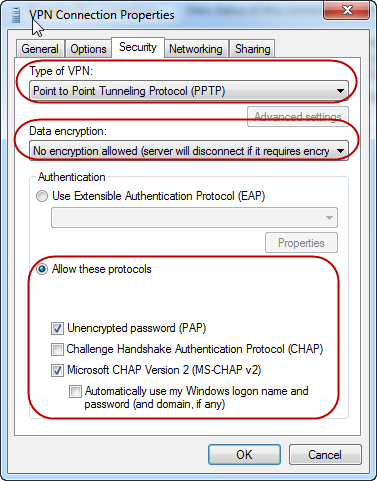
Note: If you are unable to connect to your
VPN server, please ensure that your VPN settings are identical to your VPN
server settings.
For example, in the graphic below, we check
that the [Type of VPN] is Point to Point Tunneling Protocol (PPTP),
that the [Data encryption] method is PAP or MS-CHAP v2 and that they have been allowed under the [Allow these protocols] radio button.
2.1.2 Connecting using Windows 10
STEP
1
Click the [Network] icon on the bottom right-hand
side of the system tray and select [Network
Settings].

STEP
2
Select [VPN] from the left panel, and click [Add a VPN connection].

STEP
3
Select Windows (built-in) in [VPN
Provider] field. Type in the name for this VPN connection and enter the IP address of your ASUSTOR NAS into the [Server name or address] field. Choose PPTP as the [VPN Type], enter the username/password in the
appropriate fields, and click [Save].

STEP
4
Now you can see that the
newly created VPN connection has appeared. To specify the authentication protocol,
please click [Change adapter options].

Right click on the VPN
connection and select [Properties].

STEP
5
Select the [Security] tab, check the [Allow these protocols] option, then
choose the same protocol (PAP or MS-CHAP v2) as the VPN server on your ASUSTOR
NAS. Click [OK] to save the
settings.

STEP
6
To establish the VPN
connection, go to the Windows [NETWORK
& INTERNET] > [VPN] page,
select an existing VPN profile and click [Connect].

2.1.3 Connecting using a Mac
STEP 1
From the Apple menu, select [System Preferences…].

STEP 2
Select [Network].

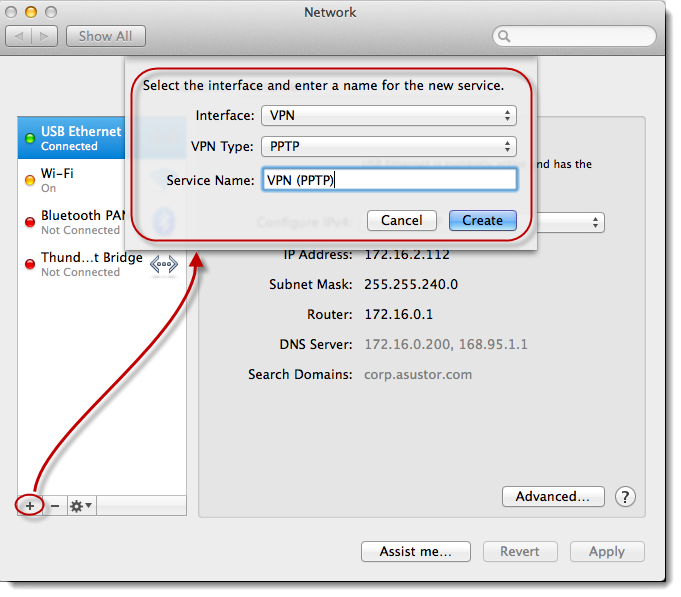
STEP
3
Click on the [ + ] button and then select [VPN] for Interface, [PPTP] for VPN Type,
fill in the Service Name as “VPN (PPTP)”
and then click on [Create].
STEP
4
Enter your [Server Address] and [Account
Name], select “None” for [Encryption] and then click on [Connect]. Please ensure that your VPN
client settings and VPN server settings are identical.

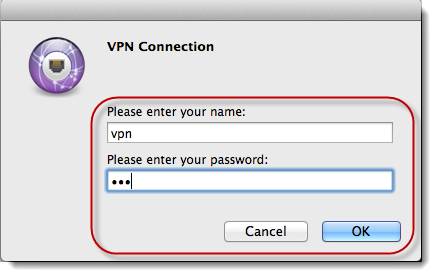
STEP 5
Enter the name and password for
your VPN server and then click on [OK].
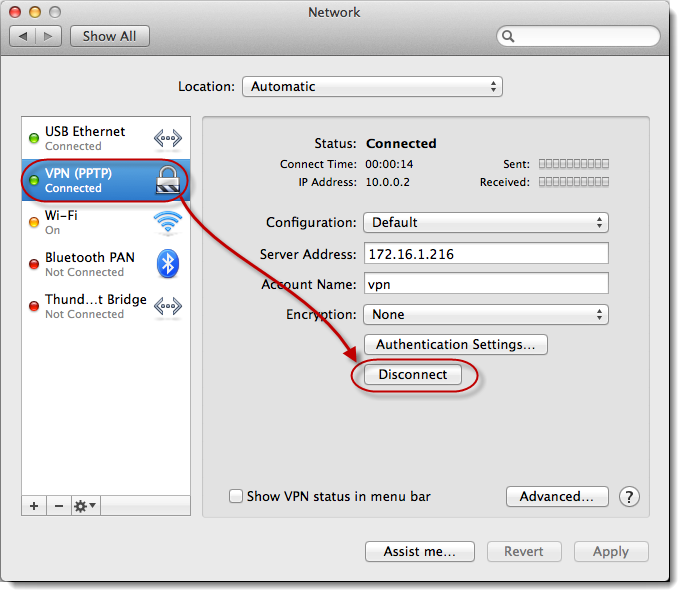
STEP
6
You should now be successfully connected and should be able to access
your ASUSTOR NAS using your Mac. You can disconnect the connection at any time
by clicking on the [Disconnect] button.
2.2 Connecting to your VPN server via OpenVPN
2.2.1 Connecting using Windows 7
STEP
1
Download and
install the OpenVPN program from the OpenVPN website.

STEP
2
Extract the OpenVPN configuration file that you
have downloaded from your ASUSTOR NAS’s VPN server (see section 3.2). Open the [asustor.ovpn] file, change the IP
address for the VPN server and then save the changes. In the graphic below, we
have changed the IP address of the VPN server to 172.16.2.102.

STEP
3
Copy the [asustor.ovpn] and [ca.crt] files to the (C:Program
FilesOpenVPNconfig) folder.

STEP
4
Open [OpenVPN GUI].
You
should now be able to see the [OpenVPN
GUI] icon in your system tray. Double-click on it.
![]()
STEP
5
Enter the username and
password for your ASUSTOR NAS VPN server and then click on [OK].

STEP
6
After
successfully connecting, you should be able to see that the OpenVPN GUI icon in
your system tray has turned green. You should now be able to access your
ASUSTOR NAS using Windows.
![]()
2.2.2 Connecting using a Mac
STEP
1
Download tunnelblick.

STEP
2
Install [Tunnelblick].
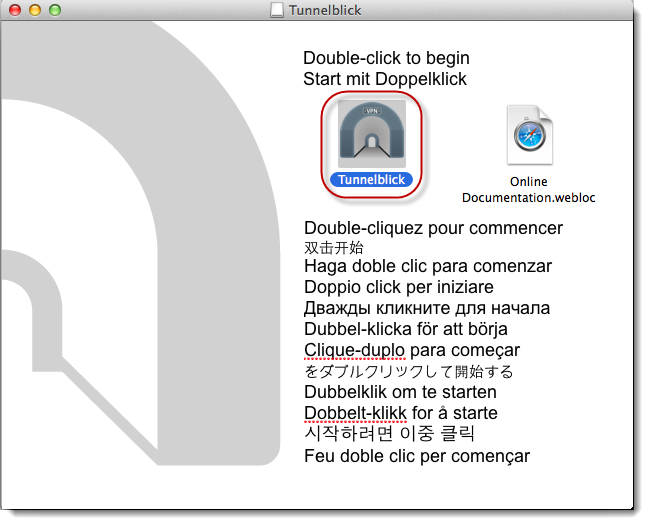
After
installation, click on [Launch].

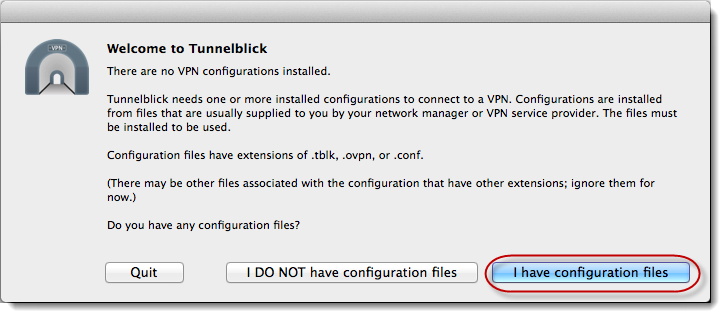
STEP
3
Click
on [I have configuration files].
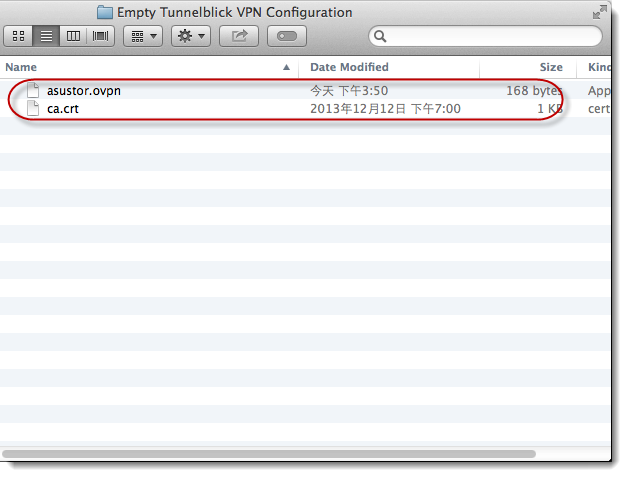
If
you have already download the configuration file from your ASUSTOR NAS’s VPN
server, click on [OpenVPN
Configuration(s)].

You should now be able to
see the newly created [Empty Tunnelblick
VPN Configuration] folder on your desktop. Copy the configuration file from
your ASUSTOR NAS’s VPN server to this folder.
Open
the [asustor.ovpn] file and then
change the IP address for your ASUSTOR NAS VPN server.
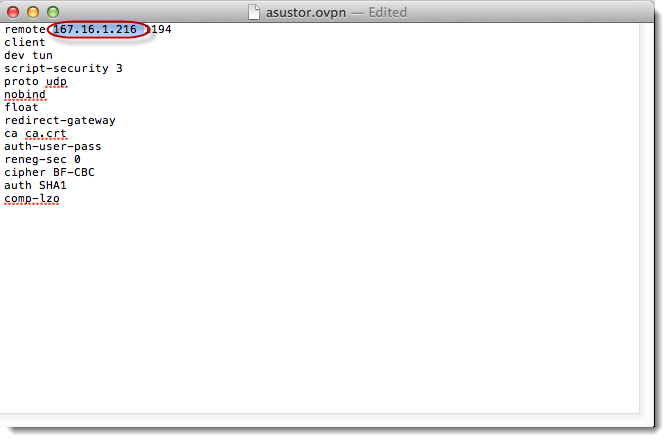
After
saving the changes to the file, change the name of the folder to “ASUSTORVPN.tblk”.

Tunnelblick
VPN configurations should have now been installed successfully.

STEP
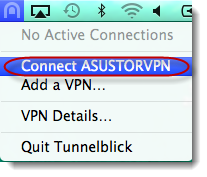
4
From
the Mac menu bar, click on the [Tunnelblick] icon and then select [Connect
ASUSTORVPN].
STEP
5
After
successfully connecting, you will be able to see the connection status and time
in the menu bar as shown in the graphic below.

2.3 Configuring the gateway and routing for the VPN client
When
using a VPN client, the system will automatically forward your VPN server’s default gateway.
Under these circumstances, you will not be able to connect to the Internet.
Therefore, we must change the VPN gateway and routing in order to connect to
the Internet.
2.3.1 Configurations using Windows 7
STEP
1
Right-click
on your VPN connection and then select [Properties].
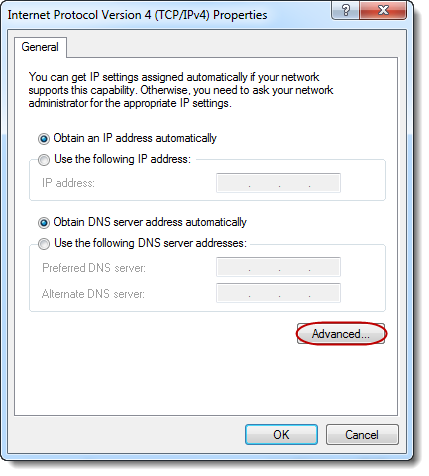
Select [Internet
Protocol Version 4 (TCP/IPv4)] and
then click on [Properties].

STEP
2
Click
on [Advanced…].
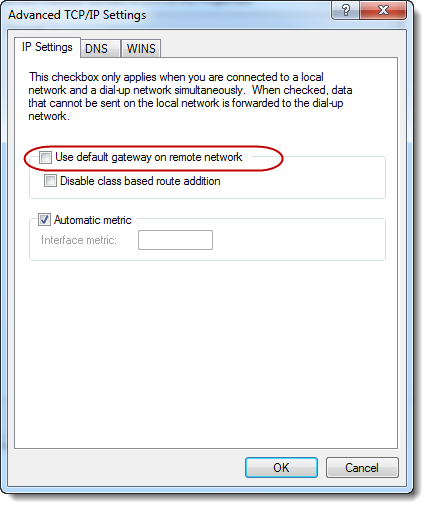
STEP
3
Uncheck
the [Use default gateway on remote
network] checkbox.
2.3.2 Configurations using Windows 10
STEP
1
Click the
Windows icon on the bottom left-hand side of the taskbar, select [All apps] from
the list, and scroll down to find [Windows Powershell].
Click on it to execute the program.

STEP
2
Issue
the ”Get-VpnConnection” command
to list the information of your existing VPN connections.
By
default, the value of the SplitTunneling parameter is False, which means all
network traffic of this VPN client will be forwarded to the VPN server’s
gateway.

STEP
3
Issue the “Set-VpnConnection
-Name “ASUSTOR VPN” -SplitTunneling $True”
command to change the value of the SplitTunneling parameter to True.
Note: The “ASUSTOR NAS” string in the example above
must be replaced to your own VPN connection name.

STEP
4
Issue the ”Get-VpnConnection” command again to verify that the change has been made successfully.

2.3.3 Configurations using a Mac
STEP
1
Open [Terminal] and
then enter the command “ifconfig-a”. You
will now be able to see your VPN server’s IP address. Note that the Mac operating
system only provides this gateway for connecting to a VPN server and cannot
connect to the Internet. Therefore, we will have to manually enter the IP
address for the ASUSTOR NAS.

STEP
2
Please
replace either 10.0.1.6 or 10.0.1.5 with the IP address of the ASUSTOR NAS.
Executing the commands below will allow you to connect to the Internet.
|
sudo route OR
sudo route |
2.4 Connecting to your VPN server via L2TP/IPsec
2.4.1 Connecting using Windows 7
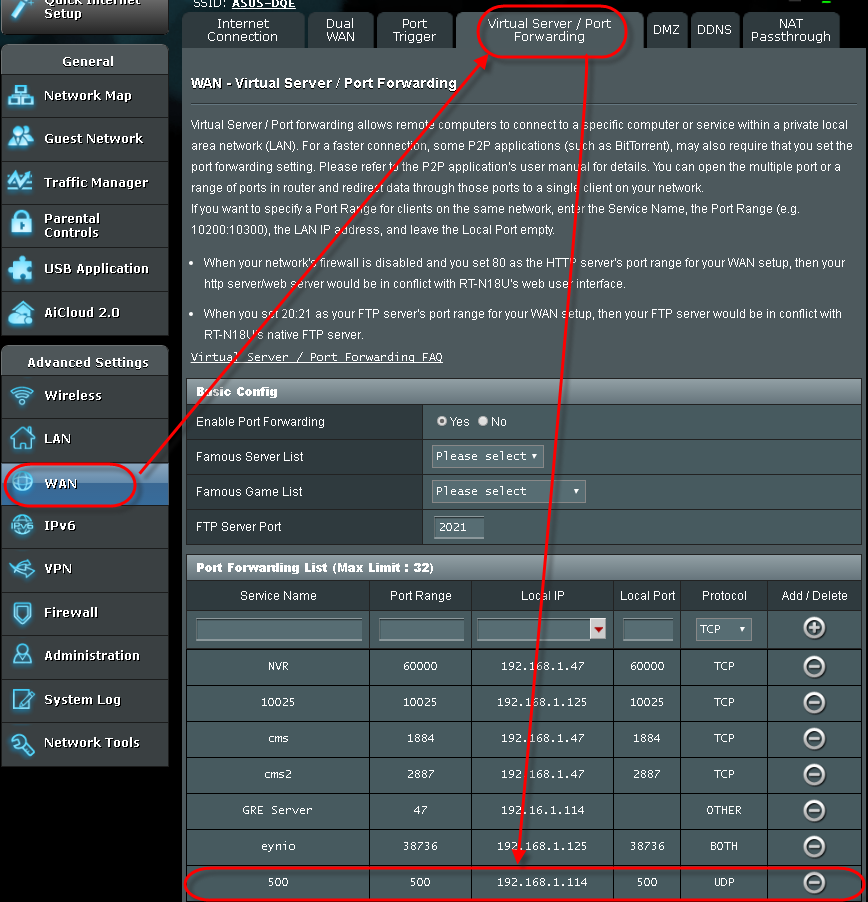
If you are using an ASUS router, please manually open port 500 under port forwarding. From the router configuration interface, select [WAN] [Virtual Server / Port Forwarding] tab [Port Forwarding List]. Add a new item to the Port Forwarding list by entering the following information:
Service Name: A name of your choice
Port Range: 500
Local IP: Your NAS’s IP address
Local Port: 500
Protocol: UDP
Click on the [Add] button after you have entered all the information. Port 500 should now be opened.
STEP 1
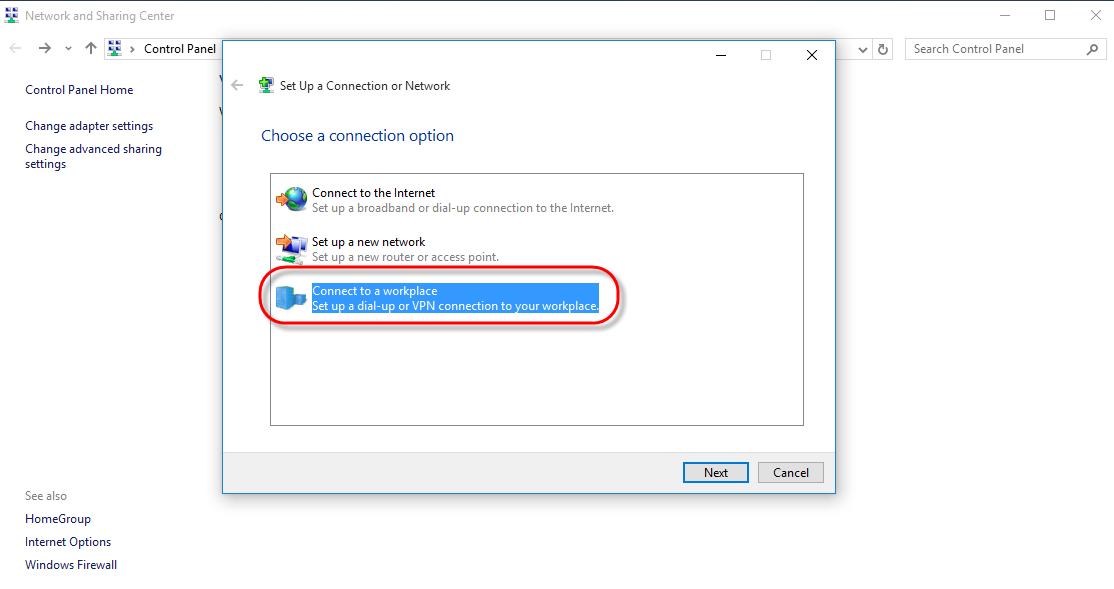
In Windows, go to [Control Panel] > [All Control Panel Items] > [Network and Sharing Center] and then click on [Set up a new connection or network].

STEP 2
Select [Connect to a workplace] then click [Next].
STEP 3
Select [No, create a new connection] and then click [Next].

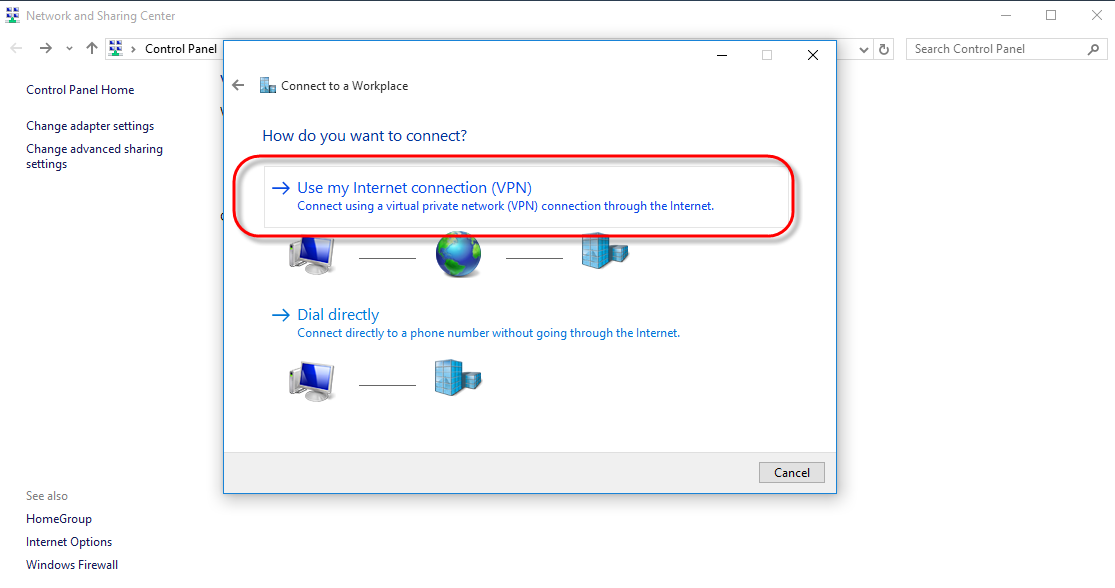
STEP 4
Select [Use my Internet connection (VPN)]

STEP 5
In the [Internet address:] field enter your ASUSTOR NAS’s IP address or domain address.

STEP 6
Enter your [User name] and [Password] and then click on [Connect]. You will now be able to access the local network resources on your ASUSTOR NAS via Windows.

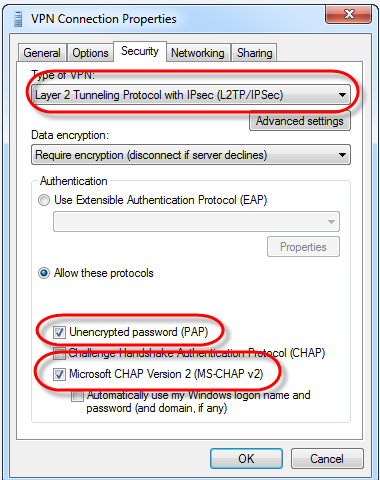
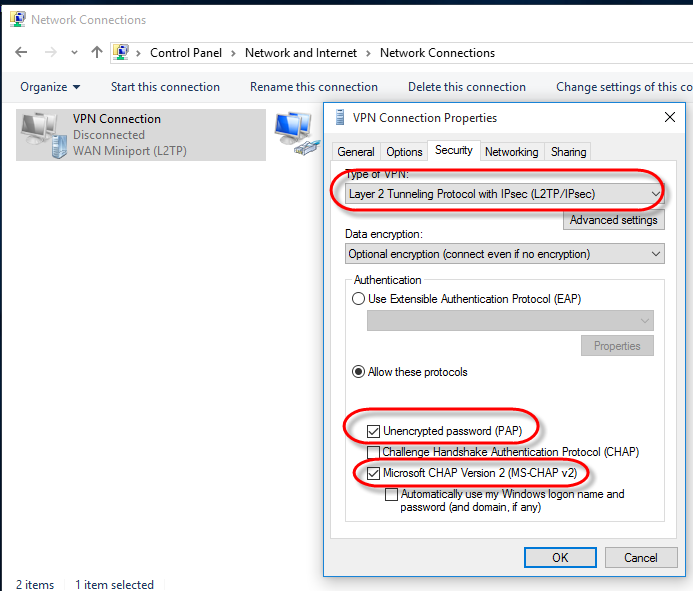
Note: If you are unable to connect to the VPN Server, please ensure that the [VPN Settings] and [VPN Server] settings are identical.
Using the graphic below as an example, we check that the [Type of VPN] is L2TP/IPSec, that the data encryption method is either PAP or MS-CHAP v2 and that [Allow these protocols] radio button has been selected.
STEP 7
Click on [Start] and run “regedit”.

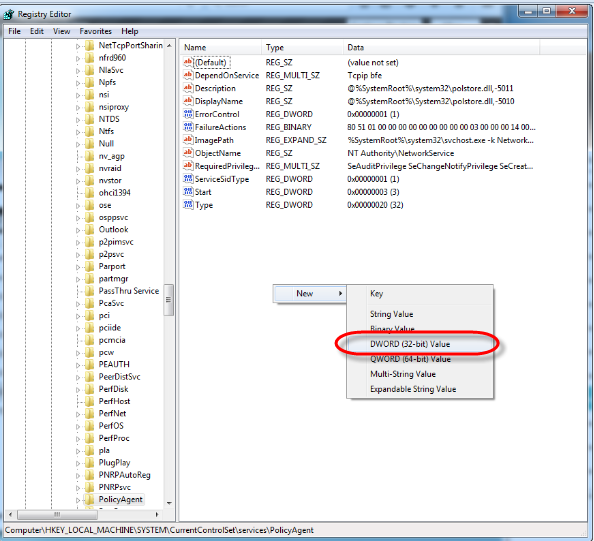
STEP 8
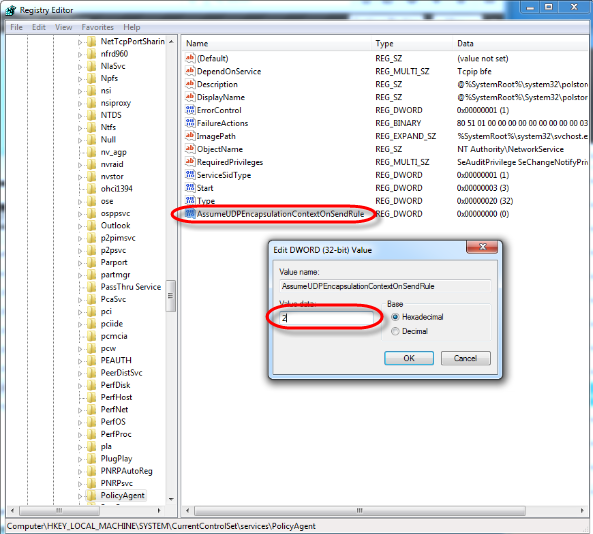
Navigate to HKEY_LOCAL_MACHINE\SYSTEM\CurrentControlSet\Services\PolicyAgent and then right click and select [New] > [DWORD (32 bit) Value].

STEP 9
For the Value name enter “AssumeUDPEncapsulationContextOnSendRule”and set the Value data to “2” and then click [OK]. Restart your computer.
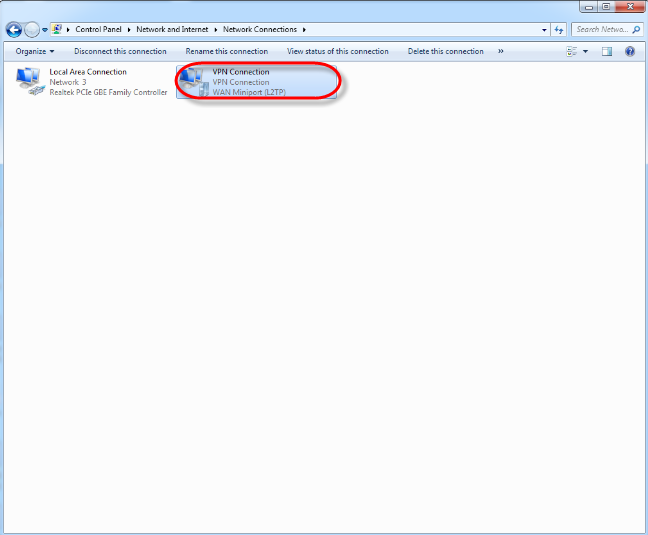
STEP 10
After restarting your computer, go to [Control Panel] > [Network and Internet] > [Network Connections] to see that your new connection is successful.
2.4.2 Connecting using Windows 10
If you are using an ASUS router, please manually open port 500 under port forwarding. From the router configuration interface, select [WAN] > [Virtual Server / Port Forwarding] tab > [Port Forwarding List]. Add a new item to the Port Forwarding list by entering the following information:
Service Name: A name of your choice
Port Range: 500
Local IP: Your NAS’s IP address
Local Port: 500
Protocol: UDP
Click on the [Add] button after you have entered all the information. Port 500 should now be opened.
STEP 1
Click on the [Network] icon in the system tray and then click on [Open Network and Sharing Center].

STEP 2
Click on [Set up a new connection or network].
STEP 3
Select [Connect to a workplace] then click [Next].
STEP 4
Click on [Use my Internet connection (VPN)].
STEP 5
Enter the Internet address, Destination name and then select the [Allow other people to use this connection] checkbox. Click on [Create] once you are done.

STEP 6
Click on [Change adapter settings]. Right-click on the VPN connection that you have just created and select [Properties]. Click on the [Security] tab and change the [Type of VPN] to L2TP/IPsec. Click on [Advanced settings], make sure the [Use preshared key for authentication] radio button is selected and then enter your key (Your key can be found from the ADM interface by selecting [VPN Server] > [Settings] > [L2TP]). Click on [OK] once you are done.
STEP 7
Click on [Start] and run “regedit”.

STEP 8
Navigate to HKEY_LOCAL_MACHINE\SYSTEM\CurrentControlSet\Services\PolicyAgent and then right click and select [New] > [DWORD (32 bit) Value].
STEP 9
For the Value name enter “AssumeUDPEncapsulationContextOnSendRule”and set the Value data to “2” and then click [OK]. Restart your computer.

2.4.3 Connecting using a Mac
If you are using an ASUS router, please manually open port 500 under port forwarding. From the router configuration interface, select [WAN] > [Virtual Server / Port Forwarding] tab > [Port Forwarding List]. Add a new item to the Port Forwarding list by entering the following information:
Service Name: A name of your choice
Port Range: 500
Local IP: Your NAS’s IP address
Local Port: 500
Protocol: UDP
Click on the [Add] button after you have entered all the information. Port 500 should now be opened.

STEP 1
Click on the [Apple] icon and then select [System Preferences…].

STEP 2
Click on [Network].

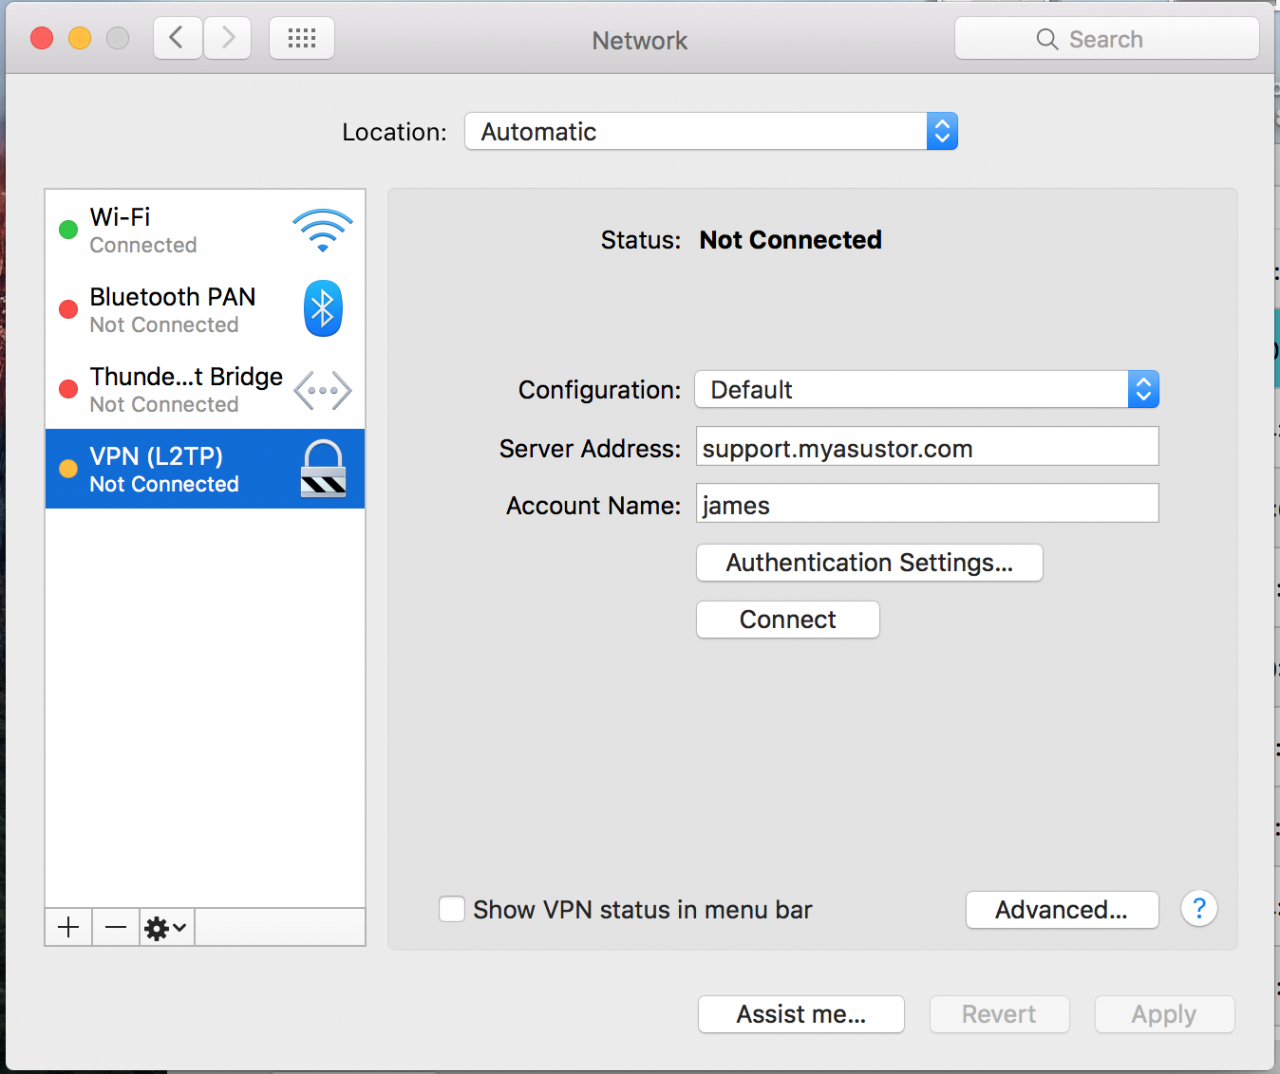
STEP 3
Click on the + button, select [VPN] for “Interface:”, [L2TP Over IpSec] for “VPN Type”, enter a Service Name and then click on [Create].

STEP 4
Enter your [Server Address] and [Account Name]. Click on [Authentication Settings…] and enter the User Account Password and Shared Secret (The Shared Secret is the key that can be found from the ADM interface by selecting [VPN Server] > [Settings] >[XL2TP]).
Click [OK] and then click on [Connect].

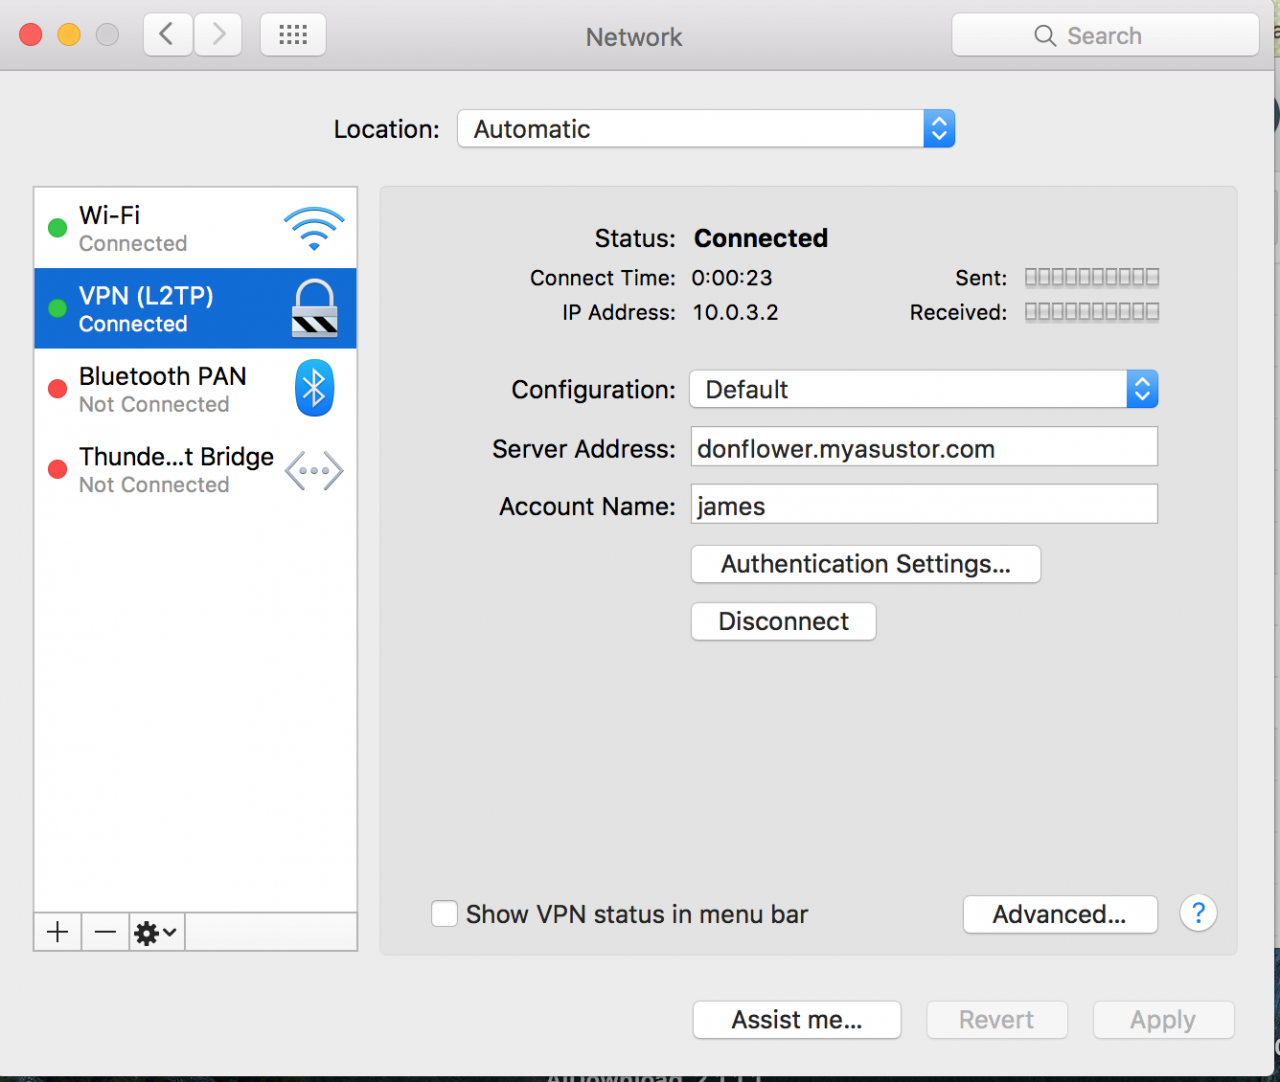
STEP 5
Enter the VPN Server account name and password and then click on [OK].

STEP 6
After successfully connecting, you will be able to access the resources on your ASUSTOR NAS local network. If you wish to disconnect the VPN connection, you can click on the [Disconnect] button.
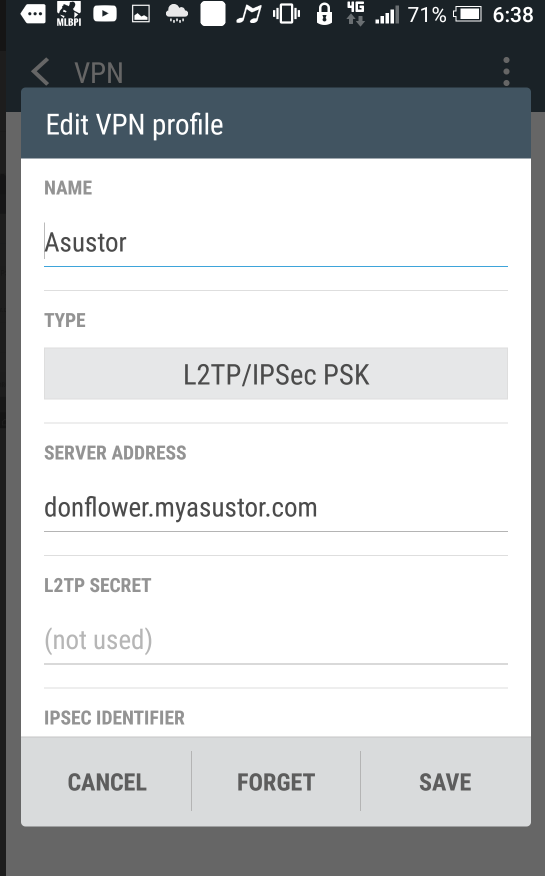
2.4.4 Connecting using an Android device
STEP 1
Select [Settings]>[More] > [VPN].

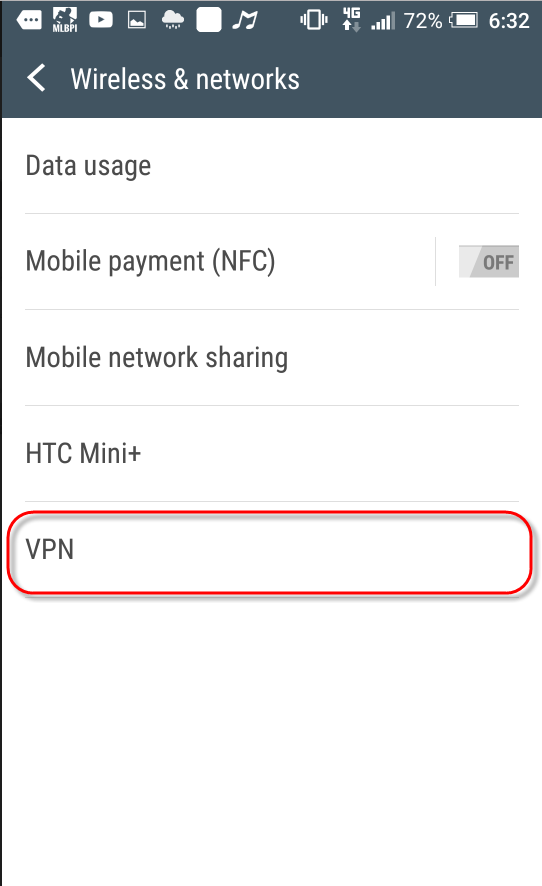
STEP 2
Click on [Add VPN profile], enter a name of your choice, select [L2TP/IPSEC PSK] for “Type” and enter your NAS’s IP address or URL into the [Server Address] field. Choose an encryption method and then select [Save] to complete configurations.
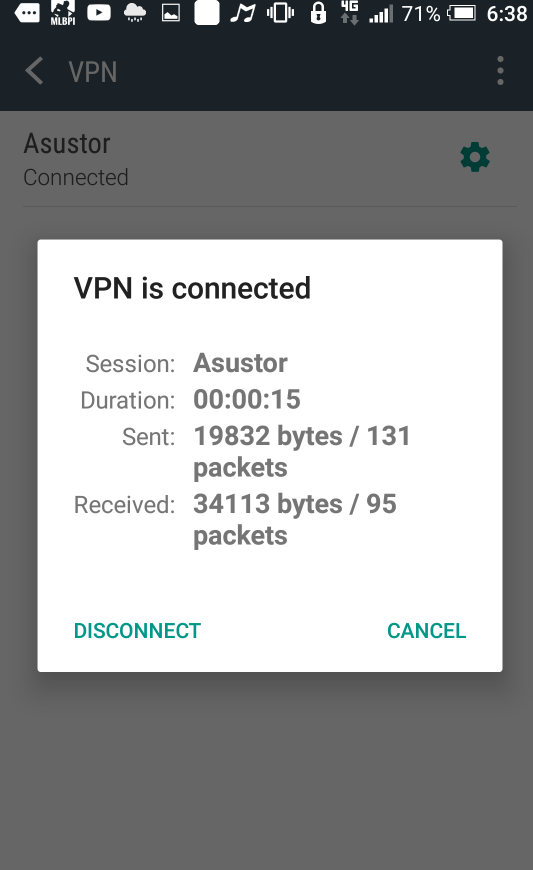
STEP 3
Select the created VPN profile. After entering the username and password, select [Connect] to create the VPN connection.
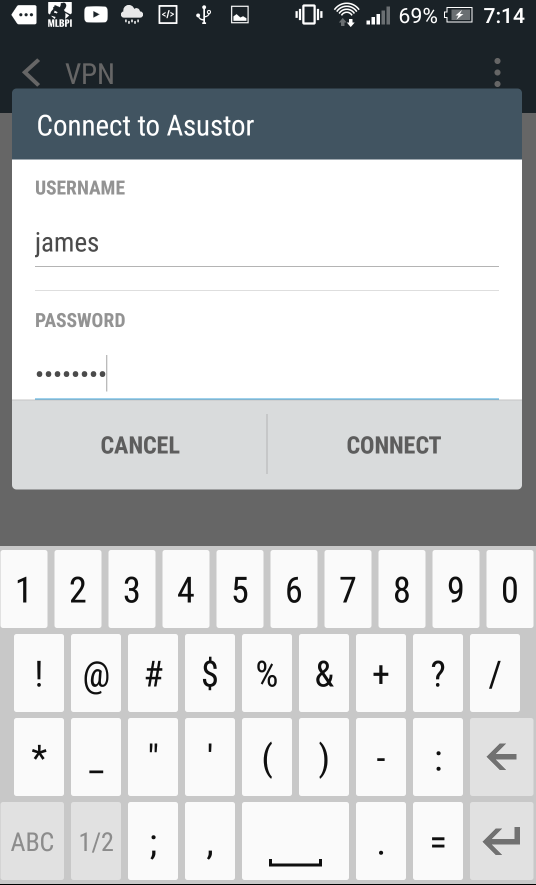
After creating the connection, selecting the profile again will allow you to view the associated information for the connection.
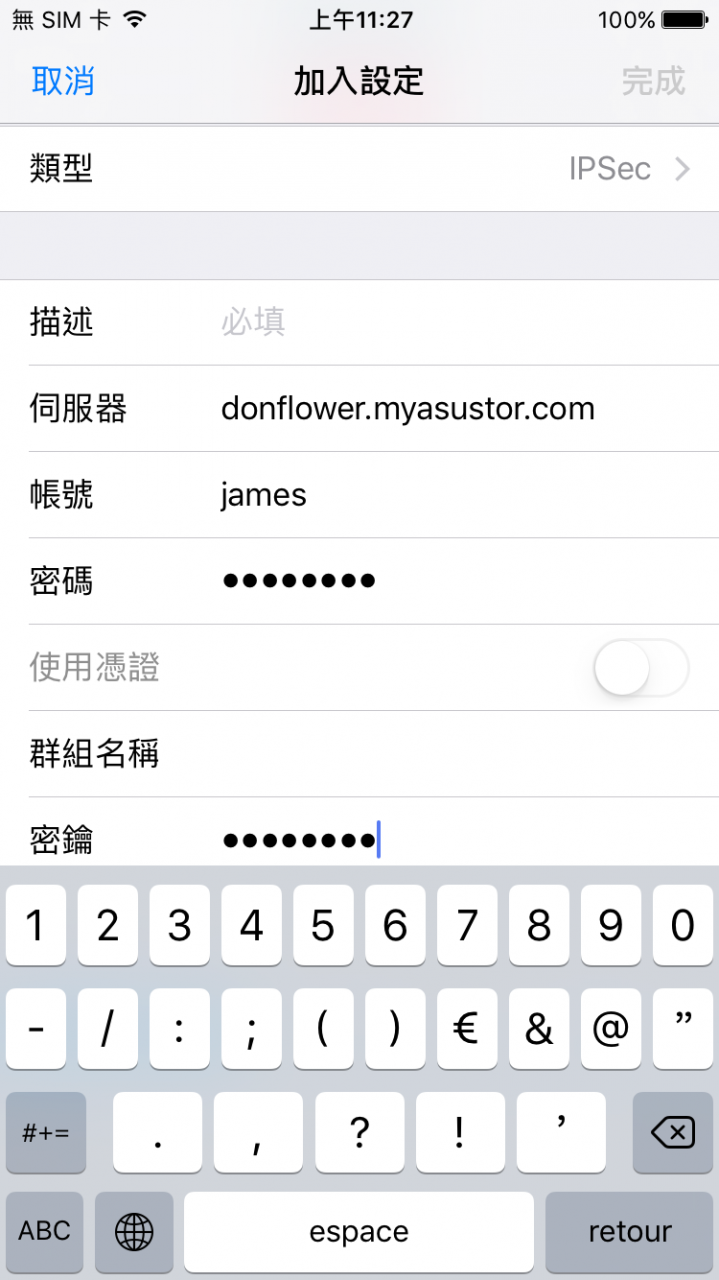
2.4.5 Connecting using an iOS device
The configurations in the following example were done using an iPhone 6.
STEP 1
In iOS, select [Settings] >[General] > [VPN].
STEP 2
Select [Add a VPN configuration…] and then enter the following information:
Type: L2TP
Description: A description of your choice
Server: Your NAS’s IP address or URL
Account: Your account name
Password: The password for the account
Secret: They key that can be found in ADM interface by selecting [VPN Server]> [Settings]>[XL2TP]
Once you have finished entering the information select [Done].
STEP 3
After completing the VPN profile you can select the status toggle to activate the VPN connection.

iSCSI with your NAS
https://www.qnap.com/en/how-to/tutorial/article/how-to-create-and-use-the-iscsi-target-service-on-a-qnap-nas/
https://clickety-clack.click/img/whitepaper_ipbridge_xtendsan_iscsi_macosx.pdf
[3d-flip-book mode=”fullscreen” id=”108117″ ][/3d-flip-book]
https://www.asustor.com/en/online/College_topic?topic=308
COURSE OBJECTIVES
Upon completion of this course you should be able to:
1. Have a basic understanding of iSCSI
2. Be able to use the iSCSI service with your ASUSTOR NAS
PREREQUISITES
Course Prerequisites:
None
Students are expected to have a working knowledge of:
N/A
1. Introduction to iSCSI
1.1 What is iSCSI?
iSCSI, (Internet Small Computer System Interface), is an Internet Protocol (IP)-based storage networking standard for linking data storage facilities. It
offers high expandability and low implementation costs. Through existing network infrastructure and iSCSI you can use your NAS to expand existing storage
space or have it act as a backup destination.
iSCSI consists of two ends, a target and an initiator. The initiator (on your computer) functions as an iSCSI client and is used to search for iSCSI hosts
and to set up targets. Targets are storage resources that are located on an iSCSI server. An iSCSI target is often a dedicated network-connected hard disk
storage device (ASUSTOR NAS).
Note: A single target should not be simultaneously connected to multiple clients or initiators.
2. Using the iSCSI service with your computer
In the following example we will take you through the process of creating an iSCSI volume on the ASUSTOR NAS and then connecting to it using a PC.
2.1 Creating an iSCSI target and LUN
STEP 1
Open [Storage Manager]. Click on [Create] button under the iSCSI section.

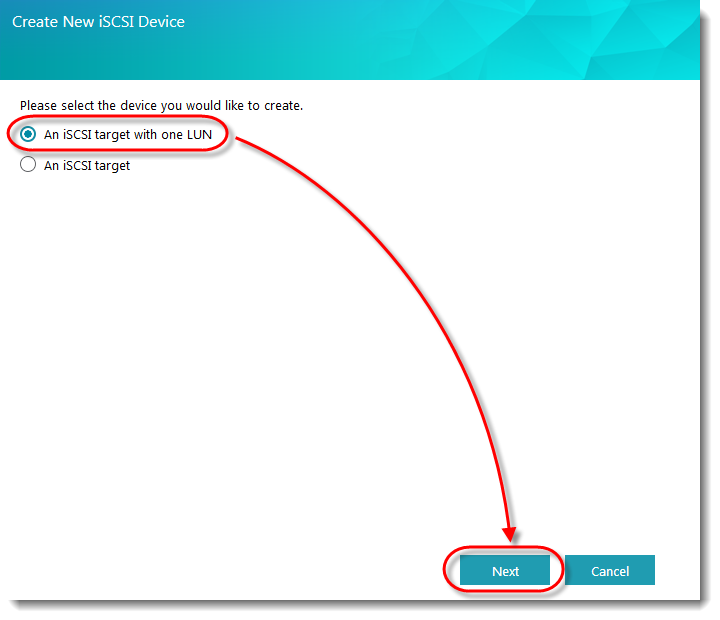
STEP 2
The Create New iSCSI Device window will now appear. Select the [An iSCSI target with one LUN] radio button and click [Next].
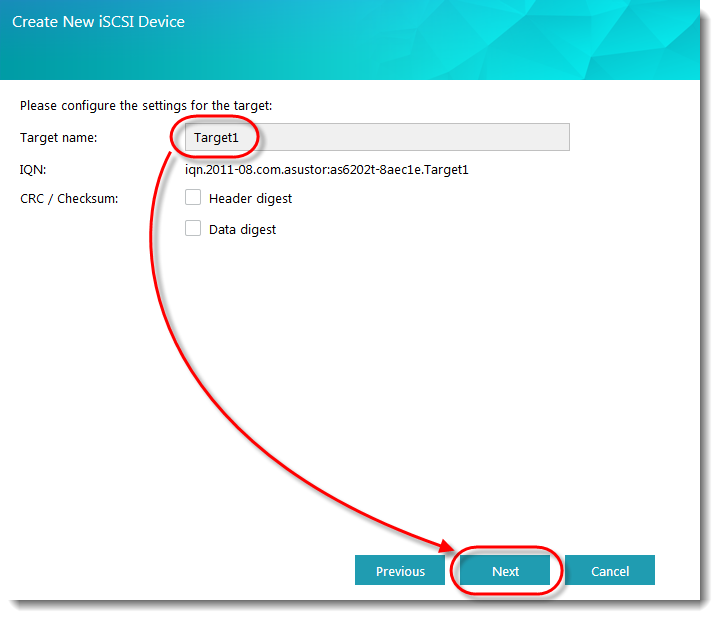
STEP 3
Enter a name for your Target and then click [Next].
STEP 4
Select the [No authentication required] radio button and click [Next].
In our example we have chosen not to use authentication. However, if you wish to verify a user’s identity you can choose to use CHAP authentication. If
you choose to use CHAP authentication, a CHAP password must first be entered from the initiator for verification before it can connect to the target.

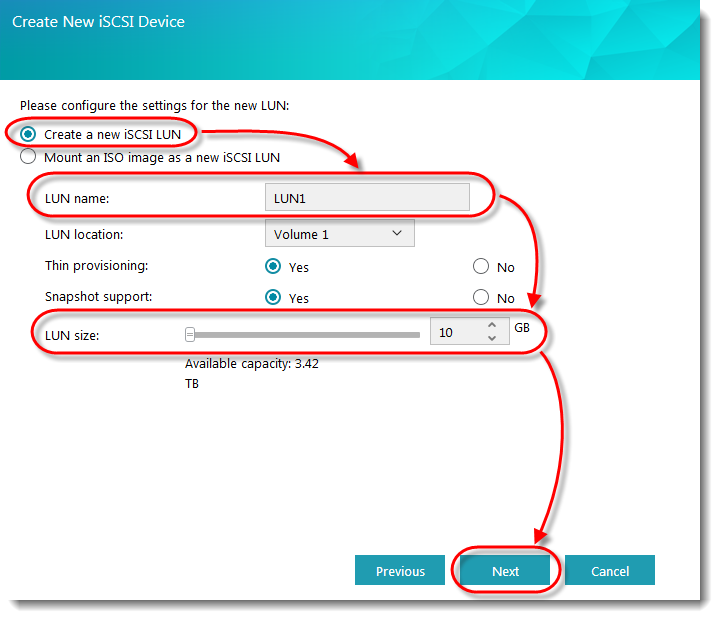
STEP 5
Select the [Create a new iSCSI LUN] radio button. Fill in a name for your LUN and select a size for it. Once, you’re done click [Next].
Note: A LUN (logical unit number) represents an individually addressable (logical) SCSI device that is part of a physical SCSI device (target). In an
iSCSI environment, LUNs are essentially numbered disk drives. An initiator negotiates with a target to establish connectivity to a LUN. LUNs represent
slices of your hard disks.
STEP 6
Look over a final summary of your settings. Once you’re done, confirm these settings by clicking [Finish].

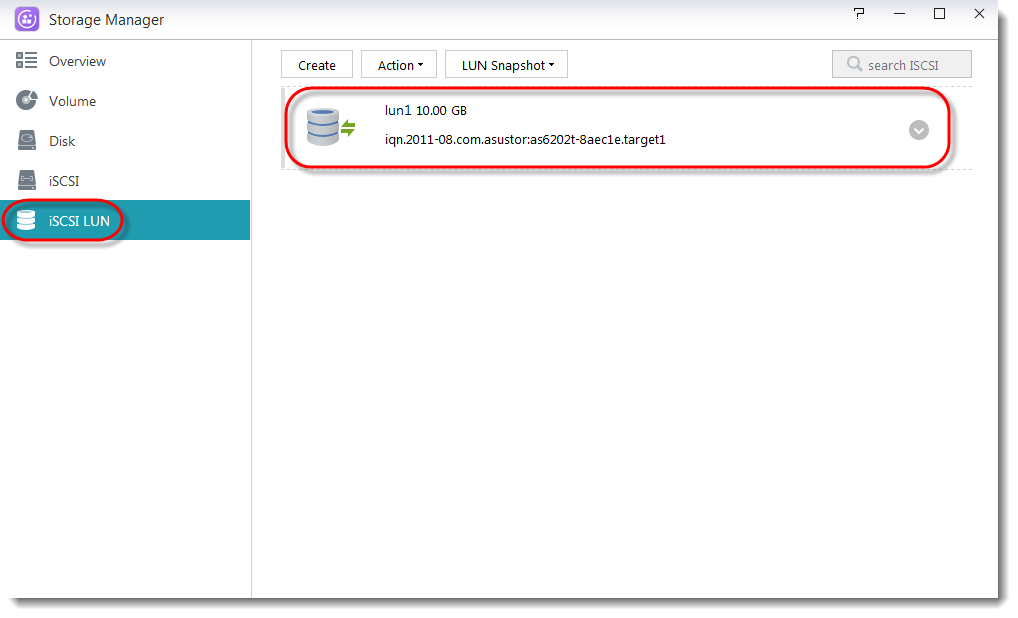
STEP 7
You will now be able to see the new target that you have created.

You will be able to see the LUN that you have created in the iSCSI LUN section.
2.2 Connecting to the target using the iSCSI initiator
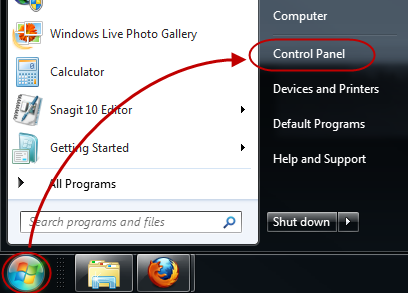
STEP 1
In Windows, click [Start] and then click on [Control Panel].
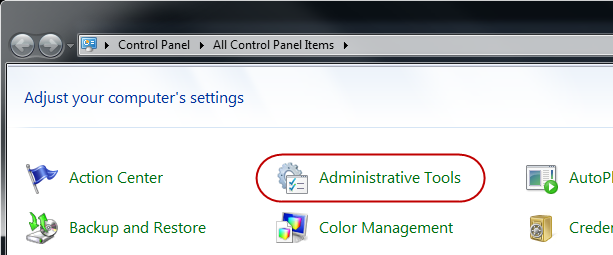
STEP 2
Select [Administrative Tools].
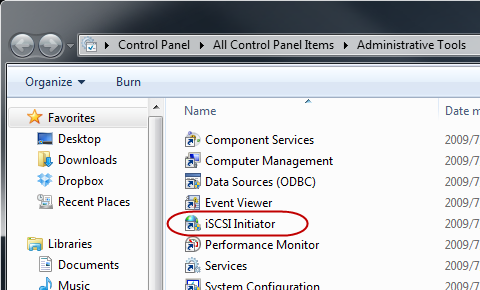
STEP 3
Double-click on [iSCSI Initiator].
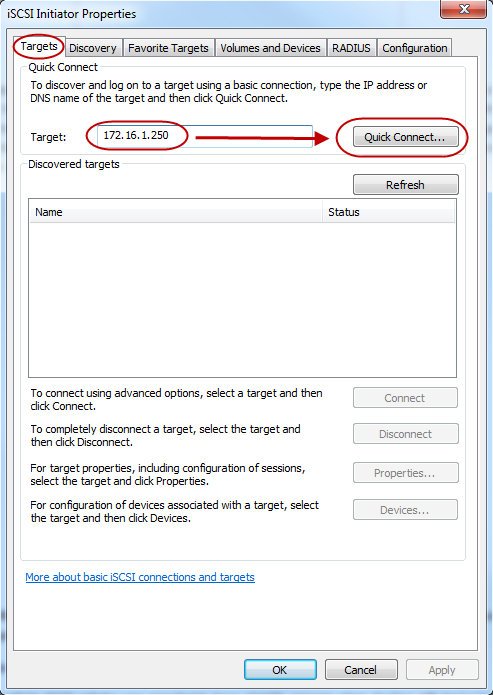
STEP 4
Under the Targets tab enter the IP address of your NAS into the [Target:] field and then click on [Quick Connect…].
STEP 5
You will now see the Quick Connect dialog box and that your target has been connected to. Click on [Done].
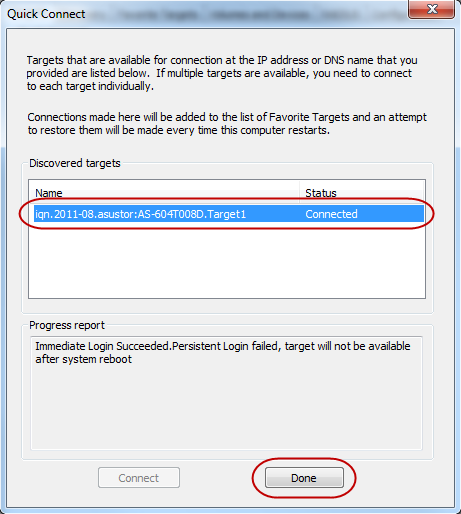
STEP 6
Once again, you will see that the target has been connected to under the [Discovered targets] heading. Click on [OK].

2.3 Initializing the new disk volume
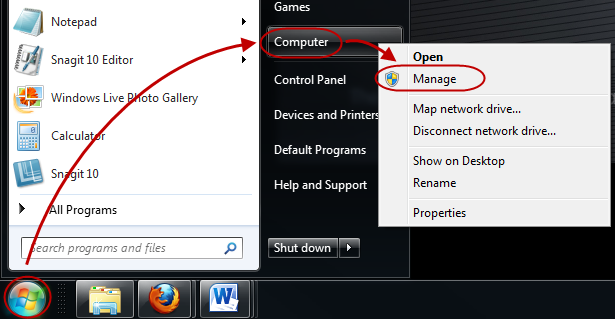
STEP 1
In Windows click [Start]. Then right-click on [Computer] and select [Manage].
STEP 2
The Computer Management window will now appear. Click on [Disk Management] under [Storage] in the left hand panel. The Initialize Disk
dialog box will now appear. Make sure the disk is selected and then click [OK] to initialize it.

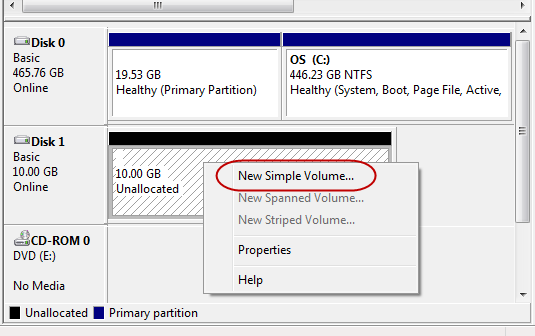
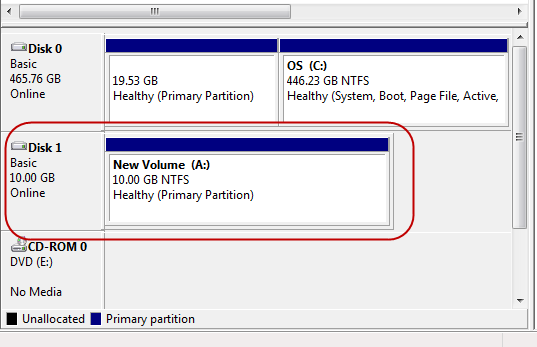
STEP 3
You will now see that the new disk is online but unallocated. Right-click on it and select [New Simple Volume…].
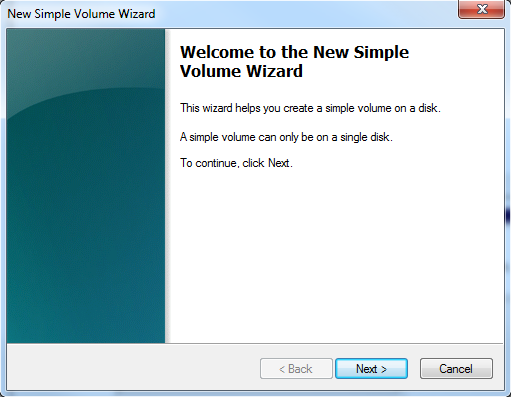
STEP 4
The New Simple Volume Wizard will now appear. Follow the steps provided by the wizard to complete the creation of the new disk volume.
STEP 5
This is what the information for the disk should look like once the new volume has been created.
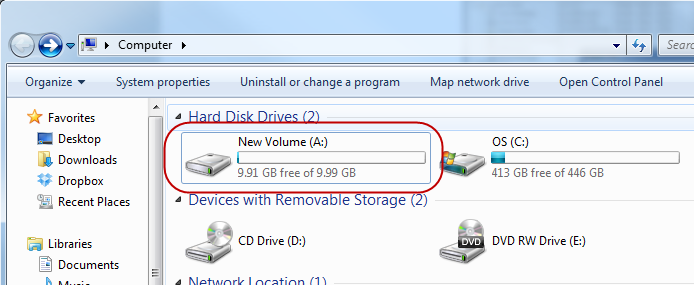
STEP 6
The new volume is now ready for use. It will appear as a hard disk drive as in the picture below. You can use it as if it were a hard drive on your
computer and any data that you store on it will be saved to the ASUSTOR NAS.
Note: Please remember that a single target should not be simultaneously connected to multiple clients or initiators.
3. Using iSCSI LUN Snapshots
A snapshot of an iSCSI LUN is a point-in-time, read-only copy of an iSCSI LUN. It saves a significant amount of time and storage capacity when compared
with traditional LUN backups. Each individual LUN supports up to 256 snapshot versions. In the following example we will show you how to create and restore
an iSCSI LUN snapshot.
3.1 Manually creating an iSCSI LUN snapshot
STEP 1
Open [Storage Manager]. Go to the [iSCSI LUN] tab, select a LUN that supports snapshots, click on [LUN Snapshot] and then choose [Create].
STEP 2
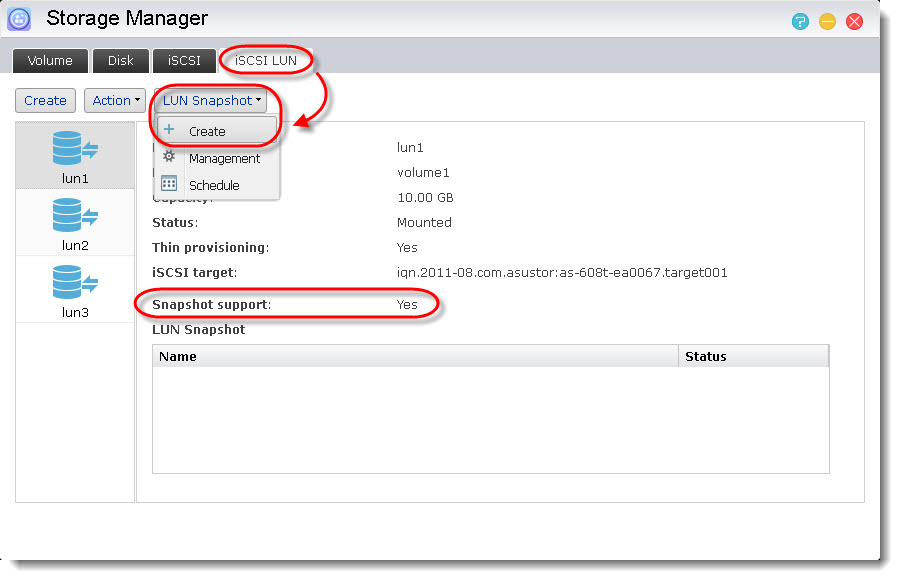
Click [Next] to proceed.

STEP 3
Now you will be able to configure the snapshot name, description (optional), and snapshot lock status. If the snapshot is locked, it cannot be removed
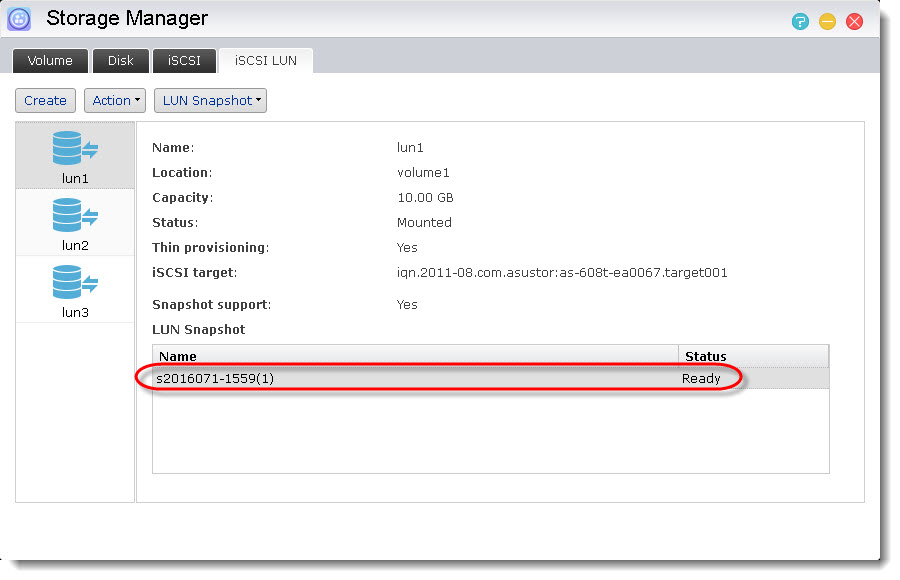
manually or automatically. Click [Finish] to complete creation of the snapshot.

Upon completion, you will see the newly created snapshot in the LUN Snapshot table as shown in the graphic below.
3.2 Scheduled creation of iSCSI LUN snapshots
STEP 1
Open [Storage Manager]. Go to the [iSCSI LUN] tab, select a LUN that supports snapshots, click on [LUN Snapshot] and then choose [Schedule].

STEP 2
Define the schedule in accordance with your own requirements and then click [OK] when you are done.

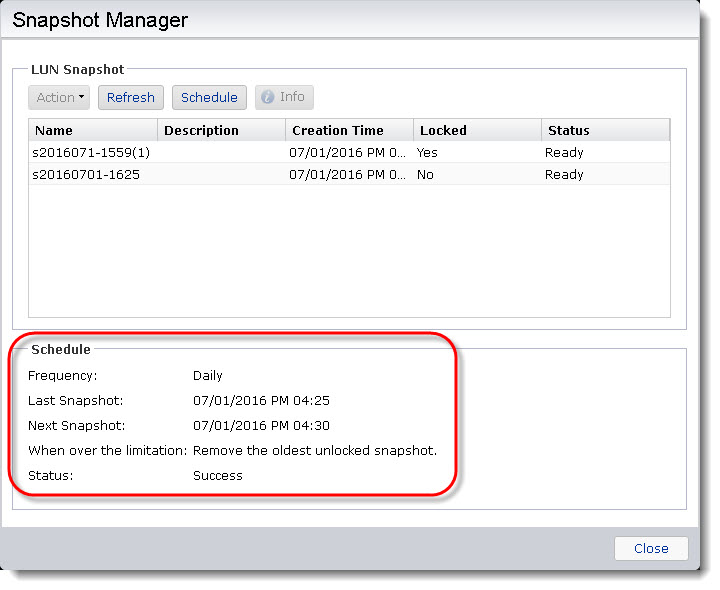
STEP 3
You will now be able to see the schedule details in the [Snapshot Manager].
3.3 Restoring from an iSCSI LUN snapshot
STEP 1
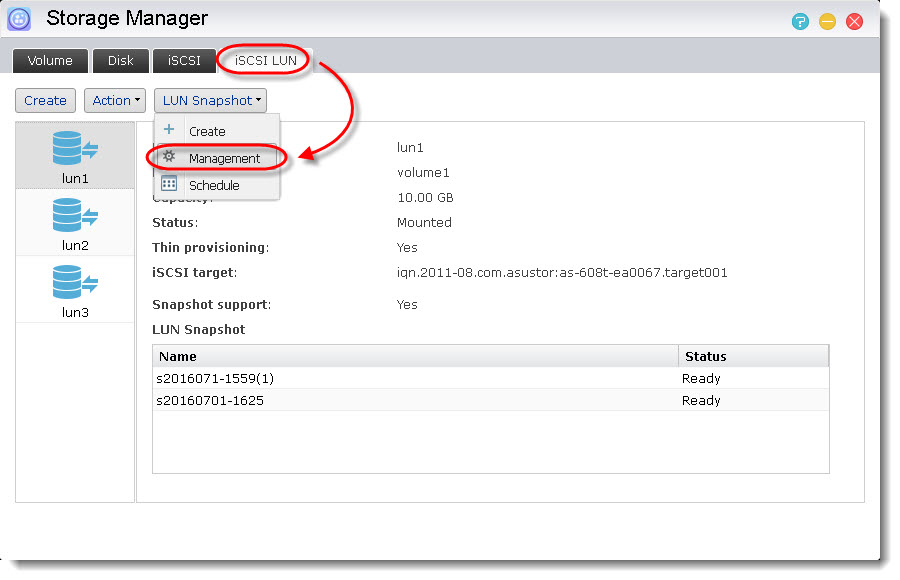
Open [Storage Manager]. Go to the [iSCSI LUN] tab, select a LUN that has existing snapshot(s), click on [LUN Snapshot] and then choose [Management].
STEP 2
Select the snapshot you want to restore, click on [Action] and then choose [Restore].

STEP 3
You will be provided with some extra settings before starting the restoration. You can configure the settings according to your requirements. After you
click [OK], the iSCSI LUN will be rolled back with the selected snapshot.

iSCSI with your NAS
https://www.qnap.com/en/how-to/tutorial/article/how-to-create-and-use-the-iscsi-target-service-on-a-qnap-nas/
https://clickety-clack.click/img/whitepaper_ipbridge_xtendsan_iscsi_macosx.pdf
[3d-flip-book mode=”fullscreen” id=”108117″ ][/3d-flip-book]
https://www.asustor.com/en/online/College_topic?topic=308
COURSE OBJECTIVES
Upon completion of this course you should be able to:
1. Have a basic understanding of iSCSI
2. Be able to use the iSCSI service with your ASUSTOR NAS
PREREQUISITES
Course Prerequisites:
None
Students are expected to have a working knowledge of:
N/A
1. Introduction to iSCSI
1.1 What is iSCSI?
iSCSI, (Internet Small Computer System Interface), is an Internet Protocol (IP)-based storage networking standard for linking data storage facilities. It
offers high expandability and low implementation costs. Through existing network infrastructure and iSCSI you can use your NAS to expand existing storage
space or have it act as a backup destination.
iSCSI consists of two ends, a target and an initiator. The initiator (on your computer) functions as an iSCSI client and is used to search for iSCSI hosts
and to set up targets. Targets are storage resources that are located on an iSCSI server. An iSCSI target is often a dedicated network-connected hard disk
storage device (ASUSTOR NAS).
Note: A single target should not be simultaneously connected to multiple clients or initiators.
2. Using the iSCSI service with your computer
In the following example we will take you through the process of creating an iSCSI volume on the ASUSTOR NAS and then connecting to it using a PC.
2.1 Creating an iSCSI target and LUN
STEP 1
Open [Storage Manager]. Click on [Create] button under the iSCSI section.
STEP 2
The Create New iSCSI Device window will now appear. Select the [An iSCSI target with one LUN] radio button and click [Next].
STEP 3
Enter a name for your Target and then click [Next].
STEP 4
Select the [No authentication required] radio button and click [Next].
In our example we have chosen not to use authentication. However, if you wish to verify a user’s identity you can choose to use CHAP authentication. If
you choose to use CHAP authentication, a CHAP password must first be entered from the initiator for verification before it can connect to the target.
STEP 5
Select the [Create a new iSCSI LUN] radio button. Fill in a name for your LUN and select a size for it. Once, you’re done click [Next].
Note: A LUN (logical unit number) represents an individually addressable (logical) SCSI device that is part of a physical SCSI device (target). In an
iSCSI environment, LUNs are essentially numbered disk drives. An initiator negotiates with a target to establish connectivity to a LUN. LUNs represent
slices of your hard disks.
STEP 6
Look over a final summary of your settings. Once you’re done, confirm these settings by clicking [Finish].
STEP 7
You will now be able to see the new target that you have created.
You will be able to see the LUN that you have created in the iSCSI LUN section.
2.2 Connecting to the target using the iSCSI initiator
STEP 1
In Windows, click [Start] and then click on [Control Panel].
STEP 2
Select [Administrative Tools].
STEP 3
Double-click on [iSCSI Initiator].
STEP 4
Under the Targets tab enter the IP address of your NAS into the [Target:] field and then click on [Quick Connect…].
STEP 5
You will now see the Quick Connect dialog box and that your target has been connected to. Click on [Done].
STEP 6
Once again, you will see that the target has been connected to under the [Discovered targets] heading. Click on [OK].
2.3 Initializing the new disk volume
STEP 1
In Windows click [Start]. Then right-click on [Computer] and select [Manage].
STEP 2
The Computer Management window will now appear. Click on [Disk Management] under [Storage] in the left hand panel. The Initialize Disk
dialog box will now appear. Make sure the disk is selected and then click [OK] to initialize it.
STEP 3
You will now see that the new disk is online but unallocated. Right-click on it and select [New Simple Volume…].
STEP 4
The New Simple Volume Wizard will now appear. Follow the steps provided by the wizard to complete the creation of the new disk volume.
STEP 5
This is what the information for the disk should look like once the new volume has been created.
STEP 6
The new volume is now ready for use. It will appear as a hard disk drive as in the picture below. You can use it as if it were a hard drive on your
computer and any data that you store on it will be saved to the ASUSTOR NAS.
Note: Please remember that a single target should not be simultaneously connected to multiple clients or initiators.
3. Using iSCSI LUN Snapshots
A snapshot of an iSCSI LUN is a point-in-time, read-only copy of an iSCSI LUN. It saves a significant amount of time and storage capacity when compared
with traditional LUN backups. Each individual LUN supports up to 256 snapshot versions. In the following example we will show you how to create and restore
an iSCSI LUN snapshot.
3.1 Manually creating an iSCSI LUN snapshot
STEP 1
Open [Storage Manager]. Go to the [iSCSI LUN] tab, select a LUN that supports snapshots, click on [LUN Snapshot] and then choose [Create].
STEP 2
Click [Next] to proceed.
STEP 3
Now you will be able to configure the snapshot name, description (optional), and snapshot lock status. If the snapshot is locked, it cannot be removed
manually or automatically. Click [Finish] to complete creation of the snapshot.
Upon completion, you will see the newly created snapshot in the LUN Snapshot table as shown in the graphic below.
3.2 Scheduled creation of iSCSI LUN snapshots
STEP 1
Open [Storage Manager]. Go to the [iSCSI LUN] tab, select a LUN that supports snapshots, click on [LUN Snapshot] and then choose [Schedule].
STEP 2
Define the schedule in accordance with your own requirements and then click [OK] when you are done.
STEP 3
You will now be able to see the schedule details in the [Snapshot Manager].
3.3 Restoring from an iSCSI LUN snapshot
STEP 1
Open [Storage Manager]. Go to the [iSCSI LUN] tab, select a LUN that has existing snapshot(s), click on [LUN Snapshot] and then choose [Management].
STEP 2
Select the snapshot you want to restore, click on [Action] and then choose [Restore].
STEP 3
You will be provided with some extra settings before starting the restoration. You can configure the settings according to your requirements. After you
click [OK], the iSCSI LUN will be rolled back with the selected snapshot.