
Photo editing basics in Photos on Mac
You can use the Photos editing tools to easily make simple changes to your photos, such as rotating them or cropping them to get the best framing. You can also use over a dozen sophisticated adjustments to change exposure and color, remove marks or blemishes, eliminate red-eye, change white balance, and more.
To make more advanced adjustments, you can use Levels and Curves controls to alter brightness, contrast, and tonal range in different areas of a photo. See Apply levels adjustments to a photo and Apply curves adjustments to a photo. You can also enhance and change videos and Live Photos. See Change and enhance a video and Change a Live Photo.
When you change a photo or video, Photos keeps the original so you can always undo your changes and revert to the original look.
Changes you make to a photo or video appear everywhere it appears in your library—every album, project, and so on. If you want to give a photo or video a unique look that appears in only one version of the item, first duplicate it and work on the copy.
Edit a photo or video
- In the Photos app
 on your Mac, do one of the following:
- Double-click a photo or video thumbnail, then click Edit in the toolbar.
- Select a photo or video thumbnail, then press Return.
- Do any of the following:

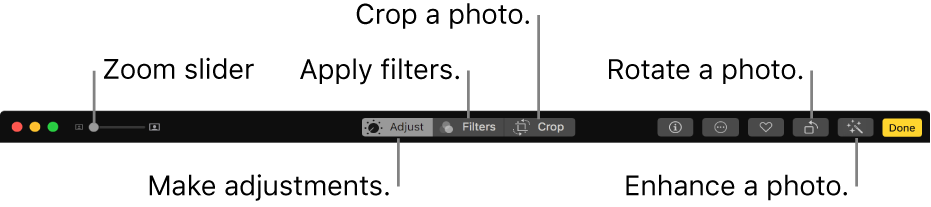
- Zoom in or out on a photo: Click or drag the Zoom slider.
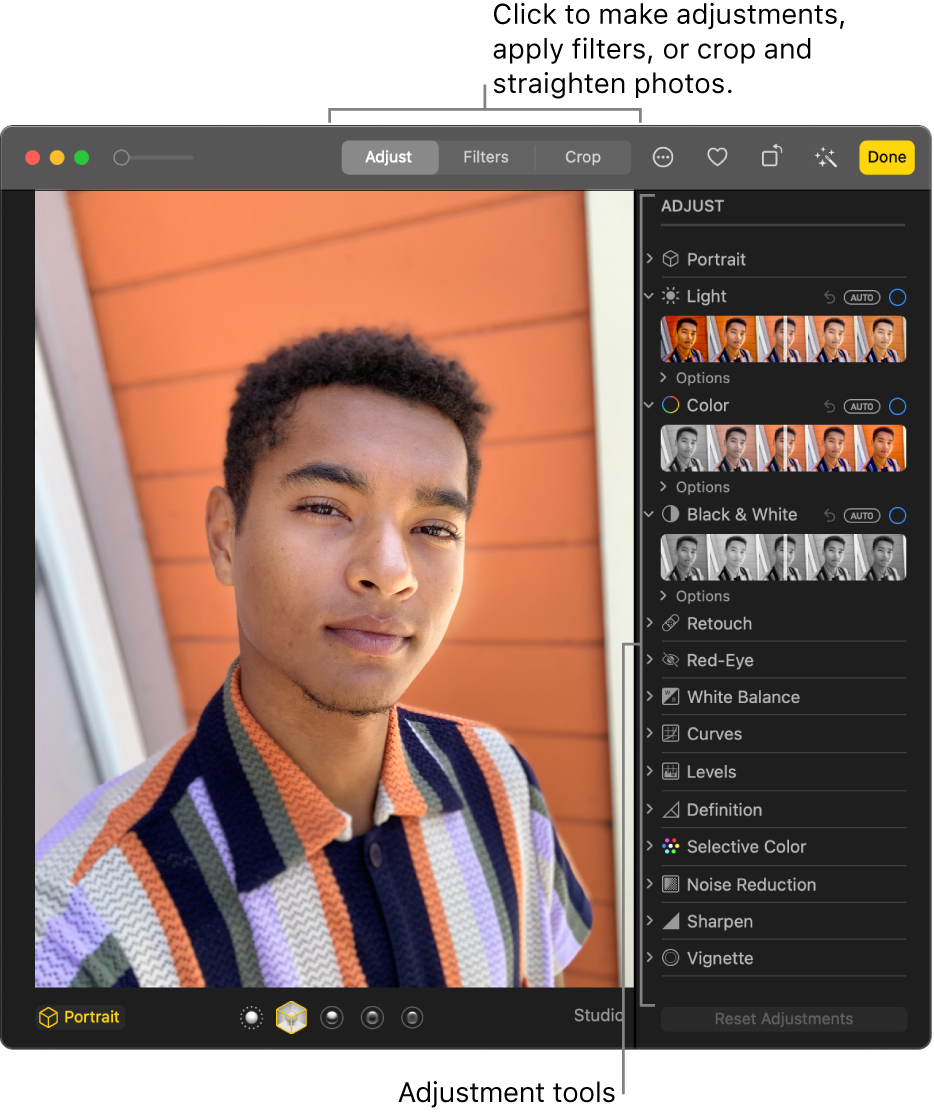
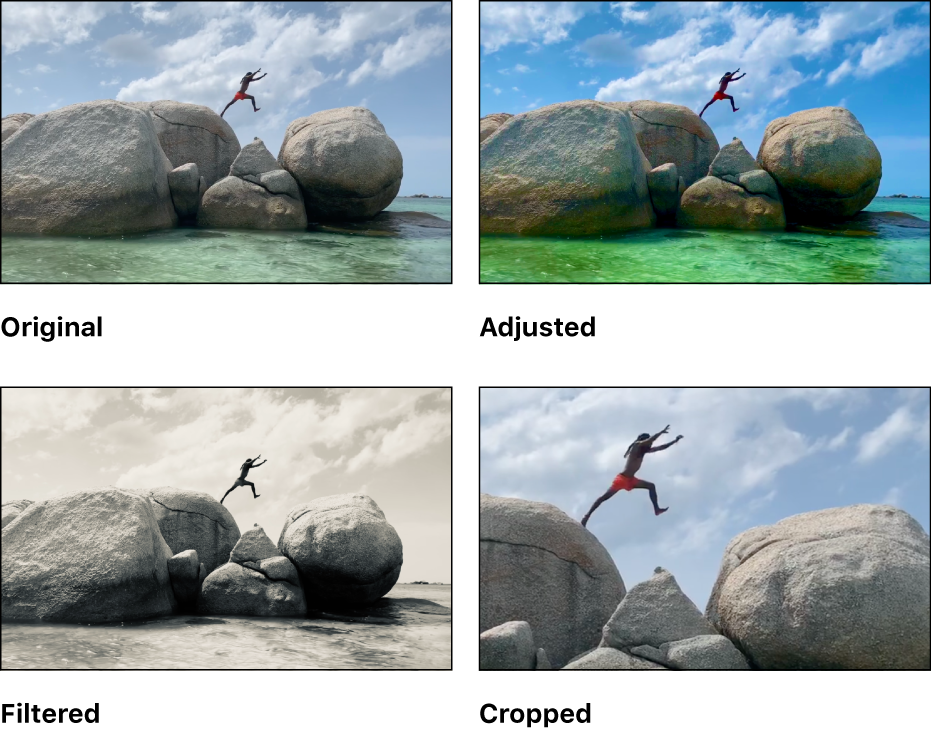
- Make adjustments: Click Adjust to display the adjustment tools. See Adjust a photo’s light, exposure, and more.
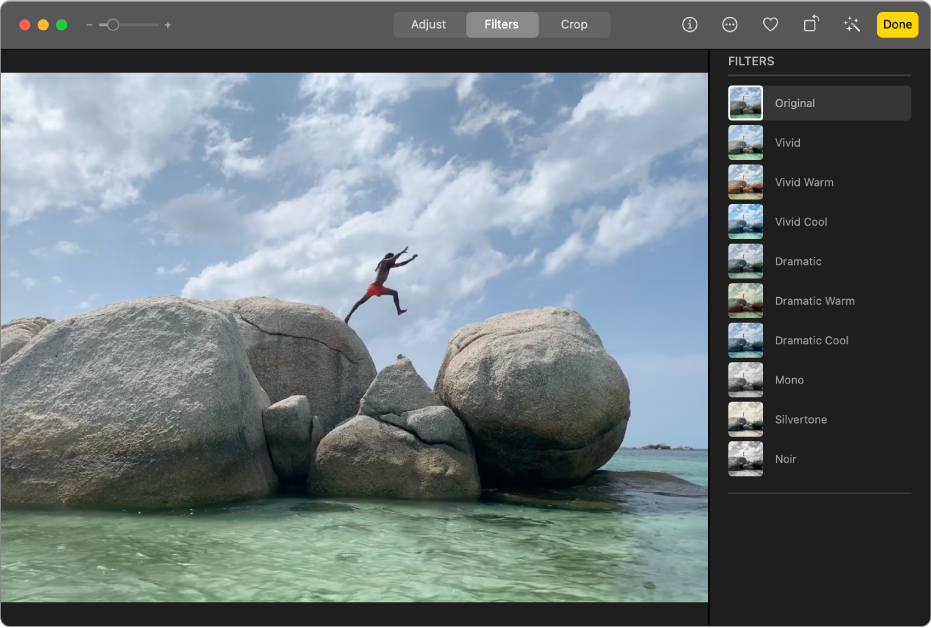
- Apply filters: Click Filters to display filters you can apply to change the look of your photo or video. See Use a filter to change a photo’s look.
- Crop the image: Click Crop to display the options for cropping a photo or video. See Crop and straighten photos.
- Rotate a photo or video: Click the Rotate button
 in the toolbar to rotate the image counterclockwise. Continue clicking until you get the orientation you want. Option-click the button to rotate the image clockwise.
 - Automatically enhance a photo or video: Click the Auto Enhance button
 to have the color and contrast of your photo or video adjusted automatically. To remove the changes, press Command-Z or click Revert to Original.
- To stop editing, click Done or press Return.
 on your Mac, do one of the following:
 in the toolbar to rotate the image counterclockwise. Continue clicking until you get the orientation you want. Option-click the button to rotate the image clockwise.
 to have the color and contrast of your photo or video adjusted automatically. To remove the changes, press Command-Z or click Revert to Original.
While you’re editing a photo or video, you can press the arrow keys to switch to other items.
Duplicate a photo
To create different versions of a photo or video, you duplicate it and work on the copy.
- In the Photos app on your Mac, select the item you want to copy.
- Choose Image > Duplicate 1 Photo (or press Command-D).If you’re duplicating a Live Photo, click Duplicate to include the video portion, or Duplicate as Still Photo to include just the still image.
Compare photos or videos before and after editing
While editing an item, you can compare the edited version with the original.
- In the Photos app on your Mac, double-click a photo or video to open it, then click Edit in the toolbar.
- To see the original image, click and hold the Without Adjustments button, or press and hold the M key.Release the button or the M key to see the item with edits.


Copy and paste adjustments
After you adjust a photo or video, you can copy the adjustments that you’ve made and paste them on other items. You can only paste adjustments onto one item at a time.
Note: You can’t copy and paste the settings from the retouch tool, red-eye tool, crop tool, or third-party extensions.
- In the Photos app on your Mac, double-click an item you’ve made adjustments to, then click Edit in the toolbar.
- Choose Image > Copy Adjustments.
- Double-click the item to which you want to apply the adjustments, then click Edit.
- Choose Image > Paste Adjustments.
You can also Control-click an item in editing view and choose Copy Adjustments or Paste Adjustments.
You can quickly remove changes to a photo or video. To undo the last change you made, choose Edit > Undo, or press Command-Z. To discard all changes and start over, select the item and choose Image > Revert to Original.
Change and enhance a video in Photos on Mac
You can adjust and enhance video clips to make fine color corrections or create stunning visual effects. You can even view, play, and edit 10-bit HDR (HLG-encoded) videos. The Photos editing tools change the look of videos just as they do photos. You can enhance color, apply filters, and even crop and straighten videos. Changes that you make affect the entire video clip (you can’t make changes to just one part of a clip).
You can also use the Auto Enhance, Rotate, and Markup tools in the Edit toolbar to change videos. See Photo editing basics and Use Markup to write or draw on a photo.
Apply adjustments to a video clip
You can apply a single adjustment or a combination of adjustments to a video to achieve the look you want. (You can’t use the retouch or red-eye tool to change video; these adjustments appear dimmed in the Adjust pane.) Applying adjustments to a clip doesn’t actually change your footage; you can revert to the original look of your video at any time.
- In the Photos app on your Mac, double-click a video clip, then click Edit in the toolbar.
- Click Adjust in the toolbar to show adjustment options in the Adjust pane, then do any of the following:

- Adjust the light, color, or black-and-white look of a video: Click the Light, Color, or Black & White adjustment, then drag the slider until you see the change you want. You can also make advanced light and color adjustments. See Adjust a photo’s light, exposure, and more.
- Apply white balance color corrections: Click the White Balance adjustment, then use the controls to achieve the look you want. See Adjust a photo’s white balance.
- Change the brightness and contrast: Click the Curves adjustment, then use the controls to achieve the look you want. See Apply curves adjustments to a photo.
- Adjust the tonal range and contrast: Click the Levels adjustment, then use the controls to achieve the look you want. See Apply levels adjustments to a photo.
- Add contour and shape as well as midtone definition: Click the Definition adjustment, then use the controls to achieve the look you want. See Adjust definition in a photo.
- Adjust specific colors: Click the Selective Color adjustment, then use the controls to achieve the look you want. See Apply changes to specific colors in a photo.
- Reduce graininess, speckles, or noise: Click the Noise Reduction adjustment, then use the controls to achieve the look you want. See Reduce noise in a photo.
- Make edges crisper and better defined: Click the Sharpen adjustment, then use the controls to achieve the look you want. See Sharpen a photo.
- Apply a vignette: Click the Vignette adjustment, then use the controls to achieve the look you want. See Apply a vignette to a photo.
 on your Mac, double-click a video clip, then click Edit in the toolbar.
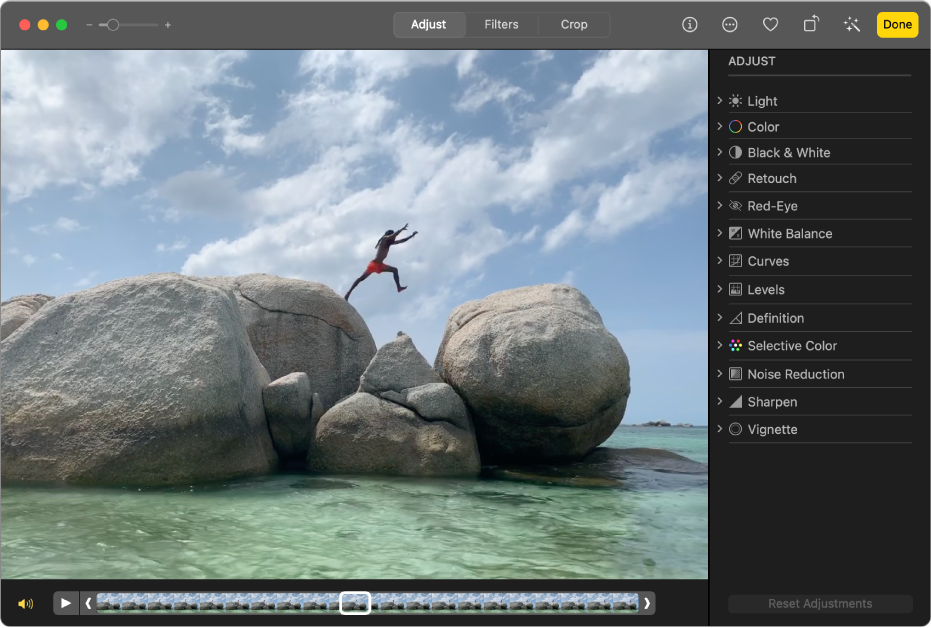
Apply a filter to a video clip
You can apply a filter to a video to create a cooler or warmer look or apply a special black-and-white effect. When you apply the filter, you can adjust the amount of filtering that appears.
- In the Photos app on your Mac, double-click a video, then click Edit in the toolbar.
- Click Filters in the toolbar, then click the filter you want and drag the slider to change the filter’s look.See Use a filter to change a photo’s look.
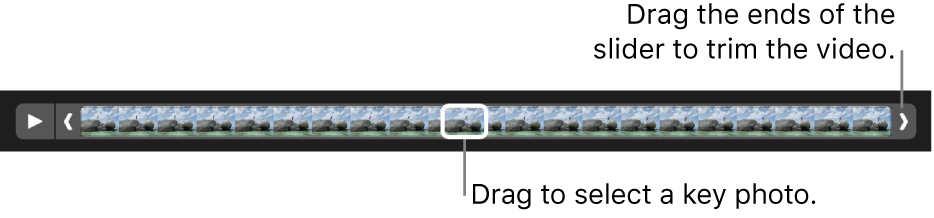
Trim a video clip
You can trim a video clip so that it starts and stops at specific places. Trimming a video clip doesn’t actually delete footage; you can recover any trimmed video later.
- In the Photos app on your Mac, double-click the video clip to open it.
- Click Adjust in the toolbar, then drag the trim handles at either end to shorten the clip.

To cancel the trim, drag the trim handles to their original position. You can also click Revert to Original in the toolbar, which removes all adjustments made to the video clip.
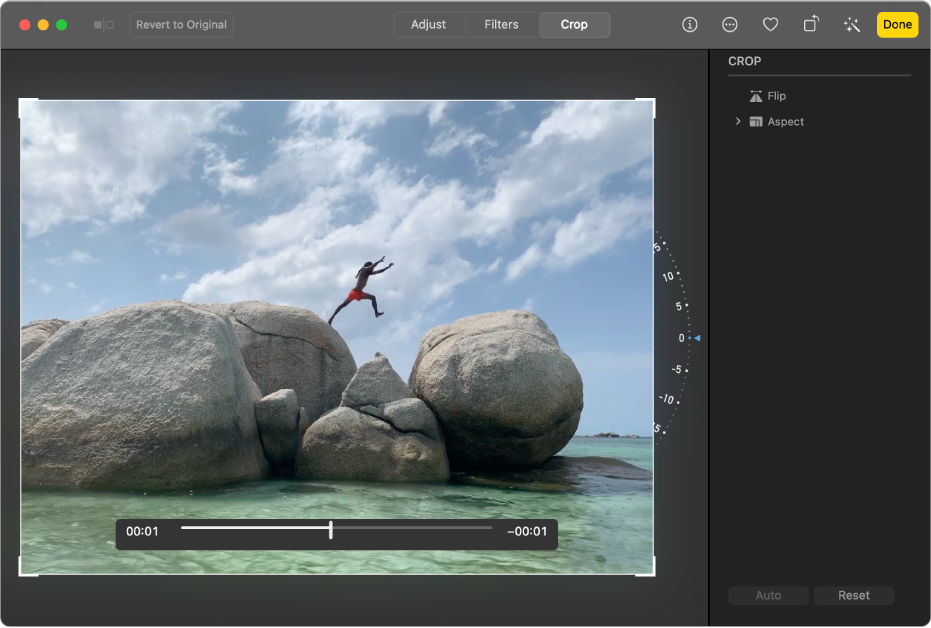
Crop or straighten a video clip
You can crop or straighten a video clip to center or change the video framing. You can also straighten a video if the video was shot at an angle unintentionally.
- In the Photos app on your Mac, double-click the video clip to open it.
- Click Crop in the toolbar, then drag the selection rectangle to enclose the area you want to keep in the video.You can also drag the tilt wheel to adjust the angle of the video. See Crop and straighten photos.
You can also click Auto to straighten the video automatically. To cancel the crop, click Reset.
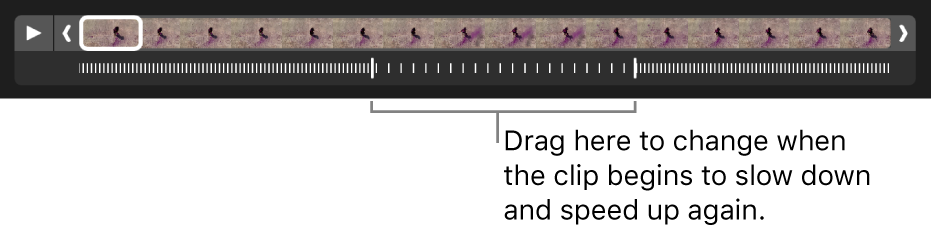
Change slow-motion video
Using an iPhone or iPad, you can capture slow-motion video using Slo-mo mode. In Photos on your Mac, you can change when a video clip recorded in Slo-mo mode slows down and speeds up again.
- In the Photos app on your Mac, double-click a slow-motion video clip to open it.
- Click Edit in the toolbar, then click Adjust in the toolbar.
- Drag the vertical bars below the frame viewer to change when the clip begins to slow down and speed up again.

After editing a slow-motion video clip, you can restore it to the original by clicking Revert to Original, which removes all adjustments made to the clip.
Create your Memoji in Messages on Mac
With macOS Big Sur, create a personalized Memoji that matches your personality. Then, send Memoji stickersto express your every mood in your messages.
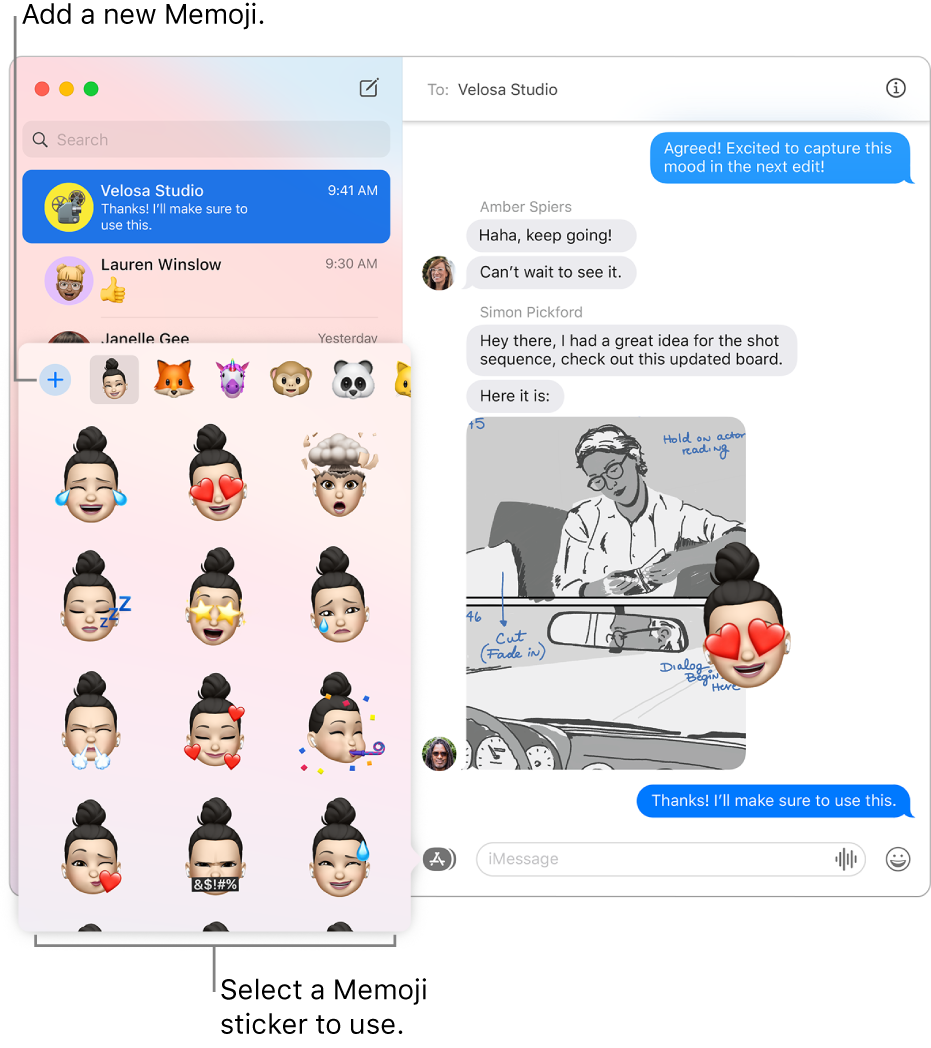
- In the Messages app on your Mac, select any conversation.
- To the left of the field at the bottom of the window, click the Apps button , then select the Memoji Stickers button .
- Click the Add button
 , the follow the onscreen instructions to customize your Memoji, starting with skin tone all the way through headwear.
 - Click Done.
 on your Mac, select any conversation.
 ,
,  .
. ,
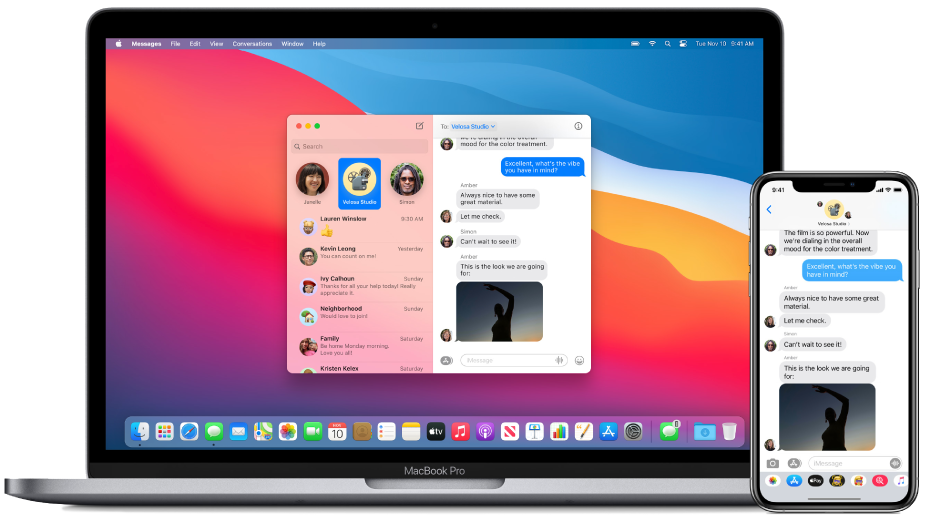
, Use Memoji stickers and #images in Messages on Mac
With macOS Big Sur, you can send your personalized Memoji stickers in addition to a variety of emotive images and GIFs in any text message.
Note: Sending images and GIFs isn’t available in all countries or regions.
- In the Messages app on your Mac, select a conversation.To search for contacts and content in conversations, click in the Search field in the top-left corner and enter what you’re looking for. Or, choose from the suggested contacts, links, photos, and more.If you’re restricted to sending and receiving messages with only certain people, an hourglass icon
 appears next to those people you can’t send messages to.
 - To the left of the field at the bottom of the window, click the Apps button
 , then select one of the following:
 Memoji Stickers: Select from a variety of Memoji stickers or create your own Memoji for personalized stickers.
- #images: Select a trending image or GIF from the list or search for a specific one that matches your mood.
Optionally, you can also drag Memoji stickers on top of a message in the transcript.
- If you want, type text to go with the sticker or image, then press Return on your keyboard.
 on your Mac, select a conversation.To search for contacts and content in conversations, click in the Search field in the top-left corner and enter what you’re looking for. Or, choose from the suggested contacts, links, photos, and more.If you’re
  ,
,  Memoji Stickers: Select from a variety of Memoji stickers or
  #images: Select a trending image or GIF from the list or search for a specific one that matches your mood.
Search with Spotlight on Mac
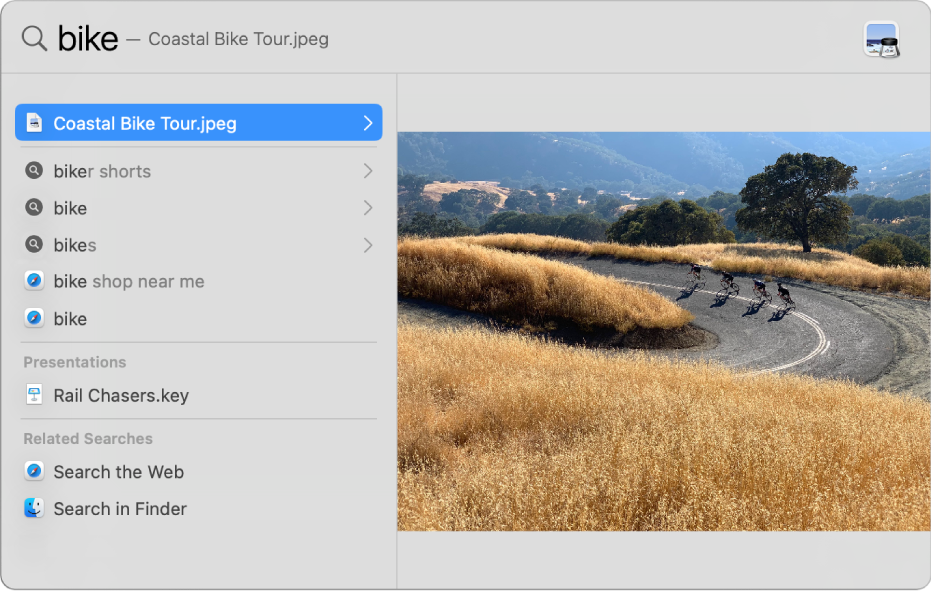
Spotlight can help you quickly find apps, documents, and other files on your Mac. With Siri Suggestions, you can also get the latest news, sports scores, weather conditions, and more. Spotlight can even perform calculations and conversions for you.
Ask Siri. Say something like: “How many centimeters in an inch?” or “What does parboil mean?” Learn how to ask Siri.
Search for something
- On your Mac, click the Spotlight icon (if shown) in the menu bar, or press Command-Space bar or press (if available in the row of function keys on the keyboard).You can drag the Spotlight window anywhere on the desktop.
Tip: If the Spotlight icon isn’t in the menu bar, add it using Dock & Menu Bar preferences.
- In the search field, type what you’re looking for—results appear as you type.Spotlight lists top hits first; click a top hit to preview or open it. Spotlight also suggests variations of your search; you can view those results in Spotlight or on the web.

- In the results, do any of the following:
- Show a preview: Press the Tab key. Depending on the type of item selected in the results, you can interact with it. For example, select an app to see a list of recently opened files, then click a file to open it. Or click the Play button to hear a song.
- See results of a suggested search in Spotlight: Click an item preceded by the Spotlight icon .
- See results of a suggested search on the web: Click an item preceded by the Safari icon .
- Open an item: Double-click it. Or select the item, then press the Return key.
- Show the location of a file on your Mac: Select the file, then press and hold the Command key. The file’s location appears at the bottom of the preview.
- Copy an item: Drag a file to the desktop or a Finder window.
- See all results from your Mac in the Finder: Scroll to the bottom of the results, then click Search in Finder. To refine the results in the Finder, see Narrow your search results.
 (if shown) in the
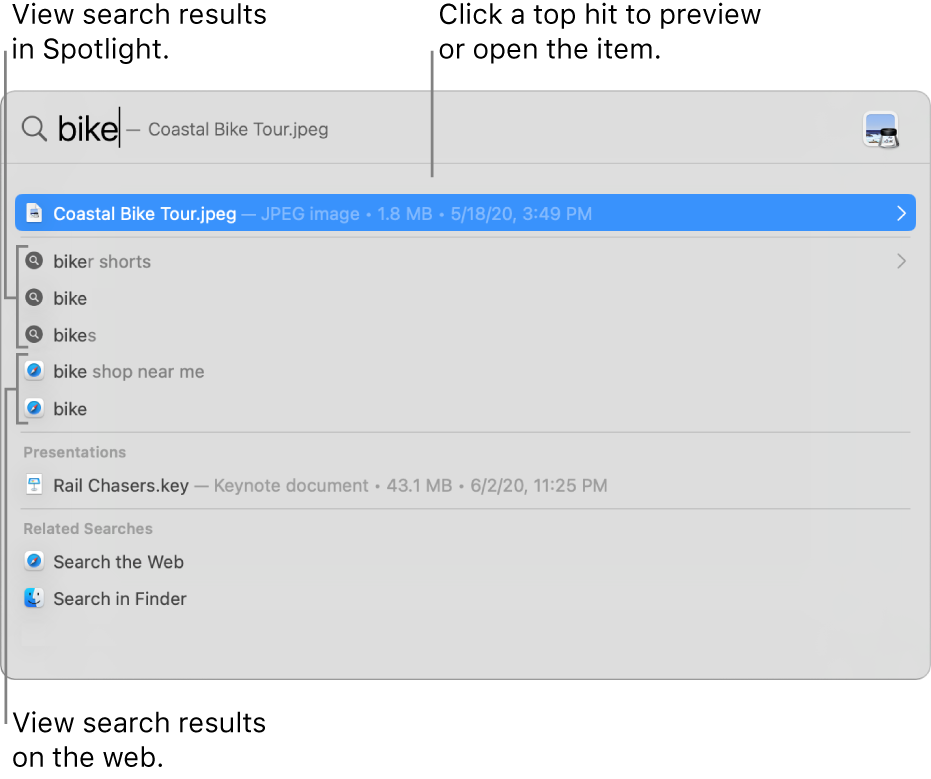
 .
. .
.During downtime, or if you reach the time limit set for apps in Screen Time preferences, app icons in results are dimmed and an hourglass icon  is shown. See Schedule downtime.
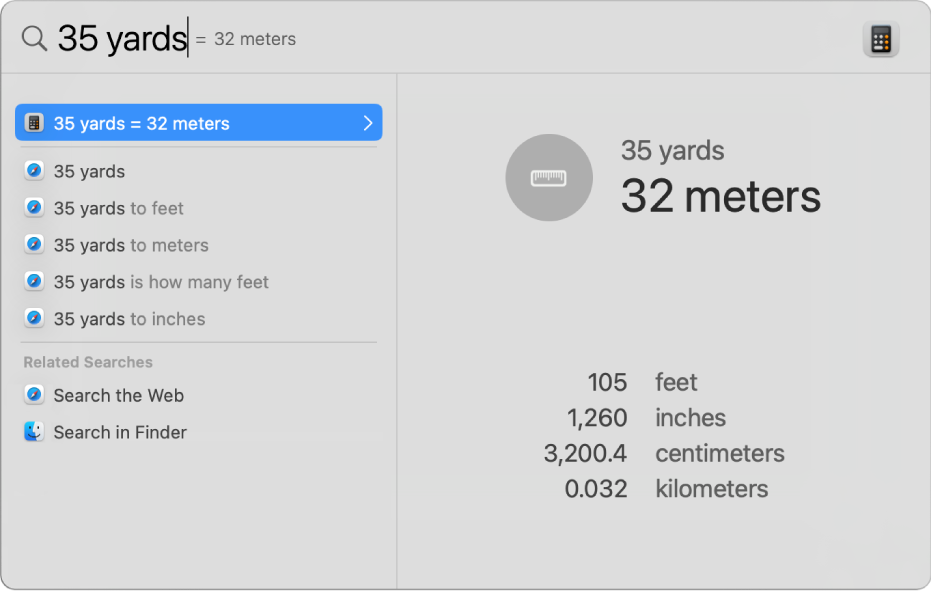
Get calculations and conversions in Spotlight
You can enter a mathematical expression, currency amount, temperature, or measurement in the Spotlight search field, and get a conversion or calculation right in the search field.
- Calculations: Enter a mathematical expression, such as 956*23.94 or 2020/15.
- Currency conversions: Enter a currency amount, such as $100, 100 yen, or “300 krone in euros.”
- Temperature conversions: Enter a temperature, such as 98.8F, 32C, or “340K in F.”
- Measurement conversions: Enter a measurement, such as 25 lbs, 54 yards, 23 stone, or “32 ft to meters.”
Tip: Press the Tab key to show additional conversions in the preview area.
You can exclude specific folders, disks, or types of information (such as email or messages) from Spotlight searches. See Change Spotlight preferences.
If you want Spotlight to search content only on your Mac and not include results from the web, you can turn off Siri Suggestions for Spotlight.
Spotlight / Continuity / Message
https://appleid.apple.com/
https://www.apple.com/support/systemstatus/
Use Continuity to work across Apple devices
With Continuity, you can use a variety of features that let your Mac and other Apple devices that support Continuity—like iPhone, iPad, iPod touch, and Apple Watch—work together in even smarter ways and let you seamlessly move between your devices.
To use Continuity features, your devices must have Wi-Fi and Bluetooth turned on, and meet system requirements. See the Apple Support article System requirements for Continuity on Mac, iPhone, iPad, iPod touch, and Apple Watch.
Sidecar
When you use your iPad as a second display, you can have your iPad show the same apps and windows as your Mac, or extend your workspace by showing different apps and windows. See Use your iPad as a second display for your Mac.
Handoff
Start a document, an email, or a message on one device and pick up where you left off on another device. Handoff works with apps like Mail, Safari, Maps, Messages, Reminders, Calendar, Contacts, Pages, Numbers, and Keynote. See Pick up where you left off with Handoff.
Continuity Camera
Take a picture or scan a document with your nearby iPhone or iPad and have it appear instantly on your Mac. See Insert photos and scans with Continuity Camera.
Continuity Markup
Edit a PDF document or image on your Mac and see it on your nearby iPhone or iPad, where you can write and sketch on it using Markup tools—and Apple Pencil on iPad—and instantly see the changes on your Mac. See Mark up files on Mac.
Continuity Sketch
Draw a sketch using your nearby iPhone or iPad and have the sketch appear instantly on your Mac. See Insert sketches with Continuity Sketch.
Universal Clipboard
Copy text, images, photos, and videos on one Apple device and then paste the content on another Apple device. For example, you can copy a recipe from Safari on your Mac, then paste it into Notes on your nearby iPhone. See Copy and paste between devices from your Mac.
Auto Unlock and Approve with Apple Watch
Use your Apple Watch to unlock your Mac or approve authentication requests from your Mac, without having to enter a password. See Unlock your Mac and approve requests with Apple Watch.
Phone Calls
When you want to make or answer a phone call, don’t reach for your iPhone—use your Mac. You can start calls from FaceTime, Contacts, Safari, Mail, Maps, Spotlight, and many other apps. When someone calls you, a notification appears. Just click the notification to answer. See Make and receive phone calls in FaceTime.
SMS Messages
Send and receive SMS and MMS text messages right from your Mac. When friends send you text messages, regardless of what phone they have, you can respond from whichever device is closest. All the messages that appear on your iPhone appear on your Mac, too. See Set up iPhone to get SMS texts.
AirDrop
AirDrop lets you quickly share photos, videos, contacts, and anything else, with anyone near you—wirelessly. It makes sharing to iPhone, iPad, iPod touch, and Mac as simple as dragging and dropping. See Use AirDrop on your Mac to send files to devices near you.
Instant Hotspot
No Wi‑Fi? No problem. Your Mac can connect to the internet using the personal hotspot on your iPhone or iPad when they’re within range of each other—no setup is required. Your iPhone or iPad automatically appears in the Wi‑Fi menu on your Mac—just select it to turn on your hotspot. See Use an iPhone or iPad to connect your Mac to the internet.
Was this help page useful? Send feedback.
Use iCloud Drive to store documents on your Mac, iPhone, and iPad
With iCloud Drive, you can safely store all kinds of documents in iCloud, and access them from all your computers, and iOS and iPadOS devices. If you like, you can have all the files in your desktop and documents folders stored automatically in iCloud Drive. That way, you can save files right where you usually keep them, and they become available on all your computers, and iOS and iPadOS devices.
You can use iCloud Drive on Mac computers (OS X 10.10 or later), iOS devices (iOS 8 or later), iPadOS devices, and Windows computers with iCloud for Windows (Windows 7 or later required). You must be signed in with the same Apple ID on all your computers and devices.
You can also use iCloud Drive on iCloud.com from a web browser on a Mac or Windows computer.
To set up iCloud drive using an iOS or iPadOS device, Windows PC, or on iCloud.com, see the Apple Support article Set up iCloud Drive.
Set up iCloud Drive
If you haven’t yet set up iCloud Drive on this Mac, you can do it now in the iCloud pane of Apple ID preferences.
- On your Mac, choose Apple menu > System Preferences, click Apple ID, then select iCloud in the sidebar.Open Apple ID preferences for me
- Select iCloud Drive.
 > System Preferences, click Apple ID, then select iCloud in the sidebar.
The first time you select the iCloud Drive feature on any of your devices, you’re asked to upgrade. When you upgrade, your documents and data currently stored in iCloud are moved to iCloud Drive. If you’re not asked to upgrade, your account is already upgraded.
Important: After upgrading to iCloud Drive, your documents stored in iCloud Drive are only available on your computers, and iOS and iPadOS devices that meet minimum system requirements, and have iCloud Drive turned on. Your documents in iCloud Drive are also available on iCloud.com.
If you have devices with iCloud Drive turned off, documents and data on those devices aren’t kept up to date with documents and data on your devices with iCloud Drive turned on.
Store your Desktop and Documents folders in iCloud Drive
- On your Mac, choose Apple menu > System Preferences, click Apple ID, select iCloud in the sidebar, then click Options next to iCloud Drive.Open Apple ID preferences for meIf you don’t see Options next to iCloud Drive, make sure iCloud Drive is turned on.
- Select Desktop & Documents Folders.
- Click Done.
After you select Desktop & Documents Folders, your Desktop and Documents folders are moved into iCloud Drive. They also appear in the iCloud Drive section of the Finder sidebar.
If you can’t move or save a document to iCloud Drive
If you can’t move or save a document to iCloud Drive, your iCloud storage space may be full. The document stays on your Mac, and is uploaded to iCloud Drive when space becomes available.
iCloud Drive shares your iCloud storage with iCloud Photos, iOS and iPadOS device backups, messages and attachments in iCloud Mail (your @icloud.com email account), and more.
To get more space, do the following:
- Upgrade your storage. See Manage iCloud storage.
- Remove items you don’t need to store in iCloud Drive.
Was this help page useful? Send feedback.
Change Notifications preferences on Mac
On your Mac, use Notifications System Preferences to specify when you don’t want to be disturbed by notifications, and to control how apps show notifications in Notification Center.
To change these preferences, choose Apple menu
![]()
System Preferences, then click Notifications. Select Do Not Disturb or an app on the left, then view or change settings on the right.
Open Notifications preferences for me
|
Option |
Description |
|---|---|
| Do Not Disturb | Stop notifications during the time period you specify, when the display is in sleep, when the screen is locked, or when you mirror the screen (for example, while playing a presentation). |
To receive call notifications even when Do Not Disturb is on, select the call checkboxes.
When Do Not Disturb is on, the Do Not Disturb icon  is shown in the menu bar. See Use Do Not Disturb.
- None: Notifications don’t appear on the screen.
- Banners: Notifications appear on the screen and disappear after a while.
- Alerts: Notifications stay on the screen until you dismiss them.
- always: Previews are always shown (even in the login window).
- when unlocked: Previews are shown only when you’re logged in to your user account.
- never: Previews are never shown.
Note: If you choose a setting from the “Show previews” pop-up menu at the bottom of the preference pane, it’s applied to all apps.
- automatic: When more than one notification is received, automatically group them.
- by app: Notifications are grouped by app; the app with the most recent notification is listed first.
- off: Notifications are grouped by app; the apps are sorted based on the order in which they’re listed in Notifications preferences when this option is chosen. You can reorder apps in the list by dragging them up or down.
@import url(https://clickety-clack.click/wp-content/plugins/siteorigin-panels/css/front-flex.min.css); #pgc-110057-0-0 , #pgc-110057-2-0 { width:100%;width:calc(100% – ( 0 * 30px ) ) } #pg-110057-0 , #pg-110057-1 , #pl-110057 .so-panel { margin-bottom:30px } #pgc-110057-1-0 { width:61.8034%;width:calc(61.8034% – ( 0.38196600790794 * 30px ) ) } #pgc-110057-1-1 { width:38.1966%;width:calc(38.1966% – ( 0.61803399209206 * 30px ) ) } #pl-110057 .so-panel:last-child { margin-bottom:0px } #pg-110057-0.panel-no-style, #pg-110057-0.panel-has-style > .panel-row-style , #pg-110057-1.panel-no-style, #pg-110057-1.panel-has-style > .panel-row-style { -webkit-align-items:flex-start;align-items:flex-start } @media (max-width:780px){ #pg-110057-0.panel-no-style, #pg-110057-0.panel-has-style > .panel-row-style , #pg-110057-1.panel-no-style, #pg-110057-1.panel-has-style > .panel-row-style , #pg-110057-2.panel-no-style, #pg-110057-2.panel-has-style > .panel-row-style { -webkit-flex-direction:column;-ms-flex-direction:column;flex-direction:column } #pg-110057-0 > .panel-grid-cell , #pg-110057-0 > .panel-row-style > .panel-grid-cell , #pg-110057-1 > .panel-grid-cell , #pg-110057-1 > .panel-row-style > .panel-grid-cell , #pg-110057-2 > .panel-grid-cell , #pg-110057-2 > .panel-row-style > .panel-grid-cell { width:100%;margin-right:0 } #pg-110057-0 , #pg-110057-1 , #pg-110057-2 { margin-bottom:px } #pgc-110057-1-0 { margin-bottom:30px } #pl-110057 .panel-grid-cell { padding:0 } #pl-110057 .panel-grid .panel-grid-cell-empty { display:none } #pl-110057 .panel-grid .panel-grid-cell-mobile-last { margin-bottom:0px } }