


InstaBinding
Coming next week to finish top rug edge.


Seam tape
Join 2 rugs together
Seam Tape
Insta Bind – Edges
https://findanyanswer.com/how-do-you-use-instabind-carpet-binding
How do you use Instabind carpet binding?
https://findanyanswer.com/goto/98058)
Thereof, how do I install Instabind carpet binding?
The only additional item you will need is a Hot Glue Gun.
- Prepare carpet edges.
- Cut section of Instabind and peel.
- Align and apply Instabind at edge of carpet.
- Peel paper and press into carpet as you go.
- Separate cord from carpet and apply hot glue.
- Apply even pressure until bond sets.
Additionally, does Home Depot do Carpet binding? Regardless that your carpet is a shag (which is one of my favorite rug textures) you CAN bind the area rug! Through The Home Depot, there are two different ways to get your specific area rug binded. The other method is using a self-adhesive binding tape that the Home Depot sells with our carpet runners.
Correspondingly, how much does it cost to bind a carpet remnant?
The cost of carpet binding services will vary, but expect standard polyester binding (the least expensive) to cost at least $2 dollars per linear foot (measuring the perimeter of the carpet). Of course, where you live and the local cost of living will be a major factor in the price.
Can you bind your own carpet?
Place a 1/8-inch bead of hot glue between the edge of the carpet and the raised part of the binding. Use a scrap of 2-by-4 wood to press the binding into the carpet until the glue cools. Work your way around the carpet with the glue until your carpet edges are completely bound.
28 Related Question Answers Found
What is carpet binding tape?
Carpet Binding Tape for the edges of carpets, rugs, runners, mats and staircases. ( 7/8″ and 4 3/4″) Carpet edge binding tape can be used to make remnant and off cut carpet into mats and rugs where the edge binding tape stops fraying and unravelling.
How do you keep carpet edges from fraying?
How to Keep Carpet Edges from Fraying – 6 Techniques to Follow
- Cut off the Frayed Carpet Edge. First, you might think about cutting a portion of the frayed carpet, which may seem a straightforward task.
- Fix with Carpet Binding Equipment.
- Use 4 Series Carpet Edge Sealing Tip.
- Secure with Transition Strips.
- Use Binding Tape.
- Secure Edges Using a Heat gun.
What is carpet Serging?
Carpet serging is a sewing technique where the edges of a carpet are wrapped with thread in order to prevent unraveling and give it a beautiful, finished look. Serging looks very similar to a traditional whip stitch except that the yarn is even closer together.
Can a rug be too big for a room?
The size of an area rug can dramatically alter the room's overall effect. A rug that is too small for your space can cause the room to feel uninviting. A rug that is too large for the room can, paradoxically, make the room feel smaller.
How do you finish the carpet edge that meets hardwood?
For transitioning carpeting to hardwood flooring in your home, use a T-molding assembly with a track installation.
- Measure the exact length of the doorway or hallway between the two types of flooring.
- Roll up the edge of the carpeting and pad, and secure it in place with electrical tape.
What can I do with leftover carpet?
Save Those Carpet Remnants: Practical Uses for Leftover Flooring
- Planning a flooring project? Most homeowners will purchase more material than they need.
- Cushion for the pet crate.
- Make a cat scratching post.
- Under the washing machine.
- In the garden.
- Move heavy furniture.
- Soundproof a music room.
- Enhance your furniture.
Can you turn carpet into a rug?
Turn the carpet right side up and apply a bead of carpet glue to the edges and approximately 1/2 inch (1.3 cm) onto the top of the rug. Pull the edging firmly up the side of the rug and onto the bead of glue on top, pressing firmly. Allow the glue to dry, and place the home-made rug on the floor.
What is carpet whipping?
Carpet whipping is a continuous yarn that wraps around the edge of the carpet making it look more like part of the carpet. Our large 1200 square foot workshop and latest high-tech equipment enables us to edge carpets of ANY SIZE from a small door mat to a complete roll of broadloom carpet.
What is the best tool to use to cut carpet?
Start with a sharp knife.
This will be the most important (and possibly the only) tool you'll need to cut carpet. A standard utility knife is preferable, though something like an X-Acto knife or razor can also do the trick.
How do you iron a rug binding?
Video of the Day
- Place your rug right-side down on a hard flat surface.
- Fold the unfinished border of canvas toward the wrong side of the rug. Use your iron to crease the canvas so it will lay flat.
- Follow the instructions on the package of iron-on binding for the temperature setting of your iron.
Where can I find cheap carpet remnants?
You can buy remnants from nearly any carpet store – local carpet stores near you, carpet manufacturers, big-box retailers, online sellers, and carpet stores that specialize in selling remnants. Sometimes you can even find it in places you wouldn't expect like carpet cleaners and carpet installers.
How do you bind a rug without sewing?
- Trim the edges of the rug with the carpet cutter to eliminate any frayed edges on the rug.
- Peel back the adhesive tape from the paper side of the binding strip.
- Place the binding strip in the middle of one of the rug's edges.
- Press the binding into the rug's edge until you reach the corner.
How do you make a carpet rug sample?
Arrange the carpet squares into a 7×5 rectangle. Flip them over, making sure everything is aligned well and seamless. Measure across the rug, then cut and peel one side of the tape. Carefully start taping the squares together in horizontal rows.
Can I get carpet cut to size?
Whether it's indoors or outside, we can have rugs cut to size and bound the same day you order, exactly to your specifications. You won't need to worry about unsightly binding on a custom-cut rug or carpet from Koeckritz.
What is carpet edge binding?
Binding the edge of a carpet involves wrapping a strip of fabric—which is generally made from either polyester or cotton—around the edge of the carpet and stitching it in place. This is done by a carpet–binding machine.
What is a bound carpet?
Binding a carpet involves taking fabric, folding it over the edge of the carpet and then sewing it to the carpet with a large binding sewing machine. The finished width of binding is ¼” to 3/8”. Professionally serging a carpet involves continuously wrapping the edge of the carpet with yarn.
Can you buy carpet remnants at Home Depot?
Does Home Depot sell carpet remnants? Yes they do! However, what they have in-stock will vary wildly from one store to the next. Additionally, what they have in the store may be difficult to find unless you are more than casually familiar with your local store's flooring department


How to Select the Right Silicone Sealant
For over 40 years, silicone sealants have been used extensively in the construction market for applications requiring enhanced durability and strength compared to its predecessors, the organic-based sealants such as polyurethanes and polysulfides.But not all silicone sealants are the same, so understanding their chemistries and basic cure characteristics is critical to selecting the right product for your next construction project.Silicone ChemistryThe silicone sealant’s unique polymer structure allows them to withstand movement, high temperatures and ultraviolent light (UV) exposure, making them an ideal solution for outdoor applications, such as curtainwalls, window perimeters and even highways. Silicone sealants are defined by their cure mechanism, divided into acid and neutral cure categories.
The acid cure (acetoxy) silicone sealants were the first to be used in the industry, and cure by contact with moisture vapor in the air, releasing acetic acid. This acidic vapor byproduct is corrosive and can cause compatibility issues with concrete and items in the glazing pocket. It can soften other sealants, etch glass and cause a chemical fog on the interior of insulated glass units.Due to this limitation, the construction industry evolved, moving away from acid cure silicones and opening the market to neutral cure silicones.
Neutral cure silicone categories typically include basic, alcohol and oxime cure mechanisms. While these silicones do produce a condensation byproduct, it is not as corrosive as the acid cure formulations. The industry prioritizes neutral cure silicones for exterior applications because of their ability to effectively bond with a variety of substrates.
One- and Two-Part Silicones
Silicones can also be broken down into one- and two-part categories, which have their own cure processes to take into consideration.One-part silicone sealants are used most often on the job site, as they cure by contact with moisture in the air. This process begins at the exposed surface first, then through the interior of the sealant bead until the cure is complete. This process can take up to 2-3 weeks depending on sealant depth, temperature and humidity.Two-part silicone sealants are utilized for in-plant applications, when speed is essential. After the two components are mixed, often through a large pump, the sealant cures uniformly throughout the entire bead, which takes only a matter of days.You may find yourself with any of these silicone sealant types, depending on your application. But select the wrong one, and there could be serious compatibility issues, costing you significant time and money.
Download the guide Download our Sealant Selector Guide for insight into which products may best match your project, including a range of silicone sealants, custom color options, solutions for both commercial and residential window markets, as well as compatible accessories and pri
What’s the Difference? Acetoxy vs. Neutral Cure Silicones
December 12, 2018
 There are hundreds of sealants from which you can choose; how do you know which one is right for your project? The first step in deciding which silicone sealant is the best begins with determining which materials you’re using and where they’ll be located. After choosing your silicone and materials, application is fairly universal. But what about curing? The main difference between silicones begins to show itself during this step.
Acetoxy cure silicones derive their name from their release of acetic acid, which gives off a strong vinegar like smell while curing. These silicones cure with the presence of atmospheric moisture and generally have a very fast cure time (24 hours) (10 min. skin and 17 min. tack) and adhere better to many surfaces. Because of the acid released, however, acetoxy cure silicones have a stronger smell than neutral cure silicones, and the acid can have adverse effects on some delicate electronic components. The acid could even be corrosive to certain substrates and metals. With use on medical devices, they can cause bleeding.
Uses include:
- windows and door frames
- kitchens-backsplashes
- countertop sealing
- bathrooms & bathtubs
However, acetoxy cure silicones such as our Chem-Set RTV4500 provide their fair share of usefulness; some of these silicones are even biocompatible. This means that they work in harmony with the body’s natural processes, making them useful for medical device manufacturing, although they are not medical grade ISO 1000. When cured, they are food safe with USDA approval and VOC compliance. They also meet Green Building Standards and are military grade.
Neutral cure silicones, like our RTV7500 , ShinEtsu KE-45, are unique in that some release a substance known as methyl ethyl ketoxime while curing, and others release acetone. These substances are non-corrosive, thixotropic and make neutral cure silicones ideal for electronics applications. These silicones also release a much subtler odor, making them great candidates for indoor applications such as kitchen installations, even though the cure time is longer than that of acetoxy cure silicones.
Uses include:
- roofing
- industrial gaskets
- HVAC
- compressor pumps
- refrigeration
Neutral cure silicones are ideal for delicate surfaces or otherwise challenging applications; in fact, NASA has received low-outgassing approved silicones to be used in the aerospace, electronics, and optical fields due to the low odor and gentle, non-corrosive application. Tests are beginning on neutral cure silicones for biocompatibility as well.
For the heavy-duty sealant jobs, hybrid adhesives such as our Chem-Set MS-35 polyether adhesive combine the sealing capabilities of a silicone with the strength of a construction adhesive. These adhesives are vibration dampening, ready-to-use without priming, and possess the fast cure time you’ve come to expect of a silicone sealant.
To view our complete line of silicone sealants, click here. Need help deciding which sealant is right for your project? Our representatives are here to help! Give us a call, toll-free, at 1-800-220-1966 or send us an email at sales@chemical-concepts.com. We look forward to hearing from yo
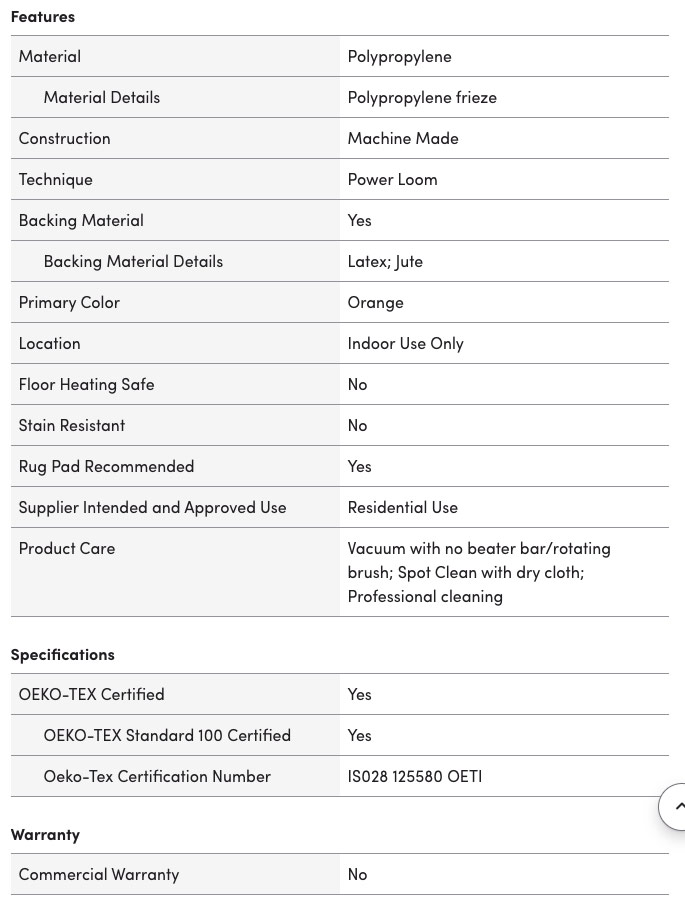
 Product Details
- Technique: Power Loom
- Construction: Machine Made
- Material: Polypropylene
- Location: Indoor Use Only
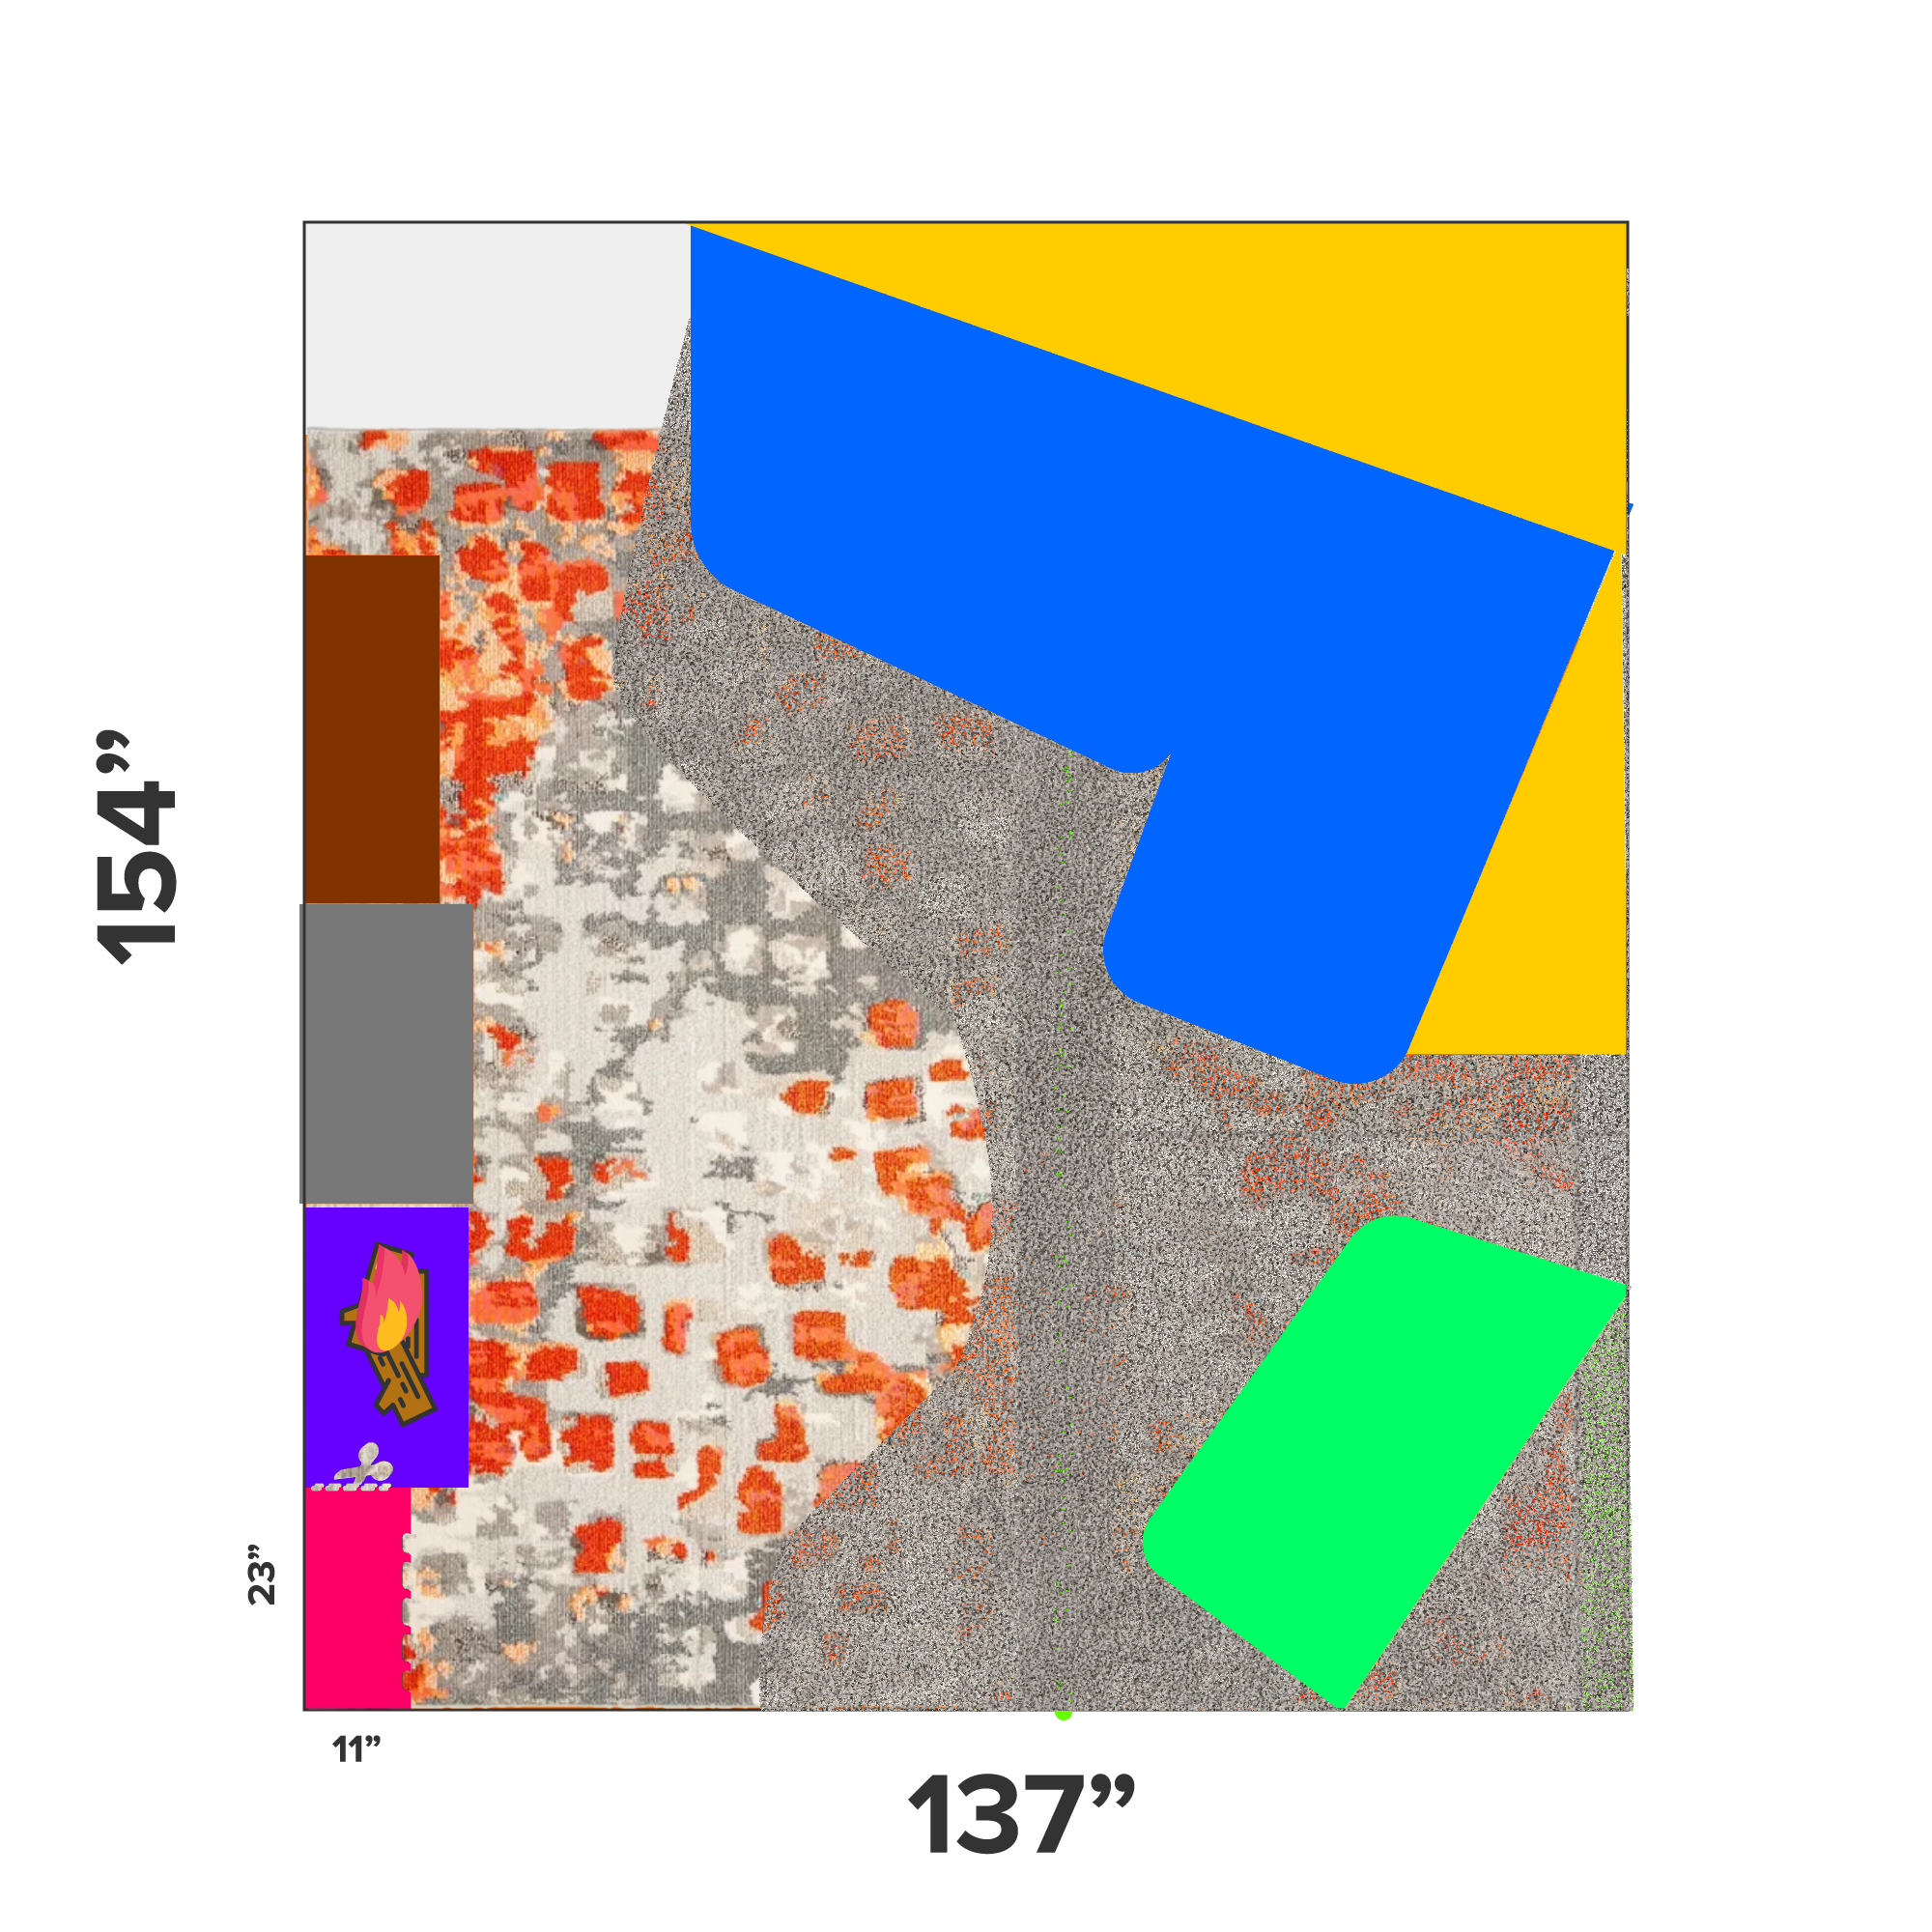
Resizing A Rug In 3 Steps
Area rugs add texture and color to any room. If your rug has the desired hue and style, but it doesn’t fit your space, don’t just roll up the rug and store it away. We’ve carefully searched for all the possible ways to resize your too big rug to fit any room. If your rug is too big, you will want to resize it to fit the space. You may be able to cut the rug following these steps –- Measure the rug
- Carefully cut to your measurement
- Sealy the newly-formed edges
How To Resize Your Rug
If your rug is larger than the floor, you intend to cover, consider resizing it to fit. Whether or not to follow this plan depends on the type of rug you have. Re-sizing works best with a square or rectangular rug that’s not too thick. If the remaining rug is large enough, you could make another rug out of it, of you could use the remaining material for re-upholstering another item of furniture to match your rug. Here are the items you’ll need for resizing a rug project:- Tape measure
- Pair of scissors/carpeting knife
- Carpet adhesive
- Paintbrush
Step 1 – Measure And Mark Your Rug
Spread out your rug upside down on a flat, clean, and open area. The cutting process gets a lot easier with the tough side on top and the softer one facing down. Grab your tape measure and determine how much of the rug you want to cut off. Click here to view this product on Amazon.
After measuring the length and width to cut, make some visible markings along the rug using either duct tape or a marker pen. Counter-check the measurements before heading to the next step.
Click here to view this product on Amazon.
After measuring the length and width to cut, make some visible markings along the rug using either duct tape or a marker pen. Counter-check the measurements before heading to the next step.
 Click here to view this product on Amazon.
Step 2 – Carefully Cut The Rug
Grab your pair of carpet cutting scissors or knife and carefully cut along the markings you made on the width. Click here to view this product on Amazon.
Step 3 – Seal The Freshly-Cut Edges
You should have two separate rugs at this point. Take the small paintbrush, dip it in some carpet adhesive, and smear it along the freshly-cut edges. Adding adhesive will help in solidifying the fibers and lower the chances of cut edges fraying. Click here to view this product on Amazon.
 Click here to view this product on Amazon.
And just like that, you not only have a rug that fits the room, but also an extra piece of carpet that you can use to coordinate in any area of your choosing!
Click here to view this product on Amazon.
And just like that, you not only have a rug that fits the room, but also an extra piece of carpet that you can use to coordinate in any area of your choosing!
Use A Portion Of The Excess Rug To Reupholster Another Furniture Item
If your remaining rug is large and pliable enough, why not use it to reupholster another furniture item? A small ottoman can be ideal for this project. You’ll end up with an ottoman that perfectly matches the rug. Start with a clean pied of the rug, large enough to cover every corner of the ottoman. Lie the rug upside down on a flat surface. Next, use a screwdriver or hammer to detach the legs from your ottoman. Lie the ottoman top-down onto the center of your rug. Cover the ottoman’s sides with the rug, and using a staple gun, tac the rug onto the sides of the ottoman with staples. Click here to view this product on Amazon.
Neatly affix the rug onto the ottoman’s corners by rounding the rug in crisp folds, then staple folds in place—trim excess rug from all sides. Reattach the legs to the ottoman. And just like that, you just saved yourself hundreds of dollars’ worth of refurbishing.
Click here to view this product on Amazon.
Neatly affix the rug onto the ottoman’s corners by rounding the rug in crisp folds, then staple folds in place—trim excess rug from all sides. Reattach the legs to the ottoman. And just like that, you just saved yourself hundreds of dollars’ worth of refurbishing.
Resize Rug To Fit Your Room
If your rug is too wide or too long for the designated floor space, resizing it is a sure way to get the right fit. Here’s what you need to get started:- Rug (should have at least one side with your preferred measurement)
- Straight edge
- Measuring tape or stick
- Colored Duck Tape
- Sharp razor or knife
 Click here to view this product on Amazon.
Step 2:
After two to three days, the rug should be ready for cutting. Get your straight edge and measure about 1-1/2″ to 2″ from the crease. Use the sharp razor or knife to cut away the excess pieces. Fold the remaining cut edges toward the underside of the rug, and either affix to the underside by using tape or sew to bind the edges. We’ll explain how to bind a carpet yourself later in this post.
Click here to view this product on Amazon.
Step 2:
After two to three days, the rug should be ready for cutting. Get your straight edge and measure about 1-1/2″ to 2″ from the crease. Use the sharp razor or knife to cut away the excess pieces. Fold the remaining cut edges toward the underside of the rug, and either affix to the underside by using tape or sew to bind the edges. We’ll explain how to bind a carpet yourself later in this post.
 Click here to view this product on Amazon.
How Much Of A Room Should A Rug Cover?
Before we delve deeper into this, here’s a quick tip to get an easy visual on how much floor area the rug should cover. Use a bedsheet as a testing tool. Fold the sheet into different sizes to have a visual representation of how each size would look in your room. Measure the size that works for you and buy a rug with those exact dimensions. With that said, here are the recommended rug sizes for various room measurements :- For a 5′ x 7′ room, a 3′ x 5′ rug will do just fine.
- For a 7′ x 10′ room, settle for a 5′ x 8′ rug.
- If you have a 10′ x 12′ room, settle for an 8′ x 10′ rug.
- For an 11′ x 14′ room, your rug should be at least 9′ x 12.’
- In a 14′ x 17′ room, settle for nothing less than a 12′ x 15′ rug.
How to Build a Radiator Cover Cabinet
With a few easy steps, your radiator can look as hot as it feels
Project details
SKILL
1 out of 5EasyYou need to be able to measure, saw, screw, and paint with the skill of a patient noviceCOST
$50 to $100ESTIMATED TIME
6 hoursTools & Materials
 Drill/driver
-
combination countersink drill bit
-
spade bit – 1/2 inch
-
Circular saw
-
Clamps
-
Jigsaw
-
Miter box and backsaw
-
tin snips
-
Staple gun
-
Scribe tool


Step 1
Radiator Cover Overview
 Illustration by Gregory Nemec
A radiator cover is basically a three-sided box with feet on the bottom and a lid on top. The one shown here is made from MDF (medium density fiberboard), an inexpensive and stable choice for a painted cover. Each side of the box allows heat to radiate outward through a large opening covered by a decorative metal screen. Behind the radiator, a piece of sheet metal helps reflect heat out into the room. You can also add a 1x strip across the open back for stability if it will fit between the radiator and the wall. Note: MDF creates a lot of dust as it’s cut, so plan to work over a drop cloth, preferably out of the house.
That same wall behind the cover also offers some stability, especially if you scribe the cover’s sides to fit against the baseboard. In these circumstances, two feet in the front will hold the cover as it leans on the wall and baseboard for rear support. Otherwise, use four feet. Adjustable feet can be a big help when leveling the cover, as years of dripping water have often warped the floor beneath the radiator.
Finding the right feet also offers you the first of several design choices. Screening comes in myriad designs, from austere to ornate. Cove molding on the inner edge of the screen openings gives the cover a more finished appearance. And though we chose to leave the top unadorned for a streamlined modern look, you could edge it with base cap (turned upside down) for a fancier bullnosed profile.
Illustration by Gregory Nemec
A radiator cover is basically a three-sided box with feet on the bottom and a lid on top. The one shown here is made from MDF (medium density fiberboard), an inexpensive and stable choice for a painted cover. Each side of the box allows heat to radiate outward through a large opening covered by a decorative metal screen. Behind the radiator, a piece of sheet metal helps reflect heat out into the room. You can also add a 1x strip across the open back for stability if it will fit between the radiator and the wall. Note: MDF creates a lot of dust as it’s cut, so plan to work over a drop cloth, preferably out of the house.
That same wall behind the cover also offers some stability, especially if you scribe the cover’s sides to fit against the baseboard. In these circumstances, two feet in the front will hold the cover as it leans on the wall and baseboard for rear support. Otherwise, use four feet. Adjustable feet can be a big help when leveling the cover, as years of dripping water have often warped the floor beneath the radiator.
Finding the right feet also offers you the first of several design choices. Screening comes in myriad designs, from austere to ornate. Cove molding on the inner edge of the screen openings gives the cover a more finished appearance. And though we chose to leave the top unadorned for a streamlined modern look, you could edge it with base cap (turned upside down) for a fancier bullnosed profile.
Step 2
Cut the cover pieces
:no_upscale()/cdn.vox-cdn.com/uploads/chorus_asset/file/19497510/hh300701_radiator02lg.jpg) Photo by Kolin Smith
Measure the radiator. Add 4 inches to its width and 2 inches to its height. Cut a piece of MDF to these dimensions; this will be the front cover.
For the sides, measure the radiator’s depth. Add 1 inch and cut two pieces of MDF to this width and the same height as the front cover. For the top, cut a piece of MDF ½ inch wider than the sides and 1 inch longer than the width of the front.
On both side pieces and the front piece, mark for the screen openings: Draw lines 3 inches from the top and sides, 4 ½ inches from the bottom. Bore two ½-inch holes inside of opposite corners of the cut lines. Use these holes to start cutting out the screen openings with a jigsaw.
Photo by Kolin Smith
Measure the radiator. Add 4 inches to its width and 2 inches to its height. Cut a piece of MDF to these dimensions; this will be the front cover.
For the sides, measure the radiator’s depth. Add 1 inch and cut two pieces of MDF to this width and the same height as the front cover. For the top, cut a piece of MDF ½ inch wider than the sides and 1 inch longer than the width of the front.
On both side pieces and the front piece, mark for the screen openings: Draw lines 3 inches from the top and sides, 4 ½ inches from the bottom. Bore two ½-inch holes inside of opposite corners of the cut lines. Use these holes to start cutting out the screen openings with a jigsaw.
Step 3
Fit the trim to the screen openings
 Photo by Kolin Smith
Using a miter box and handsaw, cut a 45-degree inside miter on a length of cove molding. Fit the cut end of the molding into one corner of a screen opening and hold it tight against the opening’s edge. Mark the molding where it reaches the next corner. Cut another 45-degree miter at this mark, facing the other direction. Continue cutting molding in this manner until you have four pieces to fit the inner edge of the opening.
Photo by Kolin Smith
Using a miter box and handsaw, cut a 45-degree inside miter on a length of cove molding. Fit the cut end of the molding into one corner of a screen opening and hold it tight against the opening’s edge. Mark the molding where it reaches the next corner. Cut another 45-degree miter at this mark, facing the other direction. Continue cutting molding in this manner until you have four pieces to fit the inner edge of the opening.
Step 4
Attach the trim
 Photo by Kolin Smith
Fasten each piece of ¾-inch cove molding with wood glue and 4d (1 ½-inch) finish nails. To prevent the nails from splitting the molding, especially when nailing close to the mitered ends, first drill ½-inch-diameter pilot holes. Repeat the above procedure for attaching trim to the other screen openings.
Tip: To get the molding to fit snugly, measure out each section with an adjacent piece in place, then cut everything just a hair too long.
Photo by Kolin Smith
Fasten each piece of ¾-inch cove molding with wood glue and 4d (1 ½-inch) finish nails. To prevent the nails from splitting the molding, especially when nailing close to the mitered ends, first drill ½-inch-diameter pilot holes. Repeat the above procedure for attaching trim to the other screen openings.
Tip: To get the molding to fit snugly, measure out each section with an adjacent piece in place, then cut everything just a hair too long.
Step 5
Cut the screening
 Photo by Kolin Smith
Measure and cut the screening in place over each opening. (This is easier to do before the cover is assembled.) Place the front of the cover facedown on a tarp. Lay a piece of screening over the center opening. Using tin snips, cut the screen so it overlaps the opening by 2 inches all around.
Cut screen pieces to fit the cover’s sides in the same manner. Set all three screens aside.
Photo by Kolin Smith
Measure and cut the screening in place over each opening. (This is easier to do before the cover is assembled.) Place the front of the cover facedown on a tarp. Lay a piece of screening over the center opening. Using tin snips, cut the screen so it overlaps the opening by 2 inches all around.
Cut screen pieces to fit the cover’s sides in the same manner. Set all three screens aside.
Step 6
Assemble the cover
 Photo by Kolin Smith
Hold a long scrap of MDF on edge against the face of the front piece, flush to one side. Draw a light pencil line along the side of the scrap on the front piece. This will be your guide for drilling pilot holes. Assemble the front piece and one side, held together flush at 90 degrees. Using a countersink bit, drill four evenly spaced pilot holes through the face panel—dead center between your pencil line and the edge—and into the side panel’s end.
Photo by Kolin Smith
Hold a long scrap of MDF on edge against the face of the front piece, flush to one side. Draw a light pencil line along the side of the scrap on the front piece. This will be your guide for drilling pilot holes. Assemble the front piece and one side, held together flush at 90 degrees. Using a countersink bit, drill four evenly spaced pilot holes through the face panel—dead center between your pencil line and the edge—and into the side panel’s end.
Step 7
Attach the feet
 Photo by Kolin Smith
Spread wood glue onto the front edge of the side panel. Hold the front cover against the side panel, forming a 90-degree angle. Join the two pieces together with four 1 ⅝-inch drywall screws, sinking their heads just below the surface. Attach the other side panel in the same manner.
Cut triangle-shaped MDF blocks for attaching metal adjustable feet. Measure from the floor to the bottom of the radiator fins. Measure the height of the radiator’s feet. Subtract the first measurement from the second. The remainder is the distance from the bottom of the cover to the underside of the blocks. Place the blocks inside the front corners of the cover. Drill pilot holes, then glue and screw the blocks through the cover’s sides and front. Next, screw the feet to the blocks.
Set the cover over the radiator and adjust the feet to level it. Use a scribe to transfer the contours of the wall’s baseboard to the cover’s sides. Cut along these lines with a jigsaw to create a tight fit over the baseboard.
Photo by Kolin Smith
Spread wood glue onto the front edge of the side panel. Hold the front cover against the side panel, forming a 90-degree angle. Join the two pieces together with four 1 ⅝-inch drywall screws, sinking their heads just below the surface. Attach the other side panel in the same manner.
Cut triangle-shaped MDF blocks for attaching metal adjustable feet. Measure from the floor to the bottom of the radiator fins. Measure the height of the radiator’s feet. Subtract the first measurement from the second. The remainder is the distance from the bottom of the cover to the underside of the blocks. Place the blocks inside the front corners of the cover. Drill pilot holes, then glue and screw the blocks through the cover’s sides and front. Next, screw the feet to the blocks.
Set the cover over the radiator and adjust the feet to level it. Use a scribe to transfer the contours of the wall’s baseboard to the cover’s sides. Cut along these lines with a jigsaw to create a tight fit over the baseboard.
Step 8
Finish the cover’s top
 Photo by Kolin Smith
Place the cover’s top upside down on a tarp. Turn the assembled cover onto it. Center the cover with the back edges flush; there should be a ½-inch overhang around the sides and the front. Mark the inside perimeter of the cover onto the top.
Cut three 1x scraps to fit in a loose U-shape inside the lines. Glue and screw the pieces to the underside of the top. Caulk all seams, fill the nail and screw holes with wood putty, sand, and paint the cover’s exterior. Once it’s dry, use a staple gun to attach the screening to the inside of the cover. Cut a piece of sheet metal to fit behind the radiator to help reflect heat into the room. Then place the cover over the radiator.
Tab content
Photo by Kolin Smith
Place the cover’s top upside down on a tarp. Turn the assembled cover onto it. Center the cover with the back edges flush; there should be a ½-inch overhang around the sides and the front. Mark the inside perimeter of the cover onto the top.
Cut three 1x scraps to fit in a loose U-shape inside the lines. Glue and screw the pieces to the underside of the top. Caulk all seams, fill the nail and screw holes with wood putty, sand, and paint the cover’s exterior. Once it’s dry, use a staple gun to attach the screening to the inside of the cover. Cut a piece of sheet metal to fit behind the radiator to help reflect heat into the room. Then place the cover over the radiator.
Tab content Let’s get this out of the way up front, because I know you’re wondering: they were all crusty. There is no way to paint a carpet that isn’t going to leave it at least a little bit crusty. And in this case, being that our carpet is probably somewhere around 30 years old, it had a pretty good crust going for it already. So the paint crusties weren’t much of a deterrent to me. I was just looking for the way that left the carpet the least crusty.
Hey, random question: how many times can I talk about my crusty carpet before people start to wonder if I’m really talking about carpet?
Moving on.
I chose option D: watered down paint on wet carpet. It saved me a lot of money on fabric medium and was also the least crusty. When I was finally ready to start painting, I tried a couple of different methods, most of which were failures. But the following ended up working really well for me.
Step 1: Use a pump sprayer to wet a large section of the carpet.
Step 2: Use a shop vac to vacuum up the excess water, leaving the carpet evenly moist.
Hehe, “moist.”
Step 3: Working in 2×2-foot sections, use a paint roller with a 1 1/4-inch nap (for rough surfaces) to lightly roll paint AS EVENLY AS POSSIBLE on the surface of the carpet. It doesn’t have to be full coverage, but it’s very important that the coverage is even.
Let’s get this out of the way up front, because I know you’re wondering: they were all crusty. There is no way to paint a carpet that isn’t going to leave it at least a little bit crusty. And in this case, being that our carpet is probably somewhere around 30 years old, it had a pretty good crust going for it already. So the paint crusties weren’t much of a deterrent to me. I was just looking for the way that left the carpet the least crusty.
Hey, random question: how many times can I talk about my crusty carpet before people start to wonder if I’m really talking about carpet?
Moving on.
I chose option D: watered down paint on wet carpet. It saved me a lot of money on fabric medium and was also the least crusty. When I was finally ready to start painting, I tried a couple of different methods, most of which were failures. But the following ended up working really well for me.
Step 1: Use a pump sprayer to wet a large section of the carpet.
Step 2: Use a shop vac to vacuum up the excess water, leaving the carpet evenly moist.
Hehe, “moist.”
Step 3: Working in 2×2-foot sections, use a paint roller with a 1 1/4-inch nap (for rough surfaces) to lightly roll paint AS EVENLY AS POSSIBLE on the surface of the carpet. It doesn’t have to be full coverage, but it’s very important that the coverage is even.
 Step 4: Use a scrub brush to scrub the surface paint down into the pre-moistened carpet.
Step 5: Sit back and let it dry. For a looooooong time. Because you put a lot of water into that carpet. It’s gonna take a while.
But in the end, you should end up with a slightly whiter carpet than what you started with.
Step 4: Use a scrub brush to scrub the surface paint down into the pre-moistened carpet.
Step 5: Sit back and let it dry. For a looooooong time. Because you put a lot of water into that carpet. It’s gonna take a while.
But in the end, you should end up with a slightly whiter carpet than what you started with.

 Woo! Time to stencil! So take everything you think you know about stenciling, and throw it out the window. Lucky for me, this was my first attempt, so that part was easy. FYI, I also tried fabric medium for this step, but after doing a small section I switched back to watered-down paint. It worked better. And was free.
Step 1: Pick a forgiving stencil, i.e., one without a lot of really clear, straight lines. The messier the stencil looks, the better. And keep in mind that tiny details will get lost. I picked this one for its rock-and-roll attitude, but it turned out to be a great choice for carpet stenciling.
Step 2: Skip the foam roller. Use a stencil brush — the biggest, cheapest stencil brush you can find.
Step 3: Two parts paint to one part water. Mix ’em up.
Step 4: Clear your schedule. Using a 1″ brush — the biggest stencil brush I could find — begin the process of dabbing a 20″ x 20″ stencil over an entire 11′ x 13′ room. Took me 10 hours.
Woo! Time to stencil! So take everything you think you know about stenciling, and throw it out the window. Lucky for me, this was my first attempt, so that part was easy. FYI, I also tried fabric medium for this step, but after doing a small section I switched back to watered-down paint. It worked better. And was free.
Step 1: Pick a forgiving stencil, i.e., one without a lot of really clear, straight lines. The messier the stencil looks, the better. And keep in mind that tiny details will get lost. I picked this one for its rock-and-roll attitude, but it turned out to be a great choice for carpet stenciling.
Step 2: Skip the foam roller. Use a stencil brush — the biggest, cheapest stencil brush you can find.
Step 3: Two parts paint to one part water. Mix ’em up.
Step 4: Clear your schedule. Using a 1″ brush — the biggest stencil brush I could find — begin the process of dabbing a 20″ x 20″ stencil over an entire 11′ x 13′ room. Took me 10 hours.
 But…
…it looks BALLER.
But…
…it looks BALLER.


 Now, the only question is: what happens when a careless musician spills a beverage on the painted carpet in The Boom Boom Room?
Meh. We’ll cross that bridge when we come to it.
Maybe this ride’s not over yet.
Now, the only question is: what happens when a careless musician spills a beverage on the painted carpet in The Boom Boom Room?
Meh. We’ll cross that bridge when we come to it.
Maybe this ride’s not over yet.