
Homebrew basics
https://setapp.com/how-to/install-homebrew-on-mac
The macOS command line interface can be intimidating — but there’s lots of value inside. By using the command line, you can solve many tasks on Mac by running commands in Terminal. It helps streamline a lot of work, especially for software developers.
Package managers like Homebrew make the command line interface even more powerful. In this tutorial, we describe how to safely install and uninstall Homebrew on Mac.
What is Homebrew?
“Homebrew installs the stuff you need that Apple didn’t” — this is how Homebrew creators describe it, and we agree. If you want a more informative definition, Homebrew is a free and open-source package manager for macOS, helping you install, update, uninstall, and manage developer tools like Python, Ruby, and Node.js on your Mac.
Why do you need it? With Homebrew, you can benefit from tons of command line tools to automate your work. Best of all, they are all installed, uninstalled, and updated in one location on your Mac. Here are just a few examples of the useful tools you can get through Homebrew:
- imagemick to convert images to other formats
- archey to share the localhost with your team
- hub for a better experience with Git
- tldr for practical examples on how to use the command line.
How to install Homebrew on Mac
Moving to the main part — ”install Homebrew Mac” — we should explain that the installation method we describe uses curl to download the installation script. This method is the easiest and it’s recommended by the Homebrew team. The same applies to the process of uninstalling Homebrew. Since some people don’t want to use curl for security reasons, there are ways to manually download and execute the script (but we won’t go into that here).
Before you dive into the process, make sure your macOS meets the following requirements:
- Apple Silicon or 64-bit CPU
- macOS 10.14 or later
- Bourne-compatible shell (bash or zsh syntax)
- Xcode’s command line tools (we explain how to install the tools in the following section).
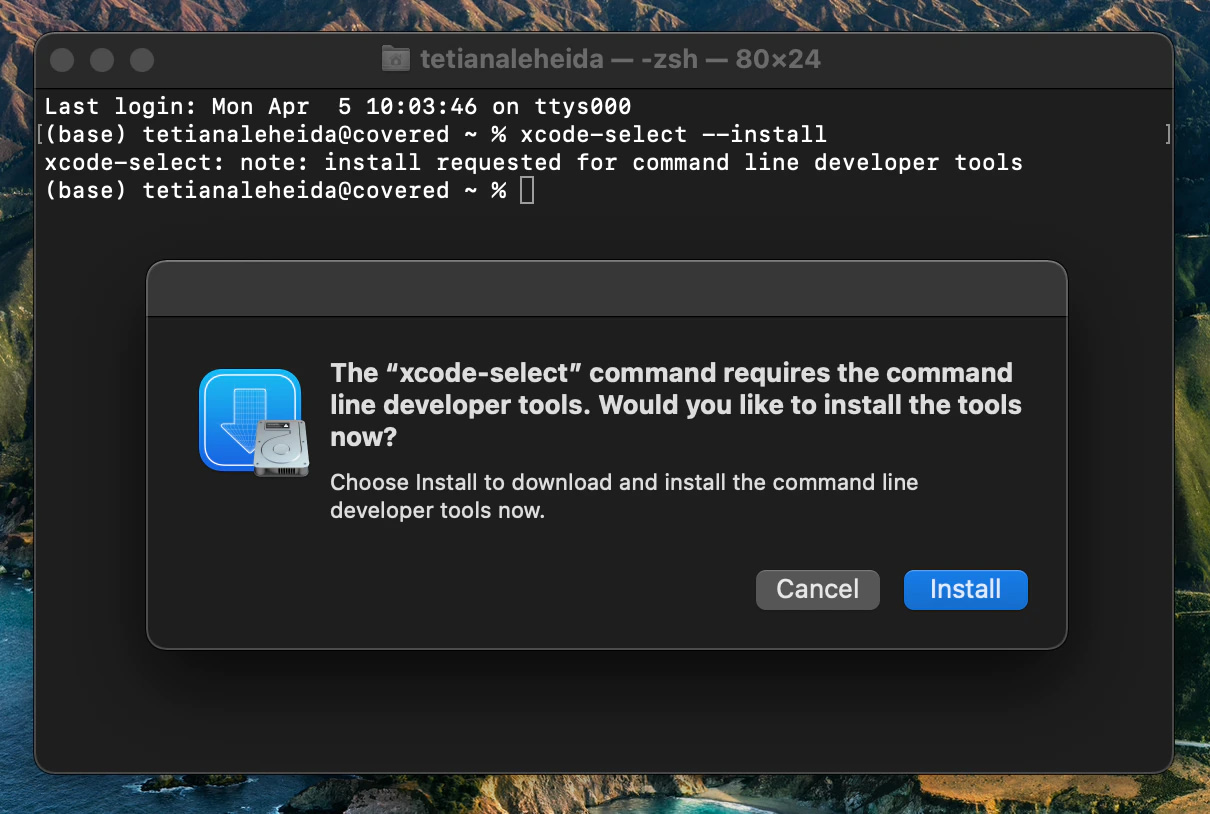
Step 1: Install command line tools for Xcode
Xcode is Apple’s native IDE, an integrated development environment that has all the tools you need for software development on Mac. To install some of the Homebrew package components, you need to install Xcode’s command line tools first (in case you haven’t done it before).
Here’s how to install command line tools for Xcode:
-
Open Terminal and type the following command: xcode-select –install
-
In the new dialog window, confirm you want to install the Xcode tools
-
Agree to a license agreement and wait for the installation process to complete. It might take a while.
Step 2: Install Homebrew on Mac
Now your Mac is ready for Homebrew. Here’s the full installation process:
-
Open Terminal and type the following command:
-
Type your admin password (note that you won’t see your keystrokes in the Terminal window — it’s a security measure) > hit Return
-
Wait a few minutes until you see the “Installation successful” message in Terminal.

/bin/bash -c "$(curl -fsSL https://raw.githubusercontent.com/Homebrew/install/HEAD/install.sh)"

Step 3: Set up Homebrew
In Terminal, run brew help to get started. You’ll see examples of commands that will help you install different software, configs, and updates through Homebrew. For example, to install a package, you should type brew install ‘package name’ in Terminal. There are also a few useful troubleshooting commands you should take note of, such as brew doctor that can detect installation issues.

Step 4: Update Mac Homebrew
Anything you install via Homebrew needs to be updated regularly. You should also update the package manager occasionally to make sure it works properly and you’re not missing some important new features:
- To update Homebrew, run brew update in Terminal
- To find out what packages need updating, run brew outdated in Terminal
- To update a specific package, run brew update package name in Terminal.
If you’re new to Homebrew, follow Homebrew’s Community Discussion — you’ll find lots of insights and troubleshooting tips from other Mac users in there.
Bonus: More tools like Homebrew
Homebrew is a step forward in your workflow. But you can take a few more steps with Setapp! Gitfox and DevUtils are two stellar apps that will help developers and anyone working with Git save a few hours every week.
If you use Homebrew to connect to repositories, you’ll love Gitfox. Not only is it a better alternative to Homebrew’s hub command, Gitfox makes the whole process of working with Git smarter. You can use this app to improve the quality of your code and commit faster.
DevUtils gives you access to a huge set of dev tools. It’s hard to describe what exactly this app does because the options are endless. From formatting JSON to debugging a JWT token, you can do all that locally on your Mac, without internet connection.

How to uninstall Homebrew from Mac
If you haven’t found much value in the Homebrew Mac tools, you can easily uninstall the package manager through Terminal. Here’s the command you should run:
/bin/bash -c "$(curl -fsSL https://raw.githubusercontent.com/Homebrew/install/HEAD/uninstall.sh)"
You’ll be warned about all the Homebrew files that will be deleted from your Mac.

How to uninstall Homebrew packages from Mac
If you don’t want to get rid of the package manager itself — but rather remove specific packages — you can do that. Here are the detailed instructions:
- Make sure there are no dependencies between the package you want to delete and the ones that are in use by running the following command: brew deps package name
- If you’ve found dependencies and decide to ignore them, type the following: brew uninstall –ignore-dependencies package name
- To uninstall the package, run the command brew uninstall package name.
Brew List
Keeping my installs down to a minimum this time:
❯ brew list
==> Formulae
gettext git openssl@1.1 pcre2
==> Casks
macfuse
~ ❯
Came back to installing homebrew – when I noticed that git was at v2.24.3 (20-Apr-2020 ) while the latest was 2.32.1 – and the steps to updating it seemed – long and tedious – same with python and a lot of other applications. So back to homebrew –
Last pre-homebrew backup – just in case –
Sunday July 11 – at 10:09 – on the NAS

https://stackoverflow.com/questions/15124205/using-git-to-update-itself
"Updating git with git" means updating the git repo sources with a git pull, once you have cloned https://github.com/git/git.
You would still need to build git from said sources, and install it before seeing a difference in the git --version command.
See the "INSTALL" file:
$ make prefix=/usr/local all doc info ;# as yourself
# make prefix=/usr/local install install-doc install-html install-info ;# as root
Since you are installing that updated git in /usr/local/bin, make sure that path comes first in your own $PATH environment variable (that you can set in your .profile)
==> This script will install:
/usr/local/bin/brew
/usr/local/share/doc/homebrew
/usr/local/share/man/man1/brew.1
/usr/local/share/zsh/site-functions/_brew
/usr/local/etc/bash_completion.d/brew
/usr/local/Homebrew
==> The following existing directories will be made group writable:
/usr/local/include
/usr/local/lib
/usr/local/lib/pkgconfig
/usr/local/share/man/man3
/usr/local/share/man/man7
==> The following existing directories will have their owner set to spiffy:
/usr/local/include
/usr/local/lib
/usr/local/lib/pkgconfig
/usr/local/share/man/man3
/usr/local/share/man/man7
==> The following existing directories will have their group set to admin:
/usr/local/include
/usr/local/lib
/usr/local/lib/pkgconfig
==> The following new directories will be created:
/usr/local/sbin
/usr/local/var
/usr/local/opt
/usr/local/var/homebrew
/usr/local/var/homebrew/linked
/usr/local/Cellar
/usr/local/Caskroom
/usr/local/Frameworks
Press RETURN to continue or any other key to abort
first thing lots of errors around open ssl
Unexpected header files:
/usr/local/include/openssl/aes.h
Unexpected dylibs:
/usr/local/lib/libcrypto.1.1.dylib
Unexpected '.pc' files:
/usr/local/lib/pkgconfig/libcrypto.pc
looking around – it sounds like re-installing openssl with homebrew will fix
just came across the same problem and felt a bit uncomfortable to manually link things around.
I was able to solve the problem by simply
-
Installing openssl via homebrew:
brew install openssl -
Pointing towards the dynamic libraries from openssl via DYLD_LIBRARY_PATH:
export DYLD_LIBRARY_PATH=/usr/local/opt/openssl/lib:$DYLD_LIBRARY_PATH
I've just added that line to my .zshrc.
Edit: According to this question, the usage of DYLD_FALLBACK_LIBRARY_PATH might be preferable over DYLD_LIBRARY_PATH.
Edit 2: As mentioned in a comment below, this should probably be the accepted answer. Simply reinstall the cryptography package.
OPEN SSL INFO
A CA file has been bootstrapped using certificates from the system
keychain. To add additional certificates, place .pem files in
/usr/local/etc/openssl@1.1/certs
and run
/usr/local/opt/openssl@1.1/bin/c_rehash
openssl@1.1 is keg-only, which means it was not symlinked into /usr/local,
because macOS provides LibreSSL.
If you need to have openssl@1.1 first in your PATH, run:
echo 'export PATH="/usr/local/opt/openssl@1.1/bin:$PATH"' >> ~/.zshrc
For compilers to find openssl@1.1 you may need to set:
export LDFLAGS="-L/usr/local/opt/openssl@1.1/lib"
export CPPFLAGS="-I/usr/local/opt/openssl@1.1/include"
broken symlinks – Warning: Broken symlinks were found. Remove them with brew cleanup:
will run brew cleanup
MACFUSE and SSHSF
those were the 2 apps that had added files – I uninstalled then reinstalled MACFUSE with homebrew –
homebrew could not install sshsf – so I downloaded it manually installed it – all ok
Paths – difference between what Apple installs and your versions
If, when you run "git –version", you see a message like "git version 1.9.3 (Apple Git-50)" you have a version of Git from Apple. The version in this example is 1.9.3, while 2.2.1 is the current latest release. We want to use the latest release, so let's check to see if we also have an official version installed that just isn't getting priority over the version from Apple.
Checking for an existing Git installation
Run "ls /usr/local" and look through that list to find git.
If you don't see git in that list, you most likely don't have it installed and should stop watching this video, and instead, watch Updating Git if You Have Only the Version That Comes with Xcode or the Command Line Developer Tools.
If you do see git in this list, like I do here, you should continue watching this video.
Giving the official version priority over the one from Apple
So, I've confirmed that I have an official version of Git installed on my system but, when I try to run "git –version" it still says I'm using "git version 1.9.3 (Apple Git-50)". This is simply because the path "/usr/local/git/bin" comes after the path used by the apple version of Git in my PATH variable. So, I just need to update my PATH variable and make sure that the path to the official version comes before the path to the version installed by Apple.
You can see what the PATH includes by typing "echo $PATH" and pressing Enter. When I do that, you'll notice that "/usr/local/git/bin" is the last one in the list. I'll update it using VI. (If you're not familiar with VI, I'd encourage you to checkout the "Command Line Basics" series on this site to get familiar with it.)
echo $PATH
/Users/spiffy/.local/bin:/Users/spiffy/Library/Python/3.8/bin:/Users/spiffy/.local/bin:/Users/spiffy/Library/Python/3.8/bin:/Users/spiffy/.nvm/versions/node/v14.17.3/bin:/usr/local/bin:/usr/bin:/bin:/usr/sbin:/sbin:/usr/local/go/bin:/Library/Apple/usr/bin
Before I proceed, I want to mention that what we're going to do could be harmful to your machine if done improperly. We'll be using "sudo", (which stands for super user do) which allows you to perform actions that standard users are not allowed to, in order to protect them from accidentally messing up their systems. If you follow these steps precisely, you won't be at risk, but please do not start using "sudo", or editing system files if you're not exactly sure what you are doing.
Okay, with that disclaimer out of the way, let's continue.
- I'll type "sudo vi /etc/paths"
When you do this for the first time, you'll get this message:
WARNING: Improper use of the sudo command could lead to data loss
or the deletion of important system files. Please double-check your
typing when using sudo. Type "man sudo" for more information.To proceed, enter your password, or type Ctrl-C to abort.
- I do want to proceed, so I'll enter my password, and press Enter
- Press "i" to enter "Insert" mode
- Type "/usr/local/git/bin" and press Enter to move the original first line to the second line
- Press esc (The escape key)
- Type ":wq"
- Press Enter
At this point, if you have any terminal sessions open, you'll need to close them and reopen them in order to pickup the new PATH. I'll go ahead and just quit iTerm and re-open it to get a fresh start. Now, we can check our PATH variable by typing "echo $PATH" and pressing Enter. When we do that, we'll see "/usr/local/git/bin" at the beginning of the list.
Now, when we type "git –version", we see the message "git version 2.0.1". So, the official release is taking precedence over the version from Apple, but the latest release is 2.2.1, so now, I need to update Git to the latest release.
I found this related post to be very helpful. Instead of changing the $PATH variable, it just has you simply edit your /etc/paths file.
Homebrew wants me to amend my PATH; no clue how
As soon as I followed the directions and put /usr/local/bin above /usr/bin, my issues were resolved.
- On OS X, open Terminal
- Type the command:
sudo vi /etc/paths - Enter your password if you're asked for it
- You will see a list of paths. Edit them so that
/usr/local/binpath is entered above the/usr/binpath - *Save and quit
- Restart Terminal
Here's what mine looks like after I did that:
/usr/local/bin
/usr/bin
/bin
/usr/sbin
/sbin
*To save and quit type a colon (:), then type wq (to write and quit at the same time), followed by Enter.
You can also open the /etc/paths file in a graphical text editor and edit it that way.
Credit to fengd over at Stack Overflow for his answer over there.
officially adding path
If you get -bash: git: command not found when you run git --version it means git is not installed or it is not on PATH.
-
Make sure git is installed.
- Git is usually installed at
/usr/local/git/ - Make sure there is a binary file where you installed git. If not, install git.
- Git is usually installed at
-
If git is installed, then it is mostly likely not on PATH
-
Find the path where you installed it and do something like this to add it to the path and set in your profile:
echo 'export PATH=/usr/local/git/bin:$PATH' >> ~/.profile -
Then make sure you restart terminal before trying to run any git commands
-
I installed git from a package manually –
removed it – then reinstalled with homebrew – all ok now
Upgrading pip and python
pip list –outdated
Package Version Latest Type
pip 21.1.2 21.1.3 wheel
setuptools 41.2.0 57.1.0 wheel
six 1.15.0 1.16.0 wheel
wheel 0.33.1 0.36.2 wheel
yq 2.12.0 2.12.2 wheel
WARNING: You are using pip version 21.1.2; however, version 21.1.3 is available.
You should consider upgrading via the '/Library/Developer/CommandLineTools/usr/bin/python3 -m pip install –upgrade pip' command.
❯ /Library/Developer/CommandLineTools/usr/bin/python3 -m pip install –upgrade pip
Defaulting to user installation because normal site-packages is not writeable
Requirement already satisfied: pip in /Users/spiffy/Library/Python/3.8/lib/python/site-packages (21.1.2)
Collecting pip
Downloading pip-21.1.3-py3-none-any.whl (1.5 MB)
|████████████████████████████████| 1.5 MB 5.0 MB/s
Installing collected packages: pip
Attempting uninstall: pip
Found existing installation: pip 21.1.2
Uninstalling pip-21.1.2:
Successfully uninstalled pip-21.1.2
Successfully installed pip-21.1.3
/usr/bin ❯ pip list –outdated
[GCC 4.2.1 (Apple Inc. build 5646)] is the version of GCC that the Python(s) were built with, not the version of Python itself. That information should be on the previous line. For example:
# Apple-supplied Python 2.6 in OS X 10.6
$ /usr/bin/python
Python 2.6.1 (r261:67515, Jun 24 2010, 21:47:49)
[GCC 4.2.1 (Apple Inc. build 5646)] on darwin
Type "help", "copyright", "credits" or "license" for more information.
>>>

# python.org Python 2.7.2 (also built with newer gcc)
$ /usr/local/bin/python
Python 2.7.2 (v2.7.2:8527427914a2, Jun 11 2011, 15:22:34)
[GCC 4.2.1 (Apple Inc. build 5666) (dot 3)] on darwin
Type "help", "copyright", "credits" or "license" for more information.
>>>
Items in /usr/bin should always be or link to files supplied by Apple in OS X, unless someone has been ill-advisedly changing things there. To see exactly where the /usr/local/bin/python is linked to:
$ ls -l /usr/local/bin/python
lrwxr-xr-x  1 root  wheel  68 Jul  5 10:05 /usr/local/bin/python@ -> ../../../Library/Frameworks/Python.framework/Versions/2.7/bin/python
In this case, that is typical for a python.org installed Python instance or it could be one built from source.
Updating the official version of Git
- Download the latest version of Git for Mac.
- Open the Disk image
Before we begin the installation process, I'll open up the README.txt file that comes with the disk image. I'll walk you through these steps now, but it's a good idea for you to open this up and read through it yourself in case there's an update in the future.
Uninstalling the current version of Git
According to the README.txt file, to upgrade your version of Git, you should first uninstall the old version using the uninstall.sh script included in the download. I'll do that now.
- I'll simply drag the "uninstall.sh" file from the disk image onto my terminal window. (This loads the path to the script in the terminal.)
- Then, switch to the terminal and press Enter
- When asked if I'm sure I want to uninstall, I'll type "yes" and press Enter
- Then, enter my password and press Enter one last time
Now, the old version of git is uninstalled and we can verify it by typing "ls /usr/local". Since it's uninstalled, we don't see it in the list here.
Now we can install the version we just downloaded.
Installing the latest release of Git
- Double click the ".pkg" installer file
- If presented a pop up saying that cannot be installed because it is from an unidentified developer, you can override this security feature for this application only.
* Click OK
* Right-click (or hold the control key and click) on the ".pkg" file and select "Open"
* Now, select Open - Click "Continue" to begin the installation process
- Then, click install
- You may be asked for your administrator password. Type it in and click "Install Software".
- Once the installation is complete, click "Close".
- The next step in the README.txt file is to restart bash sessions. I'll simply quit iTerm, and re-open it. If you have any terminal windows, GNU Screens or TMUX sessions open, you'll need to restart those, or run "source /etc/profile" in each of them.
The final step is optional, and allows non-terminal applications to see Git. There's no harm in running it, and you may find it useful in the future, so I'm going to go ahead and run the script.
- Switch back to Finder, and drag the "setup git PATH for non-terminal programs.sh" file into your terminal window. (This loads the path to the script in the terminal.)
- Press Enter
- Finally, you need to logout of your Mac OSX user account and log back in. (A restart would also work.)
Now, when I open up iTerm type "git –version", we see the message "git version 2.2.1". So, we're ready to go!
An introduction to the popular package manager
Homebrew is a great package manager. Originally created for macOS, it now runs on Linux and the Windows Subsystem for Linux, too.
Using it, you can install almost any CLI application you can think of, and even full GUI apps.
How do you install Homebrew?
On macOS, the command to install Homebrew is:
/usr/bin/ruby -e "$(curl -fsSL https://raw.githubusercontent.com/Homebrew/install/master/install)"
On Linux/Windows, see the instructions on the official website.
After the above command executes, you’ll have the brew command available in the terminal:

See? We have a list of sub-commands we can use: brew install, brew upgrade, brew uninstall, and more.
Installing applications
Use the brew install command to install an application:
brew install <packagename>
For example, to install mysql, run:
brew install mysql
The command has a lot of options available, and you can check them out

You might never need any of those options – I very rarely use anything else than the default brew install <package>.
Sometimes packages (like the mysql package I used in the example above) will install, but they will require some additional steps before you can run them.
If this is the case, those are typically highlighted to you at the end of the installation process. Make sure you read everything Homebrew prints to the console, to avoid headaches later.
Where are packages installed?
Packages installed using Homebrew are all installed in a specific folder.
Typically it’s /usr/local/Cellar.
If you don’t find this folder, run brew --prefix to find the correct folder prefix. On my system, this command returned /usr/local, the place where the Cellar folder can be found.
In there, you’ll find the list of the packages you installed, each into its own folder:

Updating a package
A single package can be upgraded using
brew upgrade <packagename>
Updating Homebrew
Homebrew itself needs to be updated from time to time. It will sometimes automatically updated when you run commands, but you can manually tell it to update by running
brew update

Removing a package
It’s very easy to install a new package. It’s also very easy to uninstall it.
Run:
brew uninstall <packagename>
Doing so, Homebrew will completely remove the package from the system.
Installing GUI apps
One cool thing that Homebrew can do, in addition to installing CLI (command line) apps is the ability to install GUI apps.
Using:
brew cask <appname>
You can install a GUI apps that you’d traditionally need to find the website, download the package, move to /Applications.. now it’s a single command.
For example:
brew cask firefox
You can find a list of all the apps you can install using this method on https://github.com/Homebrew/homebrew-cask/blob/master/Casks and you can search for a particular package using
brew search <name>
like this:
brew search google-chrome
