https://rj-graffix.com/downloads/plugins/
1,000 free trial uses, no fixed trial period. $10
AxoTools

AxoTools provides the tools for technical illustrators to define an axonometric view (isometric, dimetric, or trimetric) and project flat orthographic art to the left, right, or top planes of that view.
Define common reference points in each view so that projected art appears in place in the axonometric view. This saves much time and guesswork when doing drawings where objects aren’t rectangular and don’t conveniently meet at the corners.
When a reference point is moved in one view, its counterparts in other views are automatically adjusted as well so that the spatial relationship between the views is preserved.
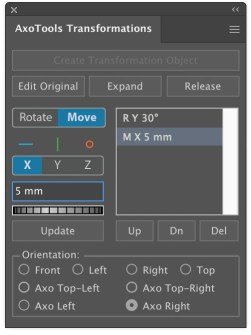
NEW in free update: With the new Transformations panel, you can rotate artwork at any angle along any axis, move it at fixed distances, then project it to your axonometric view where items will appear correctly projected and placed into your illustration.
AxoTools orients your art to match whatever view you need. Illustrations with components that tilt, turn, swivel, and spin are now easier than ever. No more guesstimating to scale and place objects!
The plugin includes five tools:
Axo Tool defines and moves reference points also moves selected art or individual anchor points constrained to the nearest axis.
Axo Rotate tool allows you to rotate an object within the axonometric plane it’s in. The tool displays a protractor for that plane, and allows you to press Shift to constrain the rotation to increments of 15 degrees.
Axo Scale tool can scale an object along the X, Y, or Z axis.
Menu items add the following functions:
- Project or unproject views with keyboard shortcuts.
- Navigate between each view with keyboard shortcuts.
- FREE Paste cube or cylinder clipart into your illustration, oriented to the current axonometric view with options for the drawing style.
Axo Line tool draws lines constrained to the current axes, automatically concatenating them as you go. Use multiple line weights. This feature is FREE, no license required to use the Axo Line tool.
###
Axo Extrude tool extrudes paths along an axis by dragging, or numerically within a panel.

Extrudes along any of the three axes with options for how the art is drawn.
- Wireframe
- Filled with white
- Filled with the existing art color
- Shaded with the existing art color
- Optional preset line weights
How does "Project in place" work?
Requires Adobe Illustrator CS6 or later for Mac or Windows. Notarized for macOS 10.15 Catalina with Illustrator 2019 through 2021. 500 free trial uses, no fixed trial period. $30 (volume licenses also available)
Note: The Axo Line tool and Primitives menu item will continue to work for FREE without a license (paid portions will be disabled when the trial has expired).
Concatenate
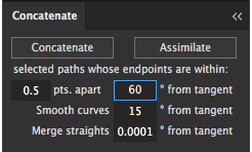

This plugin for Adobe Illustrator connects two or more selected paths into one continuous path. You choose how close the endpoints must be to combine the paths, how many degrees from tangent the endpoints must be, and how close to tangent joined curves must be to be smoothed into a continuous curve. The plugin also includes Assimilate, which will search out unselected paths that are within the distance and angle you specify, and concatenate them to a selected path.
Concatenate tutorial video
Requires Adobe Illustrator CS6 or later for Mac or Windows. Notarized for macOS 10.15 Catalina with Illustrator 2019 through 2021. 200 free trial uses, no fixed trial period. $20 (volume licenses also available)
Download Concatenate
- Cleanup Tool plugin
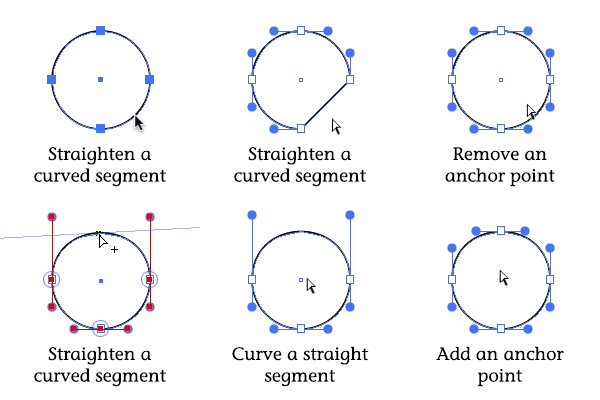
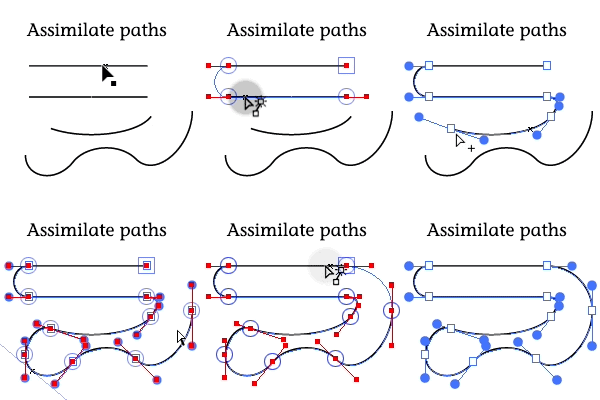
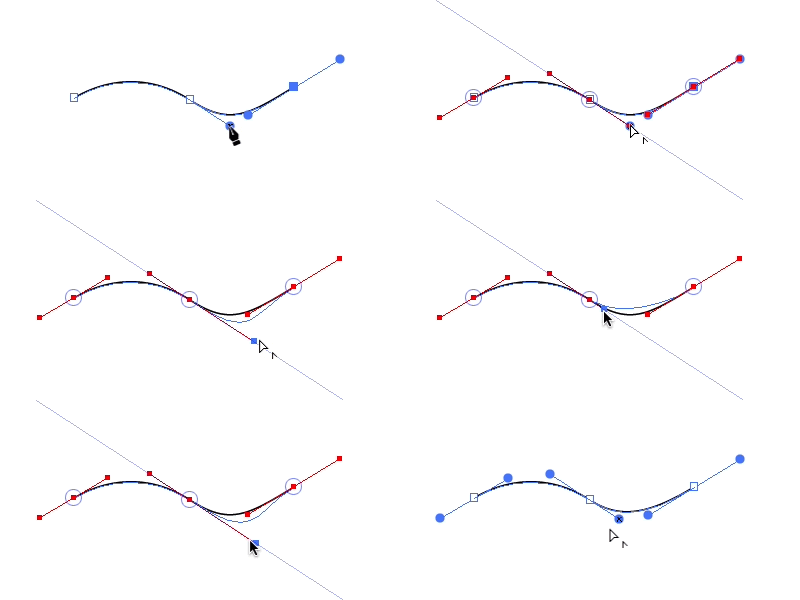
Quickly clean up vector art to create smooth transitions from one segment to another. With only a click, make a segment straight or curved, blending seamlessly into the adjacent segments. Adjust the control handles of Bezier curves, keeping them tangent to their smooth anchor points. Drag a path to another to assimilate them with a smooth connecting segment. Drag a selected anchor point to move it, constrained to the path’s tangent angle, even if it’s under other art objects. And much ore!
Requires Adobe Illustrator CS6 or later for Mac or Windows. Notarized for macOS 10.15 Catalina with Illustrator 2019through 2021. 500 free trial uses, no fixed trial period. $10 (volume licenses also available)https://rj-graffix.com/product/cleanup-tool/)
Nudge Panel plugin


Nudge Panel is a plugin for Adobe Illustrator that allows you to adjust the position of an art object, patterned fill within an object or dash pattern along a path. Clicking the arrow buttons will move the dash or pattern by one point. Holding down combinations of modifier keys will make the distance moved longer or shorter. Click the “Untransform” button to reset a dash or pattern to its default setting, also removing any transformations such as scaling, rotating, etc., that may have been done earlier.
Requires Adobe Illustrator CS6 or later for Mac or Windows. Notarized for macOS 10.15 Catalina with Illustrator 2019 through 2021. 1,000 free trial uses, no fixed trial period. $15 (volume licenses also available)
Square Up plugin
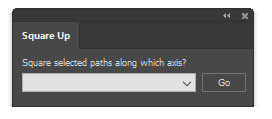

This plugin will convert a selected path’s anchor points to corner points, and adjust the path segments so that lines within 20 degrees of perpendicular will be made square to each other. Use keyboard shortcuts to make quick work of an otherwise tedious task when cleaning up technical drawings, schematics, and diagrams.
Paths can be squared in several ways:
- Vertical and horizontal.
- Along the current constrain angle.
- Along the dominant axis within the selection.
- All control handles retracted into the anchor points for straight lines with corner points.
Requires Adobe Illustrator CS6 or later for Mac or Windows. Notarized for macOS 10.15 Catalina with Illustrator 2019 through 2021.
1,000 free trial uses, no fixed trial period. $10
(volume licenses available)https://rj-graffix.com/product/square-up-plugin/)
 Cutting Tools
This plugin adds four tools to the tool panel:
![]() Hatchet tool: Click to use like the Scissors tool, except that it will cut through all paths at that point, not just the top path. This makes it perfect for cutting two lines where they cross. Hold down the Option key to cut through only selected paths. After cutting, you can drag the tool over the unwanted paths to delete them.
Hatchet tool: Click to use like the Scissors tool, except that it will cut through all paths at that point, not just the top path. This makes it perfect for cutting two lines where they cross. Hold down the Option key to cut through only selected paths. After cutting, you can drag the tool over the unwanted paths to delete them.
Trimmer tool: (NEW) Click to trim a path where it intersects with other paths, or between and endpoint and an intersection. Click and drag to delete multiple path sections.
![]() Table Saw tool: Click and drag to create a straight line. When you release the mouse button, the Saber Saw will do a fence cut through all paths that cross the one you drew.
Table Saw tool: Click and drag to create a straight line. When you release the mouse button, the Saber Saw will do a fence cut through all paths that cross the one you drew.
![]() Saber Saw tool: Drag the tool to draw a free-form line. When you release the mouse button, the Saber Saw will do a fence cut through all paths that cross the one you drew.
Saber Saw tool: Drag the tool to draw a free-form line. When you release the mouse button, the Saber Saw will do a fence cut through all paths that cross the one you drew.
![]() Vector Vac tool: Either click on paths or drag through them to delete.
Vector Vac tool: Either click on paths or drag through them to delete.
For Adobe Illustrator CS6 or later for Mac or Windows. Notarized for macOS 10.15 Catalina with Illustrator 2019 through 2021. 1,000 free trial uses, no fixed trial period. $10 (volume licenses available)
https://rj-graffix.com/product/cutting-tools-plugin/)
ToolShed
ToolShed is a collection of utility functions accessed through menus in Adobe Illustrator.
- Stabilized Pencil tool adds a “leash” to a pencil tool to smooth its travels similar to Photoshop’s smoothed brushes. Create corners where you want them and draw smooth broad strokes with ease. Choose your leader length and path smoothing settings.
- Offset Open Paths offsets an open or closed path; open paths offset as open, not closed! Use a dialog or tool to offset one or many copies on one or both sides of the target path.

- Tangent Arc tool draws circular arcs that are tangent to another path or smoothly continues a path at the angle of its endpoint. The extent of the arc can be very small or nearly a full circle. Press the Alt/Option key to draw a tangent straight line, or press Shift to constrain its angle to increments of 15 degrees.
- Transform tool that differs from Adobe’s in that it will not skew your art and lets you choose an anchor point for scaling and rotating.
- Stacking order (NEW) lets you change the order of objects based on their position. Options include center, left, right, top, and bottom, ascending or descending. Another option lets you change the stacking order by the size/area of the object.
- Latitude Lines creates a series of parallel lines distributed as though they were evenly spaced and wrapped around a cylinder, with live preview.
- Create a Radiant, or a group of lines fanning out like a pie chart at equidistant angles, with live preview.
- Unscale art will figure the inverse of a scaling factor to restore objects to their original size (or at least very, very close).
- Scale to Proportion scales art relative to two given values.
- Scale Stroke Weight will scale the line thickness of selected paths without scaling the art itself.
- Transform tool allows you to scale and rotate art without accidentally skewing. Rotate just the bounding box in order to stretch the art along any angle you choose.
- Minimum Stroke Weight will find all paths with a stroke thinner than your minimum and set the width accordingly.
- Fade will lighten or darken the stroke and/or fill of a path object by a given percentage.
Free features (These features work without licensing, even after the trial period has expired):
- Unscale
- Scale to Proportion
- Scale Stroke Weight
- Minimum Stroke Weight
ToolShed requires Adobe Illustrator version CS6 or later on Mac or Windows. Notarized for macOS 10.15 Catalina with Illustrator 2019 through 2021. 1,000 free trial uses that don’t expire in time. $15 (volume licenses available)
https://rj-graffix.com/product/toolshed/)
TextSync
With the TextSync plugin, you can export text objects, either point text or area text, to a tab-delimited text file that can be opened in a word processor or spreadsheet for editing outside of Adobe Illustrator. If each text object contains, say, a bold head, italic subhead, and description, your spreadsheet would show each callout as a row with a new column wherever the text formatting changes.
When the text is imported back into the Illustrator document, the plugin first locates the original text object and flows the new text in, preserving the original character formatting.
If there is no corresponding text object, each line item becomes a new point text object in the visible document view.
TextSync requires Adobe Illustrator version CS6 through CC or 2021 on Mac or Windows. Notarized for macOS 10.15 Catalina with Illustrator 2019 and 2021 — not available for Illustrator 2020 due to unresolved bug. 100 free trial uses, no fixed trial period. $10 (volume licenses available)https://rj-graffix.com/product/textsync-plugin/)
IsoTool
(Formerly Isometric Line Tool, now replaced by AxoTools)
Easily draw straight paths at isometric angles, or at axonometric angles for a projection you specify by double-clicking the tool icon.
Also includes an axonometric mover tool to easily move selected art along any axis.

If you use Hot Door’s awesome CADtools plugin, you can define your axonometric settings there and IsoTool will adjust accordingly.
IsoTool is free for Illustrator CS6 through CC on Mac or Windows.
SELECT MENU
Select Menu for Adobe Illustrator CS6 through 2020 adds items to the Select->Object menu. Illustrator CC added Point Text Objects and Area Text Objects, so Select Menu adds them for CS6 users as well. In addition, it adds the following items:
- Legacy Text Objects
- Path Text Objects
- Guides
- Paths
- Open Paths
- Closed Paths
- Filled Paths
- Unfilled Paths
- Stroked Paths
- Unstroked Paths
- Dashed Paths
- Undashed Paths
- Compound Paths
- Styled Art
- Unstyled Art
- Opaque Art
- Transparent Art
- Symbols
- Groups
- Live Objects
- Gradient Meshes
- Raster Art
- Placed Art
- Graphs
- Plugin Art

For Adobe Illustrator CS6 and above, Mac or Windows. Notarized for macOS 10.15 Catalina with Illustrator 2019 through 2021.
FREE!
https://rj-graffix.com/software/plugins/win/SelectMenu16-25×32.zip)
Productivity Pack
Set of all paid utility plugins for Illustrator
- Cleanup Tool
- Concatenate
- Cutting Tools
- Nudge
- Square Up
- ToolShed
- TextSync
(Does not include AxoTools)
Save over purchasing individual licenses. One license enables all Illustrator plugins listed here.
$40 (volume licenses available)
Save $50 or more over purchasing all plugins individually!
More information • Purchase license
Some CS3-CS5 legacy plugins are still available. More information on the Support page.
AxoTools
version 16.2
©2021 Rick Johnson/Graffix and Ronald Kempke
support@rj-graffix.com http://rj-graffix.com
This plugin for Adobe Illustrator CS6 – 2021 adds tools to assist in making axonometric drawings.
Please see the online documentation at https://rj-graffix.com/ documentation/axotools-docs/.
Installation:
To install the plugin, just drop it into Adobe Illustrator's “Plug-ins” folder. It doesn’t matter if you put it in a subfolder you create (just to keep things tidy) or at the top level of the Plug-ins folder.
The correct path to the main plugins folder under Windows (64-bit) is: Windows (C:)\Program Files\Adobe\Adobe Illustrator[ version]\Plug- ins
The Windows 32-bit path just adds the “(x86)” like this:
Windows (C:)\Program Files (x86)\Adobe\Adobe Illustrator [version] \Plug-ins
On a Mac, the path to the plugin folder is: /Applications/Adobe Illustrator [version]/Plug-ins
For more support information, please visit http://rj-graffix.com/support/
CleanupTool
version 16
©2013-2021 Rick Johnson/Graffix
support@rj-graffix.com http://rj-graffix.com
CleanupTool is a plug-in for Adobe Illustrator CS6 – 2021 that fine-tunes paths in several ways:
Click:
– on an endpoint or intermediate anchor point to delete it – on a control point does nothing
– on a path segment to add an anchor point
Shift click:
– on an endpoint or intermediate anchor point to make it a corner point and collapse its handles
– on a control point to make its anchor a corner point (no change in the location of the control points)
– on a path segment to make the adjoining anchor points corner points and collapse the control handles for that segment
Option click:
– on an endpoint to extend its control handle
– on an intermediate anchor point to make it a smooth point and rotate the control handles to become tangent
– on a control point to rotate it to become tangent to the adjacent segment's control handle
– on a path segment to make its anchor points smooth, extend the control
handles, and rotate the handles to become
tangent to adjacent beziers
Shift-Option click:
– on an endpoint does nothing
– on an intermediate anchor point toggles it between a corner and smooth point
– on a control point toggles its anchor point between a corner and smooth point
– on a path segment does nothing
So, essentially, clicking adds/deletes points, shift clicks make things angular, option clicks make things smooth, and shift-option toggles them.
When the tool’s cursor is over a selected path, its control handles will be highlighted even if Illustrator currently doesn’t display them, and anchor points will be marked with a square for corner points or a circle for smooth points.
⁃ Dragging a control handle adjusts it, constrained to its original angle.
-
⁃ Dragging an anchor point will move it, even if it’s under other art objects.
-
⁃ By default, anchor point dragging will be constrained to the initial trajectory of the next bezier segment. Pressing Alt/Option will change the constraint to the exit trajectory of the previous segment (for smooth anchor points, these angles will be the same). After you’ve started dragging, you may press Control/Command to move the anchor point freely.
-
⁃ Shift-drag a control point or anchor point to constrain its movement to each increment of 45 degrees.
-
⁃ Drag a segment to find another path to assimilate. A smoothed segment will be added connecting the two paths.
Double-click the tool’s icon to show its Preferences dialog, or select “Cleanup Tool…” from the Preferences menu. Here you can select whether to show help text near the cursor and whether to show enhanced path
highlighting.
Concatenate
version 16.1.5 for Adobe Illustrator CS6 – 2021 ©1997-2021 Rick Johnson/Graffix
support@rj-graffix.com http://rj-graffix.com
Concatenate is a plug-in for Adobe Illustrator that connects two or more paths into one continuous path. It's especially useful for cleaning up CAD drawings, exported from 3D applications, and EPS files that have been converted to Adobe Illustrator or, for example, filling state/country borders in Mountain High Maps or GIS data maps such as those from the USGS.
Square Up
version 16 for Adobe Illustrator CS6 – 2021 ©1998-2021 Rick Johnson/Graffix
support@rj-graffix.com http://rj-graffix.com
Square Up is a plug-in for Adobe Illustrator that takes selected paths with two or more anchor points and:
\1) Makes all points corner points.
\2) Checks the angles of adjacent segments.
\3) If they're within 20 degrees of perpendicular, it makes them perpendicular.
To use the filter, first choose one of the four options from the Square Up panel, available in the Window > Square Up menu.
-
Paths will be made square along the horizontal and vertical axis.
-
Paths will be made square along the current constrain angle, as
specified in your preferences.
-
Paths will be squared along the dominant axis within the selection.
Dominance is determined by the length and the number of lines at a
particular angle.
-
Control handles will be retracted into the anchor points. Anchor points
will not be moved.
Once you’ve chosen your Square Up method, select one or more paths that you'd like to make perpendicular, then select Paths > Square Up from the Objects menu or click the Go button on the Square Up panel.
Cutting Tools
version 16 for Adobe Illustrator CS6 – 2020 ©2001-2021 Rick Johnson/Graffix
support@rj-graffix.com http://rj-graffix.com
This plugin adds four tools to the tool panel in Adobe Illustrator.
• Hatchet tool: Click to use like the Scissors tool, except that it will cut through all paths at that point, not just the top path. This makes it perfect for cutting several lines where they cross. Hold down the Option key to cut through only selected paths. After cutting, you can drag the tool over the unwanted paths to delete them.
• Saber Saw tool: Drag the tool to draw a free-form line. When you release the mouse button, the Saber Saw will do a fence cut through all paths that cross the one you drew.
• Table Saw tool: Click and drag to create a straight line. When you release the mouse button, the Saber Saw will do a fence cut through all paths that cross the one you drew.
• Trim tool: Click or drag to delete path segments up to the end of the path or its intersection with another path. Note: closed paths and paths that cross over themselves may not recognize path intersections properly.
• Vector Vac tool: Either click on paths or drag through them to delete them. Note that the cursor will change to indicate when it's over a path or a point.
Menu item, Object > Path > Fence Cut: Select a path object, either open or closed, then select Fence Cut from the Object menu. All paths below the selected path will be cut where they intersect the selected “fence” path. In the plugin’s Preferences, you can choose whether the selected (Cut) path will be deleted, preserved, or cut.
ToolShed
version 16 for Adobe Illustrator CS6 – 2021 ©2021 Rick Johnson/Graffix
support@rj-graffix.com http://rj-graffix.com
ToolShed is a plug-in for Adobe Illustrator that adds an assortment of functions.
Transform tool is similar to Illustrator’s built-in Free Transform tool, but with a few differences.
-
Objects are always constrained so they never skew.
-
It uses the rotation of the topmost object’s bounding box.
-
The bounding box rotation can be changed by rotating the selection
with the shift key pressed.
-
When scaling from a corner, you’re unlikely to rotate the art by
mistake.
With the Transform tool active, your selection will appear with a bounding box, similar to Adobe’s Free Transform tool, rotated to the current rotation of the topmost object.
-
Drag outside of the bounding box to rotate the object.
-
Shift-drag outside of the art to constrain its rotation to increments of
45 degrees.
-
Drag inside of the bounding box to move the art.
-
Shift-drag inside of the bounding box to constrain its movement to
increments of 45 degrees.
-
Drag a handle to resize the art, anchored at the opposite handle.
-
Option/Alt drag a handle to resize the art, anchored at the displayed
anchor point.
-
Option/Alt click to set a new anchor point for scaling and rotating the
art.
-
Click inside the bounding box to reset the anchor point to the
bounding box’s center.
• Option/Alt drag outside of the bounding box to rotate the art’s
bounding box and change its accumulated rotation property. Guide lines will display to help position the new rotation angle.
Object > Transform > Get Bounding Box Rotation gets and displays the rotation of the bounding box for the topmost selected object.
Object > Transform > Set Bounding Box Rotation sets the rotation of the bounding box for the selected art to the value retrieved from Object > Transform > Get Bounding Box Rotation. It does not rotate the object, it simply redefine’s the object’s accumulated rotation property in order to display its bounding box relative to a different angle.
Stabilized Pencil tool creates smooth freeform paths by pulling a pencil point with a variable-length leash. A ring displays around the pencil point to indicate when there’s “slack” in the leash and the tool has a slight buffer when starting, so you’ll feel in control when starting or changing direction for corners. Double-click the tool’s icon to access the tool’s preferences where you can set the leader length, path simplification (directly corresponds to Object > Path > Simplify), or whether to display help text or onscreen annotations. Press the Option/Alt key when releasing the mouse to skip the automatic smoothing if you’d prefer a “high res” path or wish to use Astute Graphics’ excellent Smart Point Remove tool.
Object > Path > Offset Open Path creates offset paths that are open if your reference path is open, closed offsets if it’s closed. The dialog allows setting a number of additional offset paths, an option for mirroring paths offset to both sides of the reference path, delete the reference path, live preview, and fine tuning the offset distance with up/down arrow keys with Shift, Alt/Option, and Ctl/Cmd modifier keys, as well as the option to set custom stepping distances in your document’s ruler units.
Open Path Offset Tool drags offset copies of paths without the dialog. Use the Alt/Option key to mirror offset paths to the other side of your reference path and use up/down arrow keys to add intermediate paths. Press the Ctl/ Cmd key before releasing the mouse to delete the reference path. Help text annotations near the cursor can be toggled on and off in the tool preferences.
Tangent Arc Tool creates circular arcs that are tangent to the paths they’re dragged from. The distance and angle of the drag determine the radius of the arc and the extent of its curvature. Press Alt or Option to drag a tangent straight line. Press the Shift key to constrain rotations to increments of 15 degrees. Paths created end-to-end will be automatically concatenated into one continuous path. If you create an arc that’s not adjacent to another path, the default start angle is 0 (right), but you can define your own start angle; just click, and when you move the mouse a guide line will be drawn. Click and drag to finish the arc.
Stacking Order changes the order of objects in the artwork tree so that objects overlap each other based on their position. Select Object >Stacking Order**…** The Horizontal and Vertical options evaluate the horizontal position of the object’s center point. Top, Left, Bottom, and Right evaluate objects’ bounding box edge and stack them in ascending or
descending order.
Latitude Lines creates a series of parallel lines distributed as though they were evenly spaced and wrapped around a cylinder (or globe). Select Object > Create > Latitude Lines. The dialog will allow you to enter a number of divisions per hemisphere and tells how many degrees each division represents. Click “OK” and the grid will appear in the center of your screen. A live preview option is available, along with a checkbox to turn the art 90°. If an object is selected, the new art will be created at the selection’s size and location.
Create a Radiant, or a group of lines fanning out like a pie chart at equidistant angles. Go to Object > Create > Radiant. The dialog will allow you enter a number of divisions per circle and displays the number of degrees per division. A live preview option is available, along with a checkbox to turn the art 90°. The preview art can be moved to another area on the screen, then you can return to the dialog to adjust the number of divisions. Click Cancel or close the dialog to cancel the operation, or click OK or press Enter to commit to the new radiant art. If an object is selected, the new art will be created at the selection’s size and location.
Object > Transform > Unscale art. Say you’ve scaled a bunch of things and some of them shouldn’t have been scaled. To return them to their original size, you can select them and the plugin will figure the inverse of the scaling factor to restore them to their original size (or at least very, very close).
Object > Transform > Scale Proportionally scales art relative to two given values. Say you have a map and you know that the distance from one point to another. You can draw a line between those points, call this plugin, enter the distance the selection represent, the distance you’d like your scale of miles to be, and the selected line will be scaled accordingly. You could, of course, do this with the help of a calculator, but now you won’t have to.
Object > Path > Scale Stroke Weight will scale the line thickness of selected paths by the percentage you enter, without scaling the art itself.
Object > Path > Minimum Stroke Weight will find all paths with a stroke thinner than your minimum and set the width accordingly. Please note that if an object’s appearance includes more than one stroke, Minimum Stroke Weight and Scale Stroke Weight affect only the topmost stroke.
Object > Fade will lighten the fill and/or stroke of a path object (including gradients) to the percent given. Checking “Invert fade” will effectively undo a previous fade after an Undo operation is no longer possible.
——
FREE Functions: Object > Fade, Scale Stroke Weight, Minimum Stroke Weight, Object > Transform > Get Bounding Box Rotation, Object > Transform > Unscale, Object > Transform > Scale to Proportion, and Transform > Set Bounding Box Rotation can be considered FREE, as they will continue to work for free after the trial of the other functions is
over. ——
Preferences can be accessed by double-clicking one of the tool icons in the tool bar or from the menu:
Mac: Illustrator > Preferences > Graffix Plugins > ToolShed… Win: Edit > Preferences > Graffix Plugins > ToolShed…
The top half of the preferences is for the Offset Open Path tool and menu items. As with most Adobe dialogs, measurements can be increased or decreased by pressing the Up or Down arrow keys, and that value can be increased by pressing the Shift key as well. To make it easier to fine-tune your settings when previewing the offset, you can use smaller values by
pressing Alt/Option or Ctl/Cmd.
“Transform pattern/gradient fills” will tell the Transform tool to scale or rotate pattern or gradient fills.
“Preview art” works with the Radiant, Latitude Lines, and Offset Open Paths to preview your changes as you adjust values in the dialog.
“Show help text” sets whether to display text near the cursor showing tool options such as results of pressing Alt/Option or other modifier keys.
“Show annotations” sets whether to display guide lines, etc., when using the tools. It is highly recommended to keep this option checked.
Select Menu
version 16 for Adobe Illustrator CS6 – 2021 ©2001-2021 Rick Johnson/Graffix
support@rj-graffix.com http://rj-graffix.com
Select for Adobe Illustrator C6 adds items to the Select->Object menu. Illustrator CC added Point Text Objects and Area Text Objects, so Select Menu adds them for CS6 users as well. In addition, it adds the following 25 items:
- ▪ Legacy Text Objects
- ▪ Path Text Objects
- ▪ Guides
- ▪ Paths
- ▪ Open Paths
- ▪ Closed Paths
- ▪ Filled Paths
- ▪ Unfilled Paths
- ▪ Stroked Paths
- ▪ Unstroked Paths
- ▪ Dashed Paths
- ▪ Undashed Paths
- ▪ Compound Paths
- ▪ Styled Art
- ▪ Unstyled Art
- ▪ Opaque Art
- ▪ Transparent Art
- ▪ Symbols
- ▪ Groups
- ▪ Live Objects
- ▪ Gradient Meshes
- ▪ Raster Art
- ▪ Placed Art
- ▪ Graphs
- ▪ Plugin Art
While opening Illustrator’s Select > Object menu, press the Alt/Option key to have the plugin check the current document for instances of the corresponding object type and disable all item types not found. This can take several seconds in a complex document, so the menu’s default behavior is to enable all items.
Requires Adobe Illustrator version CS6 – 2020 on either Mac or Windows.
Nudge
version 16 for Adobe Illustrator CS6 – 2021 ©1998-2021 Rick Johnson/Graffix
support@rj-graffix.com http://rj-graffix.com
Nudge is a plugin for Adobe Illustrator that performs several functions:
• It fine-tunes the position of an art object (native art only, excluding graphs and some live or plugin objects)
• It fine-tunes the position of an object's pattern fill, either from buttons on a panel or a tool to drag to a new position
• "Slides" dash pattern forward or backward along a path (in the Path dialog, “Preserves exact dash and gap lengths” must be selected)
• Untransforms a dash pattern, fill pattern, or placed or embedded object
To use the Nudge filter, select Nudge from the Window menu. The palette can be docked just like other palettes, and its location will be saved next time you open Illustrator. Select the object(s) you wish to modify, then click on the arrow buttons to move the object, pattern fill, or dashed pattern by one point. Hold down the Command/Control key to move 1/2 point, the Option/Alt key to move 1/4 point, the Control (Mac only) key to move 1/8 point. Holding down combinations of these keys will divide the distance it moves even further. Hold down the Shift key to move 2 points, Shift- Command for 4 points, Shift-Option for 8 points, Shift-Control for 16 points, or combinations of Shift and the other modifier keys for larger increments.
You may also use the Nudge Tool in Illustrator’s toolbox to manually drag a pattern to a new position. Hold down the shift key to constrain the movement to the nearest multiple of 45 degrees.
Click the "Untransform" button to restore a fill pattern, dash pattern, placed EPS or imbedded raster object to its default setting. This will remove any transformations such as scaling, rotating, etc., that may have been done to the dash or fill.


 Cutting Tools