
iSCSI with your NAS
https://www.qnap.com/en/how-to/tutorial/article/how-to-create-and-use-the-iscsi-target-service-on-a-qnap-nas/
https://clickety-clack.click/img/whitepaper_ipbridge_xtendsan_iscsi_macosx.pdf
[3d-flip-book mode=”fullscreen” id=”108117″ ][/3d-flip-book]
https://www.asustor.com/en/online/College_topic?topic=308
COURSE OBJECTIVES
Upon completion of this course you should be able to:
1. Have a basic understanding of iSCSI
2. Be able to use the iSCSI service with your ASUSTOR NAS
PREREQUISITES
Course Prerequisites:
None
Students are expected to have a working knowledge of:
N/A
1. Introduction to iSCSI
1.1 What is iSCSI?
iSCSI, (Internet Small Computer System Interface), is an Internet Protocol (IP)-based storage networking standard for linking data storage facilities. It
offers high expandability and low implementation costs. Through existing network infrastructure and iSCSI you can use your NAS to expand existing storage
space or have it act as a backup destination.
iSCSI consists of two ends, a target and an initiator. The initiator (on your computer) functions as an iSCSI client and is used to search for iSCSI hosts
and to set up targets. Targets are storage resources that are located on an iSCSI server. An iSCSI target is often a dedicated network-connected hard disk
storage device (ASUSTOR NAS).
Note: A single target should not be simultaneously connected to multiple clients or initiators.
2. Using the iSCSI service with your computer
In the following example we will take you through the process of creating an iSCSI volume on the ASUSTOR NAS and then connecting to it using a PC.
2.1 Creating an iSCSI target and LUN
STEP 1
Open [Storage Manager]. Click on [Create] button under the iSCSI section.

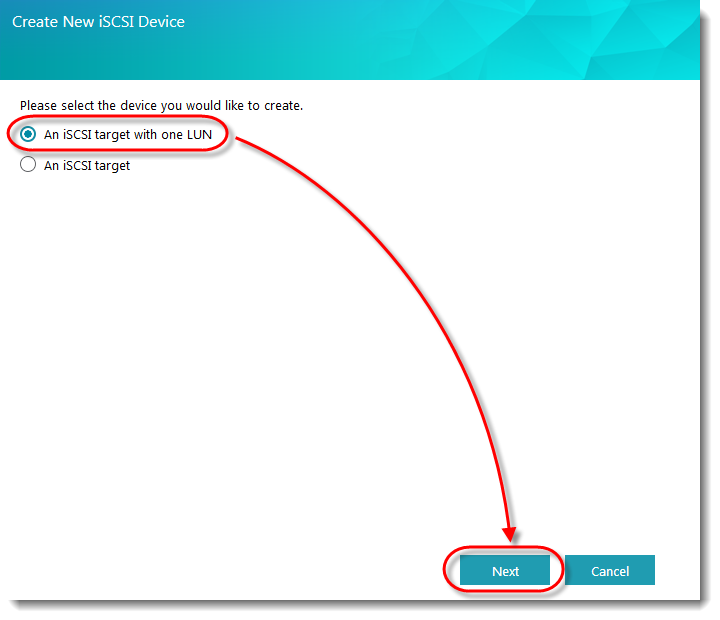
STEP 2
The Create New iSCSI Device window will now appear. Select the [An iSCSI target with one LUN] radio button and click [Next].
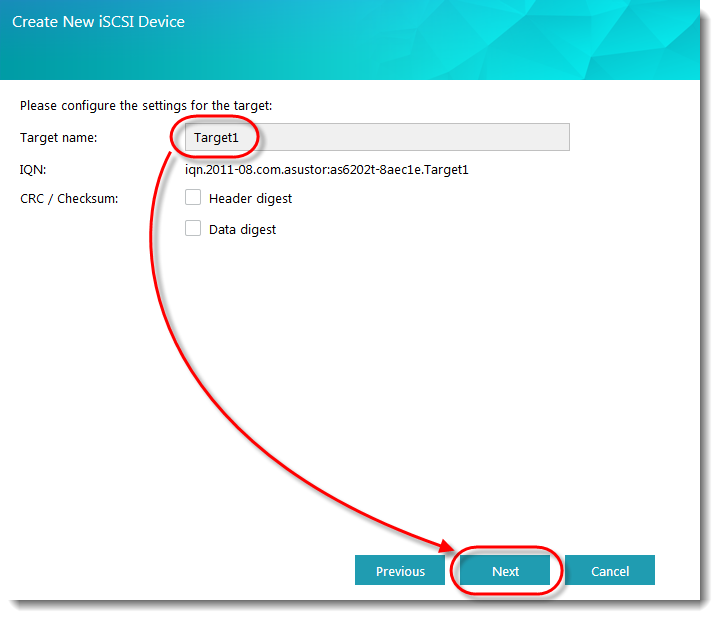
STEP 3
Enter a name for your Target and then click [Next].
STEP 4
Select the [No authentication required] radio button and click [Next].
In our example we have chosen not to use authentication. However, if you wish to verify a user’s identity you can choose to use CHAP authentication. If
you choose to use CHAP authentication, a CHAP password must first be entered from the initiator for verification before it can connect to the target.

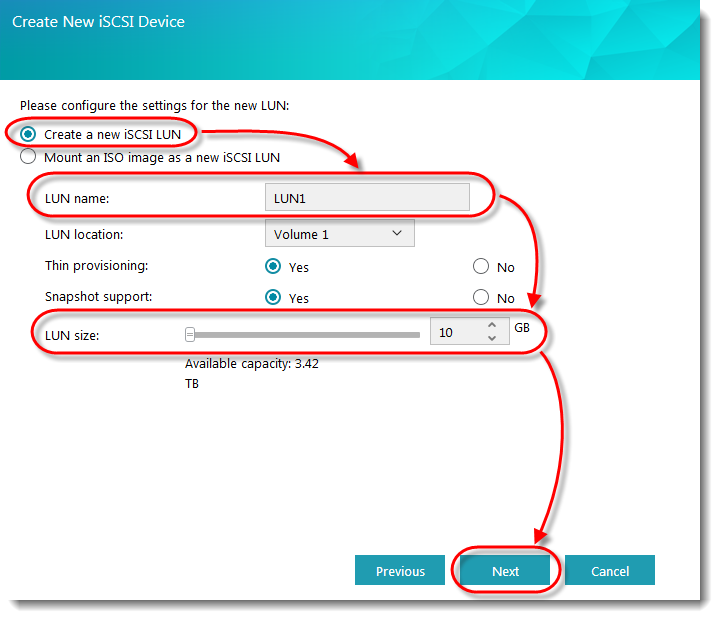
STEP 5
Select the [Create a new iSCSI LUN] radio button. Fill in a name for your LUN and select a size for it. Once, you’re done click [Next].
Note: A LUN (logical unit number) represents an individually addressable (logical) SCSI device that is part of a physical SCSI device (target). In an
iSCSI environment, LUNs are essentially numbered disk drives. An initiator negotiates with a target to establish connectivity to a LUN. LUNs represent
slices of your hard disks.
STEP 6
Look over a final summary of your settings. Once you’re done, confirm these settings by clicking [Finish].

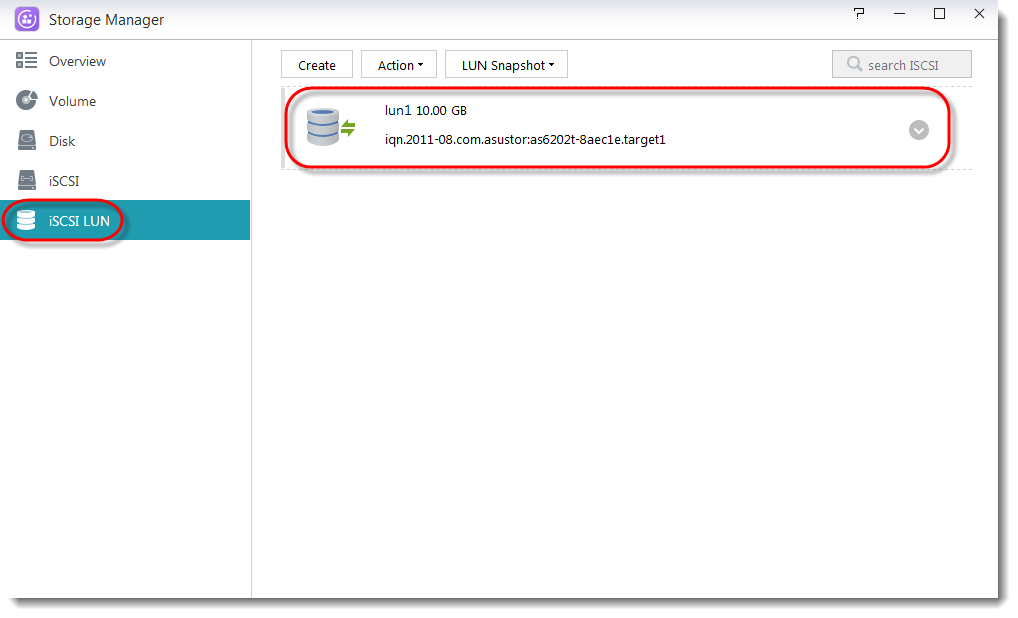
STEP 7
You will now be able to see the new target that you have created.

You will be able to see the LUN that you have created in the iSCSI LUN section.
2.2 Connecting to the target using the iSCSI initiator
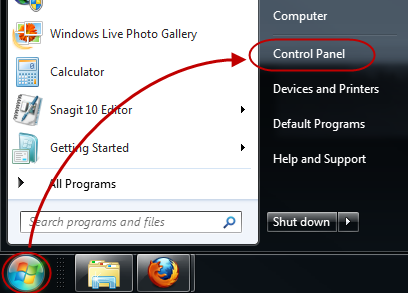
STEP 1
In Windows, click [Start] and then click on [Control Panel].
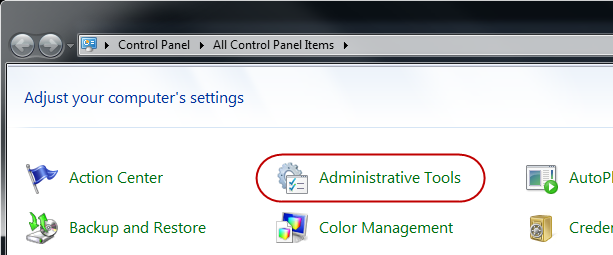
STEP 2
Select [Administrative Tools].
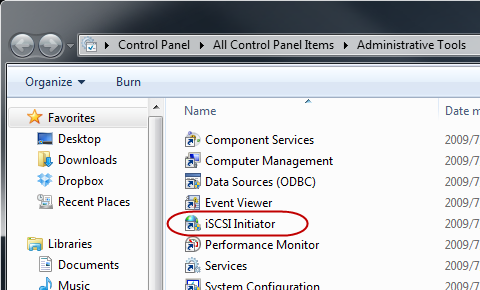
STEP 3
Double-click on [iSCSI Initiator].
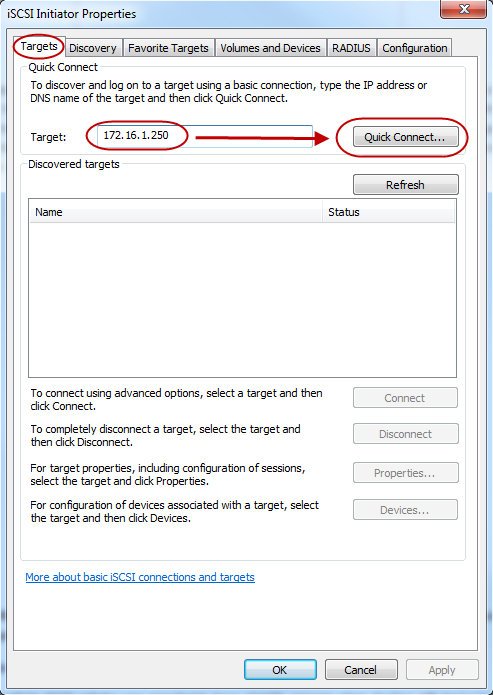
STEP 4
Under the Targets tab enter the IP address of your NAS into the [Target:] field and then click on [Quick Connect…].
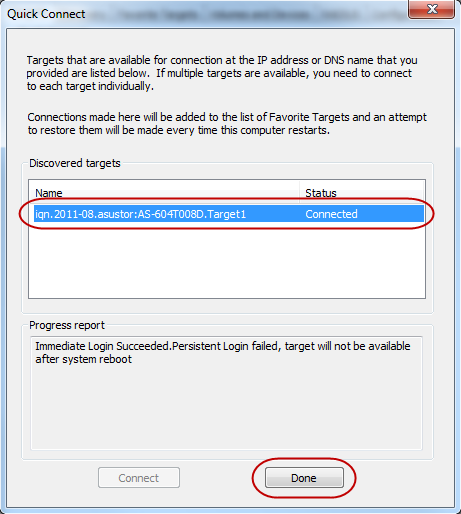
STEP 5
You will now see the Quick Connect dialog box and that your target has been connected to. Click on [Done].
STEP 6
Once again, you will see that the target has been connected to under the [Discovered targets] heading. Click on [OK].

2.3 Initializing the new disk volume
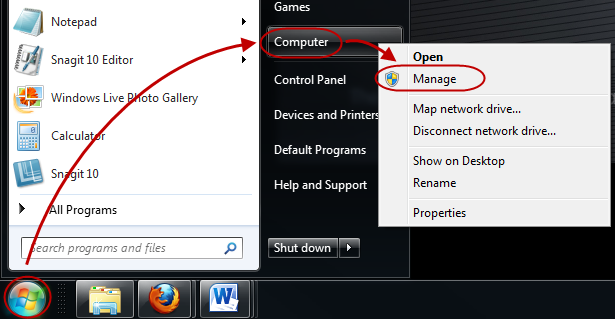
STEP 1
In Windows click [Start]. Then right-click on [Computer] and select [Manage].
STEP 2
The Computer Management window will now appear. Click on [Disk Management] under [Storage] in the left hand panel. The Initialize Disk
dialog box will now appear. Make sure the disk is selected and then click [OK] to initialize it.

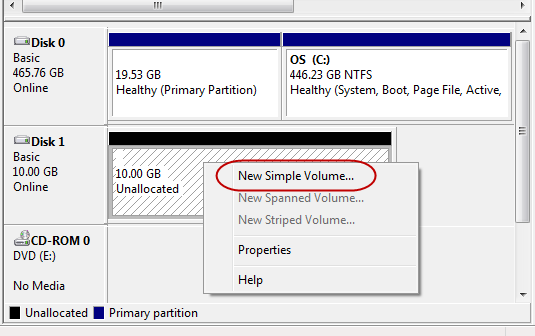
STEP 3
You will now see that the new disk is online but unallocated. Right-click on it and select [New Simple Volume…].
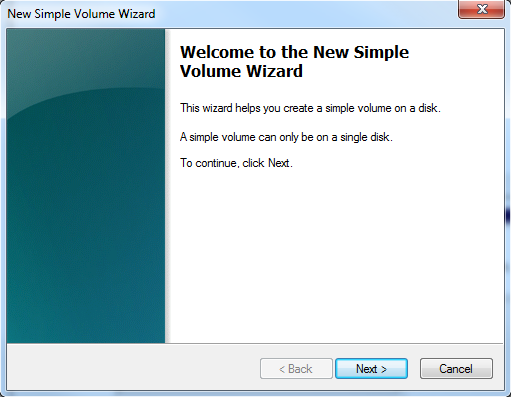
STEP 4
The New Simple Volume Wizard will now appear. Follow the steps provided by the wizard to complete the creation of the new disk volume.
STEP 5
This is what the information for the disk should look like once the new volume has been created.
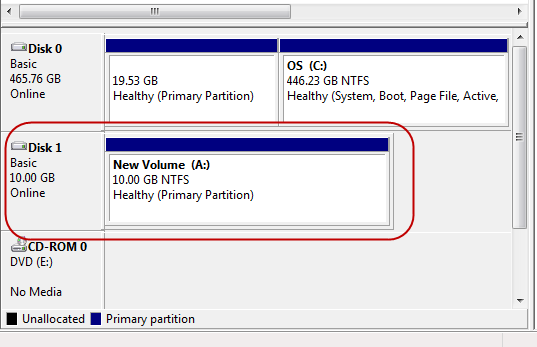
STEP 6
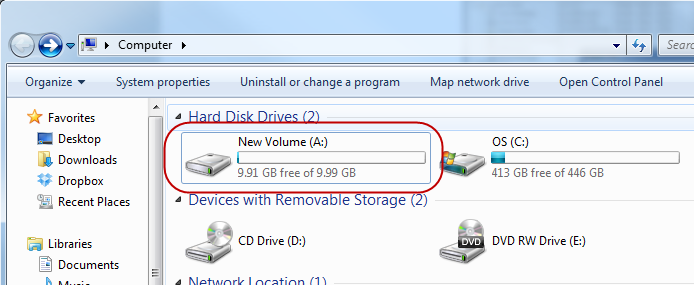
The new volume is now ready for use. It will appear as a hard disk drive as in the picture below. You can use it as if it were a hard drive on your
computer and any data that you store on it will be saved to the ASUSTOR NAS.
Note: Please remember that a single target should not be simultaneously connected to multiple clients or initiators.
3. Using iSCSI LUN Snapshots
A snapshot of an iSCSI LUN is a point-in-time, read-only copy of an iSCSI LUN. It saves a significant amount of time and storage capacity when compared
with traditional LUN backups. Each individual LUN supports up to 256 snapshot versions. In the following example we will show you how to create and restore
an iSCSI LUN snapshot.
3.1 Manually creating an iSCSI LUN snapshot
STEP 1
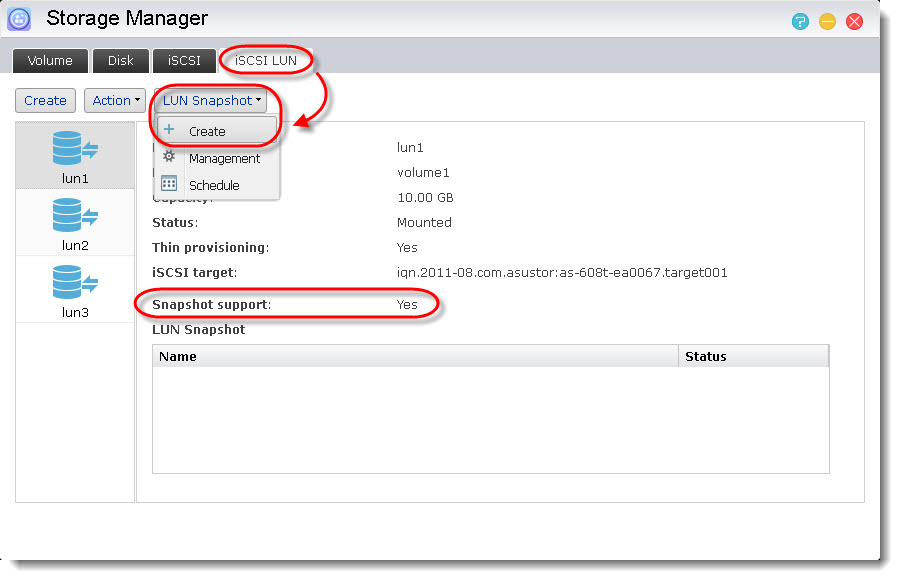
Open [Storage Manager]. Go to the [iSCSI LUN] tab, select a LUN that supports snapshots, click on [LUN Snapshot] and then choose [Create].
STEP 2
Click [Next] to proceed.

STEP 3
Now you will be able to configure the snapshot name, description (optional), and snapshot lock status. If the snapshot is locked, it cannot be removed
manually or automatically. Click [Finish] to complete creation of the snapshot.

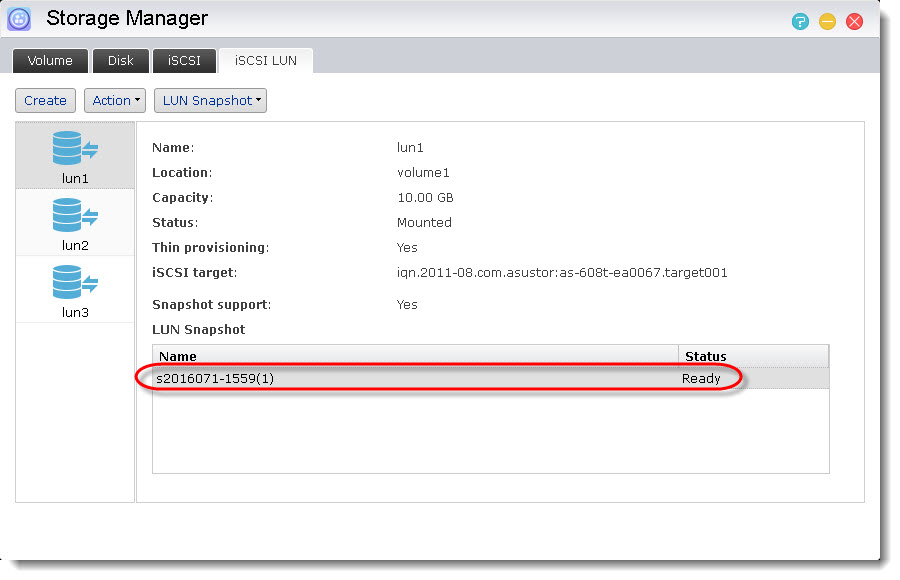
Upon completion, you will see the newly created snapshot in the LUN Snapshot table as shown in the graphic below.
3.2 Scheduled creation of iSCSI LUN snapshots
STEP 1
Open [Storage Manager]. Go to the [iSCSI LUN] tab, select a LUN that supports snapshots, click on [LUN Snapshot] and then choose [Schedule].

STEP 2
Define the schedule in accordance with your own requirements and then click [OK] when you are done.

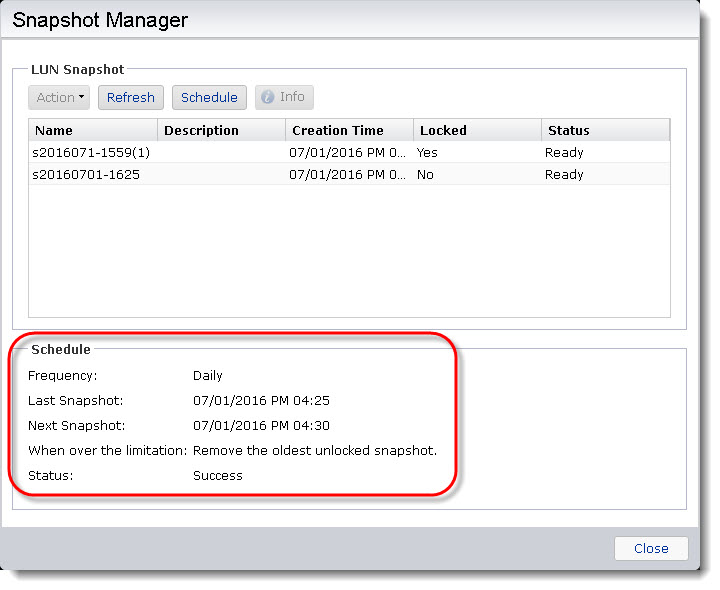
STEP 3
You will now be able to see the schedule details in the [Snapshot Manager].
3.3 Restoring from an iSCSI LUN snapshot
STEP 1
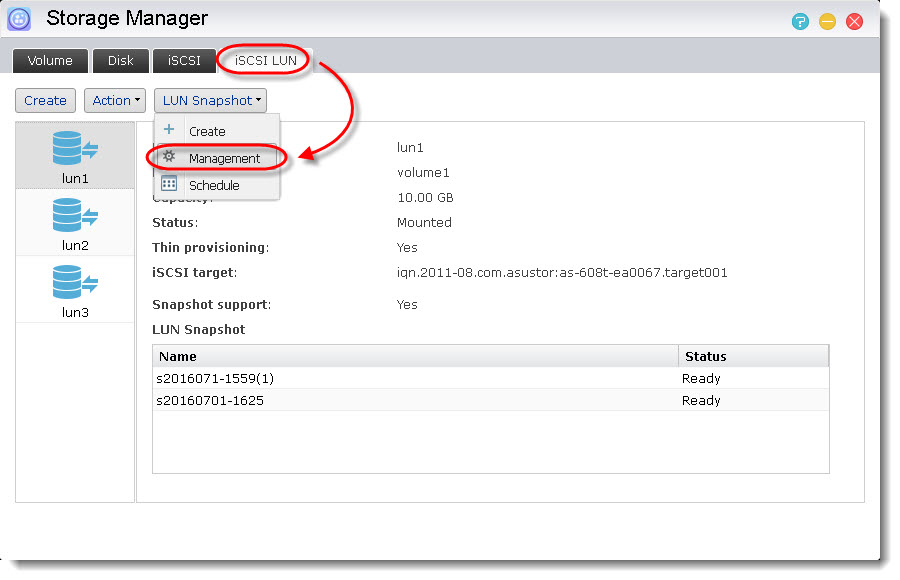
Open [Storage Manager]. Go to the [iSCSI LUN] tab, select a LUN that has existing snapshot(s), click on [LUN Snapshot] and then choose [Management].
STEP 2
Select the snapshot you want to restore, click on [Action] and then choose [Restore].

STEP 3
You will be provided with some extra settings before starting the restoration. You can configure the settings according to your requirements. After you
click [OK], the iSCSI LUN will be rolled back with the selected snapshot.
