
Asustor
https://www.asustor.com/en-gb/online/College_topic?topic=324
COURSE OBJECTIVES
Upon completion of this course you should be able to:
- Install a certificate to your ASUSTOR NAS.
- Use HTTPS to ensure communication security between your NAS and client devices.
PREREQUISITES
*Course Prerequisites:* None
*Students are expected to have a working knowledge of:* N/A
OUTLINE
2.1 Enabling ADM HTTPS Connections
2.2 Enabling HTTPS for the Web server
3. Adding a Signed Certificate
3.1 Manually importing a certificate
3.2 Getting a certificate from Let's Encrypt
1. Introduction
HTTPS (also called HTTP over TLS, HTTP over SSL, and HTTP Secure) is a protocol for secure communication over a computer network which is widely used on the Internet. HTTPS consists of communication over Hypertext Transfer Protocol (HTTP) within a connection encrypted by Transport Layer Security or its predecessor, Secure Sockets Layer. In its popular deployment on the internet, HTTPS provides authentication of the website and associated web server with which one is communicating, which protects against man-in-the-middle attacks.
The following are the most common connections using HTTPS on ASUSTOR NAS:
- Log in to ADM from a browser to manage, configure and use ASUSTOR NAS. Click here to enable ADM HTTPS connection and set the port. https://NAS_CloudID.myasustor.com:[ADM_HTTPS_port]
- Install the web server Apps on the ASUSTOR NAS, and enable the web server to host personal web sites. For example: Install Wordpress to host a personal web site, and then connect the web site using the browser via HTTPS. Click hereto enable web server HTTPS connection and set the port. https://NAS_CloudID.myasustor.com:[HTTPS_webserver_port]/wordpress
2. Enabling HTTPS
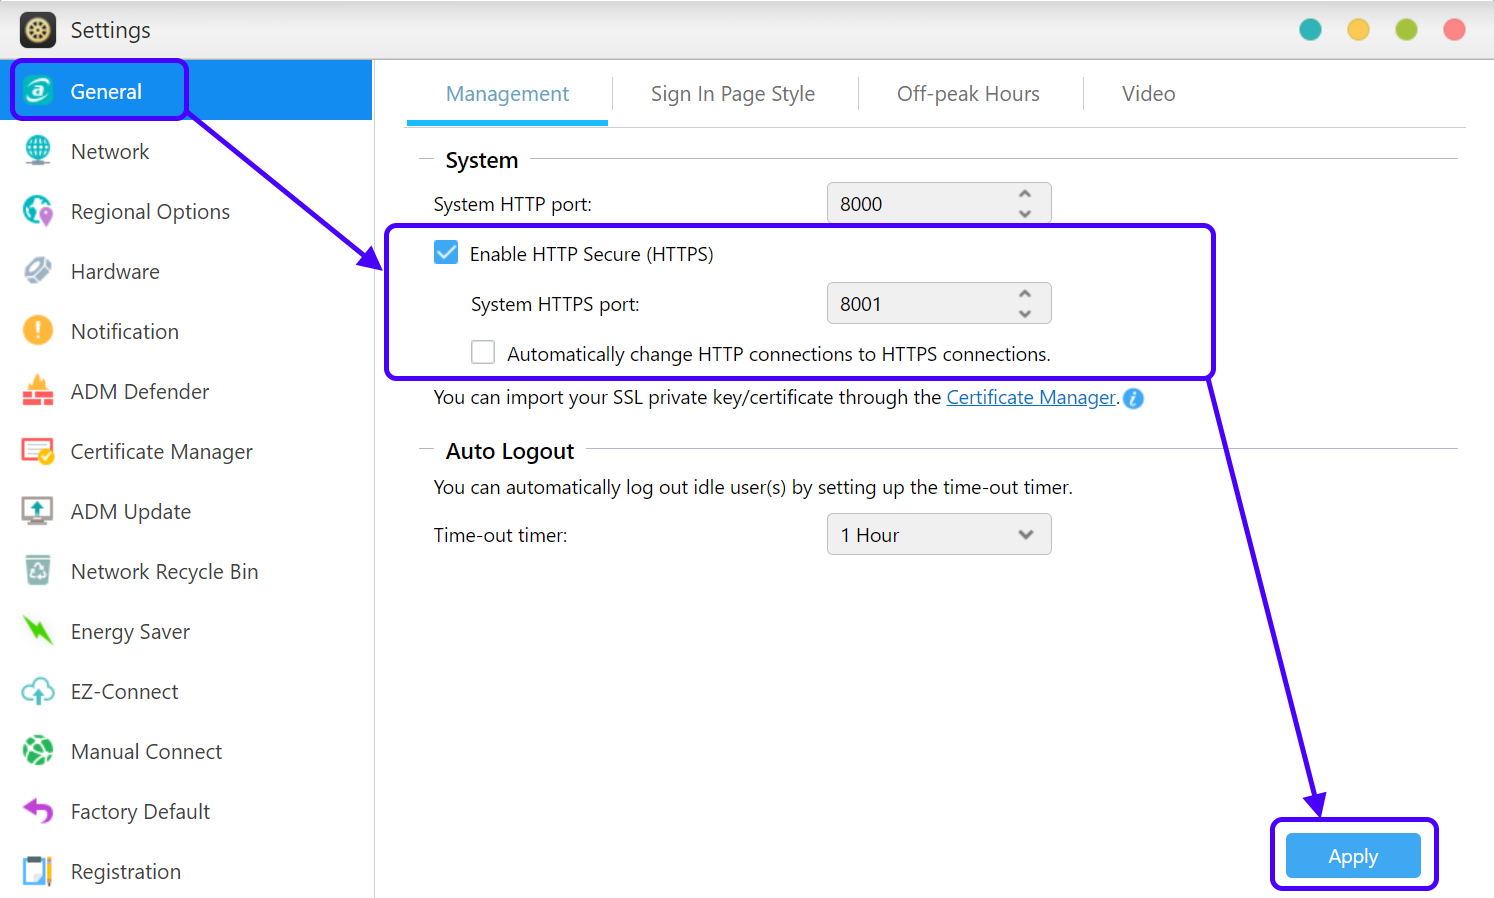
*2.1 Enabling ADM HTTPS Connections*
- Log in to ADM using an administrator account.
- Select [Settings] [General] [Management].
- Select [Enable HTTP Secure (HTTPS)]. The default HTTPS port for ADM is 8001.
To decrease the risks to your NAS when exposed to the Internet, it is advised that the default values for HTTP and HTTPS ports be changed.
- Select [Automatically change HTTP connections to HTTPS connections.].
- Click on [Apply] to make the configurations effective.
*2.2 Enabling HTTPS for the Web server*
- Log in to ADM using an administrator account.
- ADM 3.5: Select [Services] [Web Server].
- ADM 4.0: Select [Web Center] [Web Server].
- Select the [Enable secured Web server port]. The default port for Web Server HTTPS is 443. You may configure another port if you wish.
- Click on [Apply] to make the configurations effective.
ADM 3.5:

ADM 4.0:

3. Adding a Signed Certificate
There is a default ASUSTOR signed certificate built into ADM, but browsers will not trust this certificate because it is not signed by a third party. Therefore, when you connect to your ASUSTOR NAS using HTTPS, you will see a privacy error message. (Shown in the graphic below using Google Chrome as an example)

You can click on the "Proceed to [NAS IP] (unsafe)" link to skip past page and log in to ADM. However, in order to correctly verify the identity of your ASUSTOR NAS and ensure secure communication, you must get a signed certificate from a trusted certificate authority and import it into ADM.
*3.1 Manually importing a certificate*
If you already have a registered domain name, and have a signed certificate from a certificate authority, you can use the following steps to import the certificate into ADM. (You can skip this part and process to 3.2 Getting a certificate from Let's Encrypt if you don't have a registered domain name and wish to use CloudID.myasustor.com)
STEP 1
- Log in to ADM, select [Settings] [Certificate Manager] and then click on [Add].

STEP 2
- Enter a name for the certificate and then click on [Next].

STEP 3
- Select [Import your SSL private key and certificate] and then click on [Next].

STEP 4
- Use the [Browse] buttons to select the [Private Key] (*.key or .pem), [Certificate] (.crt or *.pem) and [Intermediate Certificate] (optional) from your local machine and then click [Finish].

*3.2 Getting a certificate from Let's Encrypt*
Let's Encrypt is a free, automated, and open certificate authority (CA), that provides a trusted certificate for free to anyone who owns a domain name. Let's Encrypt issued certificates are recognizable by all Web browsers. The Certificate Manager in ASUSTOR NAS can directly connect to Let's Encrypt to generate a valid certificate and install it automatically. This helps you to enhance NAS security with an SSL connection in a fast and easy way at zero cost.
You can use your Cloud id and .myasustor.com together as your domain name.
Note:
- DNS Challenge support for myasustor.com on ADM 4.1 makes connecting to your NAS securely even easier. Port 80 no longer needs to be forwarded for Let’s Encrypt certificates. Please skip STEP 1 and process to STEP 2.
- You can skip STEP 1 and process to STEP 2 if you are using non-ASUS router and the 80 port is not used by default.
STEP 1
- If you use ASUS router or some of the router that use 80 port by default, you have to manually go to router settings to set up 80 port with your NAS internal network IP to enable Let's Encrypt.
Instructions: https://www.asustor.com/knowledge/detail/?group_id=1006
Attention: Before proceed to STEP 2, please help to check the WAN IP + 80 port is working. Sometimes even setting up port in router like the FAQ but the router itself doesn't support.
- You can go to Manual Connect to find you WAN IP.

- Type WAN IP and :80 in your browser address bar.

- If you can see the Congratulations page, then you can proceed to set up Let's Encrypt.

STEP 2
- Log in to ADM.
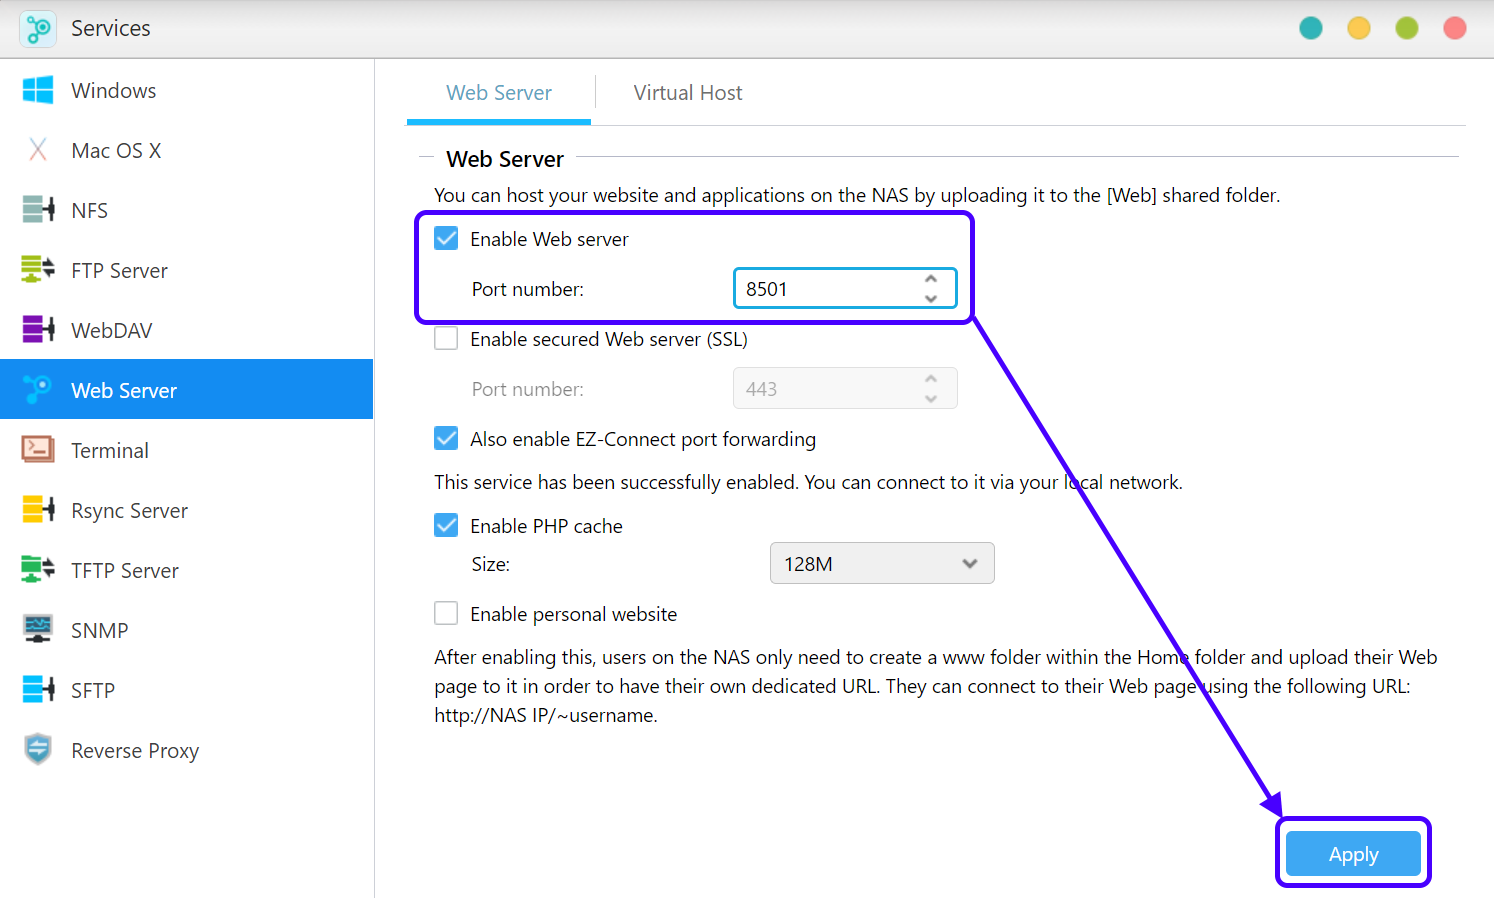
- ADM 3.5: Select [Services] [Web Server].
- ADM 4.0: Select [Web Center] [Web Server].
- Select [Enable Web server]. Make sure to use the default port 80. If you have followed STEP 1 to set non-80 port in ASUS Router settings previously, you have to change the web server port as well; for example, we use 8501. Do not check [Enable secured Web server port] here.
Note: Port 80 no longer needs to be forwarded for getting myasustor.com Let’s Encrypt certificates after upgrading to ADM 4.1.
ADM 3.5:

ADM 4.0:

If you have followed STEP 1 previously, please check next image to change the web server port to any non-80 port.
ADM 3.5:
ADM 4.0:

STEP 3
- Select [Settings] [Manual Connect] [EZ-Router] and check if Web service/Web Center is added to the [Port Forwarding] list.
STEP 4
- If your router does not support EZ-Router, please manually go to the router management interface to configure port forwarding.
Note:
- Before Let's Encrypt assigns certificates, it will use port 80 to execute domain verification. Therefore, please ensure that your NAS and router have port 80 open in order to allow connections from the Internet.
- Port 80 no longer needs to be forwarded for getting myasustor.com Let’s Encrypt certificates after upgrading to ADM 4.1.
STEP 5
- Log into ADM, select [Settings] [Certificate Manager] and then click on [Add].
STEP 6
- Enter a name for your certificate, set as default certificate and then click on [Next].

STEP 7
- Select [Create certificate from Let's Encrypt] and install Let's Encrypt ACME Client. Then, click on [Next].

STEP 8
Enter the following information:
- [Domain name]: Enter the domain name registered with the domain provider. For the use of myaustor.com, you can type your Cloud id and .myasustor.com together. For example, cloudid.myasustor.com.
- [E-mail]: Enter the e-mail address used to register for the certificate. Here you can use your NAS registration email if you want to use it with myasustor.com.
- [Subject Alterative Name]: If this certificate needs to be used on multiple domains, please enter the names of the other domains. (Not a necessary item.)
- [Update automatically when certificates expire.]: Let's Encrypt issued certificates will expire after 90 days. By selecting this option, ADM will automatically renew the certificate before the expiration date, if domain verification is successful. Please ensure that your NAS and router have port 80 opened in order to allow for certificate updates.
Note: Port 80 no longer needs to be forwarded for updating myasustor.com Let’s Encrypt certificates after upgrading to ADM 4.1.
Click on [Finish]. The Let's Encrypt certificate will be imported to ADM.

Note: If you use http, the webpage will not be trusted by the browsers. You have to use https like https://CloudID.myasustor.com:[ADM_HTTPS_port]/
Asustor Nas
I installed Home Assistant on my Asustor NAS, the Nimbustor 2, Model AS5202T. I was transitioning/updating from my Hassbian install on my RaspberryPi. After getting it configured, I wanted to setup my DuckDNS and SSL certificate like I had previously had. The Asustor has a built in certificate manager and also has a LetsEncrypt app, but I was not able to find any guides. I struggled through it and thought I would share!
On your Asustor, in addition to the Docker and HomeAssistant Apps, you will need the LetsEncrypt App installed.
If you don’t already have a DuckDNS account, create one.
Follow this guide for creating a LetsEncrypt Certificate https://www.asustor.com/en-gb/online/College_topic?topic=324 45 If you have an ASUS Router, there are specific instructions for Port Forwarding. My settings worked at port 80 and 443 (external 80 to internal 80 and 443 to 443). These instructions can be found in the above link.
When you have successfully created a certificate and can access your Asustor Portal via your WAN IP, export your certificates from the Certificate Manager. If you are using a web browser, they will download to your local machine. Alternatively, you could find these certificates on the file system, but I could not locate them. It was easier to export and transfer.
Load these certificates back onto your Asustor, where you can access them from your config file. Then following the format in the following link, point the config file at the Certificate files you just uploaded.


Effortless encryption with Let's Encrypt and DuckDNS 35
Get Home Assistant encrypted in less than 5 minutes.
After restarting, you should be able to access your HomeAssitant from your DuckDNS address with a valid certificate.
https://www.namecheap.com/support/knowledgebase/article.aspx/795/14/how-to-install-ssl-certificates/
How to install SSL certificates
SSL certificate installation is typically performed by the hosting company that provides services for the domain. However, you may also choose install an SSL certificate yourself. Select your server type from the list below to find detailed instructions for installation.cPanel
WHM
Plesk 12
Plesk Onyx
Apache OpenSSL/ModSSL
httpd (CentOS)
apache2 (Debian, Ubuntu)
IIS 7
IIS 8&10
IIS: multiple certificates installation
Nginx
Tomcat (using keytool)
Exchange2007 (PowerShell)
DirectAdmin
AWS ELB
Synology NAS
Vesta CP
Mac OS X/Yosemite/El Capitan
Mac OS SSL Import/Export via Keychain
Sun Java System Web Server 7.x
Webmin
Node.js
Exchange 2013 (EAC)
Exchange 2013 (Shell)
SSL export/import on Exchange 2013 Shell
Exchange 2010
Heroku
Heroku SSL
Azure Web App
Glassfish
Zimbra
Google App
SonicWall
Citrix NetScaler VPX
XAMPP
CWP
Certreq
Namecheap EasyWP App
Unifi
ISPConfig
SiteWorx
Installing SSL Certificate NotesIf your server type is not shown here, you can try following the instructions provided by Comodo (now Sectigo) Certification Authority.If you host your domain name with Namecheap, simply provide us with your certificate and we'll be happy to install it for you. Please note that on all Namecheap Shared Hosting servers, a special Namecheap SSL plugin installs a 1-year free PositiveSSL certificate automatically on the newly added subdomain or add-on. It works the same way for the main domain in the newly purchased hosting account. The plugin can also be used for manual installation (in a few clicks) of PositiveSSL and EssentialSSL certificates. You can find more details on the free 1 year SSL offer in this article, and here's your reference guide on the NamecheapSSL plugin.A dedicated IP address is required to install an SSL certificate. However, you may install your SSL certificate on a shared IP address using the Server Name Indication (SNI) protocol extension available in your cPanel. You can learn more about the differences between a dedicated IP and SNI technology in this article.
Keep in mind that the SNI technology is available on all Namecheap hosting servers. When contacting our support team with an SSL installation request, please specify whether you wish to order a dedicated IP address or have your SSL installed on a server's shared IP.
Associated articles
How do I activate an SSL certificate
SSL certificate activation and installation for domain(s) hosted on Namecheap hosting servers