
Installation – Messages / Directory Changes
https://opensource.com/article/20/6/homebrew-mac
In my quest to "automate all the things," I have been on a journey to manage my Mac laptop as the code it inherently is. Instead of pointing and clicking to manually manage my applications and utilities, I prefer to use package management software to install, update, and remove unneeded software.
That's a challenge for Mac users. One place where the Mac operating system, macOS, has always been behind Linux is in package management. There is no default package manager for Mac users, while Linux users have many options—from the familiar yum and apt to the modern choice of Flatpak. But what about us?
This is where Homebrew comes in. Homebrew fills the void as the de facto package manager for macOS (and as another option for Linux). It provides an incredibly smooth and straightforward experience for anyone familiar with the command line, and it's a good way to learn the command line if you're new to it.
If you're on a Mac and don't already have Homebrew, you can install it with:
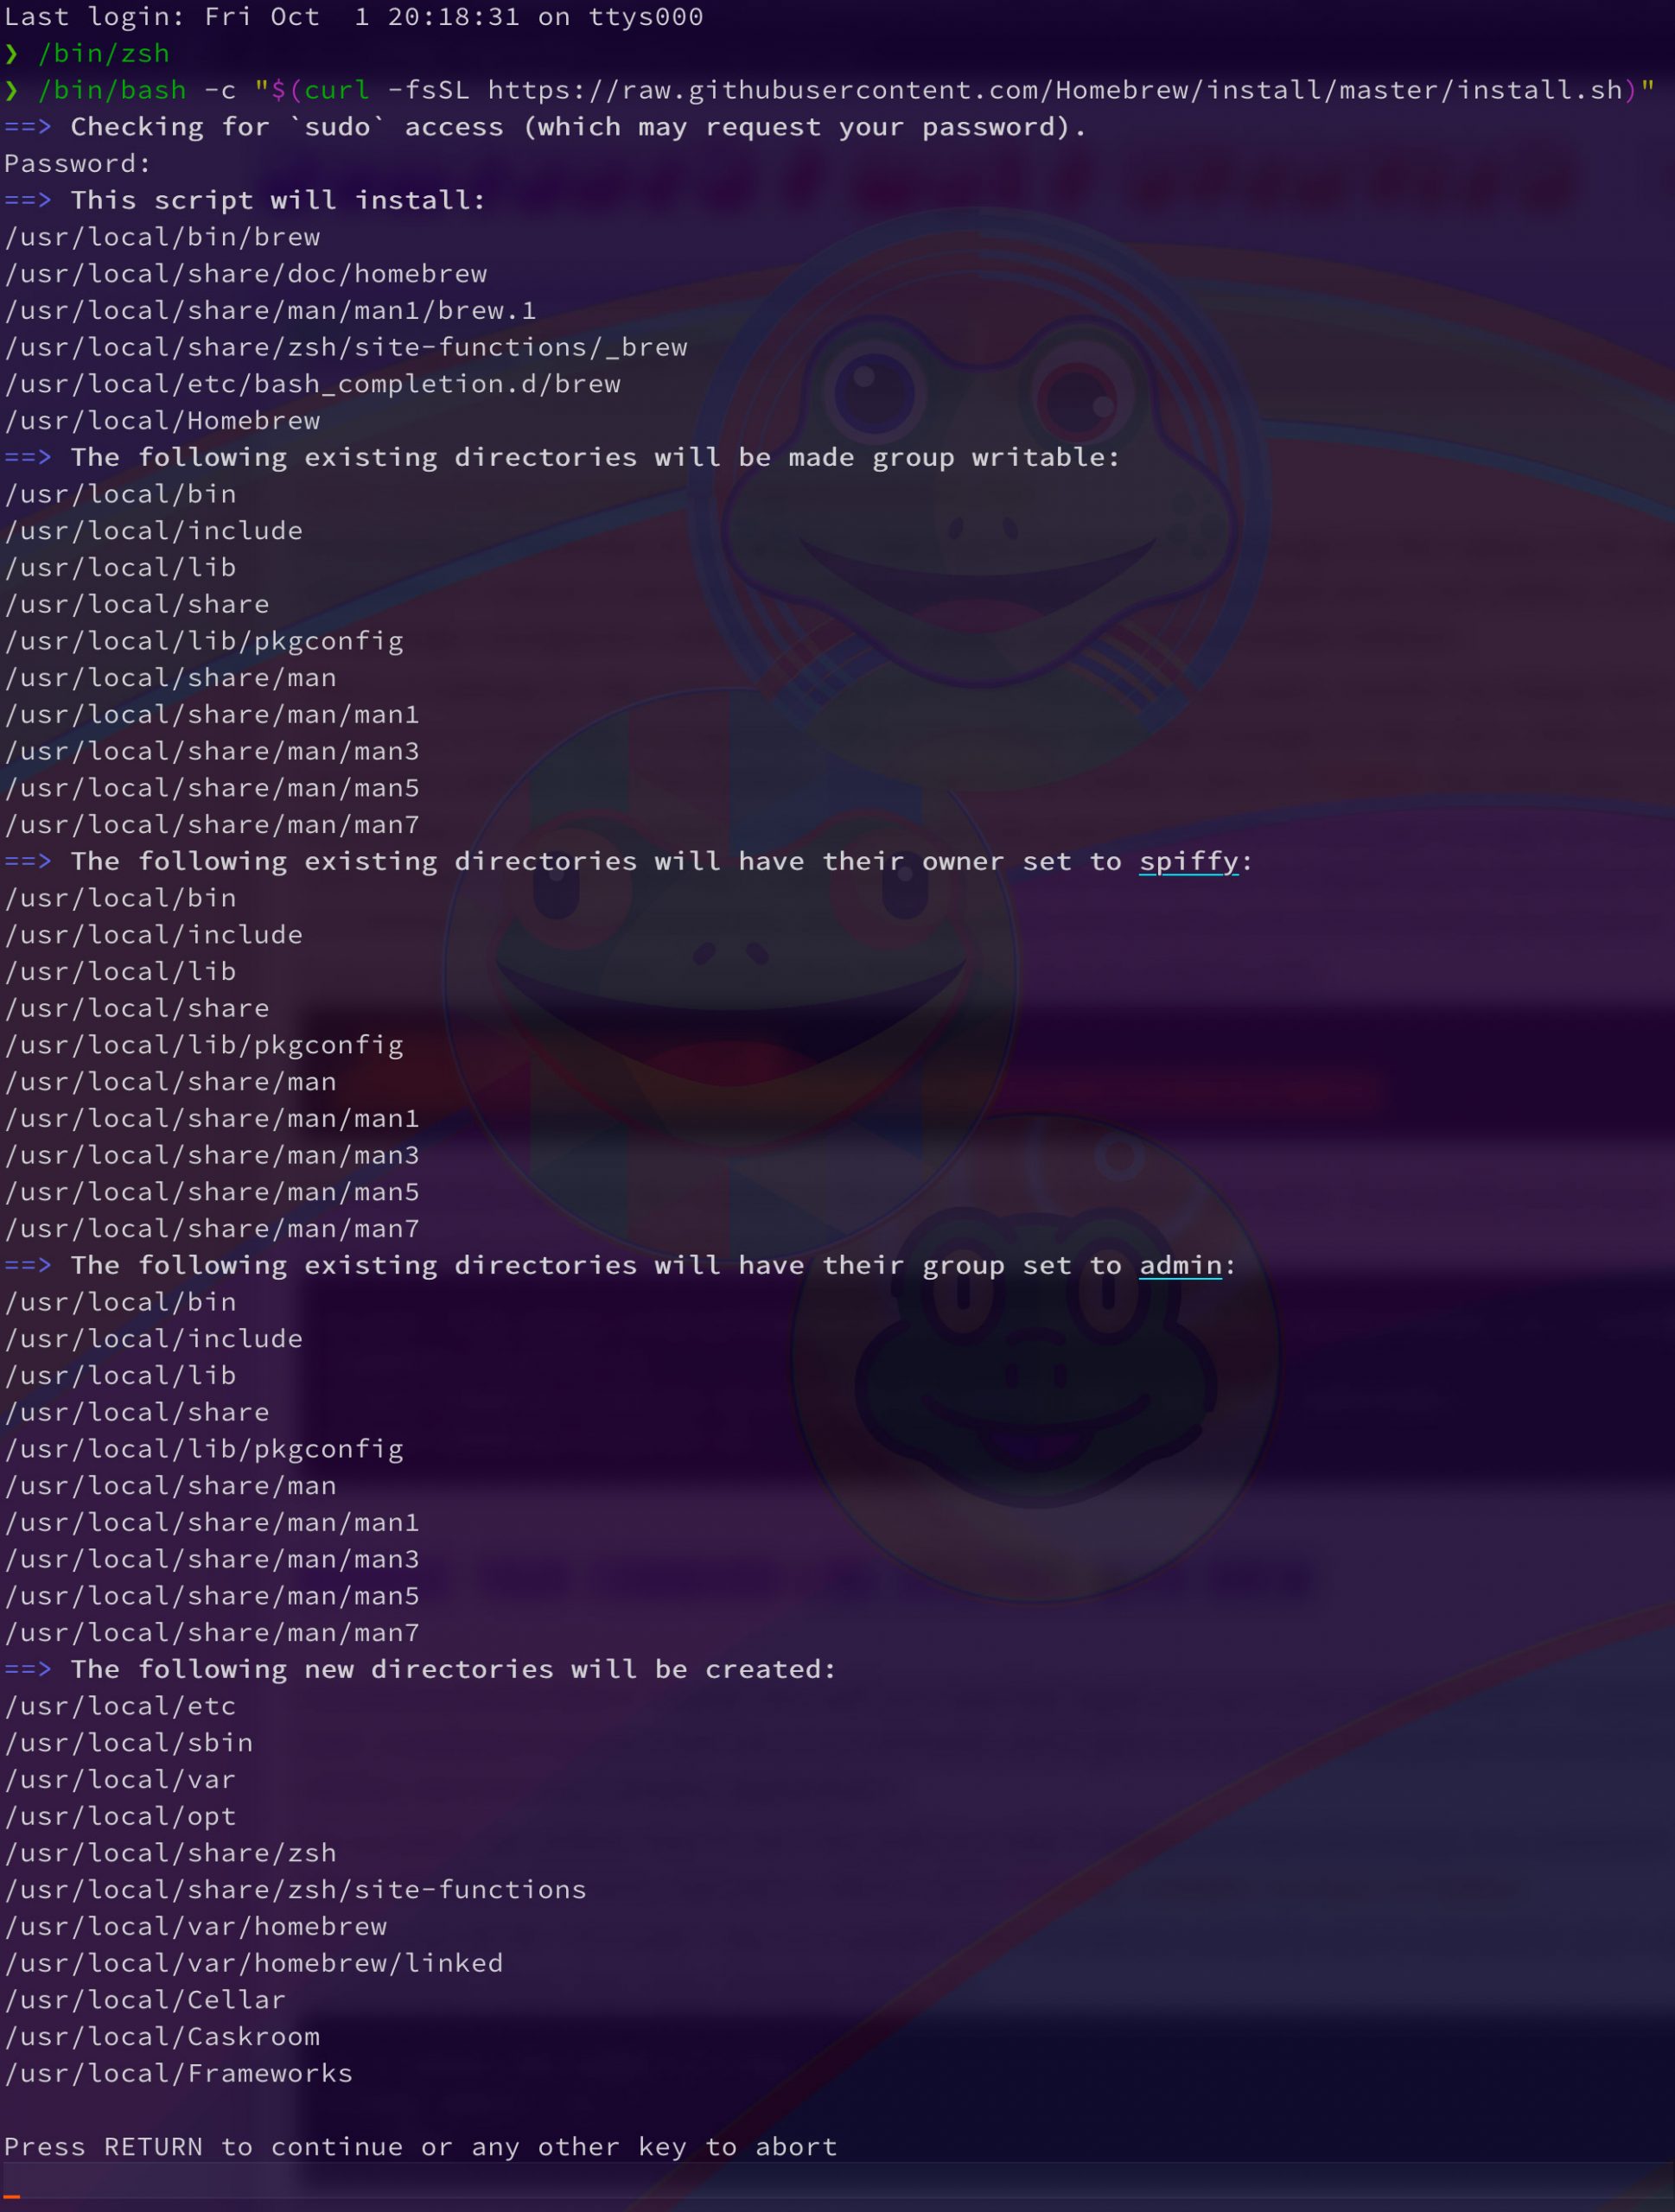
$ /bin/bash -c "$(curl -fsSL https://raw.githubusercontent.com/Homebrew/install/master/install.sh)"
This command executes the installer script provided by the Homebrew team. If you prefer to be more cautious, you can curl the file, then run it manually after reviewing it:
$ curl -fsSL https://raw.githubusercontent.com/Homebrew/install/master/install.sh --output homebrew_installer.sh
$ more homebrew_installer.sh # review the script until you feel comfortable
$ bash homebrew_installer.sh
Manage your command-line utilities with brew
Homebrew boasts that it "installs the stuff you need that Apple (or your Linux system) didn't" install by default. Installation happens with the brew command, which gives us access to thousands of command-line utilities, but not more complex applications.
For us nerds, the utilities that fit into "the stuff you need" category include the handy tree command that shows directory structures and pyenv, which I use to manage multiple versions of Python.
You can see all the "formulae" that are available from Homebrew using the search command, and I use the wc command shows how many formulae there are:
# -l counts the number of lines
$ brew search | wc -l
    5013
There are over 5,000 formulae, which is an incredible amount of software. So it's best to have an idea of what you want before searching that huge list. Thankfully, it is easy enough to browse. Formulae are codified and centralized into the core repositories that are split by operating system (Mac in Homebrew Core and Linux in Linux Core). They are also available through the Homebrew API and listed on the website.
Word of mouth is another great method to find utilitites. With that in mind, here are some of my favorites if you're looking for inspiration:
pyenv,rbenv, andnodenvto manage Python, Ruby, and Node.js versions (respectively)imagemagickfor scriptable image editspandocfor scriptable document conversions (I often switch from .docx to .md or .html)hubfor a better Git experience for GitHub userstldrfor examples of how to use a command-line utility
As an example, take a look at tldr pages, a user-friendly alternative to scrolling through an application's man pages. You can confirm it's available by running search again:
$ brew search tldr
==> Formulae
tldr ✔
Success! The checkmark lets you know it is available. Now you can install it:
$ brew install tldr
==> Downloading https://homebrew.bintray.com/bottles/tldr-1.3.0_2.catalina.bottle.tar.gz
Already downloaded: /Users/mbbroberg/Library/Caches/Homebrew/downloads/901bc14594a9283e9ab20aec942dc5a9a2befb7e96e1b0fcccb4e3257918813c--tldr-1.3.0_2.catalina.bottle.tar.gz
==> Installing tldr
==> Pouring tldr-1.3.0_2.catalina.bottle.tar.gz
🍺  /usr/local/Cellar/tldr/1.3.0_2: 6 files, 35.5KB
Homebrew, thankfully, prebuilds the binaries, so you don't have to build from source code on your local machine. That saves a lot of time and CPU fan noise. Another thing I appreciate about Homebrew is that you can appreciate this feature without understanding exactly what it means.
But if you're into it, it can be fun to look at the complexity. Run info on tldr, and you can see all the dependency management, the source code, and even public analytics:
$ brew info tldr
tldr: stable 1.3.0 (bottled), HEAD
Simplified and community-driven man pages
https://tldr.sh/
Conflicts with:  tealdeer (because both install `tldr` binaries)
/usr/local/Cellar/tldr/1.3.0_2 (6 files, 35.5KB) *
  Poured from bottle on 2020-05-20 at 15:12:12
From: https://github.com/Homebrew/homebrew-core/blob/master/Formula/tldr.rb
==> Dependencies
Build: pkg-config ✔
Required: libzip ✔
==> Options
--HEAD
        Install HEAD version
==> Analytics
install: 2,811 (30 days), 7,875 (90 days), 27,105 (365 days)
install-on-request: 2,806 (30 days), 7,860 (90 days), 27,080 (365 days)
build-error: 0 (30 days)
Finally, as in any good package manager, Homebrew's brew uninstall is available to quickly clean and remove unused utilities.
Manage your applications with brew casks
Command-line utilities are a blast, but what about full-blown applications? Homebrew keeps its standard commands simple and installs only single-file applications through its default brew command-line interface. Applications don't fit that structure. They have a more complex directory hierarchy that is much more than a single binary.
Fortunately, Homebrew on Mac includes a subcommand called "casks" for more complex multi-directory structures. What's especially nice is that cask uses a similar command structure to the standard brew commands, so you can use similar search, install, and info steps:
brew search --cask | wc -l
    4772
Wow, there are nearly 5,000 more applications to browse, which are easier to peruse on Homebrew's website.
I'll walk you through cask with one of my new favorite applications: Meld (which I read about on Opensource.com). It's a feature-rich editor that helps manage merge conflicts. There is a download on its website, and I could run through the installer and drag-and-drop it into my Applications folder, but I don't do that anymore. I use Homebrew.
First, I confirm it's available through a slightly different syntax:
$ brew search --casks meld
==> Casks
meld
Then I use the cask sub-command to install it:
$ brew cask install meld
==> Downloading https://github.com/yousseb/meld/releases/download/osx-19/meldmerge.dmg
==> Downloading from https://github-production-release-asset-2e65be.s3.amazonaws.com/28624006/66cb25
######################################################################## 100.0%
==> Verifying SHA-256 checksum for Cask 'meld'.
==> Installing Cask meld
==> Moving App 'Meld.app' to '/Applications/Meld.app'.
==> Linking Binary 'meld.wrapper.sh' to '/usr/local/bin/meld'.
🍺  meld was successfully installed!
Homebrew not only installs the application but also makes it available in my current path under /usr/local/bin/. Now I can run meld from the command line or launch the application from the Applications folder.
Update everything with brew upgrade
The main reason I consistently use a package manager is so that I can consistently upgrade my software to avoid known security bugs and ensure I always have the latest features. If I install everything by hand, I have to keep an eye on each tool and application to know whether it has an auto-updater and, if not, pull down the latest releases myself.
Upgrades are where great package management shines. Since I don't have any special version requirements, I run only one command to update everything smoothly:
$ brew upgrade
==> Upgrading 6 outdated packages:
helm 3.2.1 -> 3.2.2
python@3.8 3.8.2_4 -> 3.8.3
ipython 7.14.0 -> 7.15.0
go 1.14.2_1 -> 1.14.3
libzip 1.6.1 -> 1.6.1_1
sqlite 3.31.1 -> 3.32.1
If you have more complex needs or want to keep an eye on upgrades before installing them, there are plenty of feature flags available. For instance, -n offers a "dry run" that lists available upgrades without installing them. You can also "pin" an application version to prevent upgrades.
Back up your installation
The command-line utility and application management jumps to a whole new level when tools allow you to back up your installation like any other dotfile in version control. Homebrew has that kind of functionality available to use under the dump subcommand. It generates a Brewfile, which is a reusable list of all the currently installed tools. To generate one from your installation, go into your preferred folder and run:
$ cd ~/Development/dotfiles # This is my dotfile folder
$ brew bundle dump
When I change machines and want to install the same applications with Homebrew, I go to the folder with the Brewfile and run:
$ brew bundle
It will install all the listed formulae and casks on my new machine.
Go to Homebrew for package management
More Great Content
- Free online course: RHEL technical overview
- Learn Advanced Linux Commands
- Download Cheat Sheets
- Find an Open Source Alternative
- Read Top Linux Content
- Check out open source resources
Homebrew is my go-to manager for command-line utilities and applications. It keeps me organized and up-to-date, and its design is a beautiful balance between ease of use and depth of functionality. Homebrew minimizes package management details to only what you need to know, and most users will benefit from that.
If you're already comfortable with Linux package managers, you may think Homebrew is too simple, but don't mistake Homebrew's ease of use for lack of features. Looking a little deeper reveals many advanced options that go far beyond what I showed you here. Adding -h to any brew subcommand shows the rich features available to upgrade, remove, troubleshoot, and even contribute new formulas using templates.
Overall, Homebrew makes being a command-line wielding Mac user a joy. In addition, it's open source, so you can contribute back to the code if you're so inclined. Give it a try, and let me know what you think by leaving a comment below.
Homebrew welcome message
Common Problems / Solutions
- Examples of common errors and their solutions
curlerrorPermission deniederrorChecksum does not matcherrorsource is not thereerrorwrong number of argumentserror- The app can’t be opened because it is from an unidentified developer
- My problem isn’t listed
https://www.digitalocean.com/community/tutorials/how-to-install-and-use-homebrew-on-macos
Introduction
The command line interface is a non-graphical way to interact with your computer. Instead of clicking buttons with your mouse, you’ll type commands as text and receive text-based feedback. The command line, also known as a shell, lets you automate many tasks you do on your computer daily, and is an essential tool for software developers.
While the command line interface on macOS has a lot of the functionality you’d find in Linux and other Unix systems, it does not ship with a good package manager. A package manager is a collection of software tools that work to automate software installations, configurations, and upgrades. Package managers keep the software they install in a central location and can maintain all software packages on the system in formats that are commonly used.
Homebrew is a package manager for macOS which lets you install free and open-source software using your terminal. You’ll use Homebrew to install developer tools like Python, Ruby, Node.js, and more.
In this tutorial you’ll install and use Homebrew on your Mac.
Prerequisites
You will need a macOS computer running High Sierra or higher with administrative access and an internet connection.
Step 1 — Using the macOS Terminal
To access the command line interface on your Mac, you’ll use the Terminal application provided by macOS. Like any other application, you can find it by going into Finder, navigating to the Applications folder, and then into the Utilities folder. From here, double-click the Terminal application to open it up. Alternatively, you can use Spotlight by holding down the COMMAND key and pressing SPACE to find Terminal by typing it out in the box that appears.
To get more comfortable using the command line, take a look at An Introduction to the Linux Terminal. The command line interface on macOS is very similar, and the concepts in that tutorial are directly applicable.
Now that you have the Terminal running, let’s install some additional tools that Homebrew needs.
Step 2 — Installing Xcode’s Command Line Tools
Xcode is an integrated development environment (IDE) that is comprised of software development tools for macOS. You won’t need Xcode to use Homebrew, but some of the software and components you’ll want to install will rely on Xcode’s Command Line Tools package.
Execute the following command in the Terminal to download and install these components:
xcode-select --install
You’ll be prompted to start the installation, and then prompted again to accept a software license. Then the tools will download and install automatically.
You can now install Homebrew.
Step 3 — Installing and Setting Up Homebrew
To install Homebrew, you’ll download an installation script and then execute the script.
First, download the script to your local machine by typing the following command in your Terminal window:
curl -fsSL -o install.sh https://raw.githubusercontent.com/Homebrew/install/master/install.sh
The command uses curl to download the Homebrew installation script from Homebrew’s Git repository on GitHub.
Let’s walk through the flags that are associated with the curl command:
- The –
for--failflag tells the Terminal window to give no HTML document output on server errors. - The
-sor--silentflag mutescurlso that it does not show the progress meter, and combined with the-Sor--show-errorflag it will ensure thatcurlshows an error message if it fails. - The
-Lor--locationflag will tellcurlto handle redirects. If the server reports that the requested page has moved to a different location, it’ll automatically execute the request again using the new location. - The
-oswitch specifies a local filename for the file.
Before running a script you’ve download from the Internet, you should review its contents so you know what the script will do. Use the less command to look at the installation script:
less install.sh
Once you’re comfortable with the contents of the script, execute the script with the bash command:
/bin/bash install.sh
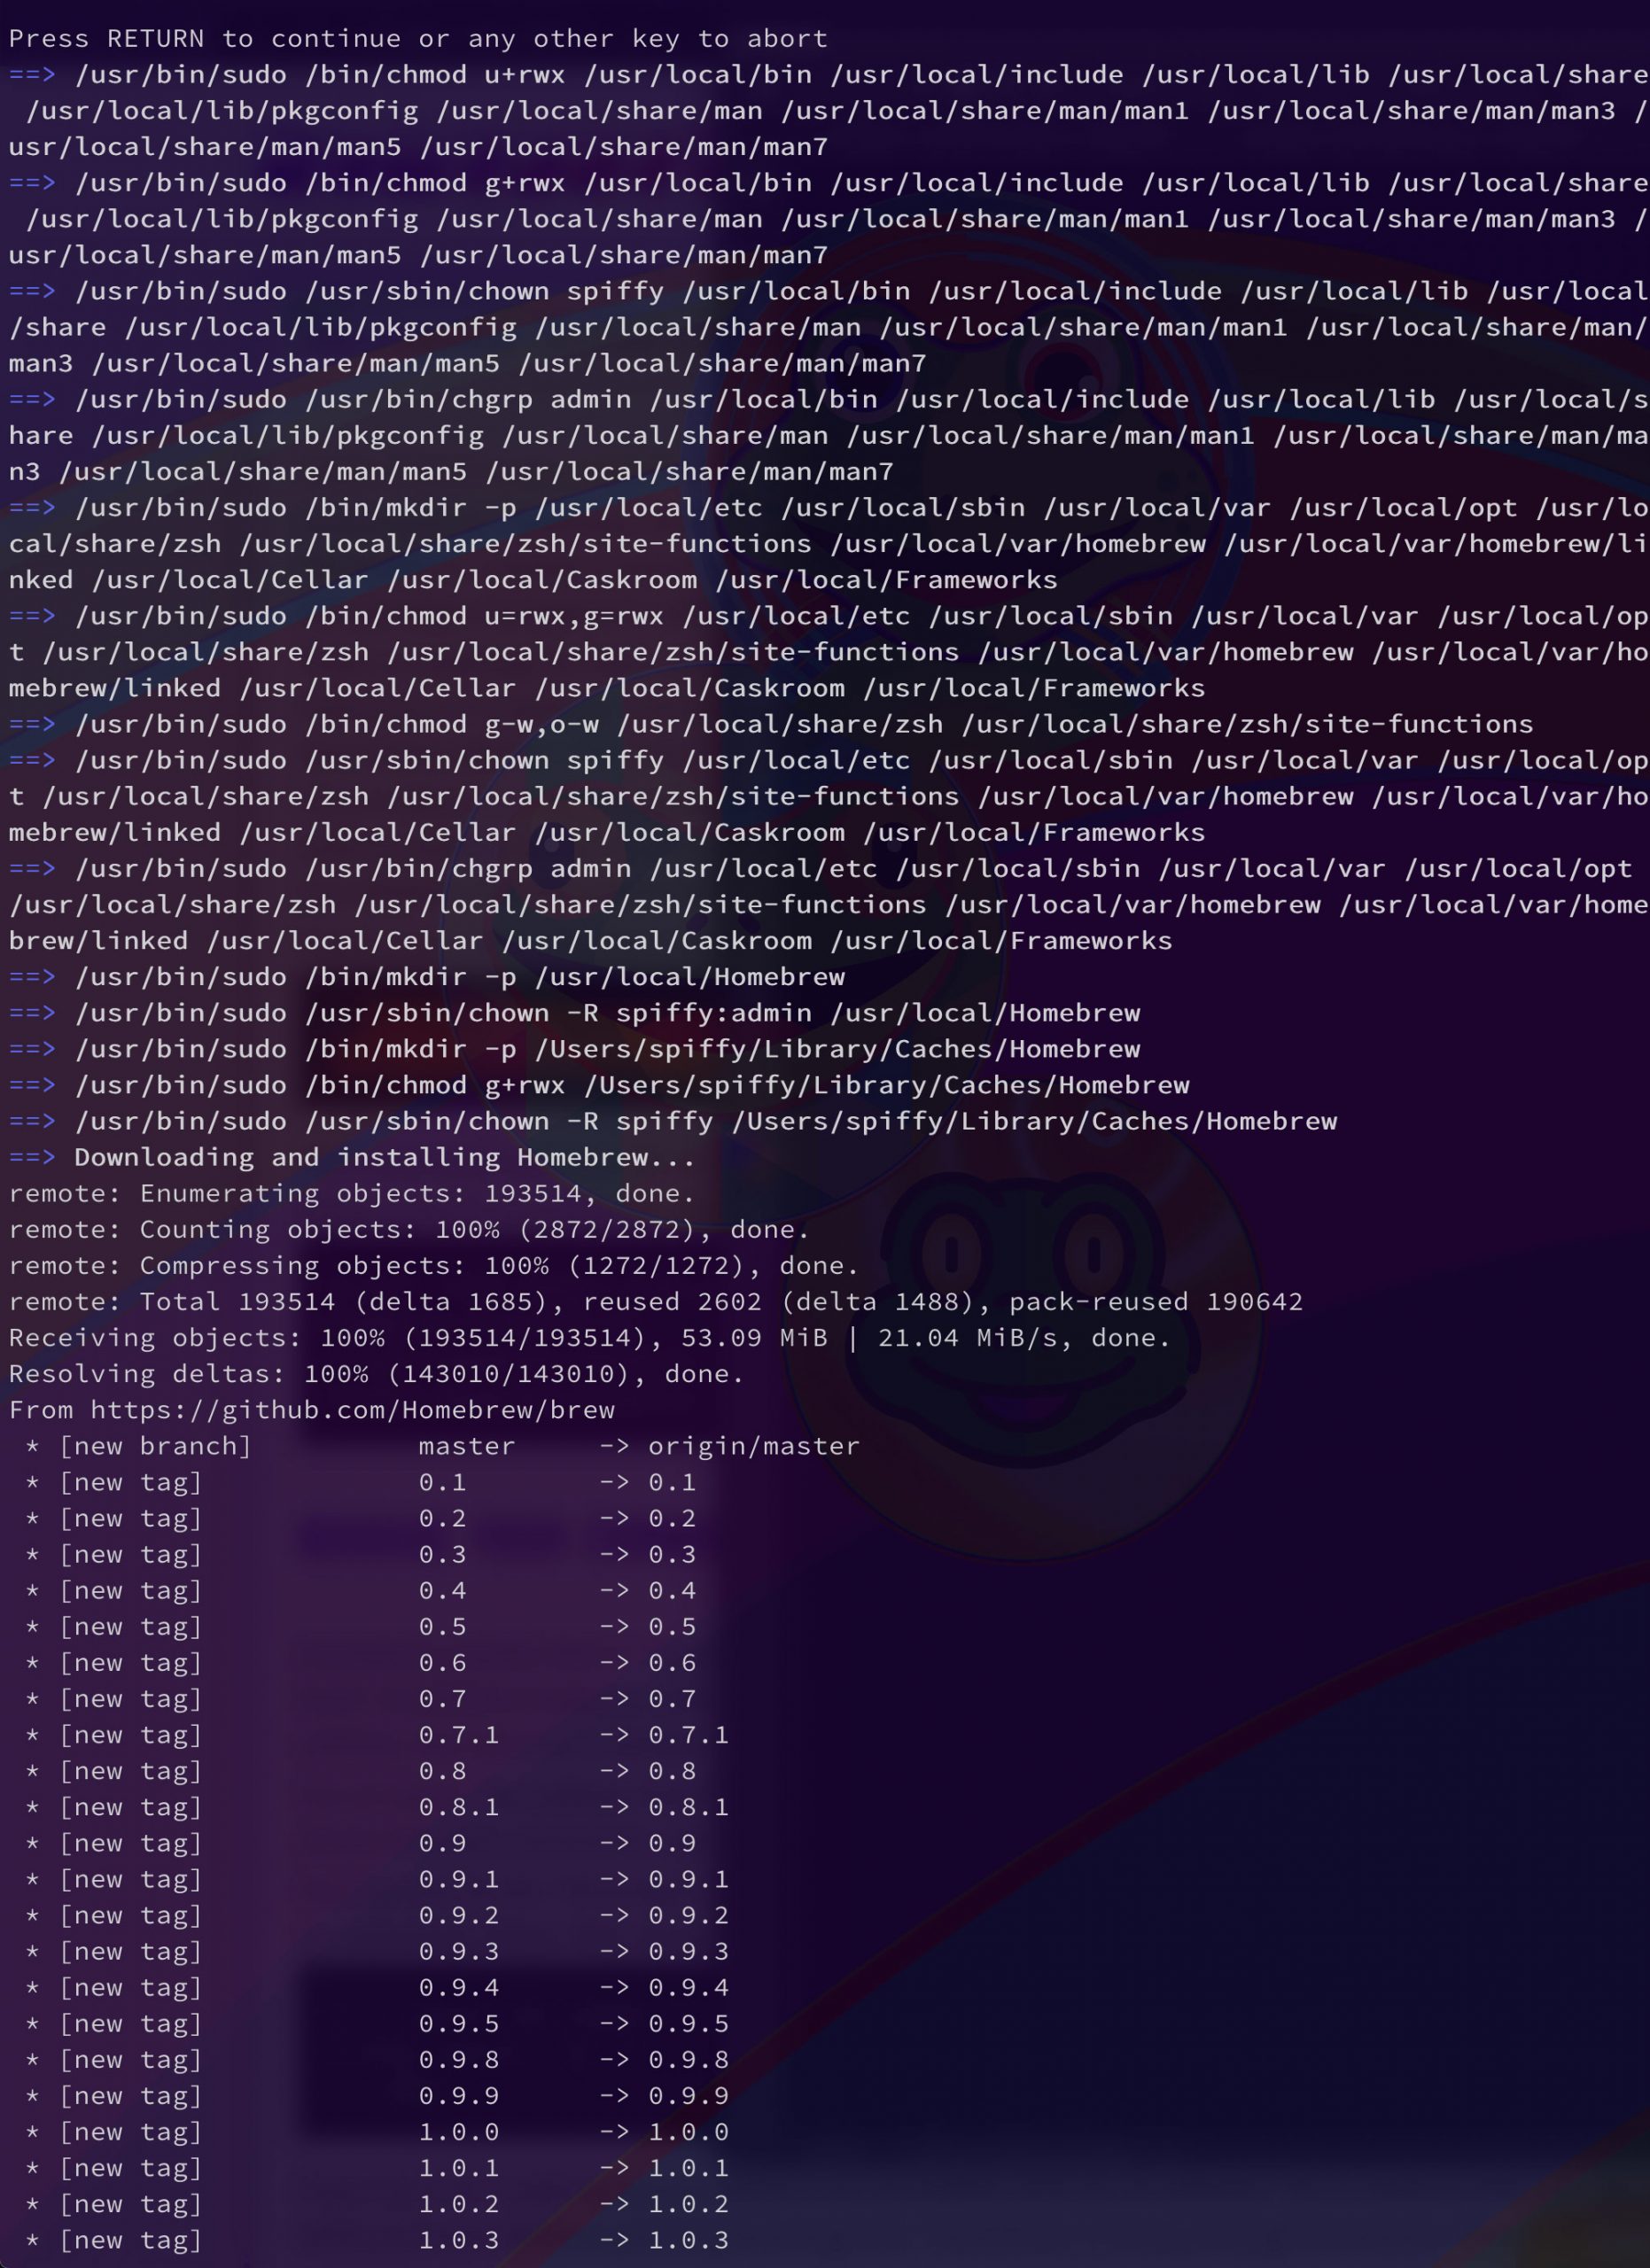
The installation script will explain what it will do and will prompt you to confirm that you want to do it. This lets you know exactly what Homebrew is going to do to your system before you let it proceed. It also ensures you have the prerequisites in place before it continues.
You’ll be prompted to enter your password during the process. However, when you type your password, your keystrokes will not display in the Terminal window. This is a security measure and is something you’ll see often when prompted for passwords on the command line. Even though you don’t see them, your keystrokes are being recorded by the system, so press the RETURN key once you’ve entered your password.
Press the letter y for “yes” whenever you are prompted to confirm the installation.
Once the installation process is complete, you will want to put the directory Homebrew uses to store its executables at the front of the PATH environment variable. This ensures that Homebrew installations will be called over the tools that macOS includes.
The file you’ll modify depends on which shell you’re using. If you’re using Bash, you’ll use the file ~/.bash_profile:
nano ~/.bash_profile
However, if you’re using ZSH, you’ll open the file ~/.zshrc.
nano ~/.zshrc
Once the file opens up in the Terminal window, add the following lines to the end of the file:
~/.bash_profile
# Add Homebrew's executable directory to the front of the PATH
export PATH=/usr/local/bin:$PATH
The first line is a comment that will help you remember what this does if you open this file in the future.
To save your changes, hold down the CTRL key and the letter O, and when prompted, press the RETURN key. Then exit the editor by holding the CTRL key and pressing X. This will return you to your Terminal prompt.
To activate these changes, close and reopen your Terminal app. Alternatively, use the source command to load the file you modified.
If you modified .bash_profile, execute this command:
source ~/.bash_profile
If you modified .zshrc, execute this command:
source ~/.zshrc
Once you have done this, the changes you have made to the PATH environment variable will take effect. They’ll be set correctly when you log in again in the future, as the configuration file for your shell is executed automatically when you open the Terminal app.
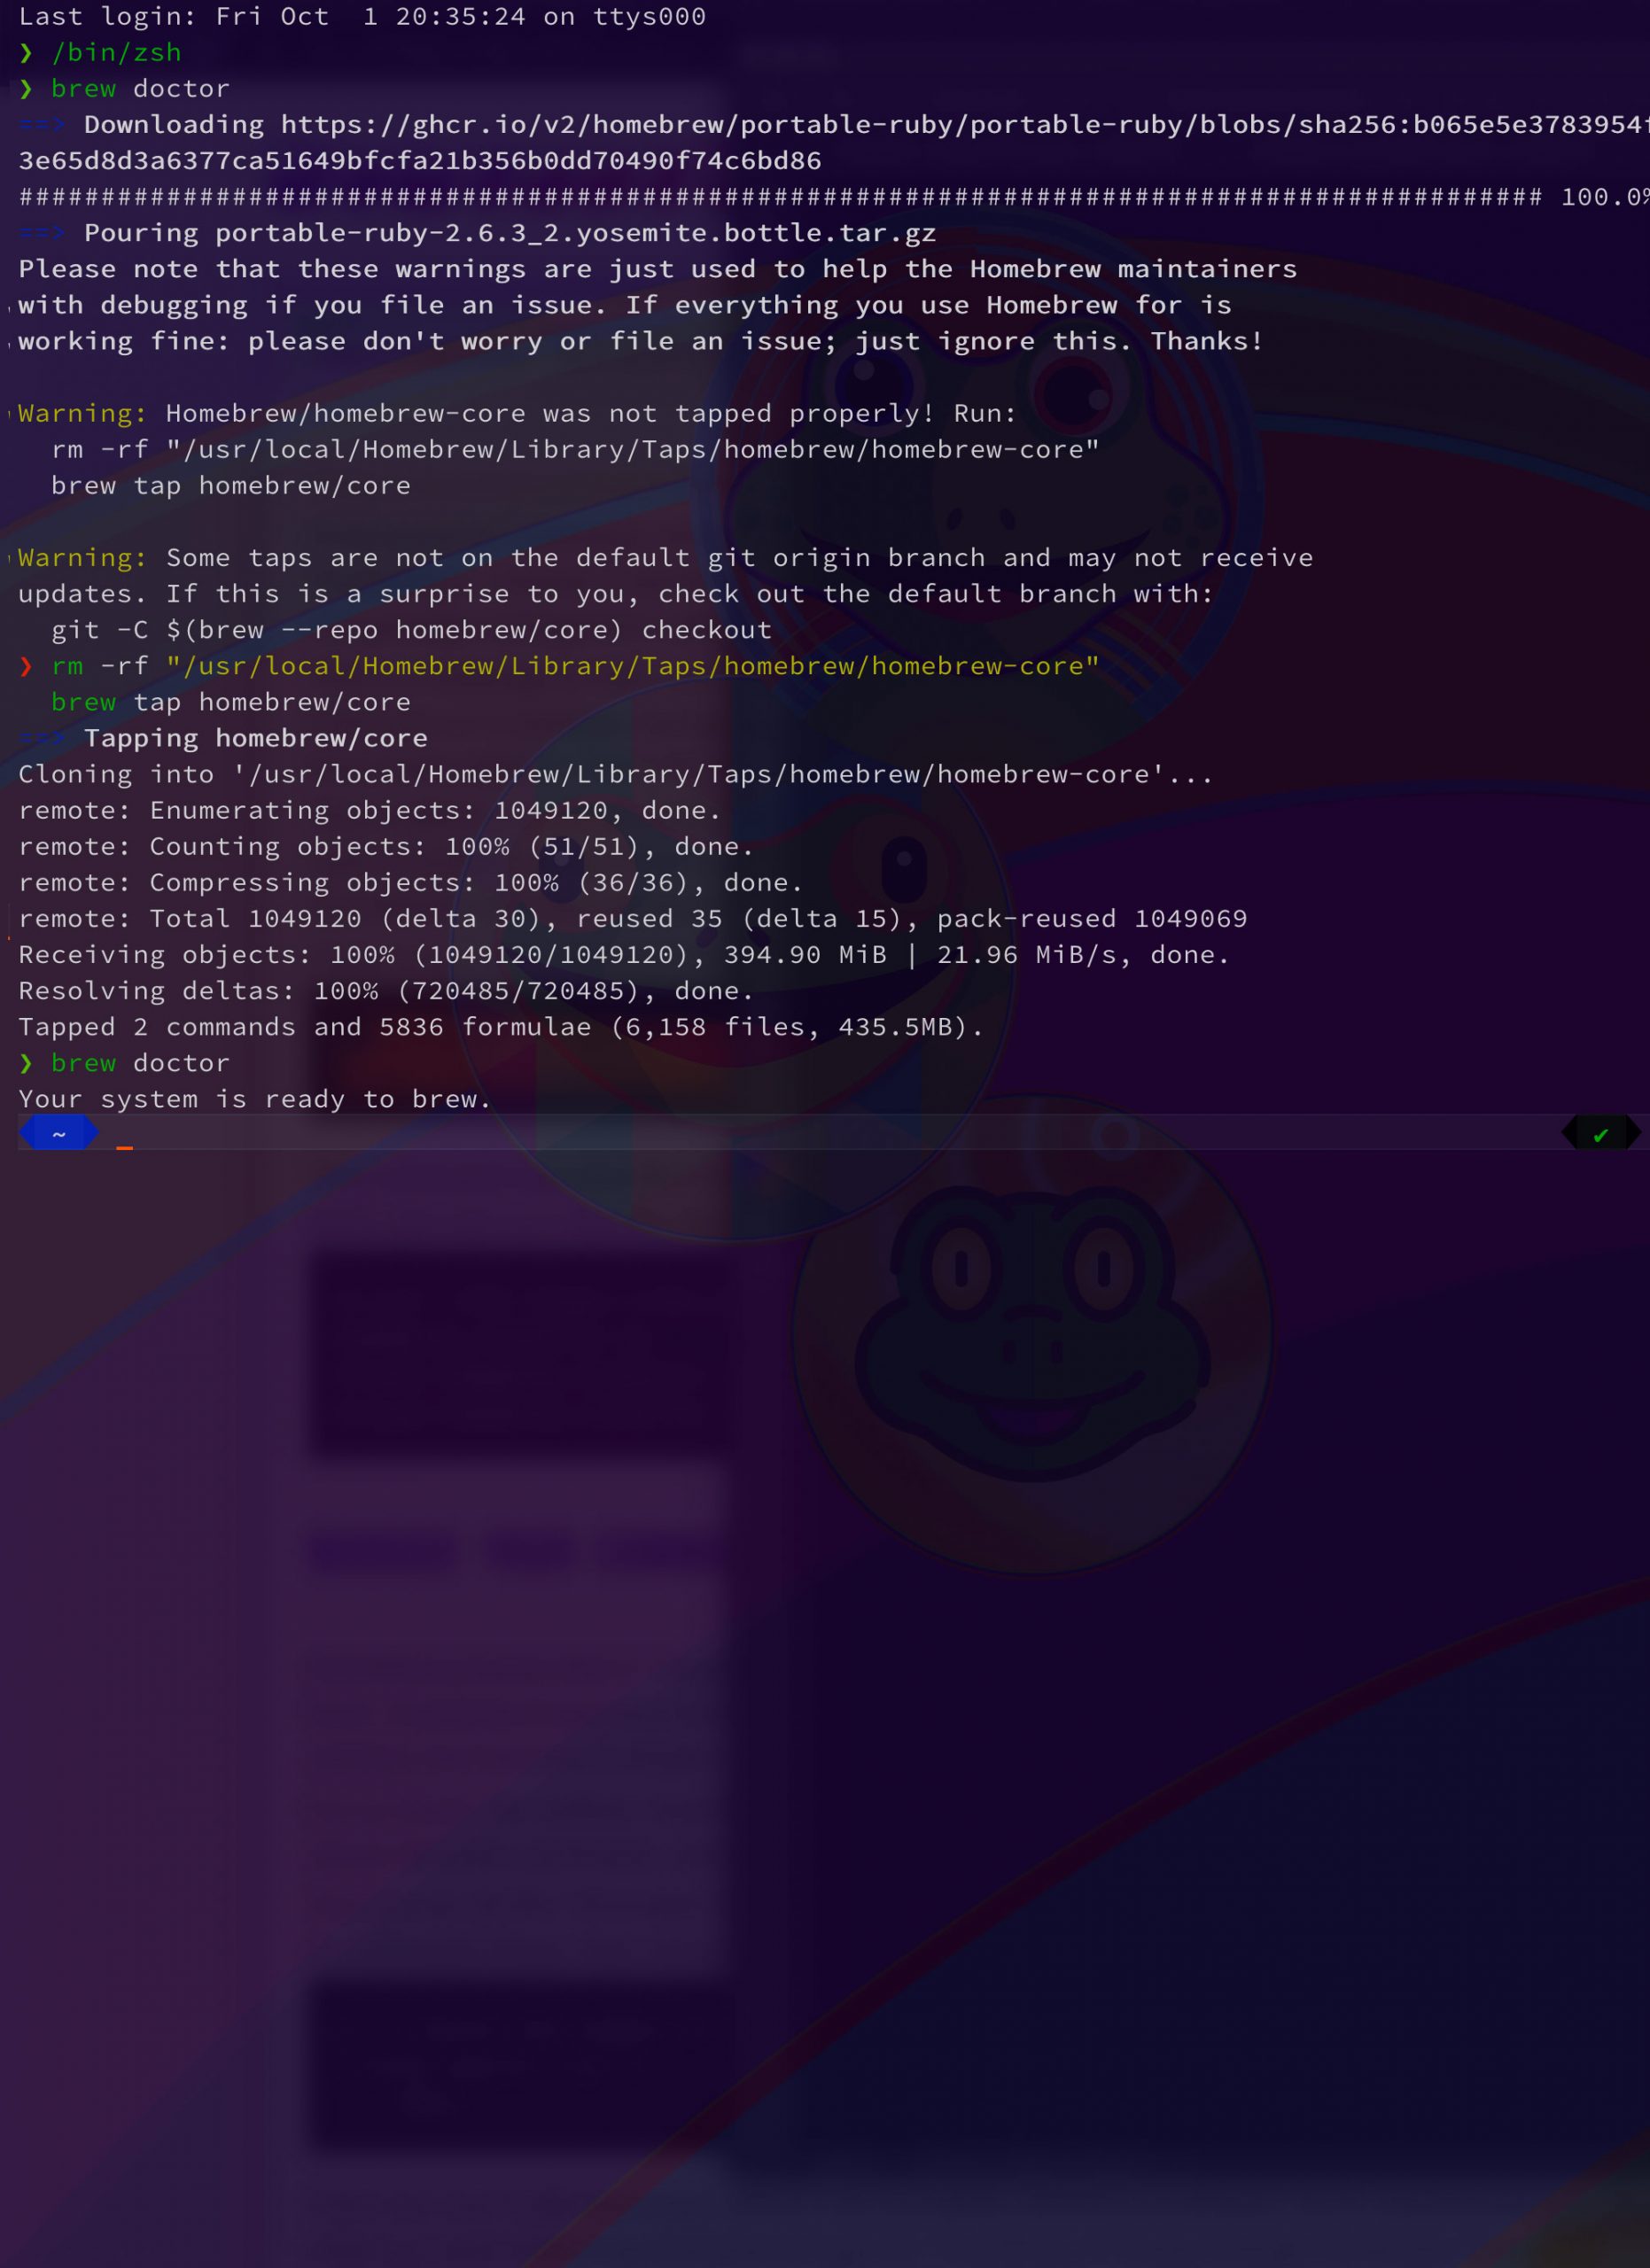
Now let’s verify that Homebrew is set up correctly. Execute this command:
brew doctor
If no updates are required at this time, you’ll see this in your Terminal:
OutputYour system is ready to brew.
Otherwise, you may get a warning to run another command such as brew update to ensure that your installation of Homebrew is up to date. Follow any on-screen instructions to fix your environment before moving on.
Step 4 — Installing, Upgrading, and Removing Packages
Now that Homebrew is installed, use it to download a package. The tree command lets you see a graphical directory tree and is available via Homebrew.
Install tree with the brew install command:
brew install tree
Homebrew will update its list of packages and then download and install the tree command:
Output
Updating Homebrew...

==> Downloading https://homebrew.bintray.com/bottles/tree-1.8.0.catalina.bottle.tar.gz
######################################################################## 100.0%
==> Pouring tree-1.8.0.catalina.bottle.tar.gz
🍺  /usr/local/Cellar/tree/1.8.0: 8 files, 117.2KB
Homebrew installs files to /usr/local by default, so they won’t interfere with future macOS updates. Verify that tree is installed by displaying the command’s location with the which command:
which tree
The output shows that tree is located in /usr/local/bin:
Output/usr/local/bin/tree
Run the tree command to see the version:
tree --version
The version prints to the screen, indicating it’s installed:
Outputtree v1.8.0 (c) 1996 - 2018 by Steve Baker, Thomas Moore, Francesc Rocher, Florian Sesser, Kyosuke Tokoro
Occasionally, you’ll want to upgrade an existing package. Use the brew upgrade command, followed by the package name:
brew upgrade tree
You can run brew upgrade with no additional arguments to upgrade all programs and packages Homebrew manages.
When you install a new version, Homebrew keeps the older version around. After a while, you might want to reclaim disk space by removing these older copies. Run brew cleanup to remove all old versions of your Homebrew-managed software.
To remove a package you’re no longer using, use brew uninstall. To uninstall the tree command, execute this command:
brew uninstall tree
The output shows that the package was removed:
OutputUninstalling /usr/local/Cellar/tree/1.8.0... (8 files, 117.2KB)
You can use Homebrew to install desktop applications too.
Step 5 — Installing Desktop Applications
You’re not restricted to using Homebrew for command-line tools. Homebrew Cask lets you install desktop applications. This feature is included with Homebrew, so there’s nothing additional to install.
To use Homebrew to install Visual Studio Code, execute the following command:
brew cask install visual-studio-code
The application will install:
OutputUpdating Homebrew...
==> Auto-updated Homebrew!
Updated 1 tap (homebrew/cask).
==> Updated Casks
abstract                  cacher                    chirp                     sipgate-softphone

==> Downloading https://update.code.visualstudio.com/1.48.2/darwin/stable
==> Downloading from https://az764295.vo.msecnd.net/stable/a0479759d6e9ea56afa657e454193f72aef85bd0/VSC
######################################################################## 100.0%
==> Verifying SHA-256 checksum for Cask 'visual-studio-code'.
==> Installing Cask visual-studio-code
==> Moving App 'Visual Studio Code.app' to '/Applications/Visual Studio Code.app'.
==> Linking Binary 'code' to '/usr/local/bin/code'.
🍺  visual-studio-code was successfully installed!
You’ll find the application in your Applications folder, just as if you’d installed it manually.
To remove it, use brew cask uninstall:
brew cask uninstall visual-studio-code
Homebrew will remove the installed software:
Output==> Uninstalling Cask visual-studio-code
==> Backing App 'Visual Studio Code.app' up to '/usr/local/Caskroom/visual-studio-code/1.48.2/Visual St
==> Removing App '/Applications/Visual Studio Code.app'.
==> Unlinking Binary '/usr/local/bin/code'.
==> Purging files for version 1.48.2 of Cask visual-studio-code
It performs a backup first in case the removal fails, but once the program is fully uninstalled, the backup is removed as well.
Step 6 — Uninstalling Homebrew
If you no longer need Homebrew, you can use its uninstall script.
Download the uninstall script with curl:
curl -fsSL -o uninstall.sh https://raw.githubusercontent.com/Homebrew/install/master/uninstall.sh
As always, review the contents of the script with the less command to verify the script’s contents:
less uninstall.sh
Once you’ve verified the script, execute the script with the --help flag to see the various options you can use:
bash uninstall.sh --help
The options display on the screen:
OutputHomebrew Uninstaller
Usage: uninstall.sh [options]
    -p, --path=PATH  Sets Homebrew prefix. Defaults to /usr/local.
        --skip-cache-and-logs
                     Skips removal of HOMEBREW_CACHE and HOMEBREW_LOGS.
    -f, --force      Uninstall without prompting.
    -q, --quiet      Suppress all output.
    -d, --dry-run    Simulate uninstall but don't remove anything.
    -h, --help       Display this message.
Use the -d flag to see what the script will do:
bash uninstall.sh -d
The script will list everything it will delete:
OutputWarning: This script would remove:
/Users/brianhogan/Library/Caches/Homebrew/
/Users/brianhogan/Library/Logs/Homebrew/
/usr/local/Caskroom/
/usr/local/Cellar/
/usr/local/bin/brew -> /usr/local/bin/brew
==> Removing Homebrew installation...
Would delete:
....
When you’re ready to remove everything, execute the script without any flags:
bash uninstall.sh
This removes Homebrew and any programs you’ve installed with it.
Conclusion
In this tutorial you installed and used Homebrew on your Mac. You can now use Homebrew to install command line tools, programming languages, and other utilities you’ll need for software development.
Homebrew has many packages you can install. Visit the official list to search for your favorite programs.
Install Homebrew on Mac OS
https://www.digitalocean.com/community/tutorials/how-to-install-and-use-homebrew-on-macos
Introduction
The command line interface is a non-graphical way to interact with your computer. Instead of clicking buttons with your mouse, you’ll type commands as text and receive text-based feedback. The command line, also known as a shell, lets you automate many tasks you do on your computer daily, and is an essential tool for software developers.
While the command line interface on macOS has a lot of the functionality you’d find in Linux and other Unix systems, it does not ship with a good package manager. A package manager is a collection of software tools that work to automate software installations, configurations, and upgrades. Package managers keep the software they install in a central location and can maintain all software packages on the system in formats that are commonly used.
Homebrew is a package manager for macOS which lets you install free and open-source software using your terminal. You’ll use Homebrew to install developer tools like Python, Ruby, Node.js, and more.
In this tutorial you’ll install and use Homebrew on your Mac.
Prerequisites
You will need a macOS computer running High Sierra or higher with administrative access and an internet connection.
Step 1 — Using the macOS Terminal
To access the command line interface on your Mac, you’ll use the Terminal application provided by macOS. Like any other application, you can find it by going into Finder, navigating to the Applications folder, and then into the Utilities folder. From here, double-click the Terminal application to open it up. Alternatively, you can use Spotlight by holding down the COMMAND key and pressing SPACE to find Terminal by typing it out in the box that appears.
To get more comfortable using the command line, take a look at An Introduction to the Linux Terminal. The command line interface on macOS is very similar, and the concepts in that tutorial are directly applicable.
Now that you have the Terminal running, let’s install some additional tools that Homebrew needs.
Step 2 — Installing Xcode’s Command Line Tools
Xcode is an integrated development environment (IDE) that is comprised of software development tools for macOS. You won’t need Xcode to use Homebrew, but some of the software and components you’ll want to install will rely on Xcode’s Command Line Tools package.
Execute the following command in the Terminal to download and install these components:
xcode-select --install
You’ll be prompted to start the installation, and then prompted again to accept a software license. Then the tools will download and install automatically.
You can now install Homebrew.
Step 3 — Installing and Setting Up Homebrew
To install Homebrew, you’ll download an installation script and then execute the script.
First, download the script to your local machine by typing the following command in your Terminal window:
curl -fsSL -o install.sh https://raw.githubusercontent.com/Homebrew/install/master/install.sh
The command uses curl to download the Homebrew installation script from Homebrew’s Git repository on GitHub.
Let’s walk through the flags that are associated with the curl command:
- The –
for--failflag tells the Terminal window to give no HTML document output on server errors. - The
-sor--silentflag mutescurlso that it does not show the progress meter, and combined with the-Sor--show-errorflag it will ensure thatcurlshows an error message if it fails. - The
-Lor--locationflag will tellcurlto handle redirects. If the server reports that the requested page has moved to a different location, it’ll automatically execute the request again using the new location. - The
-oswitch specifies a local filename for the file.
Before running a script you’ve download from the Internet, you should review its contents so you know what the script will do. Use the less command to look at the installation script:
less install.sh
Once you’re comfortable with the contents of the script, execute the script with the bash command:
/bin/bash install.sh
The installation script will explain what it will do and will prompt you to confirm that you want to do it. This lets you know exactly what Homebrew is going to do to your system before you let it proceed. It also ensures you have the prerequisites in place before it continues.
You’ll be prompted to enter your password during the process. However, when you type your password, your keystrokes will not display in the Terminal window. This is a security measure and is something you’ll see often when prompted for passwords on the command line. Even though you don’t see them, your keystrokes are being recorded by the system, so press the RETURN key once you’ve entered your password.
Press the letter y for “yes” whenever you are prompted to confirm the installation.
Once the installation process is complete, you will want to put the directory Homebrew uses to store its executables at the front of the PATH environment variable. This ensures that Homebrew installations will be called over the tools that macOS includes.
The file you’ll modify depends on which shell you’re using. If you’re using Bash, you’ll use the file ~/.bash_profile:
nano ~/.bash_profile
However, if you’re using ZSH, you’ll open the file ~/.zshrc.
nano ~/.zshrc
Once the file opens up in the Terminal window, add the following lines to the end of the file:
~/.bash_profile
# Add Homebrew's executable directory to the front of the PATH
export PATH=/usr/local/bin:$PATH
The first line is a comment that will help you remember what this does if you open this file in the future.
To save your changes, hold down the CTRL key and the letter O, and when prompted, press the RETURN key. Then exit the editor by holding the CTRL key and pressing X. This will return you to your Terminal prompt.
To activate these changes, close and reopen your Terminal app. Alternatively, use the source command to load the file you modified.
If you modified .bash_profile, execute this command:
source ~/.bash_profile
If you modified .zshrc, execute this command:
source ~/.zshrc
Once you have done this, the changes you have made to the PATH environment variable will take effect. They’ll be set correctly when you log in again in the future, as the configuration file for your shell is executed automatically when you open the Terminal app.
Now let’s verify that Homebrew is set up correctly. Execute this command:
brew doctor
If no updates are required at this time, you’ll see this in your Terminal:
OutputYour system is ready to brew.
Otherwise, you may get a warning to run another command such as brew update to ensure that your installation of Homebrew is up to date. Follow any on-screen instructions to fix your environment before moving on.
Step 4 — Installing, Upgrading, and Removing Packages
Now that Homebrew is installed, use it to download a package. The tree command lets you see a graphical directory tree and is available via Homebrew.
Install tree with the brew install command:
brew install tree
Homebrew will update its list of packages and then download and install the tree command:
Output
Updating Homebrew...

==> Downloading https://homebrew.bintray.com/bottles/tree-1.8.0.catalina.bottle.tar.gz
######################################################################## 100.0%
==> Pouring tree-1.8.0.catalina.bottle.tar.gz
🍺  /usr/local/Cellar/tree/1.8.0: 8 files, 117.2KB
Homebrew installs files to /usr/local by default, so they won’t interfere with future macOS updates. Verify that tree is installed by displaying the command’s location with the which command:
which tree
The output shows that tree is located in /usr/local/bin:
Output/usr/local/bin/tree
Run the tree command to see the version:
tree --version
The version prints to the screen, indicating it’s installed:
Outputtree v1.8.0 (c) 1996 - 2018 by Steve Baker, Thomas Moore, Francesc Rocher, Florian Sesser, Kyosuke Tokoro
Occasionally, you’ll want to upgrade an existing package. Use the brew upgrade command, followed by the package name:
brew upgrade tree
You can run brew upgrade with no additional arguments to upgrade all programs and packages Homebrew manages.
When you install a new version, Homebrew keeps the older version around. After a while, you might want to reclaim disk space by removing these older copies. Run brew cleanup to remove all old versions of your Homebrew-managed software.
To remove a package you’re no longer using, use brew uninstall. To uninstall the tree command, execute this command:
brew uninstall tree
The output shows that the package was removed:
OutputUninstalling /usr/local/Cellar/tree/1.8.0... (8 files, 117.2KB)
You can use Homebrew to install desktop applications too.
Step 5 — Installing Desktop Applications
You’re not restricted to using Homebrew for command-line tools. Homebrew Cask lets you install desktop applications. This feature is included with Homebrew, so there’s nothing additional to install.
To use Homebrew to install Visual Studio Code, execute the following command:
brew cask install visual-studio-code
The application will install:
OutputUpdating Homebrew...
==> Auto-updated Homebrew!
Updated 1 tap (homebrew/cask).
==> Updated Casks
abstract                  cacher                    chirp                     sipgate-softphone

==> Downloading https://update.code.visualstudio.com/1.48.2/darwin/stable
==> Downloading from https://az764295.vo.msecnd.net/stable/a0479759d6e9ea56afa657e454193f72aef85bd0/VSC
######################################################################## 100.0%
==> Verifying SHA-256 checksum for Cask 'visual-studio-code'.
==> Installing Cask visual-studio-code
==> Moving App 'Visual Studio Code.app' to '/Applications/Visual Studio Code.app'.
==> Linking Binary 'code' to '/usr/local/bin/code'.
🍺  visual-studio-code was successfully installed!
You’ll find the application in your Applications folder, just as if you’d installed it manually.
To remove it, use brew cask uninstall:
brew cask uninstall visual-studio-code
Homebrew will remove the installed software:
Output==> Uninstalling Cask visual-studio-code
==> Backing App 'Visual Studio Code.app' up to '/usr/local/Caskroom/visual-studio-code/1.48.2/Visual St
==> Removing App '/Applications/Visual Studio Code.app'.
==> Unlinking Binary '/usr/local/bin/code'.
==> Purging files for version 1.48.2 of Cask visual-studio-code
It performs a backup first in case the removal fails, but once the program is fully uninstalled, the backup is removed as well.
Step 6 — Uninstalling Homebrew
If you no longer need Homebrew, you can use its uninstall script.
Download the uninstall script with curl:
curl -fsSL -o uninstall.sh https://raw.githubusercontent.com/Homebrew/install/master/uninstall.sh
As always, review the contents of the script with the less command to verify the script’s contents:
less uninstall.sh
Once you’ve verified the script, execute the script with the --help flag to see the various options you can use:
bash uninstall.sh --help
The options display on the screen:
OutputHomebrew Uninstaller
Usage: uninstall.sh [options]
    -p, --path=PATH  Sets Homebrew prefix. Defaults to /usr/local.
        --skip-cache-and-logs
                     Skips removal of HOMEBREW_CACHE and HOMEBREW_LOGS.
    -f, --force      Uninstall without prompting.
    -q, --quiet      Suppress all output.
    -d, --dry-run    Simulate uninstall but don't remove anything.
    -h, --help       Display this message.
Use the -d flag to see what the script will do:
bash uninstall.sh -d
The script will list everything it will delete:
OutputWarning: This script would remove:
/Users/brianhogan/Library/Caches/Homebrew/
/Users/brianhogan/Library/Logs/Homebrew/
/usr/local/Caskroom/
/usr/local/Cellar/
/usr/local/bin/brew -> /usr/local/bin/brew
==> Removing Homebrew installation...
Would delete:
....
When you’re ready to remove everything, execute the script without any flags:
bash uninstall.sh
This removes Homebrew and any programs you’ve installed with it.
Conclusion
In this tutorial you installed and used Homebrew on your Mac. You can now use Homebrew to install command line tools, programming languages, and other utilities you’ll need for software development.
Homebrew has many packages you can install. Visit the official list to search for your favorite programs.