
Quick House Cleaning Items after Upgrading to GA4
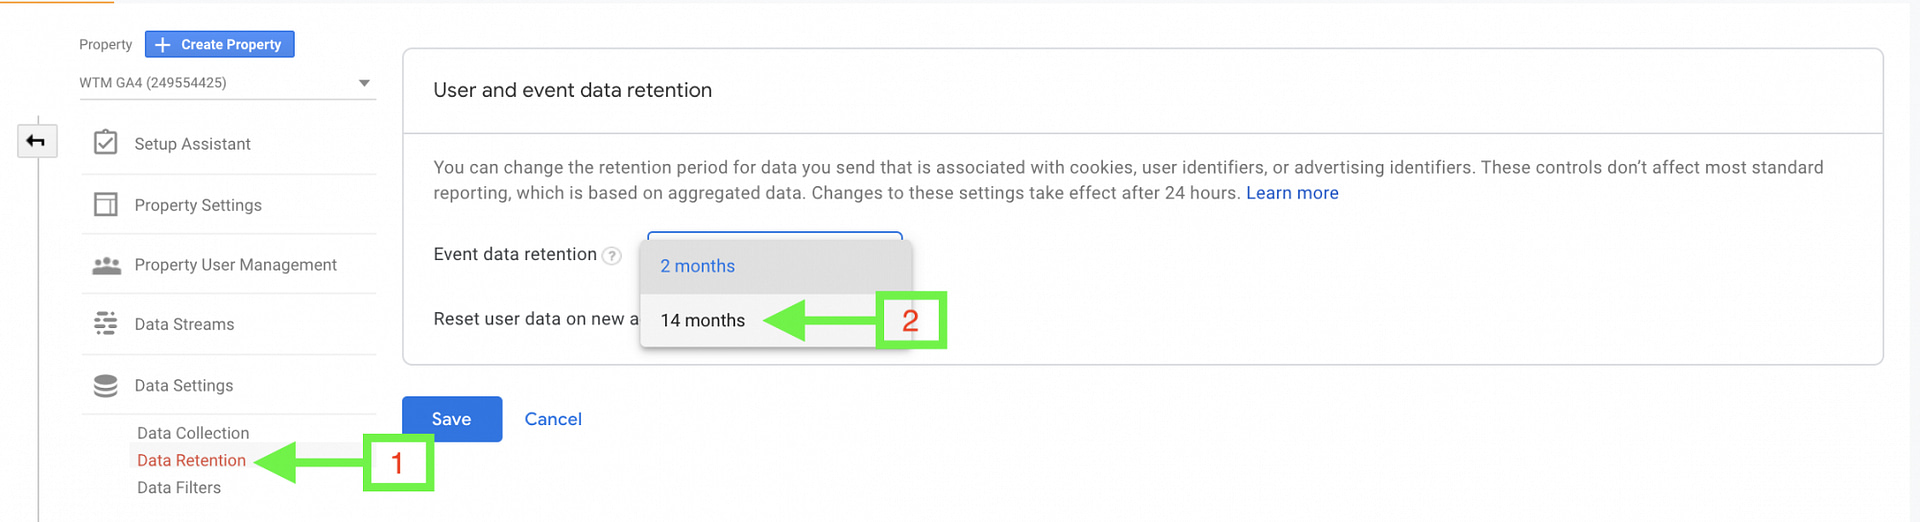
Data Retention
Like UA, there is a Data Retention setting within GA4 that lets you choose how long GA retains user and event data before automatically deleting it. I recommend bumping it up to 14 months, the maximum amount allowed. It can be found under Property < Data Settings < Data Retention.
Define Internal Traffic
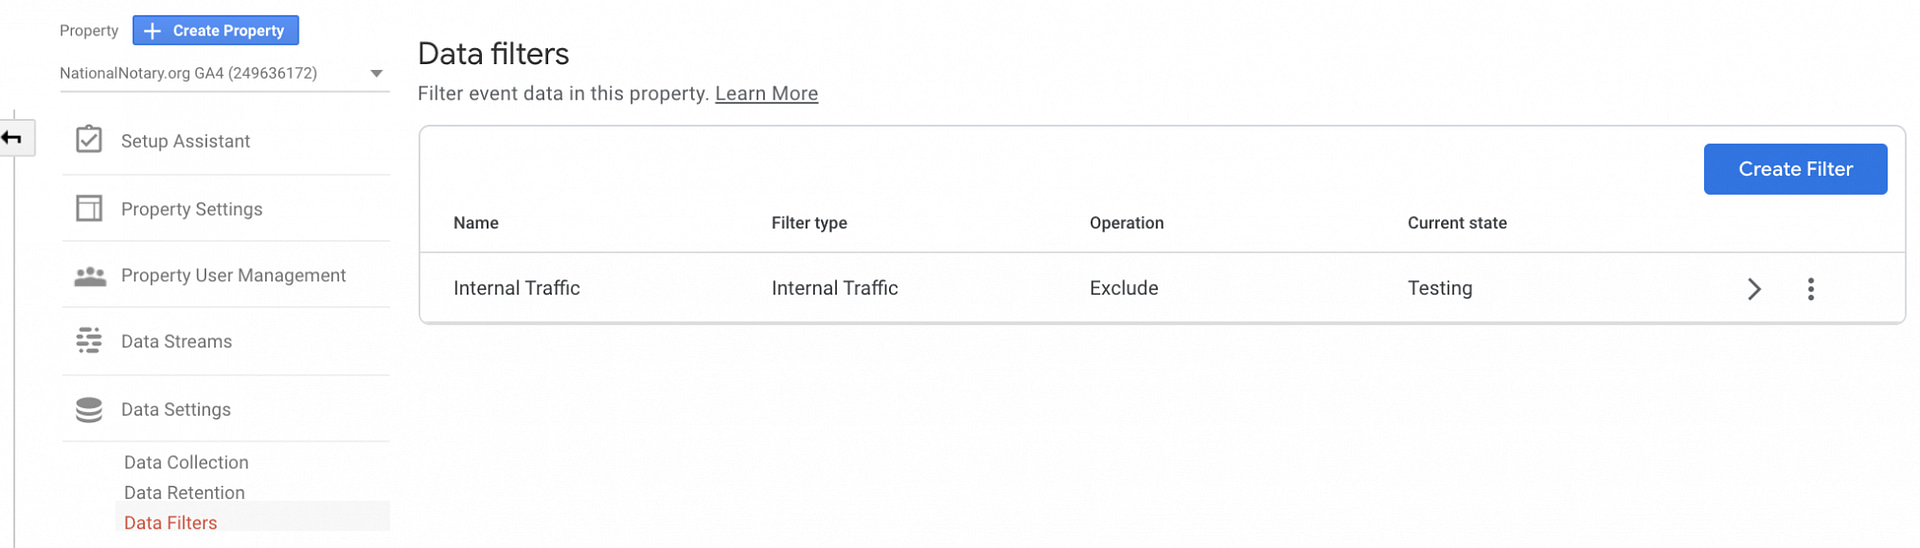
In Data Settings, you will see another setting that should be familiar called Data Filters. Similar to the View > Filters setting in UA, GA4 gives you the ability to filter event data in your property. Let’s walk through excluding internal traffic by excluding our internal IP address.
By default, GA4 will automatically create a Data Filter to exclude internal traffic. However, it is up to us to configure the internal traffic to be excluded. Before we dive into the settings within the Data filter, let’s define the internal traffic.
- Navigate to Data Streams, select your stream and click ‘Tagging Settings’
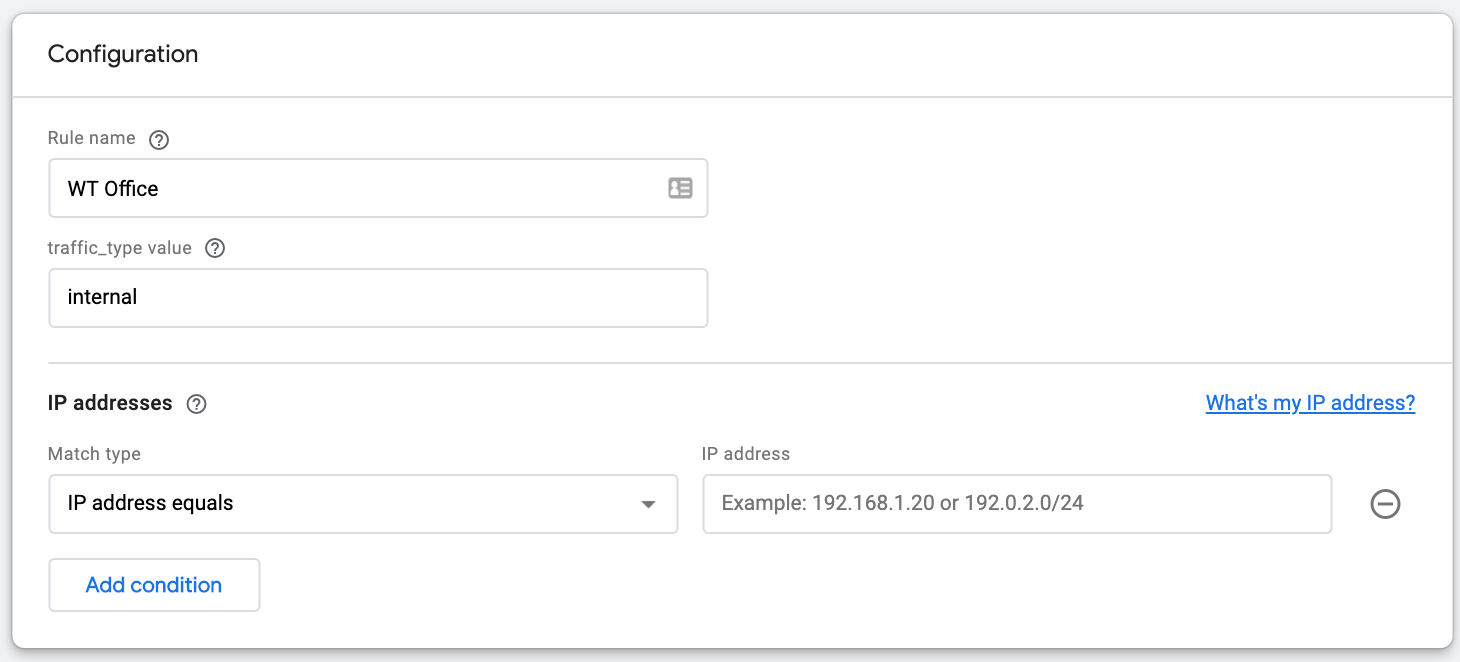
- Select ‘Define internal traffic’ and click ‘Create.’
- In ‘Configuration,’ enter a descriptive Rule name and enter the IP address to be excluded.
- Hit Save.
Navigate to Data Settings > Data Filters and select the ‘Internal Traffic’ filter that GA4 created.
The Filter details don’t require changes with a standard IP exclusion. However, we have 3 options in ‘Filter state’ that are new with GA4:
- Testing: The filter doesn’t permanently change the data but can be identified with the dimension name ‘test data filter.’
- Active: The filter permanently changes the data.
- Inactive: The filter is not considered for processing the data.

Testing can be selected if you want GA4 to consider the data but not to permanently change it. When Testing is selected, the data from the filter can be viewed in reports by using the ‘test data filter’ dimension. This can be temporary to test your filter before making it Active. If you are certain that the IP Filter should permanently be excluded from the data, select ‘Active’ as your Filter state.
With data collection enabled and house cleaning items complete, now you can start exploring GA4. The dashboard and reports are completely different than UA and it will take some time to get used to. Explore the different reports as this will become the new long term standard for Analytics.
GA4 will look a little light at first, but there are many enhancements available that offer more robust reporting and analysis. The GA360 ‘Analysis Hub’ enhancement is available for free within GA4. The ‘Analysis Hub’ report takes a deep dive into user behavior, funnels, and pathing. It will be important to remember that GA4 uses Event based modeling and User scoped dimensions.
To not completely throw you in the deep end, here are some nuggets to help you get familiar with GA4.
Tips for Working with GA4
Mimic the Landing Page Report from UA
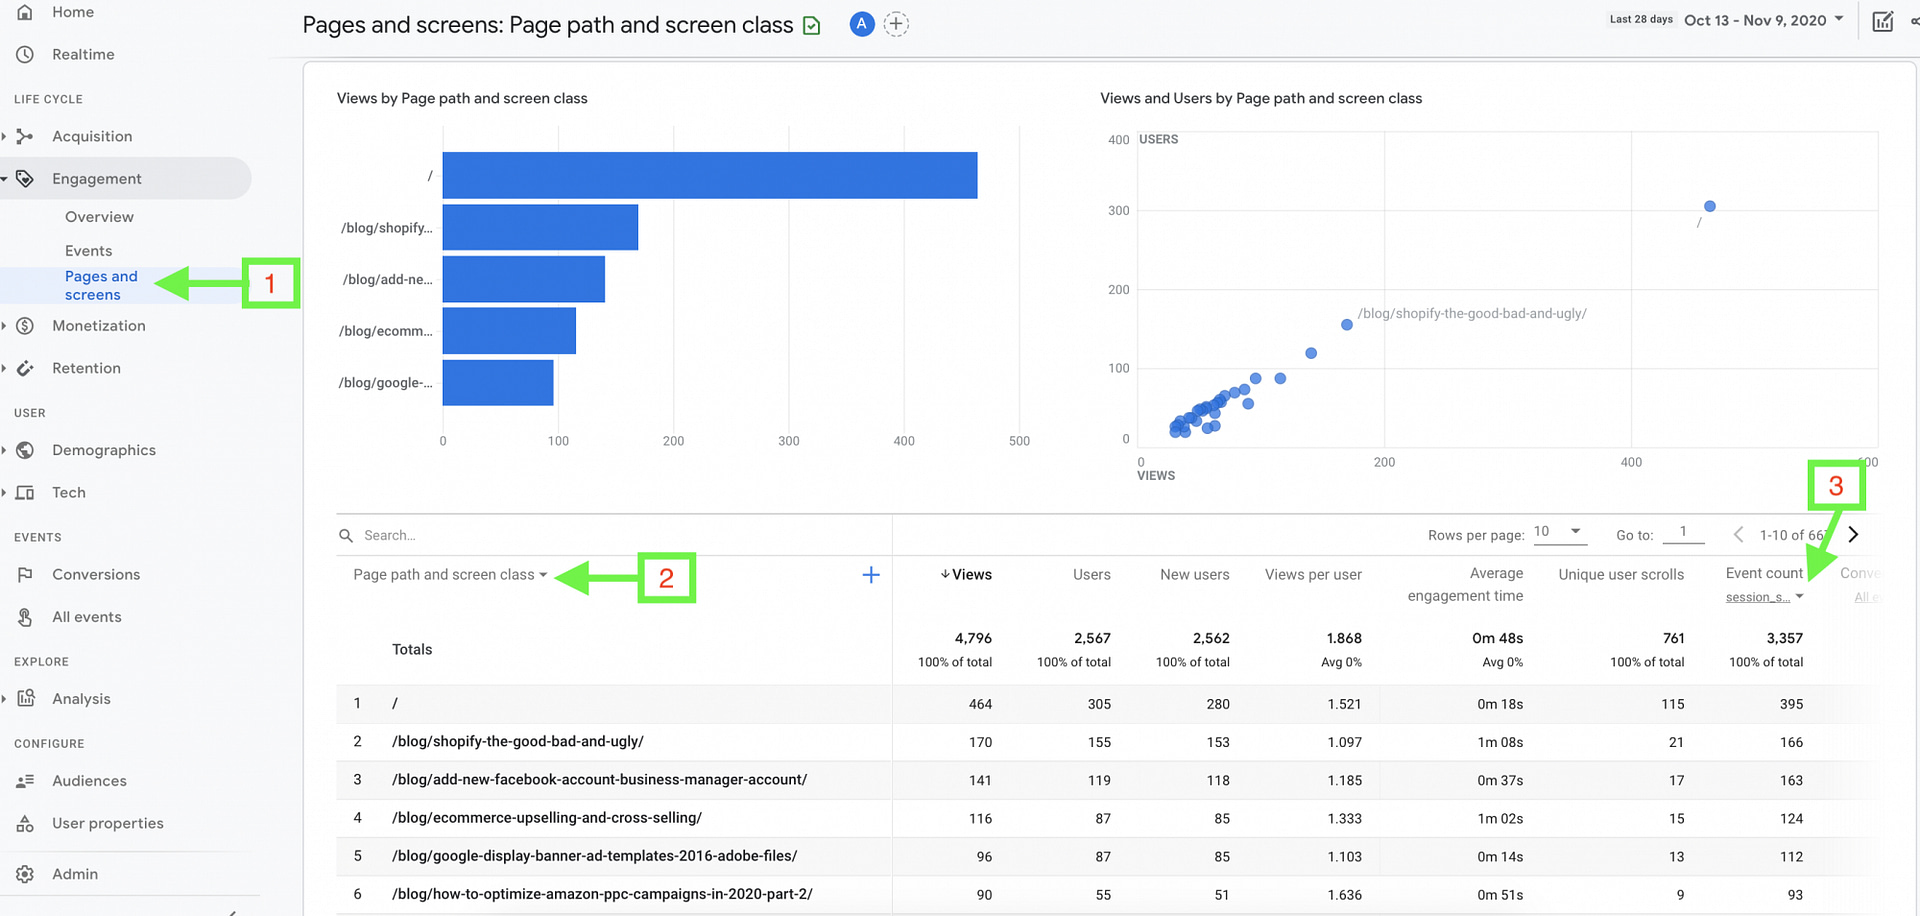
- Navigate to Life Cycle > Engagement > Pages and screen
- Select ‘Page path and screen class’
- Expand the ‘Event count’ dropdown and select ‘session_start’*
*Note – Sessions will differ when comparing GA4 to UA. Since GA4 processes data differently with Event based modeling, Sessions may appear lower when compared to UA.
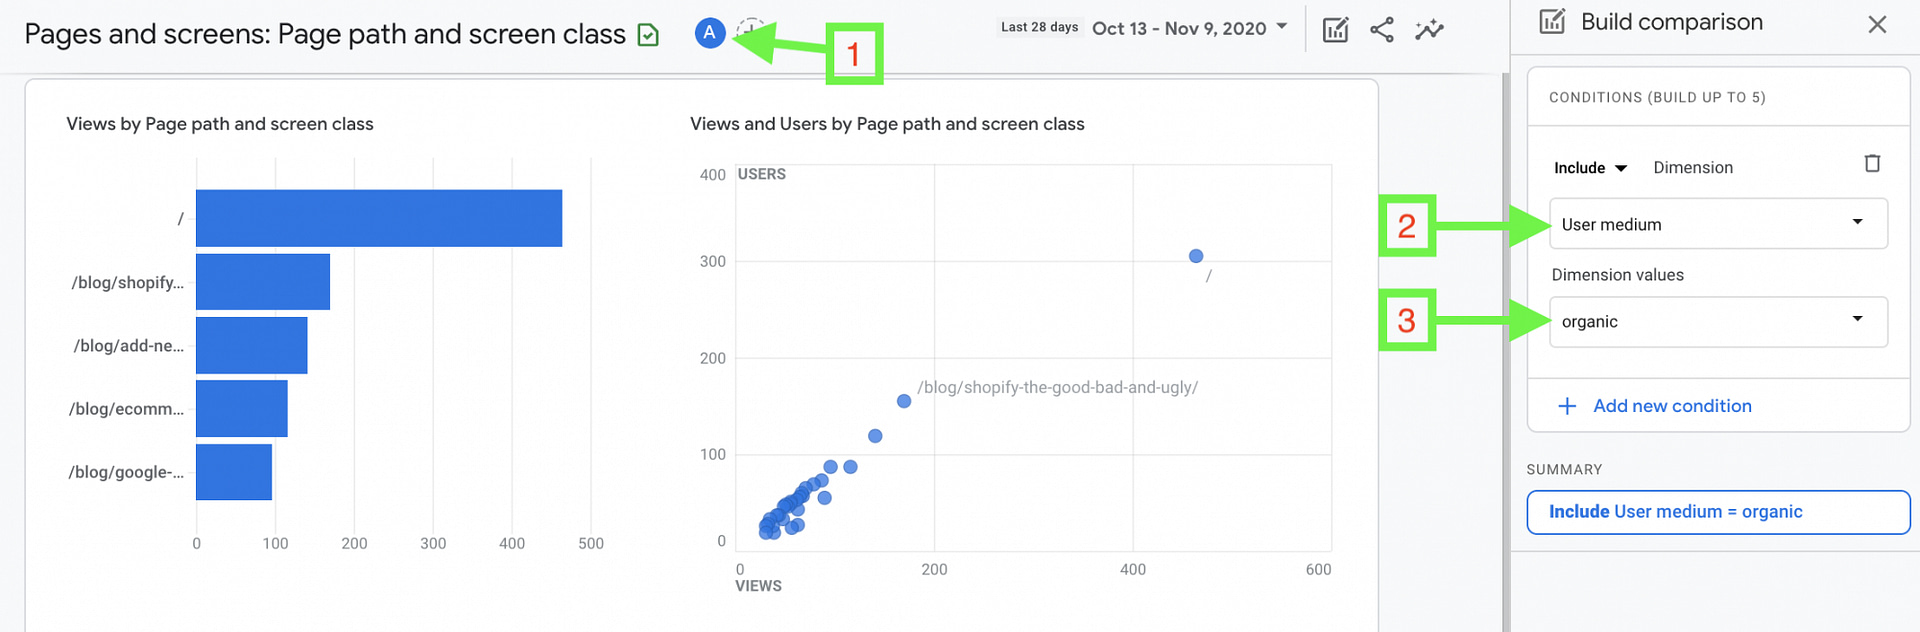
View Reports by Medium (Comparable to Segments and Acquisition Report)
- Click the ‘All Users’ icon at the top of the page to edit the Build comparison
- Type ‘User medium’ into the Audience Name dimension field
- Select ‘organic’ from the dimension value dropdown and hit Apply
Other Mediums such as ‘cpc’ or ‘social’ can also be applied to reports. ‘User source/medium,’ ‘User source,’ and ‘User campaign’ are other available dimensions.
Session dimensions are available in GA4 but are less important than UA. Start using User scoped dimensions as GA4 is more focused on user interactions than session based interactions.
Setting Up Thank You Pages as Custom Events and Conversions
In GA4, Conversions are built from Events. GA4 Conversion implementation will be different if you’re used to the standard Conversion configurations in UA. However, if you’re a Google Tag Manager user this should be familiar.
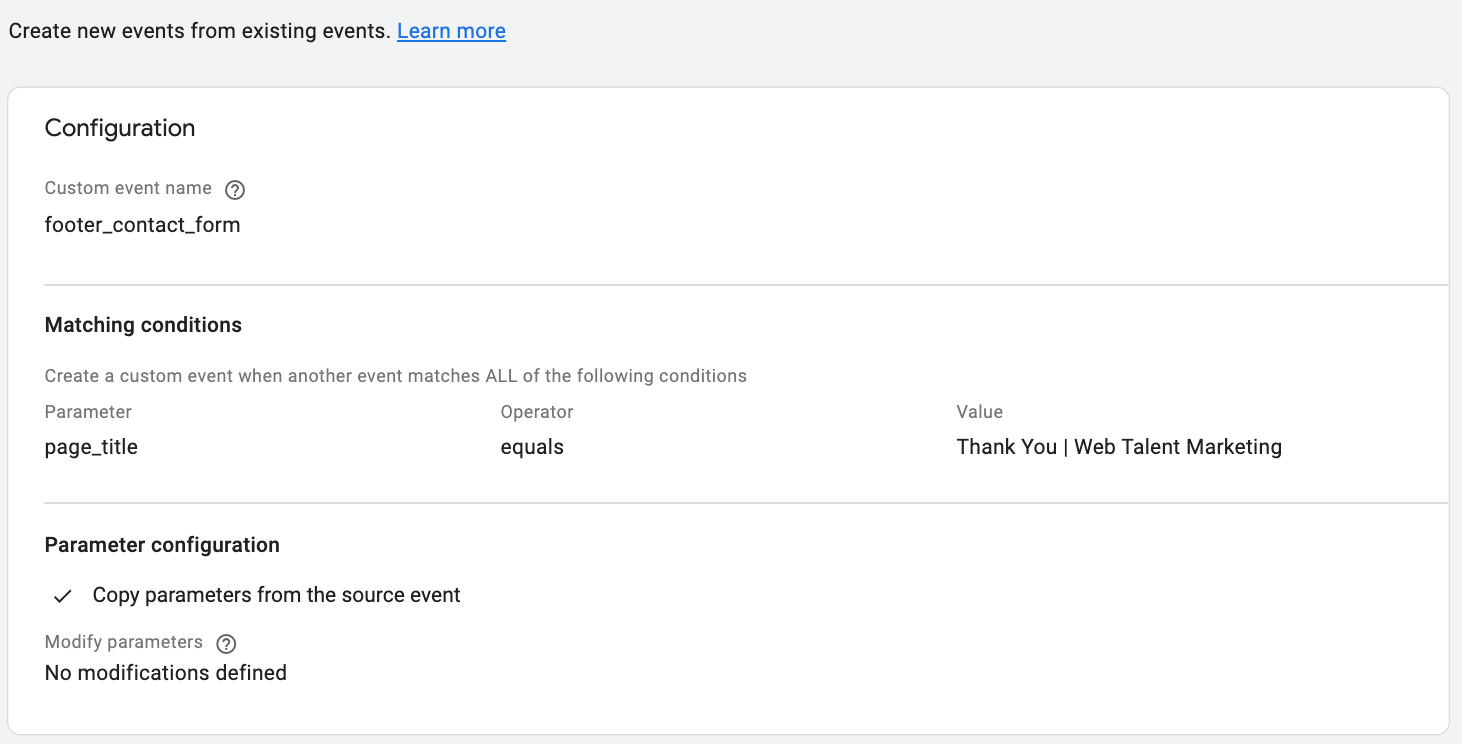
GA4 will pick up some Events, but it won’t find everything you need to complete your GA4 configuration. For example, our thank you page from a contact form wasn’t being collected as an Event so we created a Custom Event in GA4 to start collecting this data.
- Navigate to Events > All events
- Select ‘Create event’

The Custom Event will be similar for those who use Tag Manager. The matching conditions are almost a mirror of the Trigger configuration in GTM. Here are the conditions to be configured for the custom event:
- Parameter: This is the referenced event. Similar to the Variables dropdown in GTM, you select the necessary event.
- Operator: Define the condition to trigger the custom event.
- Value: The value of the parameter.
We have two ways to track our thank you page from the available list of parameters in the dropdown. One being the page title (page_title) and the other being the page URL (page_location).
For the sake of testing, we created two Custom Events targeting both parameters but only one is necessary. Below are the two configurations created for our contact form thank you page. The page_location parameter details the entire page URL with protocol and all e.g. https://www.wtmdigital.com/thank-you/.
There are no other pages ending in /thank-you/ on the WTM website. In our case we chose the operator ‘ends with’ but keep in mind that if we had another page ending in /thank-you/, this would also trigger the Custom Event. Remember this when creating Custom Events so you don’t create false positives in your data. Also keep in mind that if you use page_title as the trigger, you’ll have to update it whenever you change the page’s title tag.
GA4 is slow to process the data in the reports. It will take some time for these Custom Events to populate in the All Events report. The Realtime report will render the event hits minutes after testing. Test your events and check Realtime to ensure your configuration is correct.
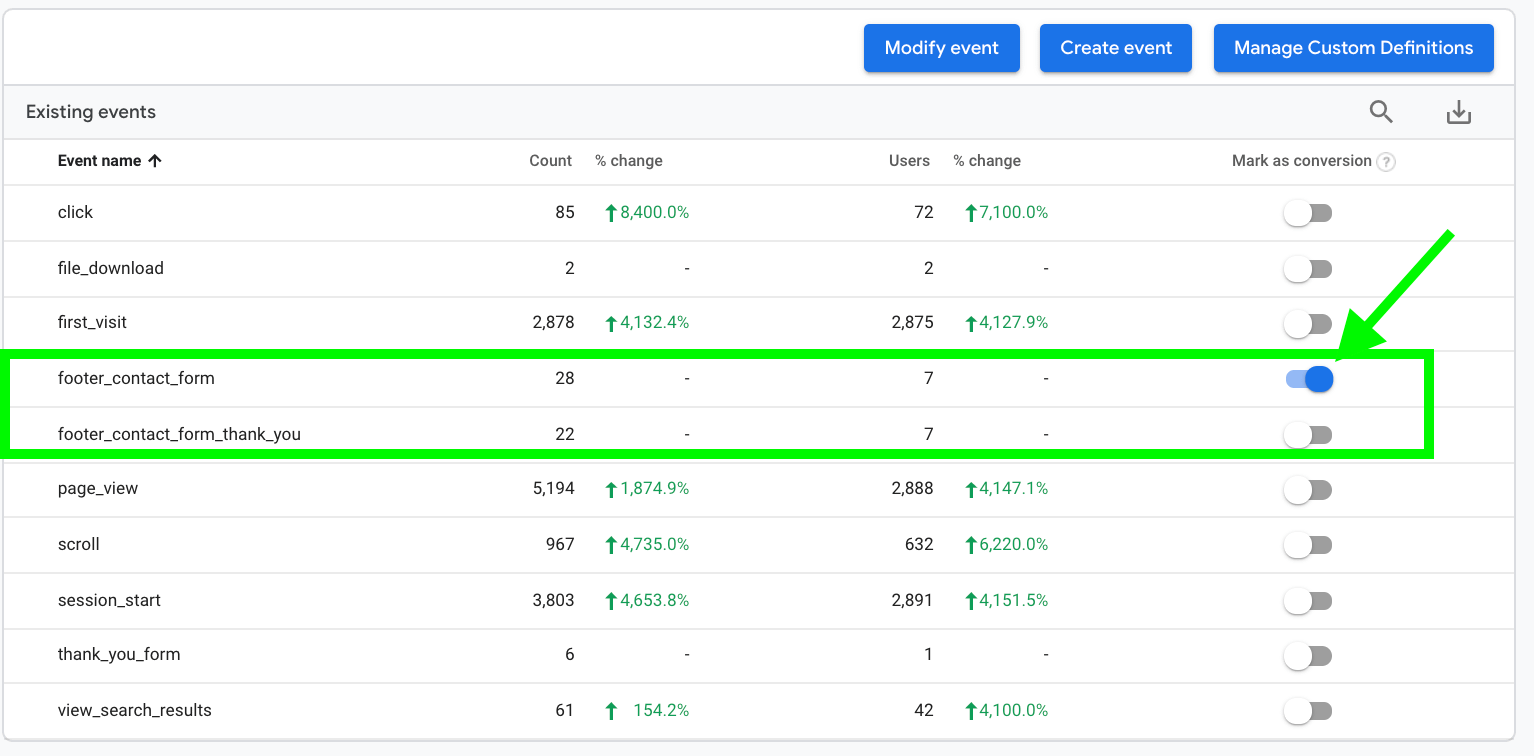
It took 24 hours for our Custom Events to populate in the All Events report. The wait was mandatory for the final step of turning the custom event into a conversion. From the All Events report, mark the event you wish to track as a conversion by switching on the toggle as shown below. This enables the event as a conversion and it can be viewed in the Conversions report.

Need More Tips for GA4?
We’ll be updating and adding more nuggets as improvements to GA4 are still being rolled out. Check back for more details on the latest enhancements and look out for our new piece coming soon about setting up Ecommerce Tracking for GA4!
At WTM, we’re experts at taking your digital marketing to the next level. If you want enhanced website tracking, better SEO, or paid search ads to improve your revenue, contact us now.