I was able to embed my full react application by doing the following…
I built my react app production files with npm run build
I copied those files into the existing web project at the root level
Then I opened the index.html file generated from npm run build and copied the scripts in the head and body sections to the page I wanted to drop in my application
Finally I added a div with the id root (this is what my renderDOM method is looking for) where I wanted my application to appear on the existing web page.
Use create-react-app and then embed it into an existing project
Let’s say you have a static website — be that on WordPress, Wix, Squarespace, or HTML from a server — and you want to add some dazzling functionality to it.
“If only I could use React!” you say to yourself, but time and budget constraints prevent a total overhaul of your website.
The good news is that you are not alone, and the great news is that this guide will show you how to create and embed a React widget within your website! We just have to learn to think about React a little differently…
“React can be used in any web application. It can be embedded in other applications and, with a little care, other applications can be embedded in React.” — React’s official documentation
Getting Started
This guide assumes some working knowledge of React and general web development. If you have never spun up a React application before, there is a great tutorial on the React website!
Let’s start, as many developers do today, by running:
yarn create react-app example-widget
This boilerplate holds a functional React application where you can develop whatever you like. For the sake of this example, I created a simple component that uses the excellent react-live library.
This component renders a web IDE where you can write code and instantly see the outcome — something that would be painfully hard to achieve on a WordPress site yet only takes 28 lines of code in React.
The 4-Step Process — Without Ejecting!
We want our application to mount onto a unique <div></div> that we have control over. Let’s change the application’s target div to something unique:
Line 11: Changing the target div ID to “javascriptExample”
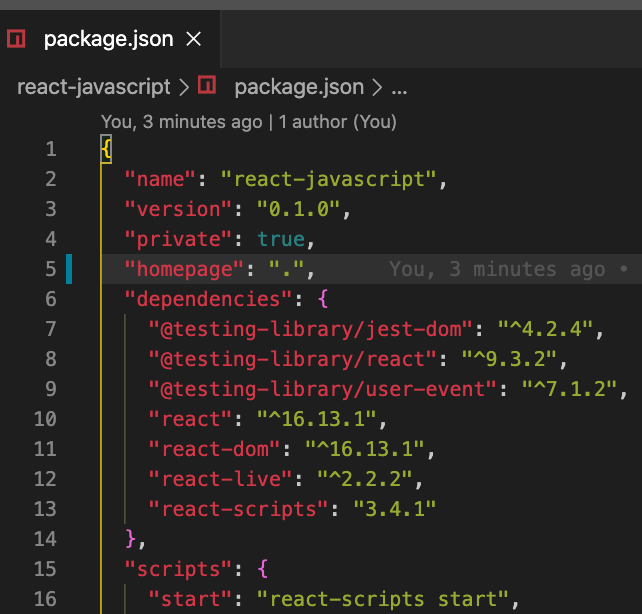
\2. We need to update the application’s homepage to serve the build from wherever your website lives. This is done by adding "homepage": “.” to the package.json file:
Line 5
Note: Things work differently if you have front-end routing on your application. See these docs for more information.
\3. Now we need to build the application and extract the Webpack bundle to be used as static assets on our other website.
First, run yarn build to produce a minified build.
Second, create a folder to hold the three files your application needs to run. I named mine dist. You will need these three files:
The file holding roughly a minified version of the libraries you are using.
When you have the files, your dist directory should look like this:
\4. Lastly, we can call our new static assets as JS files and point our React widget to mount a <div></div> on our website!
Here is my example HTML page that has two React applications mounted as React widgets:
Note that the order of these files does matter!
Now, if I serve the HTML page using lite-server…
Ta-da! An extremely interactive website featuring two React applications among other static content!
Conclusion
I hope this tutorial reveals the power of React as a flexible JavaScript library. If you are interested in why all of this works, I would encourage you to check out these docs.
React JS can be used in a normal index.html file with no npm or web-packs. Hard to believe?
Steps to Add ReactJs to an existing website:
Let’s not waste any more time and start editing our existing HTML page, which is called index.html. There is no requirement of any external libraries or any other tool, just a code editor, website folder holding all the above files and Internet Connection.
Step:1 Open the HTML file you want to edit and add a div on which you want to add the React implementation.
For instance: (index.html) looks like this, see line number 12-13
<!DOCTYPE html>
<html>
  <head>
    <meta charset="UTF-8" />
    <title>Steps To Add React to a Website </title>
  </head>
  <body>

    <h4>Steps To Add React to a Website </h4>

    <!-- We will put our React component inside this div. → Line 12

    <div id="some_random_id"></div>

  </body>
</html>
Copy Code
Provide a unique ID attribute to the div, as shown above. This will allow us to distinguish it from the element we want to implement.
Step:2 Add the Script Tags to the same HTML page before the
tag as shown below:
(Same as above)
...
    <!-- To load React add the scripts. -->
    <script src="https://unpkg.com/react@16/umd/react.development.js" crossorigin></script>
    <script src="https://unpkg.com/react-dom@16/umd/react-dom.development.js" crossorigin></script>

  </body>
</html>
Copy Code
Here, we have added the scripts to load/import the React library.
Step:3 Now add one more script, to load our component which is “some_random_id” in the above code. Let’s name the JS file as “my_component.js”.
<!DOCTYPE html>
<html>
  <head>
    <meta charset="UTF-8" />
    <title>Steps To Add React to a Website </title>
  </head>
  <body>

    <h4>Steps To Add React to a Website </h4>
    <div id="some_random_id"></div>

    <script src="https://unpkg.com/react@16/umd/react.development.js" crossorigin></script>
    <script src="https://unpkg.com/react-dom@16/umd/react-dom.development.js" crossorigin></script>

    <!-- To Load our React component. -->
    <script src="my_component.js"></script>

  </body>
</html>
Copy Code
Step:4 Now, Create and open the file named my_component.js and paste the following code:
Here we have created a React component named myButton, and displayed a button inside it.
Step:5 ???
Step:6 ???
No step 5 or 6! It’s done. React has been successfully added to the project and you can check the output too.
No step 5 or 6! It’s done. React has been successfully added to the project and you can check the output too.
Adding JSX in our Components
React is added, now let’s jump to writing code in an easier manner.
Consider the following snippet:
const element = <h3>Hello, Buddy!</h3>;
Copy Code
What does this syntax look like? It’s neither a string nor an HTML. This is JSX, a simple extension to JavaScript. While it’s not mandatory to use JSX with React, most of the developers find it helpful while experimenting with UI. You will experience this yourself later.
Let’s quickly try JSX
JSX comes with full power, as of JavaScript. We will see this later. Let’s get started on JSX by simply adding the below script tag:
Or you can also use JSX by adding type="text/babel" in any < scrip> tag.
Add JSX to our Project
Adding JSX to the project is more like adding some preprocessors for which we really need to install Node. If it’s already installed, then ignore this step and if it’s not, then:
Move the file “my_component.js” to the src folder and the watcher will convert the preprocessed file to basic Javascript file which is readable for the browser.
If you want to play around these preprocessors, head over here.
Simple Example to See JSX:
Let’s say we have a variable called title, we will see how we can use it in JSX:
const title = 'React Developer';
Copy Code
In JSX, we use by wrapping it in curly braces as {title}
const title = 'React Developer';
const element = <h3>Welcome, {title}</h3>;

ReactDOM.render(
  element,
  document.getElementById('root')
);
Copy Code
AJAX and APIs Call-in React For Our Component
React doesn’t have any inbuilt package for calling the API calls, as it is a standalone library that comes only with fetch() method. But while working on Web projects, we need to render data somehow, either by local data or from server data.
There are plenty of libraries by which we can make API calls, and we can choose any of them depending upon our project. Some of them are
Fetch
Axios
React-Axios
Use-Http
React-request and more.
Let’s go ahead with basic simple and index(0)th option, which is Fetch. Trust me, you can choose any of them!
Using Fetch to Make HTTP Calls in React
Fetch() is a modern method and a browser-based API which is commonly used to make HTTP calls. The standard syntax of the Fetch API looks like:
let response = fetch(
    API_URL,
    …. (some more options)
);
Copy Code
Here, API_URL is the URL using which we want to fetch the data from the server, and the URL comes with other arguments also depending upon the type of request (GET, PUSH, PUT,.. etc).
The API returns with a promise which gets resolved into the response object once the response is fetched from the server.
async getNames() {
    // Calling some additional headers
    const response = await
    // Dummy API Data
fetch("https://jsonplaceholder.com/users", {
      method: "GET", // *Type of request GET, POST, PUT, DELETE
      mode: "cors", // Type of mode of the request
      cache: "no-cache", // options like default, no-cache, reload, force-cache
      headers: {
        "Content-Type": "application/json" // request content type
      },
      credentials: "same-origin", // options like include, *same-origin, omit
      redirect: "follow", // manual, *follow, error
      referrerPolicy: "no-referrer", // no-referrer, *client
      // body: JSON.stringify(data) // Attach body with the request
    });

    this.setState({ names: await response.json() });
  }
Copy Code
Here we have called a function named getNames, which fetches the data along with other parameters like:
Method: what type of HTTP call is there,
Header: to define request headers for authorization or content
Mode: defines the type od mode, cors or no-cors,
As per official documentation:
(Cross-Origin Resource Sharing (CORS) is a mechanism that uses additional HTTP headers to tell browsers to give a web application running at one origin, access to selected resources from a different origin.)
Body: to send some additional data to the server as a request body
Based on the requirement, we can call the desired options. And we can also use catch for managing errors while making API calls.
async getNames() {
    // With .then and .catch section
    let response = await fetch("https://jsonplaceholder.com/users")
      .then(response => {
        return response.json();
      this.setState({ names: response })
      })
      .catch(error => {
        console.log(error);
      });
  }
Copy Code
This is how we can use Fetch to make API calls, and do further operations in React.
Conclusion
In this article, we learned how to add a React component in an HTML file or an existing website. You can follow the same steps to your own website, or if you want to have a fresh start you can simply create an empty HTML file to get started with React. We also saw how we can use JSX in our project and also played around with basic Http calls in React.