
RESOURCES
- COMMAND LINE
- https://launchschool.com/books/command_line/read/introduction
- Test Command Line – Servers (below)
- INSTALL NODE
- GUIDE I USED: https://www.newline.co/@Adele/how-to-install-nodejs-and-npm-on-macos–22782681
- USING HOMEBREW: https://www.newline.co/@Adele/how-to-install-nodejs-and-npm-on-macos–22782681#2-using-homebrew-to-install-and-update-nodejs
- NVM INSTALL
- INSTALL: https://gist.github.com/d2s/372b5943bce17b964a79
- BREAKDOWN: https://itnext.io/nvm-the-easiest-way-to-switch-node-js-environments-on-your-machine-in-a-flash-17babb7d5f1b
nvm (Node Version Manager)
is a tool that allows you to download and install Node.js / Node.js versions
npm (Node Package Manager)
is a tool that allows you to install javascript packages. Check if you have it installed via npm –version. npm comes with Node.
Why you need nvm w/ Node.js installed w/ Homebrew
Unfortunately, Homebrew has a habit of installing only the latest version of Node.js.
This could be a problem because sometimes applications require a certain version of Node.js to work. Having the flexibility of using specific versions can be an asset. To fix this problem, the best option to install Node.js is via nvm, which stands for Node Version Manager.
3) Using nvm to install and update Node.js (recommended)
Node Version Manager, nvm, is a bash script to manage multiple active Node.js versions.
How to manage Node.js versions with nvm
Server Setup
Setting up a server to test terminal skills on
If you don't want to mess up your computer's console while going through the examples in this book, you can set up a server using one of many online cloud services or set up your own virtual machine. The following are some of the available options:
- Sign up for a service that provides a full, in-browser development environment, such as Cloud 9. Once you've set up an account, you can ignore everything except the terminal or console. We recommend this option if you're new to the command line, as it takes the least amount of effort to set up.
- Use Rackspace or Digital Ocean to set up a managed server that provides console access. For this option, you'll need a little bit of experience with servers.
- Set up a virtual machine on your computer. You can use Virtualbox, VMWare, Vagrant, Docker, or a combination of these. Setting up a virtual machine is out of the scope of this book, but a quick Google search should be enough to get you going. You should have a lot of hands-on experience with configuring software and in-depth knowledge of computers before taking this option.
https://www.macworld.com/article/2042378/master-the-command-line-navigating-files-and-folders.html
NOTE:
Both $HOME and ~ point to the same folder, the current user’s home folder, but both are very different things.
$HOME is an environment variable, that is set to contain the home folder of the current user.
~ is a shell expansion symbol, i.e., one of the symbols that is processed before the actual command is performed. ~ alone expands to the value of $HOME. ~nemo expands to the home directory of user nemo. A shell expansion symbol is a character (or pair of characters) that is processed/interpreted by the shell to build the actual command. Another example of a shell expansion symbol is *, which is used to expand file names.
If you’ve been using a Mac for any length of time, you know that it’s more than just a pretty point-and-click, window-and-icon interface. Beneath the surface of the operating system is an entire world that you can access only from the command line. Terminal (in your /Applications/Utilities folder) is the default gateway to that command line on a Mac. With it, instead of pointing and clicking, you type your commands and your Mac does your bidding.
Why would you want to do that? For almost all of your computing needs, the regular graphical user interface is enough. But the command line can be handy when it comes to troubleshooting your Mac, to turn on “hidden” settings, and other advanced chores. It’s a good idea for anyone who isn’t an utter beginner to be familiar with it.
If you aren’t already familiar with your Mac's command-line interface. First up: How to navigate the file system from the command-line prompt.
[ Further reading: Learn more about macOS Big Sur ]
The prompt
By default, when you open Terminal, the first thing you’ll see is something like this:
Last login: Tue Apr 23 13:40:35 on ttys000
walden:~ kirk$
The first line shows the last time you logged into your Mac via the command line; that’s the current time, when you’re using Terminal. The second line is the prompt, and while it can change from system to system depending on configuration, by default it contains several bits of information.
In my prompt, walden is the name of my Mac (same as the name in the Sharing pane of System Preferences), and kirk is my user name. The ~ shows where I am in the file system of my Mac; ~ is a shortcut that means the current user’s home folder. (In the Finder, that’s the folder with your user name and the house icon.) Finally, the $ is a character that the bash shell (the default interface that Terminal uses) displays to indicate that it’s ready to accept a command.
What’s in a folder
When you first get to the command line, you’re in your home folder. While you’re there—or when you’re in any folder (directory in Unix-speak)—you might want to know what’s in it. To do that you use the **ls** (or list) command. Type ls and press the Return key, and you’ll see the folders (and/or files) in the current directory.
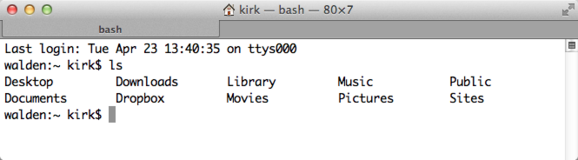
The output of the plain ls command is pretty sparse; it shows you the names of files and folders contained in the current directory (including some familiar ones such as Movies, Music, Pictures, and so on). Fortunately, you can add a number of optional switches to the ls command that allow you to see more information. So, for example, try typing **ls -l** (that’s a lower-case L), then pressing Return. You’ll see something like this:
walden:~ kirk$ ls -l
total 0
drwx------+  4 kirk  kirk    136 Mar 31 14:56 Desktop
drwx------+ 17 kirk  kirk    578 Apr  2 12:20 Documents
drwx------+ 18 kirk  kirk    612 Apr 23 13:06 Downloads
drwx------@ 19 kirk  admin   646 Apr 22 09:59 Dropbox
drwx------+ 98 kirk  kirk   3332 Mar 30 19:29 Library
drwx------+  6 kirk  kirk    204 Dec  4 09:04 Movies
drwx------+  9 kirk  kirk    306 Mar 23 09:52 Music
drwx------+ 19 kirk  kirk    646 Apr  5 17:34 Pictures
drwxr-xr-x+  7 kirk  kirk    238 Mar  6 07:51 Public
drwxr-xr-x+  8 kirk  kirk    272 Jul 19  2012 Sites
Don’t worry too much about what all that means right now; we’re just getting our feet wet. The point is that **ls** can provide additional information about files and folders, depending on the options you specify. In this case, that additional information includes the name of the user who owns each item in the directory. (That ownership is part of the Unix system’s file-permissions regime.) The kirk kirk next to most of those items above means that each one is owned by the user kirk, who is in the group kirk. The other understandable bit of information next to each file and folder is the date and time each one was last modified.
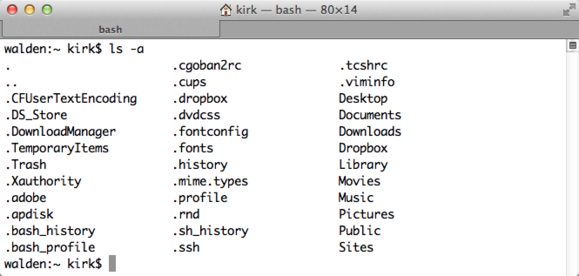
One other handy option: You can view invisible files—ones that the Finder doesn’t normally show you—by typing ls -a. (These hidden files all have dots (.) in front of their names.)
Moving around
When you’re in the Finder and you want to move to another folder, you find that folder and double-click it. From the command line, you use the **cd** (or change directory) command instead. So let’s say you’re in your Home folder and want to peek inside the Downloads folder. To do that, you’d type **cd Downloads**. (Remember to always type a space after any command that has an additional argument, such as the name of a directory in the previous example.) Once you’ve done that, ls will show you the contents of your Downloads folder.
Here are a couple of quick tricks for moving around in your Mac’s file system.
- If you type
cdand press the Return key—with no directory specified—you’ll go back to your Home folder. (You can also typecd ~to go there.) - If you type
**cd /**, you’ll go to the root level of your startup disk. - If you type
**cd ..**(that’s two periods), you’ll go to the directory above the one you’re currently in. So if you’re in your home folder, and type , you’ll go to your Mac’s /Users folder. - And if you type
**cd -**(hyphen) you’ll go back to the directory you were in before the last time you issued thecdcommand.
To learn more Terminal commands, see our articles on how to copy and move folders as well as delete files and folders using the command line and get help when you need it from man pages.
Note: When you purchase something after clicking links in our articles, we may earn a small commission. Read our affiliate link policy for more details.