
Also
https://www.pcmag.com/how-to/how-and-why-to-change-your-dns-server
How do I change DNS on Mac?
-
System Preferences
-
Network
-
Click Advanced.
-
Click the DNS tab
-
Click the little + sign at the lower left to add a new DNS server
-
Type in the numbers of a public DNS server
208.67.220.220 or 208.67.222.222 = OpenDNS
8.8.8.8 or 8.8.4.4 = GoogleDNS
84.200.69.80 or 84.200.70.40 = DNS.Watch
64.6.64.6 or 64.6.65.6 = VeriSign Public DNS
Note that you may need to try more than one to get your sites working. OpenDNS helped us around a
-
Click OK
-
Click Apply
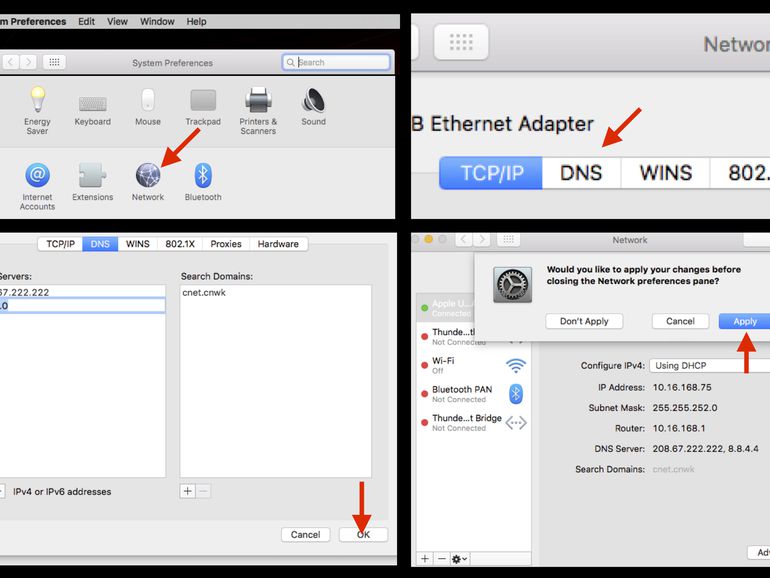 Enlarge Image
How to change your DNS on a recent Mac OS X machine.Screenshot by Patrick Holland/CNET
Using Search Domains
The Search Domains pane in the DNS settings is used for autocompleting hostnames used in Safari and other network services. As an example, if your home network is configured with the domain name example.com and you want to access a network printer named ColorLaser, you normally enter ColorLaser.example.com in Safari to access its status page.
If you added example.com to the Search Domain pane, then Safari can append example.com to any single hostname entered. With the Search Domain pane filled in, you could enter ColorLaser in Safari’s URL field, and it would connect to ColorLaser.example.com.
Search Domains are added, removed, and organized using the same method as DNS entries.
Your Mac uses something called the Domain Name System (DNS) to access websites. It’s a system invisible to you, the user, and most people don’t even know it exists. But if the DNS servers you’re using are slow or unavailable, websites will load slowly or won’t load at all. That’s why it’s important to learn about DNS and consider changing your DNS servers. In this tutorial, we’ll show you everything you need to know about DNS to speed up surfing and ward off potential problems.
DNS Crash Course
To understand how DNS works, you need some background information. Every website connected to the Internet is assigned something called an IP address, which is a little like a home or apartment’s street address. Just like a friend could find your house if she had your address, your computer can load a website if you type its IP address in to a web browser.
The problem is that IP addresses can be difficult to find and remember. DNS was created to map memorable domain names, like cnn.com, onto IP addresses, like 157.166.226.25, which is the CNN website’s IP address.
When you type in a URL in to your web browser’s address bar and hit Enter, your computer contacts a DNS server to find the IP address associated with the domain name. DNS is essentially a directory of all the websites in the world. Imagine a giant phonebook with the IP addresses for all of the websites on the Internet. That’s DNS.
Why You Should Change Your DNS Servers
Every Internet service provider operates their own DNS servers. When you purchase Internet access from a company like Comcast, your Mac will automatically use Comcast’s DNS servers. That’s not a problem unless the service provider’s DNS servers become unavailable. At that point, your Mac won’t be able to load any websites.
Fortunately, there are other companies out there that offer free DNS servers that you can use with your Mac. Many of these services are faster, and some companies have never experienced a service interruption. Plus, some DNS providers offer additional services for free, like malware protection and parental controls.
Selecting Another DNS Provider
There are dozens of free DNS servers out there. How do you know which ones to use? We’ll make it easy for you. The two best DNS services are OpenDNS and Google Public DNS, both of which are free, fast, and reliable.
Google’s service “never blocks, filters, or redirects users,” which is great for users who just want the unfiltered Internet in all of its glory. OpenDNS prevents you from accessing webpages that are known to host malware that could harm your Mac. Plus, if you register for a free OpenDNS account, you can use parental controls to restrict access to adult content and other Internet nasties.
Changing Your Mac’s DNS Servers
Once you’ve settled on a DNS service provider, it’s time to update your Mac’s DNS servers. Here’s how:
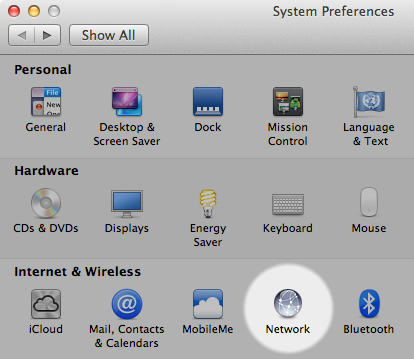
- From the Apple menu, select System Preferences. The window shown below appears.
- Select Network. The window shown below appears.
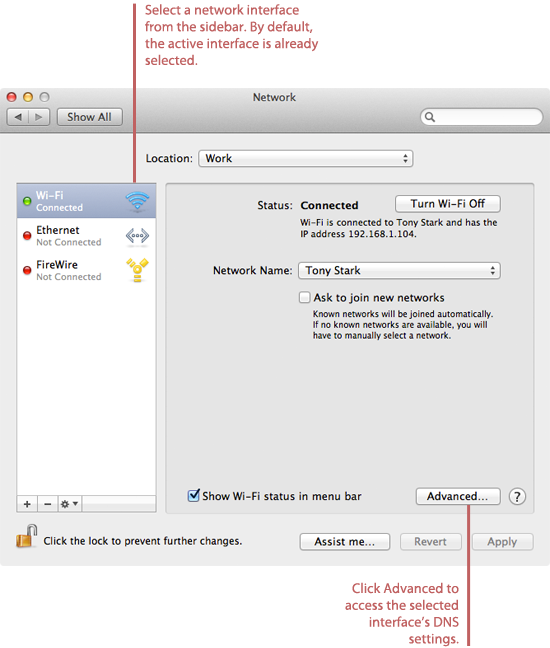
- Select a network interface from the sidebar. By default, your primary network interface is selected. If you use more than one interface to connect to the Internet, use these instructions to update the DNS servers for all of the interfaces.
- Click Advanced.
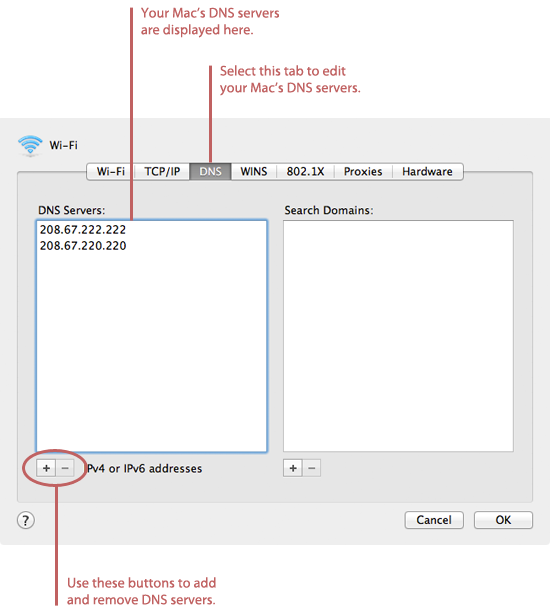
- Click the DNS tab. The window shown below appears.
- Click the + button to add a new DNS server.
- To use OpenDNS, enter
208.67.222.222and208.67.220.220 - To use Google DNS, enter
8.8.8.8and8.8.4.4
- To use OpenDNS, enter
- Click OK.
- Click Apply.
- Test your new DNS servers to make sure they’re working.
- If you’re using OpenDNS, visit the OpenDNS test page.
- If you’re using Google Public DNS, follow these testing instructions.
- If the DNS servers aren’t working, try rebooting your computer. Test the servers again when your computer turns back on.
That’s it! You’ve updated your Mac’s DNS servers!
Related Articles
- How to Change Your iPad’s DNS Servers
- Change an AirPort Extreme’s DNS Servers
- How to Find the Best DNS Servers
Meet Your Macinstructor
Matt Cone, the author of Master Your Mac, has been a Mac user for over 20 years. A former ghost writer for some of Apple’s most notable instructors, Cone founded Macinstruct in 1999, a site with OS X tutorials that boasts hundreds of thousands of unique visitors per month. You can email him at: matt@macinstruct.com.