
BusyCal Mac
Getting Started with BusyCal for Mac
This tutorial provides instructions for getting started with BusyCal and an overview of its features.
NOTE: Some images in our online documentation may appear outdated as BusyCal continues to evolve over time. However, the core functionality mentioned in the documentation still applies.
Introduction
BusyCal is a calendar and task list manager for macOS (native on Apple Silicon) that can be used as an alternative to the built-in Calendar and Reminders apps.
BusyCal’s unique and powerful features include customizable calendar views, integrated tasks that display in the calendar and carry forward until completed (can be disabled), an embedded Info Panel for quickly viewing and editing events, support for graphics, weather and moon phases, a menu bar app for quick access to your day’s events, and more.
Setup Assistant
After installing the BusyCal 30-day trial, or purchasing it, open BusyCal and you’re presented with the Setup Assistant.
The assistant walks you through a number of steps, including requests for permission to perform the following functions:
- Access to Contacts — BusyCal requires access to Contacts for displaying birthdays, meeting invitations, and email alarms, and for auto-completing addresses.
- Access to Location Services — BusyCal requires access to Location Services for displaying the weather at your current location.
Syncing with iCloud, Exchange, and Google Calendar
After completing the setup assistant, if you were previously syncing Calendar with a cloud-based calendar service, such as iCloud, Exchange, Google, or a CalDAV Server, BusyCal prompts you to enter your account password. After you enter the password and click OK, BusyCal begins syncing with the server.
BusyCal can sync with many calendar servers, including iCloud, Exchange, Google, Yahoo, OS X Server, Fruux, Kerio, Zimbra, and others. You can add or remove calendar servers by choosing BusyCal > Settings > Accounts. For more information, see the help pages on syncing BusyCal with iCloud, Exchange, Google Calendar, and CalDAV.
Syncing with OS X Calendar and Reminders
BusyCal can sync with the built-in Calendar and Reminders apps on OS X through a cloud-based service (iCloud, Exchange, Google, or a CalDAV server). If OS X Calendar is already syncing with a cloud-based service, it should automatically sync with BusyCal once BusyCal has been configured to sync with the same account.
BusyCal does not sync local “On My Mac” calendars with OS X Calendar.
Syncing with an iOS Device
BusyCal can sync with the built-in Calendar and Reminders apps on iOS, as well as with the iOS version of BusyCal, through a cloud-based service (iCloud, Exchange, Google, or a CalDAV server). If you were previously syncing Calendars between your Mac and an iOS device through a cloud-based service, your iOS device should automatically sync with BusyCal once BusyCal has been configured to sync with the same account.
BusyCal syncs calendars with an iOS device only through cloud-based services. BusyCal does not sync local “On My Mac” calendars with an iOS device, nor does it sync with an iOS device via iTunes.
For more information, see Syncing BusyCal with an iOS Device.
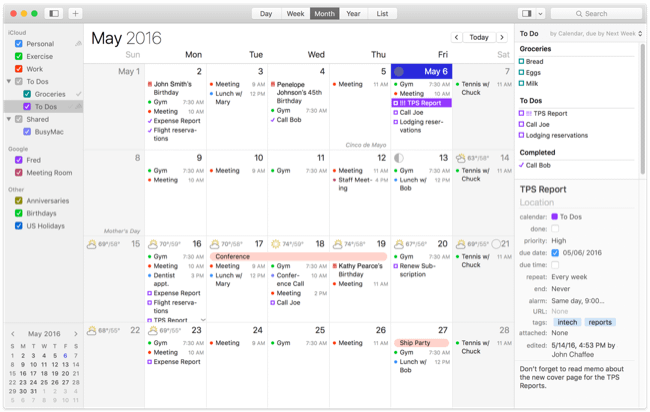
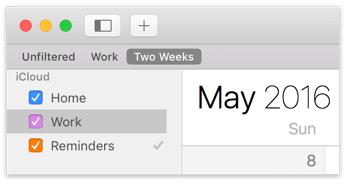
Calendars
The Calendar List in the left sidebar displays a list of your calendars.
If the sidebar is not visible, you can display it by choosing View > Show Calendar List, pressing ⌘-Option-C, or clicking the Hide/Show Calendar List button on the left side of the toolbar, next to the Close/Minimize/Zoom buttons.

Calendars are grouped by source:
- On My Mac — Calendars stored locally on your Mac.
- iCloud, Google, Exchange, etc. — Calendars hosted on a server such as iCloud, Google, Exchange, Fruux, or other CalDAV Server.
- Other — Displays birthdays and anniversaries from OS X Contacts or BusyContacts, plus read-only calendar subscriptions from a WebDAV server, like a holiday calendar.
You can change the color of a calendar (and all of its events), by Control-clicking the calendar and choosing a color from the Color submenu of the contextual menu.

Views
BusyCal provides several views for displaying your calendar: Day view, Week view, Month view, Year view, and List view. Click on the toolbar buttons to change the view.
![]()
Scrolling Views
You can scroll the view in BusyCal a full page at a time, or incrementally. Regardless of where you scroll, you can instantly return the view to the current day, week, or month (or, if already in the current time period, highlight today’s date) by clicking the Today button or choosing View > Go To Today (⌘-T).

Click the navigation arrows to scroll forward/backward by one page (such as a month in Month view or a week in Week view), or scroll by smaller units by Option-clicking the navigation arrows. You can also scroll using your trackpad, Magic Mouse, or a mouse scroll wheel.
Customizing the Number of Weeks per Month and Days per Week
You can choose the number of weeks to show in the Month View (from 1–12 weeks) by choosing View > Weeks in Month and choosing from the available options. This is particularly useful when you’re nearing the end of the month and want to see what’s ahead without having to scroll to the next month.

Likewise, you can choose the number of days to show in Week View (from 2–14 days) by choosing View > Days in Week and choosing from the available options.

Customizing the Calendar Appearance
You can customize the appearance of your calendar by choosing a font face and size, time format, and more by choosing BusyCal > Settings > Appearance and experimenting with the available options.

For more information, see Appearance Settings.
Weather
While we’re on the subject of customizing the appearance of your calendar, you may have noticed the 8-day weather forecast and moon phases that appear in the calendar. You can customize these settings by choosing BusyCal > Settings > Weather.

Weather Graphics
You can choose one of three different formats for the weather graphics: Small, Large, or Background:


Moon Graphics
And you can display moon phases in three different formats: Realistic, Symbols, or Astrological:


For more information, see Weather.
Events
BusyCal supports the following event types:
- Banner — An all-day event that can span multiple days.
- Event — An event with a start and end time.
- Dated Task — A task with a due date that appears in the calendar and/or Task List. See Tasks for more information.
- Timed Task — A task with a due date and time that appears in the calendar and/or Task List. See Tasks for more information
- Undated Task — A task with no due date that appears only in the Task List. See Tasks for more information.
- Sticky — A floating yellow sticky note attached to a date.
- Journal — A Journal event is similar to an all-day event. It occurs on a date, but has no start or end time, and does not occupy any time in your calendar. Journal events can be useful for recording information that occurred on a specific date, such as the details of a discussion, a list of accomplishments, or a diary entry.
- Graphic — A floating graphic attached to a date. Graphics may also be attached to events. See Graphics for more information.
To create a new event, double-click on a date in the calendar, choose File > New Event, Control-click on a day and choose New Event, or press ⌘-N. (You can create other event types using the File menu, by Control-clicking, or using keyboard shortcuts.) You can edit event details in the Info Panel (described just ahead).
For more information, see Event Types.
Info Panel
BusyCal includes an Info Panel for viewing and editing event details, which may appear in any of three locations: in the righthand sidebar, as a floating window, or as a popover in the main calendar view. You can move between fields on the Info Panel with the Tab key.
Info Panel in Sidebar
The Info Panel can appear in the righthand sidebar, where it’s always available when an event or task is selected. To display the Info Panel in the sidebar if it’s not currently visible, click the Hide/Show Task List button, choose View > Show/Hide Task List, or press ⌘-Option-T. (The pop-up menu on the right side of the Hide/Show Task List button lets you select whether the right sidebar shows the Task List, the Info Panel, or both.)


Info Panel as Popover
Alternatively, the Info Panel can appear as a popover, which disappears as soon as you click outside it. To display the Info Panel as a popover, first go to BusyCal > Settings > Info Panel and make sure the “Display Info Panel in floating window” checkbox is deselected. Then:
- If the Info Panel in the righthand sidebar is hidden (see above), the popover appears when you select an event in the calendar or a task in the Task List and press ⌘-Return, or double-click an event in the calendar or a task in the Task List. If “Open Info Panel for new events” is selected in BusyCal > Settings > Info Panel, the popover also appears when you create a new event or task.
- If the Info Panel in the righthand sidebar is visible (see above), the popover never appears.

Info Panel as Floating Window
The Info Panel can also appear as a movable, resizable, floating window. To display the Info Panel as a floating window, first go to BusyCal > Settings > Info Panel and select the “Display Info Panel in floating window” checkbox. Then:
- If the Info Panel in the righthand sidebar is hidden (see above), the floating window appears when you select an event in the calendar or a task in the Task List and press ⌘-Return, or double-click an event in the calendar or a task in the Task List. If “Open Info Panel for new events” is selected in BusyCal > Settings > Info Panel, the floating window also appears when you create a new event or task.
- If the Info Panel in the righthand sidebar is visible (see above), the floating window appears only when you double-click an event in the calendar or a task in the Task List.

Customizing the Info Panel
The Info Panel is customizable. You can choose to show just the basics, or add additional fields like tags, graphics, or attachments.
Tip: Choose BusyCal > Settings > Info Panel and check “Open Info Panel for new events” to automatically open an Info Panel popover (or selecting the title in the embedded Info Panel, if visible) when creating a new event.
For more information, see Info Panel.
Tasks
In BusyCal, tasks are integrated into your calendar. To dos can be displayed in the calendar on the date they are due or displayed in the Task List in the right sidebar.
To dos come in two flavors—dated and undated. Dated tasks have a due date and can be displayed in the calendar. Undated tasks do not have a due date and can be displayed only in the Task List.
Show Tasks in the Calendar
You can show dated tasks and completed tasks in the calendar on the date they are due or completed. If a task is not completed on its due date, it carries forward each day until completed (can be disabled from Settings). In order to differentiate between normal Tasks, carried forward Tasks appear with a small > arrow displayed in the center of the checkbox in Month / Week / Day view. Once completed, tasks are displayed with a checkmark on the date they were completed.

Task List
To show the Task List, choose View > Show Task List, press ⌘-Option-T, or click the Hide/Show Task List button on the right side of the toolbar and choose either Show Task List or Show Both from the pop-up menu. The Task List appears in the right sidebar.

The Task List can be sorted by Due Date, Priority, Title, Calendar, Tag, or manually. To change the sort order and other Settings, choose BusyCal > Settings > Tasks.
Repeating Tasks
You can create repeating tasks, like a status report that recurs each week.

Task Calendars
BusyCal calendars are type-specific. A calendar can contain either events or tasks, but not both. BusyCal indicates a task calendar by displaying a checkmark next to its name in the left sidebar.

Creating Tasks
With all that background information behind us, it’s time to create a task.
Click on today’s date in your calendar, then choose File > New Task (or press ⌘-K), to create a new dated task with a due date of today. The task appears in your calendar with a checkbox in front of it.
You can drag the task to a different date, and its due date changes in the Info Panel.
Note: If you drag the task to a past date it continues to be displayed on today, because past due tasks automatically carry forward to the current date (you can disable that option in BusyCal > Settings > Tasks).
If you mark the task as completed by checking the “done” checkbox in the calendar or Info Panel (or pressing ⌘-/), the completed task appears with a checkmark in front of it on the date that it was completed.
To create an undated task, choose File > New Undated Task (or press ⌘-U), and the new undated task appears in the Task List.
For more information, see Tasks.
BusyCal Menu
BusyCal includes a menu bar app that provides one-click access to your calendar and enables you to add events, even when BusyCal isn’t running. The BusyCal menu displays a navigable mini month view, a scrolling list of upcoming events and tasks, the weather forecast for today and upcoming days with events or tasks, and a Quick Entry field for creating new events with natural language.
To display the menu, click its icon in the menu bar or press Control-⌘-B.

Enabling the BusyCal Menu
To display the BusyCal Menu in your menu bar, go to BusyCal > Settings > General and select the “Show BusyCal Menu in menu bar” checkbox. This opens a background application that loads at login and continues running even when BusyCal has quit.

Using the BusyCal Menu
To display the BusyCal Menu, click the menu bar icon or press the BusyCal Menu keyboard shortcut, Control-⌘-B.
With the BusyCal menu open, you can do the following:
- Click the left or right arrow button to move to the previous or next month.
- Scroll the list of daily events and tasks forward or backward using your trackpad, Magic Mouse, or scroll wheel.
- Click or use the arrow keys to select an item. A popover appears with the details of the event or task. Click the Show button in that popover to open the event or task in BusyCal.
- If the item is a task, you can mark it as complete by clicking the done checkbox.
- Double-click an event, or press Return with an event selected, to open the event in BusyCal.
- Create new events using natural language by typing in the Quick Entry field at the top of the menu.
For more information, see BusyCal Menu.
Alarms
BusyCal can display alarms for events and tasks in the BusyCal Alarm window, or in the OS X Notification Center.
The BusyCal Alarm Window offers several advantages over Notification Center, including the ability to snooze an alarm for any number of minutes, hours, or days; mark tasks as completed; see the name and color of the calendar that the event is stored on; and more.

Enable BusyCal Alarm Window
To enable the BusyCal Alarm window, go to BusyCal > Settings > Alarms and make sure “Show alarms” is checked.

Creating an Alarm
To demonstrate the Alarm function, let’s create a new event and attach an alarm to it.
Click on today’s date, choose File > New Event. Then, in the Info Panel, set the event start time for approximately two minutes from now, and set the alarm to “At start”.

Then wait a minute or two for the alarm to appear. When it does, you can snooze or dismiss the alarm, or double-click the event to select it in your calendar.
For more information, see Alarms.
Graphics
BusyCal enables you to add graphics to your calendar to highlight certain dates, such as holidays and special events.

Graphics Panel
In BusyCal, choose Window > Graphics Panel to display a floating window that displays images you can drag and drop onto your calendar. You can browse through the hundreds of Emoji images built-in to OS X, or type a keyword to search for images on IconFinder.com. You can even drag images into BusyCal from your desktop or from the web.
For more information, see Graphics.
Birthdays and Anniversaries
BusyCal can display the birthdays and anniversaries from OS X Contacts (or BusyContacts) in your calendar. Choose BusyCal > Settings > General, and select the “Show Birthdays calendar” and/or “Show Anniversaries calendar” checkboxes.
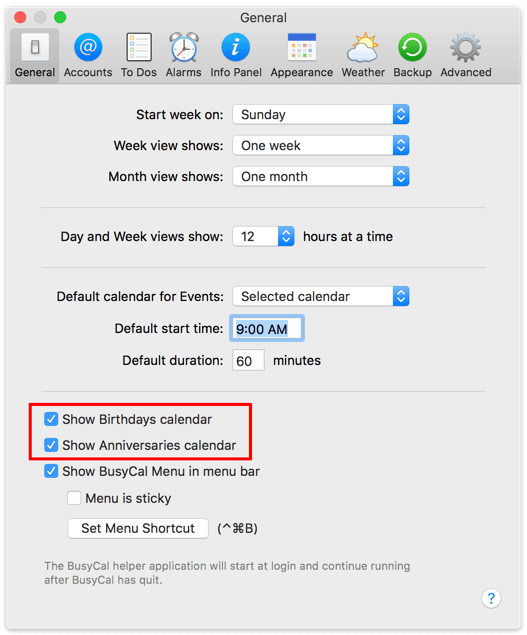
With these calendars enabled, a Birthdays calendar and an Anniversaries calendar appear under the Other heading in the Calendar List, and any contacts with birthdays or anniversaries in their Contacts records are displayed with special icons in the calendar.


For more information, see Birthdays and Anniversaries.
Holidays
There are many Holiday and Sports calendar feeds available on the internet from Apple, iCalShare, Yahoo Sports, and others that you can subscribe to in BusyCal or OS X Calendar. We provide a list of links to the most common US holiday and sports calendars here.
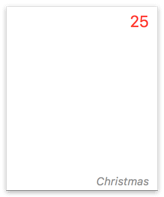
When you subscribe to a Holiday calendar, BusyCal displays all-day events on Holiday calendars in a unique style—either as a banner or as gray italicized text at the bottom of the day cell. (Double-click a calendar to open the Calendar info dialog, and check the “Holiday calendar” checkbox to use the gray italicized text rather than banners for that calendar.) Since BusyCal has the ability to display graphics, we created some variations of the US Holidays calendar that include graphics for major holidays. You can subscribe these US Holidays calendars by clicking one of the links below.
Here’s what Christmas looks like for each of the US Holidays calendars (no graphics, small graphics, and large graphics) when subscribed to in BusyCal.


For more information, see Holidays.
Calendar Groups
You can arrange calendars into groups, which enable you to show or hide multiple calendars at once. Grouped calendars must all exist on the same service (such as Local, iCloud, LAN, and CalDAV), but you can use smart filters to create calendar sets that span different services.
To create a group for calendars on any service, first select a calendar from that service. Then choose File > New Calendar Group, type a name for the calendar, and press Return. Drag calendars onto the group name to add them to the group; drag them out to remove them. To show or hide all the calendars in the group, select or deselect the group checkbox.
You can rearrange calendar groups in the sidebar by dragging them, rename them by double-clicking them, or delete them by selecting them and pressing ⌘-Delete or by Control-clicking them and choosing Delete from the contextual menu.

List View
List view displays all your events in a scrolling table format.
NOTE: Some images in our online documentation may appear outdated as BusyCal continues to evolve over time. However, the core functionality mentioned in the documentation still applies.

You can customize List view directly:
- To select which columns to display, Control-click the column header and choose column names from the contextual menu to select or deselect them.
- Move/resize columns by dragging the vertical divider line between column headers.
- Sort the list by clicking a column header. Click again to reverse the sort order.
List Settings
You can choose a date range (Day, Week, Month, Year, Decade, and Custom) from the pop-up menu in the upper-right corner, or choose List Settings to customize List view.
![]()

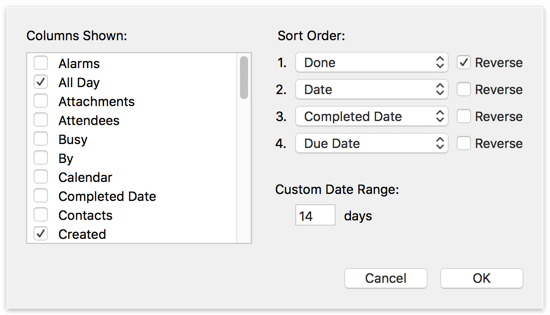
The List Settings dialog provides the following options:
Columns Shown — Check the columns you want to display in List view.
Tip: If you need to track billable hours, you can use the Duration column to display the duration of each event, and the Total Duration column to display a running total of all events currently being viewed. See Time Tracking for more info.
Sort Order — Use the pop-up menus to choose the primary, secondary, tertiary, and quaternary sort order. Select the Reverse checkbox to sort that column in reverse.
Custom Date Range — In addition to the built-in date ranges on the pop-up menu, you can specify a custom date range for x days.
Once you’ve modified the List view settings, you can create a smart filter to “Remember view settings & preferences” that enables you to redisplay the List view settings in the future by selecting the smart filter.
Smart Filters
Smart filters are a powerful tool for creating calendar sets and saved searches that can be applied with a single click.
NOTE: Some images in our online documentation may appear outdated as BusyCal continues to evolve over time. However, the core functionality mentioned in the documentation still applies.
Smart filters are a powerful tool for creating calendar sets and saved searches that can be applied with a single click. You can create smart filters to:
- Display a set of calendars.
- Show events that match certain conditions, such as a text string or event type.
- Apply view settings, such as the columns displayed and sort order in List view.
To create a smart filter, choose Filter > New Smart Filter (or press ⌘-Control-N) and fill in the dialog that appears. Some examples follow.
Calendar Sets
To create a smart filter that displays a set of calendars, do the following:
- Select the calendars you want to show or hide by checking them in the left sidebar.
- Choose Filter > New Smart Filter or press ⌘-Control-N.
- Select “Remember visible calendars,” give the filter a name, like “Work,” and click OK.

The new filter is added to the Filter bar, and clicking it displays the calendar set.

The filter can also be applied by selecting its name from the Filter menu or by pressing its keyboard shortcut. The first smart filter listed is “Unfiltered” with a keyboard shortcut of ⌘-Control-1. You can think of Unfiltered as the standard or default filter. The next smart filter (Work, in this example) corresponds to ⌘-Control-2.

Saving Changes
If you show or hide additional calendars by checking them in the left sidebar, the Filter button in the toolbar displays a * (asterisk) next to its name, indicating that the current filter has changed.

When your calendar selection has changed:
- To save the changes, choose Filter > Save Changes, press ⌘-Control-S, or Control-click the button in the toolbar and choose Save Changes from the contextual menu.
- To discard the changes, press ⌘-Control-2 (the Work filter’s keyboard shortcut), ⌘-Control-R (for Revert), or Control-click the button in the toolbar and choose Revert to Saved from the contextual menu.
Content Matching
You can create powerful smart filters to show events that match various conditions, such to dos that contain a certain string of text and that were modified in the last 30 days.

To create a content-matching smart filter:
- Choose Filter > New Smart Filter or press ⌘-Control-N.
- Select “Show events that match the following conditions,” configure the settings shown above, name the filter, and click OK.
- A button with the smart filter’s name appears on the Filter Bar, and clicking it applies the filter. Note that the filter button appears in blue, which indicates that it is showing only events that match certain conditions.

You can create some pretty sophisticated smart filters for things like:
- Due Date is in the next x days.
- Priority is High.
- Tag contains “Client X”
- Modified in the last x days.
- Location contains “Starbucks”
- Event type is Meeting.
- Meeting Status is Maybe.
Nested Filters
You can create nested sub-conditions by holding down Option and clicking the ellipsis (…) button, and then choosing All, Any or None for the sub-conditions.

For example, you could create a smart filter that matches ALL event types that are to dos, ANY tags that contain client x or client y, and NONE that have a tag containing client z.
View Settings
You can customize the calendar views in BusyCal, like a 4-day Week, a 3-week Month, or a List view with a custom number of days and columns shown.

You can use smart filters for recalling these custom views with a single click, as follows:
- Customize the current view (e.g., change the number of days or weeks shown in the Week or Month view, or the columns displayed in List view).
- Choose Filter > New Smart Filter or press ⌘-Control-N, select “Remember view settings & preferences,” name the filter, and click OK.
- A button with the smart filter’s name appears on the Filter Bar, and clicking it displays the custom view.

Combination Filters
A smart filter can include any combination of calendar set, view settings, and conditions. For example, a smart filter could combine a set of calendars with a 6-week month view. For a more sophisticated example that uses tags as a condition, see Time Tracking.
Backing Up and Restoring
BusyCal automatically backs up your calendars every 24 hours and saves your last 10 backups.
By default, BusyCal stores backups in the following directory:
~/Library/Containers/com.busymac.busycal3/Data/Documents/BusyCal Backups
To view this location manually, open Finder, click on the Go menu (from the top menu bar) and then on "Go To Folder". Copy and paste the path above and hit "Go".
Backup
You can change the frequency, the number of backups to keep, and the location for the backup folder in BusyCal > Preferences > Backup. Your options are:
- Automatically back up — Controls how often backups are created.
- Backups to keep — Controls how many backup archives are kept when deleting old copies.
- Backup location — Controls the location where backups are stored. The default location is the BusyCal Backups folder in the Documents folder.

Restore
If you want to restore your calendar from one of these backups, choose File > Restore From Backup (or click Restore From Backup on the Backup pane of the Preferences window), then double-click on a backup file to open it. Select the calendars you want to restore and click Restore. Your calendar(s) are restored from the backup.
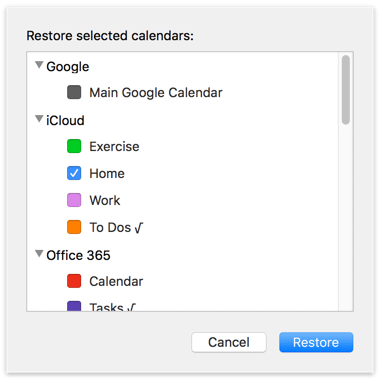
Starting with v3.11.2, you can click on the Restore as a "On My Mac" calendar only checkbox on the dialog presented to restore it as a Local calendar. This allows you to then drag and drop individual events you would like to restore from the restored calendar back to the account you wish to restore these to.
Note: When this option is unchecked, all events on the calendar you restore are replaced with the contents of the backup. Therefore, if you restore from a backup that was created yesterday, any events created on the calendar you are restoring since yesterday are lost.
Searching, Finding, and Filtering Events
BusyCal provides two methods of searching for events: you can find all matching events throughout your entire calendar, or you can filter the current view to show only matching events within the current date range.
Finding Events
To find all matching events, choose Edit > Find, press ⌘-F, or click in the Search field. Enter your search criteria to find all events whose title, location, notes, or tags match the search criteria and display them in a list. You can then select items in the list by clicking on them or using the arrow keys on the keyboard to highlight those events in your calendar.

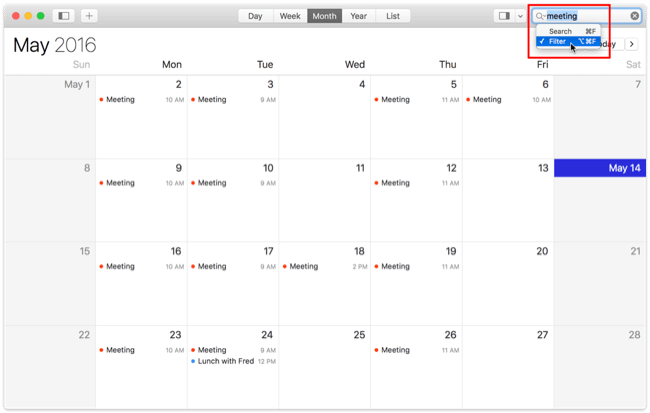
Filtering Events
To filter the current view to display only matching events, press ⌘-Option-F or click in the Search field, click the small downward-pointing arrow next to the magnifying glass icon, and choose Filter from the pop-up menu; then type the text to search for. BusyCal searches for all events whose title, location, notes or tags match the search criteria and filters the current view to show only the matching events.
Only matching events in the current calendar date range are shown. You can then page or scroll backward or forward through the current view (Month, Week, Day) to see matching events in the past or future. You can also switch to List view and set a wider date range (like a year or a decade) to see more results.
To create reusable filters, see Smart Filters.
Tags
Tags are user-defined labels with which you can categorize and color events in BusyCal. You can also search and filter events in your calendar based on tags.
NOTE: Some images in our online documentation may appear outdated as BusyCal continues to evolve over time. However, the core functionality mentioned in the documentation still applies.
Note: Tags in BusyCal map to Categories in Exchange/Outlook.
Also See: Automatic Tagging
Entering Tags
To apply tags to events, type them in the Tags field. When adding tags to an event, the tags are auto-completed as you type, based on tags you have entered previously. TIP: Entering a hex color code in the tags field automatically turns it into a colored tag.

Note: To see the Tags field on the Info Panel, you must enable it in Info Panel Preferences.
You can also apply tags to an event by Control-clicking an event and choosing a tag from the contextual menu.

Tag History
BusyCal automatically remembers tags as you create them and adds them to the Tag History. Choose Edit > Edit Tags to open the Tag History dialog, where you can add, delete, rename, and colorize tags.

Note: Deleting or renaming a tag in the Tag History dialog does not affect any events that already have that tag applied. However, changing the color of a tag does affect all events with that tag.
Tag Colors
You can use tags to color events. For example, you can have an “Important” tag that is colored red, and a “Family” tag that is colored green.
Normally, events appear in the same color as the calendar they’re stored on. But you can override the event color by adding a colored tag to an event. If you add multiple colored tags to an event, the color of the first tag, sorted alphabetically, is applied.
Event Colors
In BusyCal 2022.3.1 and above, items can also be colored using the new Color property.

This property is automatically synced with the Tags property and behaves as a shortcut. You can use the drop-down to quickly switch between colors. Custom colors can also be assigned as hex-codes.
NOTE: Event colors from Google Calendar now sync directly with this new property.
Tag Syncing
Due to technical limitations, your Tag List will not sync between devices (i.e. from one installation of BusyCal to another). However, tags that you assign to an event will in fact sync along with that event. These tags will be visible and editable on another device running BusyCal.
Tag Colors however are assigned and stored locally, and so will not sync across devices.
Meetings and Invitations
BusyCal enables you to schedule meetings with others by adding attendees to an event and sending a meeting invitation.
Sending Meeting Invitations
When you create an event and add attendees to it, a Send Invitation button appears. Clicking this button sends a meeting invitation to the attendee.

Note: When a meeting is created on an iCloud calendar, Google calendar, or Exchange calendar, the meeting invitation is delivered by the server and NOT by your email client. However, if a meeting is created on a local calendar then the invitation is sent by your email client.
Receiving Meeting Invitations
When an attendee receives an invitation, BusyCal displays an Inbox notification in the upper-left corner of the window. Clicking on the inbox icon enables the attendee to respond to the meeting request (by clicking Accept, Decline, or Maybe), at which point a reply is sent to the meeting organizer with their status.

Note: The Inbox also displays notifications of changes to shared calendars, depending on your settings.
Meetings with one or more attendees that have not yet responded, or have responded with a busy / busy-tentative status, will appear with diagonal stripes in day and week view.
On iCloud, Meeting Invitations will automatically get added to your preferred Meeting Calendar. You can change this setting under Preferences > Accounts > iCloud Account > Meeting Calendar.
Cancelling Meetings
As an organizer, you can cancel the meeting at any time. To do this, simply select the meeting and hit Delete. This will send out a cancellation to all of the attendees.
Me Card
BusyCal requires you to have a default email address defined in your OS X Contacts or BusyContacts Me Card for sending and responding to meeting invitations. You can open your Me Card by opening Contacts and choosing Card > Go to My Card, or by opening BusyContacts and choosing File > Go to My Card.
Note: BusyCal requires permission to access your Contacts Me Card.
Attendee
When you receive a meeting invitation via email, BusyCal determines whether you are a valid attendee by comparing the attendee email address in the meeting invitation with the email addresses in your Contacts Me Card. If BusyCal finds a matching email address in your Me Card, it enables you to accept or decline the meeting request.
Organizer
The creator of a meeting is the Organizer. Only the meeting Organizer can edit a meeting; attendees have read-only access. BusyCal determines whether you are the meeting Organizer and have editing privileges by comparing the Organizer email address to the email addresses in your Contacts Me Card.
When you create a meeting in BusyCal, your default email address is used for the Organizer. You can change the default Organizer email by choosing BusyCal > Preferences > Advanced, and choosing one of your email addresses from the “Meeting organizer email” pop-up menu. You can select any of the email addresses in your Contacts Me Card.
Note: This setting affects only meetings created on local calendars. When scheduling meetings on iCloud, Google Calendar, or Exchange, your account email address is used for the meeting Organizer.

Mail Account
If you create a meeting on a local calendar, BusyCal sends meeting invitations from the default mail account in Apple Mail. You can set the default account in Mail by choosing Mail > Preferences > Composing, and choosing an account from the “Send new messages from” pop-up menu. BusyCal also supports several third-party mail clients that allow sending meeting invitations via AppleScript.
You can view outgoing meeting invitations in Mail before sending them. This may be useful for adding a personal note to the email or changing the mail account the invitation is being sent from. To configure this setting, open BusyCal > Preferences > Advanced, and check the “Show outgoing meeting invitations in Mail” checkbox.
Note: These settings only affect meetings created on local calendars. When scheduling meetings on iCloud, Google Calendar, or Exchange,the meeting invitation is delivered by the server and not your email client.

iCloud Meetings
When you create a meeting on an iCloud calendar:
Organizer — The meeting invitation is delivered by the iCloud server and not by your email client, and your Apple ID email address is used as the meeting Organizer.
Attendee — If an iCloud user sends you a meeting invitation using your iCloud email address (@icloud.com, @me.com, or @mac.com), the meeting invitation is intercepted by the iCloud server and delivered to you in one of two ways, based on your iCloud Calendar preferences. Log in to your calendar on icloud.com in your web browser, click the gear icon, choose Preferences from the pop-up menu, click Advanced, and select how you would like to receive meeting invitations from other iCloud users:
- In-app notifications — iCloud delivers meeting invitations to your BusyCal inbox.
- Email to — iCloud delivers meeting invitations to your email inbox.

Google Meetings
When you create a meeting on a Google calendar:
Organizer — The meeting invitation is delivered by the Google server and not by your email client, and your Google email address is used as the meeting Organizer.
Attendee — If a Google user sends you a meeting invitation using your Google email address, the meeting invitation is intercepted by the Google server and may be added to your calendar automatically, depending on your Google Calendar settings. Log in to your calendar on Google in your web browser, click the Gear icon, choose Settings from the pop-up menu, and select whether you want to Automatically add invitations to your calendar.
- Yes — Invitations are automatically added to your Google primary calendar. You also receive the invitation via email, which you can ignore.
- No — Invitations are not added to your calendar. You must manually add the invitation received via email to your calendar.

In both cases above, you still need to accept or decline the meeting invitation once it is added to your calendar.
Google Meeting Limitations
Please be aware of the following when creating meetings on a Google calendar:
- For best results, you should create meetings on your primary Google calendar. This ensures that the meeting invitations are delivered to attendees by Google and that the attendee responses are properly received and processed by Google.
- Attendees cannot add meeting invitations to secondary Google calendars. You can add and accept meeting invitations only on your primary Google calendar.
- Meeting invitations are not delivered to attendees if you create the meeting in BusyCal on a secondary Google calendar. If you want to invite attendees to a meeting on a secondary Google calendar, you must create the meeting on Google Calendar in your web browser.
- If an attendee receives a meeting invitation via email addressed to their non-Google email address and adds the meeting to their primary Google calendar, the attendee email address in the meeting reply is changed to their Google email address and the meeting reply is sent to the organizer from Google using the attendee’s Google email address. Since the attendee email address in the reply does not match the original attendee email address, the attendee’s status will probably not be recognized and updated by the organizer.
RSVP with Comments
RSVP / responding to meetings with a comment is only supported by Exchange / Office 365 or CalDAV servers that explicitly advertise support for private comments (i.e. calendarserver-private-comments). When you receive an invite, you can click on the Add a comment field to type in a comment before selecting Accept / Maybe / Decline.