
Build PC – Overview
https://www.makeuseof.com/tag/the-guide-build-your-own-pc/
Building your own PC feels like a rite of passage. You've gone from buying off-the-shelf computers that anyone can get, to creating your own customized machine. It's very gratifying . . . as well as intimidating. But the process itself is actually quite simple. We'll walk you through everything you need to know.
Some Quick Notes
The order in which I assembled my own computer might not be the best order for you. For example, I put the motherboard in first, then added the CPU, RAM, and everything else. However, it might be easier to install your processor and RAM before inserting the motherboard. You may want to put your PSU in first as well, if there's not going to be much room between it and your motherboard. Different walkthroughs recommend different things. But the best way to go is to look at your case and your components and make a decision from there.
If you do things in an inconvenient order, though, all is not lost. You may have to loosen a few screws or use a needle-nose pliers to attach some cables in a tight spot, but it shouldn't be too hard to make it work.
Also, a cleanly cabled computer will be quieter, cooler, and look nicer. It's not a requirement to spend time making sure your cables are routed cleanly, but it's a good idea. Most cables should be routed behind the motherboard tray (where the motherboard sits) and then back to the front of the board. Not only does it look nicer, but it encourages better airflow around the heat-generating parts of your PC.
Use velcro straps or twist ties to keep them secured, too. You can use zip ties, but if you ever have to cut them, be extremely careful not to cut the cable.
Want to see the process in video form? We've got you covered:
1. Eliminate Static Risk
Static electricity can destroy the sensitive components you'll be using to build your computer. Even a tiny shock can fry a motherboard or processor. So you'll want to take specific steps to make sure that you're not going to build up and release static electricity.
One common way to do this is to wear an anti-static wristband. You can grab one of these for about five bucks, and it'll keep you grounded, preventing damage from static. It's an easy way to be safe.
If you don't have one, you can take other precautions. Stand on a bare floor instead of on carpet while you're building. Don't wear wool socks or a big sweater. Try to minimize the amount of clothing you're wearing; jeans and a t-shirt are good. Touch a grounded piece of bare metal often during the build, and always before you pick up a component (the metal of your computer case is a good option). Try not to move around a lot while you're putting your computer together. All of these things will help reduce the amount of static you build up.
On a related note, be careful when handling your components. They're very sensitive, and bending a tiny pin or getting oil from your skin on one of the contacts could affect how they work. So be especially careful not to touch the contact points. Hold components by the edges. In general, just be careful when handling this stuff, and you'll be fine.
2. Get Everything Together
The first thing you're going to want to do is gather all of your supplies. Get your case, all of your components, and all of the manuals together. Grab a small screwdriver, a small needle-nose pliers, thermal paste (if your CPU didn't come with a stock cooler), and a scissors or knife for opening packages.
You can take everything out of the boxes now, if you'd like. Leave components in the anti-static packaging, though. Getting all of those boxes out of the way will give you more room to work, but it also makes everything a little less protected. So it's up to you. I would recommend having all of the manuals set aside, though, as there's a good chance you'll need to reference them a few times.
Here are the components that I used for my own build:
- Case: Corsair Carbide Series 100R (UK)
- Motherboard: Asus ATX DDR4 H170-PRO/CSM (UK)
- CPU: Intel Core i5-6500 3.2GHz Quad Core Skylake (UK)
- RAM: Corsair Vengenace LPX 8GB DDR4 2400MHz (UK)
- Graphics card: Gigabyte GeForce GTX 1060 WINDFORCE 6G (UK)
- SSD: SanDisk SSD Plus 240GB (UK)
- HDD: WD Blue 1TB 7200 RPM (UK)
- Power supply: Rosewill Capstone G550
These instructions will apply to pretty much any set of components, but skim through your manuals to make sure you're not missing anything particular to your specific machine.
3. Install The Motherboard's I/O Shield
Don't forget this step! It's a common PC-building mistake.
First, take the side panels off of your case. They're probably held on by a couple screws; remove those, then slide the side panels out.
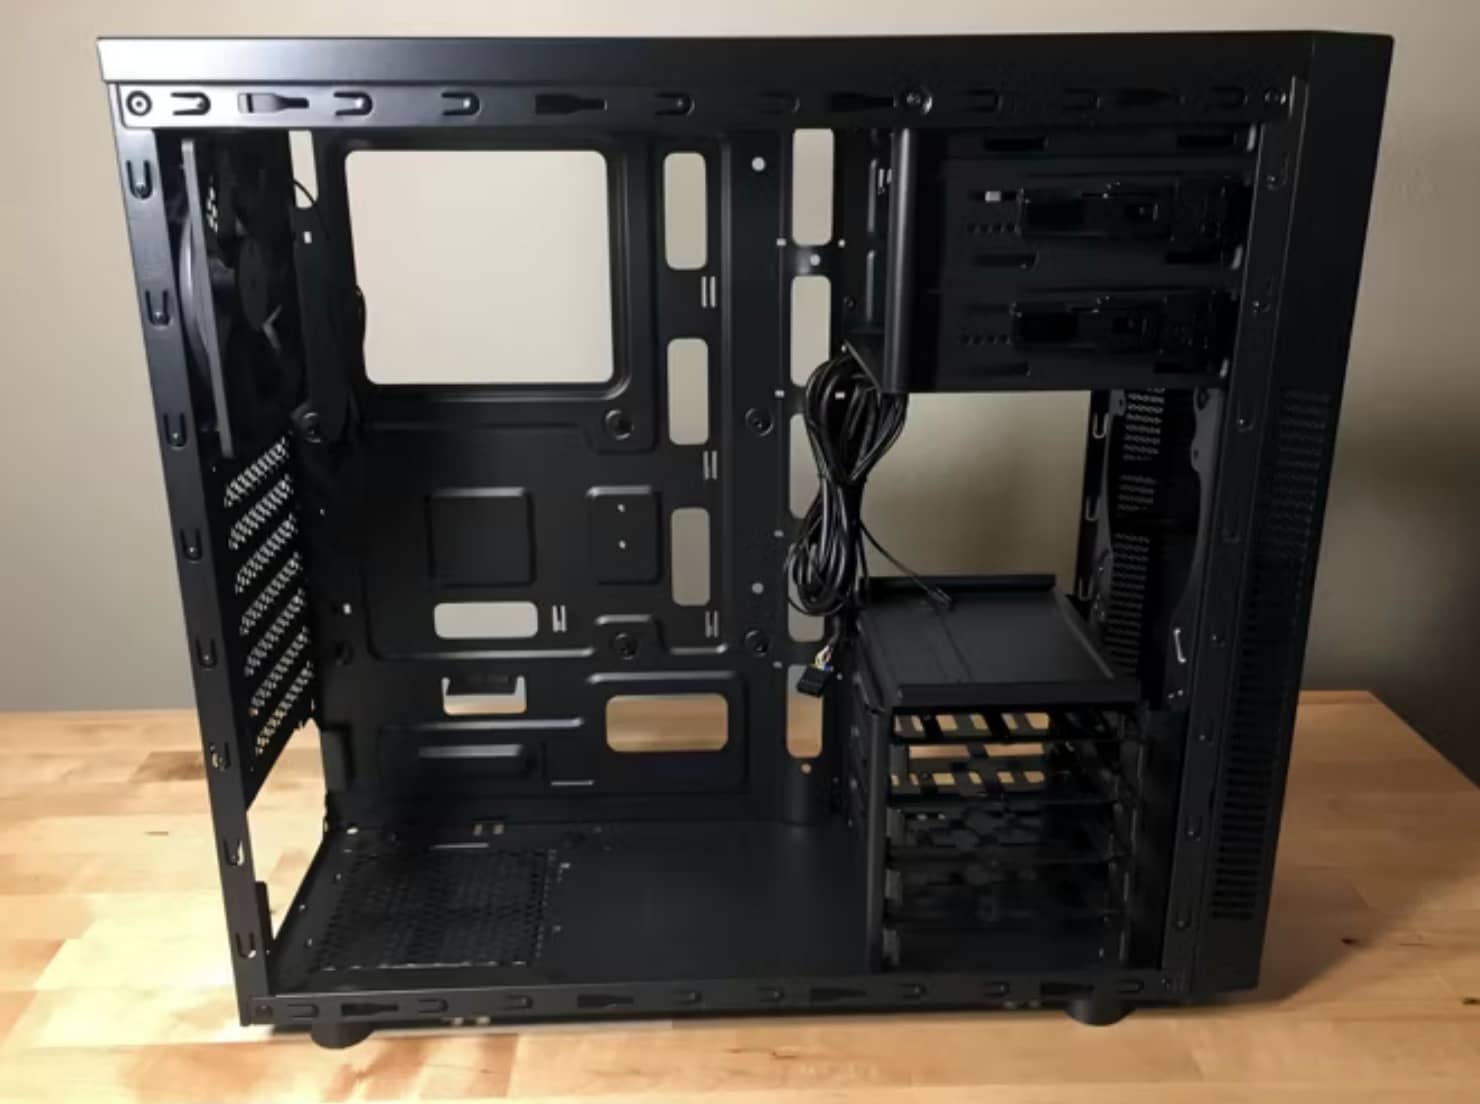
Every motherboard comes with an I/O shield that snaps into the back of your case from the inside. It should be clear which orientation to use (any labels on the shield will be right-side-up), but if it's not, look at how your motherboard will be oriented in the case. The ports on the board should match up with the ports on the shield.

You might have to give the shield a solid push to get it to snap into the back of the case.
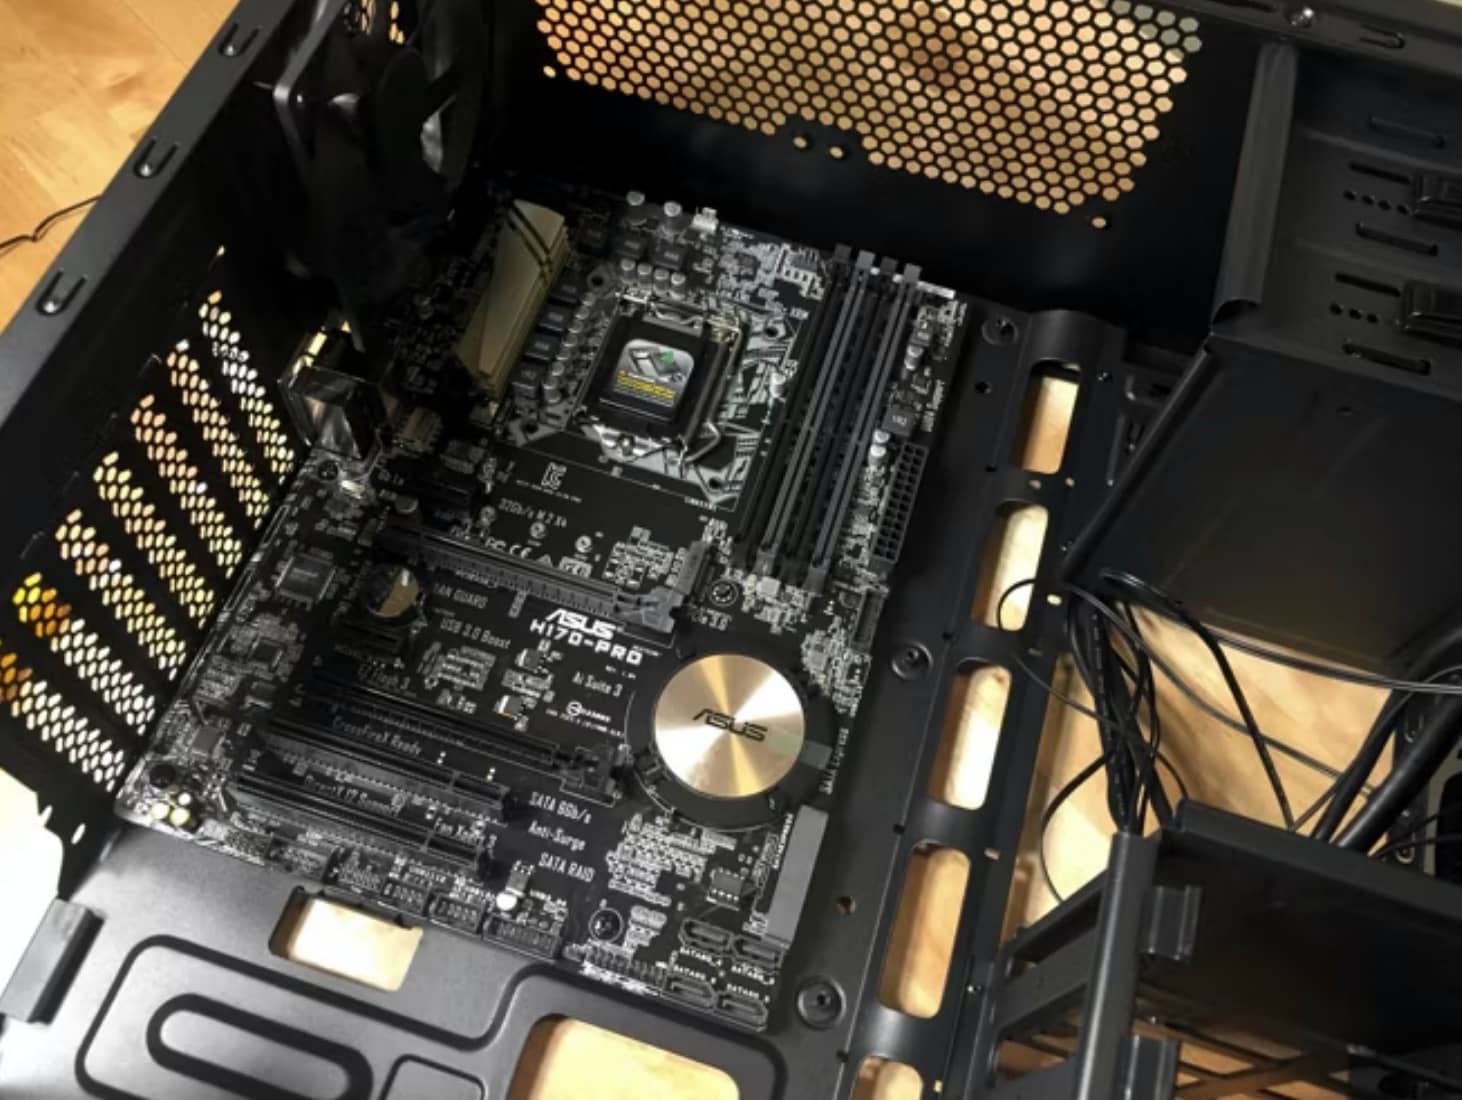
4. Install The Motherboard
If the processor is the heart of your computer, the motherboard is the nervous system. It coordinates the activities of various components. Your computer case will have a number of screws that keep the motherboard in place, so make sure you have those and a small screwdriver handy.
It should be obvious where your motherboard goes; the ports will line up with the I/O shield. There will also be a number of standoffs — small posts that keep your motherboard from touching the side of the case. Line up the holes in your motherboard with the slots for the screws, and set the motherboard down.
Getting the board to sit properly can be a bit of a challenge, especially with the I/O shield. You may have to move it around a bit or very slightly bend back the metal pieces on the backside of the shield. Be very careful while you're doing this, and make sure not to touch any of the contacts on the board.
Once the motherboard is properly seated, loosely put in the screws, then tighten them one at a time. Don't go crazy; they don't need to be super tight, just snug, and you can damage the board if you over-tighten them. Just put enough pressure on to be sure that the board isn't going to move around. Make sure to insert a screw into every hole in the motherboard.
There are a number of cables coming from your case that can now be connected to your motherboard. These are very small connectors that will be labeled "LED+," "LED-", "HDD+," "Reset," and so on, and they need to connect to the corresponding pins on your motherboard. Every case is going to be different, so consult the manuals of your motherboard and case. You can also connect the built-in case fan as well.
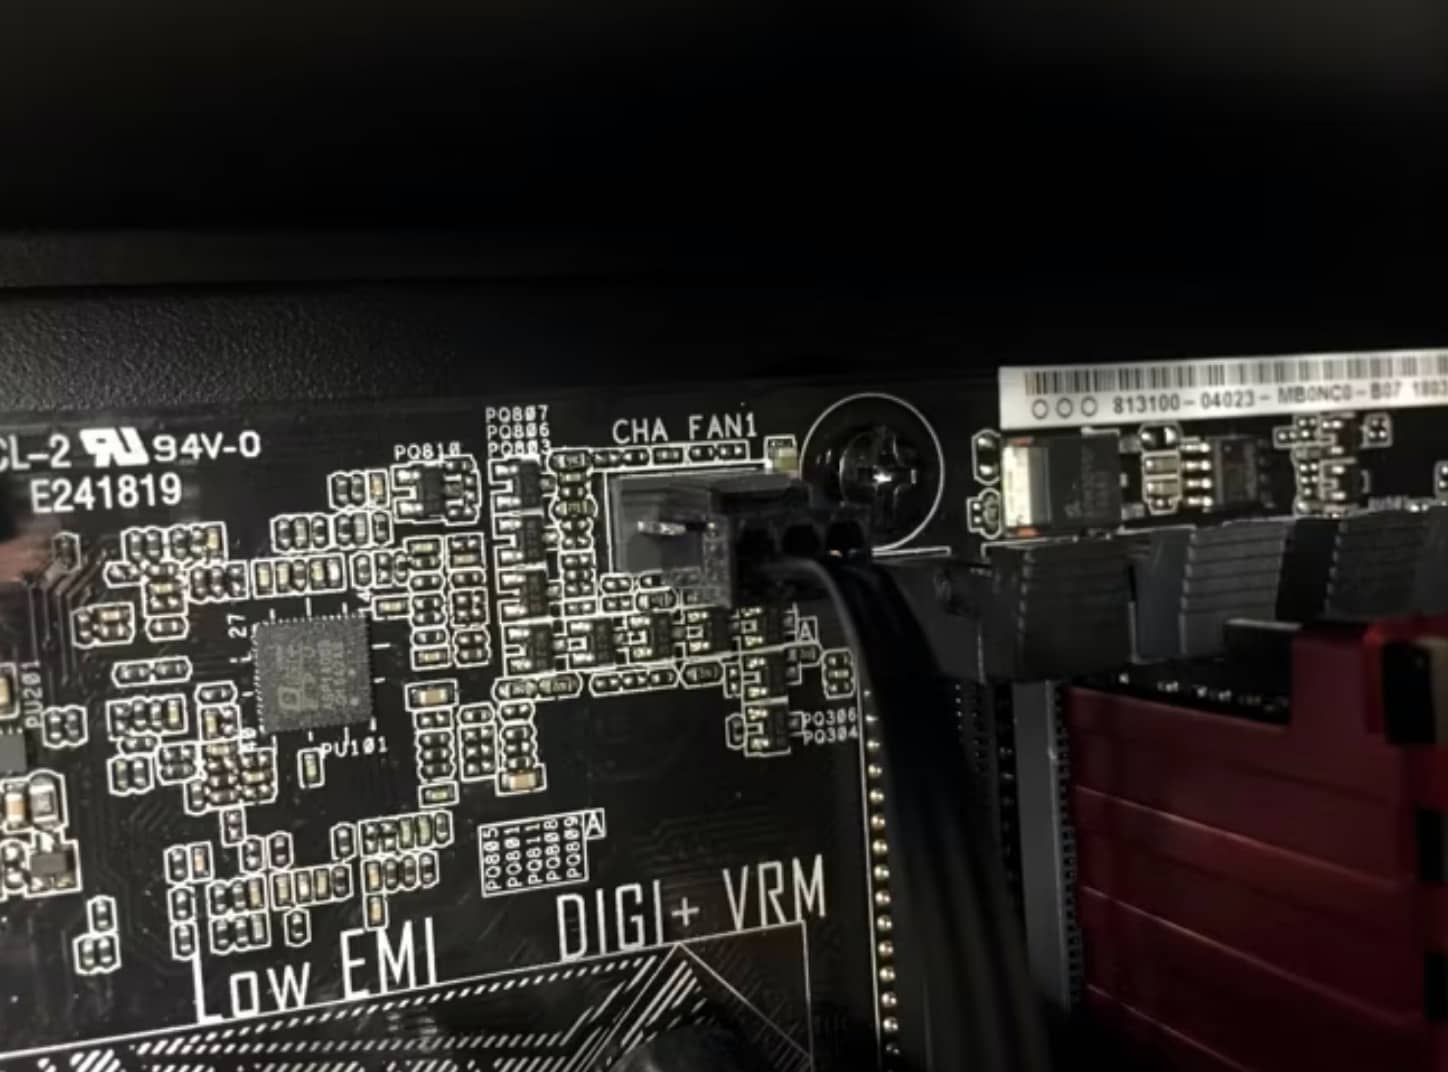
My motherboard's fan pins are labeled CHA FAN1 (as in "chassis"); look for something similar on your board.
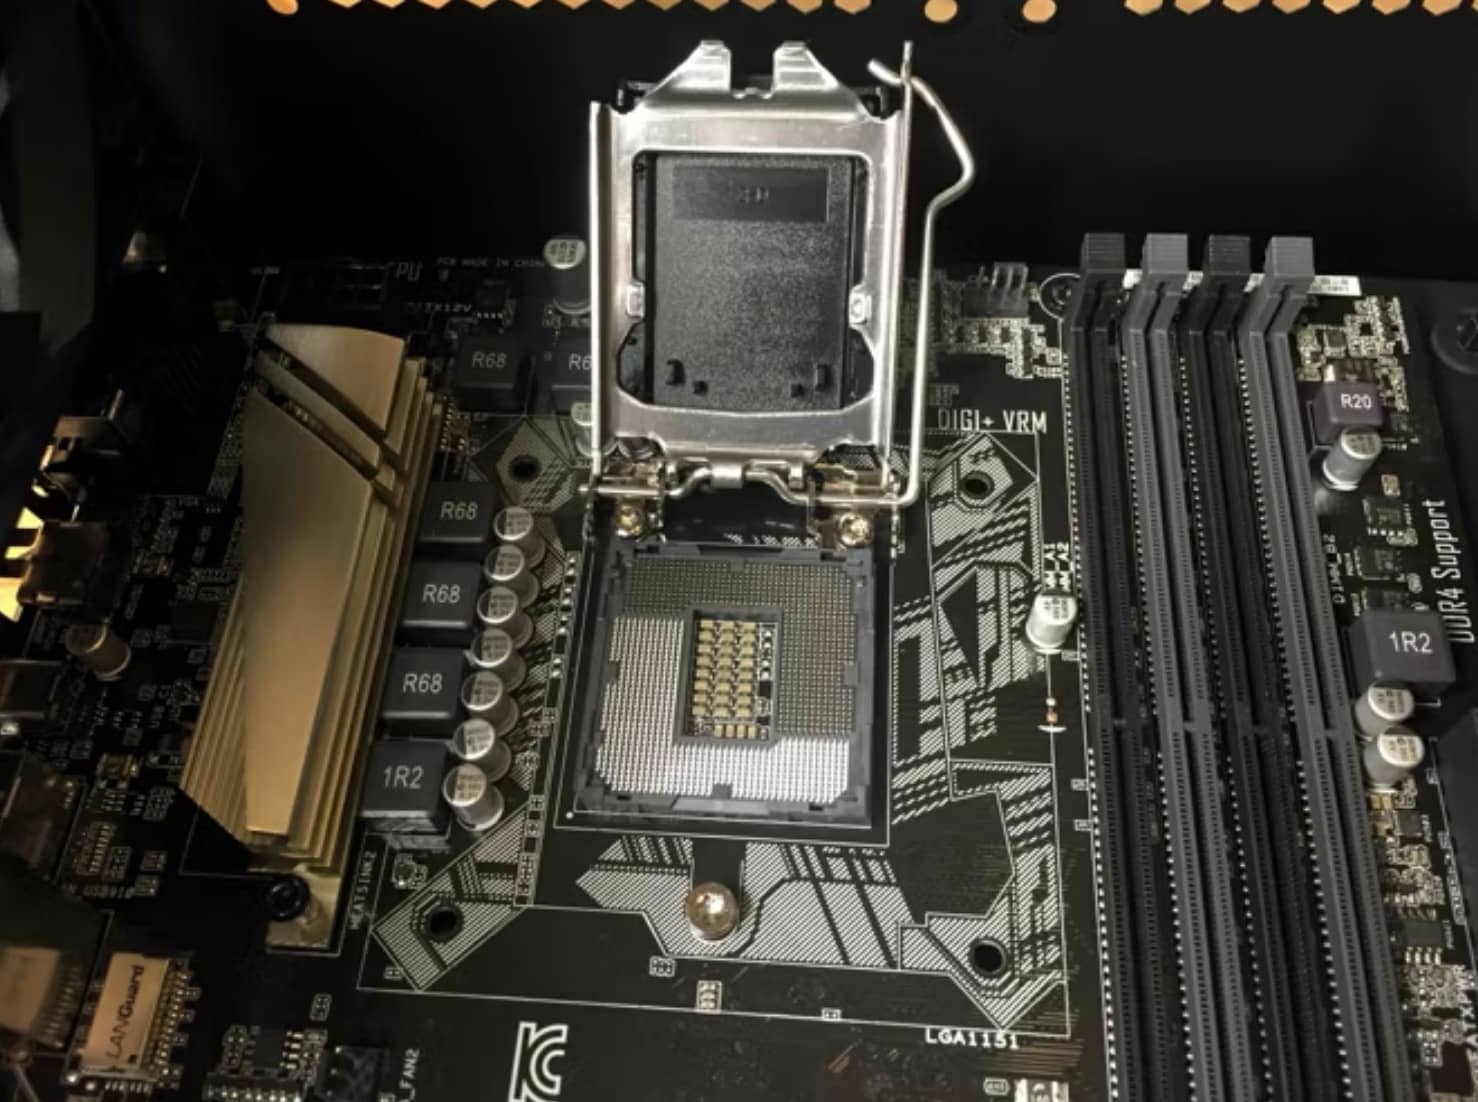
5. Install The Processor
The port for the processor will be obvious on any motherboard; it's a prominent square panel. To open the panel, push down on the arm and move it sideways to get it out from under the metal retaining piece that secures it. Lift up on the arm to expose the contacts for the processor.
Holding your processor by the edges, gently set it onto the port. If you have an Intel processor, there will be two notches that align if you have it in the correct orientation. AMD processors have a gold triangle in one corner, and that aligns with a triangle in the CPU socket. (There's also a very good chance that the text printed on the CPU will face the same direction as the text printed on the motherboard.)
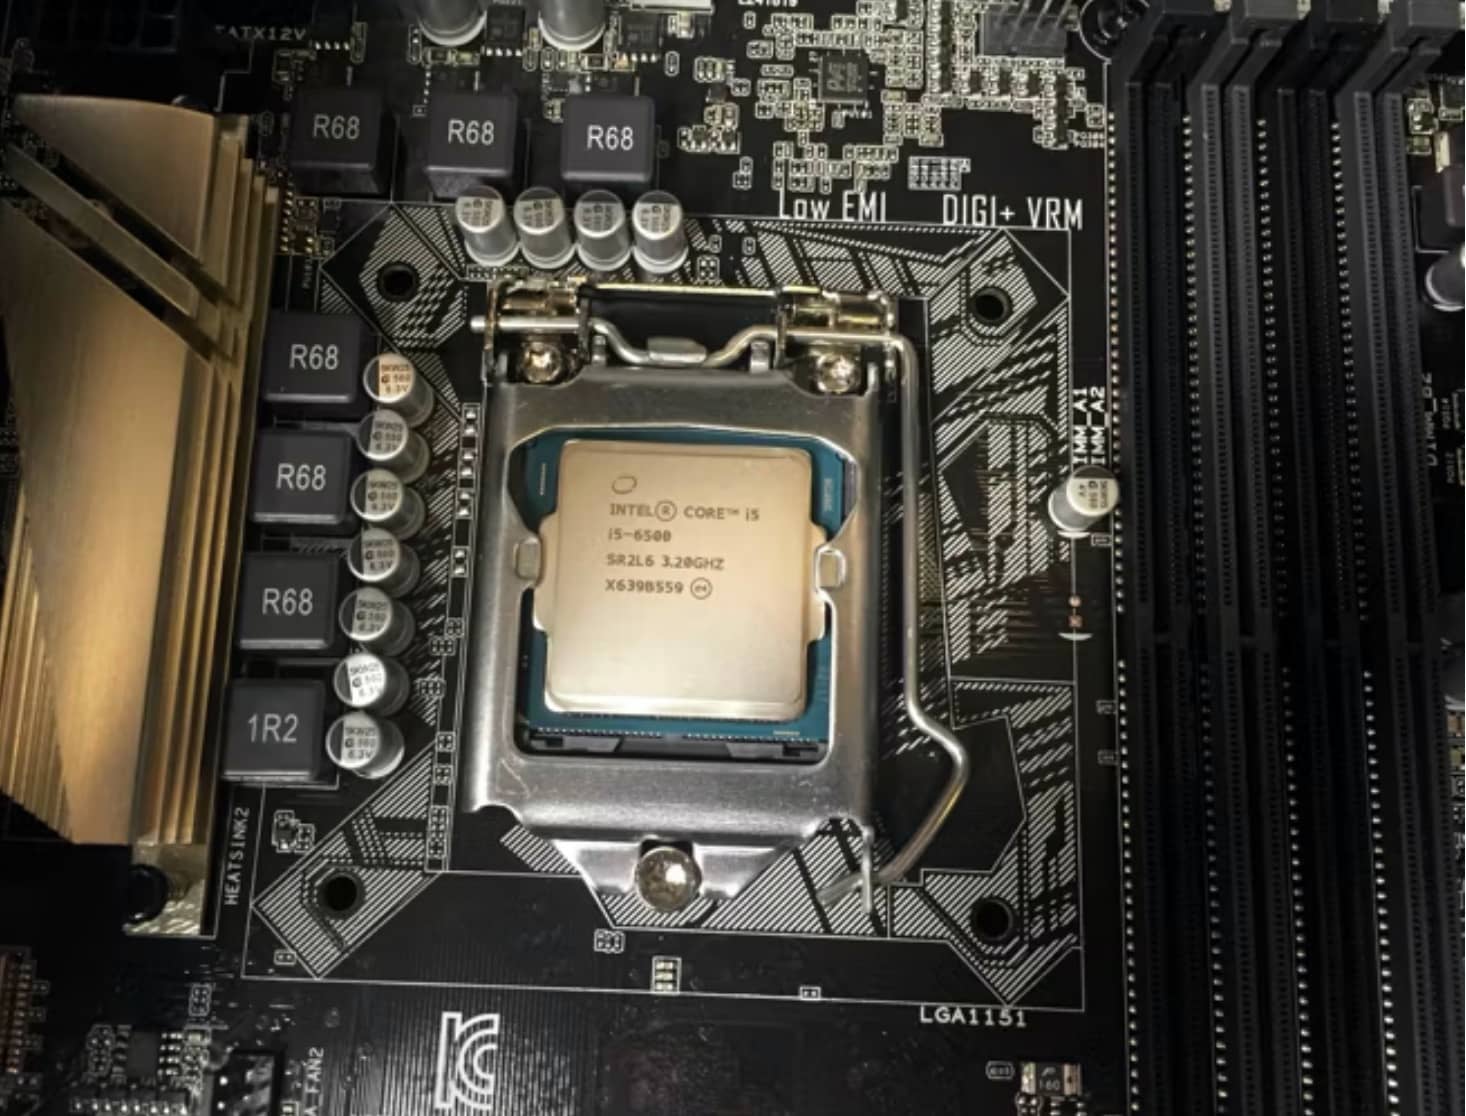
Once you've set the CPU in the socket, use the arm to lower the panel cover. Push down on the arm — it takes some pressure, so you'll need to press firmly — and slide it back under the metal retainer.
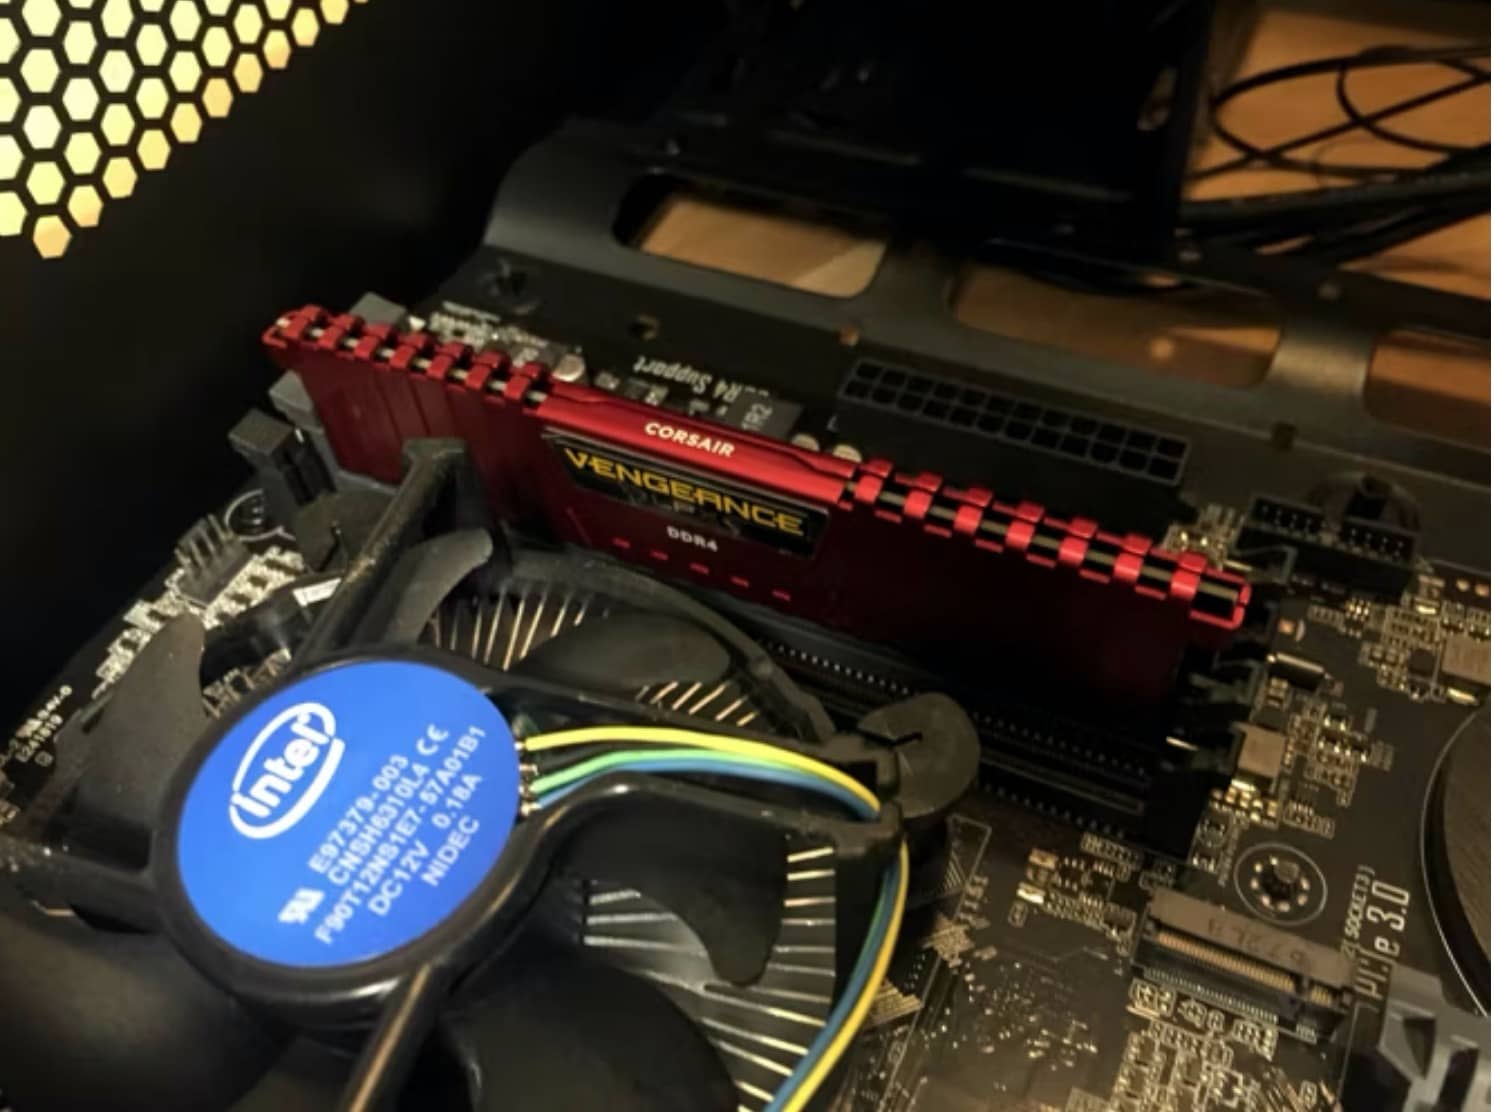
6. Install The CPU Fan
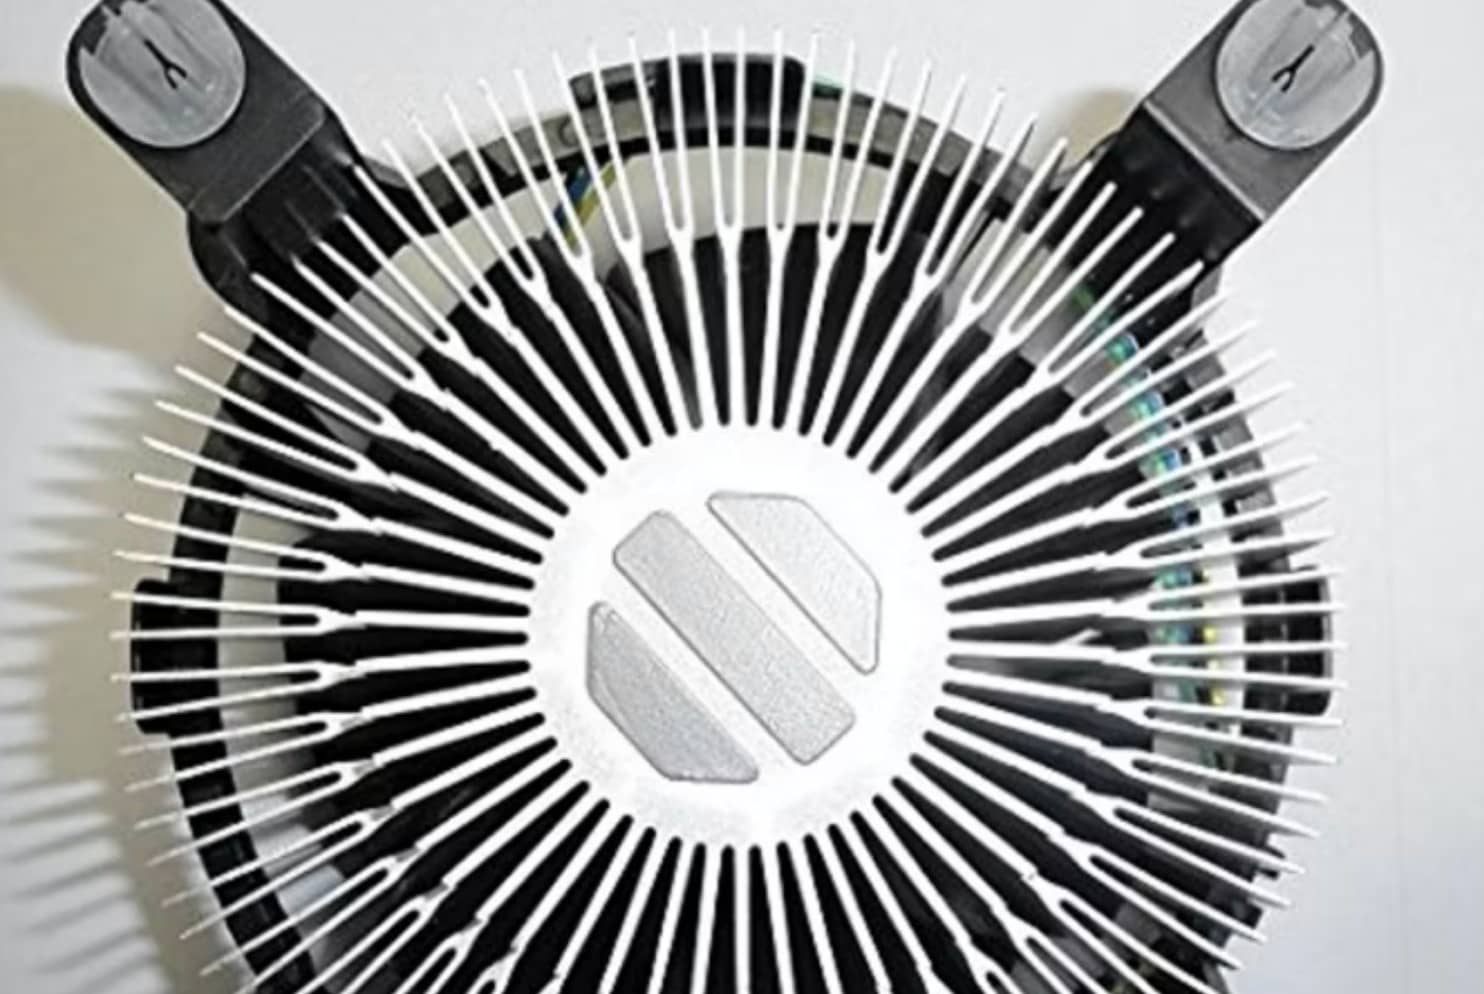
Your CPU is going to be doing a lot of hard work, which means it's going to be generating quite a bit of heat. The CPU fan (or another type of cooler, if you're going for a third-party option) helps keep it cool, prolonging the life of your processor. If your CPU came with a cooling fan, the fan almost certainly already has thermal paste on the bottom of it. Look for the silver stripes on the metal heatsink.
If you bought a a cooler and it doesn't have thermal paste on it already, you're going to have to apply some. There are various schools of thought on the best way to pattern the paste you apply, but it all comes down to the same thing: a little bit goes a long way. You really don't need very much. Some sources recommend a dot the size of a grain of rice. Other recommend two parallel lines. Each manufacturer will also provide some guidance on how to apply the paste. Read the instructions that come with your paste.
After that, you're ready to install the cooler. The fan that came with my Intel CPU simply requires that you push the four corner pins until they click. Other coolers may require that you do something else to secure them to the board; again, read the instructions.
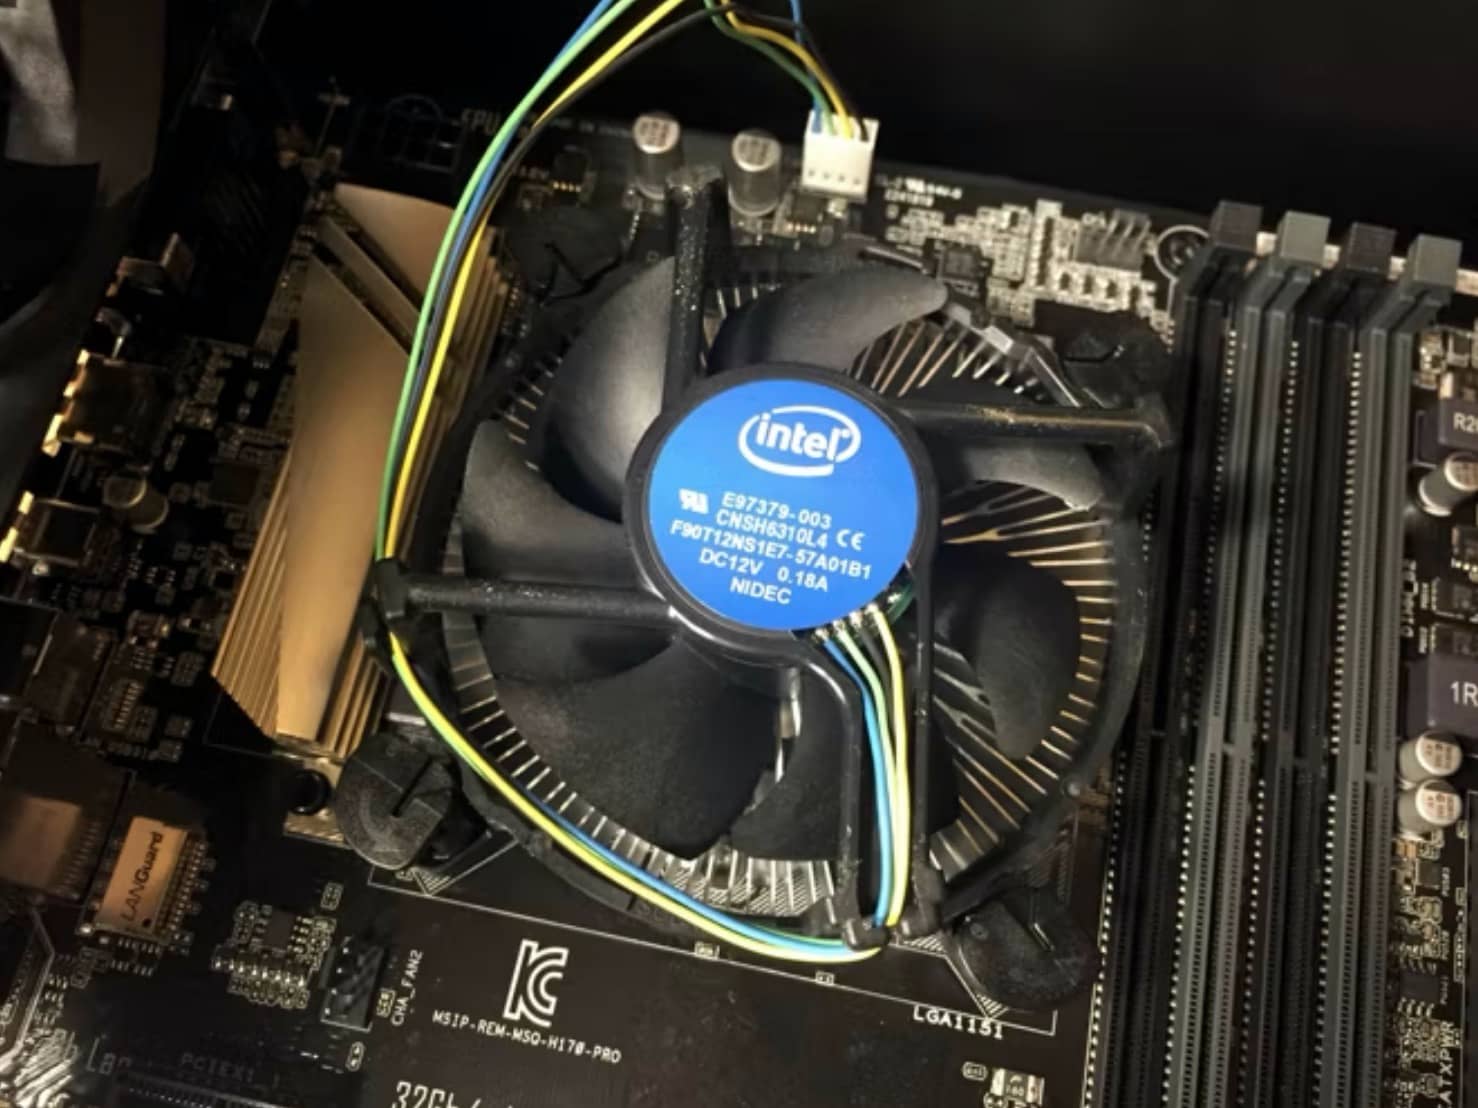
The CPU cooler also needs to be connected to your motherboard; you'll see a set of pins labeled "CPU fan" or something similar. Connect the CPU cooler in the same way you connected the case fan.
7. Install RAM
Your motherboard should have a very obvious place to place RAM (it may have "DIMM" printed on the board). There are often four slots for RAM sticks. Check the instructions on your motherboard for instructions on which slots you should use for the number of sticks you have. Mine, for example, says to put one in the second slot if you're using one; the second and fourth slots if you're using two; the first, second, and fourth for three; or all four.
RAM slots have a small lever that you'll need to push down before inserting the RAM.
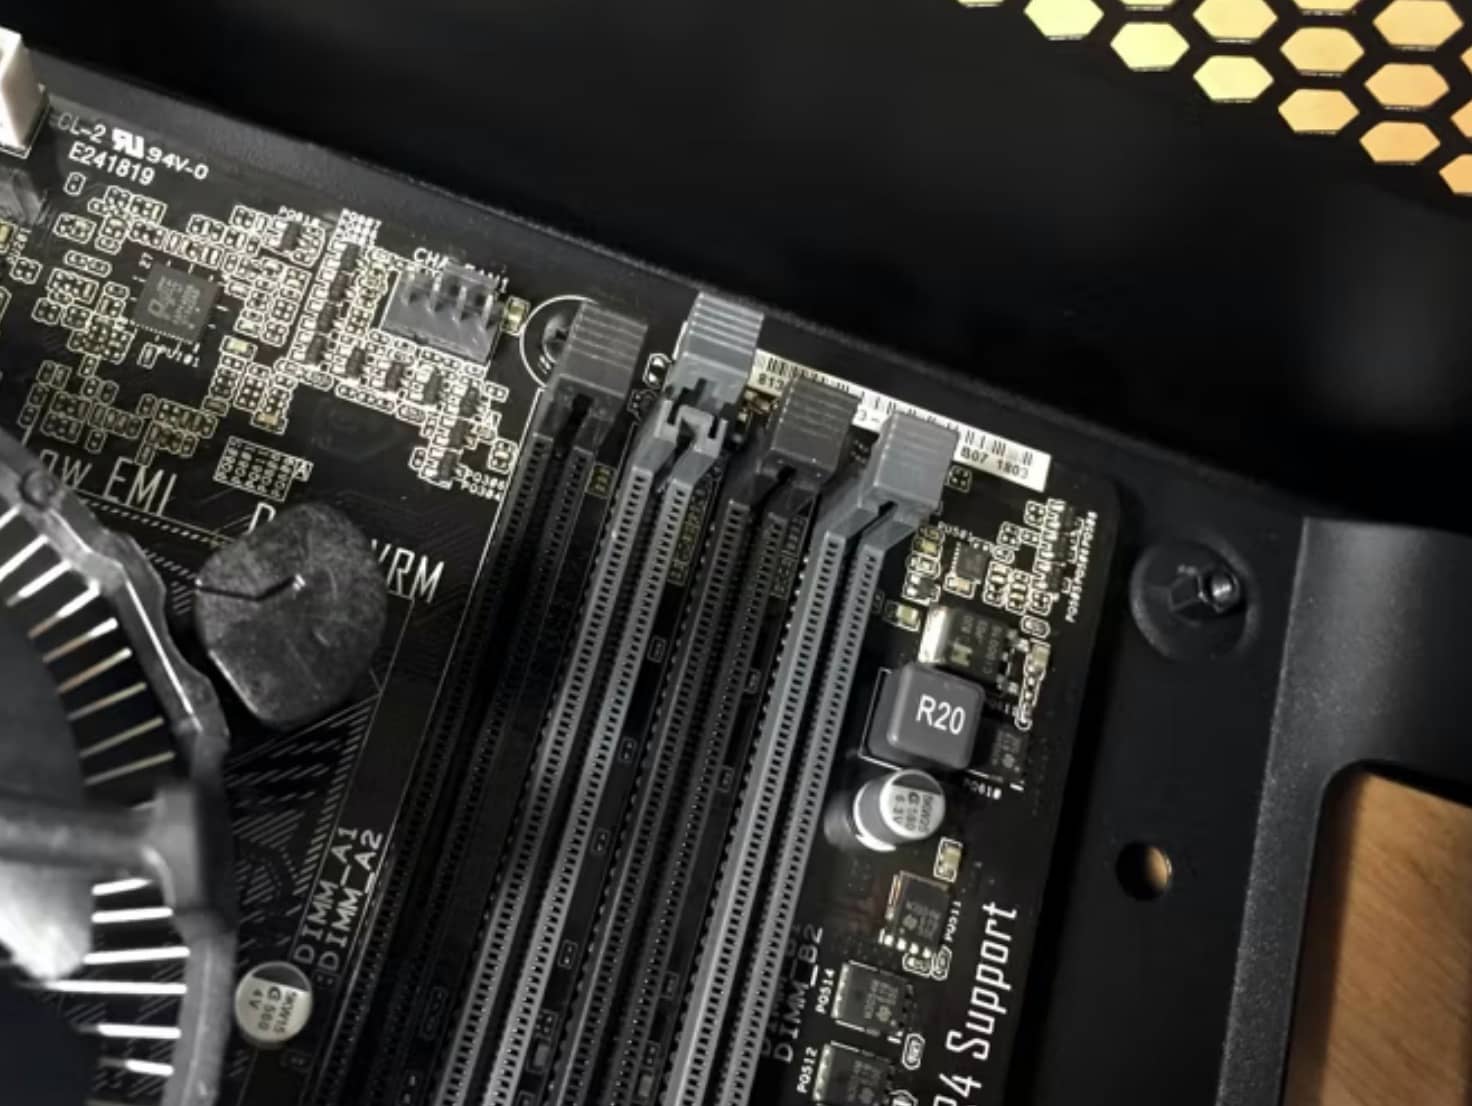
Once you've done that, push the RAM into the slot until you hear it click. It may take more force than you expect (but start gently and slowly increase the pressure). When I first installed my RAM, it only clicked on one side, and it wasn't fully engaged. Make sure yours is all the way in.
If you have an SO-DIMM (shorter) RAM stick, don't put it in a DIMM (longer) slot. It won't work. You'll need a motherboard that supports SO-DIMM RAM or a standard DIMM stick.
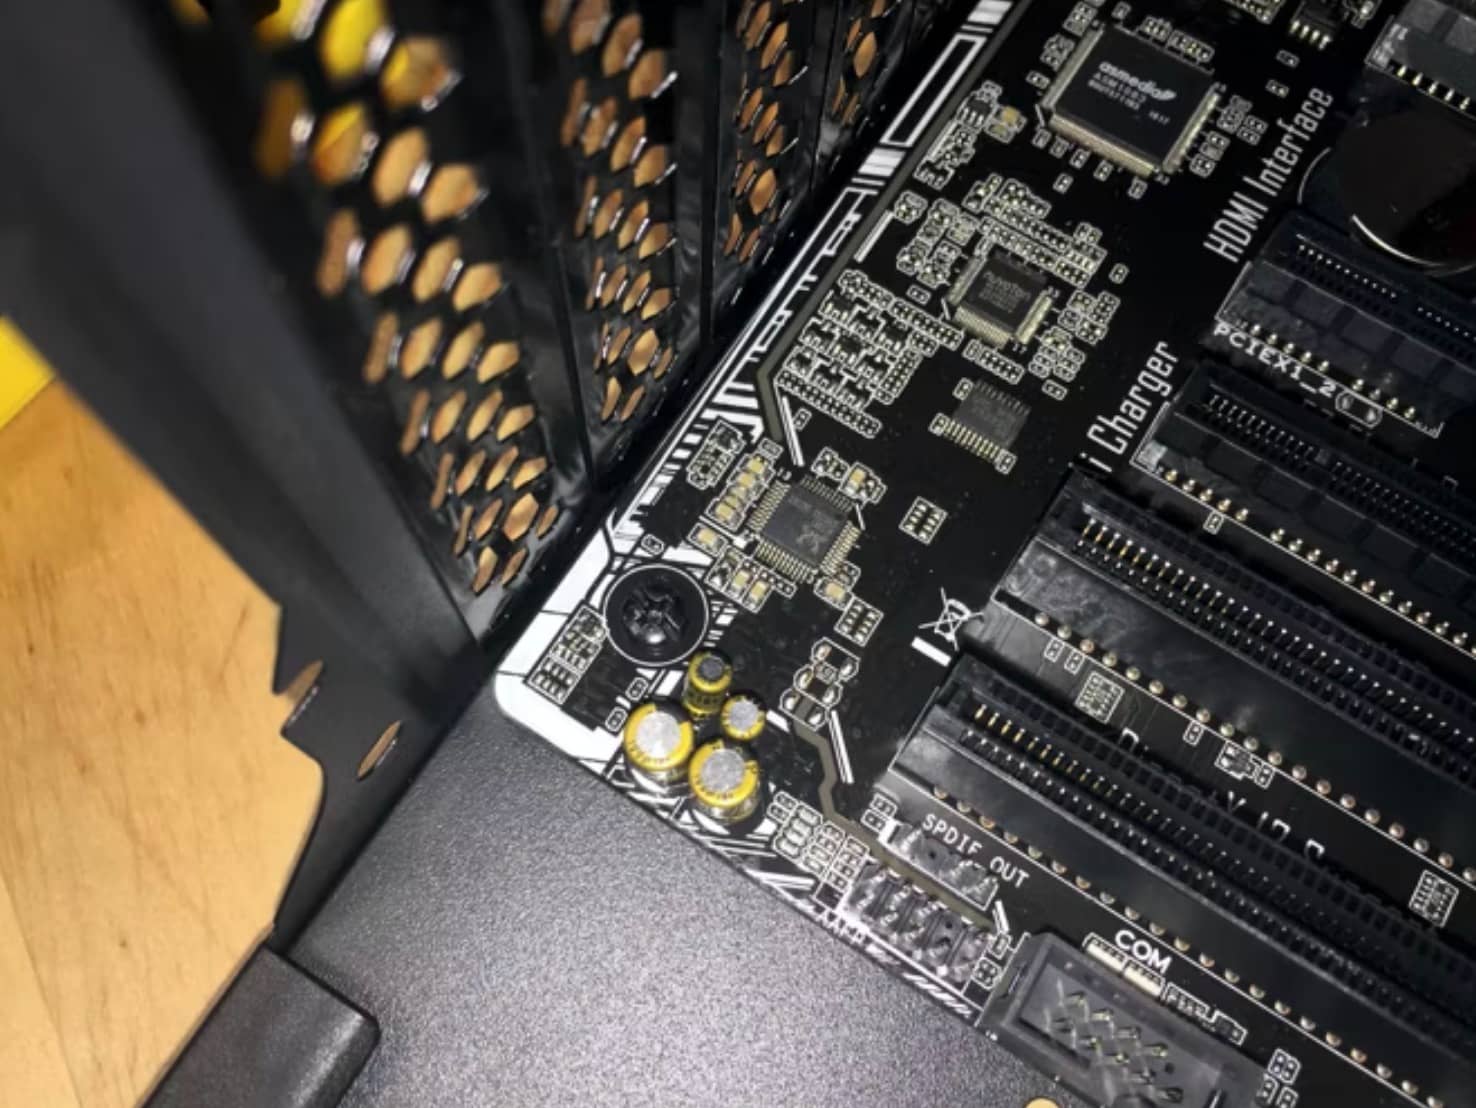
8. Install The Graphics Card
If you're building a gaming PC, this is the real muscle of your machine. Hopefully you already checked to make sure that your card will fit in your case – modern graphics cards can be quite large. If not, you're going to need a new case or a new card.
To start, find the PCIe port nearest to the heat sink on your motherboard. Your motherboard will likely have multiple PCIe ports, but not all of them are the same length. Many graphics cards use the PCIe x16 port, which is longer than the PCIe x4 ports you might also see. Once you've found the right port for your card, remove the corresponding vent cover(s) from the back of your computer. The covers can be removed with a small screwdriver. On my case, the rear vent covers were also secured by an L-shaped piece. If you see anything like this, remove it; it will make inserting the card much easier.
Now, insert the video card into the uppermost PCIe slot. If you have two similar slots, always use the one closest to the CPU; the furthest one is used for a second video card running in Crossfire or SLI mode. Make sure the plastic retaining lever is down, then push the card into the slot and secure it with the lever, much like you did with your RAM.
As with RAM, it might take a bit of pressure.
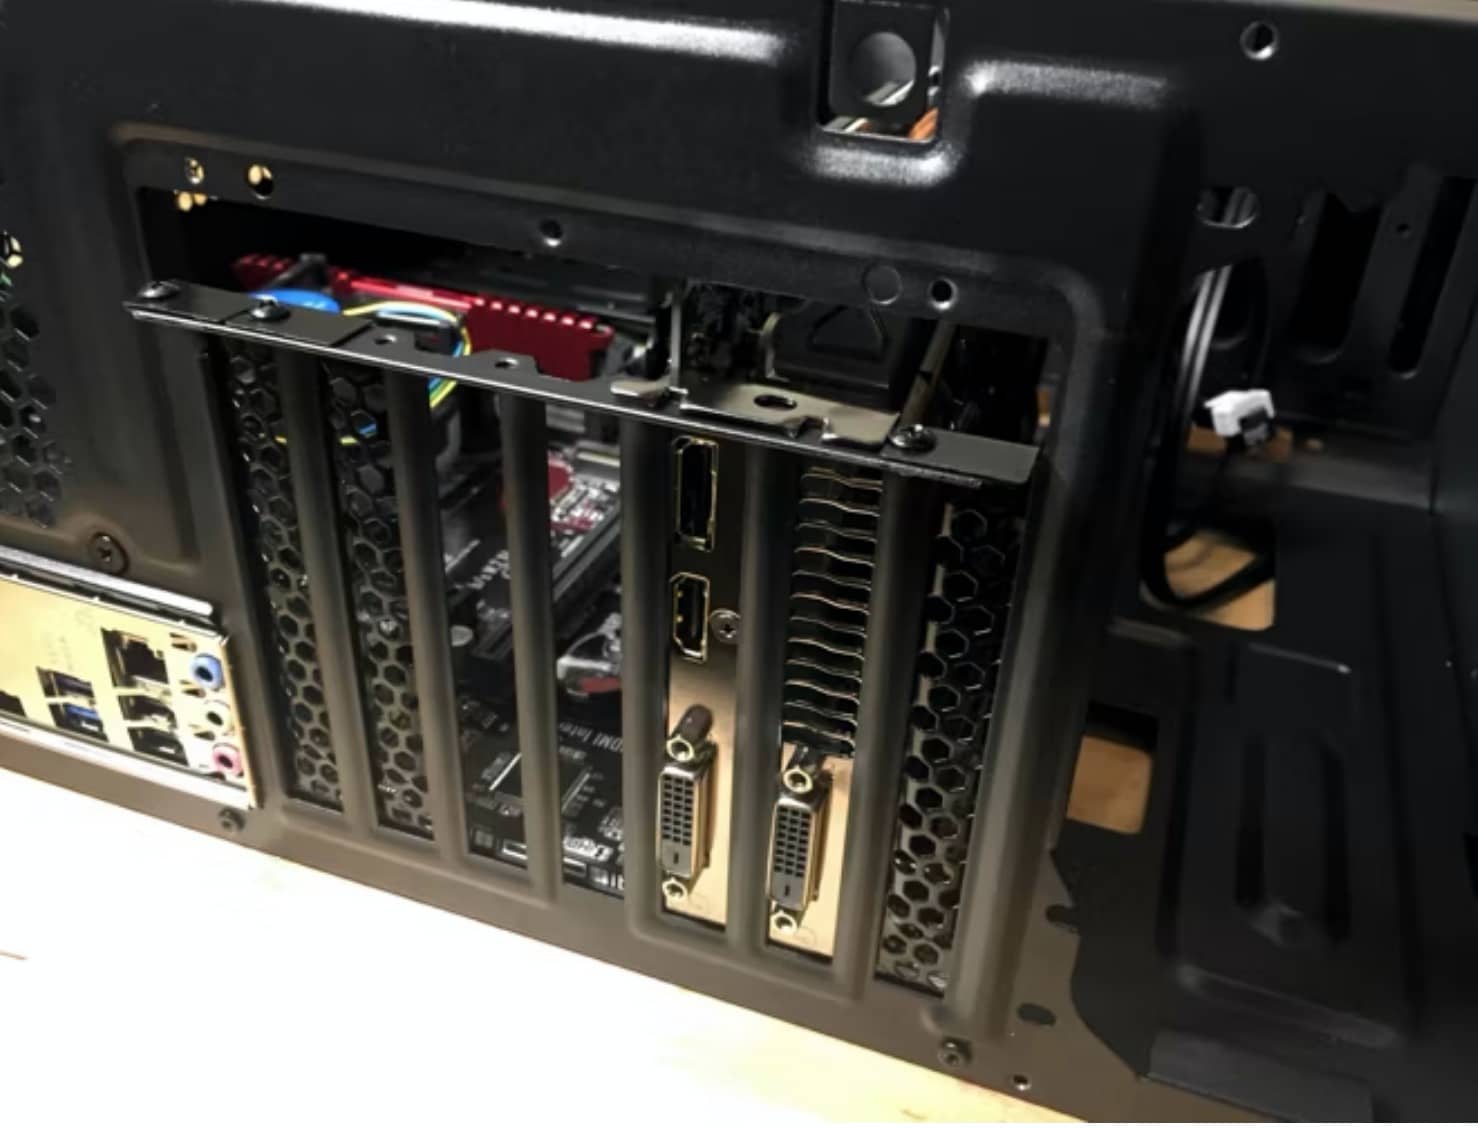
Once you've got the card in and the securing lever back in place, make sure the bracket on the back side of the card matches up with the vent cover ledge. Put the screws that were holding the small vent covers back in to secure the back of your card to the case. Put those covers in a safe place in case you need them again. Then replace the L-shaped piece as well.
9. Install Other Expansion Cards
If you have other expansion cards, like Bluetooth, networking, or RAID cards, use the same process for installing them as you did the video card. Find the correctly sized PCIe port that's closest to the motherboard's heat sink and install the card, making sure the retaining lever is in place. Then attach the card — if required — to the back of the case.
10. Install Storage Drives
First, find the storage drive bays in your case. Depending on the case, there may be removable brackets to hold your drives, or there may just be a sort of scaffold where you can secure the drives. In the picture below, you can see the removable brackets that hold my drives.
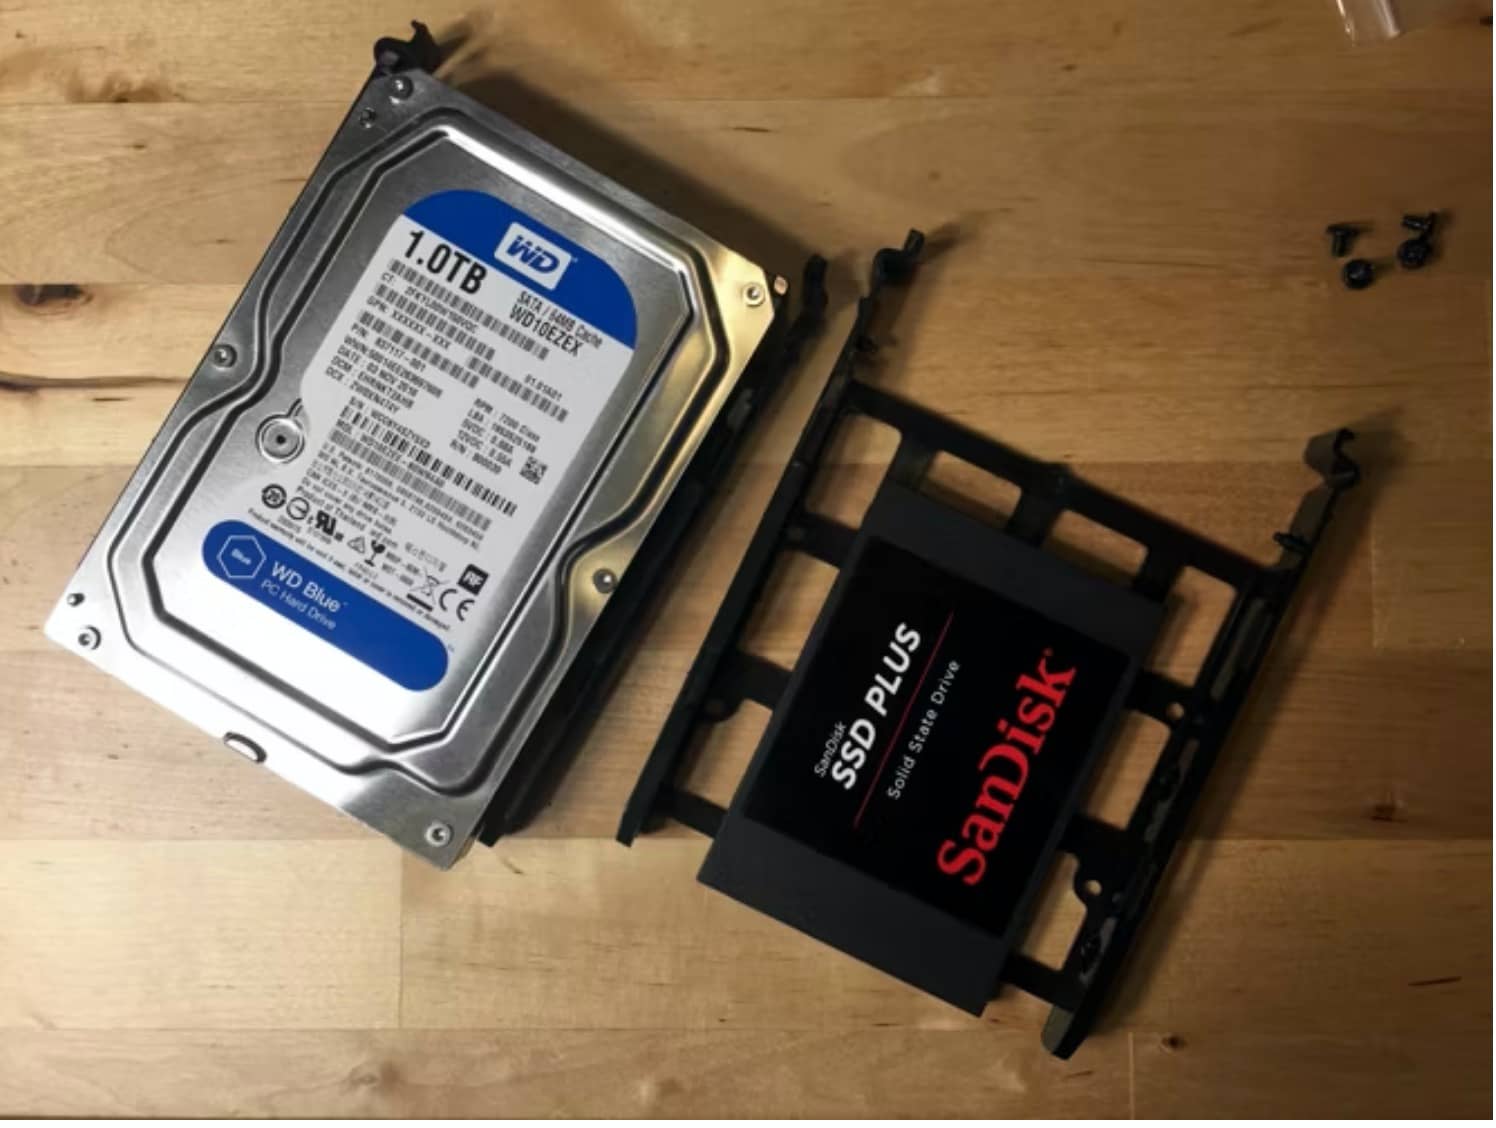
If you have these brackets, secure your drives to them with the small screws that came with your case. If your case offers tool-free installation, you don't have to worry about this step. Once the drives are secure, reinsert the brackets back into the case. Whether you use these brackets or not, orient the drives so that the SATA ports are facing toward the motherboard (or the motherboard side of the case).
If your case doesn't have these removable brackets, you'll just need to find the screw slots that match up with the small holes on your drives and screw them in. As with other pieces, don't over-tighten the screws; just make sure they're tight enough to keep your drives from moving around or falling out.
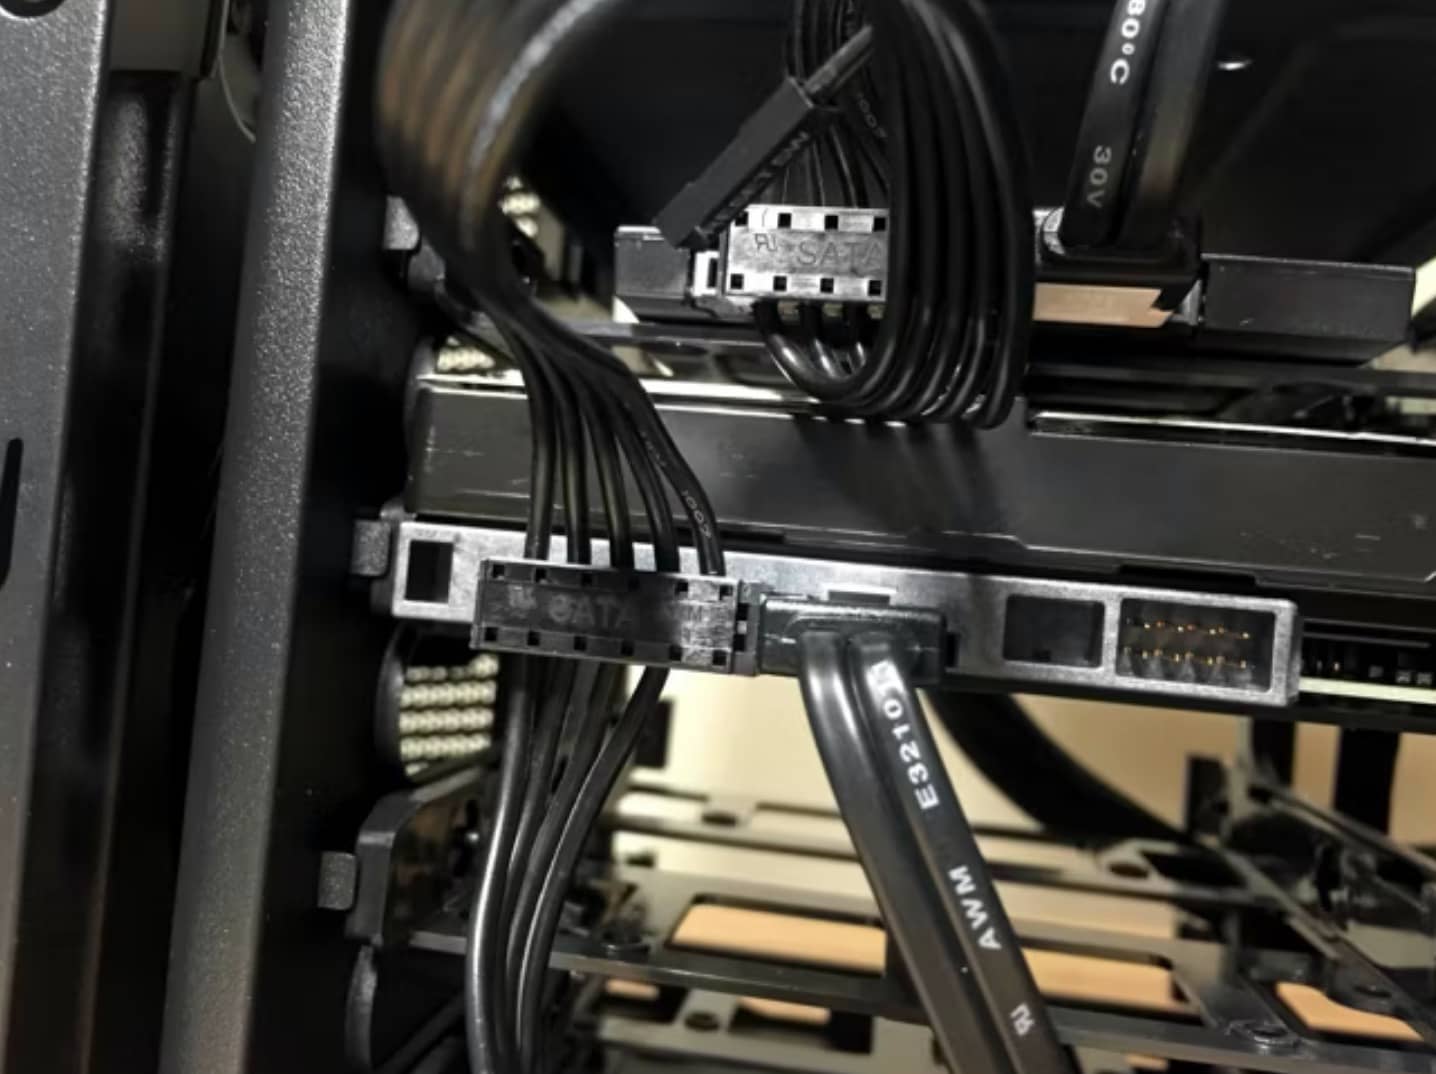
To connect the drives to your motherboard, find the SATA cables that came with your board. Insert one end in the SATA port on your drive, and another into the SATA port on your motherboard.
If you have both SATA2 and SATA3 ports, use the SATA3 ports for your drive, as it will benefit from faster speeds. That's all there is to it.
If you've opted for a PCI SSD, you won't need to worry about all this. Just plug it into a PCI port and you're good to go.
11. Install Optical Drives
While many people will opt to build their computers without optical drives (as I did), you may still want one. To insert an optical drive, remove the cover from the front of your computer case and slide the drive into one of the available optical drive bays. You should see two screw holes on each side of the drive align with holes in the drive bay. Secure it with screws.
Then, just as you did with your storage drives, connect SATA cables. Optical drives should be plugged into SATA2 ports, if they're available.
12. Install The PSU
The power supply unit is a rather hefty piece of gear that distributes power to your entire machine. Before anything else, make sure it's off, and unplug the cord that goes into the wall. This is not a piece of equipment to be trifled with.
There will be an obvious place at the bottom of the case for it, near the back, as well as a large space in the back of the case for the PSU's vent. Slot the PSU in the space and line up the slots for screws on the back of the case.

Once you've made sure the PSU is oriented correctly (the port for the power cord, as well as the power switch, face out the back of the case), secure the PSU with the screws from your case. Make sure you can get to the ports on the back of the PSU.
13. Connect The PSU
Everything in your computer needs power, so it's time to get the PSU hooked up. If it's a modular PSU, there will be one large bundle of cables coming out of the back of the unit with a 20-, 20+4-, or 24-pin connector. That's the main power supply for your motherboard. Find the large socket for this connector, make sure it has the same number of pins, and connect the PSU. If you have a 20-pin motherboard, the 20- and 20+4-pin PSU connectors will work. A 20+4- or 24-pin connector will work on a 24-pin motherboard.
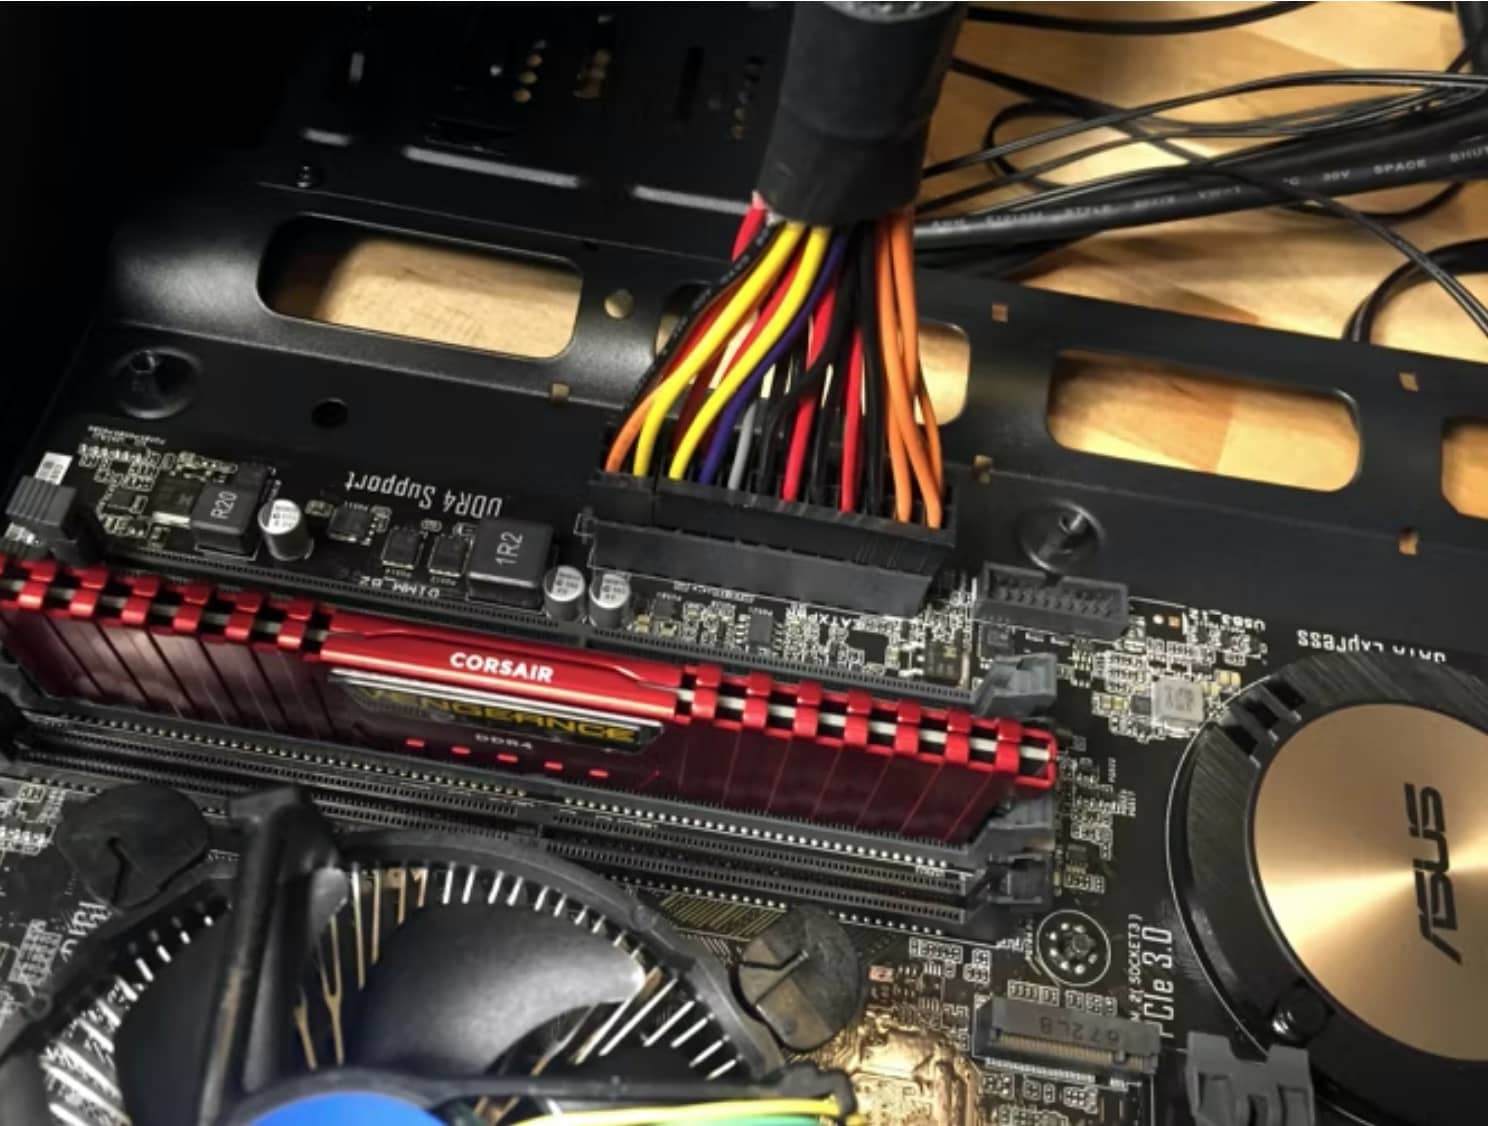
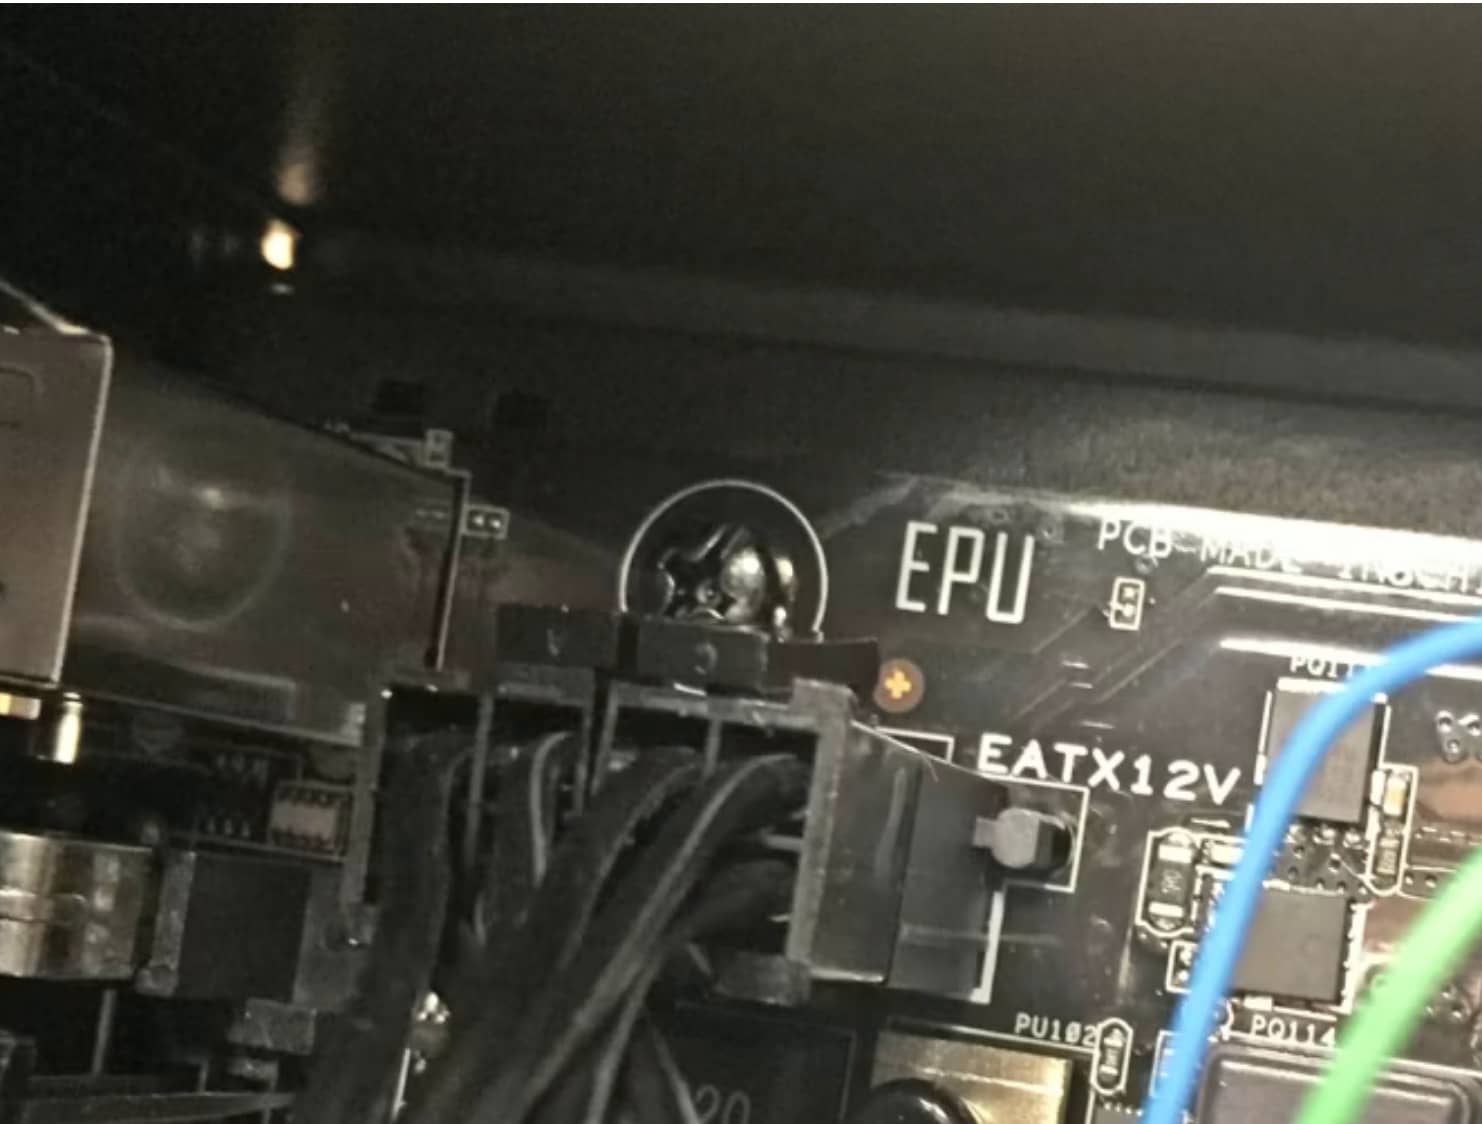
You'll also need to attach a PSU cable to power your CPU; this port should be near the processor (as you can see below, it'll also likely be labeled "EATX12V"). It'll be either a 4- or 8-pin socket. Connect your PSU to this socket using the appropriate cable. The back of your PSU will be labeled to indicate which port to use.
Next, connect your PSU to your graphics card and any other expansion card that needs its own power supply. These are usually 6- or 8-pin sockets, and your PSU should have cables to match. Again, check the back of your power supply to determine where to plug those cables in.
Your storage and optical drives will need power from SATA connectors as well. You might not be able to tell in the image below, but some of the PSU's cables have multiple connectors, so I used a single cable to connect both the HDD and SSD to the power supply.
Take a look around your case to make sure everything has a power socket has been connected to your PSU. If you miss something, it's not going to work.
14. Install Case Fans
Most cases include a single case fan, but if you're going to install additional fans, it's time to connect them. Find an unused fan location and use the four included screws to attach the fan to the inside of the case. Attach the cable from the fan to your motherboard.
If you're using a very high-powered CPU, graphics card, or a whole lot of RAM, consider installing additional cooling mechanisms. Extra fans are cheap, easy to install, and will keep your computer functioning longer.
15. Double-Check Everything
Now that everything's been installed, take a moment to double-check that everything's connected how it should be. Make sure your RAM and graphics card are seated properly. Check that your drives are plugged into your motherboard. Ensure that all of the PSU cables are secure. Check for anything you forgot to put into your computer. If something hasn't been assembled properly, there's a good chance that your computer won't boot up.
If it all looks good, put the side panels back on your case and secure them with the included screws.
16. Boot It Up
The moment of truth! Attach the power cable to your PSU, plug it into the wall, and flip the power switch. Plug in your monitor. Then, hit the power button on your case. If it boots up, congratulations! You've successfully built your first PC.
If it doesn't boot up — which is probably more likely — you're going to have to go back into the case and check everything again. When I first fired up my machine, the case fan started up, but nothing appeared on my monitor. I knew the motherboard was getting power, so I checked everything else. I discovered that my RAM wasn't fully in the socket. A couple of the PSU cables seemed a little bit loose, too, so I made sure they were all the way in. I had to open up the case and check everything again a couple times.
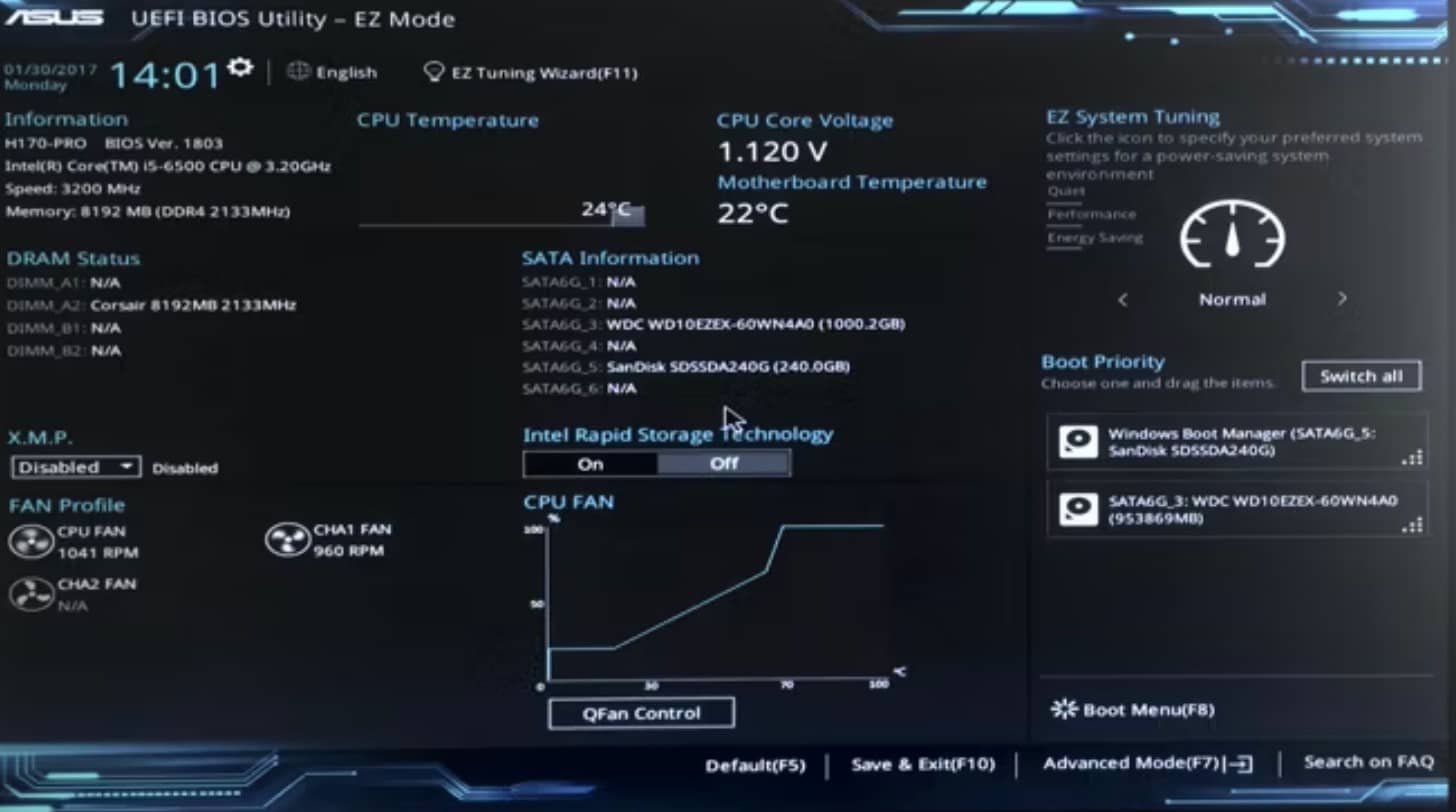
Eventually, though, hitting the power button resulted in a reassuring whir and the UEFI BIOS appearing.
17. Install the Operating System
Installing an operating system on a computer without one should be fairly easy; just insert the bootable CD or USB drive, and tell your BIOS to boot from that media (how you do that depends on the BIOS on your motherboard). If it doesn't install right away, you're going to have to do some troubleshooting. Depending on your components and the operating system you're using, you'll use different strategies, and your best bet is probably to run a search online.
Once you've done that, you're good to go! Download essential Windows apps, or get set up for Linux gaming, or do whatever it is you plan to do with your newly built, fully custom computer.
How to Build a Small PC With the Mini-ITX Form Factor
https://www.makeuseof.com/tag/how-to-build-a-mini-itx-pc/
Ready to build a new PC, but don't have much space and a limited budget? It's time to consider the Mini-ITX form factor. Compact motherboards measuring just 170mm by 170mm can revolutionize how you use a computer.
As with any PC build, you need to have the right components, carefully matched for compatibility. Here's everything you need to know about building a powerful, compact PC using the Mini-ITX form factor.
Uses for an ITX Form Factor PC
Building a small, Mini-ITX PC is ideal for several uses.
- A compact desktop computer
- Building a media center or home theater PC (HTPC)
- To run as your own data or media server
- As a dedicated gaming PC
The steps below show you how to build a standard, low power, compact desktop computer. For a dedicated HTPC or a gaming computer, you may opt to add a dedicated graphics card. Similarly, if you're building a server, you'll probably opt to max out the storage options.
What You'll Need for a Mini-ITX PC
Whatever the size, building a PC has the same basic requirements: making sure the hardware is compatible.
For a Mini-ITX PC, you'll need a suitable motherboard of 170mm x 170mm, along with low profile heatsink and fan. Looking for a more graphic intensive gaming experience? Look for a suitably powerful GPU that will fit the case.
The PC demonstrated in this guide features the following components:
- Case: Cooler Master RC-130-KKN1 Elite 130
- PSU: Corsair VS450
- Motherboard: ASRock AB350 Gaming-ITX/IC
- CPU: AMD Ryzen 3 2200G with Radeon Vega 8 Graphics
- RAM: Ballistix Elite 4GB DDR4
- HDD: SanDisk SSD PLUS 120GB Internal SSD
The total cost for this low-cost build was under $500. Your build might be more elaborate. Be sure to check out PC Part Picker for additional help as well.
Building a Mini-ITX PC in 10 Steps
Before you proceed, it's imperative that read the documentation that accompanies your motherboard and case. Understanding what device connects where, what jumpers to use, and how to correctly configure the BIOS will overcome most issues encountered when building a new computer.
You're about to build a small computer, but the general principles for building a standard desktop apply. Our downloadable guide on how to build your own PC provides a more detailed approach.
Step 1: Order Parts, Check for Compatibility
You've already settled on an Mini-ITX case, so now you need to choose hardware that meets your requirements and budget.
Beware: it's easy to order the wrong parts. The motherboard, CPU, and RAM modules need to be totally compatible for the computer to work. As such, you should use an online tool to ensure compatibility.
- Crucial offers a RAM and motherboard compatibility "Advisor" tool
- Intel dedicates a portion of its website to hardware compatibility
- PC Part Picker is an excellent independent resource for ensuring you buy compatible components
Once you've checked, check again. Only place your order once you're satisfied the hardware is correct and you've researched satisfactory reviews.
Step 2: Prepare Your Anti-Static Workspace
Before you unpack your parts, take the time to clear your work area. Wipe it free of fabrics and loose metal. Then ground yourself with an anti-static wrist strap.
Next, unpack the motherboard, putting the anti-static bag to one side.
Place the motherboard on the foam anti-static packaging (NOT the anti-static bag) that it shipped with before proceeding.
Step 3: Install the CPU
Here's how to safely install a CPU:
- Release the catch on the CPU socket. This will either be an arm, or a cover that pivots over the CPU and locks it in place.
- The CPU will only sit one way. The pins on the underside each have their own individual socket, so it is vital that the CPU is correctly oriented. You'll probably notice a small triangle in one corner of the CPU; this will match a similar symbol on the motherboard's CPU socket. Ensure the CPU is sitting flat on the socket before proceeding.
- Lock the CPU in place using the arm or cover. If you have seated the CPU correctly, no force should be required.
This three-step process ensures safe and accurate installation. CPU installation will differ depending on the socket type.
Step 4: Attach the Heatsink and Fan
It's vital for the CPU to remain cool, which means adding a heatsink and fan to draw heat away.
There is another element to this, however: thermal paste. In most cases, the heatsink and fan will ship together with the thermal paste pre-applied. This means that you shouldn't need to worry about applying the right amount to your CPU, and the complications that can lead to.
Follow the provided instructions to mount the heatsink and fan on the CPU, locking them in place safely.
Step 5: Install the RAM
Installing the RAM correctly is vital. Without it, the computer cannot run. Incorrect installation can short out the RAM module, as well as the motherboard.
When installing RAM, ensure that the entire module is fully pushed into the slot. Everything should be level; you don't want to see any of the contacts above the slot. Additionally, the clasps at either end of the module will lock in place when the module is fully inserted.
If you're using multiple RAM modules, they should both be the same type and size for the best performance.
Step 6: Prepare the Case
You're almost ready to mount the motherboard in the case. Begin by screwing four risers (also known as stand-offs) into the case where the motherboard should sit.
Once this is done, you'll need to fit the motherboard's input/output (I/O) shield. This is the metal surround for the ports on the back of the case. It needs to be snapped into place before the motherboard is installed.
Step 7: Install the Motherboard in the Case
With everything installed on your motherboard, it's time to install it in the Mini-ITX compatible case.
Carefully lift the board, and slot it into the case, taking care to line it up with the risers and the I/O shield. The back of the case should line up with the ports on the motherboard.
With the board in place, secure it into position using the dedicated screws.
Step 8: Add the Power Supply Unit
If the case doesn't have its own PSU, you'll need to install one. This can be troublesome for Mini-ITX cases, which is why you need to choose either a compact PSU, or a case with extra space for a standard PSU.
Once the PSU is fitted, connect the cables to the motherboard as directed in the board's manual. It should be obvious where to connect the cables. The motherboard receives power from a ribbon of cables, while the CPU and fans have separate power cables.
Remaining PSU cables are for storage devices.
Step 9: Test Boot the Mini PC
At this stage, it's a good idea to check that everything is working. You should have already double-checked the connections, so plug in the PC, and power it up. Remember to switch the PSU on before you hit the button on the front of the case!
With your computer hooked up to the monitor, you should see the initial POST (power-on self-test) screen. Part of this is a scan for the storage drive, which you haven't hooked up yet. If you've made it this far, you should see that the CPU is correctly displayed, along with the RAM total.
Hold the power button to shut down the computer and unplug from the mains. You're ready to install your storage device and operating system.
Step 10: Attach a Hard Drive
Connecting a storage drive (SSD or HDD) to your motherboard is relatively straightforward. You simply need to connect the SATA data cable from the motherboard to the drive; then, connect the power cable to the drive. You'll also need to secure the drive in a suitable slot.
However, if your motherboard supports bootable M.2 SSD storage, you may prefer to use this. While this will increase the price of your build slightly, it delivers far greater data speeds, and improved performance.
Note: Any Blu-ray (or other optical device) drive you plan to use should be installed at this stage. Optical drives are connected in the same way as storage drives.
Modern cases typically have a locking mechanism to keep the drive secure, rather than screws.
Installing an Operating System
Your chosen operating system should be downloaded in advance and written to a USB flash device.
Whether you use Windows, Linux, or another operating system is up to you. However, be aware of compatibility issues with modern hardware.
For example, Windows 7 will not run with Ryzen CPUs. For example, in this test build I had to choose between Windows 10 and Linux (specifically Linux Mint).
It's this sort of surprising compatibility issue that you should be aware of before starting. It could result in you actually building a Linux PC.
Mini-ITX PCs: Multipurpose, Compact Computing
Building a Mini-ITX PC is no tougher, or easier, than building a traditional ATX tower system. Although if you have large hands, it may be difficult to access the motherboard once it's mounted in the case.
By this point, you should have a brand-new working PC. If not, it's time to check over the documentation. Have you set up your motherboard correctly? Is the RAM correctly inserted? Does your HDD need configuring with a jumper setting?
Problems occur when building PCs, but they can usually be resolved. Here are some other problems to avoid when building your first PC.