
RESOURCES
- REST API Querying
- https://restdb.io/docs/querying-with-the-api
- https://docs.oracle.com/en/cloud/saas/commerce-cloud/occ-developer/rest-api-query-parameters.html
-
- Authentication
- Laravel API Authentication using JWT Tokens
https://www.youtube.com/watch?v=jIzPuM76-nI&list=PLlameCF3cMEuSQb-UCPDcUV_re5uXaOU9 - React Authentication Full Course | Login, Logout, Forgot and Reset Password
https://www.youtube.com/watch?v=6sLh_5iFnFc - React JWT Authentication
https://www.youtube.com/watch?v=OUP-urBy1k4&t=0s
>
use / understand rest api
https://www.smashingmagazine.com/2018/01/understanding-using-rest-api/
There’s a high chance you came across the term “REST API” if you’ve thought about getting data from another source on the internet, such as Twitter or Github. But what is a REST API? What can it do for you? How do you use it?
In this article, you’ll learn everything you need to know about REST APIs to be able to read API documentations and use them effectively.
Part Of: Rest API & GraphQL
- Understanding And Using REST APIs
- Consuming REST APIs In React With Fetch And Axios
- A GraphQL Primer: Why We Need A New Kind Of API (Part 1)
- A GraphQL Primer: The Evolution Of API Design (Part 2)
- Introducing The Component-Based API
- Also, subscribe to our newsletter to not miss the next ones.
What Is A REST API #
Let’s say you’re trying to find videos about Batman on Youtube. You open up Youtube, type “Batman” into a search field, hit enter, and you see a list of videos about Batman. A REST API works in a similar way. You search for something, and you get a list of results back from the service you’re requesting from.
An API is an application programming interface. It is a set of rules that allow programs to talk to each other. The developer creates the API on the server and allows the client to talk to it.
REST determines how the API looks like. It stands for “Representational State Transfer”. It is a set of rules that developers follow when they create their API. One of these rules states that you should be able to get a piece of data (called a resource) when you link to a specific URL.
Each URL is called a request while the data sent back to you is called a response.
The Anatomy Of A Request #
It’s important to know that a request is made up of four things:
- The endpoint
- The method
- The headers
- The data (or body)
The endpoint (or route) is the url you request for. It follows this structure:
root-endpoint/?
The root-endpoint is the starting point of the API you’re requesting from. The root-endpoint of Github’s API is https://api.github.com while the root-endpoint Twitter’s API is https://api.twitter.com.
The path determines the resource you’re requesting for. Think of it like an automatic answering machine that asks you to press 1 for a service, press 2 for another service, 3 for yet another service and so on.
More after jump! Continue reading below ↓
Meet “TypeScript in 50 Lessons”, our shiny new guide to TypeScript. With detailed code walkthroughs, hands-on examples and common gotchas — all broken down into short, manageable lessons. For developers who know enough JavaScript to be dangerous.
You can access paths just like you can link to parts of a website. For example, to get a list of all posts tagged under “JavaScript” on Smashing Magazine, you navigate to https://www.smashingmagazine.com/tag/javascript/. https://www.smashingmagazine.com/ is the root-endpoint and /tag/javascript is the path.
To understand what paths are available to you, you need to look through the API documentation. For example, let’s say you want to get a list of repositories by a certain user through Github’s API. The docs tells you to use the the following path to do so:
/users/:username/repos
Any colons (:) on a path denotes a variable. You should replace these values with actual values of when you send your request. In this case, you should replace :username with the actual username of the user you’re searching for. If I’m searching for my Github account, I’ll replace :username with zellwk.
The endpoint to get a list of my repos on Github is this:
https://api.github.com/users/zellwk/repos
The final part of an endpoint is query parameters. Technically, query parameters are not part of the REST architecture, but you’ll see lots of APIs use them. So, to help you completely understand how to read and use API’s we’re also going to talk about them. Query parameters give you the option to modify your request with key-value pairs. They always begin with a question mark (?). Each parameter pair is then separated with an ampersand (&), like this:
?query1=value1&query2=value2
When you try to get a list of a user’s repositories on Github, you add three possible parameters to your request to modify the results given to you:
 Github let’s you add three parameters to your request
If you’d like to get a list the repositories that I pushed to recently, you can set sort to push.
https://api.github.com/users/zellwk/repos?sort=pushed
How do you know if this endpoint works? Well, it’s time to give it a try!
Testing Endpoints With Curl #
You can send a request with any programming language. JavaScript users can use methods like the Fetch API and jQuery’s Ajax method; Ruby users can use Ruby’s Net::HTTP class, Python users can use Python Requests; and so on.
For this article, we’ll use the command line utility called cURL. We use cURL because API documentations are normally written with reference to cURL. If you understand how to use cURL, you’ll have no problems understanding API documentations. Then, you can easily perform requests with your preferred language.
Before you continue, you’ll want to make sure you have cURL installed on your machine. Open up your Terminal and type curl -version. This command checks the version of cURL you have installed on your system.
curl --version
If you don’t have cURL installed, you’ll get a “command not found” error. If you get this error, you will need to install curl before moving on.
To use cURL, you type curl, followed by the endpoint you’re requesting for. For example, to get Github’s root endpoint, you type the following:
curl https://api.github.com
Once you hit enter, you should get a response from Github that looks like this:
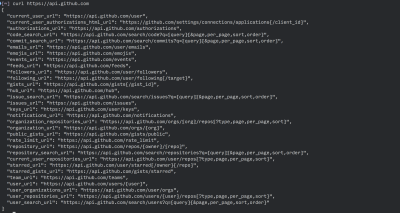 Response from Github’s root-endpoint
To get a list of a user’s repositories, you modify the endpoint to the correct path, like what we discussed above. To get a list of my repositories, you can use this command:
curl https://api.github.com/users/zellwk/repos
If you wish to include query parameters with cURL, make sure you prepend a backslash (\) before the ? and = characters. This is because ? and = are special characters in the command line. You need to use \ before them for the command line to interpret them as normal characters:
curl https://api.github.com/users/zellwk/repos\?sort\=pushed
Try using either commands and perform a request! You’ll get a similar response to what you’ve seen with Github’s root-endpont (but with a lot more data).
JSON #
JSON (JavaScript Object Notation) a common format for sending and requesting data through a REST API. The response that Github sends back to you is also formatted as JSON.
A JSON object looks like a JavaScript Object. In JSON, each property and value must be wrapped with double quotation marks, like this:
{
    "property1": "value1",
    "property2": "value2",
    "property3": "value3"
  }
Back To The Anatomy Of A Request #
You’ve learned that a request consists of four parts.
- The endpoint
- The method
- The headers
- The data (or body)
Let’s go through the rest of what makes up a request.
The Method
The method is the type of request you send to the server. You can choose from these five types below:
GETPOSTPUTPATCHDELETE
These methods provide meaning for the request you’re making. They are used to perform four possible actions: Create, Read, Update and Delete (CRUD).
| Method Name | Request Meaning |
|---|---|
GET |
This request is used to get a resource from a server. If you perform a GET request, the server looks for the data you requested and sends it back to you. In other words, a GET request performs a READ operation. This is the default request method. |
POST |
This request is used to create a new resource on a server. If you perform a POST request, the server creates a new entry in the database and tells you whether the creation is successful. In other words, a POST request performs an CREATE operation. |
PUT and PATCH |
These two requests are used to update a resource on a server. If you perform a PUT or PATCH request, the server updates an entry in the database and tells you whether the update is successful. In other words, a PUT or PATCH request performs an UPDATE operation. |
DELETE |
This request is used to delete a resource from a server. If you perform a DELETE request, the server deletes an entry in the database and tells you whether the deletion is successful. In other words, a DELETE request performs a DELETE operation. |
The API lets you know what request method to use each request. For example, to get a list of a user’s repositories, you need a GET request:
![]() A GET request is required to get a list of repositories from a user
A GET request is required to get a list of repositories from a user
A GET request is required to get a list of repositories from a user. To create a new Github repository, you need a POST request:
 A POST request is required to create a new repository
You can set the request method in cURL by writing -X or --request, followed by the request method. This command below tries to create a repository via cURL:
curl -X POST https://api.github.com/user/repos
Try running this request. You’ll get a response that tells you that authentication is required. (More on authentication later).
{
    "message": "Requires authentication",
    "documentation_url": "https://developer.github.com/v3"
  }
The Headers
Headers are used to provide information to both the client and server. It can be used for many purposes, such as authentication and providing information about the body content. You can find a list of valid headers on MDN’s HTTP Headers Reference.
HTTP Headers are property-value pairs that are separated by a colon. The example below shows a header that tells the server to expect JSON content.
"Content-Type: application/json". Missing the opening ".
You can send HTTP headers with curl through the -H or --header option. To send the above header to Github’s API, you use this command:
curl -H "Content-Type: application/json" https://api.github.com
(Note: the Content-Type header is not a requirement for Github’s API to work. This is only an example to illustrate how to use a header with cURL).
To view headers you’ve sent, you can use the -v or --verbose option as you send the request, like this:
curl -H "Content-Type: application/json" https://api.github.com -v
 cURL tells you additional information, which includes headers when you use the verbose option
Here, * refers to additional information provided by cURL. > refers to request headers, and < refers to the response headers.
The Data (Or “Body”)
The data (sometimes called “body” or “message”) contains information you want to be sent to the server. This option is only used with POST, PUT, PATCH or DELETE requests.
To send data through cURL, you can use the -d or --data option:
curl -X POST <URL> -d property1=value1
To send multiple data fields, you can create multiple -d options:
curl -X POST <URL> -d property1=value1 -d property2=value2
If it makes sense, you can break your request into multiple lines \ to make it easier to read:
curl -X POST <URL> \
    -d property1=value1 \
    -d property2=value2
If you know how to spin up a server, you can make an API and test your own data. If you don’t know, but feel courageous enough to try, you can follow this article to learn to create a server with Node, Express, and MongoDB
If you don’t want to spin up your server, you can go to Requestbin.com (it’s free!) and click on the “create endpoint”. You’ll be given a URL that you can use to test requests, like https://requestb.in/1ix963n1 shown in the picture below.
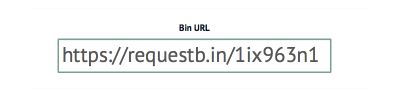 Request bin gives you a unique URL you can use for 48 hours
Make sure you create your own request bin if you want to test your request. Request bins only remains open for 48 hours after its creation. By the time you read this article, the bin I created above will be long gone.
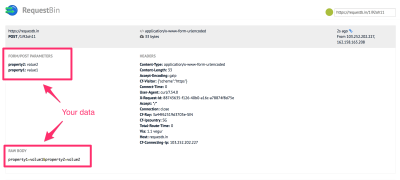
Now, try sending some data to your request bin, then refresh your bin’s webpage. You’ll see some data, like this:
curl -X POST https://requestb.in/1ix963n1 \
    -d property1=value1 \
    -d property2=value2
 Requests you sent to your bin will appear like this
By default, cURL sends data as if they’re sent through “form fields” on a page. If you wish to send JSON data, you’ll need to set the Content-Type to application/json, and you’ll need to format your data as a JSON object, like this:
curl -X POST https://requestb.in/1ix963n1 \
    -H "Content-Type: application/json" \
    -d '{
    "property1":"value1",
    "property2":"value2"
  }'
 Sending data as JSON
And that is (almost!) everything you need to know about the structure of a request.
Now, remember when you tried to send a POST request through Github’s API, you got a message that says “Requires authentication”? Well, that’s because you’re not authorized to perform the POST request!
Authentication #
You wouldn’t allow anyone to access your bank account without your permission, would you? On the same line of thought, developers put measures in place to ensure you perform actions only when you’re authorized to do. This prevents others from impersonating you.
Since POST, PUT, PATCH and DELETE requests alter the database, developers almost always put them behind an authentication wall. In some cases, a GET request also requires authentication (like when you access your bank account to check your current balance, for example).
On the web, there are two main ways to authenticate yourself:
- With a username and password (also called basic authentication)
- With a secret token
The secret token method includes oAuth, which lets you to authenticate yourself with social media networks like Github, Google, Twitter, Facebook, etc.
For this article, you’ll only learn to use basic authentication with a username and a password. If you’re interested in authenticating with oAuth, I suggest reading “What You Need To Know About OAuth3 And Logging In With Facebook” by Zack Grossbart.
To perform a basic authentication with cURL, you can use the -u option, followed by your username and password, like this:
curl -x POST -u "username:password" https://api.github.com/user/repos
Try authenticating yourself with your username and password in the above request. Once you succeed in authentication, you’ll see the response change from “Requires authentication” to “Problems parsing JSON.”
This is because you’ve yet to provide any data (which is required by all POST, PUT, PATCH and DELETE requests) to the server.
With the knowledge you’ve learned so far, you should be able to edit the code above to create a Github repository via your cURL. I’d leave you to try it yourself!
Now, let’s talk about HTTP Status codes and error messages.
HTTP Status Codes And Error Messages #
Some of the messages you’ve received earlier, like “Requires authentication” and “Problems parsing JSON” are error messages. They only appear when something is wrong with your request. HTTP status codes let you tell the status of the response quickly. The range from 100+ to 500+. In general, the numbers follow the following rules:
- 200+ means the request has succeeded.
- 300+ means the request is redirected to another URL
- 400+ means an error that originates from the client has occurred
- 500+ means an error that originates from the server has occurred
You can debug the status of a response with the verbose option (-v or --verbose) or the head option (-I or --head).
For example, if you tried adding -I to a POST request without providing your username and password, you’ll get a 401 status code (Unauthorized):
 Example of an unauthorized request
If your request is invalid because your data is wrong or missing, you usually get a 400 status code (Bad Request).
>
To get more information about specific HTTP status codes, you may want to consult MDN’s HTTP Status Reference.
API Versions #
Developers update their APIs from time to time. Sometimes, the API can change so much that the developer decides to upgrade their API to another version. If this happens, and your application breaks, it’s usually because you’ve written code for an older API, but your request points to the newer API.
You can request for a specific API version in two ways. Which way you choose depends on how the API is written.
These two ways are:
- Directly in the endpoint
- In a request header
Twitter, for example, uses the first method. At the time of writing, Twitter’s API is at version 1.1, which is evident through its endpoint:
https://api.twitter.com/1.1/account/settings.json
Github, on the other hand, uses the second method. At the time of writing, Github’s API is at version 3, and you can specify the version with an Accept header:
curl https://api.github.com -H Accept:application/vnd.github.v3+json
Wrapping Up #
In this article, you learned what a REST API is and how to use cURL to perform a request with GET, POST, PUT, PATCH and DELETE methods. In addition, you also learned how to authenticate your requests with the -u option, and what HTTP statuses mean.
https://www.techiediaries.com/php-react-rest-api-crud-tutorial/
PHP, MySQL & React REST API Tutorial with Example Form
Throughout this tutorial, we'll be using PHP with React and Axios to create a simple REST API application with CRUD operations. In the backend we'll use PHP with a MySQL database.
The PHP backend will expose a set of RESTful API endpoints so we'll be using the Axios library for making Ajax calls from the React.js UI.
We'll also see how to handle forms in React and how to send multipart form data with Axios using FormData.
In this tutorial, we are going to integrate React with PHP using Babel in the browser and a <script> tag. As such, we'll serve the React application from PHP so we don't need to enable CORS in our server since both the backend and frontend are served from the same domain.
We'll see the other approach of using two separate servers for the frontend and backend apps in another tutorial which will use the create-react-app to create the React project.
Prerequisites
You must have the following prerequsites in order to follow this tutorial comfortably:
- Knowledge of PHP and MySQL,
- Knowledge of JavaScript and React,
- PHP and MySQL installed on your development machine.
Creating the MySQL Database
Let's start by creating a MySQL database using the MySQL client (this usually gets installed when you install the MySQL server). Open a new terminal and run the following command:
mysql -u root -p
You'll be asked for your MySQL password. Make sure to submit the correct password and type Enter on your keyboard to confirm.
Next, you'll be presetend with the MySQL client CLI. You can create a database using the following SQL statement:
mysql> create database reactdb;
Next, let's add a SQL table in our database. Simpy run the following SQL instructions:
mysql> use reactdb;
  mysql> CREATE TABLE `contacts` (
    `id` int(11) NOT NULL PRIMARY KEY AUTO_INCREMENT,
    `name` varchar(100) NOT NULL,
    `email` varchar(100) NOT NULL,
    `city` varchar(100),
    `country` varchar(100),
    `job` varchar(100)
  ) ENGINE=InnoDB DEFAULT CHARSET=latin1;
We first run the use SQL instruction to select the reactdb database as our current working database. Next, we invoke the CREATE TABLE <name_of_table> statement to create a SQL table that has the following columns:
- id: A unique identifier for the person,
- name: The name of the person,
- email: The email for the person,
- city: The city of the person
- country: The country of the person
- job: The job occupied by the person
Basically, this is a simple database for managing your contacts data.
Creating The PHP & MySQL RESTful API
After creating the MySQL database, table and columns. Let's now proceed to create a RESTful API interface exposed by a PHP application that runs CRUD operations against our previously-created MySQL table. Head back to your terminal and start by creating a directory for your project's files:
$ cd ~
  $ mkdir php-react-rest-api-crud
Create a REST API Endpoint
Now, let's create an endpoint that provides contacts data in a JSON format to our Vue frontend.
Create an api folder inside your project's root folder:
$ mkdir api
Navigate inside the api folder and create a contacts.php file and add the following content:
<?php
  $host = "localhost";
  $user = "root";
  $password = "YOUR_MYSQL_DB_PASSWORD";
  $dbname = "reactdb";
  $id = '';

  $con = mysqli_connect($host, $user, $password,$dbname);

  $method = $_SERVER['REQUEST_METHOD'];
  $request = explode('/', trim($_SERVER['PATH_INFO'],'/'));


  if (!$con) {
    die("Connection failed: " . mysqli_connect_error());
  }


  switch ($method) {
      case 'GET':
        $id = $_GET['id'];
        $sql = "select * from contacts".($id?" where id=$id":'');
        break;
      case 'POST':
        $name = $_POST["name"];
        $email = $_POST["email"];
        $country = $_POST["country"];
        $city = $_POST["city"];
        $job = $_POST["job"];

        $sql = "insert into contacts (name, email, city, country, job) values ('$name', '$email', '$city', '$country', '$job')";
        break;
  }

  // run SQL statement
  $result = mysqli_query($con,$sql);

  // die if SQL statement failed
  if (!$result) {
    http_response_code(404);
    die(mysqli_error($con));
  }

  if ($method == 'GET') {
      if (!$id) echo '[';
      for ($i=0 ; $i<mysqli_num_rows($result) ; $i++) {
        echo ($i>0?',':'').json_encode(mysqli_fetch_object($result));
      }
      if (!$id) echo ']';
    } elseif ($method == 'POST') {
      echo json_encode($result);
    } else {
      echo mysqli_affected_rows($con);
    }

  $con->close();
We first use the MySQLi PHP extension to create a connection to our MySQL database using the mysqli_connect() method. Next, we use the $_SERVER['REQUEST_METHOD'] to retrieve the request method sent from the Axios client. If the request is GET, we create a SQL SELECT query. if the request is POST we create a SQL INSERT query with the post data retrieved from the $_POST object.
After that, we use the mysqli_query() method to run the query against our database table either to get or create data. Finally we use the json_encode() method to encode data as JSON data and send it to the client.
You can serve your PHP application using the following command from the root of your project:
$ php -S 127.0.0.1:8080
Create the React App
Next, navigate to the project's root folder and add an index.php file:
$ touch index.php
Next, open the index.php file and add the following code:
<!DOCTYPE html>
  <html lang="en">
  <head>
      <meta charset="UTF-8">
      <meta name="viewport" content="width=device-width, initial-scale=1.0">
      <meta http-equiv="X-UA-Compatible" content="ie=edge">
      <title>PHP| MySQL | React.js | Axios Example</title>
      <script src= "https://unpkg.com/react@16/umd/react.production.min.js"></script>
      <script src= "https://unpkg.com/react-dom@16/umd/react-dom.production.min.js"></script>
      <!-- Load Babel Compiler -->
      <script src="https://unpkg.com/babel-standalone@6.15.0/babel.min.js"></script>

      <script src="https://unpkg.com/axios/dist/axios.min.js"></script>

  </head>
  <body>
  </body>
  </html>
We simply include the React, ReactDOM, Babel and Axios libraries from their CDNs.
Next, in the index.html, in the <body> tag add a <div> tag where you can mount your React application:
<div id='root'></div>
Next, add a <script> tag of the text/babel type to create our React app:
<body>
  <div id='root'></div>

  <script  type="text/babel">

  class App extends React.Component {
    state = {
      contacts: []
    }
    render() {
      return (
          <React.Fragment>
          <h3>Contact Management</h3>
          <table border='1' width='100%' >
          <tr>
              <th>Name</th>
              <th>Email</th>
              <th>Country</th>
              <th>City</th>
              <th>Job</th>
          </tr>

          {this.state.contacts.map((contact) => (
          <tr>
              <td>{ contact.name }</td>
              <td>{ contact.email }</td>
              <td>{ contact.country }</td>
              <td>{ contact.city }</td>
              <td>{ contact.job }</td>
          </tr>
          ))}
          </table>
          </React.Fragment>
      );
    }
  }

  ReactDOM.render(<App />, document.getElementById('root'));
  </script>
  </body>
We first create a React component called App by extending the React.Component class. Next, we add a contacts variable to the state object which will be used to hold the contacts after we fetch them from the PHP REST endpoint using Axios.
Next, we define a React render() method which returns a fragment that wraps the <h3> header and <table> elements.
In the table we loop through the this.state.contacts and we display each <tr> corresponding to each contact information.
Finally, we use the render() method of ReactDOM to actually mount our App component to the DOM.
The contacts array is empty. Let's use the Axios client to send a GET request to fetch data from /api/contacts.php endpoint exposed by the PHP server.
In the App component add a componentDidMount() life cycle method, which gets called when the component is mounted in the DOM, and inside it; add the code to fetch data:
  componentDidMount() {
      const url = '/api/contacts.php'
      axios.get(url).then(response => response.data)
      .then((data) => {
        this.setState({ contacts: data })
        console.log(this.state.contacts)
       })
    }
When data is fetched, we call the React setState method to update the state of the component with the fetched data.
Create a React Form for Submitting Data
Let's now add a React component that displays a form and handles submitting the form to the PHP backend. In your index.php file add the following component before the App component:
class ContactForm extends React.Component {
      state = {
          name: '',
          email: '',
          country: '',
          city: '',
          job: '',

      }

      handleFormSubmit( event ) {
          event.preventDefault();
          console.log(this.state);
      }

      render(){
          return (
          <form>
              <label>Name</label>
              <input type="text" name="name" value={this.state.name}
                  onChange={e => this.setState({ name: e.target.value })}/>

              <label>Email</label>
              <input type="email" name="email" value={this.state.email}
                  onChange={e => this.setState({ email: e.target.value })}/>

              <label>Country</label>
              <input type="text" name="country" value={this.state.country}
                  onChange={e => this.setState({ country: e.target.value })}/>

              <label>City</label>
              <input type="text" name="city" value={this.state.city}
                  onChange={e => this.setState({ city: e.target.value })}/>

              <label>Job</label>
              <input type="text" name="job" value={this.state.job}
                  onChange={e => this.setState({ job: e.target.value })}/>

              <input type="submit" onClick={e => this.handleFormSubmit(e)} value="Create Contact" />
          </form>);
      }
  }
Next include it in the App component to be able to display it below the table:
class App extends React.Component {
    // [...]
    render() {
      return (
          <React.Fragment>
              <!-- [...] -->
              <ContactForm />
          </React.Fragment>
      );
    }
  }
Now let's change the handleFormSubmit() of ContactForm method to actually send the form data using Axios and FormData to our PHP REST endpoint which takes care of saving it in the MySQL database:
    handleFormSubmit( event ) {
          event.preventDefault();


          let formData = new FormData();
          formData.append('name', this.state.name)
          formData.append('email', this.state.email)
          formData.append('city', this.state.city)
          formData.append('country', this.state.country)
          formData.append('job', this.state.job)

          axios({
              method: 'post',
              url: '/api/contacts.php',
              data: formData,
              config: { headers: {'Content-Type': 'multipart/form-data' }}
          })
          .then(function (response) {
              //handle success
              console.log(response)

          })
          .catch(function (response) {
              //handle error
              console.log(response)
          });
      }
Conclusion
In this tutorial, we've seen how to use PHP with MySQL, React and Axios to create a simple REST API CRUD example application. We have also seen how to handle forms in React and submit data to the server.