
More from this category


GITHUB – WORDPRESS AWS TEMPLATES w/permissions/security/all settings ready to deploy
https://github.com/aws-samples/aws-refarch-wordpress
Cloudfront – Extended Configuration Info – AWS DOC
Level 1 Article
https://aws.amazon.com/cloudfront/getting-started/
Level 2 Article (applicable info)
Cloudfront conifg explanation – full article on aws (click here) | Adding security to aws (click here)
https://aws.amazon.com/blogs/startups/how-to-accelerate-your-wordpress-site-with-amazon-cloudfront/
Extra – Bitnami configuration cdn / is there an ubuntu?
Amazon S3 Quick Start Guide
- Set up AIM USER
- Set up bucket with permissions
- Https and CName
- Cron Job
- Cloudfront setup for Media Items
- Bucket Permissions
- Upload Media
- File CDN distribution settings – ASSETS PULL ADD-ON – Info on lauch of asset pull
- Creating a custom origin to serve the assets
- Edit the default cache behaviour of the distribution
- Create a cache behaviour for the S3 origin
- Assets pull testing / fix errors
- Compatability additions
Introduction
This guide aims to help you start offloading your WordPress Media Library to an Amazon S3 bucket with WP Offload Media as quickly as possible.
We also have Quick Start Guides for other storage providers.
This article covers the following steps:
- Login to the AWS Console
- Create an Amazon Web Services (AWS) User
- Saving the AWS User’s access details for WP Offload Media to use
- Activate Your WP Offload Media License
- Configure WP Offload Media to offload newly uploaded media to an Amazon S3 bucket
- Offload Your Existing Media Library
- Next steps for setting up WP Offload Media to use a CDN
Login to the AWS Console
Already have an Amazon Web Services (AWS) account? Sign in here.
If you don’t have an AWS account yet, you will need to sign up here.
Create an IAM User
Once you have logged into the console, you will need to create a new IAM user:
Navigate to the IAM Users page in the AWS Console, click the Add user button.
Enter a name for the user in the User name field.
Names are case insensitive and must be unique within your AWS account. User names can be a combination of up to 64 letters, digits, and these characters: plus (+), equal (=), comma (,), period (.), at sign (@), and hyphen (-).
Under Access type select the checkbox for Programmatic access, then click the Next: Permissions button.

To allow the new user to manage buckets and objects in the S3 service, you need to grant it specific permissions.
Click the “Attach existing policies directly” button, and then enter “s3” in the filter policies input box.
Select the “AmazonS3FullAccess” policy, then click the Next: Review button at the bottom of the page.

If everything looks good, click the Create user button.

You will be shown the security credentials for the user, which consists of an Access Key ID and a Secret Access Key. Amazon will not show these again so please download them as a .csv and also copy them somewhere safe. If you lose them, you can always create a new set of keys from the console but you cannot retrieve the secret key again later.

Define Your Access Keys
Now that you have your AWS Access Keys, you need to add them to your site so that WP Offload Media can use them to work with the Amazon S3 service.
For better security, we recommend defining your access keys in your wp-config.php:
define( 'AS3CF_SETTINGS', serialize( array(
    'provider' => 'aws',
    'access-key-id' => '********************',
    'secret-access-key' => '**************************************',
) ) );
These should be placed before the following block of code in your wp-config.php:
/* That's all, stop editing! Happy blogging. *//** Absolute path to the WordPress directory. */
if ( !defined('ABSPATH') )
define('ABSPATH', dirname(FILE) . '/');
/** Sets up WordPress vars and included files. */
require_once(ABSPATH . 'wp-settings.php');
Warning: If you define your access keys after this block of code, WP Offload Media will not be able to read them.
IAM Roles
If you’re running your site on an Amazon EC2 instance, you might like to use an IAM Role instead. This is even more secure than defining your access keys in wp-config.php.
Questions?
Each of the above quick start guides should help you with getting started with WP Offload Media but if you run into any issues, you can search these docs via the search bar above.
Bucket set up
Configure WP Offload Media
To start offloading newly uploaded media to Amazon S3 you need to first tell WP Offload Media which bucket it should use. If you have not already created a bucket to use with WP Offload Media, it can be created for you from WP Offload Media’s Settings page.
Go to the “Media Library” tab of WP Offload Media’s Settings page in the WordPress admin dashboard. If you have followed the steps above then you should see something like the following.

If you have already created the bucket you want to offload your media to, then you can enter the bucket name in the above input and click the “Save Bucket” button.
If you haven’t created the bucket yet, then you can click the “Create new bucket” link to get a form where you can specify the new bucket’s name and region.

As long as you haven’t restricted your IAM User’s access to list buckets then you can also “Browse existing buckets.”


Regardless of how you specify the bucket, once saved, WP Offload Media will be set up to offload newly-uploaded media to the bucket with some recommended default settings.
this sounds strange to me? but apparently we already did it

Bucket Permissions
Access Denied to Bucket
If you see an “Access Denied to Bucket” error notice after selecting a bucket created in the AWS Console, the chances are you have “Public Access Settings” enabled for the bucket. You can tell by selecting the bucket in the AWS Console’s list of buckets and looking at the “Public access settings” option within the “Permissions” section of the pop-over panel.

WP Offload Media needs to be able to make objects in the bucket public readable (not editable) so that your site visitors can see them, this is safe to do as it is on a per object basis and is different from making the bucket public. Even if you’re only going to use WP Offload Media to offload “private” objects for WooCommerce, Easy Digital Downloads or similar, it still needs to be able to change the permissions on individual objects in the bucket.
If “Public access settings” does not say “Disabled“, click the “Permissions” section link in the pop-over panel and click “Edit”.

Uncheck all of the settings and save the changes, you’ll need to confirm the change if asked.

Refresh WP Offload Media’s settings page and the “Access Denied to Bucket” error should disappear.
IMPORTANT: There is also a Block public access (account settings) page that can be accessed from the Amazon S3 sidebar that can also be used to disable public access to objects in all existing and new buckets. If the AWS account is relatively new, or someone has visited this settings page and turned on the blocking of public access, you may need to visit the page, click “Edit”, clear the “Block all public access” checkbox, and then save the changes.

HTTPS
Configure a Custom Domain for CloudFront with HTTPS
This article assumes that you’ve already configured CloudFront, as detailed in our CloudFront Setup guide.
Generate a Certificate
Log into the AWS console and visit the AWS Certificate Manager.
IMPORTANT: Make sure you switch to the “US East (N. Virginia)” region using the region selector at the top right, CloudFront only works with certificates that are created in that “global” region.
Click ‘Get Started’ and you will be prompted to enter your first domain.

Enter your domain and any subdomains you want the certificate to cover, or enter a wildcard as I have. Click ‘Review and request’ followed by ‘Confirm and request’. Shortly after you should receive an authorization email.

Once you approve the request your certificate is ready to use.

Adding the Certificate to CloudFront
Open the CloudFront console page and select your distribution.

Click ‘Edit’ and add your custom domain to the ‘Alternate Domain Names’ option. Change the ‘SSL Certificate’ to ‘Custom SSL Certificate’ and select your previously created certificate from the drop-down list.

Make a note of your unique CloudFront URL and log into your DNS control panel. Add a new CNAME entry that points to your CloudFront domain. This entry should match that entered in the ‘Alternate Domain Names’ from within the CloudFront console.

Add Your Custom Domain to WP Offload Media
Log into your WordPress dashboard and open the WP Offload Media settings screen. Change the ‘Domain’ option to ‘CloudFront or Custom Domain’ and enter your new custom domain. If you’re using the Assets addon remember to also update the ‘CloudFront or Custom Domain’ option on the Assets tab.

Now if you load the front-end of your site and open the developer tools you should see that the URLs point to your custom domain.

SET UP CRON JOB
Make Sure Cron Is Set Up
We highly recommend that you configure a proper cron job on your server as WP Offload Media relies heavily on background processing. See our Cron Setup doc for details on how to accomplish this.
Cron Setup
WP Offload Media relies heavily on cron functioning correctly for background processing. Out of the box WordPress checks for cron jobs on every single page load by firing a request off to wp-cron.php, which is very inaccurate. If a site doesn’t receive any visits for a set amount of time, cron will not run during this period. This is also true of sites that implement full page caching, as WordPress is generally bypassed. Basic auth and some security plugins can also restrict cron if not correctly configured.
To ensure that cron runs more often, you need another method of hitting wp-cron.php. If your site is running on Linux and you have access to SSH you can you use the built in crontab. If not, a cron service can be used.
Regardless of which method you choose, a cron schedule of 5 minutes or less is recommended.
Cron Services
There are various cron services available and most offer a free plan, however, the free plans usually limit the frequency in which cron jobs can be scheduled.
www.easycron.com
www.setcronjob.com
Signup for an account at your chosen provider and proceed to create your first cron job.

Enter the URL to your site’s cron file. The free plan at www.easycron.com limits cron jobs to 10 minute intervals.

Cron will now fire every 10 minutes, regardless of whether or not any visits are received.
Crontab
SSH to your server.
ssh username@server.com
Open the crontab. If this is the first time, you may be asked to select an editor. Option 2 (nano) is usually the easiest.
crontab -e
Add a new line to the end of the file, ensuring that you specify the absolute file path to your WordPress install.
*/5 * * * * cd /var/www/example.com/public; php -q wp-cron.php >/dev/null 2>&1
Alternatively, you can use cURL if PHP CLI causes you issues.
*/5 * * * * curl http://example.com/wp-cron.php?doing_wp_cron >/dev/null 2>&1
Hit CTRL-X followed by Y to save and exit. Cron will now fire every 5 minutes, regardless of whether or not your site receives any visits.
Testing Cron
You can test that cron is correctly configured by installing WP Crontrol. Once installed and activated head to Tools > Cron Events.

Each scheduled event will have it’s next run time displayed. An event which has now in the next run column is due for processing and should be handled on the next cron tick. If the next run time doesn’t update and the cron interval you have configured has elapsed, then cron jobs are not being processed. You need to check that your cron job is configured correctly, as detailed above.
Disable WP Cron
On high traffic sites, you may wish to disable WP Cron once you’ve configured a custom cron job and confirmed that it’s working correctly. To do so add the following line to your wp-config.php file:
define('DISABLE_WP_CRON', true);
Once set, WordPress will no longer fire off a request to wp-cron.php on every page request.
MEDIA ONLY::
Once the Status has changed from In Progress to Deployed, you can configure WP Offload Media to start serving from CloudFront using the cloudfront.net domain provided. However, we highly recommend that you configure a custom domain for your CloudFront distribution. Using the cloudfront.net domain name is not great for your site’s SEO. See the doc Configure a Custom Domain for CloudFront with HTTPS for step-by-step instructions.
CloudFront Setup for Media Offloaded to Amazon S3
This article assumes that you’ve already set up an Amazon S3 bucket and followed the steps within our Amazon S3 Quick Start Guide.
Once the above steps are taken care of, login into the AWS console and visit the CloudFront page. Click Create Distribution followed by Get Started under the Web delivery method.

Populate Origin Domain Name with the desired S3 bucket, however, leave Origin Path blank. Feel free to customize the remaining options if required, but the defaults are fine in most cases.

Click Create Distribution. CloudFront will begin copying all of your files from the specified bucket to its edge servers. This can take a while depending on the size of your Media Library.

Once the Status has changed from In Progress to Deployed, you can configure WP Offload Media to start serving from CloudFront using the cloudfront.net domain provided. However, we highly recommend that you configure a custom domain for your CloudFront distribution.
Our Cloudfront Distributions

Using the cloudfront.net domain name is not great for your site’s SEO. See the doc Configure a Custom Domain for CloudFront with HTTPS for step-by-step instructions.
If you are fine with using the cloudfront.net domain name, head over to your WordPress site. Visit the WP Offload Media screen and enter your cloudfront.net domain name into the Custom Domain (CNAME) option.

Click Save Changes. All of your media library files will now be served from the CloudFront distributed servers.
Offload Your Existing Media Library
Now that your site is configured to offload newly-uploaded media to Amazon S3, you might want to offload any existing media to the bucket too.
In the right-hand sidebar of WP Offload Media’s “Media Library” tab you should see what we call the “Offload Tool”, this can be used to offload existing media to the bucket.
If you have not offloaded anything yet, then you’ll see a “Your Media Library needs to be offloaded” message in the Offload Tool with an “Offload Now” button.

If you have already offloaded a few items, then you might see a message like “66% of your Media Library has been offloaded” in the Offload Tool, with an “Offload Remaining Now” button.

Either way, clicking the Offload Tool’s button will start an upload to the bucket of all existing media yet to be offloaded.

The media offload progresses in small batches in the background to keep things efficient. You can close the tab and just forget about it, when the tool finishes its job, you’ll get a notice in the WordPress dashboard, or you can monitor progress from WP Offload Media’s settings page.
Once complete, the Offload Tool displays a “100% of your Media Library has been offloaded, congratulations!” message and the “Download all files from bucket to server” and “Remove all files from bucket” tools are made available.

Sending our images up in versioned folder

Now that your media is offloaded to Amazon S3, your next step if you’re concerned about performance (i.e. load time and SEO), is to configure a CDN.
By default WP Offload Media is configured to use raw Amazon S3 URLs when serving offloaded media. Your media URLs might look something like this:
http://s3-eu-west-1.amazonaws.com/wicked-awesome-bucket-name/wp-content/uploads/…
Not only is this an ugly URL, but this URL is also bad for SEO as Google likes to see your media on your own domain. Also, Amazon S3 is primarily a storage platform and is not optimized for high speed delivery of media. Faster media is obviously better for user experience but also better for SEO. For these reasons, we strongly recommend configuring Amazon CloudFront or another CDN for delivering your media. For more details about the benefits of CloudFront and other CDNs, please read our Why Use a CDN? doc.
We have a guide for setting up Amazon CloudFront as your CDN guide. It gets you up and running with CloudFront properly configured to use your Amazon S3 bucket as its origin, and shows how to update WP Offload Media’s settings to use it.
If you’re planning to set up the Assets Pull addon as well, you will most likely want to use the same domain name for both your media and assets with Amazon CloudFront. Check out our guide to accomplish that.
If you don’t want to use Amazon CloudFront for your CDN, you can also use any other CDN. We have a guide for setting up Cloudflare as well as StackPath.
MORE ABOUT BUCKETS AND CDN
https://www.codeinwp.com/blog/wordpress-s3-guide/
OFFLOAD MEDIA – How files are updated –
The primary difference is that the old addon would actively scan for asset files in the filesystem of the WordPress install, and upload these files to Amazon S3. Asset URLs could then be rewritten to use S3 URLs or a custom domain of your choice to use with a CDN.
The Assets Pull addon, does not scan or upload your files at all, nor does it have any background processing. It simply rewrites asset URLs to use your custom CDN domain which “pulls” uncached assets from your site on-demand. This is more efficient with system resources and generally advocates better practices such as using a CDN rather than serving directly from the bucket.
Setting up CDN
https://deliciousbrains.com/wp-offload-media/doc/assets-pull-addon-settings/#rewrite-urls
- Need a second url for the assets ourside of the media files
Rewrite Asset URLs
This is the master switch which controls whether your enqueued assets will be rewritten or not.
Pull Domain
This is the domain which your asset URLs will be rewritten with and is the domain that you need to configure Amazon CloudFront (or your CDN of choice) to pull from your site. The domain should be entered by itself, without any scheme or URL path.
E.g. cdn.example.com
We highly recommend using a subdomain of your site’s domain for SEO. That is, if your site’s main domain is example.com, or www.example.com then we would recommend using a subdomain on the same domain, such as cdn.example.com or assets.example.com.
This domain should be different than the one used for your media files as they serve from different origins, and will likely have other important differences in configuration.
Force HTTPS
By default, asset URLs will use HTTPS when the request is HTTPS and regular HTTP when the request is HTTP, but you may want to force the use of HTTPS always, regardless of the request.
This may be desirable on a site using HTTP, but wishes to take full advantage of performance benefits provided by HTTP/2 for assets which require using HTTPS.
CloudFront Setup for Media Offloaded to Amazon S3
<p>This doc aims to help you start delivering your WordPress Media Library items via Amazon CloudFront as quickly as possible.</p>
It is assumed that you’ve already set up an Amazon S3 bucket and followed the steps within our Amazon S3 Quick Start Guide.
This article covers the following steps:
- Create a free HTTPS Certificate
- Create an Amazon CloudFront Origin Access Identity
- Create an Amazon CloudFront distribution
- Add a Custom Domain (CNAME) to the distribution
- Configure WP Offload Media to use Amazon CloudFront
- Block All Public Access to Bucket
- Next Steps: Deliver private media via Amazon CloudFront
For improved SEO and more professional private media URLs when using Amazon CloudFront, we recommend following the entire doc and using a subdomain of your site’s domain for the distribution.
However, if for some reason you do not wish to use a custom subdomain for your distribution and would instead like to just use the default random domain generated by Amazon CloudFront, feel free to skip the Create a free HTTPS Certificate and Add a Custom Domain (CNAME) to the distribution sections. Other sections will mention any changes to their instructions should you not be wanting a custom subdomain.
Create a Free HTTPS Certificate
Log into the AWS Console and visit the Certificate Manager page.
Because your new certificate is to be used with the “global” Amazon CloudFront service, you must create the certificate in the default us-east-1 (N. Virginia) region. To ensure you are working in the default us-east-1 (N. Virginia) region, pick it from the top-right menu.
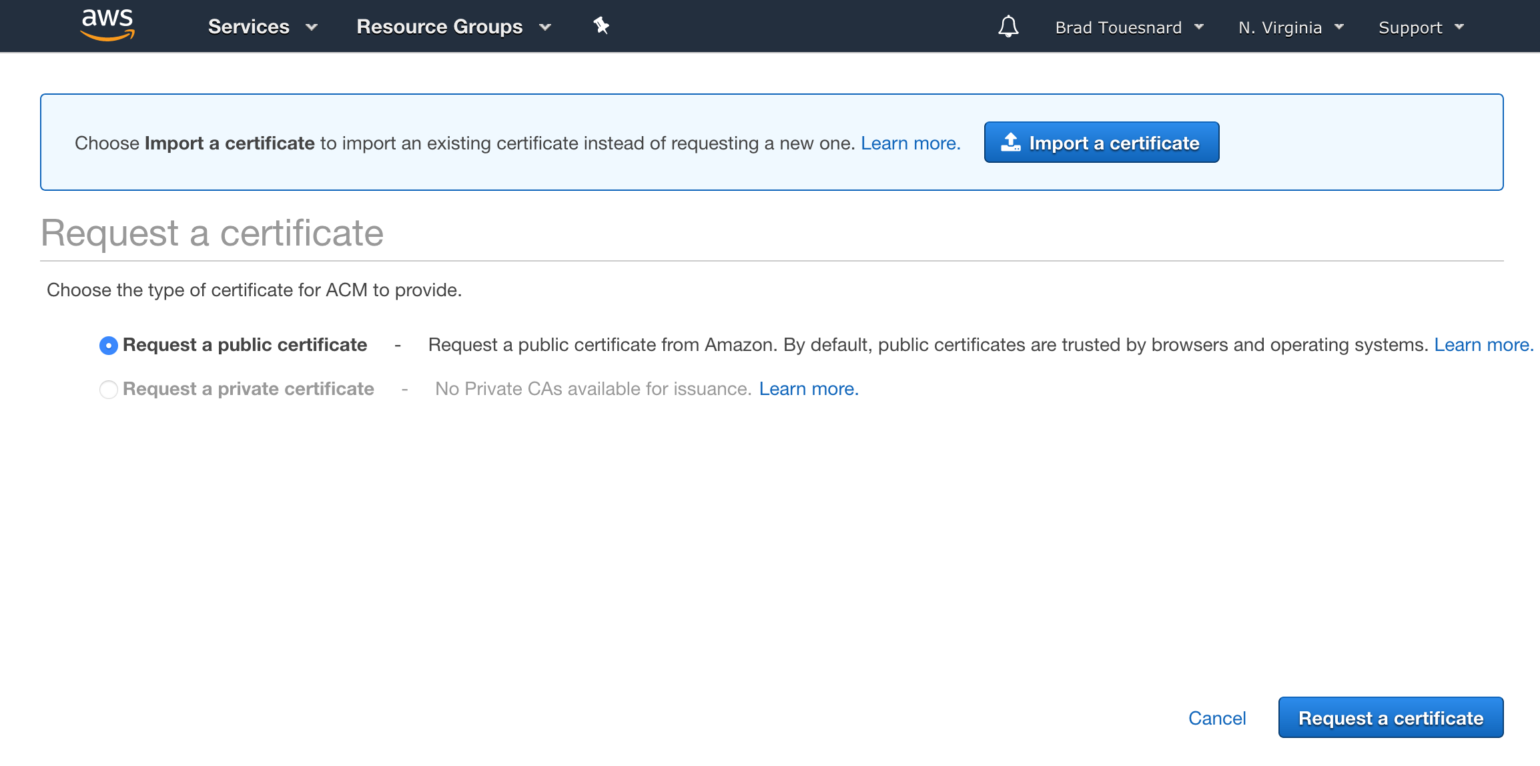
Then click the Request a certificate button to start.

You’ll be given the choice of creating a public or private certificate, choose Request a public certificate and then click the Request a certificate button at the bottom right of the page.
It’s now time to enter the domain name you wish the certificate to be for.
We strongly recommend using a wildcard certificate that is able to protect multiple subdomains of your site’s primary (often called Apex) domain. For example, if your site is hosted at “www.sandwichcity.com” you should enter the domain “*.sandwichcity.com” so that the certificate can automatically protect the domain “cdn.sandwichcity.com”, but also “assets.sandwichcity.com” or any other subdomain of “sandwichcity.com” that you might want to later use with an Amazon AWS service.
If you do not wish to have the flexibility of being able to use any subdomain with other Amazon CloudFront distributions or AWS services, then you can enter the full subdomain you wish to use for the distribution, e.g. “cdn.sandwichcity.com”.
You can also have a certificate cover more than one domain by clicking the Add another domain to this certificate button.
Whether you add a single wildcard domain, full domain, or many domains, click the Next button to proceed.

On the Select validation method page you’re given the choice of using either DNS Validation or Email Validation. Pick DNS validation and click the Next button.

Next you’ll be given the opportunity to add tags. Adding tags is purely optional, if you’re a heavy user of AWS you may have a reason to add tags here to help with management tasks. Whether you add tags here or not, click the Review button at the bottom of the page to continue.

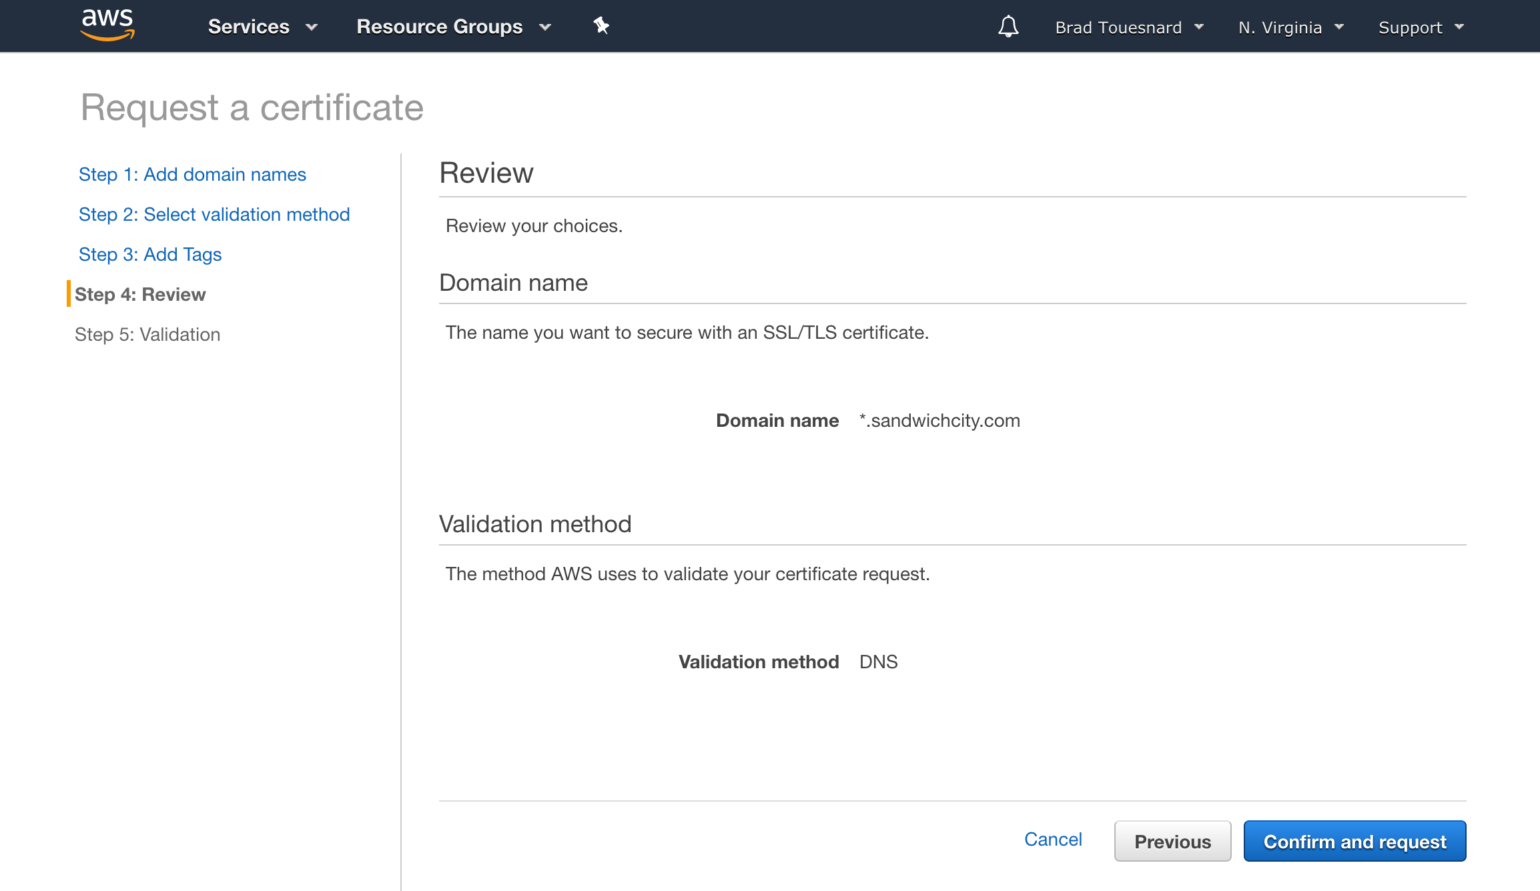
You’re now presented with the domain name and method of validation that’s about to be used for the certificate request, if all looks good, click that Confirm and request button to get things started.
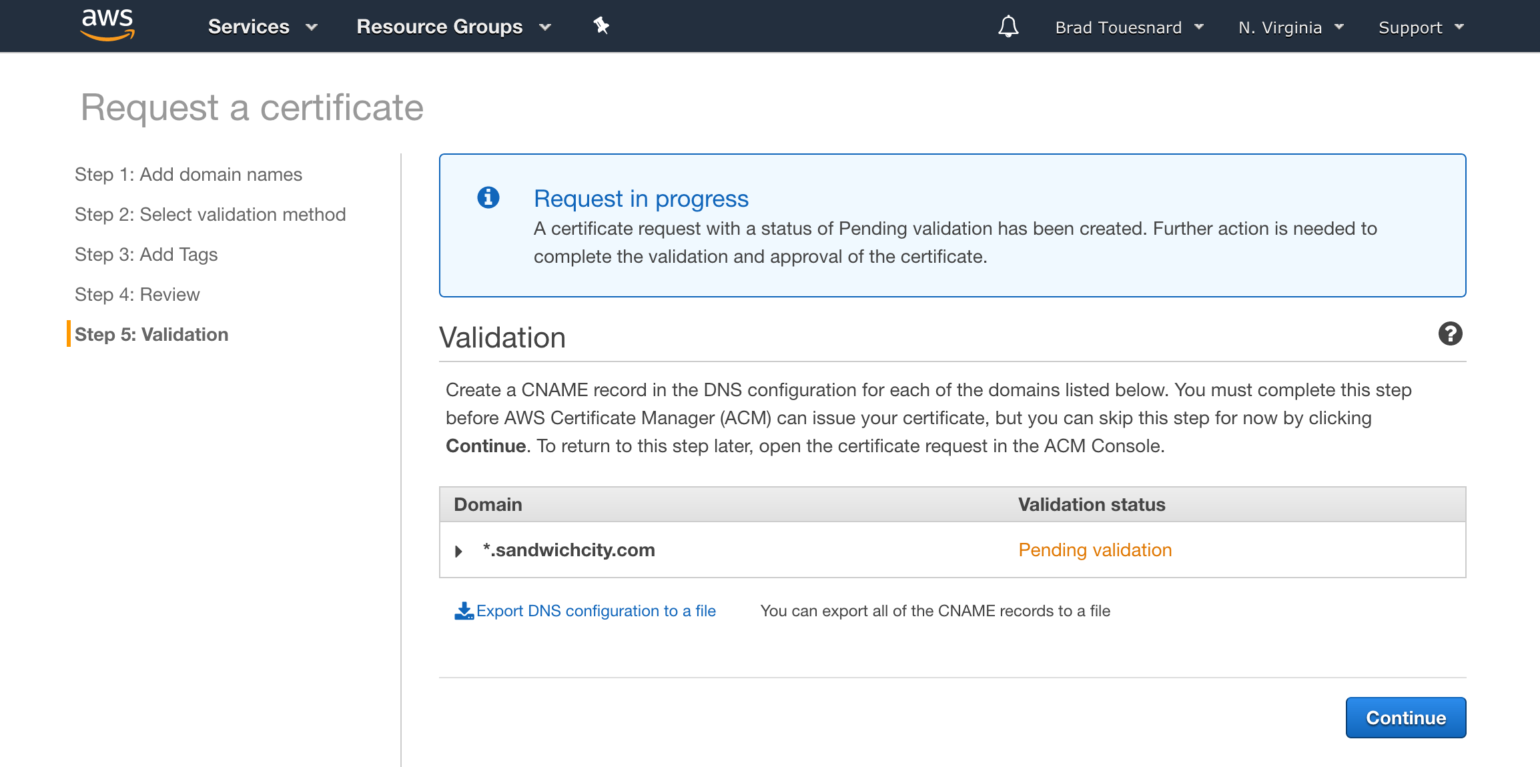
On the Validation page you should see that the request is “Pending” as you have not completed the validation yet.
If you didn’t take our recommendation to use DNS validation and instead picked the Email validation method, please go check your email and click a link in one of the emails you just got from Amazon AWS (you may get duplicate emails to various domain admin addresses, just use one of them).
In our example we picked DNS validation, so we need to click the little triangle next to our domain name to expand the details and see our instructions.
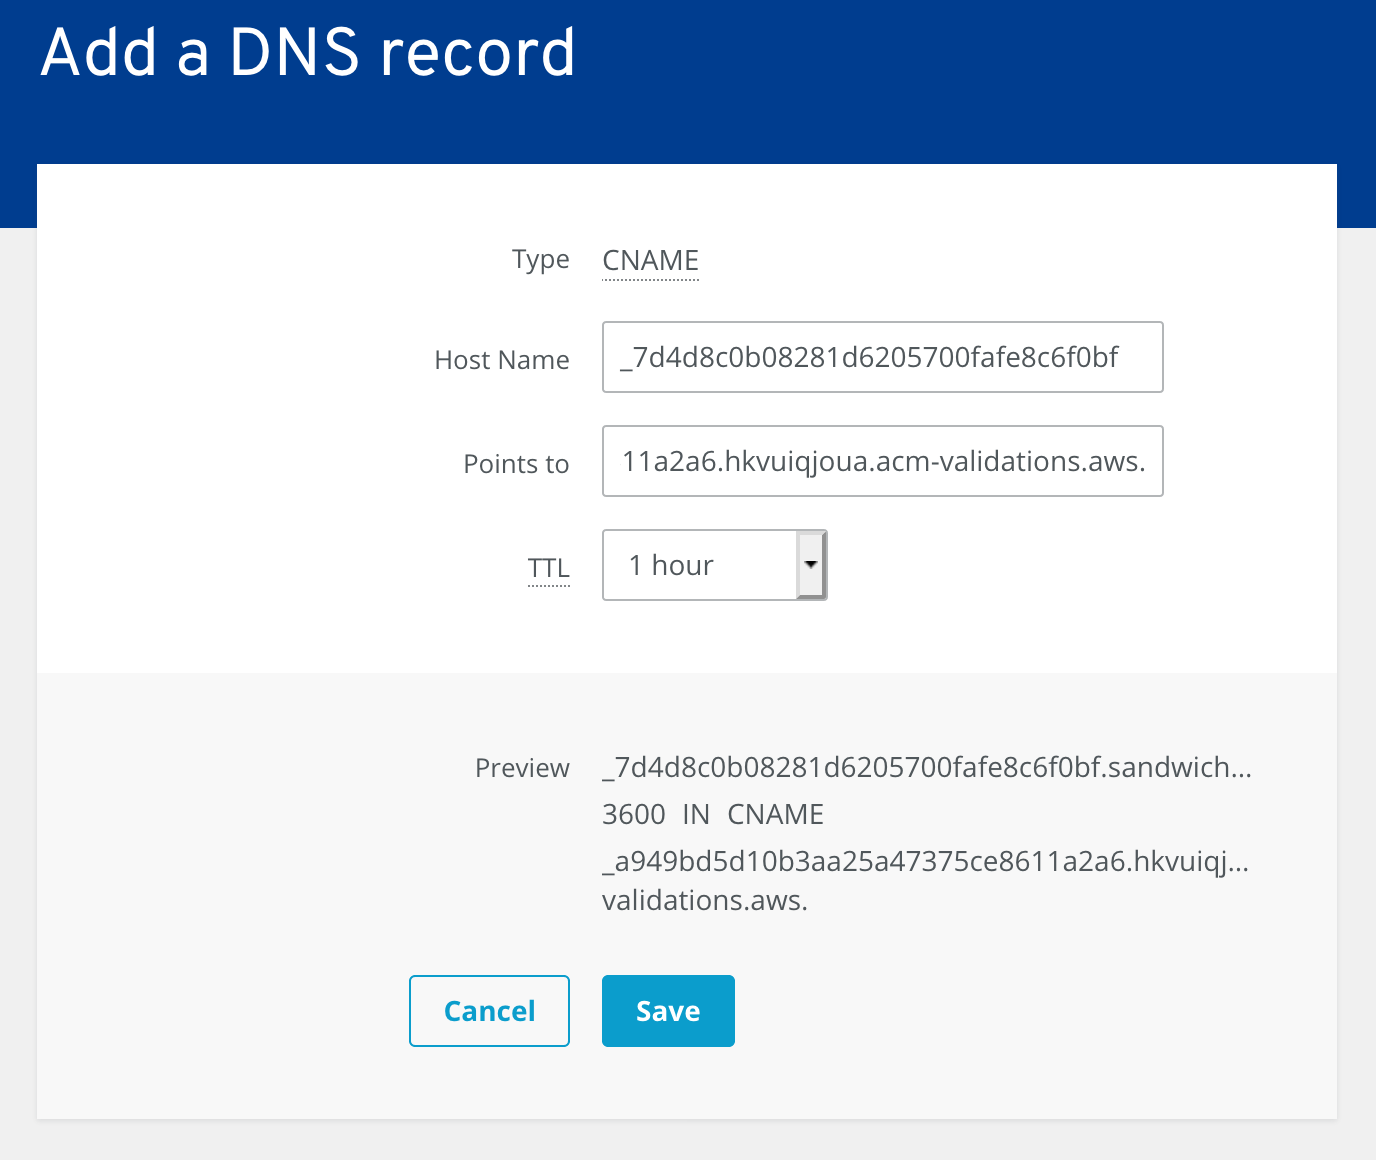
Once expanded you’ll see the “Name” and “Value” that need to be used to create a new CNAME entry with your DNS provider.
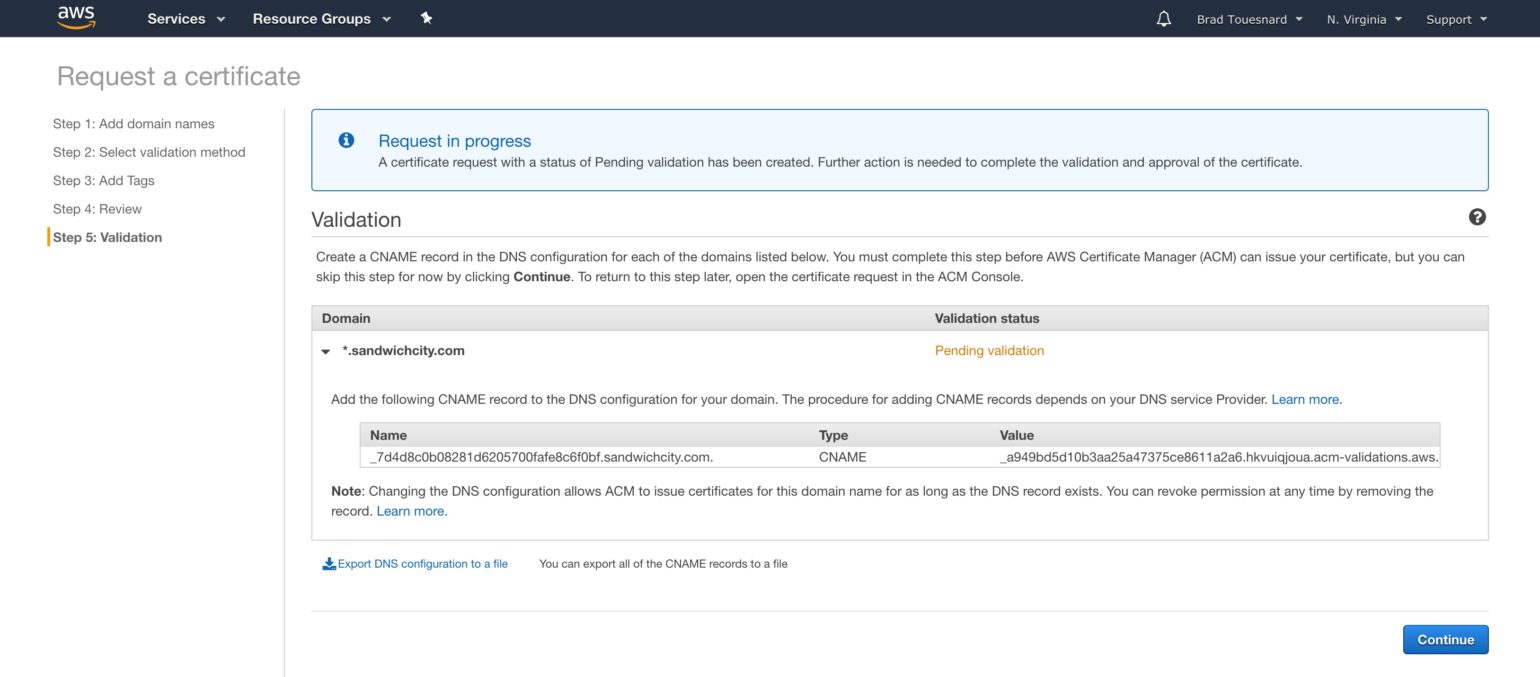
Tip: When copying and pasting the “Name” and “Value” from the Amazon Certificate Manager to enter into your DNS provider, you only need to hover over the “Name” and “Value” fields and use your usual copy hotkey, no need to explicitly select the text.

Open a new browser tab and log into the control panel of the DNS provider for your site’s domain. Every DNS provider has wildly different setups, but you should be able to create a new CNAME record for your domain and enter the “Name” specified by Amazon along with the “Value” as the alias or target.
For most DNS providers you only need to enter the first part of the name specified by Amazon as the provider already knows the rest of the name. You usually need to enter the full “Value”, but often the full stop (period) at the end isn’t required.
Once you’ve added the CNAME record to your DNS or clicked the link in the validation email, switch back to the AWS Console and click the Continue button on the Validation page to be taken to your list of certificates. With luck your certificate will already be validated and shows a status of “Issued” with validation status of “Success”, but it can take a few minutes for DNS changes to propagate and for AWS to see them.

Create an Amazon CloudFront Origin Access Identity
For added security and cost savings, once you have created an Amazon CloudFront distribution to deliver the media offloaded to your bucket, it’s good practice to Block All Public Access to the bucket. This ensures your media can only be accessed via your Amazon CloudFront distribution. But we must also give our Amazon CloudFront distribution access to the bucket by creating an Origin Access Identity.
You can create an Origin Access Identity later and then edit the Amazon CloudFront distribution to make it use it, but it’s much easier to create it up front so you can use it when creating a new Amazon CloudFront distribution.
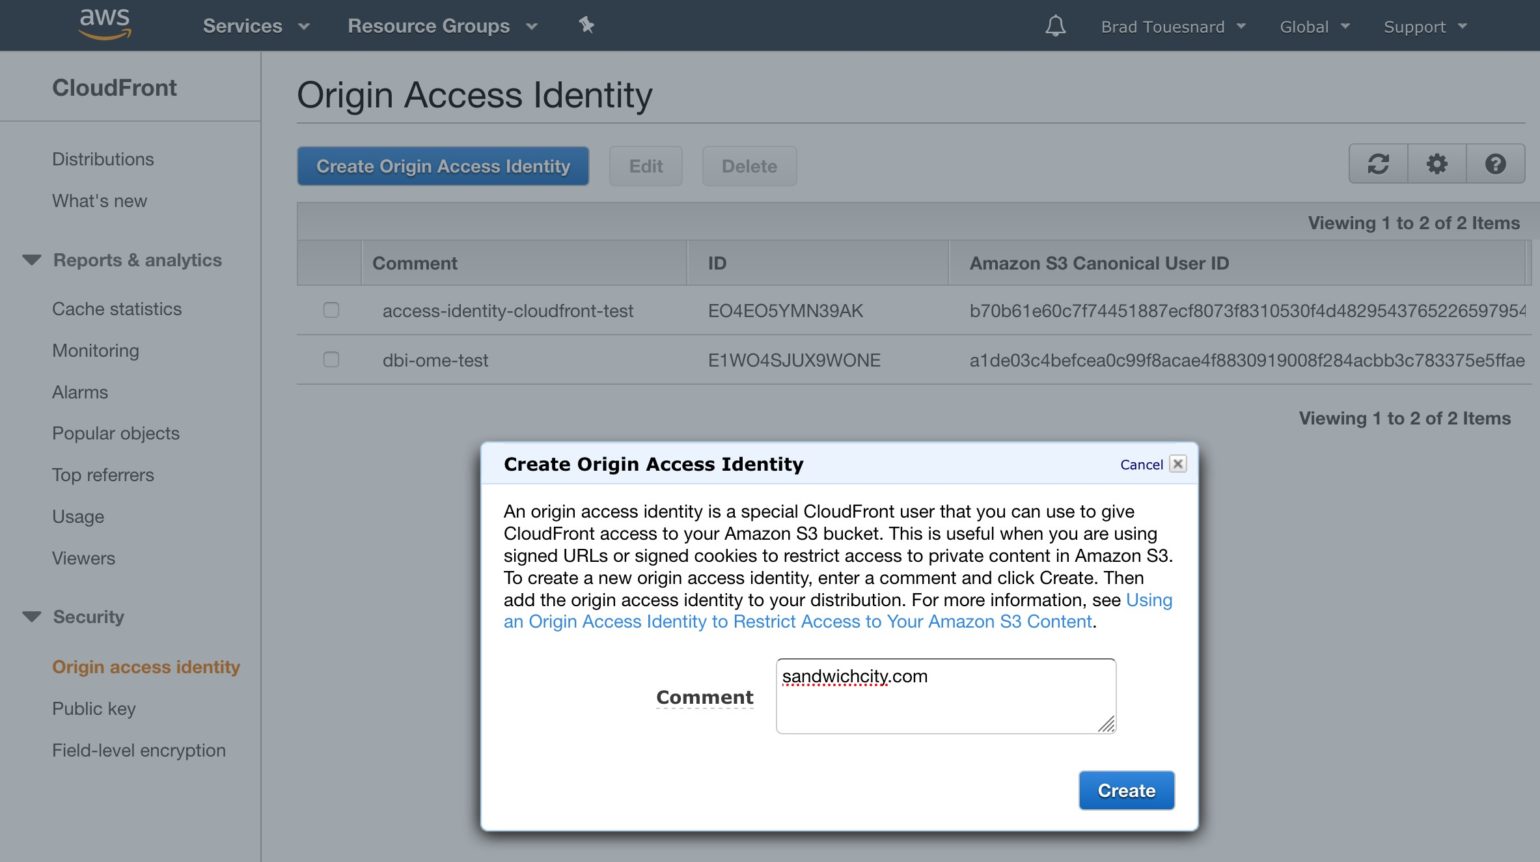
Log into the AWS console and visit the Origin access identity under the Security sub-section of the CloudFront page.

Click the Create Origin Access Identity button, enter a clear and concise comment for your new identity that reflects which site or bucket you intend to use it with. Click the Create button to save your new Origin Access Identity.
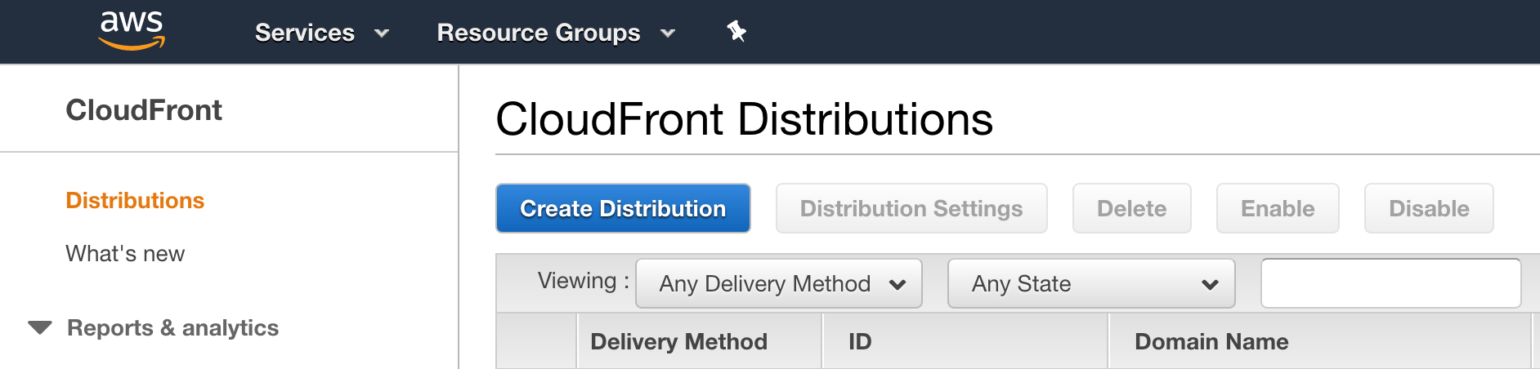
Create an Amazon CloudFront distribution
Ensure you’re in the Distributions section of the AWS Console’s CloudFront page, click Create Distribution.
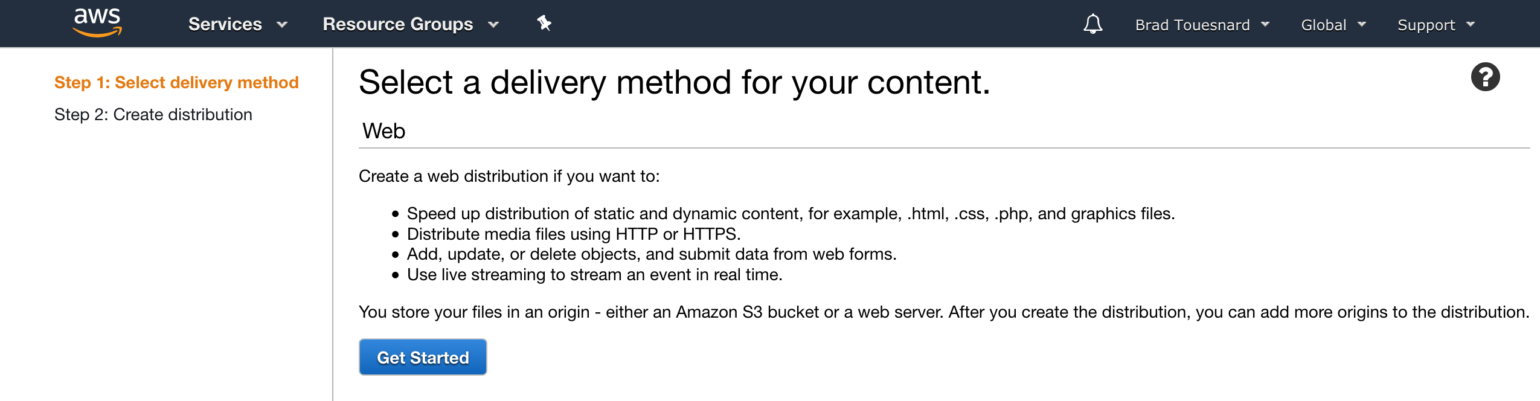
Step 1 is to select a delivery method, click the Get Started button within the top Web section of the page.
In the Origin Settings section of the Create Distribution page, populate Origin Domain Name with the Amazon S3 bucket you’ve already set up WP Offload Media to offload to. When you click into that Origin Domain Name field you should get a list of all your buckets, typing the first few characters of the bucket’s name will help you find it if you have a lot.
Leave Origin Path blank.
If you are going to follow our recommendation and later restrict direct access to the bucket by enabling Block All Public Access on the bucket, select the Restrict Bucket Access radio button. Ensure the Use an Existing Identity radio button is selected as the Origin Access Identity, and then select the Origin Access Identity you created earlier.
For the Grant Read Permissions on Bucket field, select Yes, Update Bucket Policy.

The Default Cache Behavior section can be left alone, its default values are fine in most cases.
Please do not be tempted to select the Restrict Viewer Access (Use Signed URLs or Signed Cookies) option, even if you intend to use Signed URLs for WooCommerce or Easy Digital Download product file downloads. We have a doc for enabling Private Media that helps you use signed CloudFront URLs with WP Offload Media while still being able to serve offloaded images and other media to general site visitors.

In the final Distribution Settings section of the Create Distribution page, enter the custom subdomain you’d like to use for delivering the offloaded media into the Alternate Domain Names (CNAMEs) field. If you’re not using a custom domain, leave this blank. In the example below we’re using “cdn.sandwichcity.com” as the domain we’d like to serve offloaded media from.
For the SSL Certificate option, select Custom SSL Certificate (example.com), then pick the certificate you created earlier. If you’re not using a custom domain for the delivery of media skip this and leave Default CloudFront Certificate (*.cloudfront.net) selected.
Feel free to customize the remaining options if required, but the defaults are fine in most cases.

Click Create Distribution. Amazon CloudFront will begin deploying the new distribution configuration to its edge servers. This can take a while.

Take a note of the default cloudfront.net domain name assigned to the distribution, you’ll need that when adding the CNAME record to your DNS for your custom domain.
Add a Custom Domain (CNAME) to the distribution
While the new Amazon CloudFront distribution is deploying, you can go ahead and add the CNAME record to your DNS to point your custom domain at your distribution.
Log back into your DNS provider’s control panel and create a new CNAME entry for the chosen subdomain.
In the example below we’ve entered “cdn” as the subdomain which means the full domain will be “cdn.sandwichcity.com”, and then for the target we’ve entered the default cloudfront.net domain that was assigned to our new Amazon CloudFront distribution.

Configure WP Offload Media to use Amazon CloudFront
Once the new Amazon CloudFront distribution’s Status has changed from In Progress to Deployed, you can configure WP Offload Media to start using the custom or default domain associated with it.
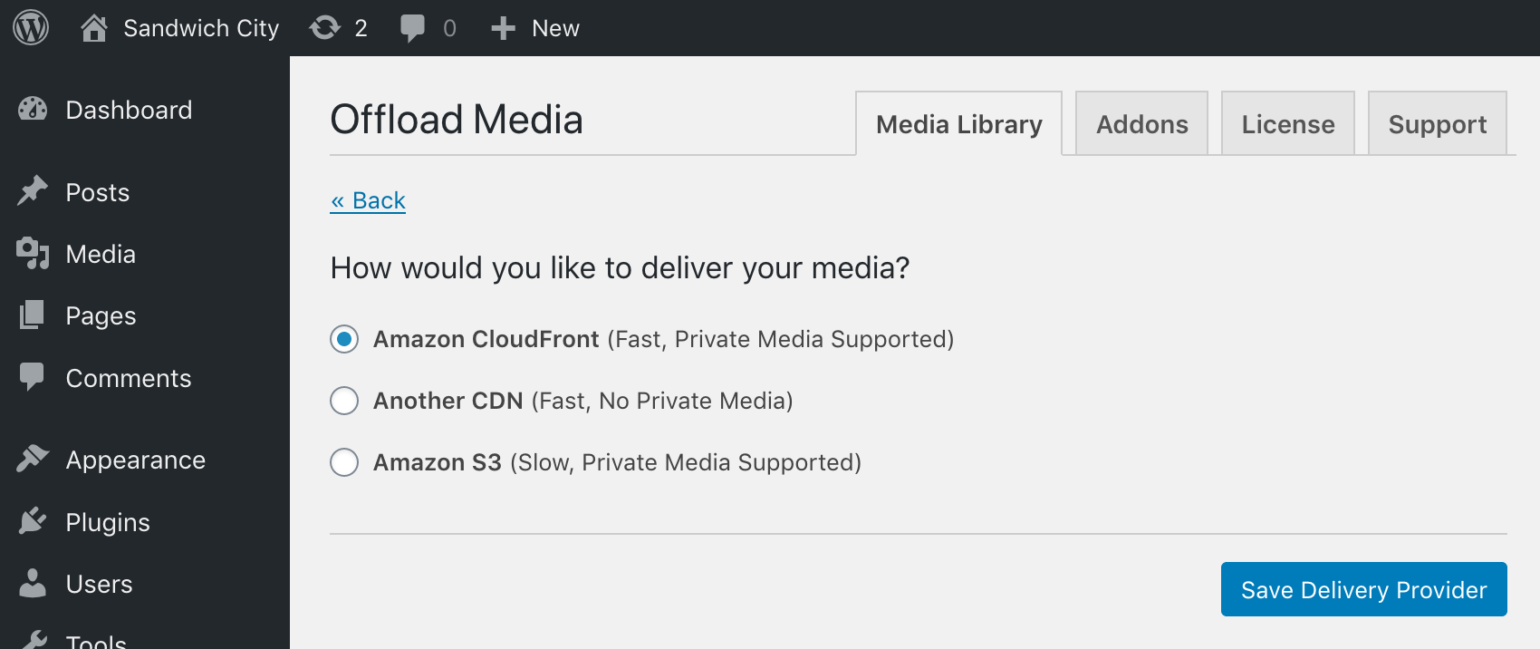
Head over to your WordPress site. Visit the WP Offload Media settings page and click the Change link next to the Delivery Provider, which should currently say “Amazon S3”.

Pick Amazon CloudFront as the new Delivery Provider, then click the Save Delivery Provider button to save your changes.
In the Delivery section of WP Offload Media’s settings page you should now see “Amazon CloudFront” as the Provider, and a new Custom Domain (CNAME) option, which is turned off by default. Toggle that switch on.

You now have a text box where you should enter the custom domain you chose for the Amazon CloudFront distribution, in our example we’ve entered “cdn.sandwichcity.com”. If you chose not to use a custom domain for your Amazon CloudFront distribution, enter your distribution’s cloudfront.net domain.
You’ll also see a new Private Media option. Leave that turned off for the moment. Later you can use our Private Media doc to configure signed CloudFront URLs for any private media or downloads you wish to serve to customers.
Click the Save Changes button to start serving your offloaded Media Library items via Amazon CloudFront while using your custom domain.
It’s a good idea to quickly check that all is in order, and an offloaded Media Library item is being served by Amazon CloudFront. Hop on over to the site’s Media Library and find an offloaded image, click on it to view its details.
If you used grid mode for viewing the Media Library, then you should see something like below, with the image displayed, and Copy Link near the bottom of the right-hand sidebar showing the expected custom domain.

If you used list mode for viewing the Media Library, then you should see something like below, with the image displayed, and File URL near the top of the right-hand sidebar showing the expected custom domain.

Block All Public Access to Bucket
Now that your Media Library is being served via Amazon CloudFront, you can now lock down the bucket so that no one can access its files directly. Blocking all public access to the bucket improves security, but also ensures no one accidentally uses the slower direct S3 URLs that also incur charges per request.
This of course means that if you are aware of any external links to your offloaded media that use the default raw S3 URL format (e.g. https://ianmjones-sandwichcity.s3.eu-west-2.amazonaws.com/…), you should not enable Block All Public Access. If there are raw S3 links on other sites other than the site that offloaded the media, but you do not care about breaking those links or explicitly want to break those links because their unauthorized use is costing you money, then by all means carry on and enable Block All Public Access to the bucket.
Before we turn on Block All Public Access for the bucket, let’s double-check that when we set up the Amazon CloudFront distribution and told it to update the Origin bucket’s policy to specifically grant the distribution’s Origin Access Identity permission, that it actually did so.
Visit the AWS Console’s S3 page and click on the name of the bucket your site is offloading to. You should see something like below.

Click on the Permissions tab, and then choose the Bucket Policy button.
You should see something similar to below, but most importantly, it should include a “Principal” element that includes a reference to a CloudFront Origin Access Identity.

If you do not see something similar in the bucket’s policy, please return to the CloudFront section of the AWS Console, edit the CloudFront distribution’s Origin, and re-select Yes, Update Bucket Policy again before saving it. There’s further details in our Block All Public Access to Bucket doc.
To turn on Block All Public Access to Bucket and ensure WP Offload Media knows about it, switch back to WP Offload Media’s settings page and click the “Change” link next to the bucket name in the Storage section.

On the “What bucket would you like to use?” prompt, just click the Save Bucket Setting button as there are no changes needed here.

You’re now given the opportunity to change the bucket’s Block All Public Access setting. Check the box to confirm that you’ve set up the Origin Access Identity and have a correct bucket policy, then click the Enable “Block All Public Access” button.
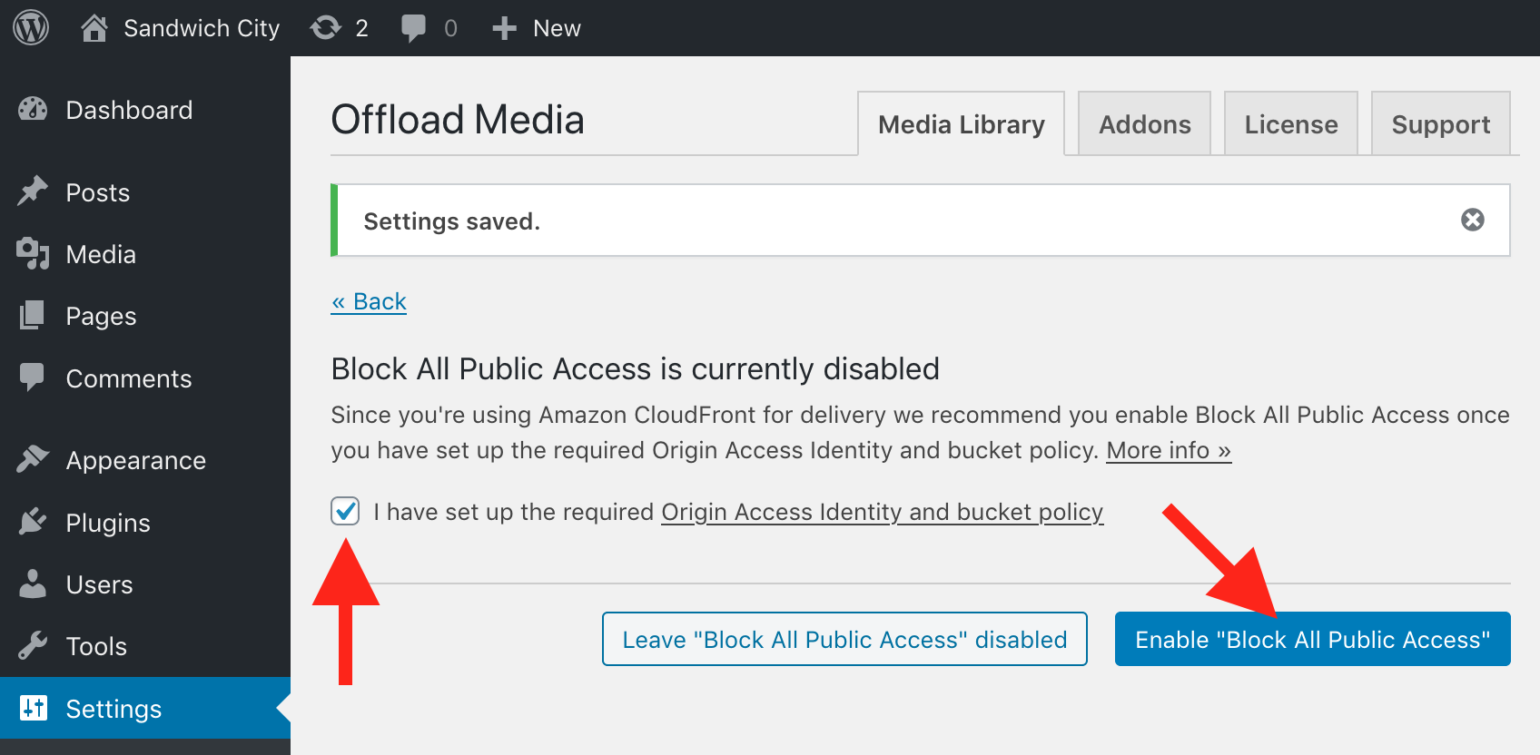
WP Offload Media will now update the bucket’s Block All Public Access setting to fully enable it. You should be returned to WP Offload Media’s settings page and be able to see that the bucket is now reporting that Block All Public Access is enabled (this info is retrieved by WP Offload Media via the S3 API).

At this point it’s probably a good idea to visit your Media Library and add a new image to confirm that it is correctly offloaded to the Amazon S3 bucket and delivered via Amazon CloudFront. If there are any errors please review the instructions above and check that the bucket and distribution are set up correctly.
Next Steps: Deliver private media via Amazon CloudFront
Now that your WordPress site is offloading its Media Library items to a protected Amazon S3 bucket, and delivering that media via an Amazon CloudFront distribution, you may also want to serve private files via signed CloudFront URLs that expire after a few seconds. Offering WooCommerce or Easy Digital Downloads product files is a good example of this.
By default WP Offload Media creates signed expiring URLs that use the raw S3 URL format (e.g. https://ianmjones-sandwichcity.s3.eu-west-2.amazonaws.com/…), this will continue to work even if Block All Public Access has been enabled. However, wouldn’t it be nice to serve those product downloads via Amazon CloudFront for improved speed, reduced costs, and better branded URLs?
Hop on over to our How to Serve Private Media via Signed Amazon CloudFront URLs doc to configure WP Offload Media’s “Private Media” setting.
Amazon S3 In A Nutshell
Amazon Web Services (AWS) is a bouquet of Web services offered by Amazon that together make up a cloud computing platform. The most essential and best known of these services are Amazon EC2 and Amazon S3. AWS also includes CloudFront, Simple Queue Service, SimpleDB, Elastic Block Store. In this article, we will focus exclusively on Amazon S3.
Amazon S3 is cloud-based data-storage infrastructure that is accessible to the user programmatically via a Web service API (either SOAP or REST). Using the API, the user can store various kinds of data in the S3 cloud. They can store and retrieve data from anywhere on the Web and at anytime using the API. But S3 is nothing like the file system you use on your computer. A lot of people think of S3 as a remote file system, containing a hierarchy of files and directories hosted by Amazon. Nothing could be further from the truth.
Amazon S3 is a flat-namespace storage system, devoid of any hierarchy whatsoever. Each storage container in S3 is called a “bucket,” and each bucket serves the same function as that of a directory in a normal file system. However, there is no hierarchy within a bucket (that is, you cannot create a bucket within a bucket). Each bucket allows you to store various kinds of data, ranging in size from 1 B to a whopping 5 TB (terabytes), although the largest object that can be uploaded in a single PUT request is 5 GB. Obviously, I’ve not experimented with such enormous files.
A file stored in a bucket is referred to as an object. An object is the basic unit of stored data on S3. Objects consist of data and meta data. The meta data is a set of name-value pairs that describe the object. Meta data is optional but often adds immense value, whether it’s the default meta data added by S3 (such as the date last modified) or standard HTTP meta data such as Content-Type.
So, what kinds of objects can you store on S3? Any kind you like. It could be a simple text file, a style sheet, programming source code, or a binary file such as an image, video or ZIP file. Each S3 object has its own URL, which you can use to access the object in a browser (if appropriate permissions are set — more on this later).
You can write the URL in two formats, which look something like this:
The bucket’s name here is deliberately simple, codediesel. It can be more complex, reflecting the structure of your application, like codediesel.wordpress.backup or codediesel.assets.images.
Every S3 object has a unique URL, formed by concatenating the following components:
- Protocol (
http://orhttps://), - S3 end point (
s3.amazonaws.com), - Bucket’s name,
- Object key, starting with
/.
In order to be able to identify buckets, the S3 system requires that you assign a name to each bucket, which must be unique across the S3 bucket namespace. So, if a user has named one of their buckets company-docs, you cannot create a bucket with that name anywhere in the S3 namespace. Object names in a bucket, however, must be unique only to that bucket; so, two different buckets can have objects with the same name. Also, you can describe objects stored in buckets with additional information using meta data.
Bucket names must comply with the following requirements:
- May contain lowercase letters, numbers, periods (
.), underscores (_) and hyphens (-); - Must begin with a number or letter;
- Must be between 3 and 255 characters long;
- May not be formatted as an IP address (e.g.
265.255.5.4).
In short, Amazon S3 provides a highly reliable cloud-based storage infrastructure, accessible via a SOAP or REST API. Some common usage scenarios for S3 are:
- Backup and storage.
Provide data backup and storage services. - Host applications.
Provide services that deploy, install and manage Web applications. - Host media.
Build a redundant, scalable and highly available infrastructure that hosts video, photo or music uploads and downloads. - Deliver software.
Host your software applications that customers can download.
ASSETS PULL ADD ON ANNOUNCEMENT
https://deliciousbrains.com/new-assets-pull-addon-wp-offload-s3/
The Assets addon, you might recall, allows you to serve your site’s assets (CSS, JS, images, fonts, etc) from S3, CloudFront, or another CDN in just a few clicks. Making it possible to speed up delivery of these assets and reduce the demand on your web server. This adds onto WP Offload S3’s ability to offload your WordPress Media Library to S3 and serve it from S3, CloudFront, or another CDN speeding up delivery of your Media Library and reducing demand on your server.
So why did we need to build a new Assets addon?
Push vs Pull
The original Assets addon pushes files to S3. It scans your site’s filesystem for assets and uploads them to S3. We went with a push solution because at the time the team felt it would be better than pull.
With a pull CDN, it retrieves the asset from the origin server on the first request, caches it, and serves it. It then serves that asset from the cache for subsequent requests (until it expires). This first request can therefore be a bit slower. With a push CDN, we push all the assets to the CDN, and now that the asset is already there it can be served on the very first request.
This seems like reason enough to favor push over pull, but we’ve since realized there are some significant downsides to the push solution:
- When we update a theme, plugin, or WordPress core we need to serve its assets from the web server until all the new and updated assets have been uploaded. Otherwise the site is likely to break using old assets.
- We have to scan the filesystem regularly for updated assets because files can be updated via FTP, SSH, etc. We can’t rely on WordPress hooks to tell us when something has been updated.
So not a great situation to have periods of time where your assets are being served from your web server again instead of your CDN. However, it’s the filesystem scanning which has been the bigger problem. There are major issues with scanning the file system from a WordPress plugin:
- Slow and consumes server resources. Recursively iterating through folders, getting directory listings, and checking for file changes is a lot of I/O, CPU, and memory.
- Unreliable. WordPress doesn’t have a background processing system. We had to bake our own, work out the bugs, and struggled to make it reliable for all web hosting configurations.
After debugging hundreds of support requests with our customers and coding dozens of fixes and improvements to our background processing library, the push solution looked like a bad choice.
S3 is not a CDN
We also noticed that many of our customers were serving their assets directly from S3. They weren’t going through the extra step of configuring CloudFront or another CDN to point at their assets on S3. They were setting up the Assets addon to push their assets to S3 and serving them from there. As we’ve written in the past, you’re better off serving your assets from your web server than S3.
This is our fault of course. After you configured the Assets addon to push your assets to S3 it definitely seemed like you were done. If you read our documentation you would know that you should configure CloudFront or another CDN, but we provided very little guidance in the Assets addon itself. We really should have been encouraging this more strongly.
For all these reasons, the original Assets addon was not the best solution. We decided to fix that.
The All-New Assets Pull Addon
The Assets Pull addon is a new plugin (not an upgrade) designed to make properly serving your assets as easy as possible using Amazon CloudFront (or just about any other CDN). The addon includes a CloudFront setup wizard to walk you through the process of creating and properly configuring a new CloudFront distribution to “pull” assets directly from your web server rather than from S3.

Without the need to upload assets to S3, assets are now immediately available to be served via CloudFront once your distribution has been configured. Another benefit is that the plugin is more compatible with third-party extensions which you might use for minification and concatenation, features not part of the Assets Pull addon. Serving compressed (gzipped) assets is now handled automatically by CloudFront.
Perhaps the feature that really sets the Assets Pull addon apart from other similar solutions is the ability to run a comprehensive test on your configuration before you enable URL rewriting. This greatly reduces the risk of experiencing problems due to DNS propagation delays or CDN misconfiguration.

Sunsetting the Assets Addon
With the release of the Assets Pull addon, we are deprecating the original Assets addon. The deprecated addon will still be supported for some time (security releases only) but will eventually be discontinued.
We’re encouraging everyone to install and activate the new Assets Pull addon to replace it. We’re confident you’ll love the new addon so much that you won’t miss the old one. 😉
Can the Two Addons Coexist?
Both the new Assets Pull and old Assets addons can be installed at the same time, but to avoid URL rewriting conflicts only one of them can be active at any given time. Activating one will automatically deactivate the other with a nice notice about what happened.

Transitioning from the Old Addon to the New Addon
If you have the original Assets addon running on your site, just install and activate the new Assets Pull addon and go through the setup wizard. Your assets will be served from your web server while you’re going through setup. Serving your assets from the web server temporarily should be completely fine as that’s exactly what happened with the original Assets addon any time you updated your plugins, themes, or WordPress core.
Updates to WP Offload S3
Along with the release of the new addon, our WP Offload S3 and Amazon Web Services plugins have been updated as well, fixing up a few things here and there.
Perhaps the biggest change is that we’ve added notices for sites running a PHP version less than 5.5 (hopefully you never see those yourself). While running a stable version of PHP is obviously recommended, we’ve never required anything higher than what was needed by the AWS SDK v2 (PHP 5.3). But we’re planning to change that soon.
Version 3 of the SDK has been available for quite some time and offers some features not available in v2. But it requires PHP 5.5+. This is why we’re warning users about old PHP versions now in this release.
What’s Coming Next
We get quite a few requests to upgrade the AWS SDK in our Amazon Web Services plugin to v3. Usually the customer wants to use the SDK in their own development and they require some features that were added to v3 and are missing in v2.
Updating to v3 of the SDK is tricky though. We’re already addressing the issue of increasing the PHP version requirements (as mentioned above) but what about those who’ve built on top of the existing Amazon Web Services plugin? It’s been coded for v2 of the SDK. If we update to v3, it’s likely to bork anything they’ve built and could take down some sites.
We’ve realized we can’t update the Amazon Web Services plugin to v3 of the SDK. And so we won’t. We’re leaving it alone.
The next release of WP Offload S3 will no longer require the Amazon Web Services plugin as a dependency. Instead it will include its own namespaced versions of the components from the AWS SDK that it needs. This means that you can safely load and use whatever version of the AWS SDK you want for your own needs, without conflicting with the SDK code bundled into WP Offload S3!
This will also eliminate one of the most common sources of problems our customers experience with WP Offload S3: another plugin loading its own version of the SDK. This causes WP Offload S3 to malfunction and so customers think there’s something wrong with it and reach out to us for help.
Congratulations to the rest of the WP Offload S3 team for all their work on this release.
Does this new addon sound like something you’d use? Any questions? Let us know in the comments.
Not a WP Offload S3 customer yet but like what you see? Get WP Offload S3 with the Assets Pull Addon at the Gold License and above.
MORE INFO ON ASSET PULL – how it works – extensions
https://the.shawneee.com/object-versioning-cache-invalidation/
https://the.shawneee.com/offload-media-tweaks/
Set up CDN for media and enqued files on same domain
Use the Same CloudFront Custom Domain with WP Offload Media and the Assets Pull Addon
If you use WP Offload Media with CloudFront and a custom domain with HTTPS, then you might want to use the same domain and CloudFront distribution for the Assets Pull addon as well to serve your site’s assets.
Using the same domain will have a performance benefit over two DNS entries, as there will be only one open connection which will utilize the multiplexing feature of HTTP/2 to make requests asynchronously.
This guide assumes you have already set up a CloudFront distribution with a custom domain running on HTTPS. The only origin of the distribution is currently pointing to the S3 bucket. The article covers setting up one CloudFront distribution to serve both your media library and site assets with the following steps:
- Creating a custom origin to serve the assets
- Edit the default cache behaviour of the distribution
- Create a cache behaviour for the S3 origin
Assets Pull Addon – Steps shortened
NOTES::
assets.nakedsword.com – I searched my email – no mention of it before this? so not sure where it came from? It is possible it was not set up for this?
the site being on sworddevelop.wpengine.com – do you guys think this could be an issue?
– I asked if we could give it a non-wpengine ulr – the only way is to move this site into a new install and put it at production – that is the only site in wpengine that can have own url.
Origin Setting – aws docs – perhaps we will need to change this section – /DeveloperGuide/using-https-cloudfront-to-custom-origin.html – I do not know what we would use –
STEPS::
- domain to pull assets – any sub-domain that points to sworddevelop.wpengine.com
-
cdn.thesword.com + set up a wildcard domain for assets
– here we may have a problem – it is on wpengine.com –
BUT can we use *thesword.com?
for example – anything-at.thesword.com points to sworddevelop.wpengine.com? and will that work? (url issue) – THIS WORKS – JUST SET UP FOR final-single-domain-url.com.
p>CloudFront distribution to "pull" and cache assets from site on-demand –
- For Origin Domain Name, enter sworddevelop.wpengine.com
- For Origin Protocol Policy, select Match Viewer.
Everything else within the Origin Settings section can be left at the default value.
Default Cache Behavior Settings – control what CloudFront will do with the response it gets from sworddevelop.wpengine.com
- Query String Forwarding and Caching, select Forward all, cache based on all.
This is necessary to ensure the proper version of an asset is served when WordPress, plugins and themes are updated. - For Compress Objects Automatically, choose Yes.
Distribution Settings –
- Adjust the Price Class based on your requirements and budget. Use All Edge Locations – best performance, but will cost slightly more.
- For Alternate Domain Names, enter cdn.thesword.com into the field.
- SSL – says choose custom ssl
- Select your certificate from the dropdown menu (indicated by *.thesword.com).
Cloudfront Domain – CloudFront will begin to deploy your new distribution – can take some time depending on the Price Class chosen
CNAME Setup – Set DNS for your chosen subdomain so assets are served through CloudFront using your own domain –
-
Create a CNAME record for the “cdn” subdomain to your CloudFront distribution’s domain name.
NOTE FROM AWS IN SUBDOMAIN ARE
You must list any custom domain names (for example, www.example.com) that you use in addition to the CloudFront domain name (for example, d1234.cloudfront.net) for the URLs for your files. Specify up to 100 CNAMEs separated with commas or put each on a new line. You also must create a CNAME record with your DNS service to route queries for www.example.com to d1234.cloudfront.net. For more information, see the Help.
ERROR CODES: (click for doc)
BONUS – additional pieces for coors
Use the Same CloudFront Custom Domain with WP Offload Media and the Assets Pull Addon
<p>If you use WP Offload Media with CloudFront and a custom domain with HTTPS, then you might want to use the same domain and CloudFront distribution for the Assets Pull addon as well to serve your site’s assets.</p>
Using the same domain will have a performance benefit over two DNS entries, as there will be only one open connection which will utilize the multiplexing feature of HTTP/2 to make requests asynchronously.
This guide assumes you have already set up a CloudFront distribution with a custom domain running on HTTPS. The only origin of the distribution is currently pointing to the S3 bucket. The article covers setting up one CloudFront distribution to serve both your media library and site assets with the following steps:
- Creating a custom origin to serve the assets
- Edit the default cache behaviour of the distribution
- Create a cache behaviour for the S3 origin
Creating a Custom origin to Serve the Assets
First create a new origin that will serve all the assets from the site as part of the Assets Pull addon. Edit your CloudFront distribution and select the Origins tab and click Create Origin. Set the Origin Domain Name to the domain of your site and set the Origin Protocol Policy to ‘Match Viewer’. Leave the other settings as they are:

Edit the Default Cache Behaviour of the Distribution
Next we need to edit the default behaviour for the distribution to point to the new origin. Select the Behavious tab, select the existing behaviour and click the Edit button:

Change the Origin to the new Custom origin we just created and ensure you turn on Compress Objects Automatically and set Query String Forwarding and Caching to ‘Forward all, cache based on all’.

Create a Cache Behaviour for the S3 Origin
Next add a new behaviour for the S3 origin for serving the site’s media files.
- Click Create Behaviour
- Set Origin as the S3 origin
- Edit the Path Pattern to match the uploads directory of your site with a wildcard for all files under that path, eg.
wp-content/uploads/* - Leave all the other settings as they are

Your behaviours should look like this:

Assets Pull: Configure CORS to Resolve Web Font Issues
If you notice that font files aren’t loading correctly, or receive the following error in the browser console then you need to modify your server configuration.

This is because web fonts are subject to Cross-Origin Resource Sharing (CORS). CORS is a way for a remote host to control access to certain types of resources.
To resolve this issue you need to ensure that your server is sending the correct Access-Control-Allow-Origin header when font files are requested. If you’re unable to modify your server configuration please contact your web host and link them to this article.
Apache
Add the following block to your .htaccess file:
<FilesMatch ".(eot|otf|ttf|woff|woff2)">
    Header always set Access-Control-Allow-Origin "*"
</FilesMatch>
Nginx
Add the following location block to your virtual host file (usually within the server directive) and reload Nginx:
location ~* \.(eot|otf|ttf|woff|woff2)$ {
    add_header Access-Control-Allow-Origin *;
}
Invalidate CloudFront Distribution
Once the changes have been made you will need to invalidate the CloudFront cache with a path of “/*”.

</div>
Round 1 Steps – assets pull
Creating a Custom origin to Serve the Assets
First create a new origin that will serve all the assets from the site as part of the Assets Pull addon. Edit your CloudFront distribution and select the Origins tab and click Create Origin. Set the Origin Domain Name to the domain of your site and set the Origin Protocol Policy to ‘Match Viewer’. Leave the other settings as they are:

Edit the Default Cache Behaviour of the Distribution
Next we need to edit the default behaviour for the distribution to point to the new origin. Select the Behavious tab, select the existing behaviour and click the Edit button:

Change the Origin to the new Custom origin we just created and ensure you turn on Compress Objects Automatically and set Query String Forwarding and Caching to ‘Forward all, cache based on all’.

Create a Cache Behaviour for the S3 Origin
Next add a new behaviour for the S3 origin for serving the site’s media files.
- Click Create Behaviour
- Set Origin as the S3 origin
- Edit the Path Pattern to match the uploads directory of your site with a wildcard for all files under that path, eg.
wp-content/uploads/* - Leave all the other settings as they are

Your behaviours should look like this:


Controlling Settings with Constants
All of the above settings can be defined in your wp-config.php which will override the value saved in the database. For more information, see Settings Constants
<h2>Settings Constants</h2>
<p>All settings within <a href="https://deliciousbrains.com/wp-offload-media/doc/settings/">WP Offload Media</a> and the <a href="https://deliciousbrains.com/wp-offload-media/doc/assets-addon-settings/">Assets Addon</a> can be defined using two constants within your <code>wp-config.php</code> file.</p>
WP Offload Media
define( 'AS3CF_SETTINGS', serialize( array(
    // Storage Provider ('aws', 'do', 'gcp')
    'provider' => 'aws',
    // Access Key ID for Storage Provider (aws and do only, replace '*')
    'access-key-id' => '********************',
    // Secret Access Key for Storage Providers (aws and do only, replace '*')
    'secret-access-key' => '**************************************',
    // GCP Key File Path (gcp only, absolute file path, not URL)
    // Make sure hidden from public website, i.e. outside site's document root.
    'key-file-path' => '/path/to/key/file.json',
    // Use IAM Roles on Amazon Elastic Compute Cloud (EC2) or Google Compute Engine (GCE)
    'use-server-roles' => false,
    // Bucket to upload files to
    'bucket' => 'mybucket',
    // Bucket region (e.g. 'us-west-1' - leave blank for default region)
    'region' => '',
    // Automatically copy files to bucket on upload
    'copy-to-s3' => true,
    // Enable object prefix, useful if you use your bucket for other files
    'enable-object-prefix' => true,
    // Object prefix to use if 'enable-object-prefix' is 'true'
    'object-prefix' => 'wp-content/uploads/',
    // Organize bucket files into YYYY/MM directories matching Media Library upload date
    'use-yearmonth-folders' => true,
    // Append a timestamped folder to path of files offloaded to bucket to avoid filename clashes and bust CDN cache if updated
    'object-versioning' => true,
    // Delivery Provider ('storage', 'aws', 'do', 'gcp', 'cloudflare', 'keycdn', 'stackpath', 'other')
    'delivery-provider' => 'storage',
    // Custom name to display when using 'other' Delivery Provider
    'delivery-provider-name' => 'Akamai',
    // Rewrite file URLs to bucket
    'serve-from-s3' => true,
    // Use a custom domain (CNAME), not supported when using 'storage' Delivery Provider
    'enable-delivery-domain' => false,
    // Custom domain (CNAME), not supported when using 'storage' Delivery Provider
    'delivery-domain' => 'cdn.example.com',
    // Enable signed URLs for Delivery Provider that uses separate key pair (currently only 'aws' supported, a.k.a. CloudFront)
    'enable-signed-urls' => false,
    // Access Key ID for signed URLs (aws only, replace '*')
    'signed-urls-key-id' => '********************',
    // Key File Path for signed URLs (aws only, absolute file path, not URL)
    // Make sure hidden from public website, i.e. outside site's document root.
    'signed-urls-key-file-path' => '/path/to/key/file.pem',
    // Private Prefix for signed URLs (aws only, relative directory, no wildcards)
    'signed-urls-object-prefix' => 'private/',
    // Serve files over HTTPS
    'force-https' => false,
    // Remove the local file version once offloaded to bucket
    'remove-local-file' => false,
    // DEPRECATED (use enable-delivery-domain): Bucket URL format to use ('path', 'cloudfront')
    //'domain' => 'path',
    // DEPRECATED (use delivery-domain): Custom domain if 'domain' set to 'cloudfront'
    //'cloudfront' => 'cdn.exmple.com',
) ) );
Assets Pull Addon
define( 'AS3CF_ASSETS_PULL_SETTINGS', serialize( array(
    // Rewrite enqueued style/script URLs to CDN domain
    'rewrite-urls' => false,
    // CDN domain to use
    'domain' => 'assets.example.com',
    // Serve files over HTTPS
    'force-https' => false,
) ) );
!!! IMPORTANT !!!
The above defines should be placed before:
/* That's all, stop editing! Happy blogging. *//** Absolute path to the WordPress directory. */
if ( !defined('ABSPATH') )
define('ABSPATH', dirname(FILE) . '/');
/** Sets up WordPress vars and included files. */
require_once(ABSPATH . 'wp-settings.php');
Test with assets pull plugin
Assets Pull Addon
With the Assets Pull addon you can start serving your site’s assets (CSS, JS, fonts, etc) from CloudFront, or another CDN in just a few clicks.
The addon contains a setup wizard which will walk you through the process of creating a proper CloudFront distribution for serving your assets using your own domain name.
Setup
Once installed and activated, the addon will prompt you to configure it using the wizard. Simply follow the steps to set up CloudFront, or skip to the settings at any time. The only required setting is the domain to use for the assets. If you followed the setup wizard this will already be configured for you.
Testing the Pull Domain
Once you have your domain configured, you can test the configuration of the domain to make sure that requests are flowing through the domain properly before enabling URL rewriting. This can be rechecked again at anytime simply by clicking the Check again link.
FAQ
Which assets will be served from the CDN?
By default, the Assets Pull addon will only rewrite URLs for styles (CSS) and scripts (JS) which are registered through the WordPress enqueue system, but any font or media files referenced via a relative URL will be served via the CDN too.
You can also rewrite URLs for any other kind of asset embedded in HTML using the get_asset_url filter.
Asset pull errors
Assets Pull: Domain Check Errors
The assets pull addon lets you test your chosen domain so you can find out about potential problems before enabling URL rewriting.
The domain check uses the WordPress REST API to be able to make assertions about the configuration of the pull domain that we would otherwise not be able to if we were simply testing a static file.
The following is a list of possible errors that you may encounter when checking the configuration of your domain.
Hostname [example.com] could not be resolved to an IP address
This means your server cannot resolve example.com to an IP address. This could be due to a typo in the domain name or if it is a new domain (or subdomain) you may need to wait a few minutes for DNS changes to propagate. When creating a new distribution with CloudFront, the dXXXXXXXXXXX.cloudfront.net domain for your distribution will be unresolvable for a few minutes after creating it. You can use the Check again link to try again every few minutes until you see this error go away. CloudFront domain names for a new distribution usually propagate within 3-5 minutes from creation.
S3 bucket set as CDN origin.
The CDN has been configured to pull from an S3 bucket instead of the site. The Assets Pull addon requires a different type of CloudFront distribution than used by the core WP Offload Media plugin to offload the Media Library. You must create a new CloudFront distribution for use with the Assets Pull addon.
Please re-run the set up wizard (there is a “Launch CloudFront Set Up Guide” link in the Assets tab once the settings have been saved) and follow its steps to properly configure a new CloudFront (or other CDN) distribution that pulls from the site, not an S3 bucket.
Invalid response code. Received [xxx] from test endpoint.
The cause varies based on the status code returned (xxx).
404 – This means that the requested resource could not be found.
This could happen for a number of reasons:
- The configured pull domain is incorrect
- The configured origin on CloudFront (or your CDN) is not configured correctly
500 – This is potentially due to an internal server error. Check your PHP error log.
Invalid response type. Received [xxxxxxxxxxx].
This will happen for any request that does not return JSON as expected by the test endpoint, which is likely caused by a misconfigured domain or origin.
Query string missing "ver" parameter. Check your configuration.
This means that your CDN is most likely stripping the query string from the URL (everything including and after the ?) to improve caching. It is important that your CDN is not configured to remove the query string to ensure that the proper version of your assets is served. At a minimum, it needs to be configured to allow the ver parameter, but we recommend allowing all.
For CloudFront Users
- Navigate to your CloudFront Distributions in the AWS console
- Select your distribution in the list and click Distribution Settings
- Select the Behaviors tab
- Select your origin from the list and click Edit
- Scroll down to the setting for “Query String Forwarding and Caching”
- Ensure this is set to Forward all, cache based on all
- If you made a change, make sure to scroll to the bottom and click Yes, Edit to save the changes
If you made a change, you will see the distribution will show a status of In Progress in your list of distributions. It may take 15 minutes or more for the changes to finish deploying to all CloudFront edge servers before you see it take effect.
Malformed response from test endpoint.
This means that the response returned a proper code and type, but the body of the response could not be read. This could happen if extra output was included with the response such as PHP errors or notices for example. Check your PHP error log, make sure is set to false and try again.
cURL error 60: SSL certificate problem: unable to get local issuer certificate
This error means your pull domain is using a self-signed certificate and it cannot verify its authenticity.
To bypass verification of SSL certificates (only for our domain check requests) you can add this filter:
add_filter( 'as3cf_assets_pull_test_endpoint_sslverify', '__return_false' );
Note: Do not add this filter on your production site as you want to make sure that your SSL is configured properly and using a valid certificate.
Invalid request signature.
The request signature checks that the response from the CDN came from the correct origin. This error would most likely happen if you were to test the domain from a staging environment using a domain configured to pull from your production site.
Other Errors
If you don’t see your error in this list, please open a support request with us through the Support tab of the WP Offload Media settings screen and be sure to include the message you’re getting.
assset pull
with other plugins
Compatibility With Other Plugins
WP Offload Media has been coded to use WordPress hooks and filters for uploading attachments and serving their URLs. This means that, for the most part, the plugin should be compatible with other plugins.
Most compatibility issues arise when WP Offload Media is configured to remove files from the server after uploading to the bucket. Many types of plugins like sliders, galleries and optimization tools require access to the local file. With so many of these kinds of plugins on the WordPress repository, not to mention premium plugins, it is hard to cater for them all. But we do attempt to cover those plugins we have encountered issues for as we find them.
WP Offload Media Lite
Out of the box the plugin supports the WordPress image editing and Customizer image tools, as well as the popular Regenerate Thumbnails plugin. It also allows plugins to communicate with bucket images, even if they have been removed from the server, fixing the majority of plugin compatibility issues.
WP Offload Media
The paid version adds compatibility with the following plugins and in some cases extra functionality:
- EWWW Image Optimizer
- OFT Regenerate Thumbnails
- Advanced Custom Fields
- Divi Builder
- Easy Digital Downloads
- Enable Media Replace
- Meta Slider
- WooCommerce
- WPML
If there is another plugin you are having issues getting to play nicely with WP Offload Media, then get in touch.
Caching Plugins
You should have no issues using WP Offload Media for your media library alongside a caching plugin like WP Total Cache or WP Rocket. It’s important to remember that WP Offload Media doesn’t provide a page caching solution, which is one of the most important things you can implement to speed up your website. WP Offload Media is designed to work alongside an existing caching solution such as Varnish or FastCGI caching, or a caching plugin.
If your caching plugin includes an option to cache the Media Library via a CDN you should turn that setting off as it will very likely conflict with WP Offload Media.
When using the Assets Pull addon you will need to turn off the CDN feature in your caching plugin for other assets too to avoid potential conflicts.
Third Party Addons
Whilst we can’t build a compatibility integration for every plugin that needs one, we do have a bunch of hooks and filters available that should allow a developer to build their own addon to accomplish what they need. A great starting point is our Tweaks plugin, and we will be happy to assist with development where necessary.
If you have built an addon let us know, it would be great to feature it below:
Plugins That Integrate With WP Offload Media
Although not verified or tested by Delicious Brains, we hear that the following plugins work with WP Offload Media:
- Church Content
- Modula Grid Gallery for WordPress
- ShortPixel Image Optimizer
- Smush Image Compression and Optimization
More from this category
