After enabling Mac OS X file service, you can access your NAS via any Mac OS X operating system (i.e., Mac OS X v10.7). This file transfer protocol is called AFP (Apple Filing Protocol). You can also use Time Machine to back up data to your NAS.
Apple Filing Protocol (AFP): This is the protocol used when transferring files between Mac OS X and local area networks. Go to the Finder and click “Go” in the Finder menu, then select “Connect to Server.” This will bring up the Connect to Server dialog box. Here you can enter the IP address that you want to connect to.
For example: afp://192.168.1.168
Bonjour Service Name: Your NAS will be identified by this name in the Finder.
Time Machine Support: Here you can enable Time Machine support and select the shared folder that you wish to back up to. If multiple Mac users wish to access this feature simultaneously, please see NAS 159 – Time Machine: Best Practice for guidance. Reminder: Enabling this feature may prevent your hard disk(s) from going into hibernation.
About Bonjour
Bonjour, also known as zero-configuration networking, has been widely used in Apple related products. It will scan your vicinity for other Apple devices and then let you directly connect to them without having to know their actual IP addresses.
After enabling this service, you will be able to see your NAS in the left hand panel of the Finder under “Shared”. Simply click on your NAS to connect to it.
ASUSTOR AS5202T Do more with 2.5GbE and AS5202T. The #1 cloud storage device for enthusiasts
ASUSTOR AS5202T 2-bay NAS (Diskless)
2 x 2.5″/3.5″ SATA3 HDD or SSD, Intel Celeron J4005 Dual-Core 2.0 GHz (burst up 2.7 GHz), 2GB SO-DIMM DDR4 (Max. 8GB) | #AS5202T
Two 2.5 GbE ports with up to 5 Gbps under Link Aggregation
Up to 28TB. Store live streams on your NAS
Overwhelming 4K experience
2GB DDR4-2400 – 30% faster than DDR3
Intel Celeron dual core CPU – 30% faster than previous generation.
Three year warranty, best in class
2.0Ghz Dual Core CPU Boosts to 2.7Ghz
The AS5202T utilizes the Intel Gemini Lake Celeron J4005 dual core CPU and is 30% faster than Apollo lake. The Celeron J4005 also doubles the on-chip cache to 4MB, making the AS5202T one of our fastest NAS devices ever.
Upgradeable 2GB DDR4-2400 RAM
The AS5202T comes with two Gigabytes of DDR4 RAM and can be upgraded up to 8GB. DDR4 RAM provides up to 30% greater performance than DDR3 while also lowering energy requirements by 40%.
2x Seagate IronWolf Pro 4TB NAS Internal Hard Drive HDD
3.5-inch hard disks: Place the hard disk into the disk tray, making sure that the mounting holes on the sides of the hard disk and disk tray are lined up. Secure the drive with four screws.
IronWolf internal hard drives are the ideal solution for up to 24-bay, multi-user NAS server environments that demand powerhouse performance
Store more and work faster with a NAS hard drive that provides 4TB and speeds up to 214MB/s
Specifically built for less wear and tear, little to no noise/vibration, no lags or down time, increased file-sharing performance, lower power consumption, and extra data protection—even in the event of power loss
Easily monitor NAS drive health using the integrated IronWolf Health Management system, and enjoy long-term reliability with 1. 2M hours MTBF
Five-year limited product warranty protection plan and three year Rescue Data Recovery Services included
Overview:
150% Faster with 2.5-Gigabit Ethernet
The AS5202T provides two 2.5-Gigabit Ethernet ports. Enable up to 150% faster performance than Gigabit Ethernet with compatible hardware and up to 5 Gbps using Link Aggregation.*
*Link Aggregation only supported with compatible hardware. Please check beforehand and verify that Link Aggregation is supported on your equipment.
All New Gaming-Inspired Theme for ADM
Take a look at the all new gaming-inspired elements brought to ADM.
Live Streaming With Your NAS
ASUSTOR NAS devices offer live stream records in up to 4K HDR to be saved directly onto a NAS without affecting game performance. For gamers without large hard drive capacities, LAN parties and internet cafés, ADM offers iSCSI to store less demanding titles to play across multiple devices simultaneously.
YouTube and Twitch as cloud platforms are not always reliable with long-term archival of content and videos may be deleted without notice. For that, ASUSTOR provides Takeasy, an app that downloads videos from YouTube and Twitch for archival purposes and can automatically download all public content from a specific channel.
As Much Space as Needed
The AS5202T supports up to 28TB, enabling storage of large live streams and videos. Complement gameplay recordings with a NAS. Not enough? Expand your AS5202T with up to three AS6004U expansion units for a total of 168TB.
Overwhelming 4K HDR Experience
The AS5202T features HDMI 2.0a with 10bit 4K hardware decoding, HEVC decoding and VP9 10bit Profile2 decoding for a smoother experience and lower CPU usage. Use Plex Pass or a third-party player to play 4K HDR videos.
A New Look
Diamond-cut exterior with gaming-inspired elements. ASUSTOR’s AS5202T features a diamond-cut exterior with new gaming-inspired aesthetic. Installation of hard drives is easy with the included toolless caddies while also supporting hot swapping.
Ultra-quiet Operation
The AS52 series devices produce only 19 decibels of noise during system standby, equivalent to the almost inaudible sound of a pin drop. During system operation, only 32 decibels of noise is produced, equivalent to the hushed tones of a quiet library, allowing the AS52/53 series devices to seamlessly and comfortably integrate into any living environment.
24/7 reliability and durability
All ASUSTOR NAS are designed for and are suitable for 24/7 use. ASUSTOR NAS devices have also undergone rigorous tests, such as drop tests and burn tests to test durability in extreme conditions. Heatsinks were added to sensitive components to dissipate heat, helping to maintain the longevity of the device.
Save power to save money
ASUSTOR NAS products are designed and developed around ecologically friendly concepts. When in use, our devices consume far less power than the average computer or server. Furthermore, our advanced power control features allow you to more efficiently manage your NAS device and hard drives. This lowers your electric bill and prolongs the lifespan of your hard drives all at the same time. While in disk hibernation, the AS5202T consumes only 10.5 W of power. Under normal operating conditions it still only consumes 17 W of power.
Cross-Platform Multi-User Access
The ASUSTOR NAS provides seamless cross-platform and multi-user access, allowing you to easily connect to your NAS from Windows, Mac OS X or Unix-like operating systems no matter if you are using a PC, notebook, tablet or smartphone.
4096 Accounts
512 Groups
512 Shared Folders
512 Concurrent Connections
>
Comprehensive Backup Solutions
ASUSTOR’s comprehensive backup solution provides more than twelve backup options, including, but not limited to Amazon S3, Dropbox, Google Drive, and Onedrive. ASUSTOR Backup Plan for Windows as well as Time Machine for macOS provide easy backups for desktop and laptops while MyArchive removable hard drives provide long term storage. Btrfs is now supported and with Snapshot Center, can take snapshots of your information in the event of unintentional modification. Restore previous versions easily with Snapshot Center.
MyArchive cold backup technology turns NAS hard disks into removable storage archives. Directly insert a MyArchive hard disk into the NAS to easily access, backup and share terabytes of content.
Snapshot Center
Snapshot Center is a new feature for ASUSTOR NAS devices to utilize Btrfs and iSCSI volumes to take snapshots of the information inside a NAS. Snapshot Center supports up to 256 snapshots of a volume and can be done every five minutes, creating a backup that can be restored easily if data is damaged or lost.
Software Portainer – Easy Docker Deployments
Even more possibilities for ADM with Portainer for Docker images. With thousands of images, Portainer can download and deploy more types of programs than ever before. Portainer is incredibly user friendly and employs a graphical interface to make docker images easier to deploy than ever.
Effortless Connections to Your NAS
ASUSTOR NAS devices support automatic port forwarding to allow remote connections to the NAS. Automatic port forwarding eliminates the need to manually configure routers. ASUSTOR EZ Connect is an ASUSTOR service that allows customers to easily connect with a customized Cloud ID and access their information while away. ASUSTOR EZ Connect supports Windows with a desktop client while EZ Connect is supported on mobile devices through ASUSTOR’s Ai Series of apps.
Protected From the Inside and Out
Protect your data from loss, damage and attacks with the AS5202T. An ASUSTOR NAS is better protected by running the Linux-based ADM, employing a built-in firewall, ClamAV Antivirus, MyArchive and ADM’s various backup tools help protect ransomware even better.
Live streaming with StreamsGood
Stream shows from your favorite content creators with StreamsGood. StreamsGood connects to accounts on Twitch, YouTube Gaming, Facebook Gaming, Douyu and King Kong and enables streaming from almost any content creator. Download StreamsGood and start streaming and interacting with your favorite streamers today.
Created for the Digital Home
ASUSTOR NAS allows you to enjoy thrilling digital entertainment at any time. Via the built-in HDMI port and various multimedia Apps the NAS can be connected directly to ultra high resolution TVs and players. Enjoy multimedia with family and friends or use the UPnP multimedia server to stream your favorite media to compatible computers and mobile devices.
ASUSTOR Portal
LooksGood
SoundsGood + Hi-Res Player
Photo Gallery
App Central
Unleash the unlimited potential of ASUSTOR NAS. The applications that come pre-installed with each ASUSTOR NAS device are just the beginning. At your convenience, you can browse through and download any applications that pique your interest from App Central. Whether your interests lie in business, website construction or even digital home entertainment, App Central has got you covered. With over 200 unique Apps, App Central provides you with the boundless variety of applications that you require to satisfy your digital lifestyle needs. Explore the unlimited potential of ASUSTOR NAS devices while creating a personalized NAS device for yourself.
Mobile Apps
ASUSTOR’s exclusive EZ Connect technology allows you to connect to your NAS from anywhere with your Mobile device in order to access and share your files. ASUSTOR mobile apps provide pass code lock functions in order to protect your privacy and data. You can also make use of HTTPS connections for even more added security.
First-Class Product Warranty
All ASUSTOR NAS products come with a 3-year warranty. ASUSTOR continues to make customer service a priority in providing the highest standard of after-sales service and technical support.
Specifications:
Specifications
CPU
CPU Model
Intel Celeron J4005
CPU Architecture
x64 64-bit
CPU Frequency
Dual Core 2.0 GHz (burst up 2.7GHz)
Hardware encryption engine integrated
Yes
Memory
Memory
2GB SO-DIMM DDR4
Memory Module Pre-installed
2GB (1 x 2GB)
Total Memory Slots
2
Memory Expandable up to
8GB (2 x 4GB)Support mixed capacity
Flash Memory
4GB eMMC
Storage
HDD
2 x SATA3 6Gb/s; 3.5″/2.5″ HDD/SSD1
Maximum Internal Raw Capacity
32 TB (16 TB HDD X 2, Capacity may vary by RAID types)
Maximum Drive Bays with Expansion Unit
14
Maximum Raw Capacity with Expansion Units
224 TB (16 TB HDD X 14, Capacity may vary by RAID types)
External Ports
Expansion
USB 3.2 Gen 1 x 3
Network
2.5 Gigabit Ethernet x 2
HDMI Output
HDMI 2.0a x1
Others
System Fan
70mm x 1
Infrared Receiver
Yes
Power Supply Unit / Adapter
65W x1
Input Power Voltage
100V to 240V AC
Certification
FCC, CE, VCCI, BSMI, C-TICK
Operation
Power Consumption
17 W (Operation); 10.5 W (Disk Hibernation); 1.3 W (Sleep Mode)2
Noise Level
18.6dB (HDD idle)
Operation Temperature
5°C~35°C (40°F~95°F)
Humidity
5% to 95% RH
Size and Weight
Size
170(H) x 114(W) x 230(D) mm
Weight
1.6 kg / 3.53 lbs
Package Contents
Package Contents
AS5202T UnitQuick Installation GuideAC Power Cord x1AC Power Adapter x1RJ-45 LAN Cable (Cat 5e) x2Flat Head Screw (for 2.5″ HDD) x8
1 Hard disks not included.2 Test HDD: WD Red 3 TB HDD3 USB Wi-Fi dongle not included.4 You must first enable real time transcoding for these files in order to play them.5 Metadata (e.g. title) may not be able to displayed in iTunes.
Supported OS
Windows XP, Vista, 7, 8, 10, Server 2003, Server 2008, Server 2012
Configurable Disk Hibernation and Sleep Mode Wait Time
Configurable Time Period for Sleep Mode Activation
Automatic Sleep
iSCSI Read/Write (5GB file, 1GbE x 1)/IP-SAN
Maximum Targets: 256
Maximum LUNs: 256
Maximum Snapshot Versions of a Single LUN: 256
Target Masking
LUN Mapping
ISO File Mounting
Supports MPIO
Persistent (SCSI-3) Reservations
Network
TCP/IP (IPv4 & IPv6)
Link Aggregation: Supports 802.3ad and Six Other Modes for Load Balancing and/or Network Failover
Jumbo Frame (MTU)
VLAN
EZ Connect
Wireless Network
DDNS and EZ-Router
Supports Wake-on-LAN (WOL)
Backup Solutions
Rsync (Remote Sync) Backup
Cloud Backup
FTP Backup
External Backup
One Touch Backup
System Administration
Log Type: System Log, Connection Log, File Access Log
Real-time Online User Monitor
Real-time System Monitor
User Quota
Virtual Drive (ISO Mounting, Maximum 16)
UPS Support
Network Recycle Bin
Share folder-based
Maintains original directory structure and file permission
On-click restore
Supports scheduled emptying
Filtering rules
File size
File extension
Access Control
Maximum Number of Users: 4096
Maximum Number of Groups: 512
Maximum Number of Shared Folders: 512
Maximum Number of Concurrent Connections: 512
Supports Windows Active Directory
Supports Windows Active Directory / LDAP
ACL
Provides both Windows ACL and Linux ACL permission configuration methods
Can enable Windows ACL for specific shared folders
Comprehensive support for Windows’ 13 types of advanced permission settings
Can view Windows ACL permission settings from within ADM
Supports local users and groups
Exclusive permission reset function allows users to quickly restore default permissions
Security
AES 256-Bit Encryption
Firewall: Prevent Unauthorized Access
Alert Notifications: E-mail, SMS
Encrypted Connections: HTTPS, FTP over SSL/TLS, SSH, SFTP, Rsync over SSH
Built-in Hardware Encryption Engine: AS70/64/63//62/61/31/32/10 Series
Network Defender
Auto black list
Trusted list
Black/White list
Supports IP/IP range/geolocation
External Devices
Supports USB External Storage Devices
USB Wi-Fi Dongle Support
Bluetooth Dongle/Speaker Support
USB Printer Support
USB DAC Support
CD ROM Drive/DVD ROM Drive/Blu-Ray ROM
Pricing Notes:
Pricing and product availability subject to change without notice.
Featured Apps:
Antivirus
Scheduled Scans
Automatic Virus Definition Updates
Quarantine Infected Files
ASUSTOR Portal (HDMI Local Output)
Supports Output for 4 Channels of Megapixel IP Camera Video Feeds
Support Chrome / Chromium browsers.
Downloads from Chrome/Chromium Automatically Saved to the NAS
Power Control Settings: Power on, Sleep, Restart and Wake via Remote
Customizable ASUSTOR Portal Desktop Wallpaper
Add Shortcuts to Favorite Websites
Increased TV Compatibility via Overscan and Resolution Settings
Max. Resolution: 1080p(HD)/2160p(4k)
ASUSTOR Portal comes preloaded with Netflix and Youtube. Users can install the supplementary URL-Pack to get access to even more popular video streaming sites such as Plex, Vimeo and Youku.
After installing URL-Pack-Social, users will be able to choose between social media sites such as Facebook, Google+, Hangouts, Pinterest, Twitter, Linkedin, WhatsApp and Instagram.
VirtualBox
Virtual Machines are Able to run the Following Operating Systems: Windows, Linux, Solaris, Mac OS X
Physical NAS Network Port can be Designated for use by Specific Virtual Machine
Download Center
Supports BT(Torrent & Magnet Link), HTTP and FTP Downloads
Torrent Search
Choose Files Before a BT Task Starts
Customizable Download Schedule
Bandwidth Control
RSS Subscription and Automatic Downloading (Broadcatching)
ASUSTOR Download Assistant for Windows & Mac
AiDownload for Android with Push Notification
Smart Download Function
DataSync for Microsoft OneDrive
Each ADM account is able to individually log into a OneDrive account
Supports file filter and bandwidth limitation
Supported backup methods:
Sync
Directly upload files to OneDrive from NAS
Directly download files from OneDrive to NAS
DropBox
Each ADM Account is Able to Individually Log in to One Dropbox Account
Supported Backup Methods:
Sync
Dropbox to NAS
NAS to Dropbox
File Explorer
Web-based File Management
ISO File Mounting
Share Links
Task Monitor
Browse Files on Local PC
Thumbnail Previews
Data Access via External Optical Drive
Supports video playback
FTP Explorer
Directory Structure View with Drag & Drop Transfers
Task Monitor
Stopping of Transmission Task & Resumption of Connection
Encrypted Connections: Explicit over TLS, Implicit over TLS
FTP Site Manager
Bandwidth Control
Maximum Simultaneous Transfer Control
Google Drive
Each ADM Account is Able to Individually Log in to One Google Account
Supported Backup Methods:
Sync
Directly Upload Files to Google Drive from NAS
Directly Download Files from Google Drive to NAS
HiDrive
Support OneDrive and OneDrive Business
Each ADM Account is Able to Individually Log in to One HiDrive Account
Supported Backup Methods:
Directly Upload Files to HiDrive from NAS
Directly Download Files from HiDrive to NAS
Supported Protocols:
Rsync
FTP
FTPS
SFTP
Rsync + SSH
LooksGood
Built-in three main video library categories (Movies, TV Shows, Home Movies) and smart video sorting management
Efficient Global Search function allows for searches by keywords followed by the execution of more detailed searches according to the Movies, TV Shows, Home Movies categories and parameters such as actors, director, year, genre, writer, and title
Attractive poster wall and thumbnail display
Automatic production of video poster thumbnails
Centralized management and ability t o configure order of favorites and playlist history
System administrator can configur e video library and editing permissions according to user
Can configure access permissions to share withfriends and family
Multimedia conversion function
Self-defined smart folder for video conversions
Supports digital TV recordings via digital TV dongles
Easy streaming with Chromecast and DLNA
Support to watch videos in Apple TV via AiVideos tvOS version
PPTP Encryption: No MPPE, MPPE (40, 128 bit), Maximum MPPE (128 bit)
OpenVPN Port Control
OpenVPN Link Compression
VPN Server
Supported VPN Protocols: PPTP, OpenVPN, and L2TP/IPsec
View Current Connections & Ability to Disconnect Suspicious Connections
Comprehensive Connection Log
Pricing Notes:
Pricing and product availability subject to change without notice.
Setting up – Connecting – Manuals
Configure OS X Settings for Xfinity Internet
Access Xfinity Internet services with a Mac.
Configure the Internet Settings on Your Mac
From the Apple menu, select System Preferences.
On the System Preferences window, select the Network icon.
On the left pane, select your Ethernet card.
If the right pane is grayed out, click the Lock icon in the bottom left corner to log in with administrator credentials.
Click the TCP/IP tab; then from the Configure IPv4 menu, select Using DHCP.
Select the Apply Now button. At this point, your computer should obtain an IP address and all the other settings from the Comcast DHCP server. You should be able to surf the web, send and receive email, etc.
Still Unable to Connect?
Select the PPPoE tab and make sure that Connect using PPPoE is not selected.
Select the Proxies tab and make sure that none of the proxies are selected. Note: You may or may not select Use Passive FTP Mode (PASV); it does not affect your Internet connection or ability to go online. However, once you are connected, if you have trouble connecting to an FTP site, you may opt to change your selection at that time.
Your Internet settings are now configured correctly to connect to the Xfinity Internet service. Click Apply Now and you should be able to surf the web, send and receive email, etc.
Newer Macbook devices do not have a built-in Ethernet adapter. If using a third-party USB3-to-Ethernet or USBC-to-Ethernet adapter, you may have to download a driver from the manufacturer’s website before the adapters can work properly. Official Thunderbolt-to-Ethernet adapters sold by Apple do not need a driver.
Why can’t I connect to my NAS over the Internet via myasustor.com?
This, or any other website that you access via your web browser, or even your mail server, have a public IP that you don’t really see when you call it, because you prefer to call hostnames for reasons of clarity.
Even your router – the device connecting your LAN to the internet – has a WAN IP adress.
You can see your WAN IP in your router, or use web services.
Routers connect to the internet while protecting your LAN
Routers are designed to block unwanted incoming connections. They offer – over DHCP – LAN IP addresses to your local devices. You can however choose to open independent ports and allow forwarding from/to specific private adresses if required.
In computer networking, port forwarding or port mapping is an application of network address translation that redirects a communication request from one address and port number combination to another while the packets are traversing a network gateway, such as a router or firewall.
Updated pw for phpmyadmin added to newly created config.inc.php – then updated in wp_config so site can open.
Unable to detect any ASUSTOR NAS. Please ensure that:
1. The ASUSTOR NAS and your PC are under the same network segment.
This means that all devices are connected to the same router and are on the same subnet. Each device can communicate with every other with no restrictions at the network level.
To test the new settings, open a terminal window and login:
ssh nas
Shutdown your NAS
You can shutdown your NAS by pressing and holding the power button (on the front panel) until you hear a beep sound. You can also shutdown your NAS by selecting the ‘Shutdown’ option on the Synology DiskStation Manager’s ‘Options’ menu.
Q: Why can’t I detect my ASUSTOR NAS using ASUSTOR Control Center?
A: If you are having trouble detecting your NAS using ASUSTOR Control Center, please do
the following:
1. Please check your network connection:
Make sure that your computer and your NAS are part of the same local area network.
Check to see if the network LED indicator is lit. If you find that it is not lit, try connecting your Ethernet cable
to the other network port or try using a different Ethernet cable.
2. Please first disable any firewalls that may be running on your computer. Then try scanning for your NAS
again using ASUSTOR Control Center.
3. If you still cannot detect your NAS, please connect your NAS to your computer using the provided RJ-45
network cable and change your computer’s IP settings.
Select [Start] [Control Panel] [Network and Sharing Center]
How To Fix NAS Connection Failure In macOS Catalina!
One of the issues you may face after upgrading to macOS Catalina is a sudden failure to connect to your NAS. And no matter what you do – you just can’t access your NAS!
Fortunately, we have the solution for this problem. Here is our guide on how you can fix the NAS connection failure in macOS Catalina!
The macOS Catalina NAS Connection Issue
After upgrading to macOS Catalina, you may experience a sudden and persistent inability to connect to your NAS.
When you try to access your NAS, it will sayConnection Failed. And nothing happens when you click theConnect As…button – you don’t get the usual security pop-up to log into your NAS.
This is beyond annoying, because you have now lost all access to your NAS on macOS Catalina.
It is definitely a macOS Catalina issue because if you try using a Windows PC or an old macOS system, you will have no issue accessing the same NAS.
So what should you do?
The Cause Of The macOS Catalina NAS Connection Failure
From what we can tell, this issue is happening because Apple apparently dropped support for SMB1 and SMB 2.0 in macOS Catalina.
With many NAS defaulting to SMB1 for compatibility reasons, users will immediately lose the ability to connect once they upgrade to macOS Catalina.
Fixing Catalina NAS Connection Failure
The key is to set your NAS to use SMB 3.0 or later. This should not be a problem if your NAS is less than 5-6 years old, because SMB 3.0 was introduced in 2012.
In our guide, we are going to use the screenshots from our Synology NAS. But it should be similar in concept to NAS from other brands like QNAP and WD :
Log into your NAS
Go toControl Panel > File Services.
Under the SMB section, click onAdvanced Settings.
In the Advanced Settings pop-up, you will find that theMaximum SMB protocolis probably set to SMB1.
You need to set the Maximum SMB protocol toSMB3.
Now, this is not necessary, but while you are here, you might as well just set theMinimum SMB protocoltoSMB2 and Large MTU.
Then clickApplyat the bottom of the Advanced Settings pop-up to save the settings.
If it works, you should be able to connect to your NAS after you log out of your NAS. However, in many cases, you need to take an additional step by manually connecting to your NAS.
To do that, you need to selectGo>Connect to Server…in Finder.
Then key insmb://ServerName/(in our example, smb://DiskStation/) and clickConnect.
This should finally launch the security login pop-up, where you can key in your Name and Password to log into your NAS.
After logging into your NAS, you should have no issue accessing your NAS. You can also drag and add your NAS folders to the Favourites list in Finder.
WORDPRESS – SITE INSTALLED – CONFIG SECURITY – TRY FOR URL
Security for WP site – breakdown for overall NAS – URL ISSSUES
After enabling this, users on the NAS only need to create a www folder within the Home folder and upload their Web page to it in order to have their own dedicated URL. They can connect to their Web page using the following URL: http://NAS IP/~username.
TRY DDNS
– maybe if I can get it online – I can figure out what’s wrong
Installed phpmyadmin – new db – get wp running
Updated default user and pw for phpmyadmin – updated wp_config to match
Updated login rights / Registration / Change prefix for wp
File Permissions Updated
original file permissions
updated file permissions
Allow / Disallow Editing
– can be added / removed from the wp_config file as you need it to be – so when I’m working on it – I just switch it in wp_config then when I’m done – make them un-editable again –
Occasionally you may wish to disable the plugin or theme editor to prevent overzealous users from being able to edit sensitive files and potentially crash the site. Disabling these also provides an additional layer of security if a hacker gains access to a well-privileged user account.
Disable Plugin and Theme Update and Installation #Disable Plugin and Theme Update and Installation<br>
define( ‘DISALLOW_FILE_MODS’, true );
This will block users being able to use the plugin and theme installation/update functionality from the WordPress admin area. Setting this constant also disables the Plugin and Theme editor (i.e. you don’t need to set DISALLOW_FILE_MODS and DISALLOW_FILE_EDIT, as on its own DISALLOW_FILE_MODS will have the same effect).
Disalow Editor
define( ‘DISALLOW_FILE_EDIT’, true );
Note: The functionality of some plugins may be affected by the use of current_user_can(‘edit_plugins’) in their code. Plugin authors should avoid checking for this capability, or at least check if this constant is set and display an appropriate error message. Be aware that if a plugin is not working this may be the cause.
disallow – files such as readme.html, license.txt and wp-config-sample – etc. + turn off error display / reporting
the nas itself has a blacklist – country blocking etc. – some of this is in the wp
If you want more fine-grained control of how both xmlrpc.php and the REST API are configured on your site, you can install the REST XML-RPC Data Checker plugin.
Once you’ve installed and activated this plugin, go to Settings > REST XML-RPC Data Checker and click the XML-RPC tab.
If you use Jetpack or WP iOS or other apps which need WP XML-RPC functionality then check this. This will enable protection against WordPress pingback vulnerabilities. -More Info
NOTE: If you use Jetpack or the Wordpress iOS or other apps then you should enable this feature but leave the “Completely Block Access To XMLRPC” checkbox unchecked.
The feature will still allow XMLRPC functionality on your site but will disable the pingback methods.
This feature will also remove the “X-Pingback” header if it is present.
OR USE “Disable Pingback Functionality From XMLRPC” checkbox. – if can’t block it all
Listing of directory contents – w/o an index.php file you can browse dirctories – plugin wants – “AllowOverride” of the Indexes directive must be enabled in your httpd.conf file. –
Can you just add index.php to folders with out it?
No, they should not. If a plugin has vulnerabilities just because someone might see its directory structure it is broken. These bugs should be fixed.
Security through obscurity is a bug for itself.
It’s up to the site owner to allow or forbid directory browsing.
A second issue is performance: WordPress scans all PHP files in a plugin’s root directory to find plugin headers. This allows you to have multiple plugins under the same directory, eg /wp-content/plugins/wpse-examples/.
It also means that unused PHP files in that directory are wasting time and memory when WordPress is searching for plugins. One file will not do much harm, but imagine this is getting a common practice. You are creating a real problem in an attempt to fix a fictional.
trace and track
HTTP Trace attack (XST) can be used to return header requests and grab cookies and other information.
This hacking technique is usually used together with cross site scripting attacks (XSS).
Disabling trace and track on your site will help prevent HTTP Trace attacks.
forbid proxy comment posting
This setting will deny any requests that use a proxy server when posting comments.
By forbidding proxy comments you are in effect eliminating some SPAM and other proxy requests.
Check this if you want to apply the 6G Blacklist firewall protection from perishablepress.com to your site.
This setting will implement the 6G security firewall protection mechanisms on your site which include the following things:
Block forbidden characters commonly used in exploitative attacks.
Block malicious encoded URL characters such as the “.css(” string.
Guard against the common patterns and specific exploits in the root portion of targeted URLs.
Stop attackers from manipulating query strings by disallowing illicit characters.
….and much more.
The 6G Blacklist is a simple, flexible blacklist that helps reduce the number of malicious URL requests that hit your website.
The added advantage of applying the 6G firewall to your site is that it has been tested and confirmed by the people at PerishablePress.com to be an optimal and least disruptive set of .htaccess security rules for general WP sites running on an Apache server or similar.
Therefore the 6G firewall rules should not have any impact on your site’s general functionality but if you wish you can take a backup of your .htaccess file before proceeding.
A bot is a piece of software which runs on the Internet and performs automatic tasks. For example when Google indexes your pages it uses automatic bots to achieve this task.
A lot of bots are legitimate and non-malicous but not all bots are good and often you will find some which try to impersonate legitimate bots such as “Googlebot” but in reality they have nohing to do with Google at all.
Although most of the bots out there are relatively harmless sometimes website owners want to have more control over which bots they allow into their site.
This feature allows you to block bots which are impersonating as a Googlebot but actually aren’t. (In other words they are fake Google bots)
Googlebots have a unique indentity which cannot easily be forged and this feature will indentify any fake Google bots and block them from reading your site’s pages.
Attention: Sometimes non-malicious Internet organizations might have bots which impersonate as a “Googlebot”.
Just be aware that if you activate this feature the plugin will block all bots which use the “Googlebot” string in their User Agent information but are NOT officially from Google (irrespective whether they are malicious or not).
All other bots from other organizations such as “Yahoo”, “Bing” etc will not be affected by this feature.
Block Fake Googlebots: Check this if you want to block all fake Googlebots. -More Info
This feature will check if the User Agent information of a bot contains the string “Googlebot”.
It will then perform a few tests to verify if the bot is legitimately from Google and if so it will allow the bot to proceed.
If the bot fails the checks then the plugin will mark it as being a fake Googlebot and it will block it
A Hotlink is where someone displays an image on their site which is actually located on your site by using a direct link to the source of the image on your server.
Due to the fact that the image being displayed on the other person’s site is coming from your server, this can cause leaking of bandwidth and resources for you because your server has to present this image for the people viewing it on someone elses’s site.
This feature will prevent people from directly hotlinking images from your site’s pages by writing some directives in your .htaccess file.
A 404 or Not Found error occurs when somebody tries to access a non-existent page on your website.
Typically, most 404 errors happen quite innocently when people have mis-typed a URL or used an old link to page which doesn’t exist anymore.
However, in some cases you may find many repeated 404 errors which occur in a relatively short space of time and from the same IP address which are all attempting to access a variety of non-existent page URLs.
Such behaviour can mean that a hacker might be trying to find a particular page or URL for sinister reasons.
This feature allows you to monitor all 404 events which occur on your site, and it also gives you the option of blocking IP addresses for a configured length of time.
If you want to temporarily block or blacklist an IP address, simply click the “Temp Block” or “Blacklist IP” link for the applicable IP entry in the “404 Event Logs” table below.
Enable 404 IP Detection and Lockout:
Check this if you want to enable the lockout of selected IP addresses.
When you enable this checkbox, all 404 events on your site will be logged in the table below. You can monitor these events and select some IP addresses listed in the table below and block them for a specified amount of time. All IP addresses you select to be blocked from the “404 Event Logs” table section will be unable to access your site during the time specified. Time Length of 404 Lockout (min): 60
Set the length of time for which a blocked IP address will be prevented from visiting your site
You can lock any IP address which is recorded in the “404 Event Logs” table section below.
To temporarily lock an IP address, hover over the ID column and click the “Temp Block” link for the applicable IP entry. 404 Lockout Redirect URL:http://127.0.0.1
blocked visitor will be automatically redirected to this URL.
Brute Force – Rename login page – REPLACED by cookie _ secret word
An effective Brute Force prevention technique is to change the default WordPress login page URL.
Normally if you wanted to login to WordPress you would type your site’s home URL followed by wp-login.php.
This feature allows you to change the login URL by setting your own slug and renaming the last portion of the login URL which contains the wp-login.php to any string that you like.
By doing this, malicious bots and hackers will not be able to access your login page because they will not know the correct login page URL.
You may also be interested in the following alternative brute force prevention features:
Cookie Based Brute Force Prevention
Login Page White List
Cookie Brute Force Protect – this replaces the url replacement – so back to normal wp url
A Brute Force Attack is when a hacker tries many combinations of usernames and passwords until they succeed in guessing the right combination.
Due to the fact that at any one time there may be many concurrent login attempts occurring on your site via malicious automated robots, this also has a negative impact on your server’s memory and performance.
The features in this tab will stop the majority of Brute Force Login Attacks at the .htaccess level thus providing even better protection for your WP login page and also reducing the load on your server because the system does not have to run PHP code to process the login attempts.
Even though this feature should not have any impact on your site’s general functionality you are strongly encouraged to take a backup of your .htaccess file before proceeding.
If this feature is not used correctly, you can get locked out of your site. A backed up .htaccess file will come in handy if that happens.
To learn more about how to use this feature please watch the following video tutorial.
Advanced 0/20
This feature can lock you out of admin if it doesn’t work correctly on your site. You must read this message before activating this feature.
Enable Brute Force Attack Prevention:
Secret Word: – created
Choose a secret word consisting of alphanumeric characters which you can use to access your special URL. Your are highly encouraged to choose a word which will be difficult to guess.
Re-direct URL:
http://127.0.0.1
Specify a URL to redirect a hacker to when they try to access your WordPress login page.
My Site Has Posts Or Pages Which Are Password Protected: Check this if you are using the native WordPress password protection feature for some or all of your blog posts or pages.
My Site Has a Theme or Plugins Which Use AJAX: Check this if your site uses AJAX functionality.
Before using this feature you are required to perform a cookie test first. This is to make sure that your browser cookie is working correctly and that you won’t lock yourself out.
Enter one or more IP addresses or IP ranges you wish to include in your whitelist. Only the addresses specified here will have access to the WordPress login page. -More Info
Each IP address must be on a new line.
To specify an IPv4 range use a wildcard “*” character. Acceptable ways to use wildcards is shown in the examples below:
Example 1: 195.47.89.*
Example 2: 195.47.*.*
Example 3: 195.*.*.*
Or you can enter an IPv6 address (NOTE: ranges/wildcards are currently not supported for ipv6)
Example 4: 4102:0:3ea6:79fd:b:46f8:230f:bb05
Example 5: 2205:0:1ca2:810d::
Honeypot on login – enabled
This feature allows you to add a special hidden “honeypot” field on the WordPress login page. This will only be visible to robots and not humans.
Since robots usually fill in every input field from a login form, they will also submit a value for the special hidden honeypot field.
The way honeypots work is that a hidden field is placed somewhere inside a form which only robots will submit. If that field contains a value when the form is submitted then a robot has most likely submitted the form and it is consequently dealt with.
Therefore, if the plugin detects that this field has a value when the login form is submitted, then the robot which is attempting to login to your site will be redirected to its localhost address – http://127.0.0.1.
A large portion of WordPress blog comment SPAM is mainly produced by automated bots and not necessarily by humans.
This feature will greatly minimize the useless and unecessary traffic and load on your server resulting from SPAM comments by blocking all comment requests which do not originate from your domain.
In other words, if the comment was not submitted by a human who physically submitted the comment on your site, the request will be blocked.
This feature will implement a firewall rule to block all comment attempts which do not originate from your domain.
A legitimate comment is one which is submitted by a human who physically fills out the comment form and clicks the submit button. For such events, the HTTP_REFERRER is always set to your own domain.
A comment submitted by a spambot is done by directly calling the comments.php file, which usually means that the HTTP_REFERRER value is not your domain and often times empty.
This feature will check and block comment requests which are not referred by your domain thus greatly reducing your overall blog SPAM and PHP requests done by the server to process these comments.
all site features still seem to be working
http://169.254.1.3/wordpress/checkout/
Autoblock sammers / sammer list
This feature allows you to automatically and permanently block IP addresses which have exceeded a certain number of comments labelled as SPAM.
Comments are usually labelled as SPAM either by the Akismet plugin or manually by the WP administrator when they mark a comment as “spam” from the WordPress Comments menu.
NOTE: This feature does NOT use the .htaccess file to permanently block the IP addresses so it should be compatible with all web servers running WordPress.
Enable Auto Block of SPAM Comment IPs: Check this box if you want this plugin to automatically block IP addresses which submit SPAM comments.
Minimum number of SPAM comments:1
Specify the minimum number of SPAM comments for an IP address before it is permanently blocked.
Example 1: Setting this value to “1” will block ALL IP addresses which were used to submit at least one SPAM comment.
Example 2: Setting this value to “5” will block only those IP addresses which were used to submit 5 SPAM comments or more on your site.
list of spam comments
This section displays a list of the IP addresses of the people or bots who have left SPAM comments on your site.
This information can be handy for identifying the most persistent IP addresses or ranges used by spammers.
By inspecting the IP address data coming from spammers you will be in a better position to determine which addresses or address ranges you should block by adding them to the permanent block list.
To add one or more of the IP addresses displayed in the table below to your blacklist, simply click the “Block” link for the individual row or select more than one address using the checkboxes and then choose the “block” option from the Bulk Actions dropdown list and click the “Apply” button.
Buddy press / BBPress not used
Security
ADM Defender
ADM Defender can protect your NAS from malicious Internet attacks, ensuring the security of your system.
Firewall: Here you can block specific IP addresses or only allow specific IP addresses to access your NAS.
Trusted List: The IP(s) specified in the trusted list will not be blocked by the black list or after multiple failed login attempts.
Auto Black List: After enabling this function, the client IP address will be blocked if there are too many unsuccessful login attempts within the specified time period.
Black and White List: The Black and White list can be defined using IP address, range, and geolocation. If you wish to define the Black and White list using geolocation, please first install the Geo IP Database App.
About the Black and White List
The Black and White List can protect you from malicious attacks and prevent hackers from trying to access your NAS. Supported protocols are as follows:
ADM system login (HTTP & HTTPS)
Windows File Service (CIFS/SAMBA)
Apple Filing Protocol (AFP)
File Transfer Protocol (FTP)
Secure Shell (SSH)
File Detection Scan
If given an opportunity hackers can insert their code or files into your system which they can then use to carry out malicious acts on your site.
Being informed of any changes in your files can be a good way to quickly prevent a hacker from causing damage to your website.
In general, WordPress core and plugin files and file types such as “.php” or “.js” should not change often and when they do, it is important that you are made aware when a change occurs and which file was affected.
The “File Change Detection Feature” will notify you of any file change which occurs on your system, including the addition and deletion of files by performing a regular automated or manual scan of your system’s files.
This feature also allows you to exclude certain files or folders from the scan in cases where you know that they change often as part of their normal operation. (For example log files and certain caching plugin files may change often and hence you may choose to exclude such files from the file change detection scan)
To perform a manual file change detection scan click on the button below.
Click the button below to view the saved file change results from the last scan.
had several sites that were compromised during the past week because of the file manager plugin vulnerability. On sites where I have fully deactivated and deleted the plugin, I am seeing that files in the: wp-content/uploads/wp-file-manager-pro/fm_backup/ directory still exist and are being updated. (Especially: index.html)
If the plugin has been removed is it ok to delete these directories? And why would the index.html file be updated once the plugin is removed?
Viewing 1 replies (of 1 total)
Plugin Authormndpsingh287 (@mndpsingh287)
1 month, 2 weeks ago
Hi @edash22
Firstly, we truly apologize for the inconvenience this has caused you.
Yes, you can remove these directories if you don’t need them. This directory contains the backups of your wp-content directory that you have created with File Manager. The file index.html is a direct directory access protector file. You can delete it as well.
If you need any further assistance we can schedule a call for personalized support on your issue. Reach out to us at https://filemanagerpro.io/contact.
https://app.malcare.com/ | http://see.spiffy-nas-ty.space/ – better luck with outer IP
– this may not work because of the setup – inability for the NAS to reach public IP
http://see.spiffy-nas-ty.space/ vs http://169.254.1.3/wordpress/product/all-purpose-balm/
all site functions work with IP – checkout etc. are not correct with see.spiffy-nas-ty.space
Must be a better way to ust the url – so that it does not get screwy
No matter if it is a personal blog, company website, or e-commerce website, ASUSTOR NAS’s Web Server function lets you host your very own website
right on the NAS. Furthermore, you can use App Central to download Apps for
content management, database management, bulletin board systems and more,
allowing you to easily set up all different types of websites in just minutes.
To host your website on your NAS, please
follow the instructions below:
1. Select [Services] -> [Web Server]. Select the [Enable Web server] checkbox found under the Web Server heading and then click [Apply].
2. In order to check that the setting has been successfully applied, enter the ASUSTOR NAS’s IP address into a Web browser and connect to it. You should be able to see the “Congratulations!”
page as shown in the graphic below. This page is located in the ASUSTOR NAS’s “Web”
shared folder. In order to host a website on the ASUSTOR NAS, you must upload
it to the “Web” shared folder of the NAS.
3. Now click on the Virtual Host tab and then click on the button.
4. The Virtual Host window will
now appear. Fill out the required fields and then click [OK] once you are done. Your website should now be successfully hosted on the NAS.
*Please note that if
you need to fine tune the Web server on the NAS, you can use terminal service
to connect to the NAS and configure .ini for apache server or php. Please refer
to following link for instructions on connecting to the NAS’s terminal service:
Note: This function may differ depending on the NAS model in use. Here you can configure the server name, LAN and Wi-Fi settings. Other settings include IP address, DNS server and default gateway.
Server Name: An online name for your NAS.
Default Gateway: The default gateway that you wish to use.
DNS Server: Here you can set the DNS server that you wish to use. Should you choose to obtain your IP address via DHCP the system will automatically obtain the available DNS servers for you. If you choose to manually enter an IP address then you will have to manually enter a DNS server as well.
Reminder: Using an invalid DNS server will affect some network related functions. (i.e., Download Center). If you are uncertain about how to proceed, please choose to obtain your IP address automatically.
Sign In Page: Under Sign In Page Style you will be able to configure the following
Lease time (hr): Enter a value (1-720) to set the DHCP lease time (in hours) for IP addresses assigned to DHCP clients.
Primary/Secondary DNS: Enter the Primary/Secondary DNS address for DHCP clients.
Domain Name: Set the domain name for the DHCP server.
Subnet List: You can add subnets here.
DHCP Client List: Here you can check the list of DHCP clients and their network configurations (e.g. MAC address, IP address, hostname, and the amount of time left before the DHCP lease expires).
DHCP Reservations: If you want a client to always receive the same IP address during DHCP lease renewal, you can add the client to the DHCP reservation list.
Proxy: Here you can enable proxy server connections, allowing the NAS to connect to the internet via a proxy server.
Proxy Server: The address of the proxy server you wish to connect to. (Supports HTTP and HTTPS
Port: The communications port of the proxy server.
Proxy Server: The address of the proxy server you wish to connect to. (Supports HTTP and HTTPS
PPPoE
If you are using DSL or a cable modem to connect to the Internet and your Internet service provider uses PPPoE (Point to Point Protocol over Ethernet), you can go to [Settings] > [Network] > [PPPoE] and enter your account information to allow the system to connect to the Internet without having to go through a router. If you wish to get more information about PPPoE, please contact your Internet service provider or network administrator.
VPN
Here you can let your ASUSTOR NAS become a VPN client, and via PPTP or Open VPN, connect to a VPN server to access a virtual private network. ASUSTOR NAS supports the use of different connection settings files, allowing you to connect to the VPN server of your choice. The ASUSTOR VPN client currently supports the two most common connection protocols: PPTP and OpenVPN.
Link Aggregation
Link aggregation (a.k.a. trunking, bonding or teaming) combines two or more network connections into one. To use link aggregation, your Ethernet cables must be connected to the same network switch and your network switch must support link aggregation.
Dynamic DNS for NAS
1. YDNS
https://ydns.io/
Based out of Germany, YDNS is a freeDdynamic DNS provider that only asks for you to sign up with your email address and password before you start using it. Unless you’re using a custom domain name, you’re restricted to using the “ydns.eu” domain, but for many people that will suffice.
Hi all, I had a NAS ( synology ds216j ) in my LAN with ip address assigned on 192.168.0.20
I got a new router from my provider and the local address is now 192.168.1.X, so obiously now I cannot see the NAS.
I wonder how to get on the NAS to change the parameter assigned before in DHCP instead so that can be recognized now.
I know I could:
Reset the NAS by default but I just dont want to delete all the configuration done before.
I know I could mount back the old modem.
Is there anything else I can do? If I connect one computer in my LAN (in wifi) and I connect the ethernet cable from the computer to the NAS i get this configuration:
Connection-specific DNS Suffix . :
Link-local IPv6 Address . . . . . : fe80::1422:438f:4ba7:1bdb%15
Autoconfiguration IPv4 Address. . : 169.254.27.219
Subnet Mask . . . . . . . . . . . : 255.255.0.0
Default Gateway . . . . . . . . . :
Wireless LAN adapter Wi-Fi:
Connection-specific DNS Suffix . :
Link-local IPv6 Address . . . . . : fe80::d4c:3381:30bf:1c00%9
IPv4 Address. . . . . . . . . . . : 192.168.1.186
Subnet Mask . . . . . . . . . . . : 255.255.255.0
Default Gateway . . . . . . . . . : 192.168.1.1
Comcast Business IP Gateway and Static IP overview
https://business.comcast.com/help-and-support/internet/using-a-static-ip/
IntroductionComcast’s IP Gateway (Comcast’s firewall, switch and static IP-capable modem) is all you need to take advantage of a static IP and built-in firewall features. Find out what you can do with a static IP, along with the additional features available on the IP Gateway device. Static IP support, in most cases, includes support for both IPv4 and IPv6.
Please note, some earlier makes and models of Comcast Business IP Gateways do not support IPv6.
Using a static vs. a dynamic IP addressA static IP address is manually configured. This manual configuration prevents the IP address from changing. A static IP allows you to run an email, web or VPN server, from a device behind the Comcast modem (Gateway), with a static routable (publicly accessible) IP address.
A dynamic IP address, for IPv4 and IPv6, has the potential to change at any given interval. A lease time is usually assigned to the IP address and once it has expired a different IP address is assigned to the device.
Static IPv4 prefixes can be ordered in blocks of 1, 5, and (in select areas) 13, for an additional monthly charge. Static IPv6 prefixes are allocated in a single size for all Business IP Gateway customers, the size being a /56. A /56 provides several millions of addresses. Once ordered, a custom configuration containing the static IP range is remotely configured to the Comcast IP Gateway with no additional hardware required for you to connect it to your equipment (server, firewall, etc.). For IPv6, no custom configuration is required on the Business IP Gateway since the provisioning of the IPv6 prefix is managed by Comcast.
Use your static IPs to run a server – IPv4Your server or firewall (connected to the modem) should be configured with the following settings:
IP address: The IP addresses which can be assigned to equipment connected to the Comcast IP Gateway will be given to you once it is built.
Subnet mask:
A CIDR /30 (or 1 static IP) – 255.255.255.252
A /29 (or 5 static IPs) – 255.255.255.248
A /28 (or 13 static IPs) – 255.255.255.240
Gateway IP: This is a static IP address, in addition to the number of ordered IPs, which is assigned to the Comcast modem (IP Gateway). By default, it is the last IP in the range loaded on the Comcast Gateway.
Primary DNS: 75.75.75.75
Secondary DNS: 75.75.76.76
Use your static IPs to run a server – IPv6Your server or firewall (connected to the modem) should be configured with the following settings:
IP address: Identify the IPv6 prefix assigned to the LAN of the Business IP Gateway, this is typically a /64 even though your gateway is allocated a /56. From the /64 configured on the LAN of the Business IP Gateway select the bits desired for the interface identified on the server (essentially the lower 64 bits of the IPv6 address).
The mask for the LAN of the Business IP Gateway will most always be a /64.
Default IPv6 Gateway will be dynamically learned by IPv6 compliant and enabled hosts connected to the LAN of the Business IP Gateway. The default gateway for IPv6 is no longer learned or transmitted using DHCPv6, IPv6 router discovery is how hosts or nodes learn their IPv6 default gateway. The IPv6 default gateway will be the IPv6 link local address of the LAN interface of the Business IP Gateway.
Primary DNS: 2001:558:feed::1
Secondary DNS: 2001:558:feed::2
Comcast IP Gateway featuresThe Comcast IP Gateway’s firewall offers:
Support for both IPv4 and IPv6
Stateful packet inspection (SPI)
Port forwarding (up to 35 forwards)
Port blocking
Port triggering (up to 50)
Keyword blocking (up to 50)
The Comcast firewall will not provide DQOS control or bandwidth usage data. For those functions we recommend that you add your own router with firewall capabilities.
Comcast can configure the Gateway according to your specifications. However, we will only disable your firewall and DHCP service on the Gateway upon request.
Port forwardingPort forwarding allows internet traffic sent to a specified public IP address on the specified port to be redirected to a local private IP address. Port forwarding rules can be set up that will allow you to run servers from your private LAN IP subnet.
Port forwarding is not applicable to static public IPs outside of local devices configured for 1-to-1 NAT (forwards all traffic destined to the specified public IP to a private IP).COVERS NETWORK SETTINGS MORE THOROUGHLY – THAN REST –
Port forwarding allows you to use the static IP address that is configured to the Comcast IP Gateway (gateway IP) effectively giving you an additional IP address beyond the number of addresses paid for.
Network your computersYou can attach your computers to the IP Gateway using it as your DHCP server for IPv4 and IPv6. Stateless IPv6 address auto-configuration is also supported by Business IP Gateways. It has 4 available ports and can support up to 256 for IPv4 (by default, this is set to 189) networked devices, however bandwidth needs may necessitate limiting the number of simultaneous connections.
Accessing the Gateway deviceYou can make changes while onsite by following the instructions in the Comcast IP Gateway User’s Guide. (See the “Ports blocked by Comcast Business Internet” article for additional information.)
Comcast does not provide remote access to the Gateway. While offsite, you will need to call Comcast Business Customer Support at 1-800-391-3000 to make changes.
Although modern routers handle most functions automatically, some applications will require you to manually forward a port to that application or device. Fortunately, it’s really simple to do if you know where to look.
What Is Port Forwarding?
There are plenty of projects we’ve covered that use your computer as a server for other devices. When you’re inside of your network, most things will work fine. But some apps, if you want to access them when you’re outside your network, make things significantly hairier. Let’s start by taking a look at why that is.
How Your Router Handles Requests and Uses Ports
Here’s a map of a simple home network. The cloud icon represents the greater internet and your public, or forward-facing, Internet Protocol (IP) address. This IP address represents your entire household from the oustide world–like a street address, in a way.
The red address 192.1.168.1 is the router address within your network. The additional addresses all belong to the computers seen at the bottom of the image. If your public IP address is like a street address, think of the internal IP addresses like apartment numbers for that street address.
The diagram raises an interesting question which you may not have thought about before. How does all the information from the internet get to the right device inside the network? If you visit howtogeek.com on your laptop how does it end up on your laptop and not your son’s desktop if the public-facing IP address is the same for all devices?
This is thanks to a wonderful bit of routing magic known as a Network Address Translation (NAT). This function occurs at the router level where the NAT acts like a traffic cop, directing the flow of network traffic through the router so that a single public IP address can be shared among all the devices behind the router. Because of the NAT, everyone in your household can request web sites and other internet content simultaneously and it will all be delivered to the right device.
So where do ports come into this process? Ports are an old but useful holdover from the early days of network computing. Back in the day, when computers could only run one application at a time, all you had to do was point one computer at another computer on the network to connect them as they would be running the same application. Once computers became sophisticated to run multiple applications, early computer scientists had to wrestle with the issue of ensuring applications connected to the right applications. Thus, ports were born.
Some ports have specific applications which are standards throughout the computing industry. When you fetch a web page, for example, it uses port 80. The receiving computer’s software knows that port 80 is used for serving http documents, so it listens there and responds accordingly. If you send an http request over a different port—say, 143—the web server won’t recognize it because it’s not listening there (although something else might be, like an IMAP email server which traditionally uses that port).
Other ports don’t have pre-assigned uses, and you can use them for whatever you want. To avoid interfering with other standard-abiding applications, it’s best to use larger numbers for these alternate configurations. Plex Media Server uses port 32400, for example, and Minecraft servers use 25565—both numbers that fall into this “fair game” territory.
Each port can be used via either TCP or UDP. TCP, or Transmission Control Protocol, is what’s used most commonly. UDP, or User Datagram Protocol, is less widely used in home applications with one major exception: BitTorrent. Depending on what is listening, it’ll be expecting requests to be made in either one or the other of these protocols.
Why You Need to Forward Ports
So why exactly would you need to forward ports? While some applications take advantage of NAT to set their own ports and handle all the configuration for you, there are still plenty of applications that do not, and you’ll need to give your router a helping hand when it comes to connecting services and applications.
In the diagram below we’re starting with a simple premise. You’re on your laptop somewhere in the world (with an IP address of 225.213.7.32), and you want to connect to your home network to access some files. If you simply plug your home IP address (127.34.73.214) into whatever tool you’re using (an FTP client or remote desktop application, for example), and that tool doesn’t take advantage of those advanced router features we just mentioned, you’re out of luck. It won’t know where to send your request, and nothing will happen.
This, by the way, is a great security feature. If somebody connects to your home network and they aren’t connected to a valid port, you want the connection to get rejected. That’s the firewall element of your router doing its job: rejecting unwelcome requests. If the person knocking on your virtual door, however, is you, then the rejection isn’t so welcome and we need to do a little tweaking.
To solve that problem, you want to tell your router “hey: when I access you with this program, you’ll need to send it to this device at this port”. With those instructions in place, your router will make sure you can access the right computer and application on your home network.
So in this example, when you’re out and about and using your laptop, you use different ports to make your requests. When you access your home network’s IP address using port 22, your router at home knows that this should go to 192.168.1.100 inside the network. Then, the SSH daemon on your Linux installation will respond. At the same time, you can make a request over port 80, which your router will send to the web server at 192.168.1.150. Or, you can try to remotely control your sister’s laptop with VNC, and your router will connect you to your laptop at 192.168.1.200. In this way, you can easily connect to all the devices you’ve set up a port forward rule for.
The usefulness of port forwarding doesn’t end there though! You can even use port forwarding to change existing services’ port numbers for clarity and convenience. For example, let’s say you have two web servers running on your home network and you want one to be readily and obviously accessible (e.g. it’s a weather server you want people to be able to easily find) and the other web server is for a personal project.
When you access your home network from the public-facing port 80, you can tell your router to send it to port 80 on the weather server at 192.168.1.150, where it will be listening at port 80. But, you can tell your router that when you access it via port 10,000, that it should go to port 80 on your personal server, 192.168.1.250. This way, the second computer doesn’t have to be reconfigured to use a different port, but you can still manage traffic effectively—and at the same time by leaving the first web server linked to port 80 you make it easier for people accessing your aforementioned weather server project.
Now that we know what port forwarding is and why we might want to use it, lets’ take a look at some small considerations regarding port forwarding before diving into actually configuring it.
Considerations Before Configuring Your Router
There are a few things to keep in mind before sitting down to configure your router and running through them in advance is guaranteed to cut down on frustration.
Set Static IP Address for Your Devices
First and foremost, all your port forwarding rules will fall apart if you’re assigning them to devices with dynamic IP addresses assigned by your router’s DHCP service. We dig into the details of what DHCP is in this article on DHCP vs. static IP address assignments, but we’ll give you the quick summary here.
RELATED:
Your router has a pool of addresses that it reserves just for handing out to devices as they join and leave the network. Think of it like getting a number at a diner when you arrive—your laptop joins, boom, it gets IP address 192.168.1.98. Your iPhone joins, boom, it gets address 192.168.1.99. If you take those devices offline for a period of time or the router is rebooted, then the whole IP address lottery happens all over again.
Under normal circumstances this is more than fine. Your iPhone doesn’t care which internal IP address it has. But if you’ve created a port forwarding rule that says your game server is at a certain IP address and then the router gives it a new one, that rule won’t work, and nobody will be able to connect to your game server. In order to avoid that, you need to assign a static IP address to each network device you’re assigning a port forwarding rule to. The best way to do that is through your router—check out this guide for more info.
Know Your IP Address (and Set a Dynamic DNS Address)
In addition to using static IP assignments for the relevant devices inside your network, you also want to be aware of your external IP address—you can find it by visiting whatismyip.com while on your home network. Although its possible you might have the same public IP address for months or even over a year, your public IP address can change (unless your internet service provider has explicitly given you a static public-facing IP address). In other words, you can’t rely on typing in your numeric IP address into whatever remote tool you’re using (and you can’t rely on giving that IP address to a friend).
RELATED:
Now, while you could go through the hassle of manually checking that IP address each time you leave the house and intend to work away from home (or every time your friend is going to connect to your Minecraft server or the like), that’s a big headache. Instead, we highly recommend you set up a Dynamic DNS service which will allow you to link your (changing) home IP address to a memorable address like mysuperawesomeshomeserver.dynu.net. For more information how to set up a dynamic DNS service with your home network, check out our full tutorial here.
Pay Attention to Local Firewalls
Once you set up the port forwarding on the router level, there is a possibility that you may need to tweak firewall rules on your computer too. For example, we’ve gotten a lot of emails over the years from frustrated parents setting up port forwarding so their kids can play Minecraft with their friends. In almost every case, the problem is that despite setting up the port forwarding rules on the router correctly, somebody ignored the Windows firewall request asking if it it was OK if the Java platform (that runs Minecraft) could access the greater internet.
Be aware that on computers running local firewall and/or anti-virus software that includes firewall protection, you’ll likely need to confirm the connection you’ve set up is okay.
Step One: Locate the Port Forwarding Rules on Your Router
Exhausted by all the networking lessons? Don’t worry, it’s finally time to set it up–and now that you know the basics, it’s pretty simple.
As much as we’d love to provide exact instructions for your exact router, the reality is that every router manufacturer has their own software, and how that software looks can even vary between router models. Rather than attempt to capture every variation, we’ll highlight a few to give you an idea what the menu looks like and encourage you to look up the manual or online help files for your particular router to find the specifics.
In general, you’re going to be looking for something called—you guessed it—“Port Forwarding”. You may have to look through the different categories to find it, but if your router is any good, it should be there.
For comparison, here’s what the port forwarding menu looks like on D-Link DIR-890L router:
As you can see, the complexity between the two views varies greatly, even on the same hardware. In addition, the location is completely different within the menus. As such it’s most useful if you look up the exact instructions for your device using the manual or a search query.
Once you’ve located the menu it’s time to set up the actual rule.
Step Two: Create a Port Forwarding Rule
After learning all about port forwarding, setting up a dynamic DNS for your home IP address, and all the other work that went into this, the important step—creating the actual rule–is pretty much a walk in the park. In the port forwarding menu on our router, we’re going to create two new port forwarding rules: one for the Subsonic music server and one for a new Minecraft server we just set up.
Despite the differences in location on different router software, the general input is the same. Almost universally, you’ll name the port forwarding rule. It’s best to simply name it what the server or service is and then append it if need be for clarity (e.g. “Webserver” or “Webserver-Weather” if there is more than one). Remember the TCP/UDP protocol we talked about at the beginning? You’ll also need to specify TCP, UDP, or Both. Some people are very militant about finding out exactly what protocol every application and service uses and matching things up perfectly for security purposes. We’ll be the first to admit that we’re lazy in this regard and we almost always just pick “Both” to save time.
Some router firmware, including the more advanced DD-WRT we’re using in the screenshot above, will allow you to specify a “Source” value which is list of IP addresses you’re restricting the port forward to for security purposes. You can use this feature if you wish, but be forewarned it introduces a whole new host of headaches as it presumes that remote users (including you when you’re away from home and friends who are connecting in) have static IP addresses.
Next you’ll need to put in the external port. This is the port that will be open on the router and facing the internet. You can use any number you want here between 1 and 65353, but practically most of the lower numbers are taken up by standard services (like email and web servers) and many of the higher numbers are assigned to fairly common applications. With that in mind, we’d recommend picking a number above 5,000 and, to be extra safe, using Ctrl+F to search this long list of TCP/UDP port numbers to make sure you’re not selecting a port that conflicts with an existing service you’re already using.
Finally, put in the internal IP address of the device, the port you on that device, and (if applicable) toggle the rule on. Don’t forget to save the settings.
Step Three: Test Your Port Forwarding Rule
The most obvious way to test if your port forward worked is to connect using the routine intended for the port (e.g. have your friend connect their Minecraft client to your home server), but that’s not always an immediately available solution if you’re not away from home.
Thankfully, there’s a handy little port checker available online at YouGetSignal.com. We can test to see if our Minecraft server port forward took simply by having the port tester try to connect to it. Plug in your IP address and the port number and click “Check”.
You should receive a message, as seen above, like “Port X is open on [Your IP]”. If the port is reported as closed, double check both the settings in the port forwarding menu on your router and your IP and port data in the tester.
It’s a wee bit of a hassle to set up port forwarding, but as long as you assign a static IP address to the target device and set up a dynamic DNS server for your home IP address, it’s a task you only need to visit once to enjoy hassle free access to your network in the future.
Change the IP address assignment method for Online Devices.
If DHCP is selected, the Gateway’s DHCP server will automatically assign the IP address.
If Reserved IP is selected, the IP address will be fixed without DHCP operation and you’ll need to manually enter the IP address. The IP address must be within the DHCP IP address pool. To find your IP address range, go to Gateway > Connection > Local IP Network.
Reserved IP addresses can be assigned to any device that acts as a server or that requires a fixed IP address.
Gateway > Connection > Local IP Configuration
Manage your home network settings.
Gateway address: Enter the IP address of the Gateway.
Subnet Mask: The subnet mask is associated with the IP address. Select the appropriate subnet mask based on the number of devices that will be connected to your network.
DHCP Beginning and Ending Addresses: The DHCP server in the Gateway allows the router to manage IP address assignment for the connected devices.
DHCP Lease time: The lease time is the length of time the Gateway offers an IP address to a connected device. The lease is renewed while it is connected to the network. After the time expires, the IP address is freed and may be assigned to any new device that connects to the Gateway.
Managing your home network settings is now easier than ever. Visit xfinity.com/myxfi to view and manage your list of connected/offline devices. You can block access to your home network for any device, among many other features and settings.
When you have a lot of devices on your network—computers, , and —it can be annoying to constantly look up their IP addresses when you need to access them remotely. Make your life easier with a set of unchanging, static IP addresses for those machines.
Your router assigns IP addresses to devices on your network using , or Dynamic Host Configuration Protocol. As you connect new devices to the network, they’ll be assigned the next IP address in the pool, and if a device hasn’t connected in a few days, its IP address will “expire” so it can be assigned to something else.
For everyday use, this is perfectly fine, and you’ll never even notice it happening in the background. But if you regularly , to turn your computer on from across the house, or perform other advanced networking tasks, DHCP can become an annoyance.
It’s hard to remember which IP address is assigned to which device, and if they ever expire, you have to look it up all over again. That’s where a static IP address comes in handy.
Understanding Static IP Addresses
Instead of letting your router assign whatever IP address is free at any given time, you can assign specific IP addresses to the devices you access frequently. For example, I have my home server set to 192.168.1.10, my main desktop to 192.168.1.11, and so on—easy to remember, sequential, and unchanging.
You can assign these static IP addresses on the device itself—using, say, Windows’ network settings on each computer—or you can do it at the router level. Doing it at the router level is called assigning a DHCP reservation, though many people (and even some routers) still refer to it as a “static IP address.”
DHCP reservations allow you to easily set everything up in one place with all your computers left at their default settings. Your computer will ask for an IP address via DHCP, and your router will assign it the one you’ve reserved, with your computer being none the wiser.
How to Set Up a DHCP Reservation
To set up a DHCP reservation, —usually by typing its IP address in your browser’s navigation bar—and log in. (If you’re using a mesh Wi-Fi system with an app instead of a config page, you’ll find these settings in the app.)
The location is different for every config page, but you’re looking for something called “DHCP reservations,” “static IP addresses,” or something similar—on my Asus router, it’s in the LAN settings category.
To assign a reservation, you’ll need the MAC address of the device in question. This is a unique string of characters that identifies a particular network adapter, and you can usually find it in your router’s list of connected devices. Make sure you’re getting the MAC address for the correct network adapter—if you have both Ethernet and Wi-Fi on your computer, you’ll have one MAC address for each.
On your router’s config page, enter an easy-to-remember label for the device (like “Whitson’s Desktop PC”), the MAC address, and your desired IP address. Save your changes, and repeat the process for any other IP addresses you want to reserve.
From then on, those devices should have your reserved IP addresses assigned to them, and you’ll never have to look them up again.
In the following example, we wil configure
ASUSTOR NAS’s VPN Server.
Before you begin, log in to ADM from your
Web browser and then search for and install [VPN Server] from [App
Central].
1.1 Enabling and configuring PPTP connections
STEP
1
Enabling
PPTP service: You can use the toggle found under [PPTP] to enable PPTP service.
STEP
2
Adding
a new user: Select [Privilege] → [User] → [Add]. In the graphic
below, we have chosen to add the account “vpn” as an example. After you have
chosen the user that wish to add, click on [Save].
Select the [PPTP] checkbox and then click on [Apply]. Now, the “vpn” user account
will be able to utilize PPTP connections.
STEP
3
Configuring
advanced settings: Select [Settings] → [PPTP]. Here, you will be
able to configure settings for [Dynamic
IP address], [Max. client number], [Authentication], [Max. MTU], [Max. MRU] and [DNS server].
Make sure to click on [Apply] after
you have made any changes to the settings.
1.2 Enabling and configuring OpenVPN connections
STEP
1
Enabling
OpenVPN service: You can use the toggle found under [OpenVPN] to enable OpenVPN service.
STEP
2
Adding
a new user: Select [Privilege] → [User] → [Add]. In the graphic
below, we have chosen to add the account “vpn” as an example. After you have
chosen the user that wish to add, click on [Save].
Select the [OpenVPN] checkbox and then click on [Apply]. Now, the “vpn” user account
will be able to utilize PPTP connections.
STEP
3
Configuring
advanced settings: Select [Settings] → [OpenVPN]. Here, you will be
able to configure settings for [Dynamic
IP address], [Transmission Protocol], [Port], [Max. client number], [Checksum
(Digest)], [Encryption (Cipher)], [DNS server], [Redirect gateway] and [VPN
link compression]. Make sure to click on [Apply] after you have made any changes to the settings.
Note: Click on the [Download
configuration file] button to download the configuration file for
OpenVPN clients. You must import this file to your VPN client in order to
successfully create OpenVPN connections.
1.3 Enabling and configuring L2TP connections
STEP 1
Enabling L2TP service: Enable XL2TP service by using the provided toggle button.
STEP 2
Add new users: Select [Privilege] >[User] >[Add]. In this example we add the user “vpn” by selecting its checkbox and then clicking on [Save].
For the added user, select the [XL2TP] checkbox and then click on [Apply]. This will allow the user to use XL2TP connections.
STEP 3
Modifying advanced settings: Click on [Settings] >[XL2TP]. Here you will be able to configure settings such as the dynamic IP address, max client number, max MTU, DNS server and key. Make sure to click on [Apply] once you are done modifying the settings.
2. Connecting to Your VPN
Server Using Windows and Mac
2.1 Connecting to your VPN server via
PPTP
2.1.1 Connecting using Windows 7
STEP
1
Select [Control
Panel] → [All
Control Panel Items] → [Network and Sharing Center] → [Set
up a new connection or network].
STEP
2
Select [Connect
to a workplace] → [Next].
STEP
3
Select [No, create a new connection] → [Next].
STEP
4
Select [Use my Internet connection (VPN)].
STEP
5
Enter
the IP address of your ASUSTOR NAS into the [Internet address] field and then click on [Next].
STEP 6
Enter a username and password in the appropriate fields and then click
on [Connect]. You will now be able
to access your ASUSTOR NAS through Windows.
Note: If you are unable to connect to your
VPN server, please ensure that your VPN settings are identical to your VPN
server settings.
For example, in the graphic below, we check
that the [Type of VPN] is Point to Point Tunneling Protocol (PPTP),
that the [Data encryption] method is PAP or MS-CHAP v2 and that they have been allowed under the [Allow these protocols] radio button.
2.1.2 Connecting using Windows 10
STEP
1
Click the [Network] icon on the bottom right-hand
side of the system tray and select [Network
Settings].
STEP
2
Select [VPN] from the left panel, and click [Add a VPN connection].
STEP
3
Select Windows (built-in) in [VPN
Provider] field. Type in the name for this VPN connection and enter the IP address of your ASUSTOR NAS into the [Server name or address] field. Choose PPTP as the [VPN Type], enter the username/password in the
appropriate fields, and click [Save].
STEP
4
Now you can see that the
newly created VPN connection has appeared. To specify the authentication protocol,
please click [Change adapter options].
Right click on the VPN
connection and select [Properties].
STEP
5
Select the [Security] tab, check the [Allow these protocols] option, then
choose the same protocol (PAP or MS-CHAP v2) as the VPN server on your ASUSTOR
NAS. Click [OK] to save the
settings.
STEP
6
To establish the VPN
connection, go to the Windows [NETWORK
& INTERNET] > [VPN] page,
select an existing VPN profile and click [Connect].
2.1.3 Connecting using a Mac
STEP 1
From the Apple menu, select [System Preferences…].
STEP 2
Select [Network].
STEP
3
Click on the [ + ] button and then select [VPN] for Interface, [PPTP] for VPN Type,
fill in the Service Name as “VPN (PPTP)”
and then click on [Create].
STEP
4
Enter your [Server Address] and [Account
Name], select “None” for [Encryption] and then click on [Connect]. Please ensure that your VPN
client settings and VPN server settings are identical.
STEP 5
Enter the name and password for
your VPN server and then click on [OK].
STEP
6
You should now be successfully connected and should be able to access
your ASUSTOR NAS using your Mac. You can disconnect the connection at any time
by clicking on the [Disconnect] button.
2.2 Connecting to your VPN server via OpenVPN
2.2.1 Connecting using Windows 7
STEP
1
Download and
install the OpenVPN program from the OpenVPN website.
STEP
2
Extract the OpenVPN configuration file that you
have downloaded from your ASUSTOR NAS’s VPN server (see section 3.2). Open the [asustor.ovpn] file, change the IP
address for the VPN server and then save the changes. In the graphic below, we
have changed the IP address of the VPN server to 172.16.2.102.
STEP
3
Copy the [asustor.ovpn] and [ca.crt] files to the (C:Program
FilesOpenVPNconfig) folder.
STEP
4
Open [OpenVPN GUI].
You
should now be able to see the [OpenVPN
GUI] icon in your system tray. Double-click on it.
STEP
5
Enter the username and
password for your ASUSTOR NAS VPN server and then click on [OK].
STEP
6
After
successfully connecting, you should be able to see that the OpenVPN GUI icon in
your system tray has turned green. You should now be able to access your
ASUSTOR NAS using Windows.
If
you have already download the configuration file from your ASUSTOR NAS’s VPN
server, click on [OpenVPN
Configuration(s)].
You should now be able to
see the newly created [Empty Tunnelblick
VPN Configuration] folder on your desktop. Copy the configuration file from
your ASUSTOR NAS’s VPN server to this folder.
Open
the [asustor.ovpn] file and then
change the IP address for your ASUSTOR NAS VPN server.
After
saving the changes to the file, change the name of the folder to “ASUSTORVPN.tblk”.
Tunnelblick
VPN configurations should have now been installed successfully.
STEP
4
From
the Mac menu bar, click on the [Tunnelblick] icon and then select [Connect
ASUSTORVPN].
STEP
5
After
successfully connecting, you will be able to see the connection status and time
in the menu bar as shown in the graphic below.
2.3 Configuring the gateway and routing for the VPN client
When
using a VPN client, the system will automatically forward your VPN server’s default gateway.
Under these circumstances, you will not be able to connect to the Internet.
Therefore, we must change the VPN gateway and routing in order to connect to
the Internet.
2.3.1 Configurations using Windows 7
STEP
1
Right-click
on your VPN connection and then select [Properties].
Select [Internet
Protocol Version 4 (TCP/IPv4)] and
then click on [Properties].
STEP
2
Click
on [Advanced…].
STEP
3
Uncheck
the [Use default gateway on remote
network] checkbox.
2.3.2 Configurations using Windows 10
STEP
1
Click the
Windows icon on the bottom left-hand side of the taskbar, select [All apps] from
the list, and scroll down to find [Windows Powershell].
Click on it to execute the program.
STEP
2
Issue
the ”Get-VpnConnection” command
to list the information of your existing VPN connections.
By
default, the value of the SplitTunneling parameter is False, which means all
network traffic of this VPN client will be forwarded to the VPN server’s
gateway.
STEP
3
Issue the “Set-VpnConnection
-Name “ASUSTOR VPN” -SplitTunneling $True”
command to change the value of the SplitTunneling parameter to True.
Note: The “ASUSTOR NAS” string in the example above
must be replaced to your own VPN connection name.
STEP
4
Issue the ”Get-VpnConnection” command again to verify that the change has been made successfully.
2.3.3 Configurations using a Mac
STEP
1
Open [Terminal] and
then enter the command “ifconfig-a”. You
will now be able to see your VPN server’s IP address. Note that the Mac operating
system only provides this gateway for connecting to a VPN server and cannot
connect to the Internet. Therefore, we will have to manually enter the IP
address for the ASUSTOR NAS.
STEP
2
Please
replace either 10.0.1.6 or 10.0.1.5 with the IP address of the ASUSTOR NAS.
Executing the commands below will allow you to connect to the Internet.
sudo route
add –net 172.16.1.216/16 10.0.1.6
OR
sudo route
add –net 172.16.1.216/16 10.0.1.5
2.4 Connecting to your VPN server via L2TP/IPsec
2.4.1 Connecting using Windows 7
If you are using an ASUS router, please manually open port 500 under port forwarding. From the router configuration interface, select [WAN] [Virtual Server / Port Forwarding] tab [Port Forwarding List]. Add a new item to the Port Forwarding list by entering the following information:
Service Name: A name of your choice
Port Range: 500
Local IP: Your NAS’s IP address
Local Port: 500
Protocol: UDP
Click on the [Add] button after you have entered all the information. Port 500 should now be opened.
STEP 1
In Windows, go to [Control Panel] > [All Control Panel Items] > [Network and Sharing Center] and then click on [Set up a new connection or network].
STEP 2
Select [Connect to a workplace] then click [Next].
STEP 3
Select [No, create a new connection] and then click [Next].
STEP 4
Select [Use my Internet connection (VPN)]
STEP 5
In the [Internet address:] field enter your ASUSTOR NAS’s IP address or domain address.
STEP 6
Enter your [User name] and [Password] and then click on [Connect]. You will now be able to access the local network resources on your ASUSTOR NAS via Windows.
Note: If you are unable to connect to the VPN Server, please ensure that the [VPN Settings] and [VPN Server] settings are identical.
Using the graphic below as an example, we check that the [Type of VPN] is L2TP/IPSec, that the data encryption method is either PAP or MS-CHAP v2 and that [Allow these protocols] radio button has been selected.
STEP 7
Click on [Start] and run “regedit”.
STEP 8
Navigate to HKEY_LOCAL_MACHINE\SYSTEM\CurrentControlSet\Services\PolicyAgent and then right click and select [New] > [DWORD (32 bit) Value].
STEP 9
For the Value name enter “AssumeUDPEncapsulationContextOnSendRule”and set the Value data to “2” and then click [OK]. Restart your computer.
STEP 10
After restarting your computer, go to [Control Panel]> [Network and Internet] > [Network Connections] to see that your new connection is successful.
2.4.2 Connecting using Windows 10
If you are using an ASUS router, please manually open port 500 under port forwarding. From the router configuration interface, select [WAN] > [Virtual Server / Port Forwarding] tab > [Port Forwarding List]. Add a new item to the Port Forwarding list by entering the following information:
Service Name: A name of your choice
Port Range: 500
Local IP: Your NAS’s IP address
Local Port: 500
Protocol: UDP
Click on the [Add] button after you have entered all the information. Port 500 should now be opened.
STEP 1
Click on the [Network] icon in the system tray and then click on [Open Network and Sharing Center].
STEP 2
Click on [Set up a new connection or network].
STEP 3
Select [Connect to a workplace] then click [Next].
STEP 4
Click on [Use my Internet connection (VPN)].
STEP 5
Enter the Internet address, Destination name and then select the [Allow other people to use this connection] checkbox. Click on [Create] once you are done.
STEP 6
Click on [Change adapter settings]. Right-click on the VPN connection that you have just created and select [Properties]. Click on the [Security] tab and change the [Type of VPN] to L2TP/IPsec. Click on [Advanced settings], make sure the [Use preshared key for authentication] radio button is selected and then enter your key (Your key can be found from the ADM interface by selecting [VPN Server] > [Settings] > [L2TP]). Click on [OK] once you are done.
STEP 7
Click on [Start] and run “regedit”.
STEP 8
Navigate to HKEY_LOCAL_MACHINE\SYSTEM\CurrentControlSet\Services\PolicyAgent and then right click and select [New] > [DWORD (32 bit) Value].
STEP 9
For the Value name enter “AssumeUDPEncapsulationContextOnSendRule”and set the Value data to “2” and then click [OK]. Restart your computer.
2.4.3 Connecting using a Mac
If you are using an ASUS router, please manually open port 500 under port forwarding. From the router configuration interface, select [WAN] > [Virtual Server / Port Forwarding] tab > [Port Forwarding List]. Add a new item to the Port Forwarding list by entering the following information:
Service Name: A name of your choice
Port Range: 500
Local IP: Your NAS’s IP address
Local Port: 500
Protocol: UDP
Click on the [Add] button after you have entered all the information. Port 500 should now be opened.
STEP 1
Click on the [Apple] icon and then select [System Preferences…].
STEP 2
Click on [Network].
STEP 3
Click on the + button, select [VPN] for “Interface:”, [L2TP Over IpSec] for “VPN Type”, enter a Service Name and then click on [Create].
STEP 4
Enter your [Server Address] and [Account Name]. Click on [Authentication Settings…] and enter the User Account Password and Shared Secret (The Shared Secret is the key that can be found from the ADM interface by selecting [VPN Server] > [Settings] >[XL2TP]).
Click [OK] and then click on [Connect].
STEP 5
Enter the VPN Server account name and password and then click on [OK].
STEP 6
After successfully connecting, you will be able to access the resources on your ASUSTOR NAS local network. If you wish to disconnect the VPN connection, you can click on the [Disconnect] button.
2.4.4 Connecting using an Android device
STEP 1
Select [Settings]>[More] > [VPN].
STEP 2
Click on [Add VPN profile], enter a name of your choice, select [L2TP/IPSEC PSK] for “Type” and enter your NAS’s IP address or URL into the [Server Address] field. Choose an encryption method and then select [Save] to complete configurations.
STEP 3
Select the created VPN profile. After entering the username and password, select [Connect] to create the VPN connection.
After creating the connection, selecting the profile again will allow you to view the associated information for the connection.
2.4.5 Connecting using an iOS device
The configurations in the following example were done using an iPhone 6.
STEP 1
In iOS, select [Settings] >[General] > [VPN].
STEP 2
Select [Add a VPN configuration…] and then enter the following information:
Type: L2TP
Description: A description of your choice
Server: Your NAS’s IP address or URL
Account: Your account name
Password: The password for the account
Secret: They key that can be found in ADM interface by selecting [VPN Server]>[Settings]>[XL2TP]
Once you have finished entering the information select [Done].
STEP 3
After completing the VPN profile you can select the status toggle to activate the VPN connection.
Upon completion of this course you should be able to:
1. Have a basic understanding of iSCSI
2. Be able to use the iSCSI service with your ASUSTOR NAS
PREREQUISITES
Course Prerequisites:
None
Students are expected to have a working knowledge of:
N/A
1. Introduction to iSCSI
1.1 What is iSCSI?
iSCSI, (Internet Small Computer System Interface), is an Internet Protocol (IP)-based storage networking standard for linking data storage facilities. It
offers high expandability and low implementation costs. Through existing network infrastructure and iSCSI you can use your NAS to expand existing storage
space or have it act as a backup destination.
iSCSI consists of two ends, a target and an initiator. The initiator (on your computer) functions as an iSCSI client and is used to search for iSCSI hosts
and to set up targets. Targets are storage resources that are located on an iSCSI server. An iSCSI target is often a dedicated network-connected hard disk
storage device (ASUSTOR NAS).
Note: A single target should not be simultaneously connected to multiple clients or initiators.
2. Using the iSCSI service with your computer
In the following example we will take you through the process of creating an iSCSI volume on the ASUSTOR NAS and then connecting to it using a PC.
2.1Creating an iSCSI target and LUN
STEP 1
Open [Storage Manager]. Click on [Create] button under the iSCSI section.
STEP 2
The Create New iSCSI Device window will now appear. Select the [An iSCSI target with one LUN] radio button and click [Next].
STEP 3
Enter a name for your Target and then click [Next].
STEP 4
Select the [No authentication required] radio button and click [Next].
In our example we have chosen not to use authentication. However, if you wish to verify a user’s identity you can choose to use CHAP authentication. If
you choose to use CHAP authentication, a CHAP password must first be entered from the initiator for verification before it can connect to the target.
STEP 5
Select the [Create a new iSCSI LUN] radio button. Fill in a name for your LUN and select a size for it. Once, you’re done click [Next].
Note: A LUN (logical unit number) represents an individually addressable (logical) SCSI device that is part of a physical SCSI device (target). In an
iSCSI environment, LUNs are essentially numbered disk drives. An initiator negotiates with a target to establish connectivity to a LUN. LUNs represent
slices of your hard disks.
STEP 6
Look over a final summary of your settings. Once you’re done, confirm these settings by clicking [Finish].
STEP 7
You will now be able to see the new target that you have created.
You will be able to see the LUN that you have created in the iSCSI LUN section.
2.2 Connecting to the target using the iSCSI initiator
STEP 1
In Windows, click [Start] and then click on [Control Panel].
STEP 2
Select [Administrative Tools].
STEP 3
Double-click on [iSCSI Initiator].
STEP 4
Under the Targets tab enter the IP address of your NAS into the [Target:] field and then click on [Quick Connect…].
STEP 5
You will now see the Quick Connect dialog box and that your target has been connected to. Click on [Done].
STEP 6
Once again, you will see that the target has been connected to under the [Discovered targets] heading. Click on [OK].
2.3 Initializing the new disk volume
STEP 1
In Windows click [Start]. Then right-click on [Computer] and select [Manage].
STEP 2
The Computer Management window will now appear. Click on [Disk Management] under [Storage] in the left hand panel. The Initialize Disk
dialog box will now appear. Make sure the disk is selected and then click [OK] to initialize it.
STEP 3
You will now see that the new disk is online but unallocated. Right-click on it and select [New Simple Volume…].
STEP 4
The New Simple Volume Wizard will now appear. Follow the steps provided by the wizard to complete the creation of the new disk volume.
STEP 5
This is what the information for the disk should look like once the new volume has been created.
STEP 6
The new volume is now ready for use. It will appear as a hard disk drive as in the picture below. You can use it as if it were a hard drive on your
computer and any data that you store on it will be saved to the ASUSTOR NAS.
Note: Please remember that a single target should not be simultaneously connected to multiple clients or initiators.
3. Using iSCSI LUN Snapshots
A snapshot of an iSCSI LUN is a point-in-time, read-only copy of an iSCSI LUN. It saves a significant amount of time and storage capacity when compared
with traditional LUN backups. Each individual LUN supports up to 256 snapshot versions. In the following example we will show you how to create and restore
an iSCSI LUN snapshot.
3.1 Manually creating an iSCSI LUN snapshot
STEP 1
Open [Storage Manager]. Go to the [iSCSI LUN] tab, select a LUN that supports snapshots, click on [LUN Snapshot] and then choose [Create].
STEP 2
Click [Next] to proceed.
STEP 3
Now you will be able to configure the snapshot name, description (optional), and snapshot lock status. If the snapshot is locked, it cannot be removed
manually or automatically. Click [Finish] to complete creation of the snapshot.
Upon completion, you will see the newly created snapshot in the LUN Snapshot table as shown in the graphic below.
3.2 Scheduled creation of iSCSI LUN snapshots
STEP 1
Open [Storage Manager]. Go to the [iSCSI LUN] tab, select a LUN that supports snapshots, click on [LUN Snapshot] and then choose [Schedule].
STEP 2
Define the schedule in accordance with your own requirements and then click [OK] when you are done.
STEP 3
You will now be able to see the schedule details in the [Snapshot Manager].
3.3 Restoring from an iSCSI LUN snapshot
STEP 1
Open [Storage Manager]. Go to the [iSCSI LUN] tab, select a LUN that has existing snapshot(s), click on [LUN Snapshot] and then choose [Management].
STEP 2
Select the snapshot you want to restore, click on [Action] and then choose [Restore].
STEP 3
You will be provided with some extra settings before starting the restoration. You can configure the settings according to your requirements. After you
click [OK], the iSCSI LUN will be rolled back with the selected snapshot.


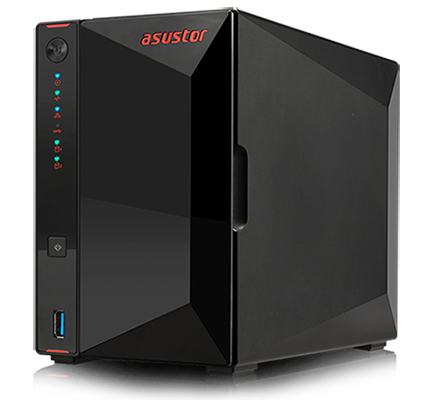
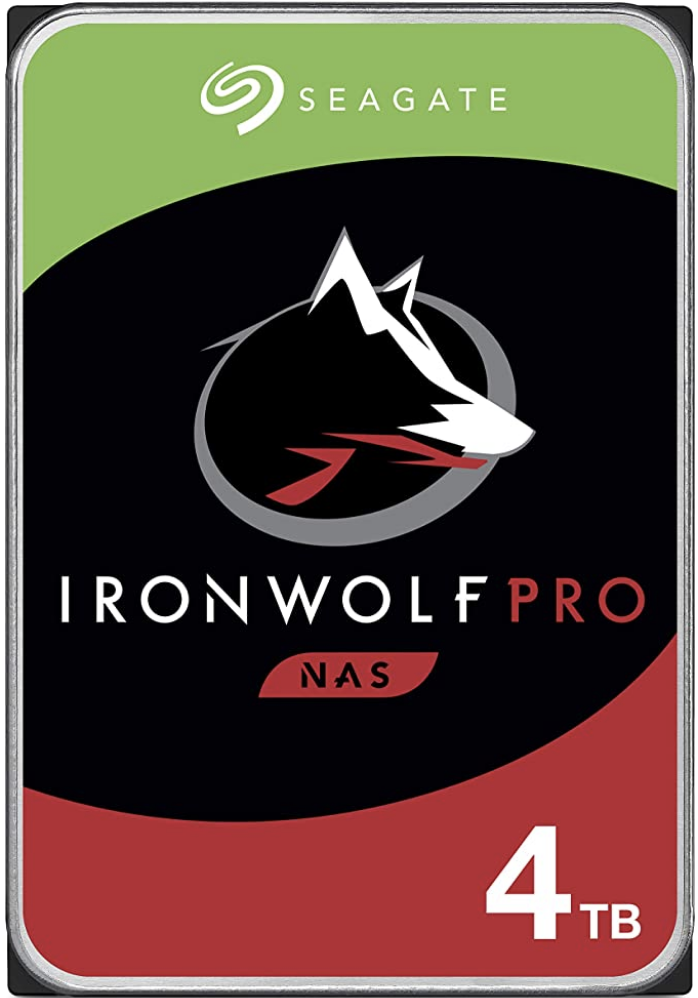
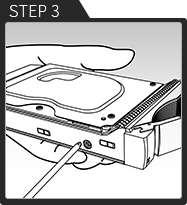
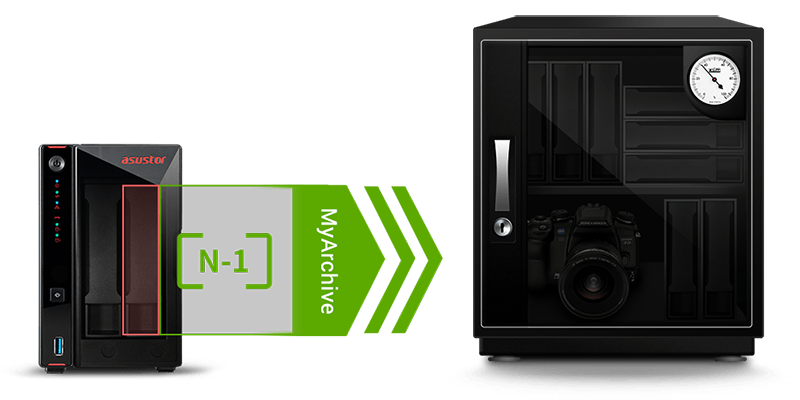


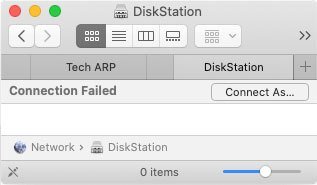

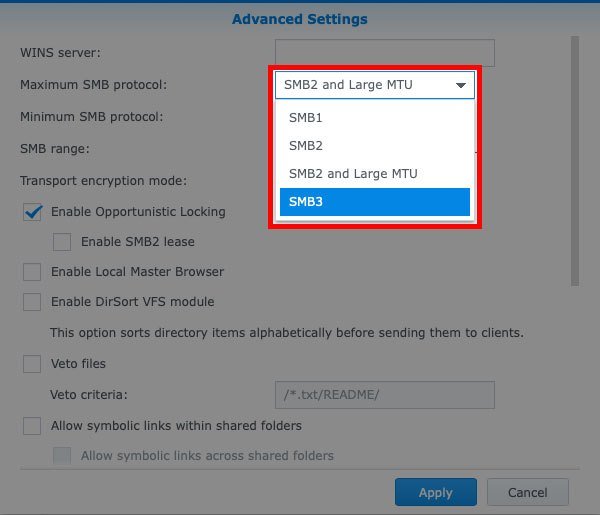
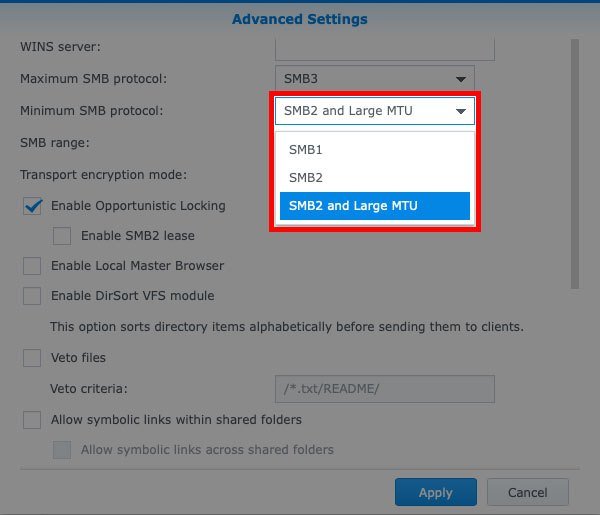

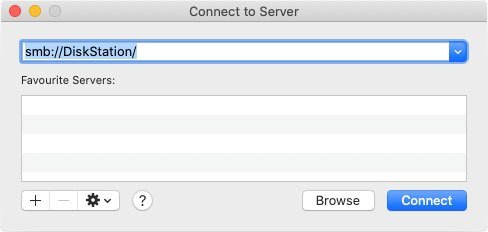

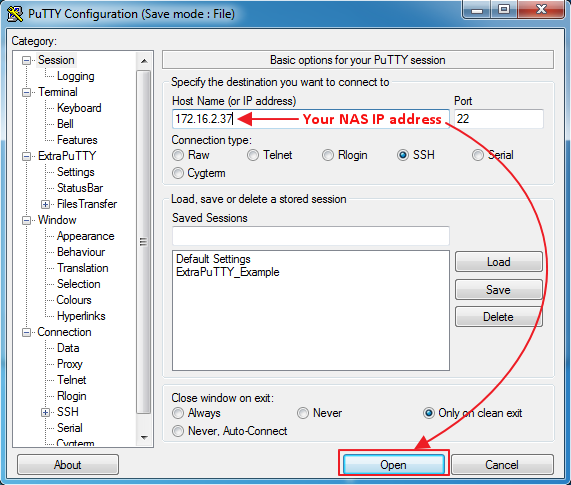
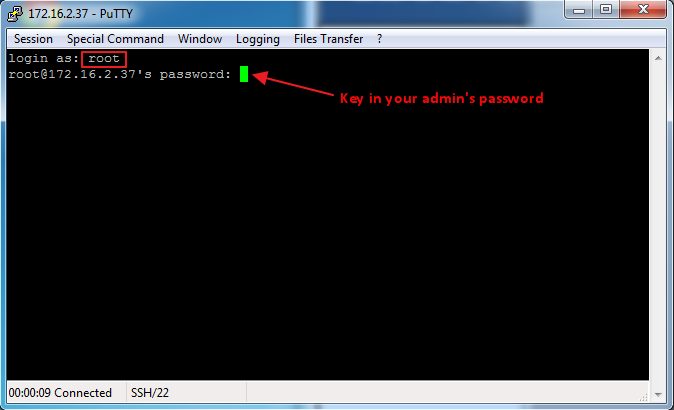
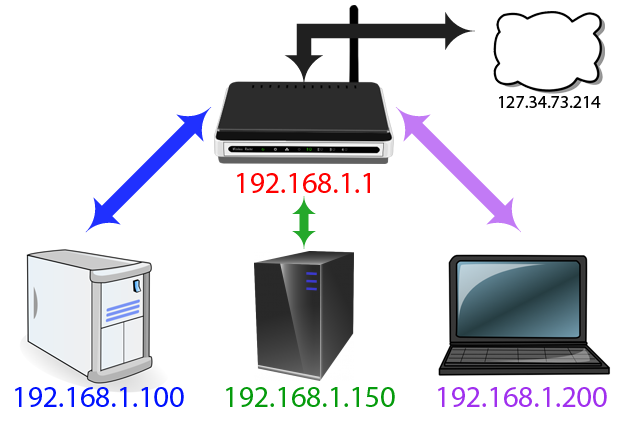
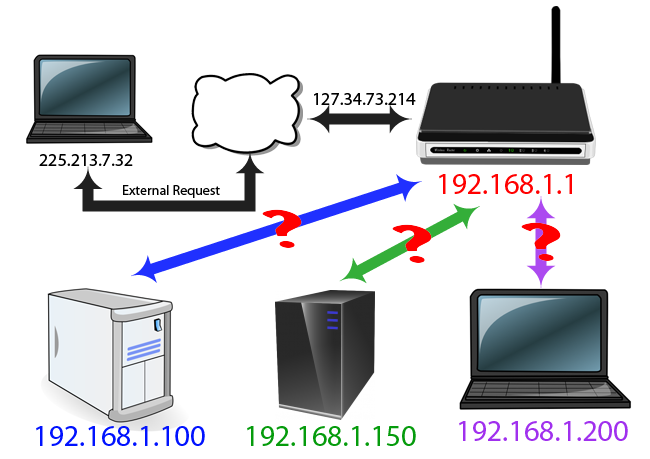
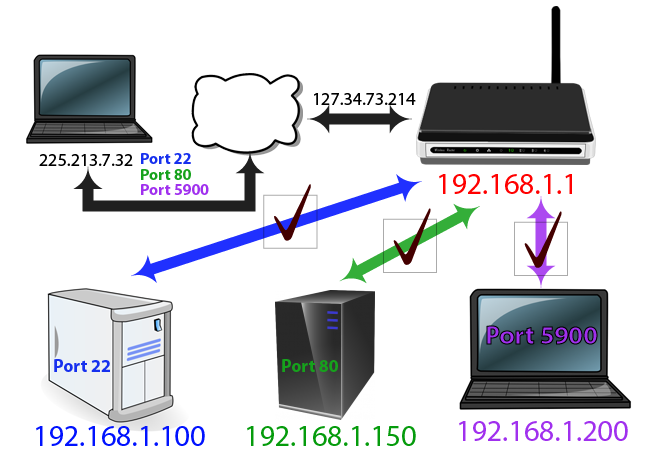
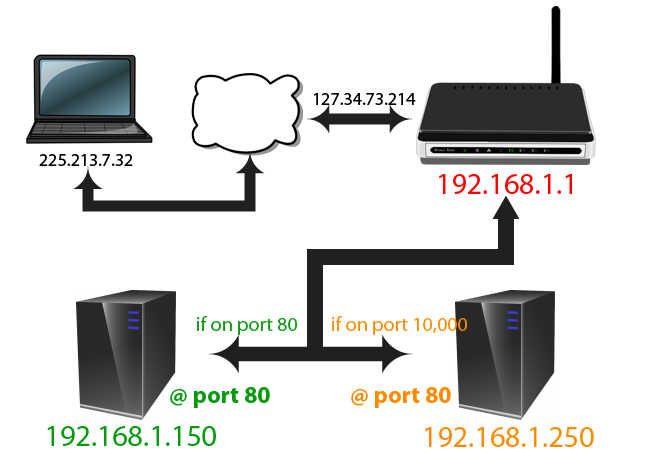
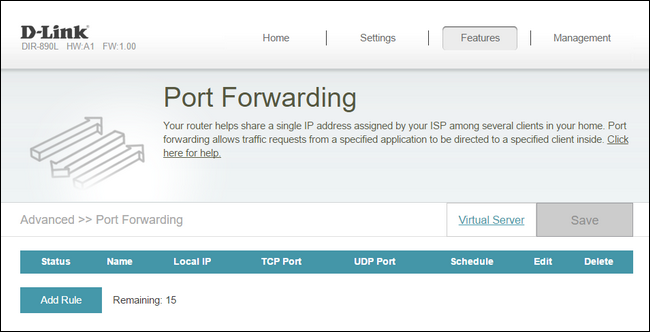


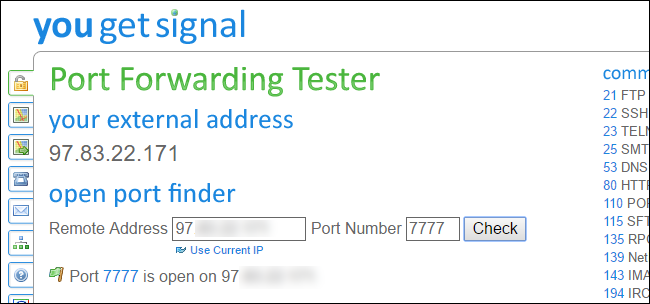
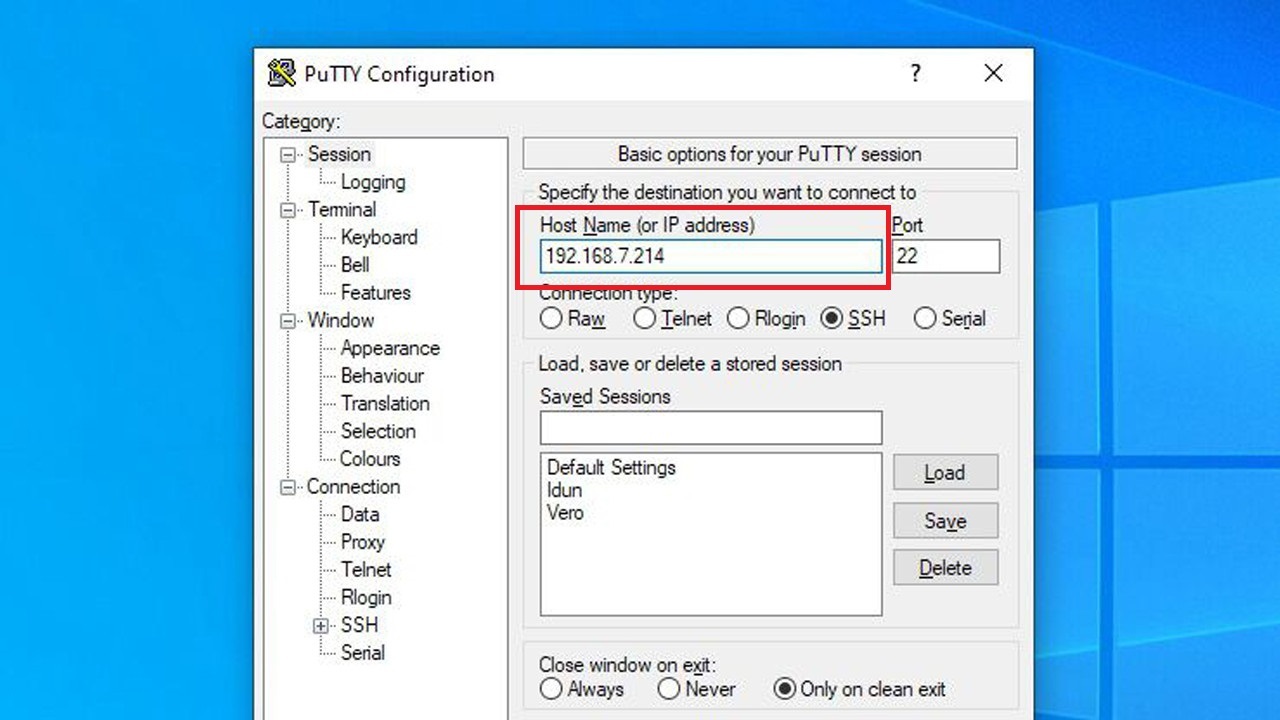


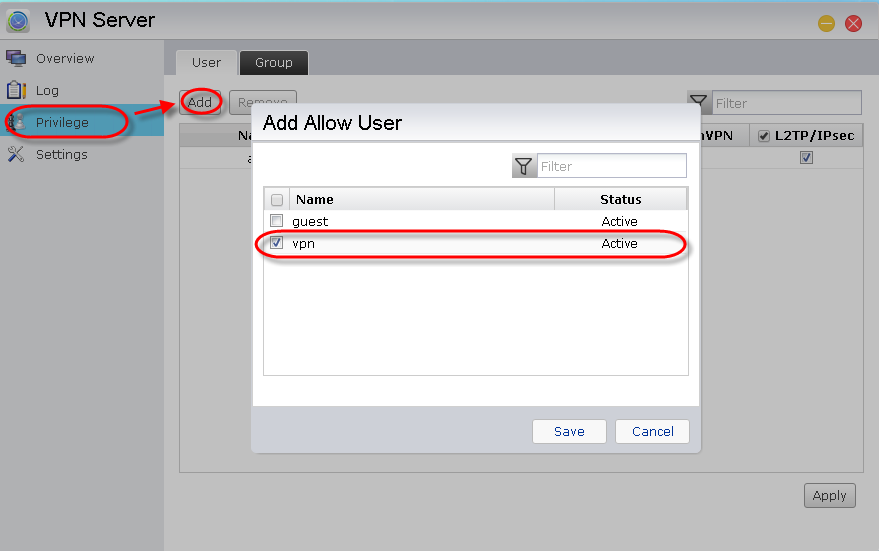

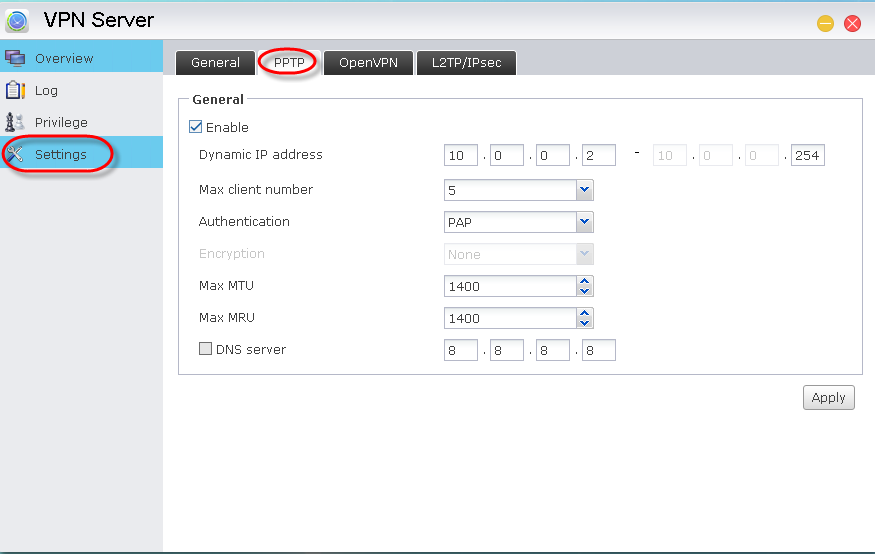
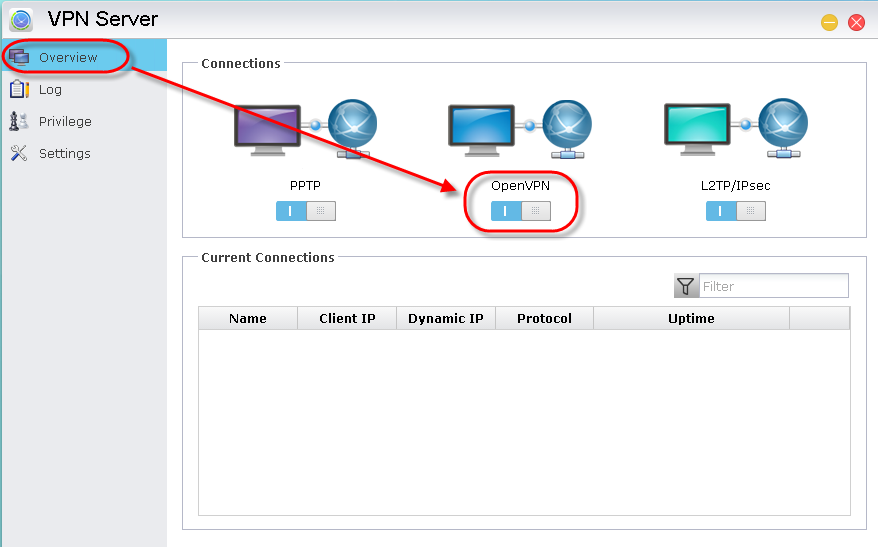
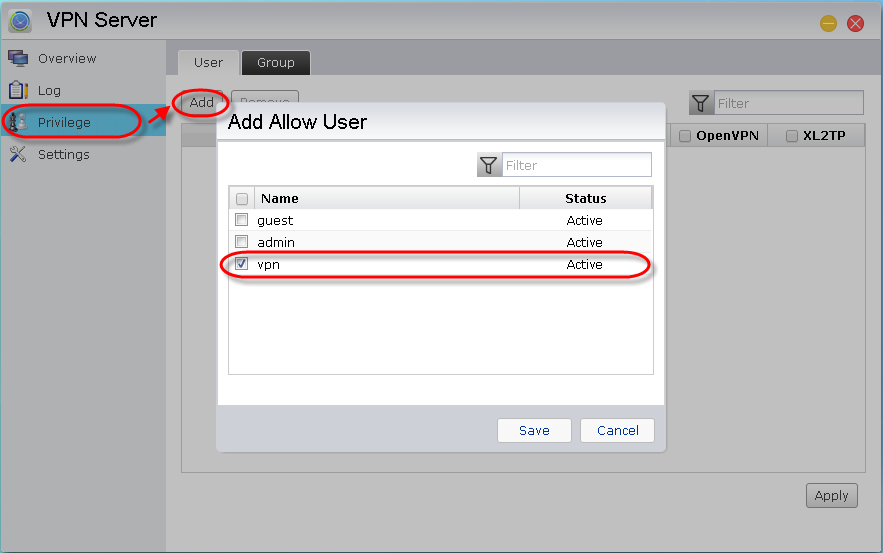
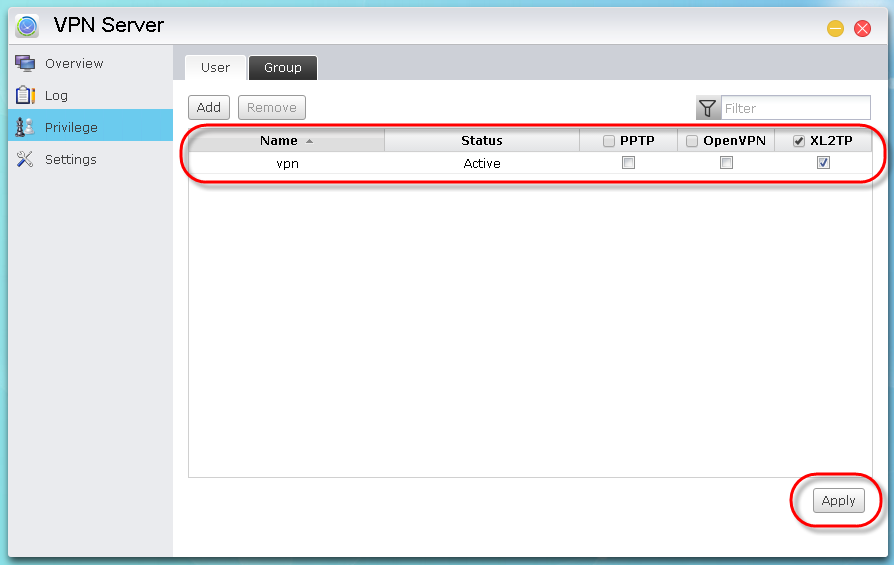

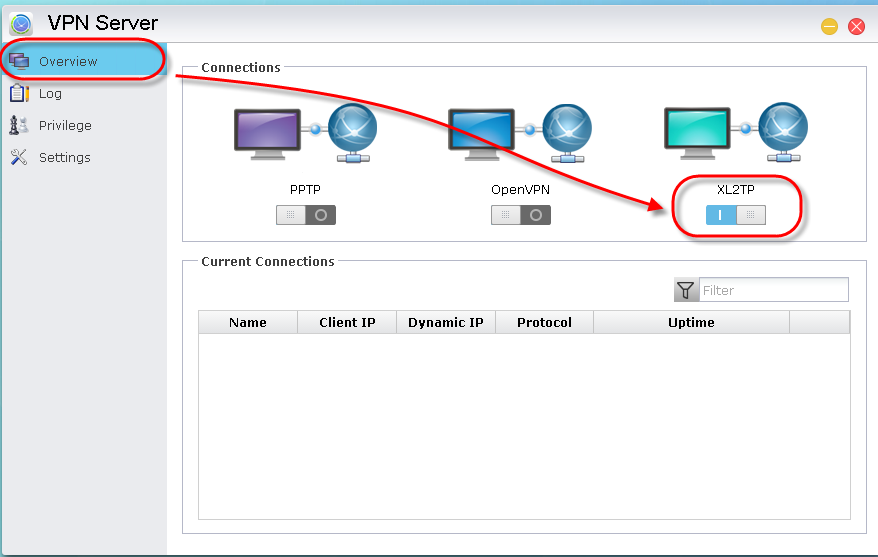


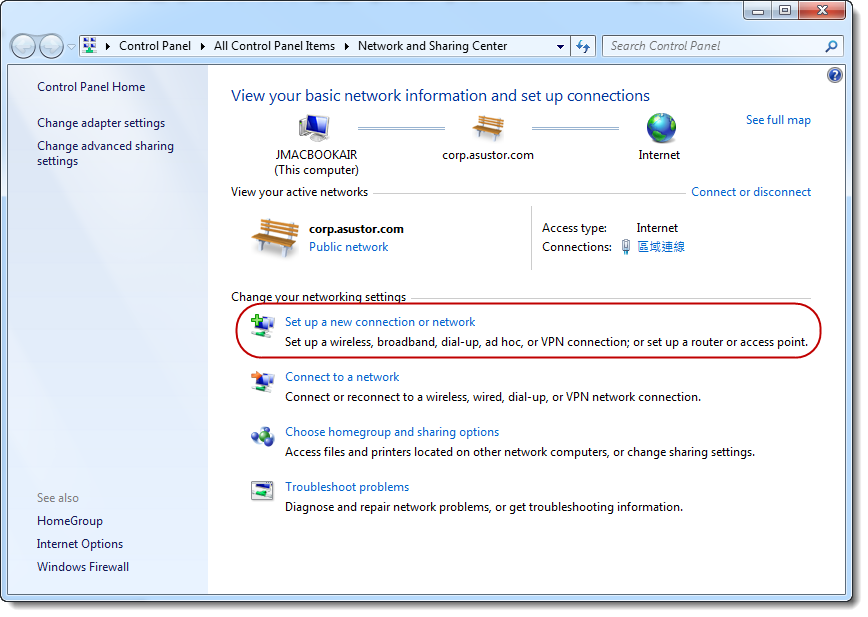

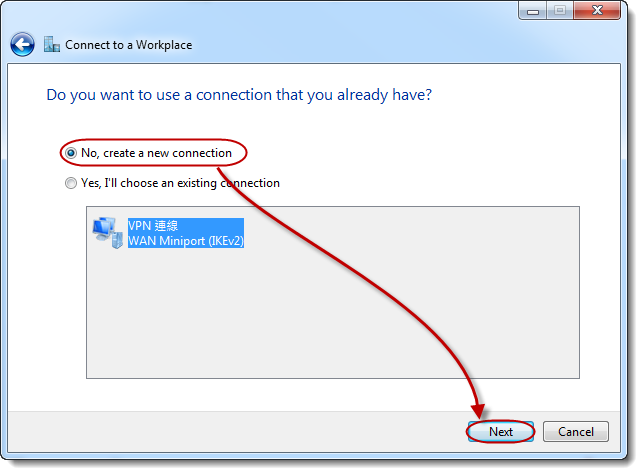
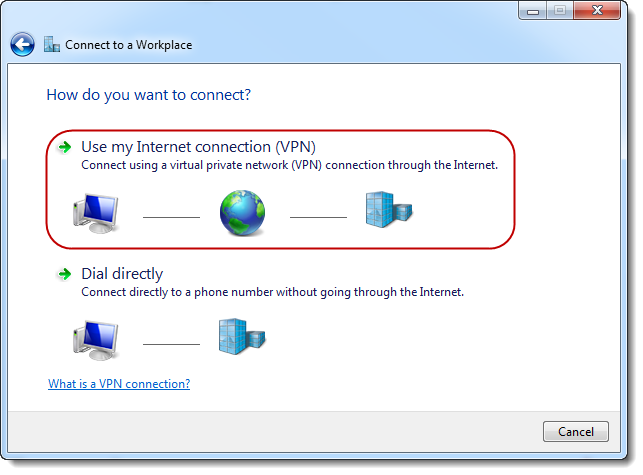


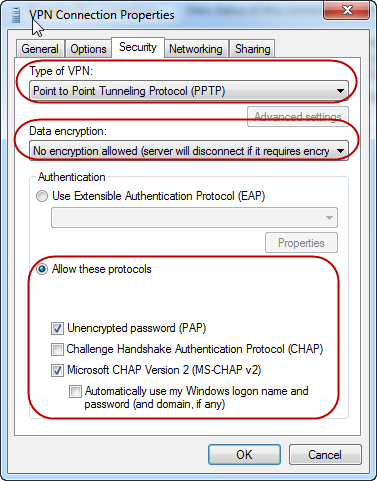


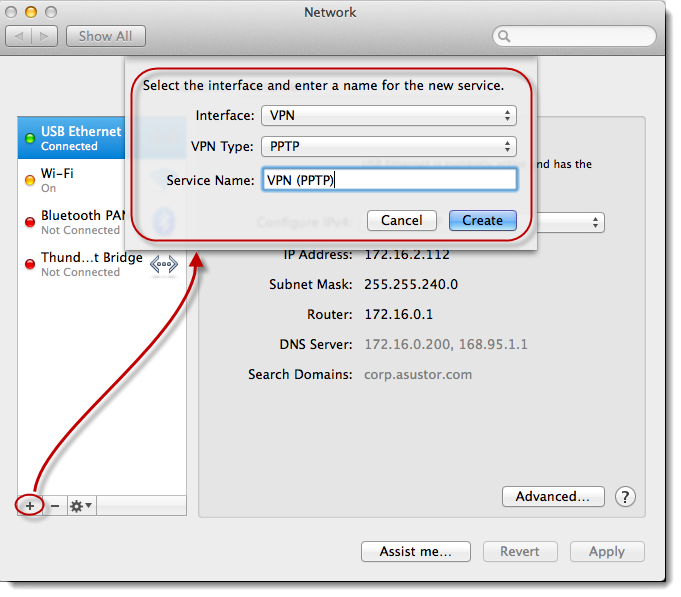

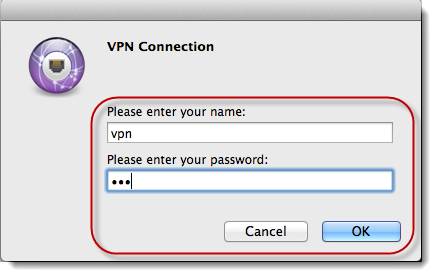
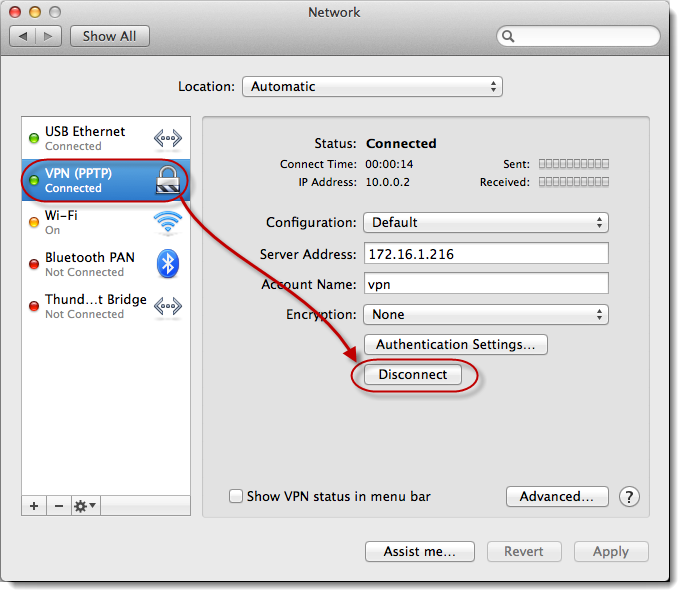


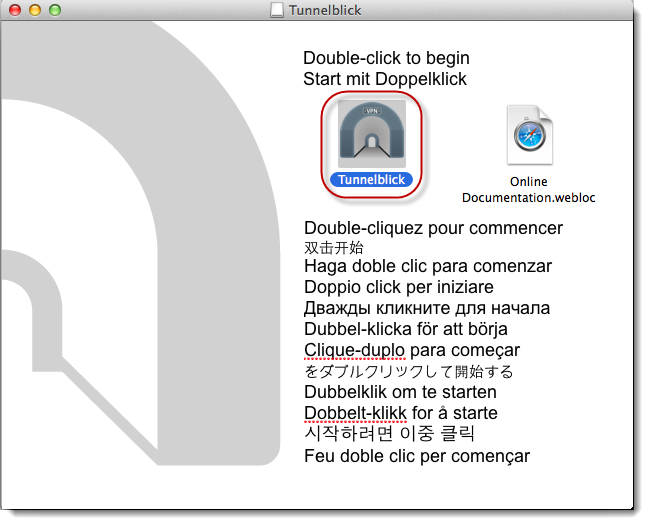

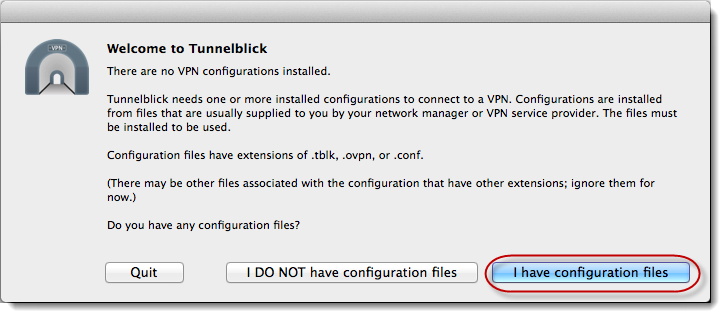

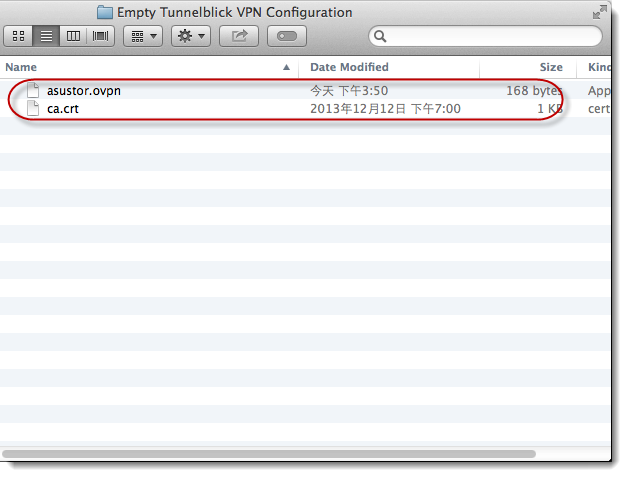
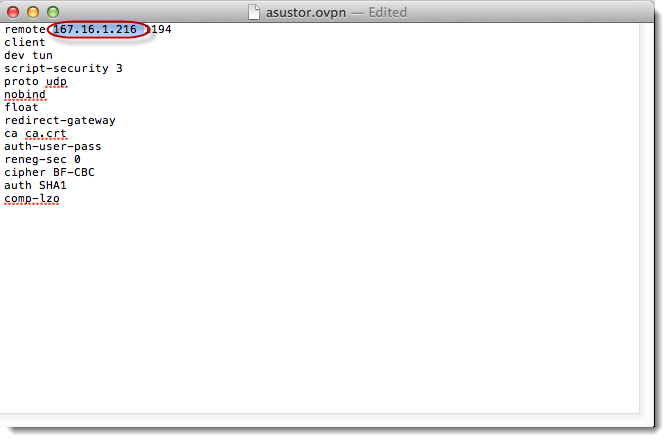


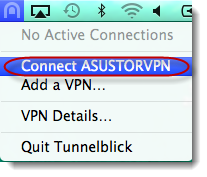


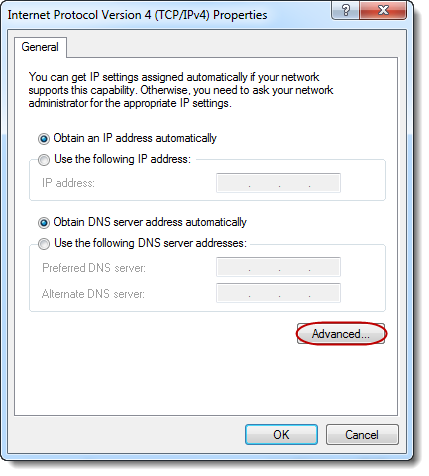
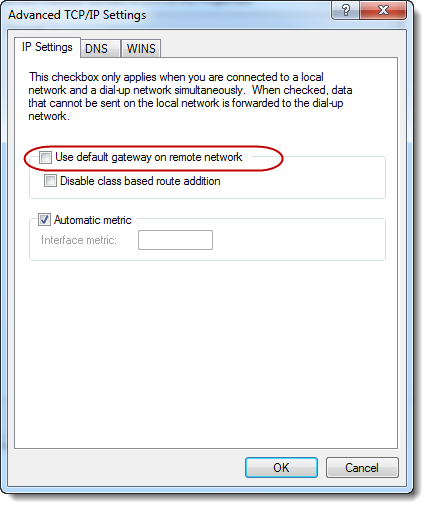


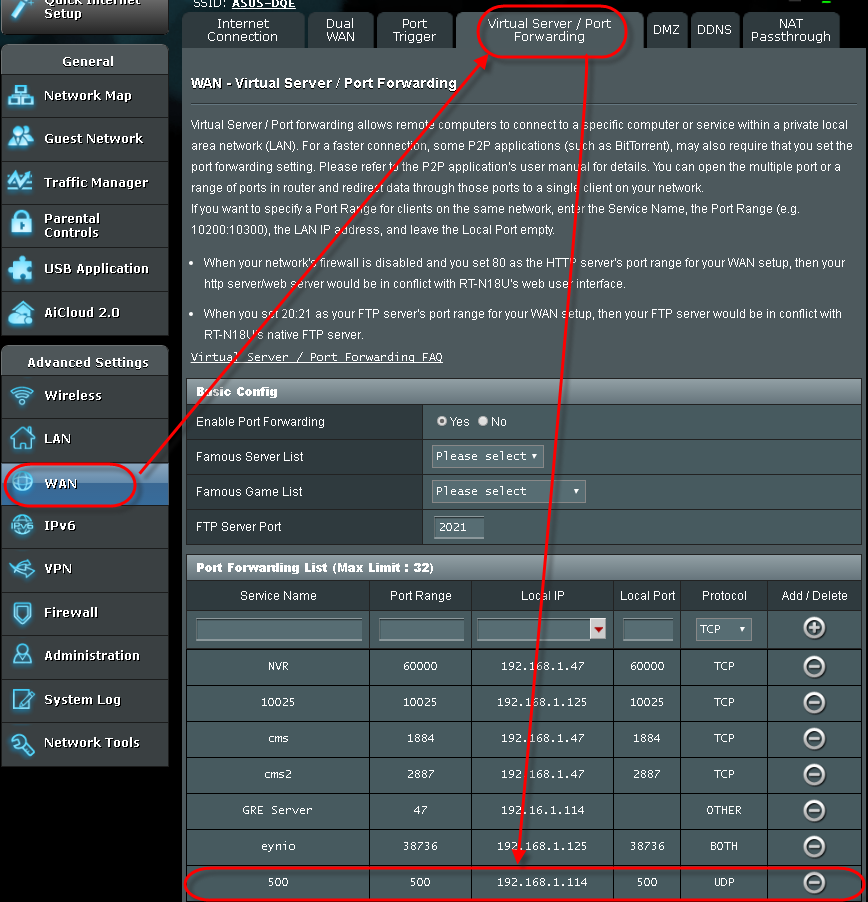

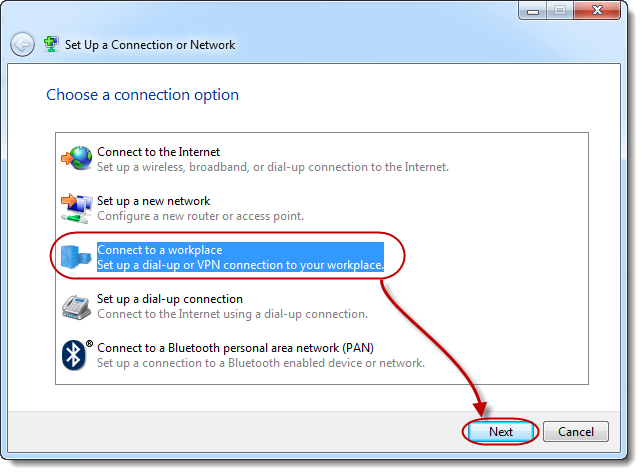


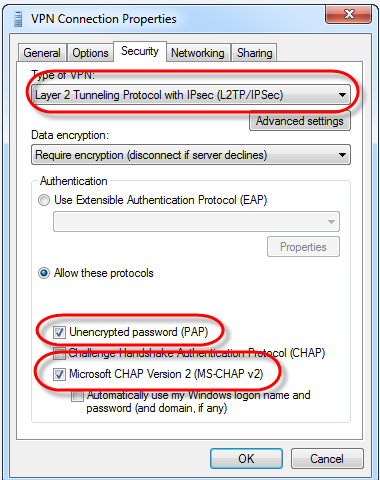


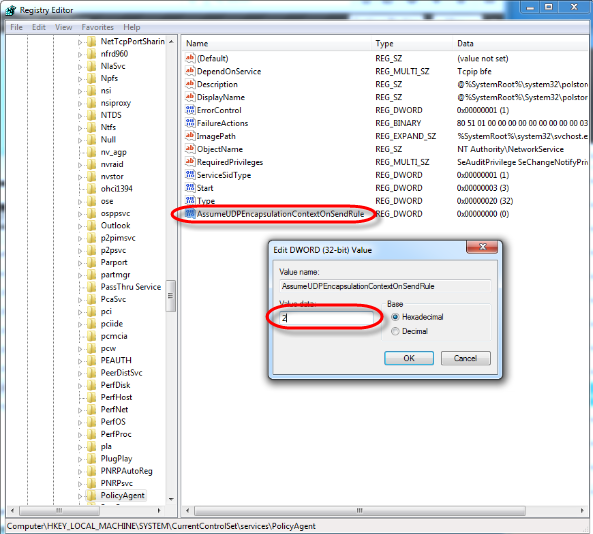
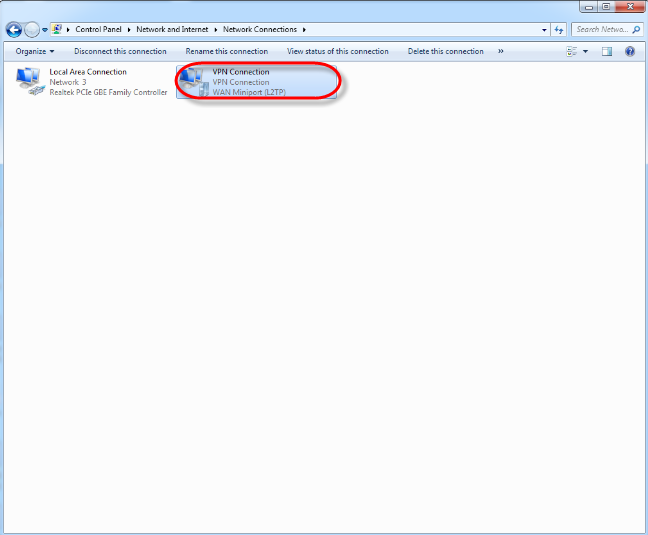


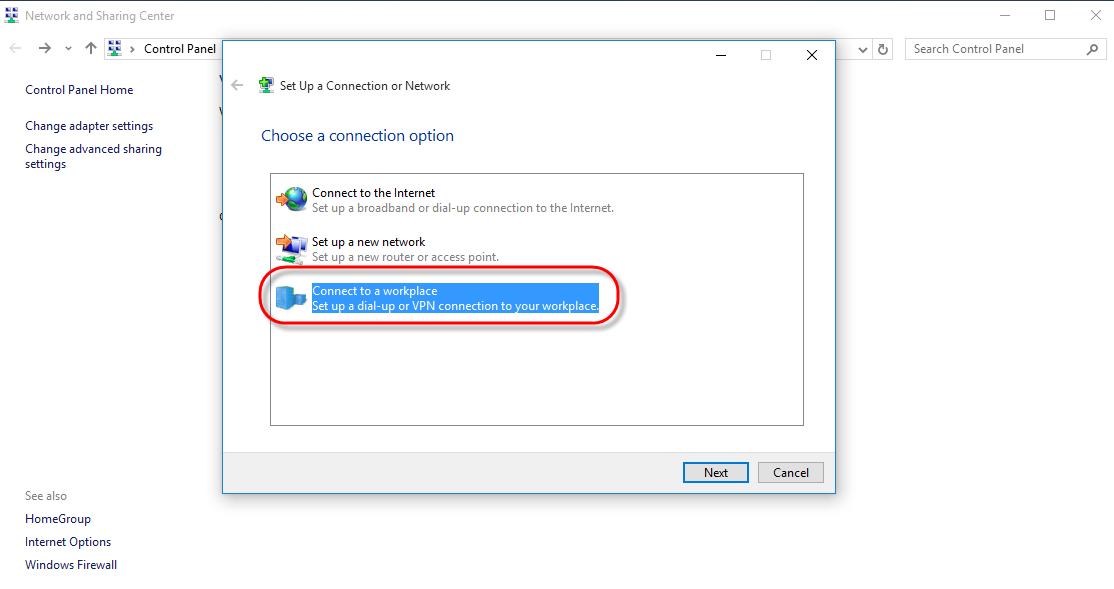
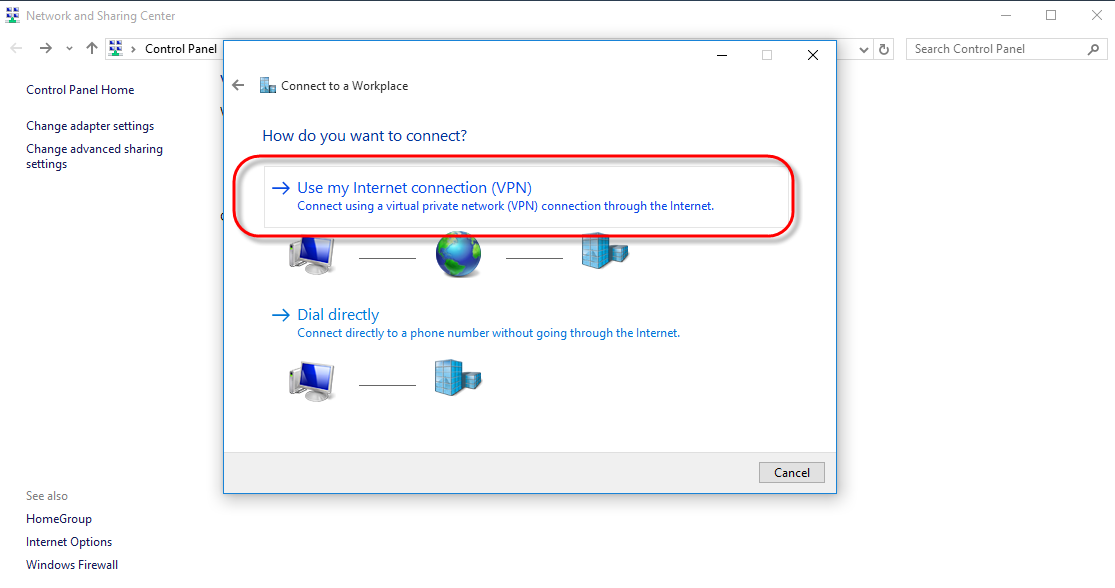

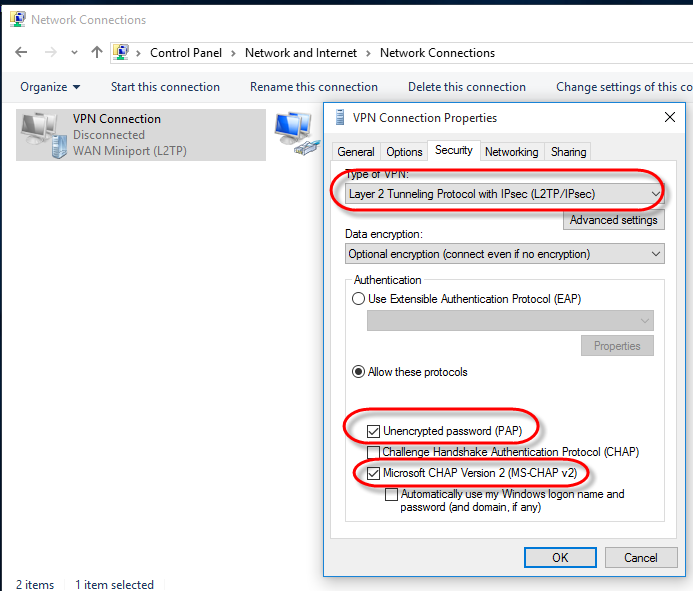

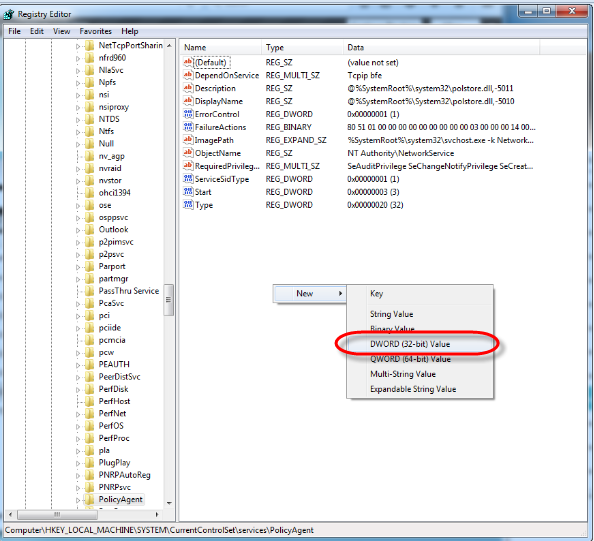


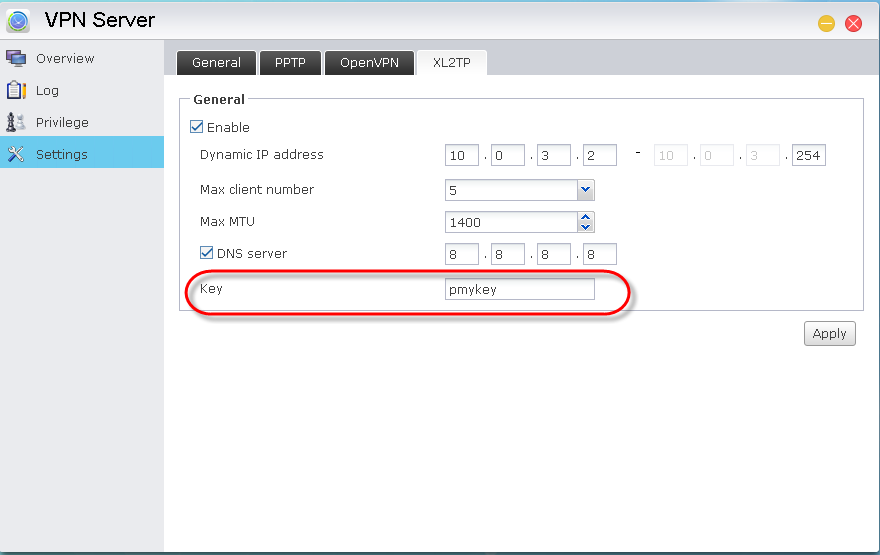

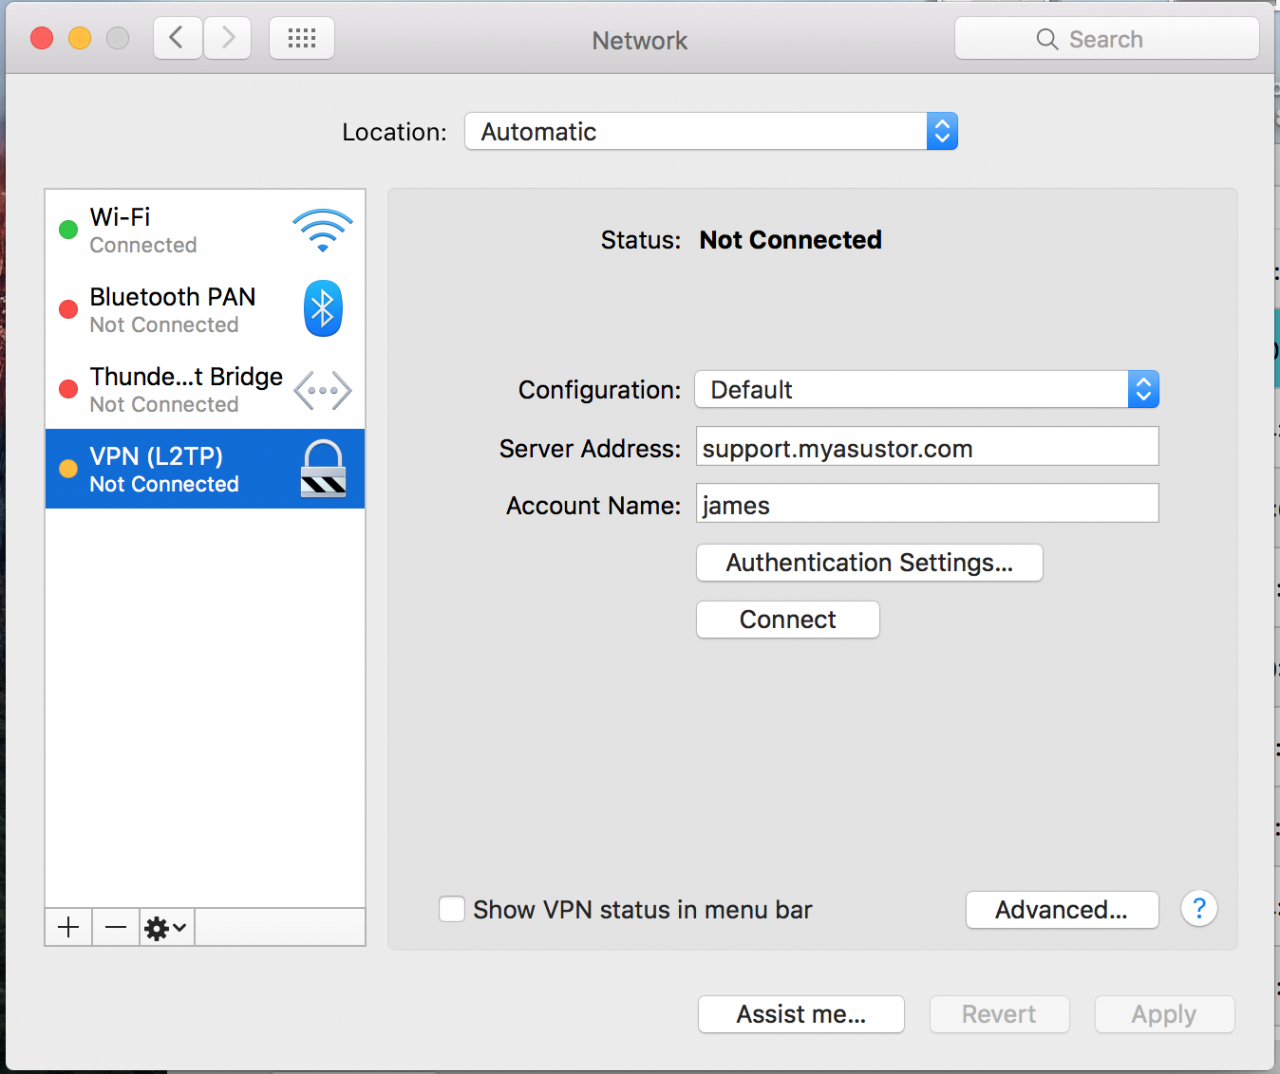

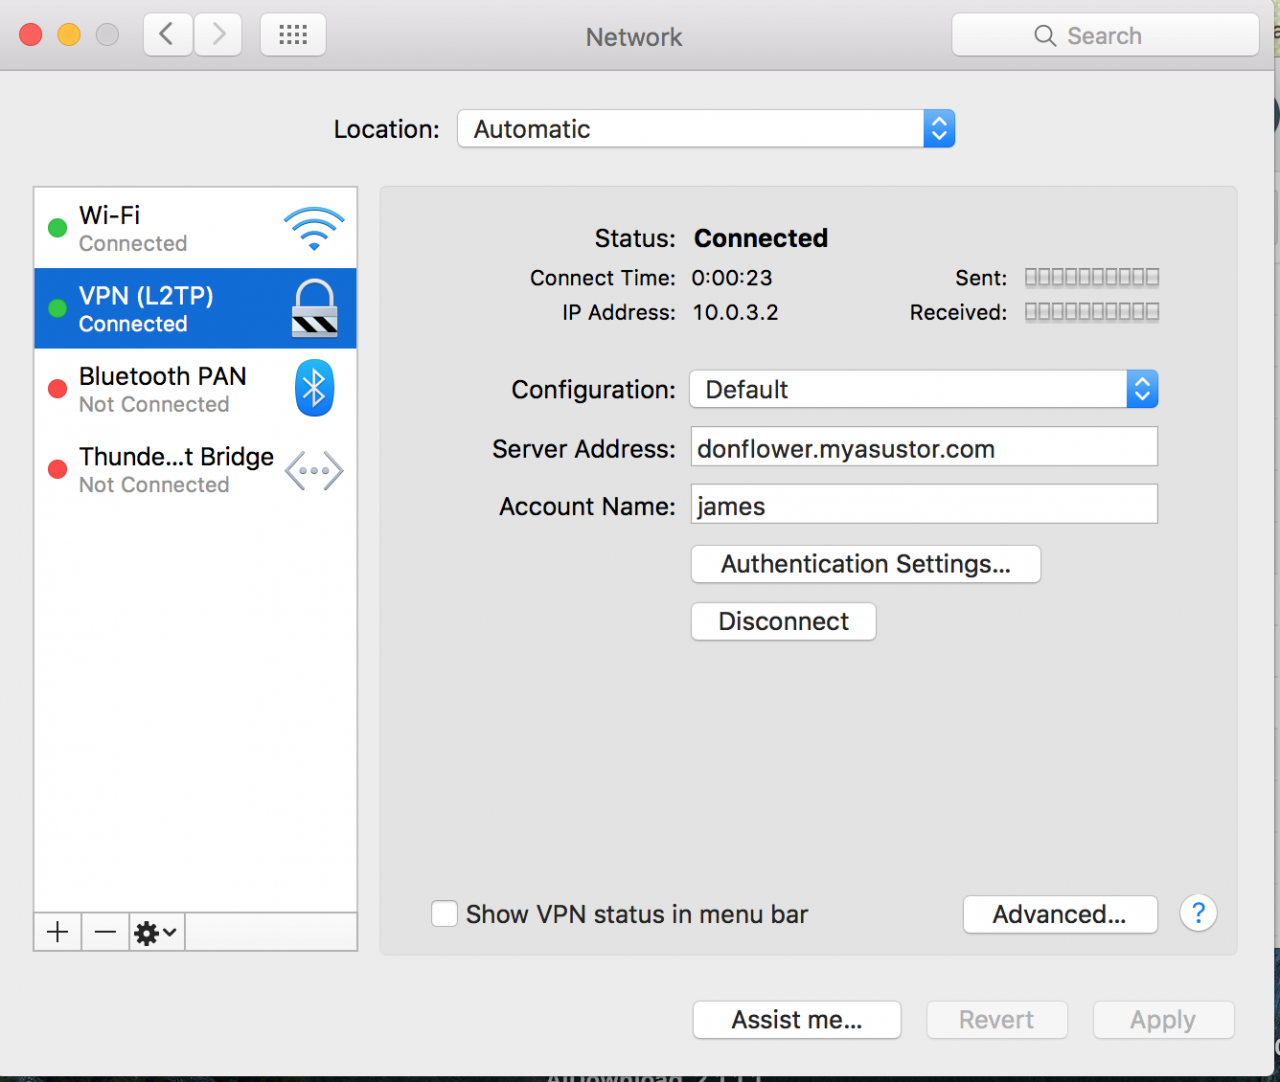

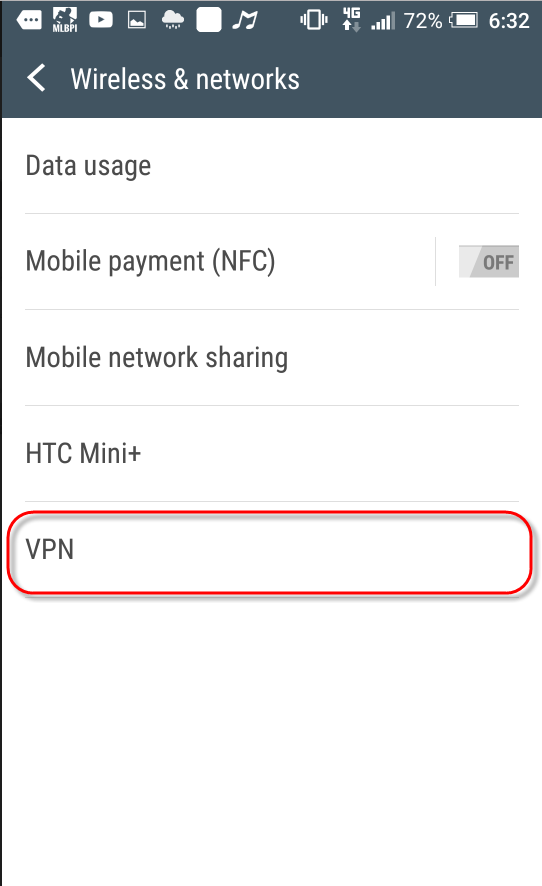
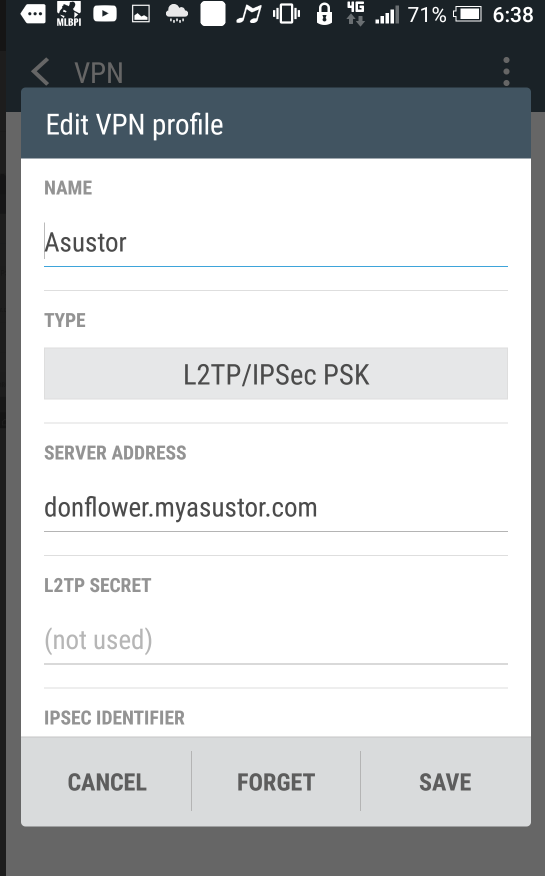
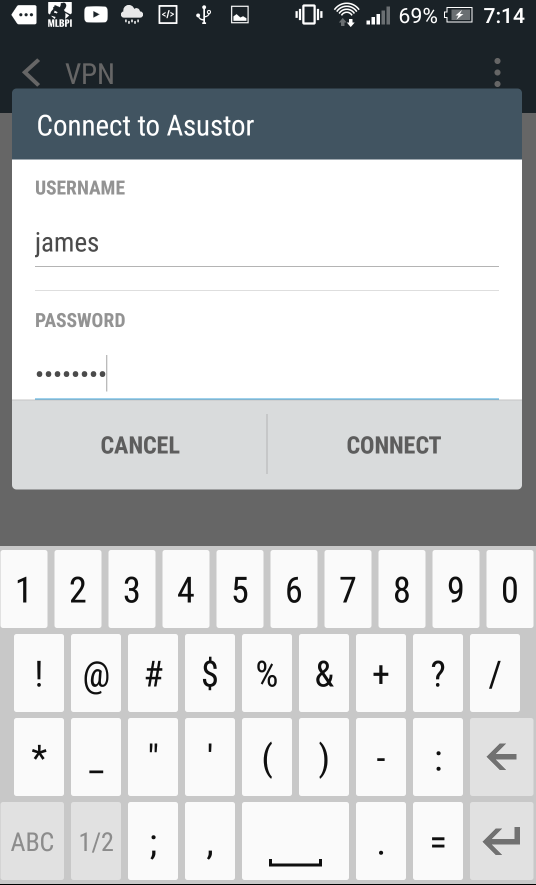
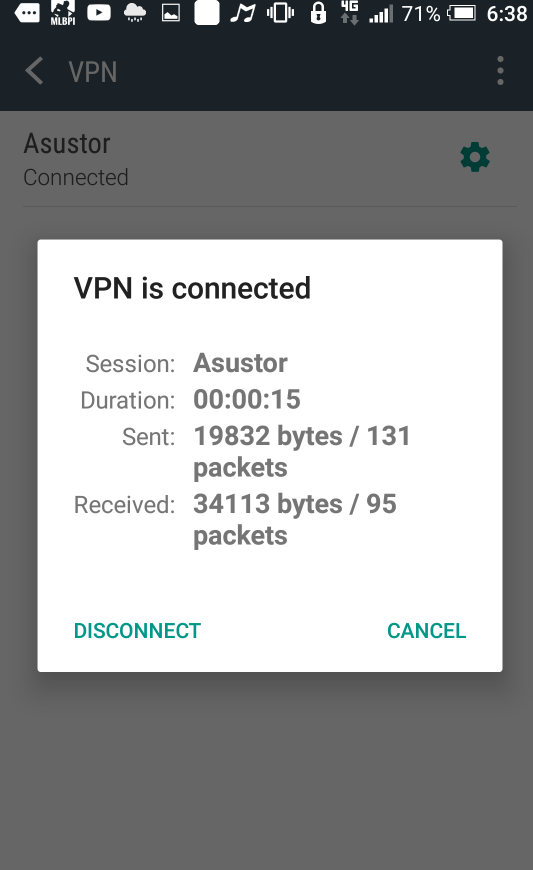
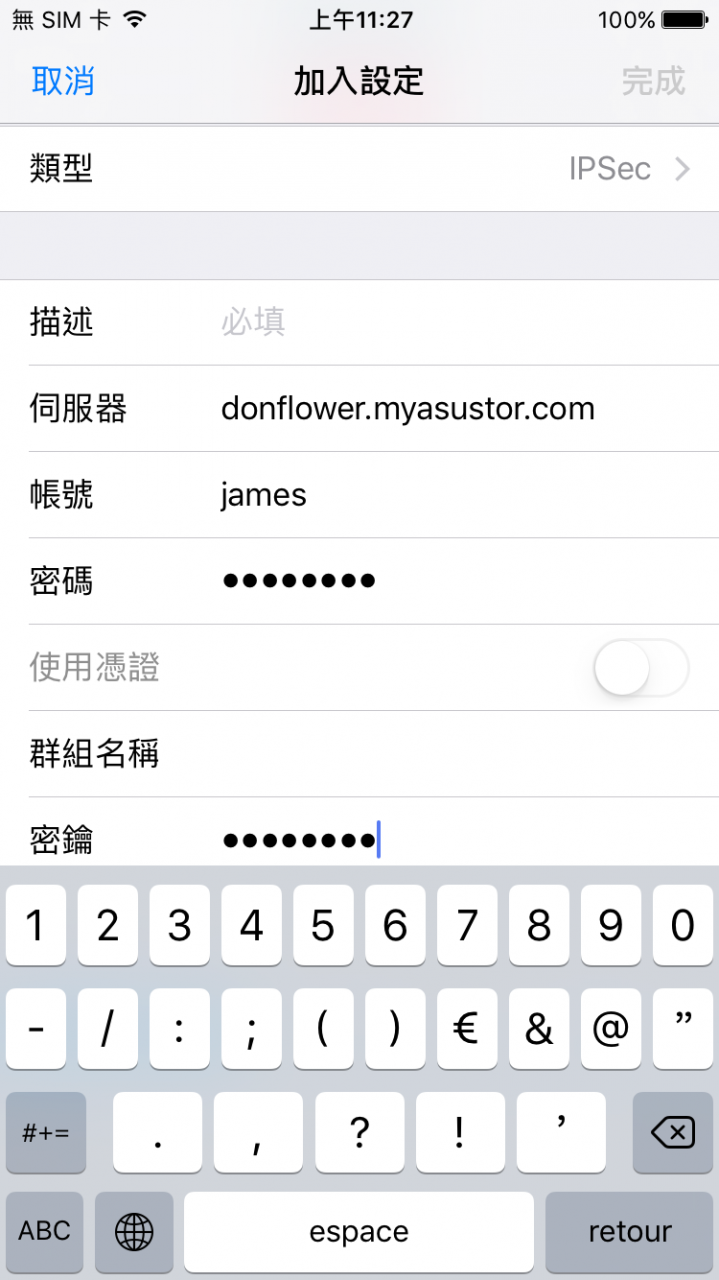


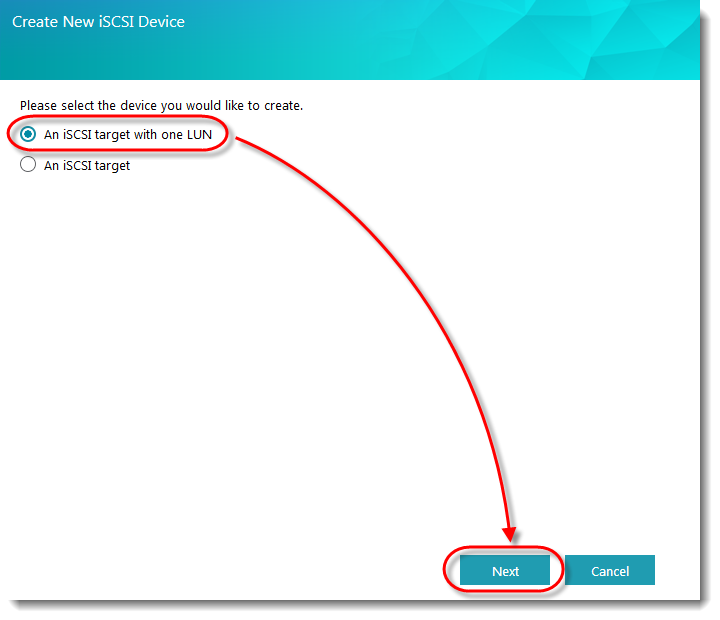
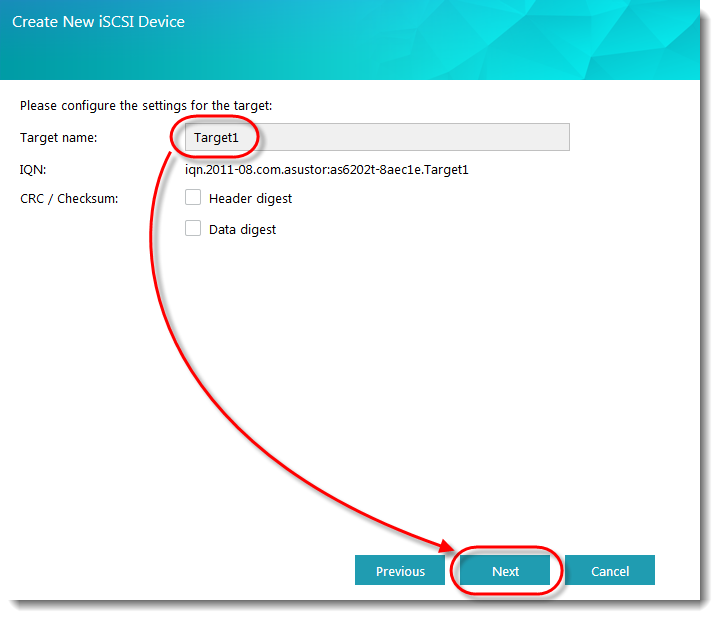

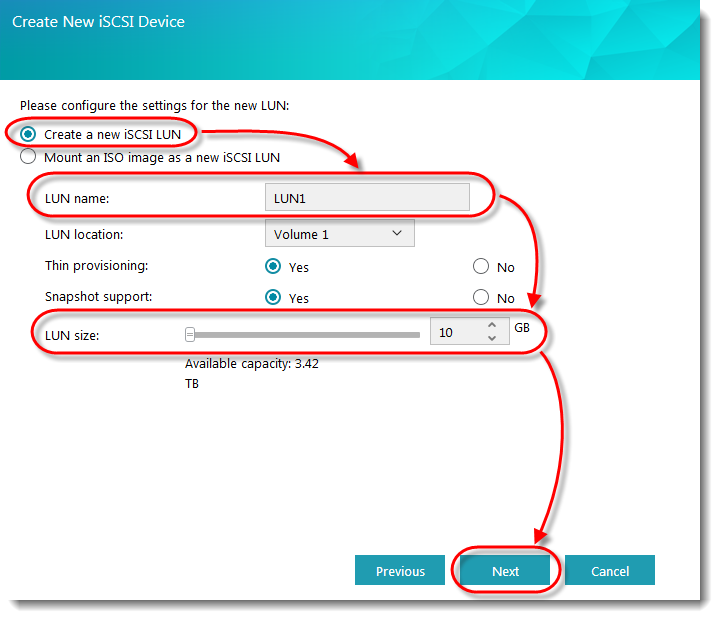


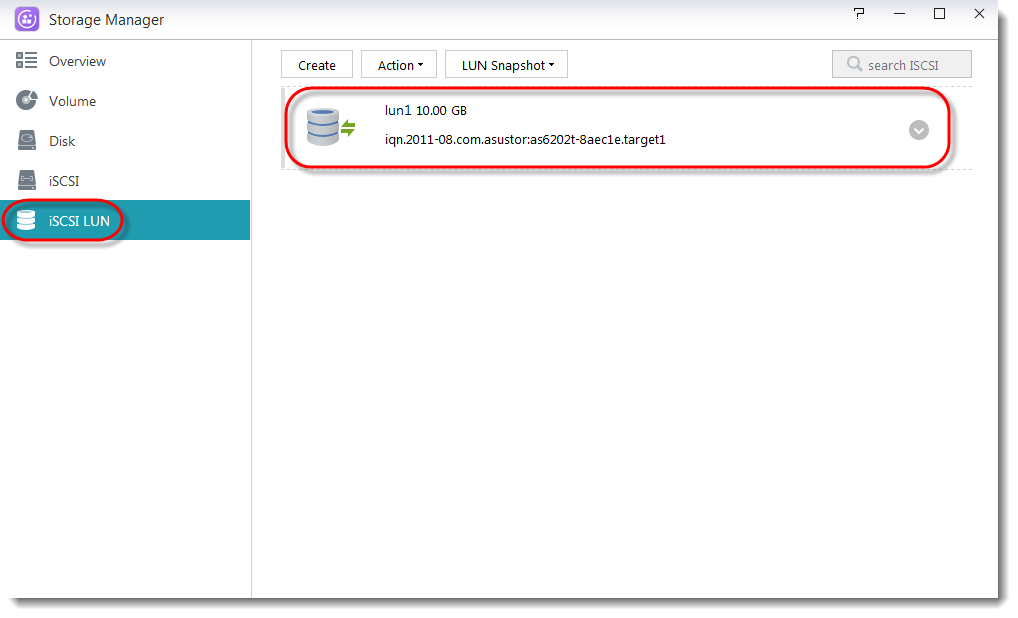
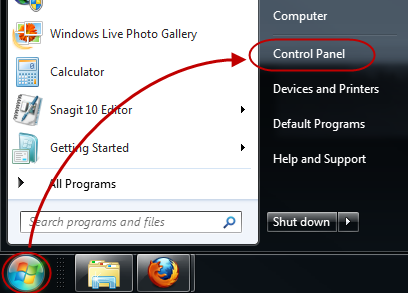
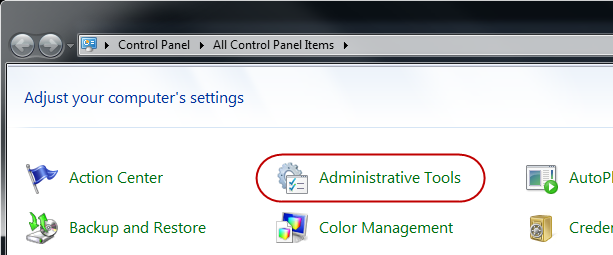
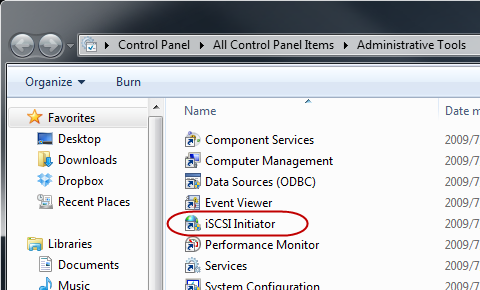
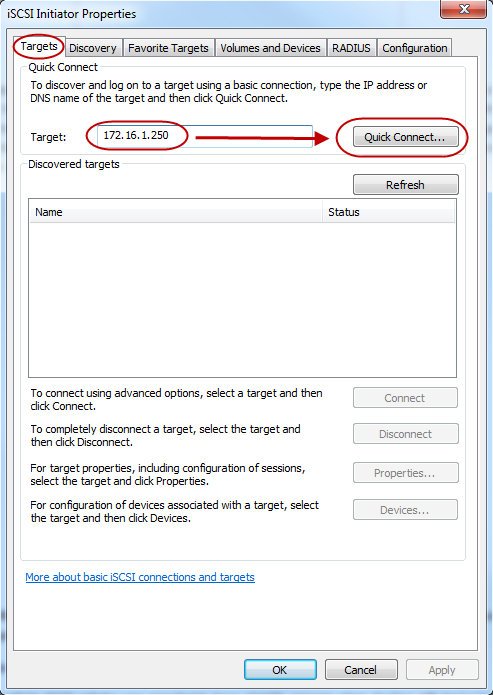
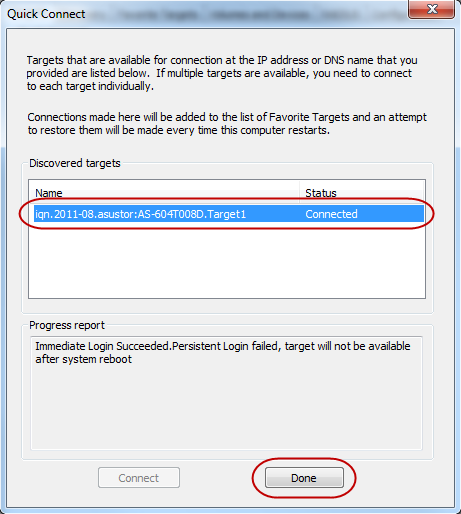

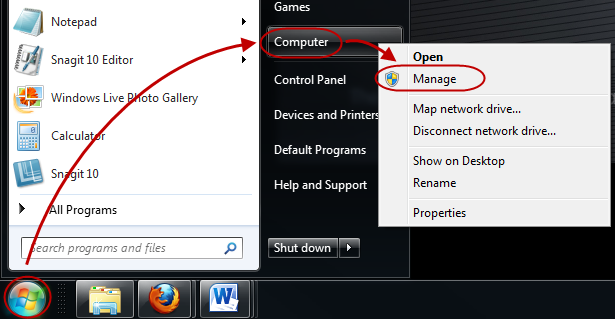

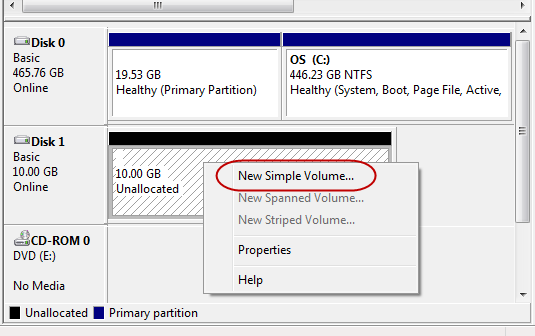
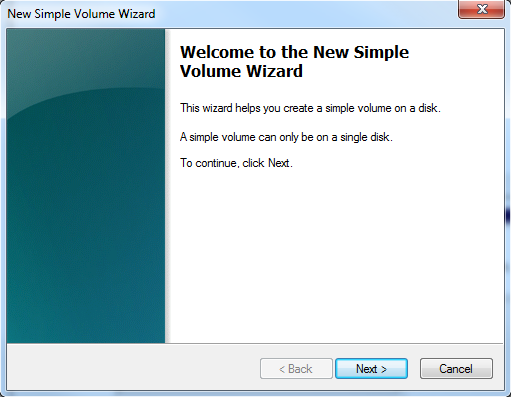
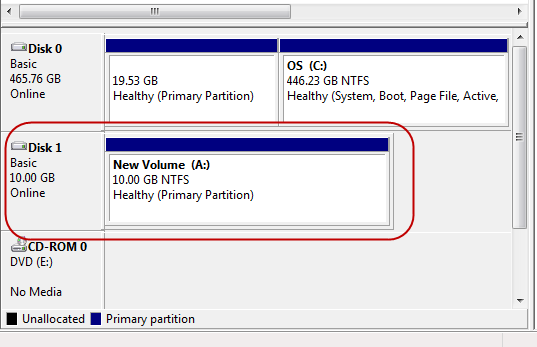
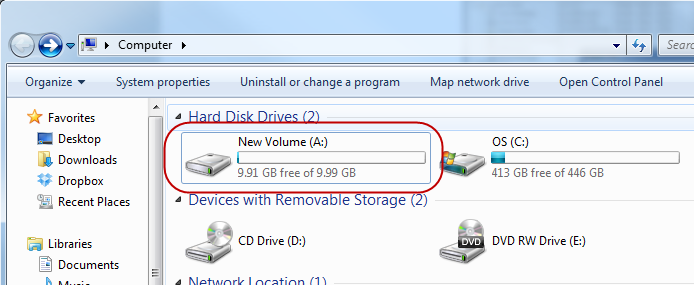
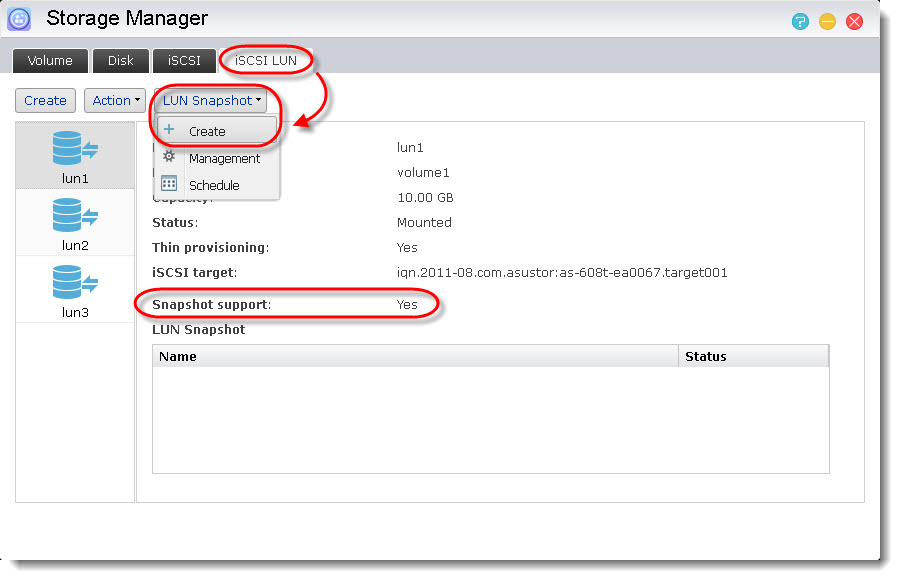


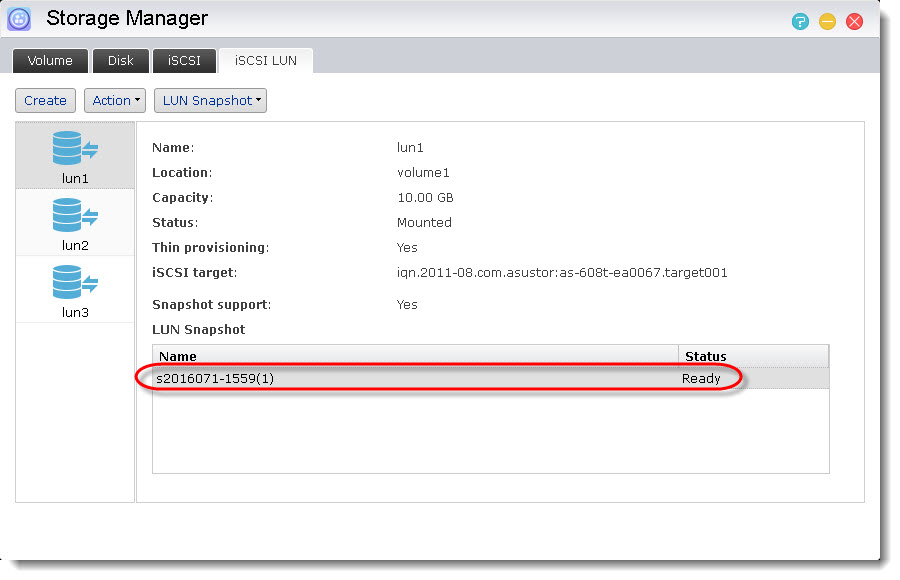


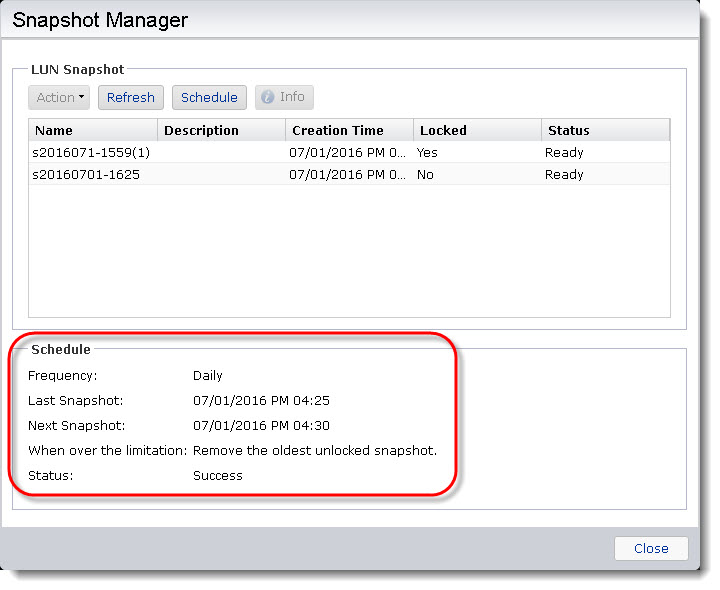
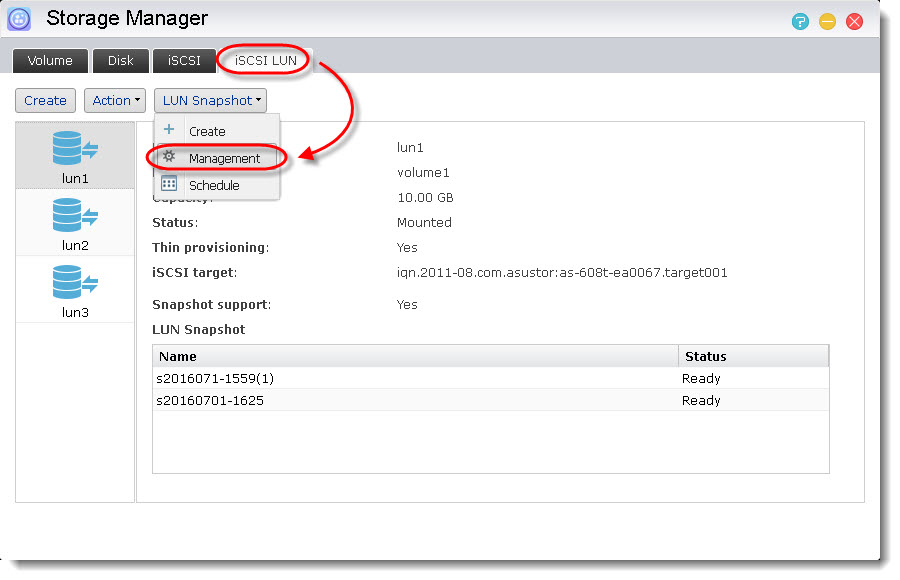


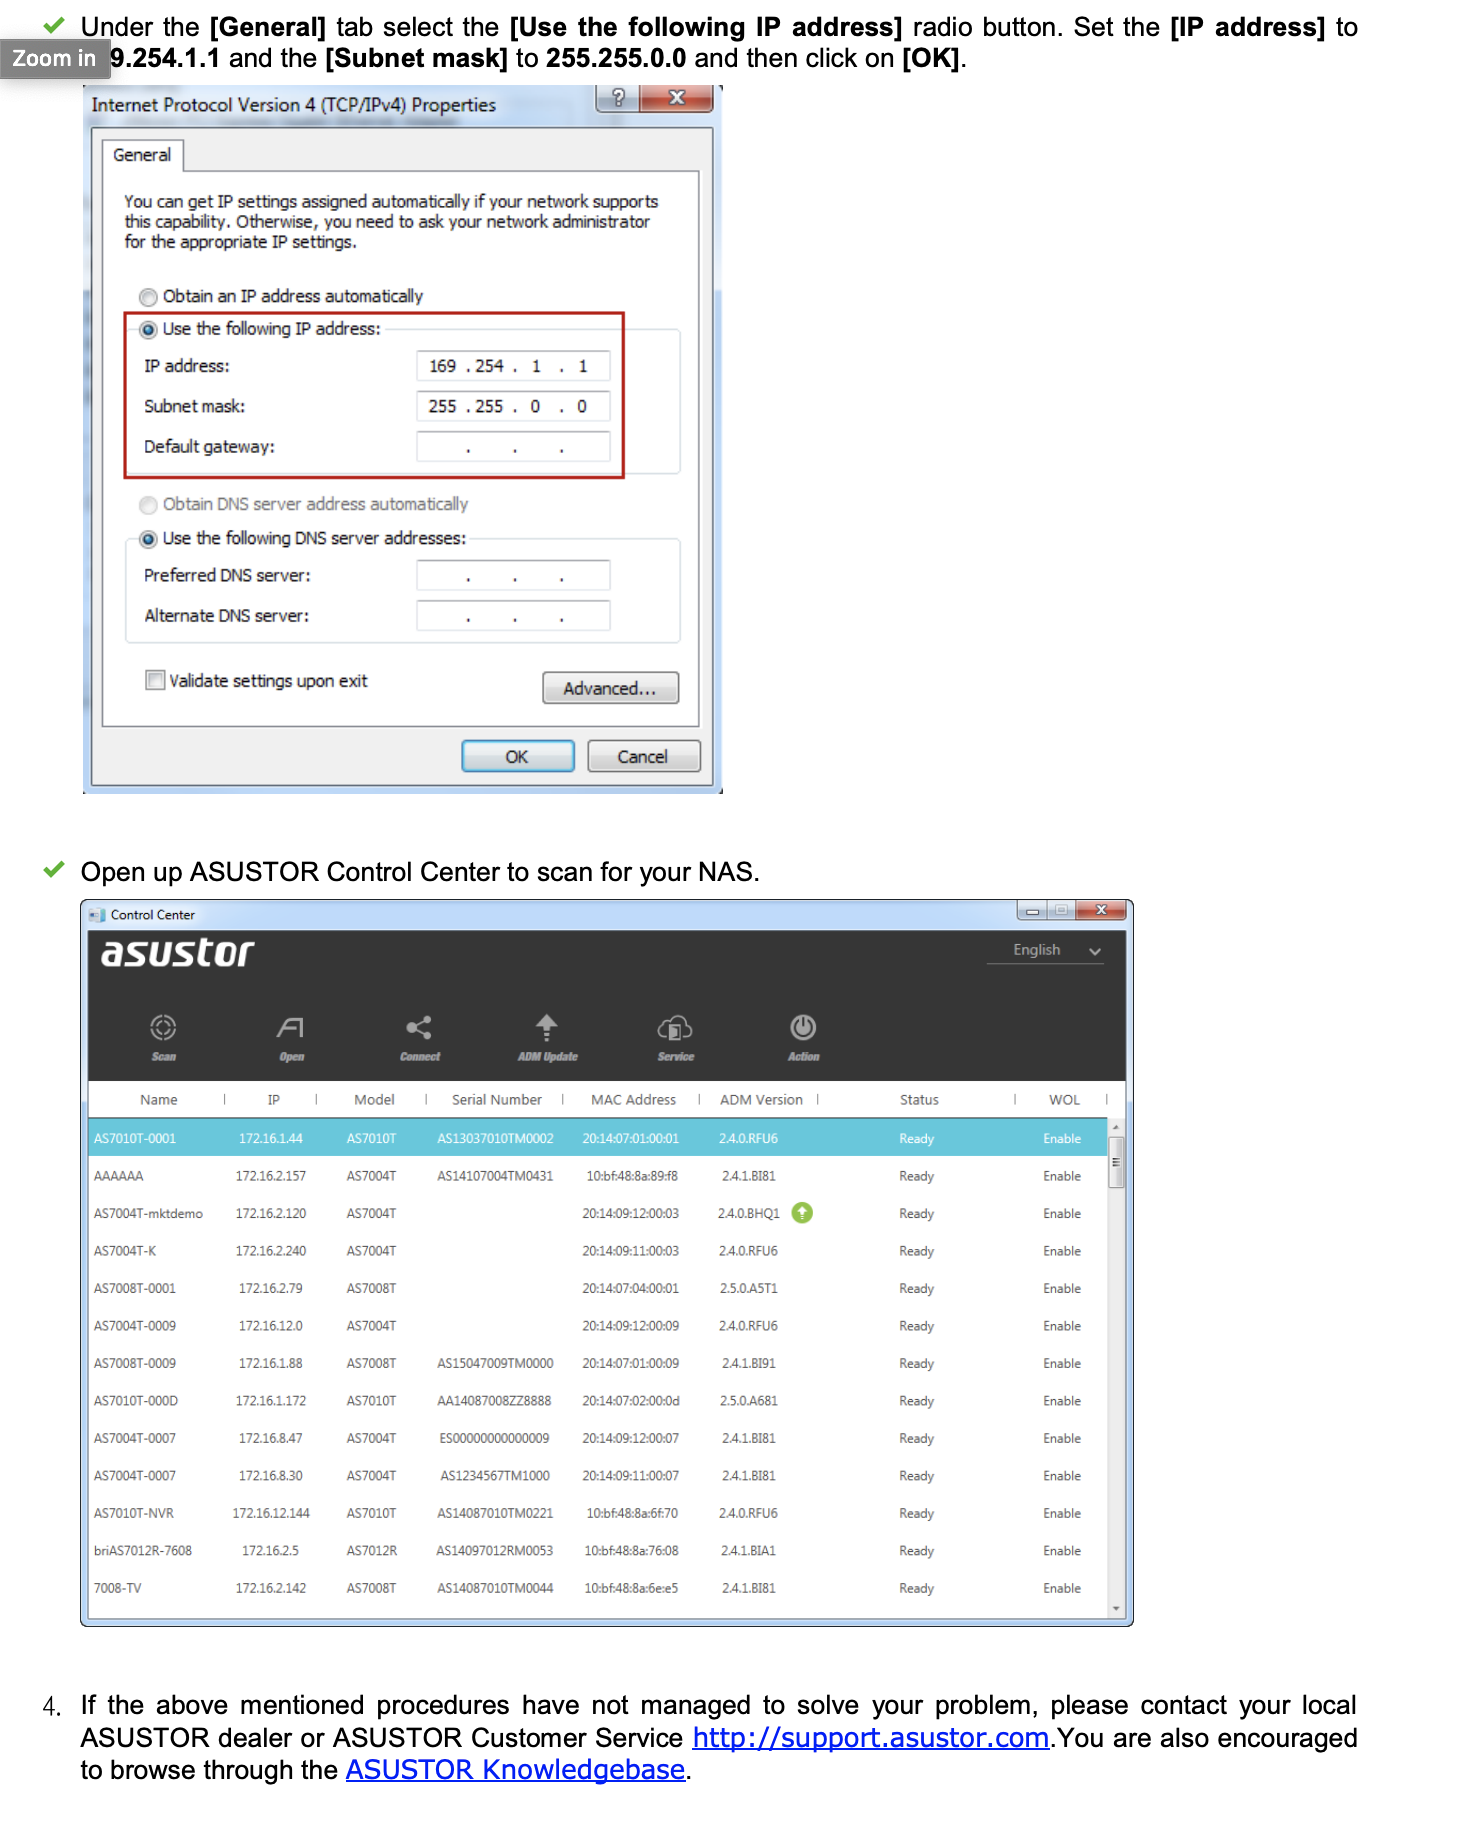
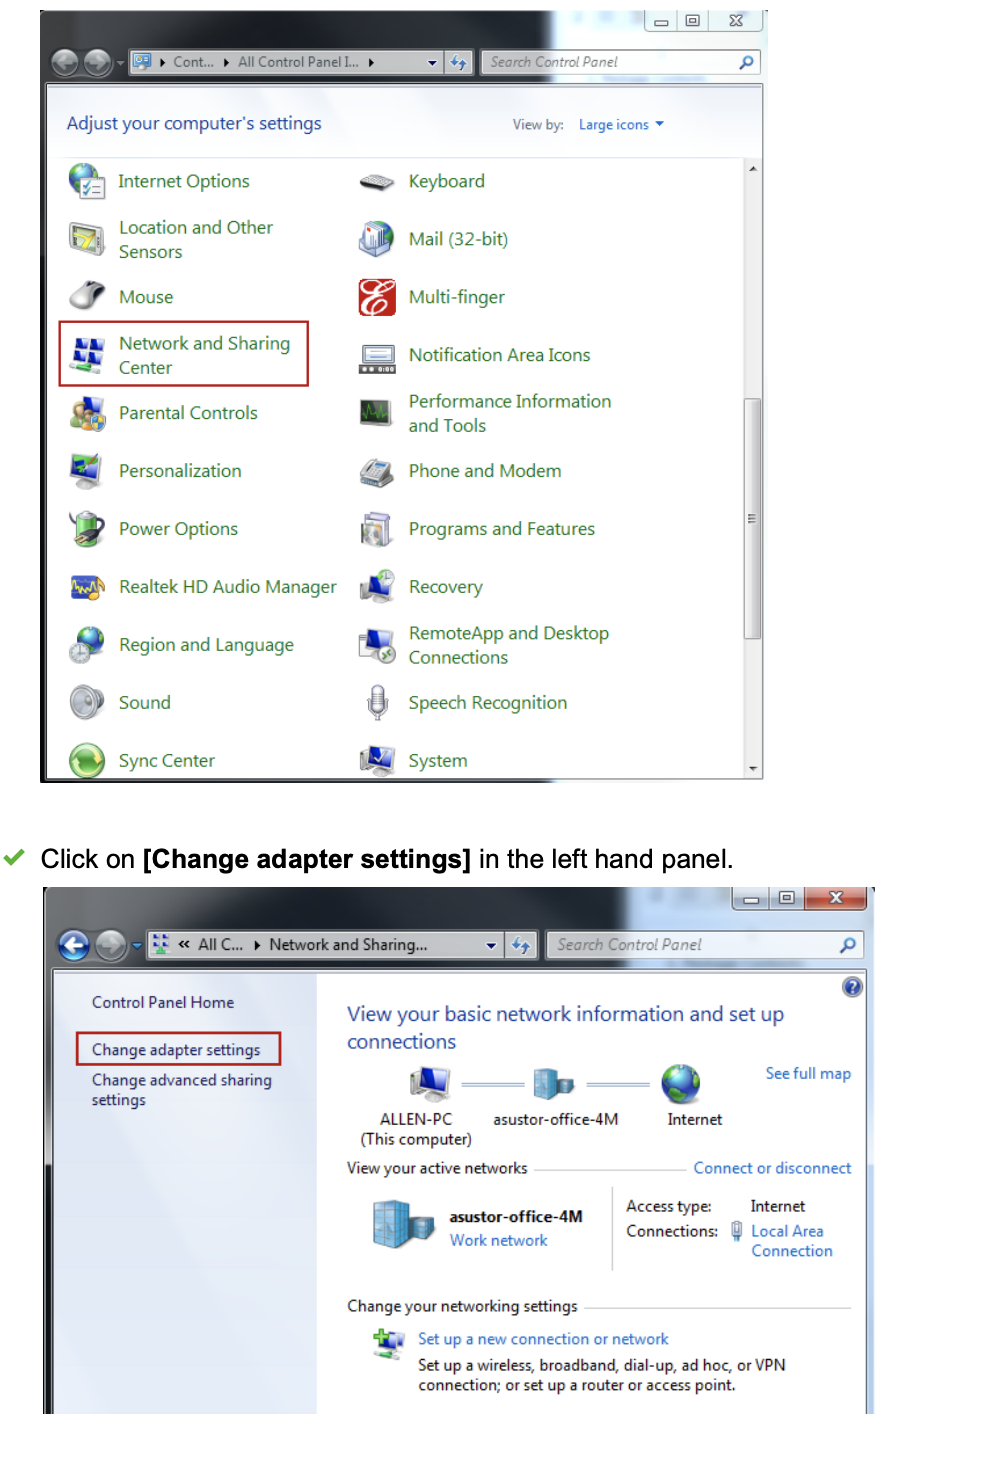
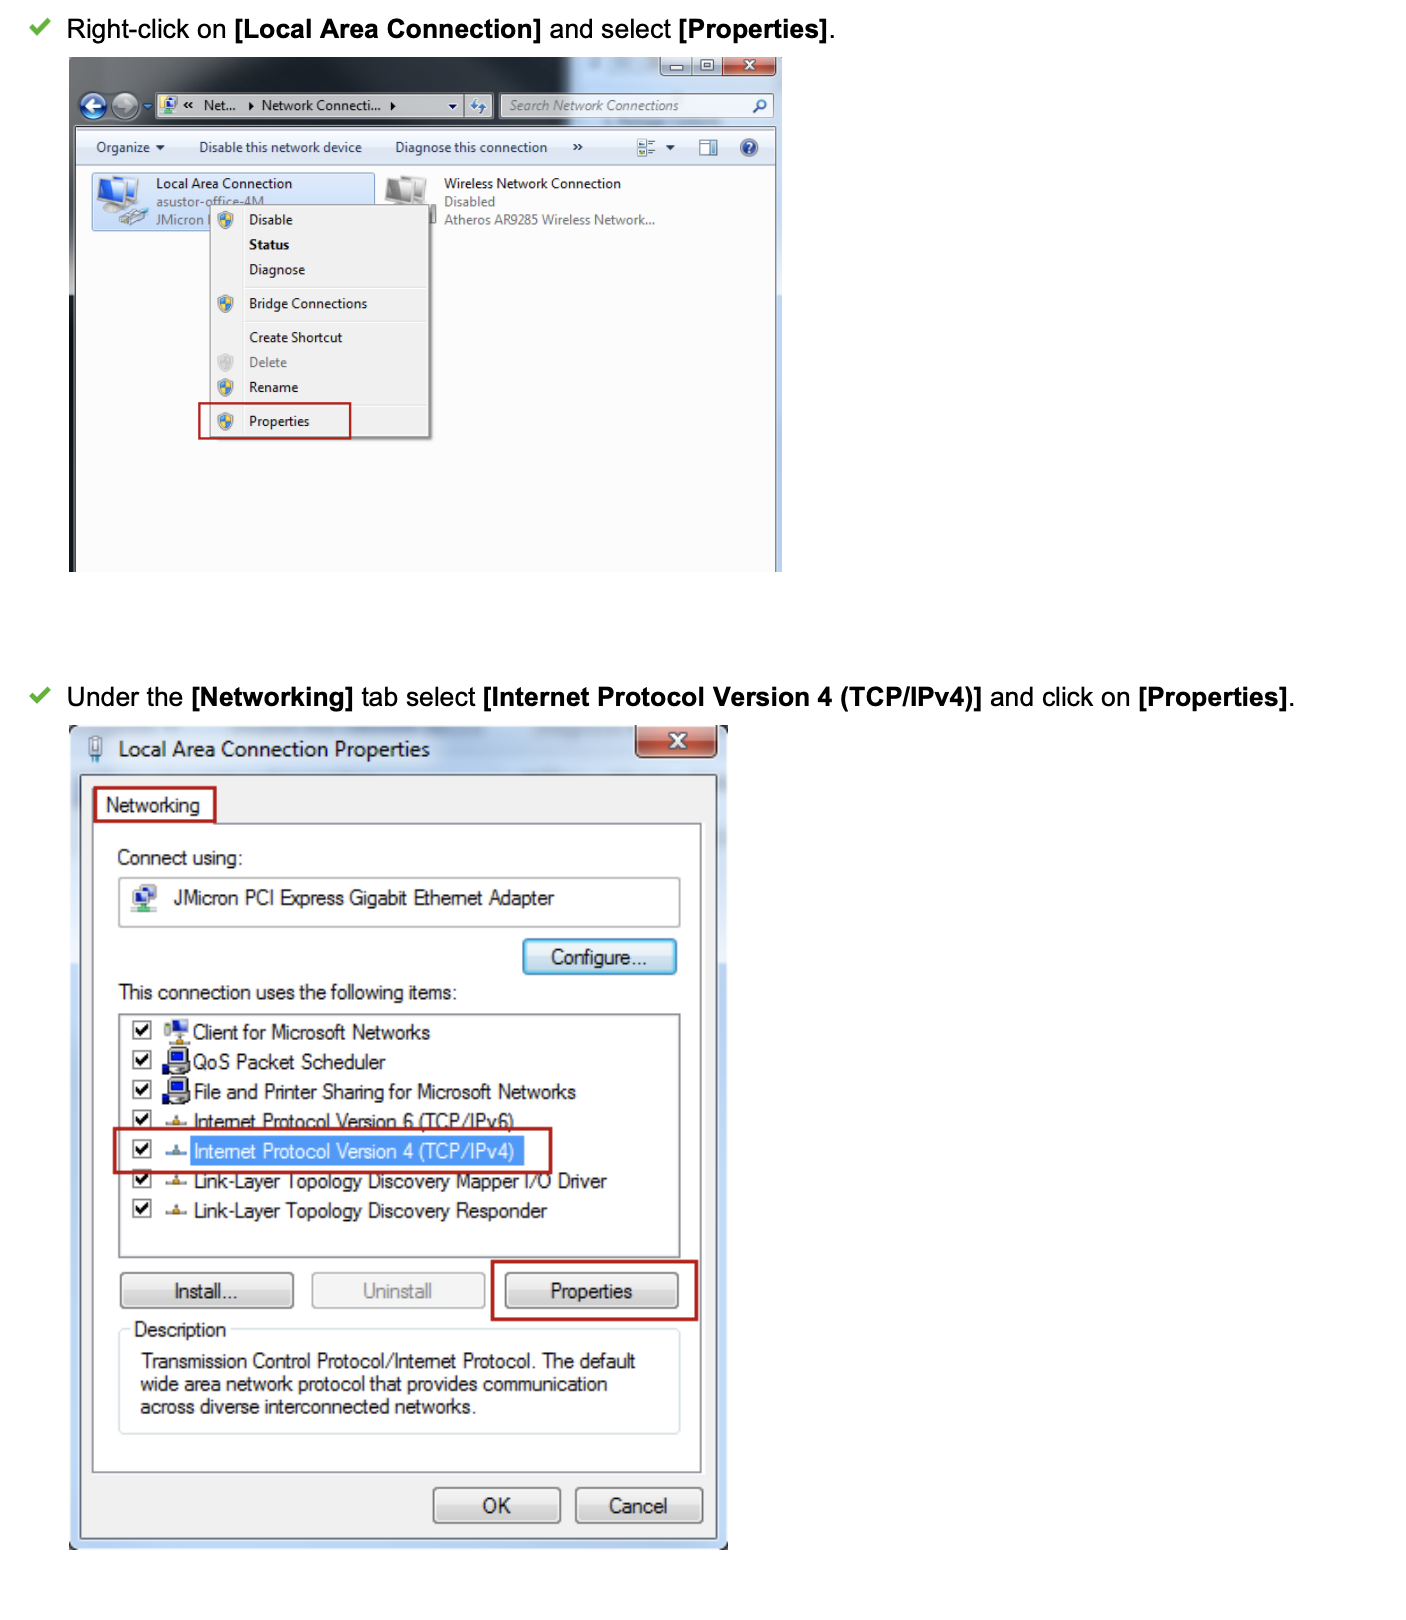
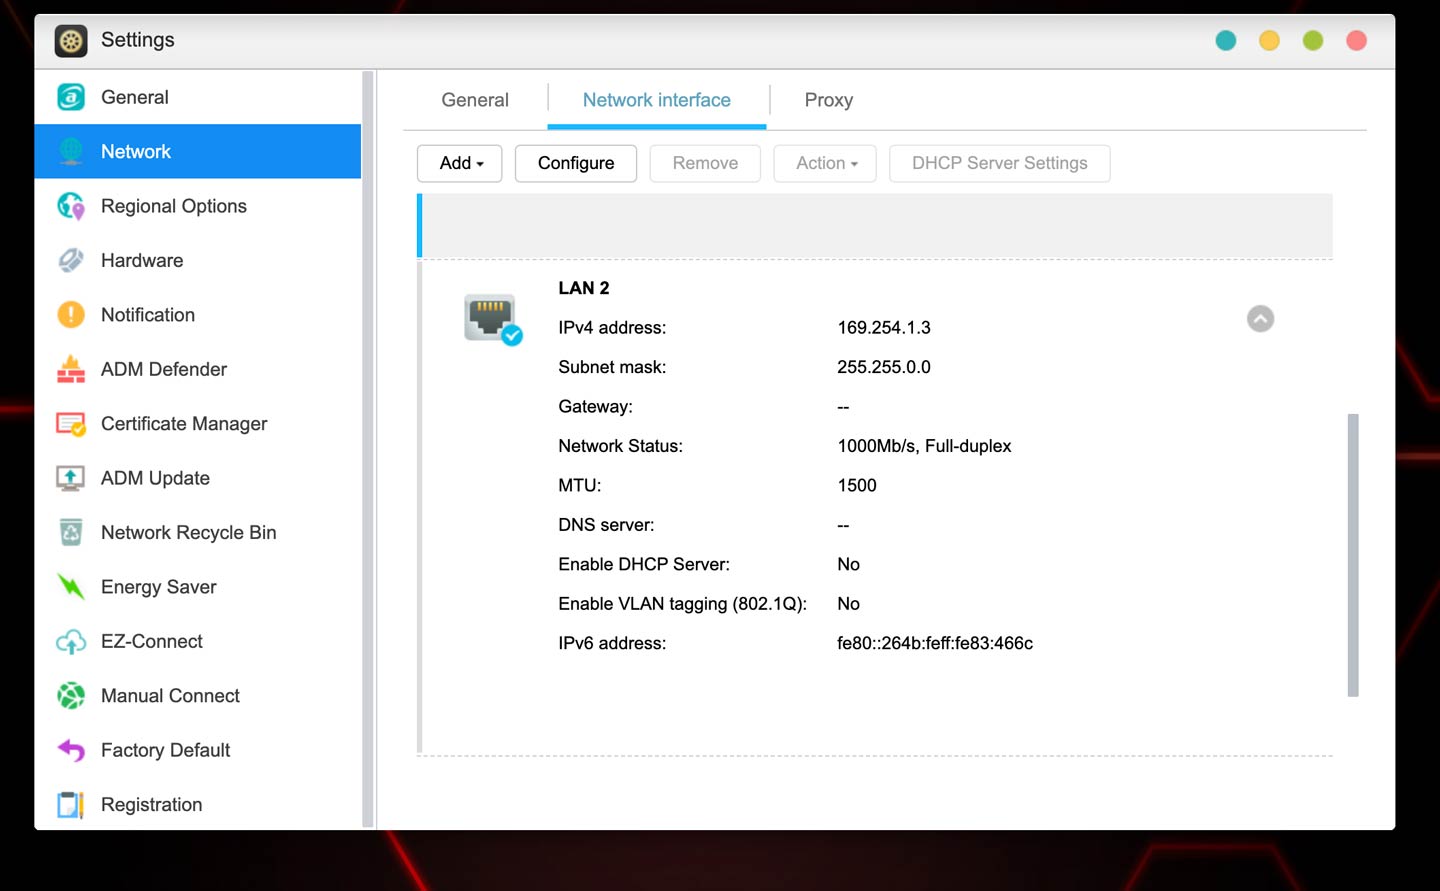
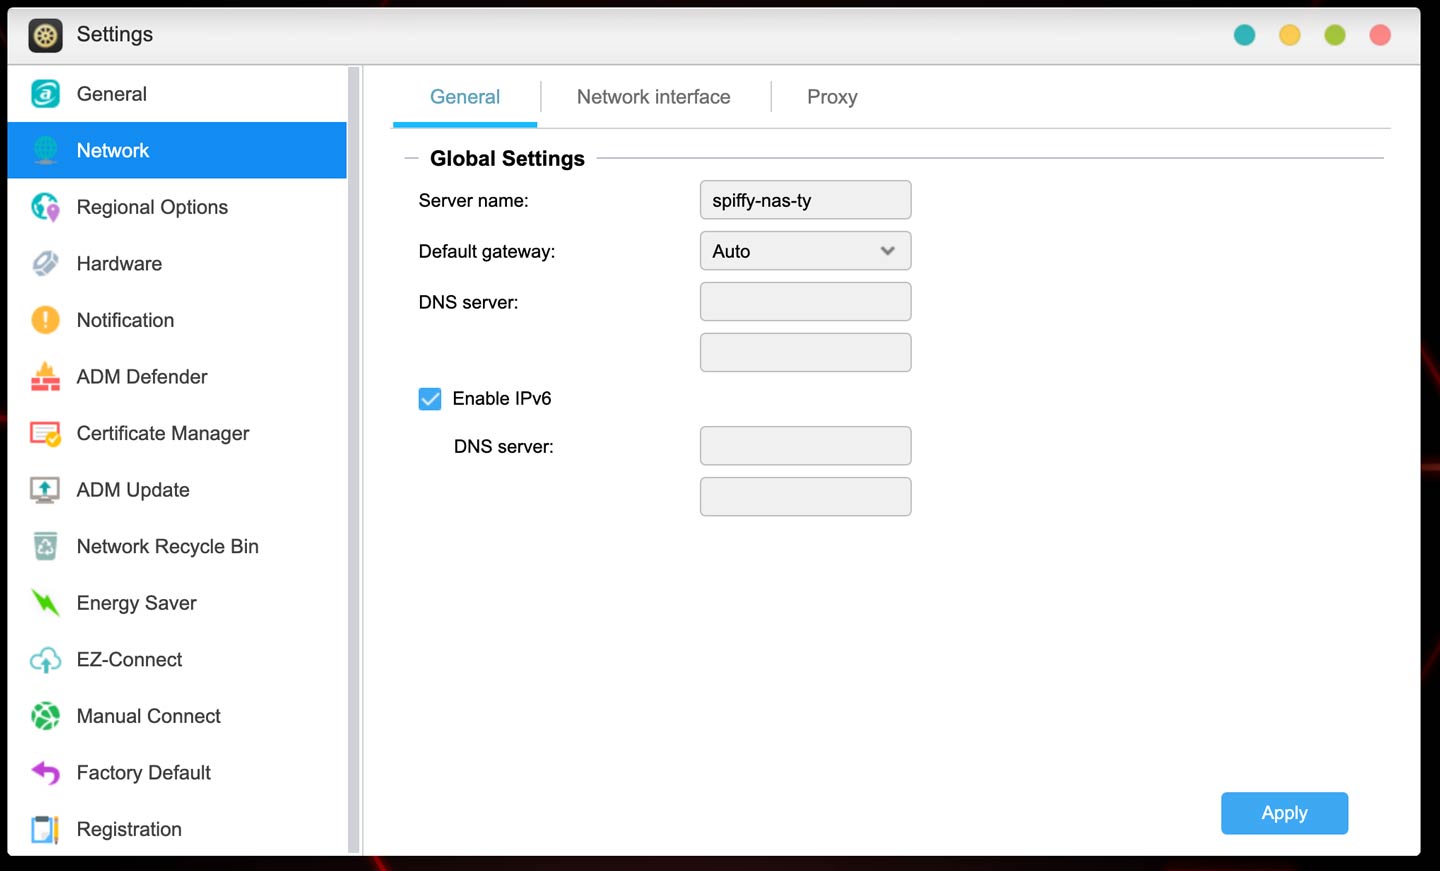
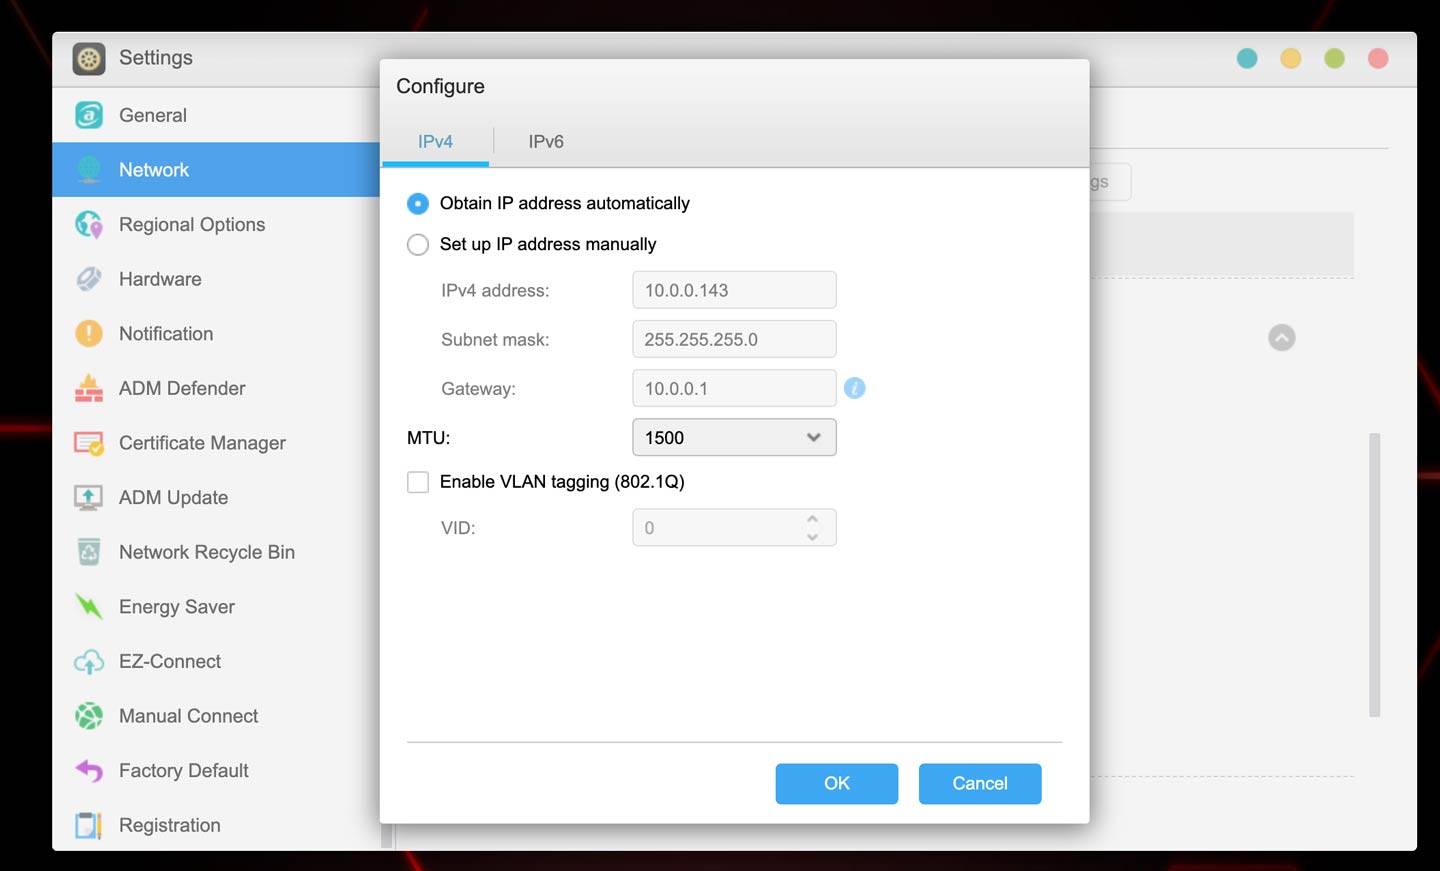
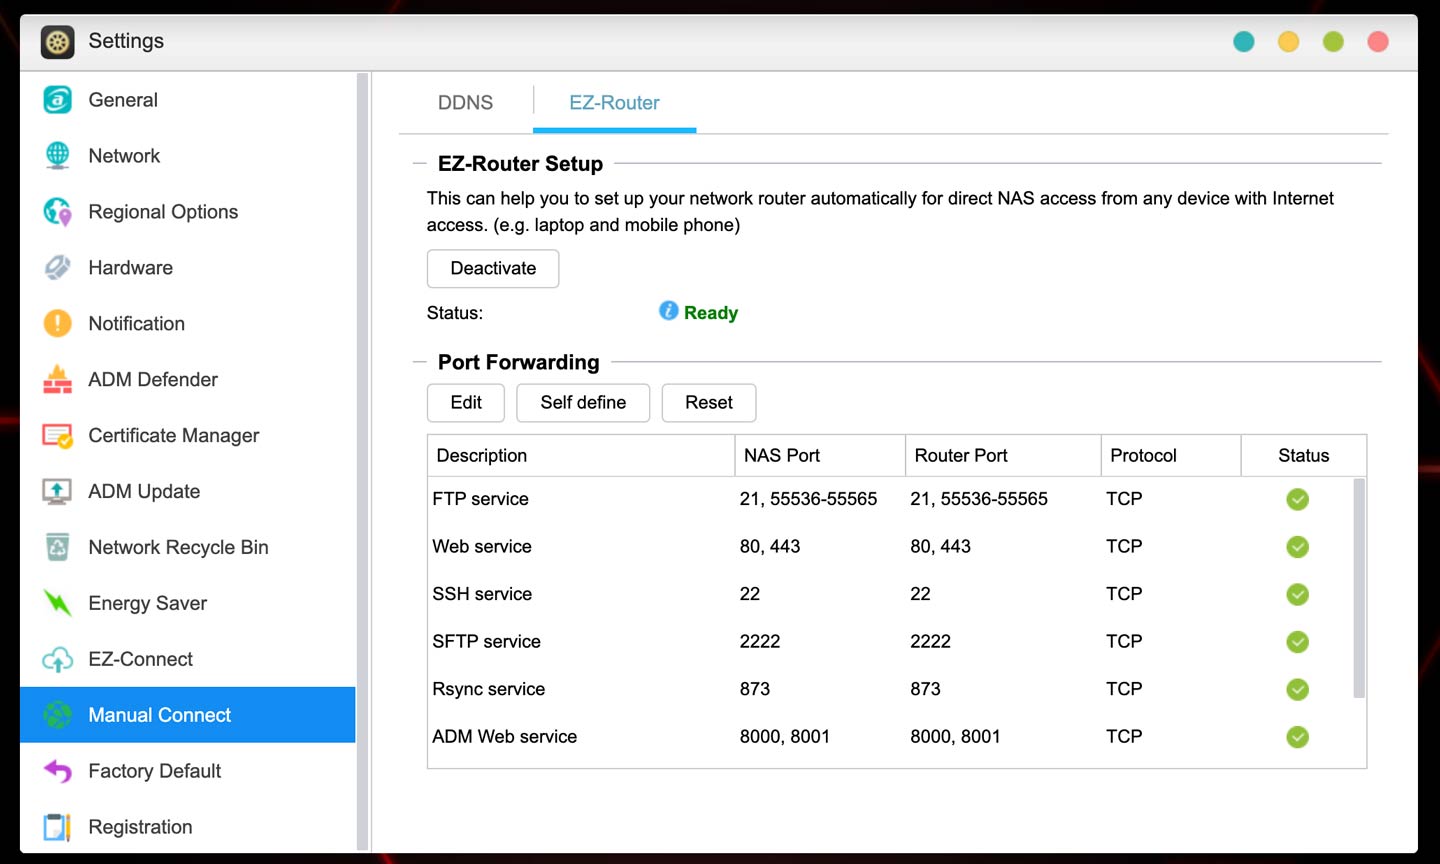
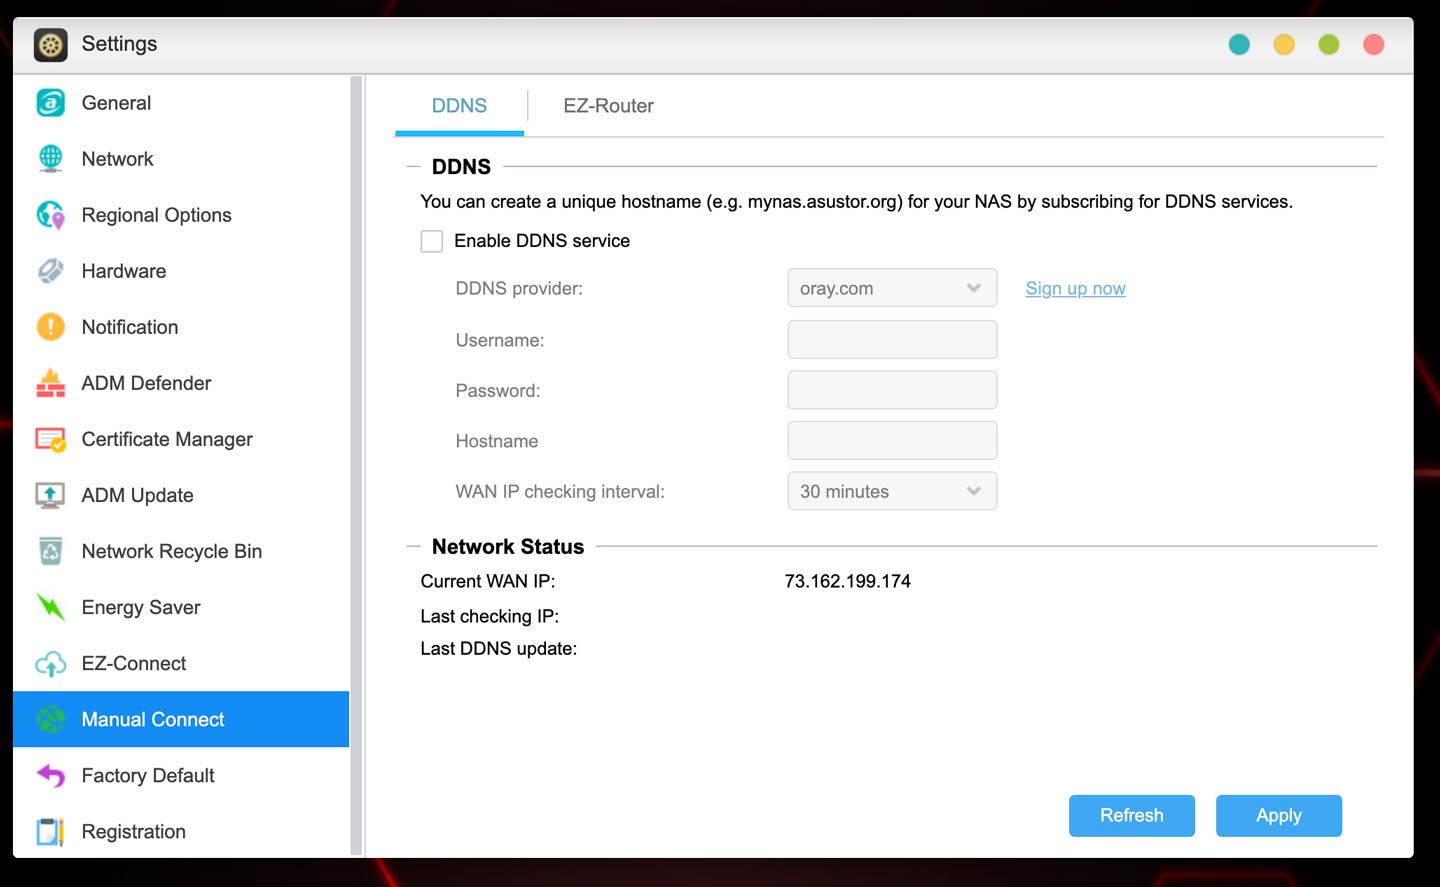