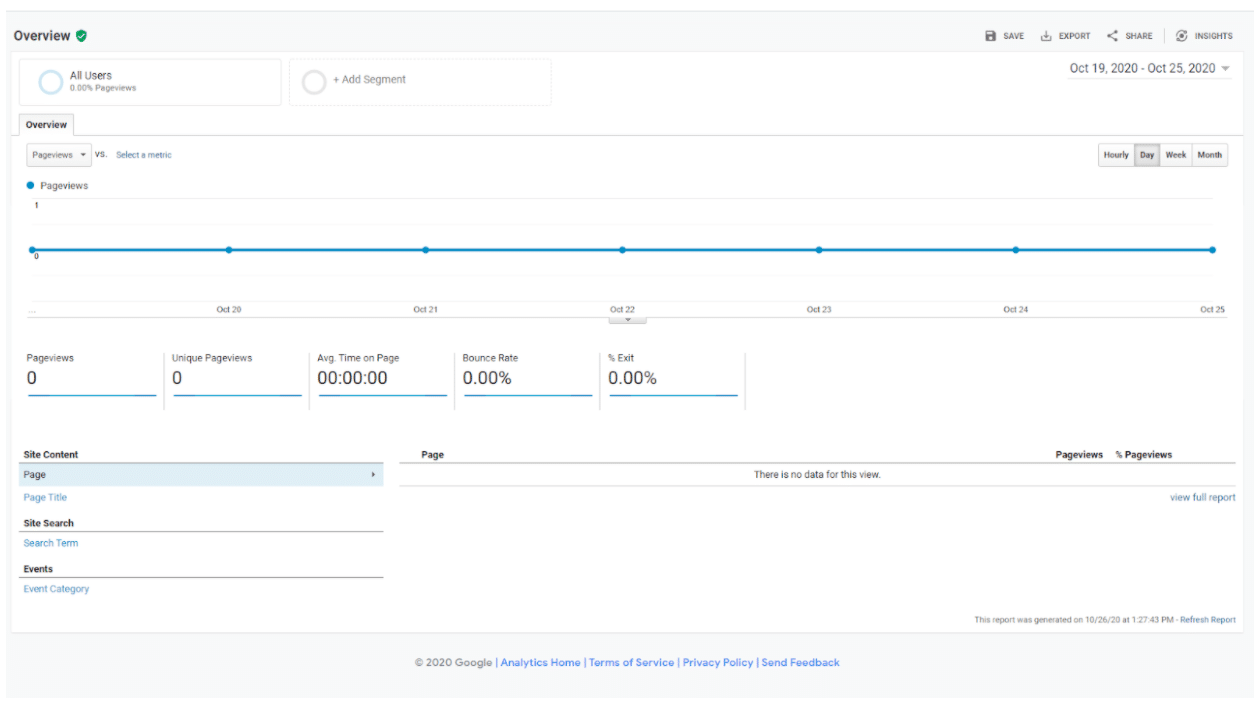
exclude your IP – other set up tips
https://databox.com/how-to-set-up-google-analytics
https://omnibug.io/
RESOURCES
set up tag manager – with a variable for gtag.js –
track the page view in tag manager as an event –
- Track Type: Event
- Category: {{Click URL}}
- Action: {{Page Path}}
- Label: {{Page URL}}
- Non-Interaction Hit: True
- Google Analytics Settings
- X Enable overriding settings in this tag
- Tracking ID : {{Analytics Settings – for GTM}}
- Added Conversion Linker:: (for ads generally)
- Linker Options:Enable linking on all page URLs
- Enable linking across domains
(domain list) - Auto Link Domains
- Decorate Forms
- URL Position
- Accept incoming linker parameters
- nakedsword.com, join.nakedsword.com,rocketgate.com
- Override cookie settings (advanced) – OFF
- Trigger: All Pages (page view)
-
https://www.analyticsmania.com/post/ecommerce-tracking-with-google-tag-manager
- https://www.analyticsmania.com/post/ultimate-google-tag-manager-data-layer-tutorial/
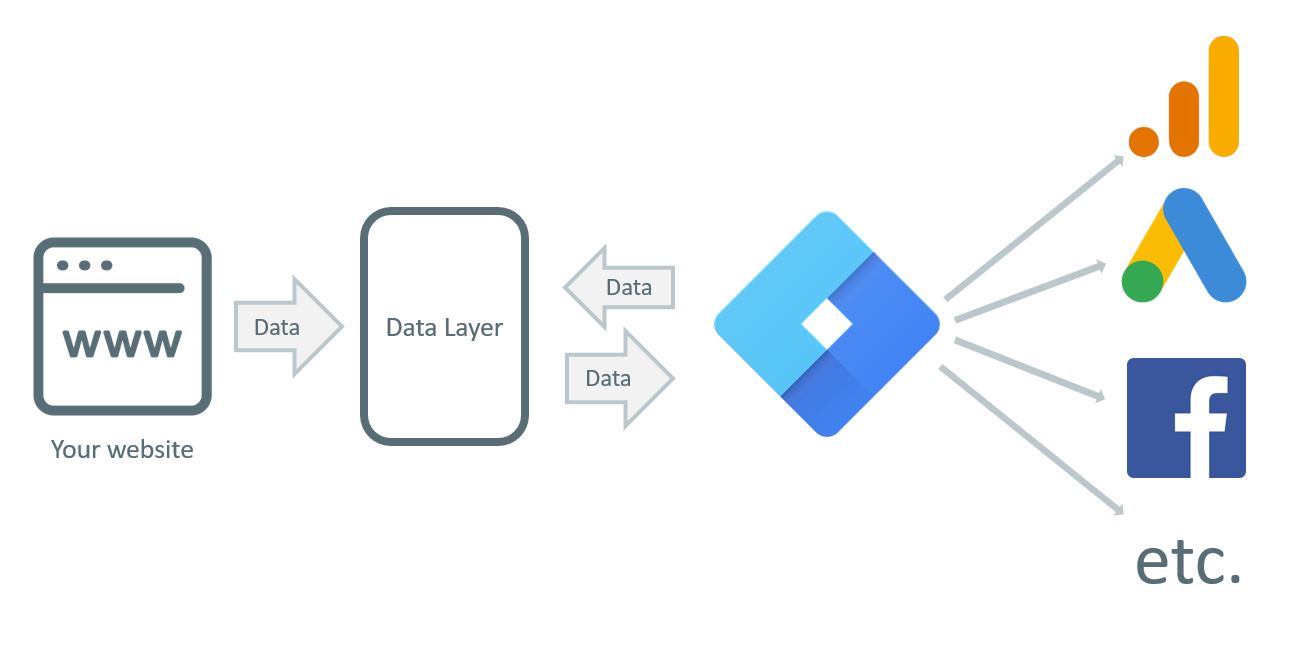
Data Layer Scheme
-
In order to make GA Ecommerce tracking with Google Tag Manager work, first, we need to get the transaction data pushed to the Data Layer. Then, we’ll instruct GTM to read that data and transfer it to Google Analytics. And it always works like that:
A developer (or a plugin) adds the transaction data to the Data Layer (after a purchase is successfully completed)
GTM is taught to recognize the successful purchase
GTM (with help of Universal Analytics tag) transfers that data from the Data Layer to Google Analytics
Here’s the code that needs to be added to the Data Layer (I’ll also refer to this code as the GA Ecommerce dataLayer.push code):[code language=”javascript”]
<script>
window.dataLayer = window.dataLayer || [];
dataLayer.push({
‘transactionId’: ‘1234’,
‘transactionAffiliation’: ‘Acme Clothing’,
‘transactionTotal’: 38.26,
‘transactionTax’: 1.29,
‘transactionShipping’: 5,
‘transactionProducts’: [{
‘sku’: ‘DD44’,
‘name’: ‘T-Shirt’,
‘category’: ‘Apparel’,
‘price’: 11.99,
‘quantity’: 1
},{
‘sku’: ‘AA1243544’,
‘name’: ‘Socks’,
‘category’: ‘Apparel’,
‘price’: 9.99,
‘quantity’: 2
}]
});
</script>
[/code]
Not every parameter is required. In fact, most of them are optional. But the more data you pass, the more you’ll see in Ecommerce reports.Speaking of the transaction parameters, only transactionId and transactionTotal are required. If with every sale you also pass transactionProducts, then the aforementioned dataLayer.push JavaScript snippet must also include name, sku, price, quantity.
If you want to see the full list of supported parameters, head over to the official Google’s documentation and expand the Standard Ecommerce section.
So there you have it: the guide on Ecommerce tracking with Google Tag Manager. Here are the key takeaways you need to remember:
A developer or a 3rd party plugin must push the transaction data to the Data Layer (with help of dataLayer.push).
The dataLayer.push code must be of the exact structure as in the official Google’s documentation.
Feel free to get rid of optional parameters (like transactionAffiliation or transactionTax) but under any circumstances do not rename the names of parameters or their structure/type. If the type of the transactionID is string (a.k.a. “text”), then it must remain as that. Don’t try to use your own names for the parameters, it won’t work.It is recommended to have that dataLayer.push code above the GTM container. If that’s not possible, then place it below and use DOM Ready trigger to fire the transaction tag. You can also ask a developer to add the “event” parameter to the dataLayer.push and then use it as a triggering condition (in the Custom Event Trigger).
Ecommerce transaction information can be passed to GA with help of the Universal Analytics tag (Tracking type: Transaction).
To prevent duplicate transactions, store their IDs in the 1st-party cookie and use that cookie to block repeating transactions.
https://www.absentdata.com/ecomerce-tracking-with-google-tag-manager/
Implementing E-commerce Tracking with Google Tag Manager will take a few steps:
- Enabling Google Analytics
- Implementing a Data Layer
- Configuring Google Tag Manager
How to Set Up Ecommerce Tracking with Google Tag Manager: Full Guide
Updated: May 13th, 2020. While Google Analytics offers a lot of tracking functionality out of the box (pageviews, sessions, traffic sources, etc.), the real magic begins after implementing custom features, like events or ecommerce tracking. Only then you’ll start seeing what really matters, conversions, and/or revenue.
By tracking important interactions, you’ll be able to combine their data with the default GA functionality and see what really drives sales, which traffic sources are more effective than others, etc.
But before you can analyze all of that, proper tracking must be set up. In this guide, I’ll show you how to implement Google Analytics Standard Ecommerce tracking with Google Tag Manager.
Table of Contents
Prerequisites
What is Google Analytics Ecommerce Tracking?
Which Ecommerce option (in GA) is right for you?
Ecommerce tracking with Google Tag Manager: What’s the plan?
#1. Enable Ecommerce reports in Google Analytics
#2. Transaction data in the Data Layer
#2.1. Several things to keep in mind
#2.2. Where to place that GA Ecommerce dataLayer.push code?
#2.3. Testing the GA Ecommerce dataLayer.push code with Google Tag Manager
#3. Configure Google Tag Manager to send Ecommerce data to Google Analytics
Scenario #1. dataLayer.push code is above the GTM container code
Scenario #2. dataLayer.push code is below the GTM container code
Scenario #3. dataLayer.push code contains the “event” parameter (useful for single-page websites)
#4. Let’s test
Prevent duplicate transactions
Checking GA Ecommerce reports
Missing a bunch of Ecommerce transactions?
Bonus: What if the “Thank you” page’s URL does not change? What trigger should be used?
Ecommerce tracking with Google Tag Manager: Final words
GA e-commerce tracking
GTM Recipe + Blueprint
Implement GA standard ecommerce tracking faster
by using this GTM container template
and following further instructions
Prerequisites
By writing this guide about Ecommerce Tracking with Google Tag Manager (GTM) I presume that you are already familiar with what GTM is and what purpose does it serve. If you have never heard of it or have never used it, take a look at these guides first:
13 reasons to start using Google Tag Manager
GTM vs Google Analytics. What’s the difference?
Best ways to learn Google Tag Manager
How to install Google Tag Manager?
How to get Google Tag Manager help?
Also, I presume that you already know some Google Analytics basics and are familiar with its interface.
What is Google Analytics Ecommerce Tracking?
By doing some additional configuration, you can start tracking sales with Google Analytics. All thanks to Ecommerce tracking features.
By implementing them, you will be able to measure the number of transactions, revenue that your website generates, etc.
Ecommerce Reports
Once a user completes a purchase (and is redirected to the Order Confirmation page) this moment can be captured by Google Analytics. By sending transaction data to GA (like Order Total or Purchased products) you’ll unlock new reporting possibilities and will start seeing how your marketing efforts are actually impacting online sales.
There are two main types of Google Analytics ecommerce implementation methods:
Standard Ecommerce reports in Google Analytics allow you to analyze purchase activity on your site or app. You can see product and transaction information, average order value, ecommerce conversion rate, time to purchase, and other data.
Enhanced Ecommerce adds functionality to your Google Analytics reports. Enhanced ecommerce shows when customers added items to their shopping carts, when they started the checkout process, and when they completed a purchase. You can also use enhanced ecommerce to identify segments of customers who fall out of the shopping funnel.
GA e-commerce tracking
GTM Recipe + Blueprint
Implement GA standard ecommerce tracking faster
by using this GTM container template
and following further instructions
Subscribe to newsletter and save time
Your email address
Your first name
SUBSCRIBE AND GET THIS TIME-SAVER
Unsubscribe at any time.
Which Ecommerce Reports Option Is Right for You?
If you want to see only sales data and how well each product performs, which traffic sources generate sales, then choose Standard Ecommerce functionality.
If you want to see not only purchases but visitor’s journey as well (data related to Add to cart activity, Checkout steps, etc.), then Enhanced Ecommerce should be your option.
However, it is much more difficult to implement Enhanced Ecommerce functionality, additionally, it requires much more developer’s time to get things going. Therefore, you’d need to weigh your options. With EE, you’ll get much more insights, but it’s much more expensive to properly implement.
This guide will explain only how to implement Standard Ecommerce reports. A very thorough step-by-step process with practical and actionable examples is explained in my Intermediate Google Tag Manager course (+ Advanced Topics).
Ecommerce Tracking with Google Tag Manager: What’s the Plan?
Although Google Tag Manager is usually promoted as the tool which enables marketers/web analysts to control web tracking without developer’s input, this time you’ll most likely need to get his/her help. Compared to Enhanced Ecommerce tracking, Standard Ecommerce requires a fairly small amount of developer’s time to successfully implement sales tracking.
Here’s the plan that you’ll need to follow in this guide:
First, you’ll need to enable Ecommerce Reports in Google Analytics
Then you’ll need to ask a developer to push a transaction data to the Data Layer (or get a plugin for that purpose, if possible)
Send the Ecommerce transaction data to Google Analytics (via Google Tag Manager)
Test if everything is working properly
Ready to implement Ecommerce tracking with Google Tag Manager? Let’s roll!
#1. Enable Ecommerce Reports in Google Analytics
Log in to your Google Analytics account and go to the Admin section. You can reach it by clicking the gear icon in the bottom left corner:
Enable Ecommerce Reports 1
…and then choose Ecommerce Settings on the view-level. Then click the toggle button to enable Ecommerce features. Leave Enhanced Ecommerce features disabled (because it’s out of the scope of this guide).
Enable Ecommerce Reports 2
That’s it! Easy. The upcoming steps of Ecommerce tracking with Google Tag Manager won’t be that simple 🙂
#2. Transaction Data in the Data Layer
If you’re not familiar yet, the Data Layer is one of the key components of Google Tag Manager which can contain useful information that is later used in GTM tags, triggers, and variables. If you’re not familiar with it (or want to learn more), read this guide.
In order to make GA Ecommerce tracking with Google Tag Manager work, first, we need to get the transaction data pushed to the Data Layer. Then, we’ll instruct GTM to read that data and transfer it to Google Analytics. And it always works like that:
A developer (or a plugin) adds the transaction data to the Data Layer (after a purchase is successfully completed)
GTM is taught to recognize the successful purchase
GTM (with help of Universal Analytics tag) transfers that data from the Data Layer to Google Analytics
Here’s the code that needs to be added to the Data Layer (I’ll also refer to this code as the GA Ecommerce dataLayer.push code):
window.dataLayer = window.dataLayer || [];
dataLayer.push({
‘transactionId’: ‘1234’,
‘transactionAffiliation’: ‘Acme Clothing’,
‘transactionTotal’: 38.26,
‘transactionTax’: 1.29,
‘transactionShipping’: 5,
‘transactionProducts’: [{
‘sku’: ‘DD44’,
‘name’: ‘T-Shirt’,
‘category’: ‘Apparel’,
‘price’: 11.99,
‘quantity’: 1
},{
‘sku’: ‘AA1243544’,
‘name’: ‘Socks’,
‘category’: ‘Apparel’,
‘price’: 9.99,
‘quantity’: 2
}]
});
Not every parameter is required. In fact, most of them are optional. But the more data you pass, the more you’ll see in Ecommerce reports.
Speaking of the transaction parameters, only transactionId and transactionTotal are required. If with every sale you also pass transactionProducts, then the aforementioned dataLayer.push JavaScript snippet must also include name, sku, price, quantity.
If you want to see the full list of supported parameters, head over to the official Google’s documentation and expand the Standard Ecommerce section.
#2.1. Several Things to Keep in Mind
There are several additional things you need to know before you copy that code and send it to the developer:
Blindly copying the aforementioned code and pasting it on a “Thank you” page won’t work. The developer must replace the value of each parameter with actually meaningful data. If the order total is $30, then the value of transactionTotal in that code must be 30.00. So in other words, the values of all the parameters must be replaced dynamically by the function(s) written by the developer.
The names of those parameters and the entire structure of the code must be identical to the one which is displayed in the aforementioned code and Google’s documentation. You are free to skip optional parameters, but you cannot rename transactionTotal into something else like orderTotal. Custom parameters are not supported in the code, therefore the developer must follow the exact naming convention used in that Ecommerce Transaction JS code.
If you are using a popular Ecommerce platform, like WooCommerce, then there is a high chance that a ready-made plugin exists which can send the GA Ecommerce transaction data to the Data Layer (in a proper format) after a successful purchase. In WooCommerce’s case, such a plugin is called GTM4WP. You can enable Standard Ecommerce tracking by going to plugin’s settings > Integration > Woocommerce and clicking Track classic e-commerce.Classic Ecommerce in GTM4WP
MORE:https://www.analyticsmania.com/post/ecommerce-tracking-with-google-tag-manager/
Before we jump into how exactly to do that, let’s take a look at what makes Google Analytics so great.
Table of Contents
How to set up Google Analytics in 5 simple steps
What to do after you’ve set up Google Analytics
5 ways to use Google Analytics to analyze your web traffic
Bonus: Get a free social media analytics report template that shows you the most important metrics to track for each network.
Why you need Google Analytics
Google Analytics is a robust and powerful tool that provides indispensable information about your website and visitors.
With more than 56% of all websites using Google Analytics, it’s also one of the most popular tools out there for digital marketers — and for good reason. The tool allows you to access a wealth of information regarding your site’s visitors.
Here’s just a few pieces of data you can get from Google Analytics:
- Amount of traffic your site gets overall
- The websites your traffic came from
- Individual page traffic
- Amount of leads converted
- The websites your leads came form
- Demographic information of visitors (e.g. where they live)
- Whether your traffic comes from mobile or desktop
It doesn’t matter if you’re a freelancer with a humble blog or if you’re a big company with a massive website. Anyone can benefit from the information in Google Analytics.
Now that you know how great it is, let’s jump into exactly how to set up Google Analytics for your own website.
How to set up Google Analytics in 5 simple steps
Setting up Google Analytics can be tricky. However, once you have it set up, you stand to gain a ton of invaluable information very quickly.
This is pure 80/20 — with a small amount of work now you stand to gain disproportionate rewards later.
To set up Google Analytics, you simply have to follow these steps:
- Step 1: Set up Google Tag Manager
- Step 2: Create Google Analytics account
- Step 3: Set up analytics tag with Google Tag Manager
- Step 4: Set up goals
- Step 5: Link to Google Search Console
Let’s jump in.
Step 1: Set up Google Tag Manager
Google Tag Manager is a free tag management system from Google.
The way it works is simple: Google Tag Manager takes all the data on your website and sends it to other platforms such as Facebook Analytics and Google Analytics.
It also allows you to easily update and add tags to your Google Analytics code without having to manually write code on the back end—saving you time and a lot of headaches down the road.
Let’s say you want to be able to track how many people clicked on a downloadable PDF link. Without Google Tag Manager, you’d have to go in and manually change all the download links to do this. However, if you have Google Tag Manager, you can just add a new tag to your Tag Manager to track the downloads.
First, you’ll have to create an account on the .

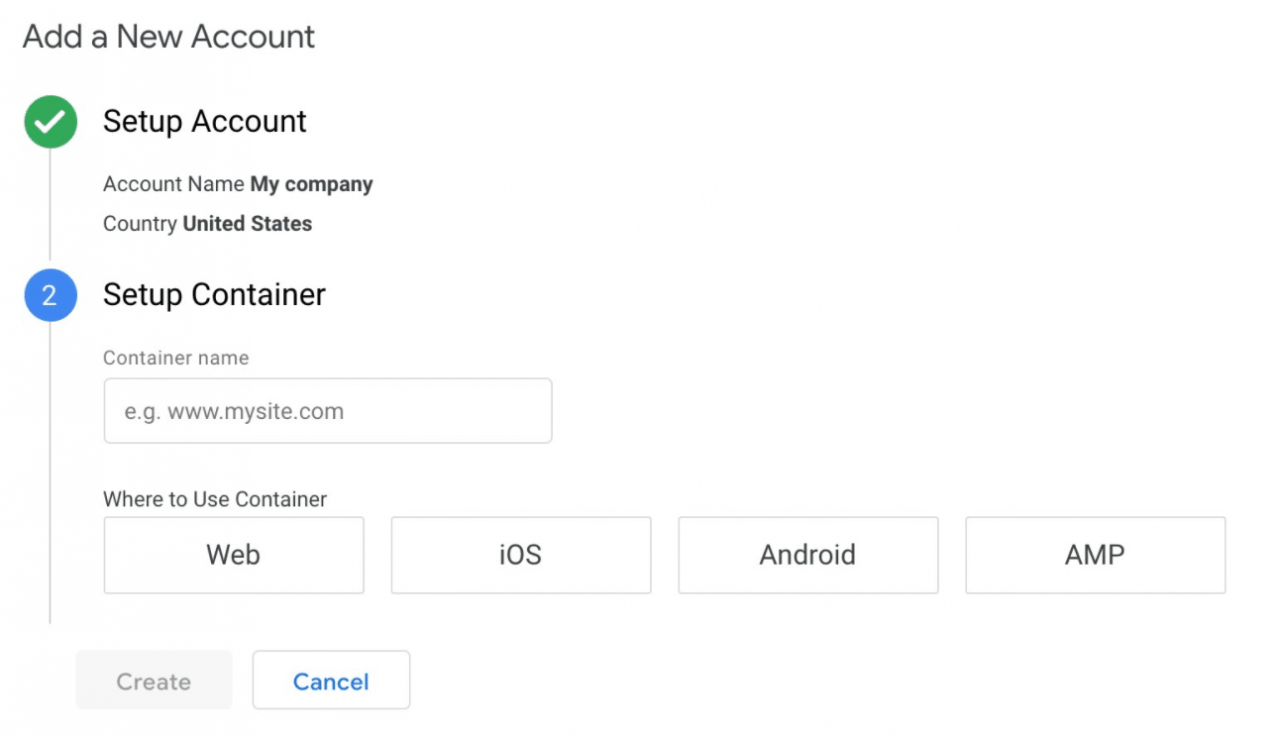
Enter in an account name and click continue.
You’ll then set up a container, which is essentially a bucket containing all of the “macros, rules, and tags” for your website, according to Google.

Give your container a descriptive name and select the type of content it’ll be associated with (Web, iOS, Android, or AMP).
Once that’s done, click create, review the Terms of Service, and agree to those terms. You’ll then be given the container’s installation code snippet.
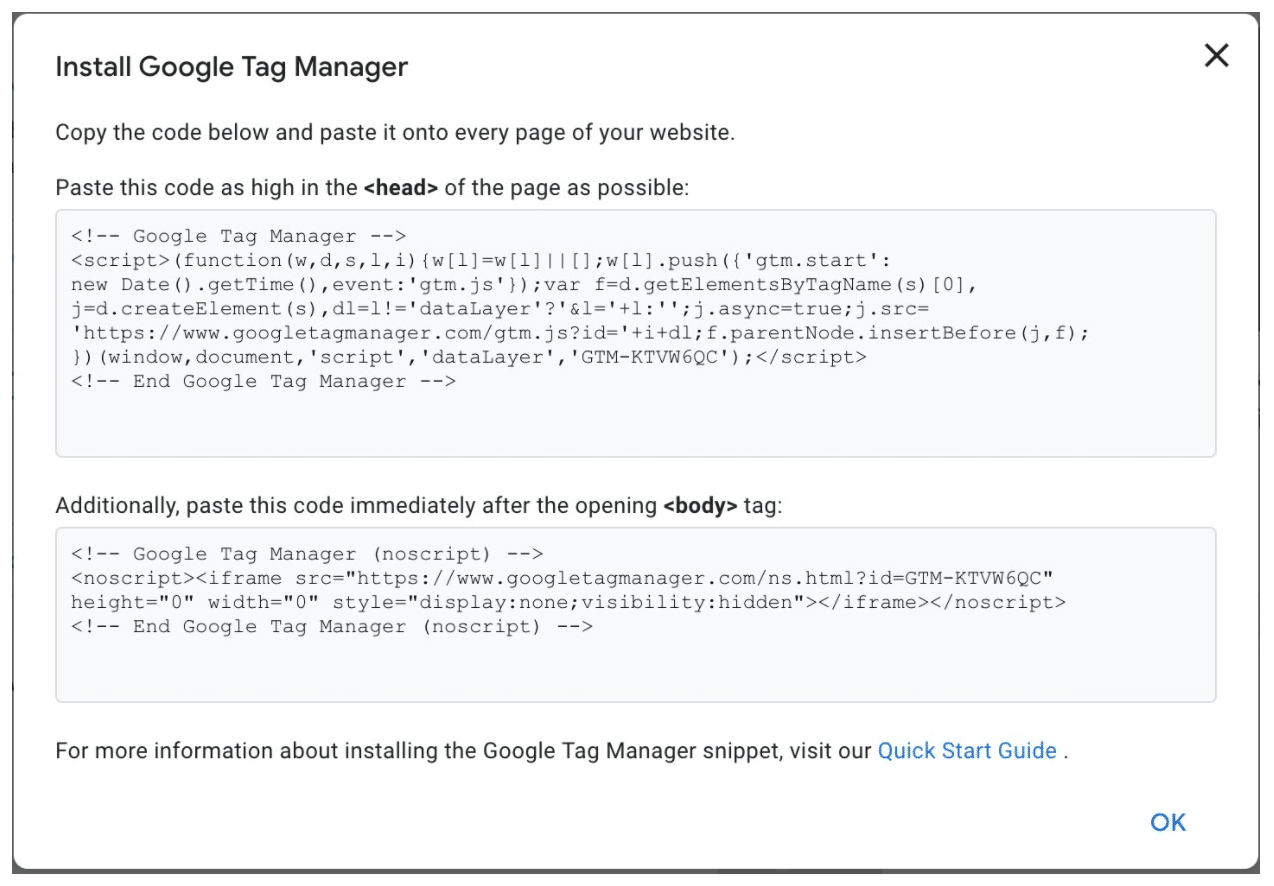
This is the piece of code you’ll be pasting into your website’s back end in order to manage your tags. To do that, copy and paste the two snippets of code onto every page of your website. As the instructions say, you’ll need to the first one in the header and the second after the opening of the body.
If you’re using WordPress, you can easily do this by pasting the two pieces of code into your WordPress theme.
Pro tip: You can make this process even easier by installing and activating the Insert Headers and Footers plugin for WordPress (or equivalent for other types of websites). This will allow you to add any script to the Header and Footer throughout your entire website, but you only have to copy and paste it once.
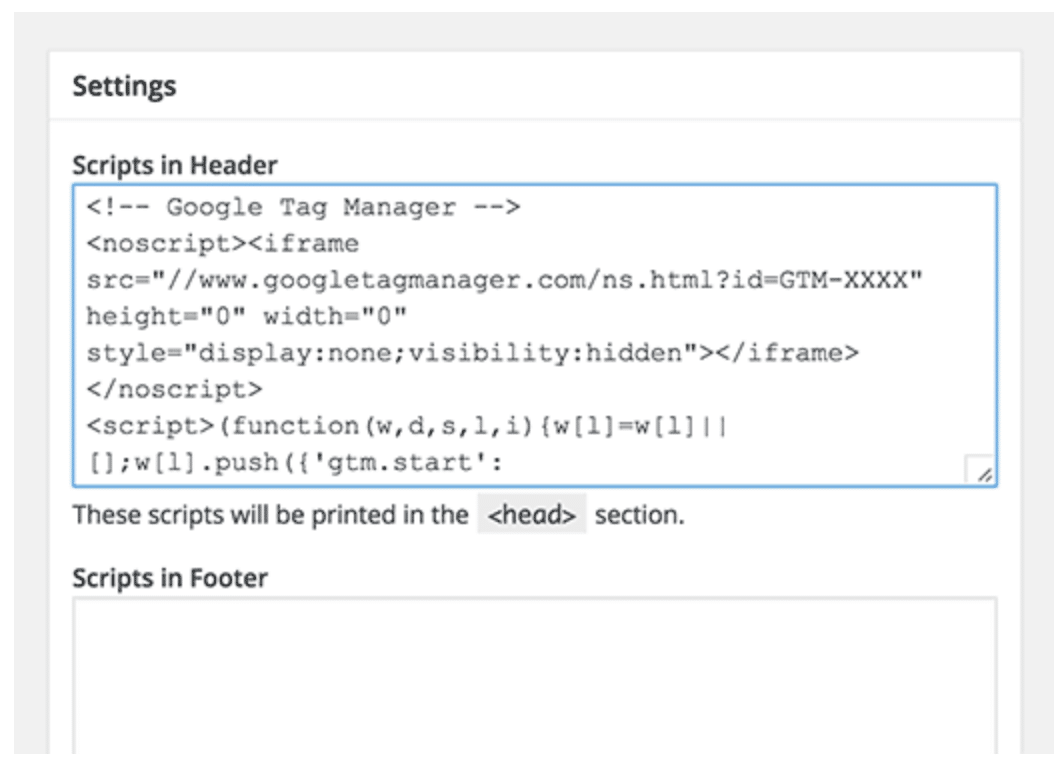
Source: WPBeginner
Once that’s done, you can move onto Step 2.
Step 2: Set up Google Analytics
Like Google Tag Manager, you’re going to want to create a Google Analytics account by .

Enter your account and website name, as well as the website’s URL. Be sure to also select your website’s industry category and the time zone you want the reporting to be in.

Once you do all that, accept the Terms and Services in order to get your tracking ID.

Source: Google
The tracking ID is a string of numbers that tells Google Analytics to send analytics data to you. It’s a number that looks like UA-000000-1. The first set of numbers (000000) is your personal account number and the second set (1) is the property number associated with your account.
This is unique to your website and your personal data—so don’t share the tracking ID with anyone publicly.
Once you have the tracking ID, it’s time to move onto the next step.
Step 3: Set up analytics tag with Google Tag manager
Now you’ll learn how to set up specific Google Analytics tracking tags for your website.
Go to your Google Tag Manager dashboard and click on the Add a new tag button.
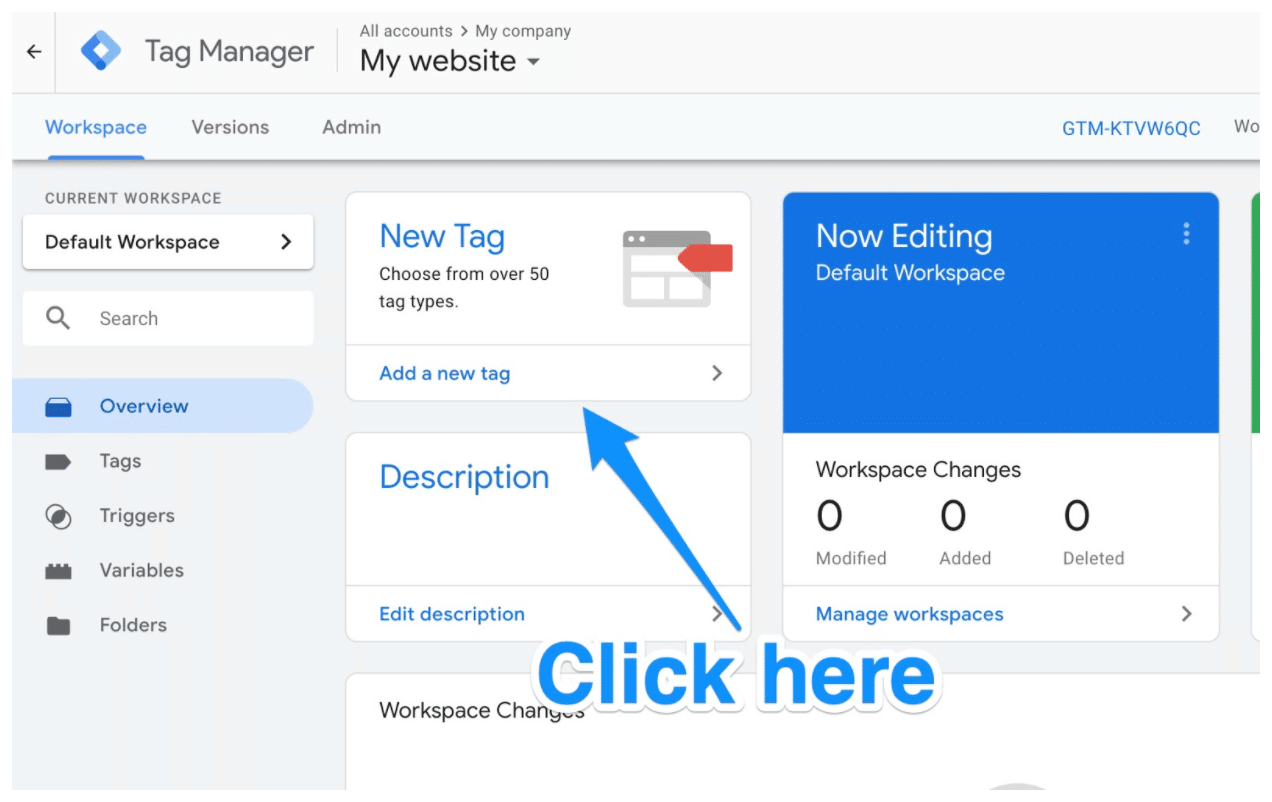
You will be taken to a page where you can create your new website tag.
On it, you’ll see that you can customize two areas of your tag:
- Configuration. Where the data collected by the tag will go.
- Triggering. What type of data you want to collect.
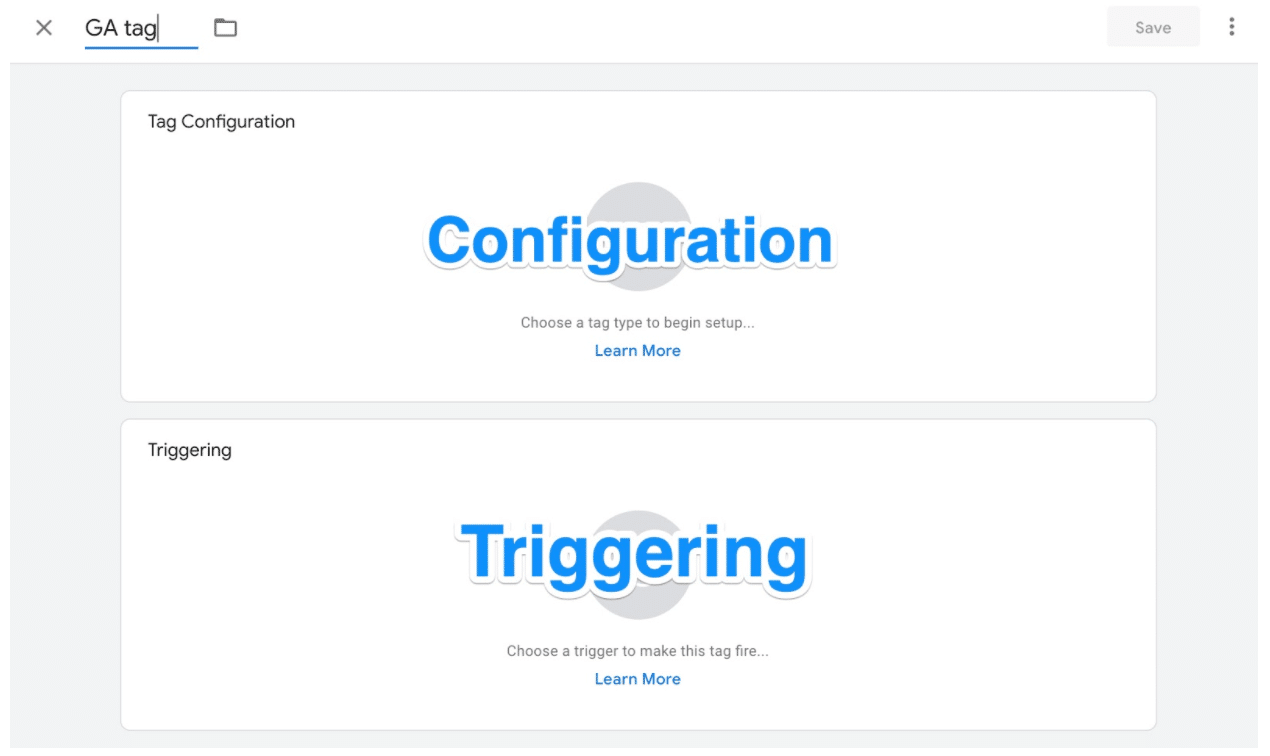
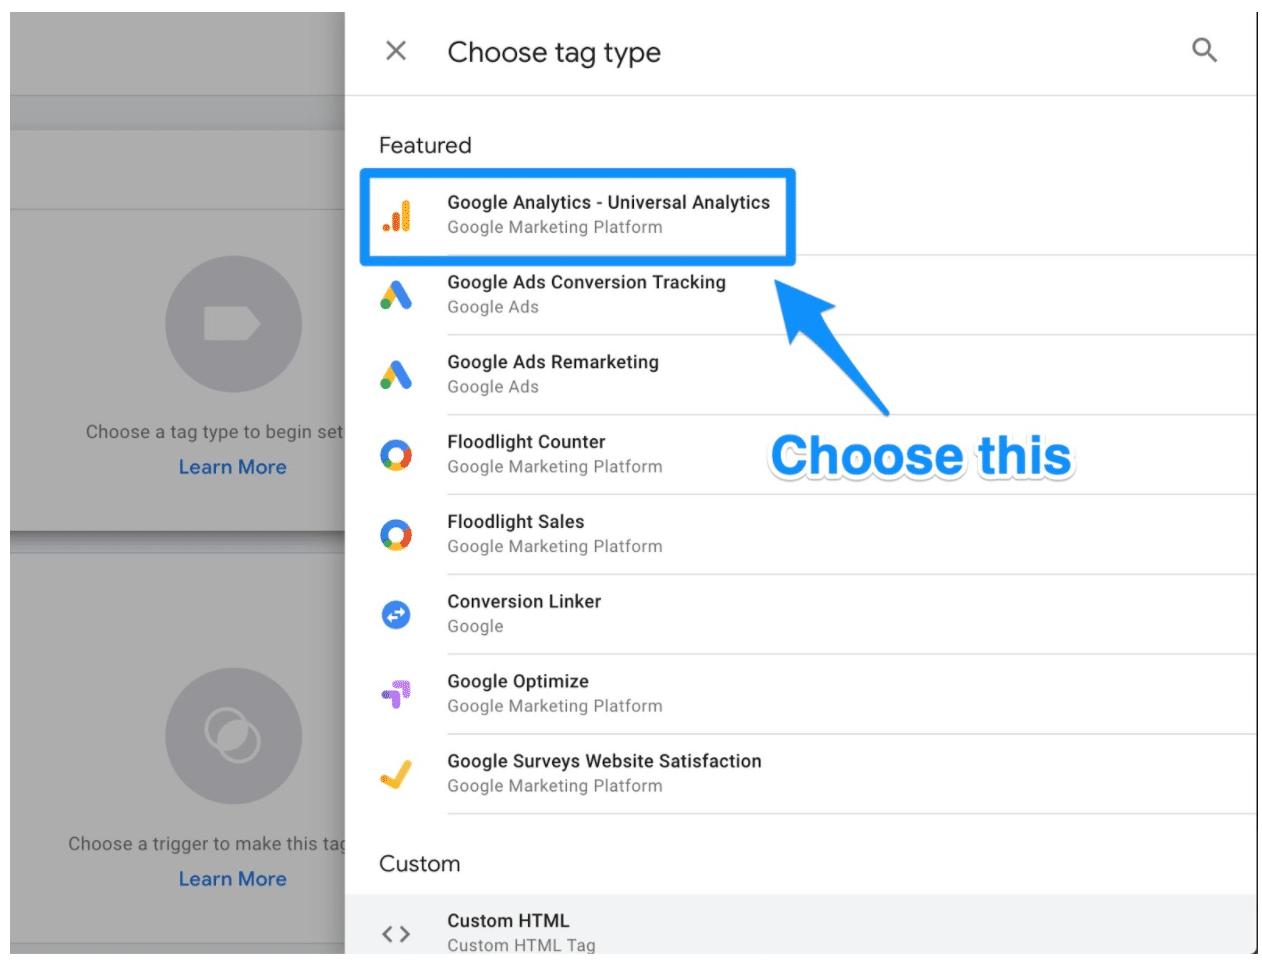
Click on the Tag Configuration button to choose the type of tag you want to create.
You’ll want to choose the “Universal Analytics” option in order to create a tag for Google Analytics.
Once you click on that, you’ll be able to choose the type of data you want to track. Do that and then go to “Google Analytics Setting” and choose “New Variable…” from the dropdown menu.
You’ll then be taken to a new window where you’ll be able to enter in your Google Analytics tracking ID. This will send your website’s data straight into Google Analytics where you’ll be able to see it later.
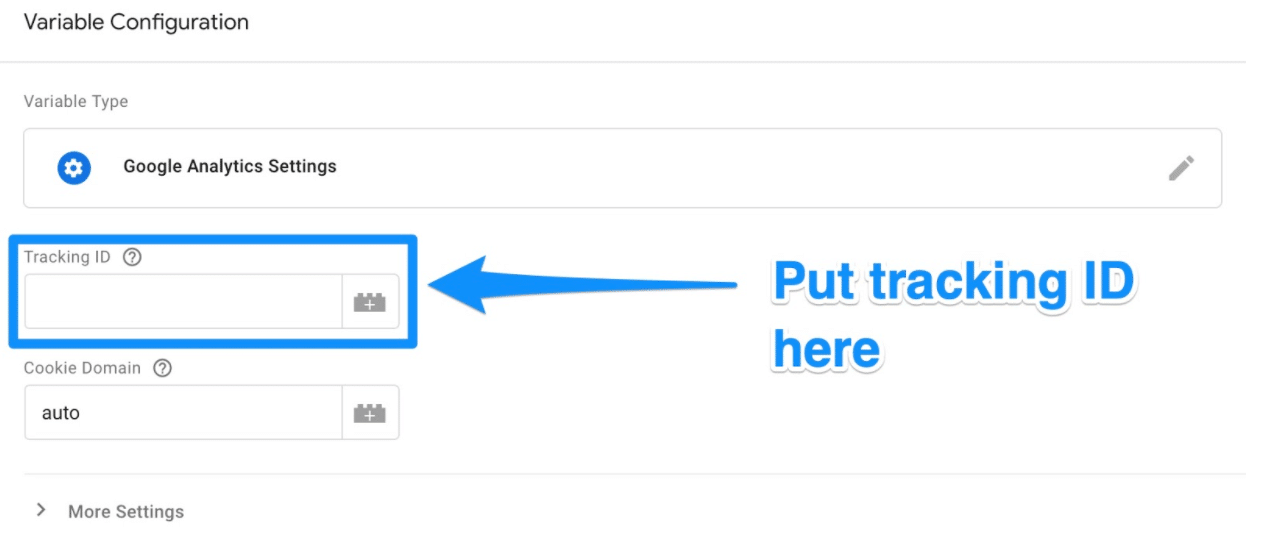
Once this is done, head to the “Triggering” section in order to select that data you want to send to Google Analytics.
As with the “Configuration,” click on the Triggering button in order to be sent to the “Choose a trigger” page. From here, click on All pages so it sends data from all your web pages.

When all is said and done, your new tag set up should look something like this:
Bonus: Get a free social media analytics report template that shows you the most important metrics to track for each network.

Now simply click on Save and voila! You have a new Google Tag tracking and sending data to your Google Analytics page about your website!
We’re not done yet, though. You still need to set up your goals — which brings us to…
Step 4: Set up Google Analytics goals
While you probably know the key performance indicators for your website and business, Google Analytics doesn’t.
That’s why you need to tell Google what success looks like for your website.
In order to do that, you need to set goals on your Google Analytics dashboard.
Start by clicking on the Admin button on the bottom left corner.
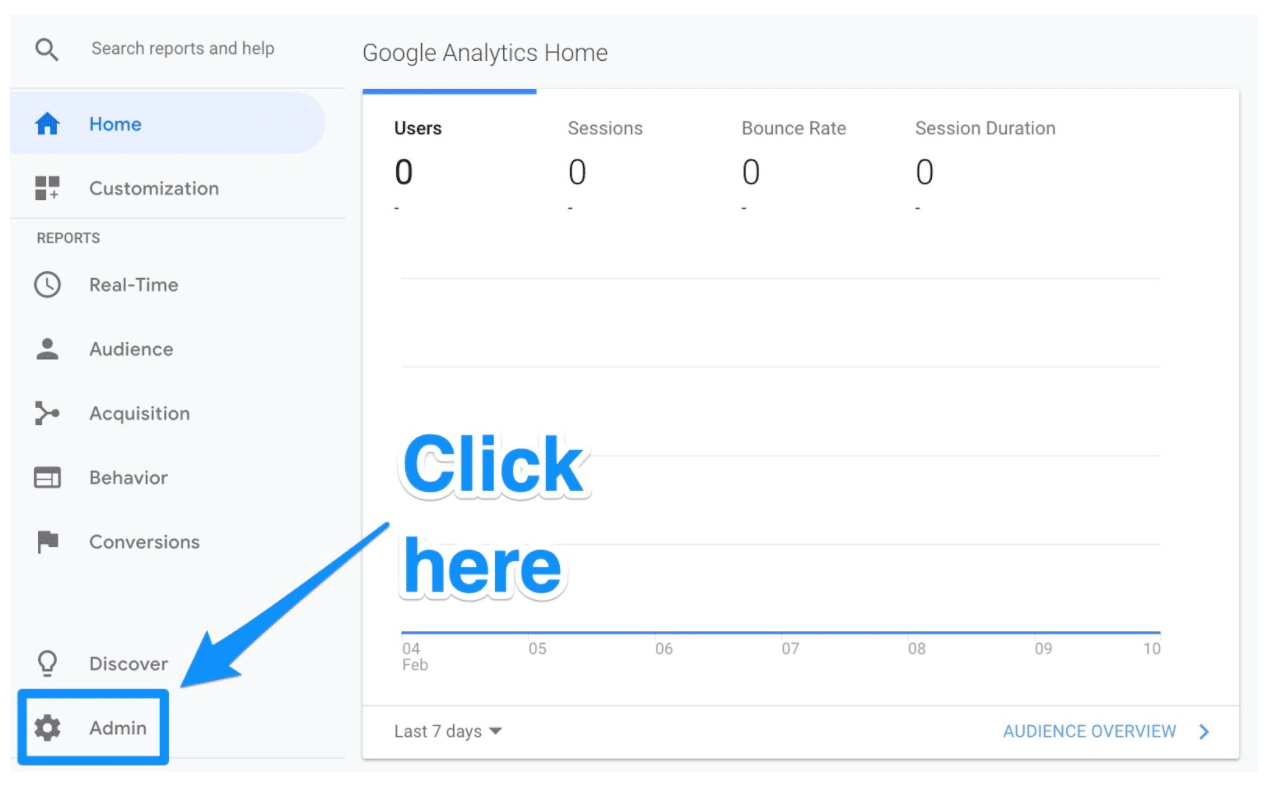
Once you do, you’ll be sent to another window where you’ll be able to find the “Goals” button.
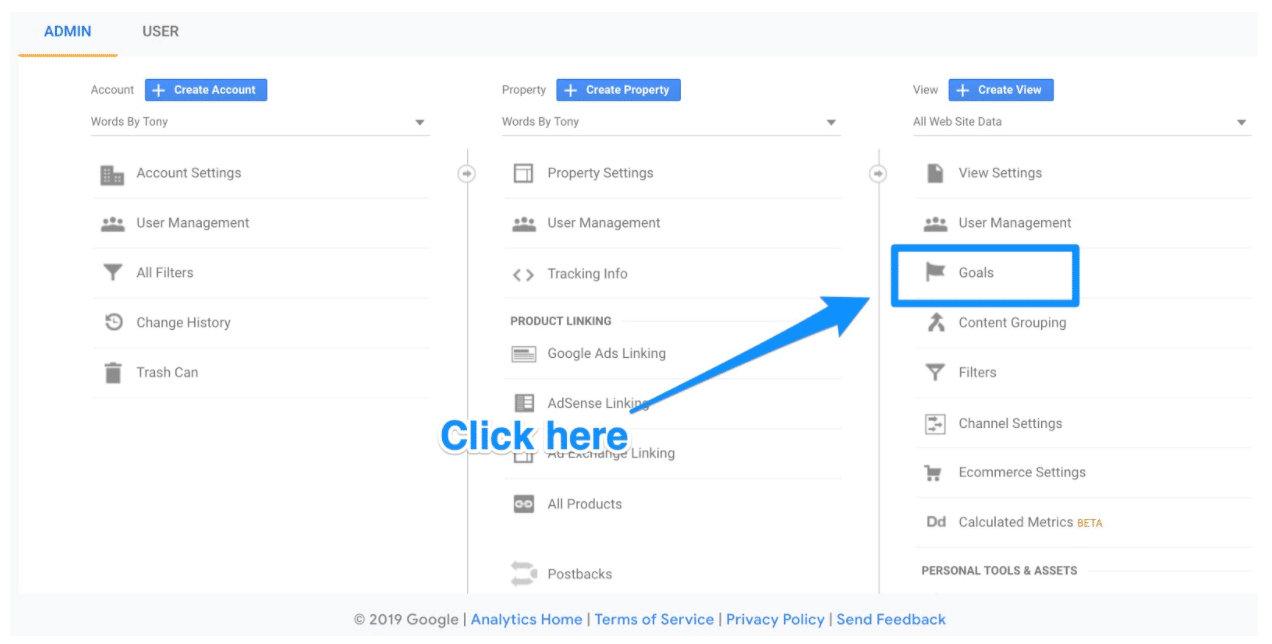
Click on that button and you’ll then be taken to the “Goals” dashboard where you’ll be able to create a new goal.

From here, you’ll be able to look through different goal templates to see if one matches your intended goal. You’ll also need to choose the type of goal you want. They include:
- Destination. e.g. if your goal was for your user to reach a specific web page.
- Duration. e.g. if your goal was for users to spend a specific amount of time on you site.
- Pages/Screens per session. e.g. if your goal was to have users go to a specific amount of pages.
- Event. e.g. if your goal was to get users to play a video or click on a link.
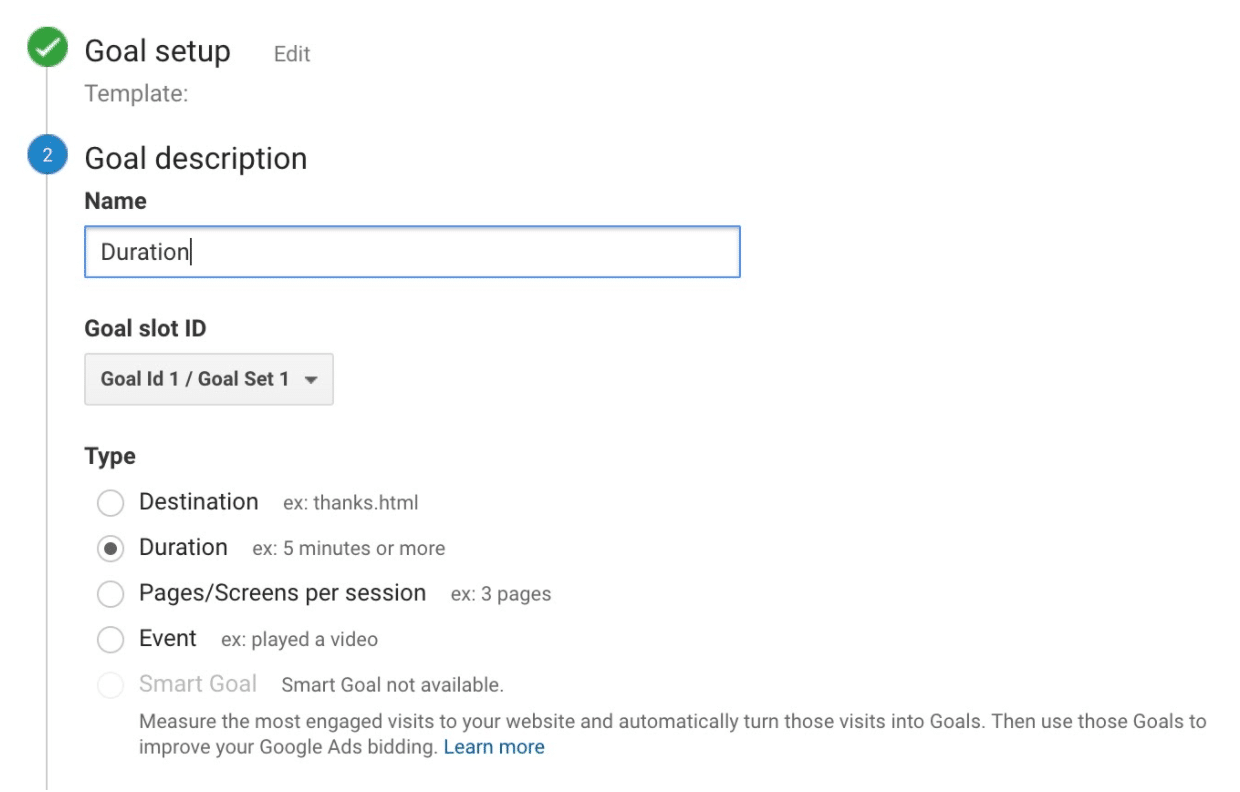
From there, you can get even more specific with your goals like choosing exactly how long users need to spend on your site in order to consider it a success. Once you’re done, save the goal and Google Analytics will start to track it for you!

Remember: There is a wide variety of data you can track using both Google Tag Manager and Google Analytics. It’s easy to get lost in all the metrics you can track. Our recommendation is to start small with the metrics that matter most to you.
Step 5: Link to Google Search Console
Google Search Console is a powerful tool to help marketers and webmasters gain invaluable search metrics and data.
With it, you can do things like:
- Check your site’s search crawl rate
- See when Google analyzes your website
- Find out what internal and external pages link to your website
- Look at the keyword queries you rank for in search engine results
To set it up, click on the gear icon in the lower left hand corner of the main dashboard.

Then click on Property Settings in the middle column.
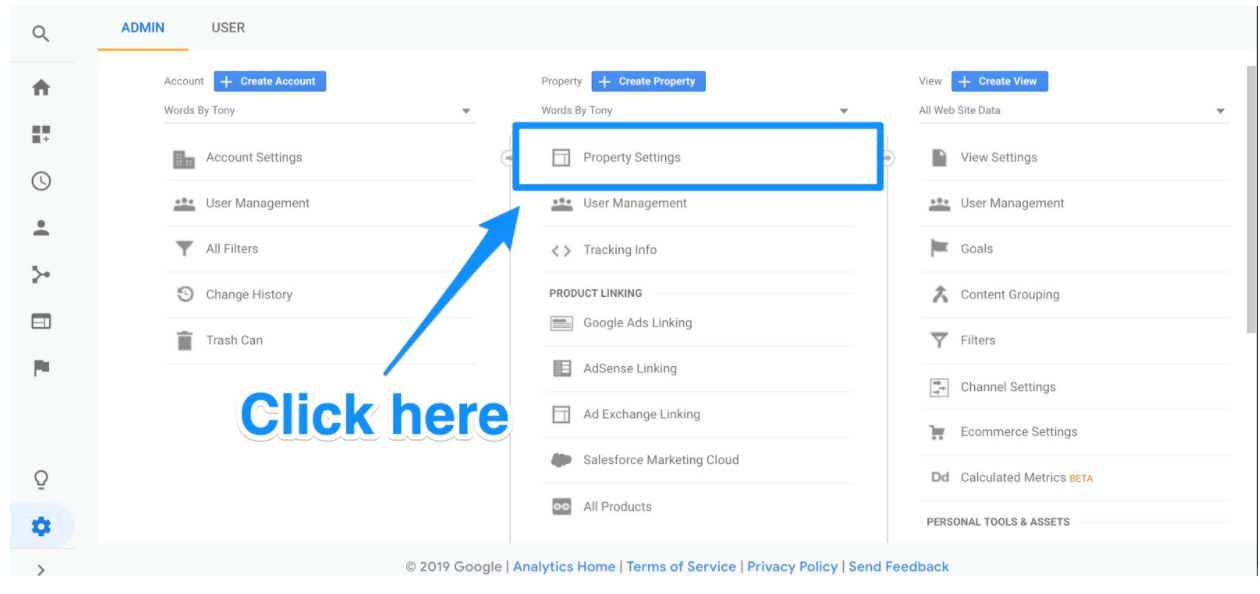
Scroll down and click on Adjust search console.

Here you’ll be able to start the process of adding your website to Google Search Console.

Click on the Add button and you’ll be redirected to this page. At the bottom, click on the Add a site to Search Console button.

From here, you’ll be able to add a new website to Google Search Console. Enter in your website’s name and click Add.

Follow the directions to add the HTML code to your site. Once you’re done with that, click on “Save” and you should be taken back to Google Analytics!
Your data won’t appear right away—so be sure to check back later to see your Google Search Console data.
What to do after you’ve set up Google Analytics
Now, there are a ton of different things you can do with Google Analytics. The world of data analysis and web marketing is literally at your fingertips.
Here are a few suggestions of things you can do:
Grant access to your team
If you’re working with a team, grant permissions to make sure other people can access the data on Google Analytics.
To add users, you simply have to follow these six steps from Google:
- Click on the gear icon in the lower left hand corner to go to the Admin dashboard
- In the first column, click on the User Management button.
- Click Add new users
- Enter the email address for the user’s Google account
- Select the permissions you want to grant them
- Click Add
And voila! You should now be able to give others access to your business’s Google Analytics data.
Link Google Ads with Google Analytics
If your business uses Google Ads, you can now link that to your Google Analytics account so you can see “the full customer cycle, from how they interact with your marketer (e.g. seeing ad impressions, clicking ads) to how they finally complete the goals you’ve set for them on your site (e.g. making purchases, consuming content),” according to Google.
To link the two accounts, follow the seven steps below:
- Click on the gear icon in the lower left hand corner to go to the Admin dashboard
- In the “Property” column, click on Google Ads Linking
- Click on New Link Group
- Click on the Google Ads accounts you want to link with Google Analytics
- Click Continue
- Make sure that linking is on for each property you want to see data from Google Ads
- Click Link accounts
With your accounts link, you’ll have even greater access to information you need to determine your ad campaign’s ROI.
Set up views
Google Analytics allows you to set up your reports so you only see the data and metrics that matter to you through “views.”
By default, Google Analytics gives you an unfiltered view of each website in your account. That means if you have, say, three websites associated with you Google Analytics, it’ll all be sent to one property where the data is aggregated.
However, you can set it up so you only get the data you want to see. For example, you could have a view that helps you see only organic search traffic. Or maybe you want to see only social media traffic. Or you want to see conversions from you target market.
All can be done through views.
To add a new view, simply follow the steps below:
- Click on the gear in the lower left hand corner to go to the Admin dashboard
- In the “View” column, click Create new view
- Select “Web Site” or “App”
- Enter a name for the view describing what it’s filtering for
- Choose the “Reporting Time Zone”
- Click Create View
Once you create your view, you’ll be able to edit the view settings to filter exactly what you want to see.
5 ways to use Google Analytics to analyze your web traffic
Now that you’ve successfully set up Google Analytics and looked at some ways to optimize it, let’s explore some ways you can analyze your traffic.
On the left sidebar, you can find five reporting options that offer you different ways of looking at your web traffic.
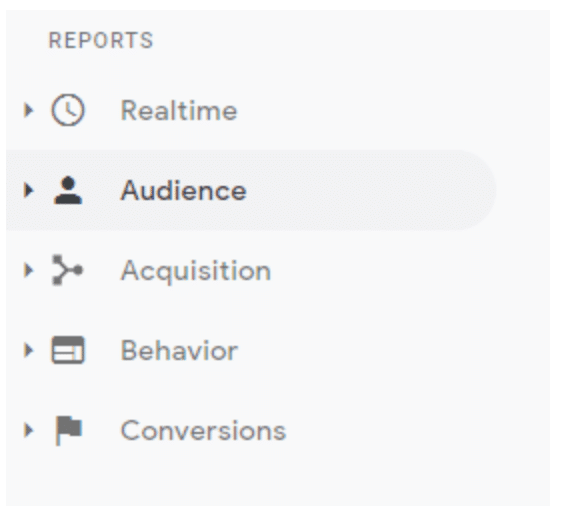
Let’s take a look at each now and break down exactly what you can expect to find in them.
Real-Time overview
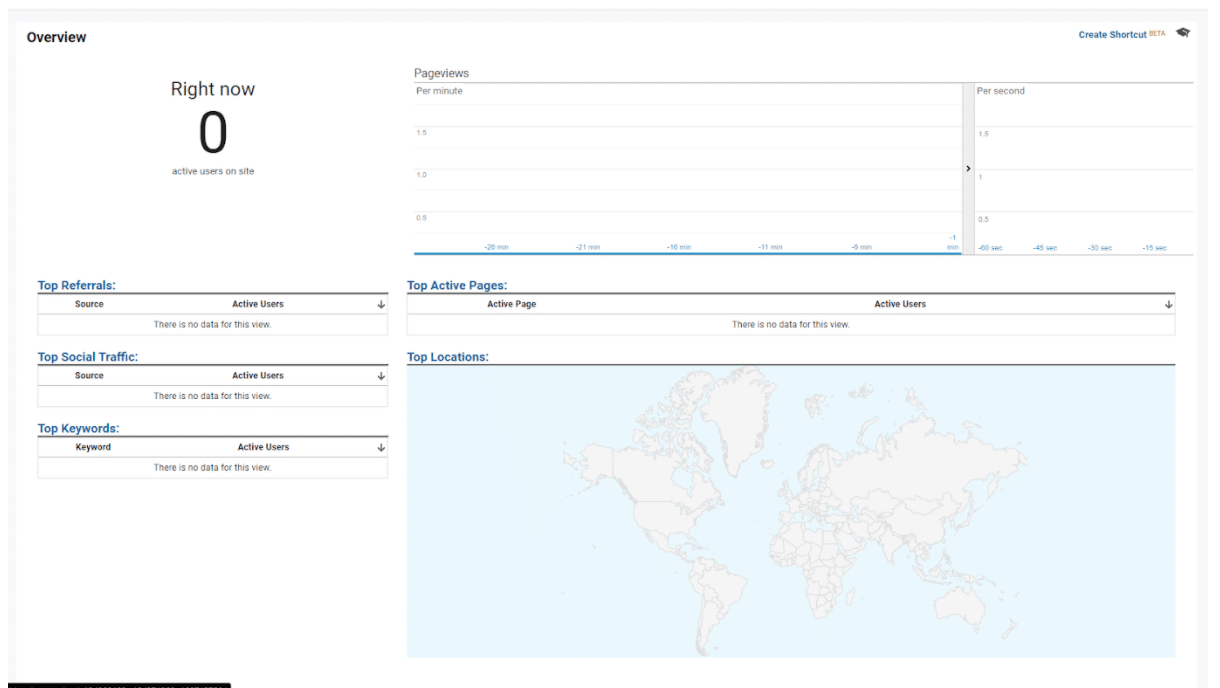
The Real-Time report shows you an overview of visitors to your site at that very moment.
The report even breaks down how many pageviews you are getting each minute and second. You’ll be able to take a look at where your audience is coming from, the top keywords you’re ranking for, and how many conversions you’re getting.
Though this can be very helpful for larger sites consistently bringing in several hundred, thousand, or million visitors each day, it’s really not as helpful for smaller websites.
In fact, you might not see very much data on this report at all if your site is smaller and/or newer. You’d be better off looking at some of the other reports on this list.
Audience overview

This is one of the most powerful pieces of reporting you can access from Google Analytics. The Audience reports gives you information about visitors to your site based on attributes relevant to your business and goals.
This can be anything and everything from key demographics (e.g. location, age), returning customers, and more.
You can even get really in the weeds and track very, very specific types of audiences. For example, you could track visitors who visited a certain landing page for a product on your website and then four days later returned to buy the product.
This information is incredibly beneficial for doing things like creating buyer personas, choosing topics that your visitors might be interested in for blog posts, and tailoring your brand’s look and feel for them.
Go deeper: Here’s how you can create audiences on Google Analytics.
Acquisition overview
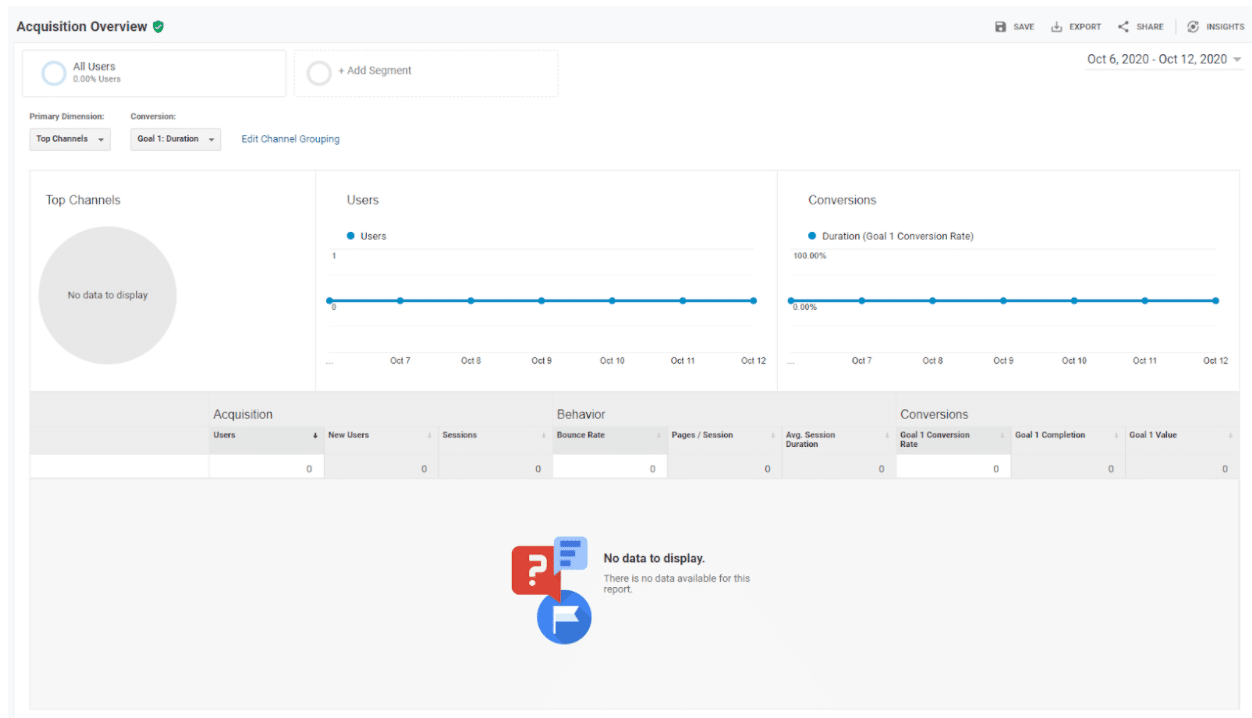
The Acquisition report shows you where your audience is coming from in the world as well as online.
If you find that a specific blog post spiked in traffic, you’ll be able to find exactly where online the visitors to that blog post are coming from. For example, after some digging, you might discover that the blog post was posted in a relevant Facebook group that really engaged with the post.
The Acquisition report is very important and can help you determine the ROI of specific marketing campaigns. For example, if you recently started a big Facebook advertising campaign, you’ll be able to see how many users are coming from Facebook to your website.
This better informs how you should approach social media and SEO marketing campaigns in the future.
Behavior overview
The Behavior report shows you how your users move through and interact with your website. More broadly, it shows you how many pageviews your site gets total, as well as how many pageviews individual pages on your site receives.
This breakdown can be incredibly valuable. It’ll show you exactly where your audience spends the bulk of their time when they’re on your website, right down to the web page. Diving in even further, you can see the “Behavior Flow” of your users. This is a visualization of the path your visitors most often take on your website.
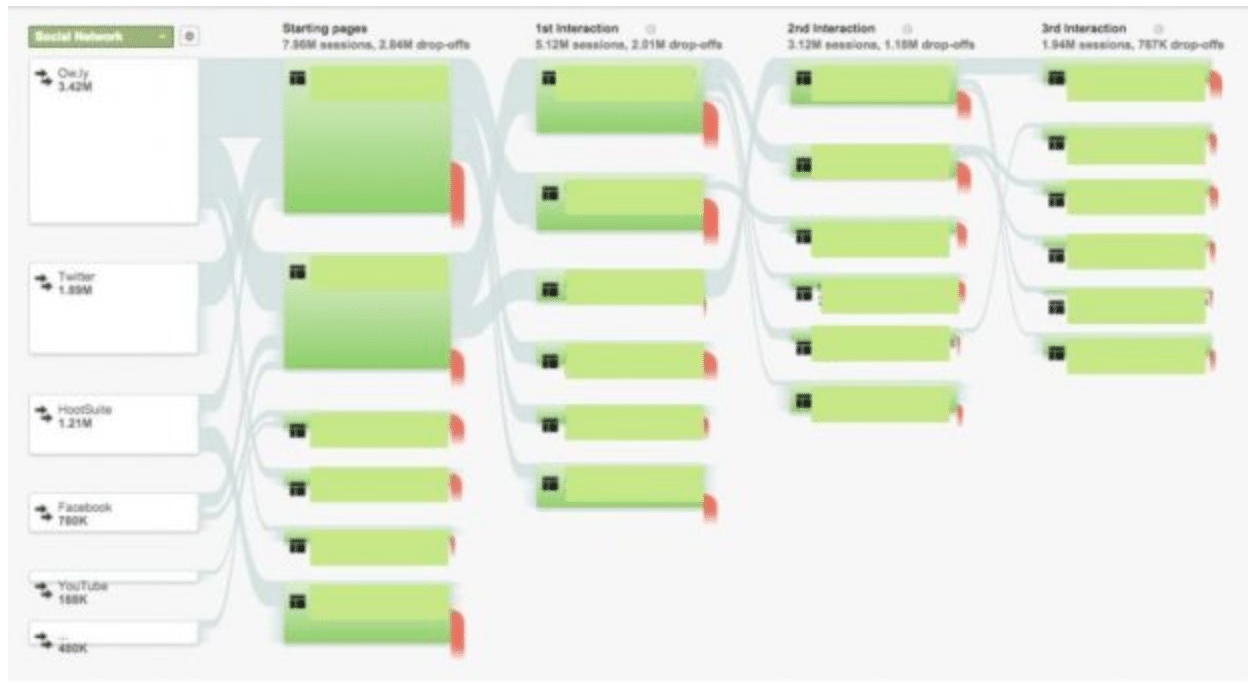
This follows the user from the first page they typically visit all the way to the last page they typically visit before they leave.
This can be a good way to gut check your assumptions about how your visitors approach your site. If they aren’t taking a desired path (for example, you want them to go to a specific landing page or a product page but they’re not), then you can re-optimize your website to help get them there.
The Behavior overview also gives you a good breakdown of each page individually. It showcases how many views those pages are getting, the average time visitors spend on those pages, as well as unique page views. This can be very valuable especially if you’re leveraging SEO marketing for your site.
Conversions overview

This is where you’ll be able to see the impact of all your marketing efforts. It showcases how much money you’re earning by turning website visitors to customers.
There are three different reports in the Conversions tab:
- Goals: This is the summary of how well your goals and conversions are performing. You’ll be able to see the number of completions along with the monetary value of each one. This report is also crucial because you can use it to quantify the value and ROI of your campaigns.
- Ecommerce. Relevant if you have an ecommerce store on your website. It’ll show you your product sales, checkout processes, as well as inventory.
- Multi-Channel Funnels. Gives you a look at how different marketing channels such as social media, landing pages, and advertisements work in conjunction to turn visitors into customers. For example, a customer might have purchased from you after finding your website on a search engine. However, they might have learned about your brand after seeing you mentioned on a social media feed. This report helps you learn that.
This is a very important report you should become very familiar with if you want to improve sales overall.
Conclusion
Google Analytics is a must have for any digital marketer. It’ll help you track the performance of your website along with all your digital marketing campaigns.
With it you’ll be able to determine ROI and learn more about your audience. Without it, you’ll practically be sailing on an ocean without a compass and a map (which is to say, very lost).
Cross Domain w/ Tag Manager
https://www.optimizesmart.com/cross-domain-tracking-in-google-tag-manager/
This article is the 4th in the series of cross domain tracking.
The first article was: where I explained cookies in great detail. Knowledge of cookies help a lot in understanding and troubleshooting cross domain tracking issues.
The second article was: Cross domain tracking in Google Analytics where I explained implementing cross domain tracking when the websites (source domain and destination domains) are using ga.js JavaScript library (aka the old Google Analytics).
The third article was: where I explained implementing cross domain tracking when the websites are using the analytics.js JavaScript library (aka Universal Analytics).
In the present article I am going to explain implementing cross domain tracking via GTM.
I won’t be able to explain the very basics of cross domain tracking here and assume that you understand linker parameter, allowLinker, ‘auto’ and other cross domain tracking jargon (explained in great detail in the articles above).
Like any other GTM implementation, basic understanding of corresponding standard GA implementation is expected and that is why I never introduce any concept/topic via GTM.
There are two methods you can use to implement cross domain tracking in GTM:
1) Decorate Link and Decorate Form tags (esp. used in case of ga.js)
2) Auto Link Domains (analytics.js only).
I am going to explain implementing cross domain tracking in GTM via ‘Auto Link Domains’.
I won’t cover cross domain tracking via ‘decorate link’ and ‘decorate form’ tags as they are required only when you are using old Google Analytics and if you are still using old Google Analytics then I would strongly urge you to instead of trying to implement cross domain tracking for the old GA.
For the purpose of explaining the cross domain tracking concept in GTM, let us suppose we want to implement cross domain tracking between two primary domains: abc.com (the source domain) and xyz.com (the destination domain) via ‘Auto Link Domains’.
Both of these domains contain different Universal Analytics Tracking code and are treated as completely different websites.

Get the E-Book (62 Pages)
Google Analytics configuration for abc.com
Step-1: Create a copy of the main GA view of abc.com by going to Admin > View > View Settings > Copy View:

We are creating a copy here in order to maintain one unfiltered view.
Step-2: Name the new view ‘ABC Cross Domain Tracking View’
Step-3: Apply following custom advanced filter to the new view:
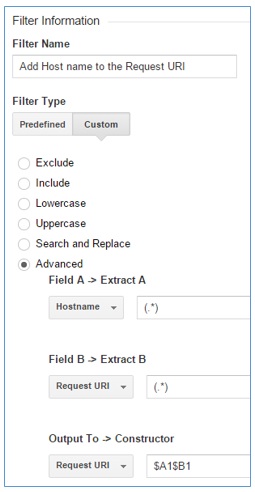
This view adds host name (domain name) to the request URI.
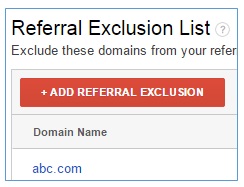
Step-4: Go to Admin > Property > Tracking Info > Referral exclusion list in ‘ABC Cross Domain Tracking View’ and add ‘abc.com’ in the ‘referral exclusion’ list:
Google Tag Manager Configuration for abc.com
Step-1: Login to the GTM account of abc.com website and edit the tag you used to deploy Universal Analytics tracking code on your website:

Step-2: Find the field ‘More Settings’ > ‘Fields to Set’ and set ‘allowLinker’ to ‘true’ and ‘cookieDomain’ to ‘auto’
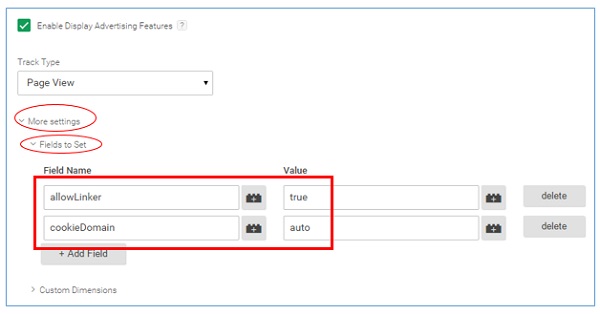
Note: I am using Google Tag Manager V2 (the latest version of GTM).
Step-3: Scroll down further to find Cross Domain Tracking > Auto Link Domains (under ‘More Settings) and enter ‘xyz.com:
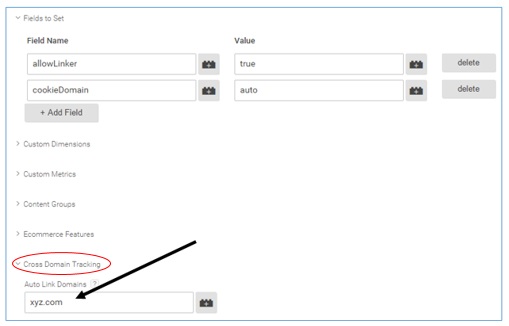
If you want to implement cross domain tracking across multiple domains then enter comma separated list of domains in the ‘AutoLink Domains’ text box:

If your source domain link to destination domain via form and you want to share cookie information on form submission then set ‘Decorate Forms’ setting to ‘True’ as shown below:
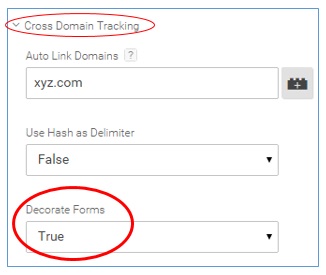
Step-4: Your Universal Analytics tag configuration should look like the one below:
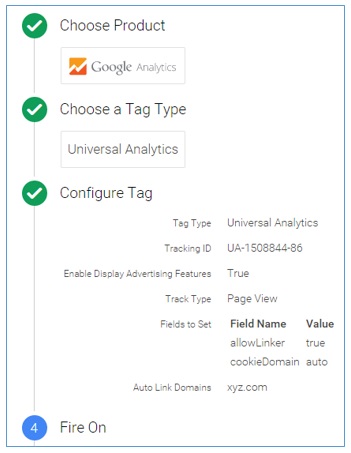
Step-5: Click on the ‘Save Tag’ button.
Step-6: Create a new version of the container, test it and then publish it.
Google Analytics configuration for xyz.com
GA configuration for xyz.com is similar to abc.com configuration:
Step-1: Create a copy of the main GA view of xyz.com
Step-2: Name the new view ‘XYZ Cross Domain Tracking View’
Step-3: Apply the custom advanced filter to the new view which append domain name to the request URI.
Step-4: Add ‘xyz.com’ in the ‘referral exclusion’ list:
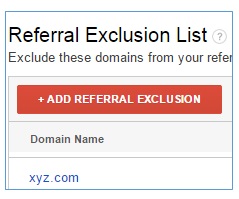
Google Tag Manager Configuration for xyz.com
GTM configuration for xyz.com is similar to the GTM configuration for abc.com. Make sure that your Universal Analytics tag configuration look like the one below:
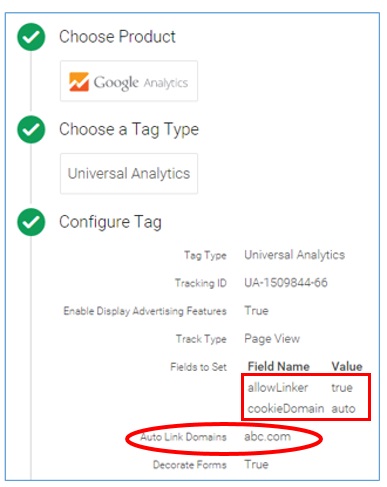
Implementing tracking across Primary domain and its sub-domain(s)
By default Universal Analytics can track traffic across all sub-domains of your website. However you still need to configure your GA and GTM to make sure that you can distinguish the traffic from different domains in analytics reports.
Follow the steps below to track across primary domain (say abc.com) and its sub-domain (say music.abc.com):
Google Tag Manager Configuration for abc.com and music.abc.com
Step-1: Use the GTM container code of abc.com on all of the pages of music.abc.com. So you will have one GTM account for managing tags on both primary domain and its sub-domain(s).
Step-2: Edit the tag you used to deploy Universal Analytics tracking code on the websites abc.com and music.abc.com:

Step-3: Find the field ‘More Settings’ > ‘Fields to Set’ and set ‘cookieDomain’ to ‘auto’:
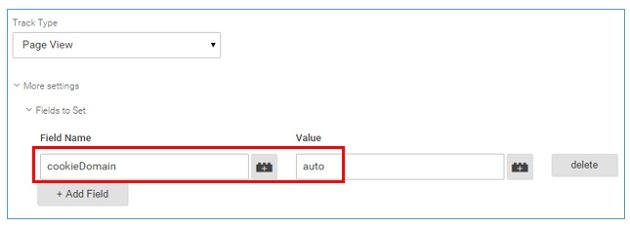
Here we are using ‘auto’ configuration parameter while creating a tracking object so that Google Analytics automatically set its cookie to the highest level domain possible.
Note: Without using the ‘auto’ configuration parameter, you cross domain tracking will not work whether you implement cross domain tracking between primary domain and its sub-domains or between two or more different primary domains.
Google Analytics Configuration for abc.com
Step-1: Create a copy of the main GA view of abc.com
Step-2: Name the new view ‘ABC Cross Domain Tracking View’
Step-3: Apply the custom advanced filter to the new view which append domain name to the request URI.
Step-4: Add ‘www.abc.com’ in the ‘referral exclusion’ list.
Google Analytics Configuration for music.abc.com
Step-1: Create a copy of the main GA view of music.abc.com
Step-2: Name the new view ‘ABC Music Cross Domain Tracking View’
Step-3: Apply the custom advanced filter to the new view which append domain name to the request URI.
Step-4: Add ‘music.abc.com’ in the ‘referral exclusion’ list.
Sales Funnel w/ Cross Domain
https://www.optimizesmart.com/setting-up-sales-funnel-across-websites-in-google-analytics/
Setting up Sales Funnel across websites in Google Analytics
In this article, you will learn to set up Sales funnel in Google Analytics, when some of the funnel pages (including the order confirmation page) are hosted on another website.
This is quite common in case of affiliate websites and third party shopping carts, where the final part of the checkout process occurs on a different website):
![]()
The Sales funnel in Google Analytics
Following is the sales funnel, we are going to set up in Google Analytics, by using virtual pageviews and by setting up cross domain tracking between our website and the website which host the shopping cart:


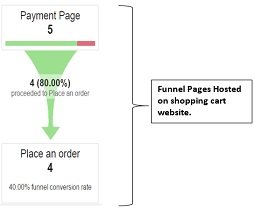
This sales funnel is made up of following funnel pages:
#1 Product detail pages – a product detail page shows all of the information about a product. Let us assume, that all of these pages are hosted on your website.
#2 Shopping Cart page – this page list all of the products in a shopping cart. Let us assume that this page is also hosted on your website.
#3 Contact information page – this page asks for customers email and shipping address and provide an option to enter discount code. Let us assume that this funnel page is on the different website which host the shopping cart.
#4 Shipping page – this page allows a website user, to select a shipping method. This funnel page is on the website which host the shopping cart.
#5 Payment page – on this page the user enter his credit card details and provide billing address (if it is different from the shipping address). This page also provide an option to enter discount code. This funnel page is on the website which host the shopping cart.
#6 Place an order page – This is an order confirmation page which is shown to a user once he has complete a purchase. This funnel page is on the website which host the shopping cart.
All of these pages together, make up my sales funnel.
I am now going to set up this sales funnel in Google Analytics by following the steps below:
Step-1: Map your entire sales funnel.
Step-2: Set up cross domain tracking between your website and the website which host the shopping cart.
Step-3: Configure the website which host the shopping cart to generate and send virtual pageviews.
Step-4: Set up sales funnel in Google Analytics and test it.

Get the E-Book (52 Pages)

Get the E-Book (50 Pages)
#1 Map your entire sales funnel
Determine all of the web pages which make up your shopping cart. In my case, the sales funnel is made up of following pages:
#1 Product detail pages – https://www.mywebsite.com/collections/products/
#2 Shopping Cart page – https://www.mywebsite.com/cart
#3 Contact information page – https://checkout.shopify.com/3108721/checkouts/d7ba5d79341cdb6755266b811ed15d93?step=contact_information
#4 Shipping page – https://checkout.shopify.com/3108721/checkouts/d7ba5d79341cdb6755266b811ed15d93?step=shipping_method
#5 Payment page – https://checkout.shopify.com/3108721/checkouts/d7ba5d79341cdb6755266b811ed15d93?step=payment_method
#6 Place an order page – https://checkout.shopify.com/3108721/checkouts/d7ba5d79341cdb6755266b811ed15d93/thank_you
#2 Set up cross domain tracking
By default, Google Analytics does not share cookie information (client ID) with another website.
Because of this reason, by default, you can’t track website user’s journey which span multiple domains.
In order to track user’s journey across domains, follow the steps below:
Step-1: Allow your website (i.e. source domain) to pass cookie information (client ID) to the website which host the shopping cart (i.e. destination domain).
In order to accomplish this goal, add following line of code in the Google Analytics Tracking Code of your website:
ga(‘create’, ‘UA-12343-26’, ‘auto’,{‘allowLinker’: true }); // allow source domain to pass cookie information
Now your Google Analytics tracking code, may look like the one below:
<script>
  (function(i,s,o,g,r,a,m){i['GoogleAnalyticsObject']=r;i[r]=i[r]||function(){
  (i[r].q=i[r].q||[]).push(arguments)},i[r].l=1*new Date();a=s.createElement(o),
  m=s.getElementsByTagName(o)[0];a.async=1;a.src=g;m.parentNode.insertBefore(a,m)
  })(window,document,'script','//www.google-analytics.com/analytics.js','ga');
ga('create', 'UA-12343-26', 'auto',{'allowLinker': true });
ga('send', 'pageview');
</script>
Step-2: Set up AutoLink plugin for your website.
This plugin is used to track cross domain traffic in Google Analytics. Add following line of code in the Google Analytics Tracking Code of your website:
ga(‘require’, ‘linker’); // setup autoLink plugin
Now your Google Analytics tracking code, may look like the one below:
<script>
  (function(i,s,o,g,r,a,m){i['GoogleAnalyticsObject']=r;i[r]=i[r]||function(){
  (i[r].q=i[r].q||[]).push(arguments)},i[r].l=1*new Date();a=s.createElement(o),
  m=s.getElementsByTagName(o)[0];a.async=1;a.src=g;m.parentNode.insertBefore(a,m)
  })(window,document,'script','//www.google-analytics.com/analytics.js','ga');
ga('create', 'UA-12343-26', 'auto',{'allowLinker': true });
ga('require', 'linker');
ga('send', 'pageview');
</script>
Step-3: Define the domain that need to be automatically cross linked –
You can define the domain that need to be automatically cross linked by using the linker:autoLink’ Command.
Let us suppose the address of the website which host your shopping cart is anotherWebsite.com.
So here is how the linker:autoLink command can be used in that case:
ga(‘linker:autoLink’, [‘anotherWebsite.com’]); // Auto link to anotherWebsite.com
Add this line of code to the Google Analytics tracking code of the website.
Now your Google Analytics tracking code, may look like the one below:
<script>
  (function(i,s,o,g,r,a,m){i['GoogleAnalyticsObject']=r;i[r]=i[r]||function(){
  (i[r].q=i[r].q||[]).push(arguments)},i[r].l=1*new Date();a=s.createElement(o),
  m=s.getElementsByTagName(o)[0];a.async=1;a.src=g;m.parentNode.insertBefore(a,m)
  })(window,document,'script','//www.google-analytics.com/analytics.js','ga');
ga('create', 'UA-12343-26', 'auto',{'allowLinker': true });
ga('require', 'linker');
ga('linker:autoLink', ['anotherWebsite.com']);
ga('send', 'pageview');
</script>
Step-4: Allow the website which host the shopping cart (i.e. destination domain) to accept cookie information (client ID) from your website (i.e. source domain).
In order to accomplish this goal, add following line of code in the Google Analytics Tracking Code of the website which host your shopping cart:
ga(‘create’, ‘UA-196844-17’, ‘auto’,{‘allowLinker’: true }); // allow destination domain to accept cookie information
Now the Google Analytics tracking code of the destination domain, may look like the one below:
<script>
  (function(i,s,o,g,r,a,m){i['GoogleAnalyticsObject']=r;i[r]=i[r]||function(){
  (i[r].q=i[r].q||[]).push(arguments)},i[r].l=1*new Date();a=s.createElement(o),
  m=s.getElementsByTagName(o)[0];a.async=1;a.src=g;m.parentNode.insertBefore(a,m)
  })(window,document,'script','//www.google-analytics.com/analytics.js','ga');
ga('create', 'UA-196844-17', 'auto',{'allowLinker': true });
ga('send', 'pageview');
</script>
Step-5: Set up AutoLink plugin for the destination website. Add following line of code in the Google Analytics Tracking Code of the destination domain:
ga(‘require’, ‘linker’); // setup autoLink plugin
Now the Google Analytics tracking code of the destination domain, may look like the one below:
<script>
  (function(i,s,o,g,r,a,m){i['GoogleAnalyticsObject']=r;i[r]=i[r]||function(){
  (i[r].q=i[r].q||[]).push(arguments)},i[r].l=1*new Date();a=s.createElement(o),
  m=s.getElementsByTagName(o)[0];a.async=1;a.src=g;m.parentNode.insertBefore(a,m)
  })(window,document,'script','//www.google-analytics.com/analytics.js','ga');
ga('create', 'UA-196844-17', 'auto',{'allowLinker': true });
ga('require', 'linker');
ga('send', 'pageview');
</script>
Step-6: Define the domain that need to be automatically cross linked – Let us suppose the address of your website is mywebsite.com. So here is how the linker:autoLink command can be used in that case:
ga(‘linker:autoLink’, [‘mywebsite.com’]); // Auto link to mywebsite.com
Add this line of code to the Google Analytics tracking code of the destination domain.
Now the Google Analytics tracking code of the destination domain, may look like the one below:
<script>
  (function(i,s,o,g,r,a,m){i['GoogleAnalyticsObject']=r;i[r]=i[r]||function(){
  (i[r].q=i[r].q||[]).push(arguments)},i[r].l=1*new Date();a=s.createElement(o),
  m=s.getElementsByTagName(o)[0];a.async=1;a.src=g;m.parentNode.insertBefore(a,m)
  })(window,document,'script','//www.google-analytics.com/analytics.js','ga');
ga('create', 'UA-196844-17', 'auto',{'allowLinker': true });
ga('require', 'linker');
ga('linker:autoLink', ['mywebsite.com']);
ga('send', 'pageview');
</script>
As you can see, setting up cross domain tracking is not that hard. The problem really occurs, when you can’t change the Google Analytics tracking code of the destination domain, which host your shopping cart.
In that case, you can ask the developer/webmaster of the destination domain, to add following line of code (highlighted in bold) to his Google Analytics tracking code:
<script>
(function(i,s,o,g,r,a,m){i[‘GoogleAnalyticsObject’]=r;i[r]=i[r]||function(){
(i[r].q=i[r].q||[]).push(arguments)},i[r].l=1*new Date();a=s.createElement(o),
m=s.getElementsByTagName(o)[0];a.async=1;a.src=g;m.parentNode.insertBefore(a,m)
})(window,document,’script’,’//www.google-analytics.com/analytics.js’,’ga’);
ga(‘create’, ‘UA-196844-17’, ‘auto’,{‘allowLinker’: true });
ga(‘require’, ‘linker’);
ga(‘linker:autoLink’, [‘mywebsite.com’]);
ga(‘send’, ‘pageview’);
</script>
Note: replace mywebsite.com by your domain name.
Once this task is complete, the cross domain tracking is set up between your website and the website which host the shopping cart.
If the developer/webmaster of the destination domain, refuse to add the cross domain tracking code to his GA tracking code, then there is nothing much you can do, except change your shopping cart provider.
If you are using a popular shopping cart like Shopify, then you don’t need to ask them, to add the cross domain tracking code to their GA tracking code.
As soon as you enable the Google Analytics tracking in your shopify account, cross domain tracking will be automatically set up.
So when a user leave your website and move to the shopping cart (hosted by Shopify) to complete the checkout, the cross domain tracking is already there to track user’s activities between your website and the third party shopping cart.
To learn more about cross domain tracking, read the article: Cross Domain Tracking in Universal Analytics – demystified
#3 Configure destination domain to send virtual pageviews
You now need to configure the destination domain, so that it sends virtual pageviews for each funnel page.
For example, if a user visit the Contact information page (hosted on the destination domain), you can add the following code to the destination domain:
ga(‘send’, ‘pageview’, ‘/checkout/contact_information‘);
Here , ‘/checkout/contact_information’ is a virtual pageview which is generated and sent, whenever your website users, visited the ‘Contact information’ page hosted on the destination domain.
Configuring destination domain to send virtual pageviews, varies from domain to domain. The actual implementation depends upon the CMS and shopping cart being used by the destination domain.
So I can’t share a code, which you can use and configure your destination domain to send virtual pageviews.
If you are using a shopping cart like Shopify, you don’t need to configure the shopify website to send virtual pageviews to your GA property. You just need to identify the virtual pageviews, which Shopify generates for each funnel step.
To identify such virtual pageviews, follow the steps below:
Step-1: Navigate to the first funnel page, hosted on Shopify via Google chrome browser. In my case, the first funnel page hosted on Shopify, is the Contact information page (https://checkout.shopify.com/3108721/checkouts/d7ba5d79341cdb6755266b811ed15d93?step=contact_information)
Step-2: Right click on the web page and select ‘Inspect‘. This will open the ‘Google Developer Console‘
Step-3: Click on the ‘console’ tab and then search for the virtual pageview generated by the page:

The virtual pageview generated by the ‘contact information’ page is ‘/checkout/contact_information‘
Step-4: Use step 1 to 3, to determine the virtual pageview generated by each funnel page hosted on the destination domain. In my case, following would be the various virtual pageviews:
#1 Virtual pageview generated by Contact information page (https://checkout.shopify.com/3108721/checkouts/d7ba5d79341cdb6755266b811ed15d93?step=contact_information) – /checkout/contact_information
#2 Virtual pageview generated by Shipping page (https://checkout.shopify.com/3108721/checkouts/d7ba5d79341cdb6755266b811ed15d93?step=shipping_method) – /checkout/shipping
#3 Virtual pageview generated by Payment page (https://checkout.shopify.com/3108721/checkouts/d7ba5d79341cdb6755266b811ed15d93?step=payment_method) – /checkout/payment
#4 Virtual pageview generated by Place an order page (https://checkout.shopify.com/3108721/checkouts/d7ba5d79341cdb6755266b811ed15d93/thank_you) – /checkout/thank_you
#4 Set up Sales Funnel in Google Analytics
Once you have documented the virtual pageviews for each funnel page, you can now set up the sales funnel in Google Analytics.
Follow the steps below:
Step-1: Create a new goal of type destination in your GA view.
Step-2: Configure the funnel steps as shown below:

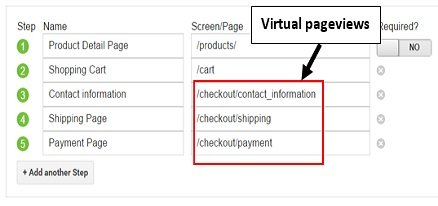
Step-3: Carry out 2 or 3 test transactions, on your website and then check your funnel visualization report after couple of hours. If you see data for each funnel step, then your sales funnel is working.
Note: You can not use events as funnel pages in Google Analytics.
Similarly, you can also use virtual pageviews and cross domain tracking, to set up Goal funnel which spans across websites.
Other articles on specialized tracking in Google Analytics
- Ecommerce Tracking in Google Analytics – Tutorial
- Event Tracking via Google Tag Manager – Tutorial
- Event Tracking in Google Analytics – Tutorial
- Guide to Google Analytics Store Visits Tracking
- Offline Conversion Tracking in Google Analytics – Tutorial
- Implementing E-Commerce Tracking via Google Tag Manager
- Tracking Virtual Pageviews in Google Tag Manager – Tutorial
- YouTube Video tracking via Google Tag Manager
- How to Use Keyword Hero to Reveal Not Provided Keywords in Google Analytics
- Virtual pageviews in Google Analytics – Tutorial
- Google Analytics and YouTube Integration Tutorial
- Google Analytics for Facebook Tutorial
- Google Analytics Cross Domain Tracking Explained Like Never Before
- Using multiple Google Analytics tracking codes on web pages
- The one thing that you don’t know about PayPal.com and the referral exclusion list
- Calculated Metrics in Google Analytics – Tutorial
- Creating your own Google Analytics Tag Auditing System
- Tracking Site Search without Query Parameter in Google Tag Manager
- Tracking true referrals in Google Analytics when using PayPal and other payment gateways
- Phone Call Tracking in Google Analytics and Beyond
- Learn to Track Qualified and Won Leads in Google Analytics
- Introduction to Postbacks in Google Analytics
- Google Analytics Recurring Revenue and Subscriptions Tracking Tutorial
- How to track the impact of cookie consent on website traffic in Google Analytics
- Tracking Offline Conversions in Google Ads
- Implementing Scroll Tracking via Google Tag Manager
- Scroll Tracking via Scroll Depth Trigger in Google Tag Manager
- Site Search Tracking In Google Analytics Without Query Parameters
- Video Tracking via YouTube Video Trigger In Google Tag Manager
- How to Correctly Measure Conversion Date & Time in Google Analytics
- Google Analytics Social Tracking – Twitter, Facebook, Google Plus and LinkedIn
- Google Analytics Cross Domain Tracking (ga.js)
- Tracking Twitter and Linkedin Social Interactions in Google Analytics
- Creating Content Group in Google Analytics via tracking code using gtag.js
- Tracking Site Search in Google Analytics with Query Parameters
- Understanding site search tracking in Google Analytics
- Creating and Using Site Search Funnel in Google Analytics
- Learn to Setup Facebook Pixel Tracking via Google Tag Manager
- Setting up & Tracking AMP Pages in Google Analytics
- Setting up Sales Funnel across websites in Google Analytics
- Regular Expressions (Regex) for Google Analytics & Google Tag Manager – Tutorial

