
ADMIN PAGE TUTORIALS
https://wordpress.org/plugins/admin-page-framework/ – PLUGIN
http://admin-page-framework.michaeluno.jp/tutorials/
ADMIN PAGE FRAMEWORK CONTROLLER:
http://admin-page-framework.michaeluno.jp/en/v3/class-AdminPageFramework_Controller.html#_setUp
Description
Reduce the Time Spent for Plugin and Theme Development
One of the time-consuming part of developing WordPress plugins and themes is creating setting pages. As you more and more write plugins and themes, you will soon realize major part of code can be reused. Admin Page Framework aims to provide reusable code that eliminates the necessity of writing repeated code over and over again.
You will have more organized means of building option pages with the framework. Extend the library class and pass your arrays defining the form elements to the predefined class methods. The library handles all the complex coding behind the scene and creates the pages and the forms for you.
Create Essential Page and Form Components for Your Users
- Top-level Page, Sub Pages, and In-page Tabs – where your users will access to operate your plugin or theme.
- Forms – to let your users store their options.
- Custom Post Types – and the custom columns in the post listing table.
- Custom Taxonomies and Fields – store options associated with a taxonomy in the taxonomy definition page.
- Meta Boxes and Fields – store meta data associated with posts of set post types. Also meta boxes can be added to the pages created with the framework.
- Widgets and Fields – display modular outputs based on the user’s settings in the front end.
- Network Admin Pages and Forms – create admin pages in the newtork admin area of WordPress multi-sites.
Construct Simple Yet Complex Setting Forms
- Section Tabs – form sections can be displayed in a tabbed box.
- Collapsible Sections – form sections can be collapsed and expanded.
- Repeatable Sections and Fields – dynamically add/remove form sections and fields.
- Sortable Sections and Fields – drag and drop form sections and fields to change the order.
- Nested Sections and Fields – nest sections and fields to construct complex forms.
- Import and Export Options – buttons that the user can import and export settings by uploading and downloading text files.
- Reset Button – let your users to initialize the saved options.
- Validation and Error Messages – with the pre-defined validation callbacks, the user’s submitting form data can be verified. Furthermore, by setting the error array, you can display the error message to the user.
- Contextual Help Pane – help information can be added to the contextual help pane that appears at the top right of each screen.
- Custom Field Types – your own field type can be registered. This allows you to design own fields such as a combination of a checkbox with a text field.
- Contact Form – receive emails of user feedback and issue reports sent via the contact form embedded in an admin page.
- Tooltips – add a small pop-up box beside section and field title for the users to read about the option.
Produce a Series of Products with the Framework Extensibility
If you are planning to create a product possibly extended with an unlimited number of add-ons, take advantage of the framework’s native extensibility. The created admin pages and forms will become highly extensible with the automatically created hooks. In other words, it empowers other developers to customize your plugin or theme. That will result on making your projects grow.
Also, use the framework as a library and your plugin or theme does not have to require an extra dependency to be installed. Therefore, your product will be perfectly portable.
Built-in Field Types
text– a normal field to enter text input.password– a masked text input field.textarea– a text input field with multiple lines. It supports TinyMCE rich text editor.radio– a set of radio buttons that lets the user pick an option.checkbox– a check box that lets the user enable/disable an item.select– a drop-down list that lest the user pick one or more item(s) from a list.hidden– a hidden field that will be useful to insert invisible values.file– a file uploader that lets the user upload files.image– a custom text field with the image uploader script that lets the user set an image URL.media– a custom text field with the media uploader script that lets the user set a file URL.color– a custom text field with the color picker script.submit– a submit button that lets the user send the form.export– a custom submit field that lets the user export the stored data.import– a custom combination field of the file and the submit fields that let the user import data.posttype– a set of check-lists of taxonomies enabled on the site in a tabbed box.taxonomy– check-lists of taxonomies enabled on the site in a tabbed box.size– a combination field of the text and the select fields that let the user set sizes with a selectable unit.section_title– a text field placed in the section title to let the user name the section.system– displays the site system information.inline_mixed– consists of inline elements of fields with different field types.
Bundled Custom Field Types
With custom field types, you can create more detailed customized field outputs. The demo component includes the following example custom field types.
ace– a rich code editor.sample– a sample custom field type with a JavaScript script.github– displays GitHub buttons.path– lets the user select file paths on the server.toggle– lets the user toggle a switch button.no_ui_slider– lets the user set values between ranges with a slider.select2– lets the user select items from a predefined list which cam be populated with AJAX.post_type_taxonomy– lets the user select taxonomy terms of selected post types.
If you want a field type that are not listed here, you can check the field type pack or request a new one in the forum.
Getting Started
To get started, go to Dashboard -> Admin Page Framework -> About -> Getting Started.
Demo
Activate the demo pages to see the possible features of the framework. To activate it, go to Dashboard -> Admin Page Framework -> Add Ons -> Demo.
Documentation
Notes: this framework does not do anything by itself. If you are not a developer, you do not need this.
Use Unique Page Slug
The framework internally uses the add_submenu_page() function to register sub menu pages. When the same page slug is registered for multiple root pages, only the last registered callback gets triggered. The other ones will be ignored.
This means if you choose a very simple page slug such as about for your plugin/theme’s information page and then if there is another plugin using the same page slug, your users will get either of your page or the other.
To avoid this, make sure to use a unique page slug. One way to do that is to add a prefix like apf_about.
Use the files generated with the component generator
There is one thing you need to be careful when you include the framework: the framework version conflicts. Imagine you publish a plugin using the framework v3.4.6 and your plugin user installs a plugin using the framework v3.0.0 which is below your framework version. If the other plugin loads earlier than yours, your plugin may not work properly and vice versa.
There is a way to avoid such a conflict: change the PHP class names of the framework you include. All the class names have the prefix AdminPageFramework so just change it to something like MyPlugin_AdminPageFramework.
Go to Dashboard -> Admin Page Framework -> Tools -> Generator. Set the prefix in the option field and download the files.
If you do not modify the framework class names, you are supposed to extend the AdminPageFramework factory class.
class MyAdminPage extends AdminPageFramework {
    ...
}
When you modify the framework class names, make sure you extend the class with the modified name.
class MyAdminPage extends MyPlugin_AdminPageFramework {
    ...
}
For more detailed instruction, go to Dashboard -> Admin Page Framework -> About -> Getting Started.
By the time WordPress’s minimum required PHP version becomes 5.3 or higher, we can use name spaces then this problem will be solved.
Change Framework’s System Messages
The default messages defined by the framework can be changed. For example, when you import a setting with the framework, the setting notice “The options have been updated.” will be displayed.
If you want to change it to something else, modify the oMsg object. It has the aMessages public property array holding all the messages that the framework uses.
Get comfortable with the ‘attributes’ array argument
In each field definition array, you can set the attributes arguments which defines the HTML attributes of the field so that you can modify the output of the field by passing attribute values.
The argument accepts the values as an array. Each element represents the attribute’s name and value. The array key corresponds to the name of the attribute and the value to the attribute value.
For example,
array(
    'field_id'      => 'interval',
    'title'         => __( 'Interval', 'task-scheduler' ),
    'type'          => 'number',
    'attributes'    => array(
        'min'   => 0,
        'step'  => 1,
        'max'   => 24,
    ),
),
In addition, you can change the attributes of the following container elements by setting their key and passing a nested attribute array.
fieldrow– thetdtag element containing the field output.fieldset– thefieldsettag element containing the field output.fields– thedivtag element containing the sub-fields and the main field.field– thedivtag element containing each field.
This submit button will float right.
array(
    'field_id'          => 'submit',
    'type'              => 'submit',
    'save'              => false,
    'value'             => __( 'Save', 'task-scheduler' ),
    'label_min_width'   => 0,
    'attributes'        => array(
        'field' => array(
            'style' => 'float:right; clear:none; display: inline;',
        ),
    ),
)
For meta box and widget form fields (as they have slightly different styling than generic admin pages),
array(
    'field_id'          => 'submit_in_meta_box',
    'type'              => 'submit',
    'save'              => false,
    'show_title_column' => false,
    'label_min_width'   => 0,
    'attributes'        => array(
        'field' => array(
            'style' => 'float:right; width:auto;',
        ),
    ),
),
Change Preview Image Size of the ‘image’ Field Type
To specify a custom size to the preview element of the image field type, set an attribute array like the below, where 300px is the max width.
array(
    'field_id'      => 'my_image_field_id',
    'title'         => __( 'Image', 'admin-page-framework-demo' ),
    'type'          => 'image',
    'attributes'    => array(
        'preview' => array(
            'style' => 'max-width: 200px;',
        ),
    ),
),
Display items of ‘radio’ field type one per line
To display radio button items one per line, set the label_min_width to 100%.
array(
    'field_id'          => 'my_radio_field_id',
    'title'             => __( 'Radio Button', 'admin-page-framework-demo' ),
    'type'              => 'radio',
    'label_min_width'   => '100%',
    'label'             => array(
        'a' => __( 'This is a.', 'admin-page-framework-demo' ),
        'b' => __( 'This is b.', 'admin-page-framework-demo' ),
        'c' => __( 'This is a.', 'admin-page-framework-demo' )c
    ),
),
Set default field value
To set the initial value of a field, use the default argument in the field definition array.
array(
    'field_id'  => 'my_text_field_id',
    'title'     => __( 'My Text Input Field', 'admin-page-framework-demo' ),
    'type'      => 'text',
    'default'   => 'This text will be displayed for the first time that the field is displayed and will be overridden when a user set an own value.',
),
Always display a particular value in a field
The value argument in the definition array can suppress the saved value. This is useful when you want to set a value from a different data source or create a wizard form that stores the data in a custom location.
array(
    'field_id'  => 'my_text_field_id',
    'title'     => __( 'My Text Input Field', 'admin-page-framework-demo' ),
    'type'      => 'text',
    'value'     => 'This will be always set.',
),
If it is a repeatable field, set values in numerically indexed sub-elements.
array(
    'field_id'      => 'my_text_field_id',
    'title'         => __( 'My Text Input Field', 'admin-page-framework-demo' ),
    'type'          => 'text',
    'repeatable'    => true,
    'value'         => 'the first value',
    array(
        'value' => 'the second value',
    ),
    array(
        'value' => 'the third value',
    ),
),
Alternately, you may use the options_{instantiated class name} filter to suppress the options so that setting the value argument is not necessary.
See examples, https://gist.github.com/michaeluno/c30713fcfe0d9d45d89f, https://gist.github.com/michaeluno/fcfac27825aa8a35b90f,
Create In-page Tabs
If your theme or plugin only uses a single setting page but needs to separate certain contents into different areas, tabs are useful. This tutorial introduces a way to add tabs within a single page.
Steps
- Include the library
- Extend the library class
- Define the setUp() method
- In the setUp method, define a sub-page and in-page tabs.
- Instantiate the extended class
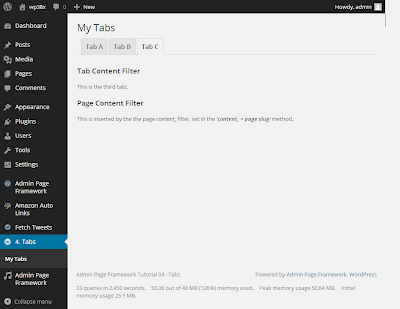
Screenshot
Include the library
The library file needs to be loaded.
”’
include( dirname( dirname( __FILE__ ) ) . ‘/admin-page-framework/library/apf/admin-page-framework.php’ );
”’
Extend the library class
This time, let’s use APF_Tabs for the class name.
”’
class APF_Tabs extends AdminPageFramework {
// our code goes here…
}
”’
Define the setUp() method
In the setUp() method, we create a root page and a sub page. For that we need to decide:
- the root page.
- the sub page title.
- the sub page slug.
We’ve covered this already in the previous tutorial.
[code language=”php”]
public function setUp() {
// Create the root menu
$this->setRootMenuPage(
‘4. Tabs’, // specify the name of the page group
‘http://lh4.googleusercontent.com/-z7ydw-aPWGc/UwpeB96m5eI/AAAAAAAABjs/Brz6edaUB58/s800/demo04_16x16.png’ // menu icon
);
// Add the sub menu item
$this->addSubMenuItems(
array(
‘title’ => ‘My Tabs’, // page title
‘page_slug’ => ‘my_tabs’, // page slug
‘screen_icon’ => ‘https://lh3.googleusercontent.com/-Z5OeZOGzN3c/UilDgCX9WjI/AAAAAAAABS4/mf7L8GGJRTc/s800/demo04_01_32x32.png’ // page screen icon for WP 3.7.x or below
)
);
[/code]
To add in-page tabs, we use the addInPageTabs() method. Pass the belonging page slug to the first parameter and in-page tab definition argument array to the next parameters. In-page tab definition argument arrays require at least two keys: tab_slug and title. For more details refer to the manual.
[code language=”php”]
$this->addInPageTabs(
‘my_tabs’, // set the target page slug so that the ‘page_slug’ key can be omitted from the next continuing in-page tab arrays.
array(
‘tab_slug’ => ‘my_tab_a’, // avoid hyphen(dash), dots, and white spaces
‘title’ => __( ‘Tab A’, ‘admin-page-framework-tutorial’ ),
),
array(
‘tab_slug’ => ‘my_tab_b’,
‘title’ => __( ‘Tab B’, ‘admin-page-framework-tutorial’ ),
),
array(
‘tab_slug’ => ‘my_tab_c’,
‘title’ => __( ‘Tab C’, ‘admin-page-framework-tutorial’ ),
)
);
[/code]
Disable Page Heading Tabs and Enlarge the In-Page Heading Tabs
The framework supports three kinds of tabs: page heading tabs, in-page tabs, and form section tabs. The page heading tabs are automatically created when a sub-menu item is created and they are linked to the sub-pages/links. In-page tabs reside within a single page. Section tabs are for form sections so don’t worry about section tabs for now. In this tutorial, we are dealing with in-page tabs.
Since we just create a single page, we don’t need the page heading tabs. To disable page heading tabs, the setPageHeadingTabsVisibility() – http://admin-page-framework.michaeluno.jp/en/v3/class-AdminPageFramework_Controller_Page.html#_setPageTitleVisibility – method is used.
[code language=”php”]
$this->setPageHeadingTabsVisibility( false ); // disables the page heading tabs by passing false.
[/code]
Next, by default, in-page tabs use the h3 HTML tag and they are a bit smaller than page heading tabs using h2 tag. To increase the size by setting a custom tag, the setInPageTabTag() – http://admin-page-framework.michaeluno.jp/en/v3/class-AdminPageFramework_Controller_Page.html#_setInPageTabTag – method is used.
[code language=”php”]
$this->setInPageTabTag( ‘h2’ ); // sets the tag used for in-page tabs
[/code]
Instantiate the extended class
Finally, we instantiate the class. Unless it is instantiated, it will do nothing.
[code language=”php”]
new APF_Tabs;
[/code]
Code
Try the code below and post comments if you get a problem.
[code language=”php”]
<?php
/*
Plugin Name: Admin Page Framework Tutorial 04 – Create In-page Tabs
Plugin URI: http://en.michaeluno.jp/admin-page-framework
Description: Creates in-page tabs with Admin Page Framework v3
Author: Michael Uno
Author URI: http://michaeluno.jp
Version: 1.0.1
Requirements: PHP 5.2.4 or above, WordPress 3.4 or above. Admin Page Framework 3.0.0 or above
*/
// Include the library file. Set your file path here.
include( dirname( dirname( __FILE__ ) ) . ‘/admin-page-framework/library/apf/admin-page-framework.php’ );
// Extend the class
class APF_Tabs extends AdminPageFramework {
// Define the setUp() method to set how many pages, page titles and icons etc.
public function setUp() {
// Create the root menu
$this->setRootMenuPage(
‘4. Tabs’, // specify the name of the page group
‘http://lh4.googleusercontent.com/-z7ydw-aPWGc/UwpeB96m5eI/AAAAAAAABjs/Brz6edaUB58/s800/demo04_16x16.png’ // menu icon
);
// Add the sub menu item
$this->addSubMenuItems(
array(
‘title’ => ‘My Tabs’, // page title
‘page_slug’ => ‘my_tabs’, // page slug
‘screen_icon’ => ‘https://lh3.googleusercontent.com/-Z5OeZOGzN3c/UilDgCX9WjI/AAAAAAAABS4/mf7L8GGJRTc/s800/demo04_01_32x32.png’ // page screen icon for WP 3.7.x or below
)
);
// Add in-page tabs
$this->addInPageTabs(
‘my_tabs’, // set the target page slug so that the ‘page_slug’ key can be omitted from the next continuing in-page tab arrays.
array(
‘tab_slug’ => ‘my_tab_a’, // avoid hyphen(dash), dots, and white spaces
‘title’ => __( ‘Tab A’, ‘admin-page-framework-tutorial’ ),
),
array(
‘tab_slug’ => ‘my_tab_b’,
‘title’ => __( ‘Tab B’, ‘admin-page-framework-tutorial’ ),
),
array(
‘tab_slug’ => ‘my_tab_c’,
‘title’ => __( ‘Tab C’, ‘admin-page-framework-tutorial’ ),
)
);
$this->setPageHeadingTabsVisibility( false ); // disables the page heading tabs by passing false.
$this->setInPageTabTag( ‘h2’ ); // sets the tag used for in-page tabs
}
/**
* One of the predefined callback method.
*
* @remark content_{page slug}
*/
public function content_my_tabs( $sContent ) {
return $sContent
. ‘<h3>Page Content Filter</h3>’
. ‘<p>This is inserted by the the page <em>content_</em> filter, set in the <b><i>\’content_ + page slug\'</i></b> method.</p>’;
}
/**
* One of the predefined callback method.
*
* @remark content_{page slug}_{tab slug}
*/
public function content_my_tabs_my_tab_b( $sContent ) {
return $sContent
. ‘<h3>Tab Content Filter</h3>’
. ‘<p>This is the second tab! This is inserted by the <b><i>\’content_ + page slug + _ + tab slug\'</i></b> method.</p>’;
}
/**
* One of the predefined callback method.
*
* @remark content_{page slug}_{tab slug}
*/
function content_my_tabs_my_tab_c( $sContent ) {
return $sContent
. ‘<h3>Tab Content Filter</h3>’
. ‘<p>This is the third tab!.</p>’;
}
}
// Instantiate the class object.
new APF_Tabs;
// That’s it!! See, it’s very short and easy, huh?
[/code]
ALSO: https://www.smashingmagazine.com/2011/10/create-tabs-wordpress-settings-pages/
sample-theme-tabbed
https://nimblewebdeveloper.com/blog/add-tabs-to-wordpress-plugin-admin-page
Seb Toombs
How To Add Tabs To Your Wordpress Plugin Admin Page
Ever wanted to add tabs to your Wordpress plugin’s admin page without coding your own? Well you can very easily it turns out.
Tabs are baked into the Wordpress core, so you don’t need to do anything particularly difficult to add them.
You might have seen various plugins such as Woocommerce using the tabs to add many settings areas to one plugin page.
Adding tabs to Wordpress plugin admin
1. Add your admin page
If you haven’t already got an admin page, add one with the following code;
If you already have, skip to step 2.
[code language=”php”]
<?php
//Add admin page to the menu
add_action( ‘admin_menu’, ‘add_admin_page’);
function add_admin_page() {
// add top level menu page
add_menu_page(
‘My Plugin Settings’, //Page Title
‘My Plugin’, //Menu Title
‘manage_options’, //Capability
‘my-plugin’, //Page slug
‘admin_page_html’ //Callback to print html
);
}
[/code]
This code hooks in to the admin_menu Wordpress hook and registers a new admin menu item. We’re adding a top level item, but it’s also possible to add a submenu item.
You can change these settings to suit your needs. I’d usually recommend leaving the capability (‘manage_options’) as is. The ‘admin_page_html’ is the name of the function to call to generate the html for your admin page.
Note: if you’re using this inside a class, change the callback to be array($this, ‘admin_page_html’).
2. Generate admin page HTML – with tabs!
Ok, now you can add the tabs to your markup;
[code language=”php”]
<?php
//Admin page html callback
//Print out html for admin page
function admin_page_html() {
// check user capabilities
if ( ! current_user_can( ‘manage_options’ ) ) {
return;
}
//Get the active tab from the $_GET param
$default_tab = null;
$tab = isset($_GET[‘tab’]) ? $_GET[‘tab’] : $default_tab;
?>
<!– Our admin page content should all be inside .wrap –>
<div class="wrap">
<!– Print the page title –>
<h2><?php echo esc_html( get_admin_page_title() ); ?></h2>
<!– Here are our tabs –>
<nav class="nav-tab-wrapper">
<a href="?page=my-plugin" class="nav-tab <?php if($tab===null):?>nav-tab-active<?php endif; ?>>Default Tab</a>
<a href="?page=my-plugin&tab=settings" class="nav-tab <?php if($tab===’settings’):?>nav-tab-active<?php endif; ?>>Settings</a>
<a href="?page=my-plugin&tab=tools" class="nav-tab <?php if($tab===’tools’):?>nav-tab-active<?php endif; ?>>Tools</a>
</nav>
<div class="tab-content">
<?php switch($tab) :
case ‘settings’:
echo ‘Settings’; //Put your HTML here
break;
case ‘tools’:
echo ‘Tools’;
break;
default:
echo ‘Default tab’;
break;
endswitch; ?>
</div>
</div>
<?php
}
[/code]
The important part of the markup is the nav-tab-wrapper and it’s contents. This is all you need to add tabs to your admin panel, and the styling is provided by Wordpress!
How it works
First, we add the required markup for the tabs. This is a