Add a Google Analytics 4 property (to a site that already has Analytics)
Set up a Google Analytics 4 property alongside your existing Universal Analytics property
This article is for website owners who are using Universal Analytics and want to try out a Google Analytics 4 property. What’s a Google Analytics 4 property?
Click GA4 Setup Assistant (instructions below) to create a Google Analytics 4 property that collects data alongside your existing Universal Analytics property. Your Universal Analytics property is left unchanged and continues to collect data — you can always access it via the property selector or Admin screen.
If you use a website builder or CMS-hosted website (for example, WordPress, Shopify, Wix, etc), use your website builder's/CMS's custom HTML feature to tag your site. Follow these instructions. Do not simply paste your "G-" or "UA-" ID into the field that your CMS provides.
The GA4 Setup Assistant wizard does not backfill your new GA4 property with historical data. Your GA4 property only collects data going forward. To see historical data, use the reports in your Universal Analytics property.
GA4 Setup Assistant wizard
Follow the instructions below to create your Google Analytics 4 property. The instructions are the same regardless of whether your website pages have the Analytics tag or whether you use Google Tag Manager.
-
In Google Analytics, click Admin.
-
In the Account column, make sure that your desired account is selected. (If you only have one Google Analytics account, it will already be selected.)
-
In the Property column, select the Universal Analytics property that currently collects data for your website.
-
In the Property column, click GA4 Setup Assistant. It is the first option in the Property column (directly above "Property Settings", which is second.)
-
Click Get started under "I want to create a new Google Analytics 4 property".
-
If your site uses the
gtag.js
, tag, you have the option to
Enable data collection using your existing tags
. However, if you use a website builder/CMS (e.g. GoDaddy, etc), Google Tag Manager, or your website is tagged with
analytics.js
, the wizard can't reuse your existing tagging and you'll need to add the tag yourself (
instructions
).
Note for advanced users: If you've implemented any custom tags for your Universal Analytics property, Enable data collection using your existing tags won’t replicate the functionality for your Google Analytics 4 property. Learn more.
-
Click Create Property.
Once you click Create Property, the setup wizard:
- Creates your new Google Analytics 4 property
- Copies the property name, website URL, timezone, and currency settings from your Universal Analytics property
- Creates a connected site tag between your Universal Analytics and Google Analytics 4 properties (if your site is tagged with gtag.js and you elected to Enable data collection using your existing tags in step 6, above)
- Creates a connection between your Universal Analytics and Google Analytics 4 properties. This connection makes it possible for you to use Setup Assistant in your Google Analytics 4 property to migrate configurations from your Universal Analytics property to your Google Analytics 4 property.
- Activates enhanced measurement in your Google Analytics 4 property
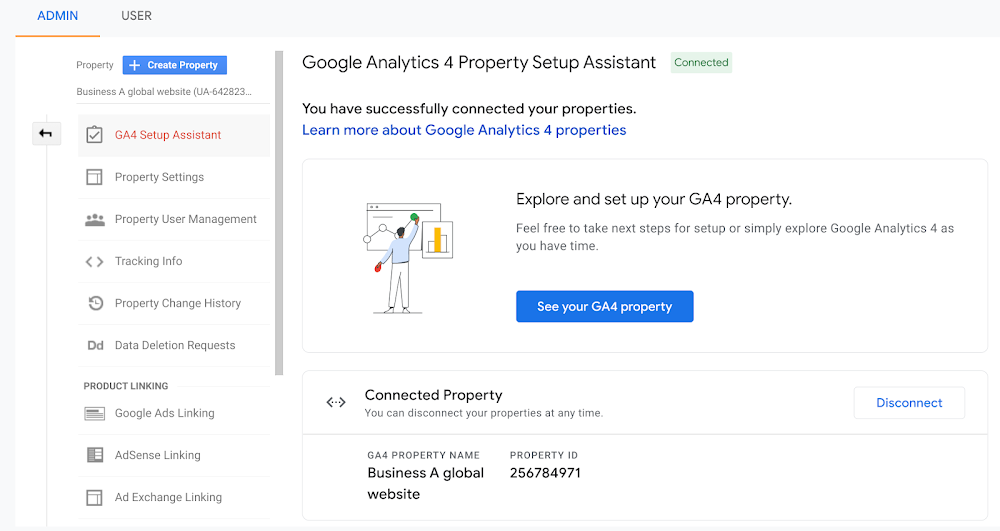
Once this process is complete, you will see "You have successfully connected your properties" at the top of your Google Analytics 4 Property Setup Assistant page. Click See your GA4 property to be taken to Setup Assistant in your new Google Analytics 4 property.
If the GA4 Setup Assistant wizard provided the option to "Enable data collection using your existing tagging" (and you left this option selected), your new Google Analytics 4 property should now be collecting data.

Note: It can take up to 30 minutes for data to begin appearing in your new Google Analytics 4 property.
To verify that data is being collected, select Realtime from the report navigation. Browse your website. You should see activity in the Realtime report.
Make a note of your Google Analytics 4 property's name so you can find it later. If your Universal Analytics property name is "Example property (UA-1234567)", your GA4 property name will be "Example property (87654321)", where 87654321 is a property number.
If you have an existing Firebase project, you can link this Google Analytics 4 property to it. However, you have to do this from Firebase. Learn how.
If the setup wizard did not use your existing tagging
If you use a website builder/CMS or your website is tagged with analytics.js (instead of gtag.js), the GA4 Setup Assistant wizard could not reuse your existing tagging. So, you'll need to add the Analytics tag yourself to begin seeing data in your new Google Analytics 4 property.
Add your tag to a website builder or CMS-hosted website (for example, WordPress, Shopify, etc.)
Add your tag directly to your web pages
Add your tag using Google Tag Manager
In Google Tag Manager, create a Google Analytics: GA4 Configuration tag:
-
Click Tags
 New.
New. -
Click Tag Configuration.
-
Select Google Analytics: GA4 Configuration.
-
Enter your Measurement ID.

-
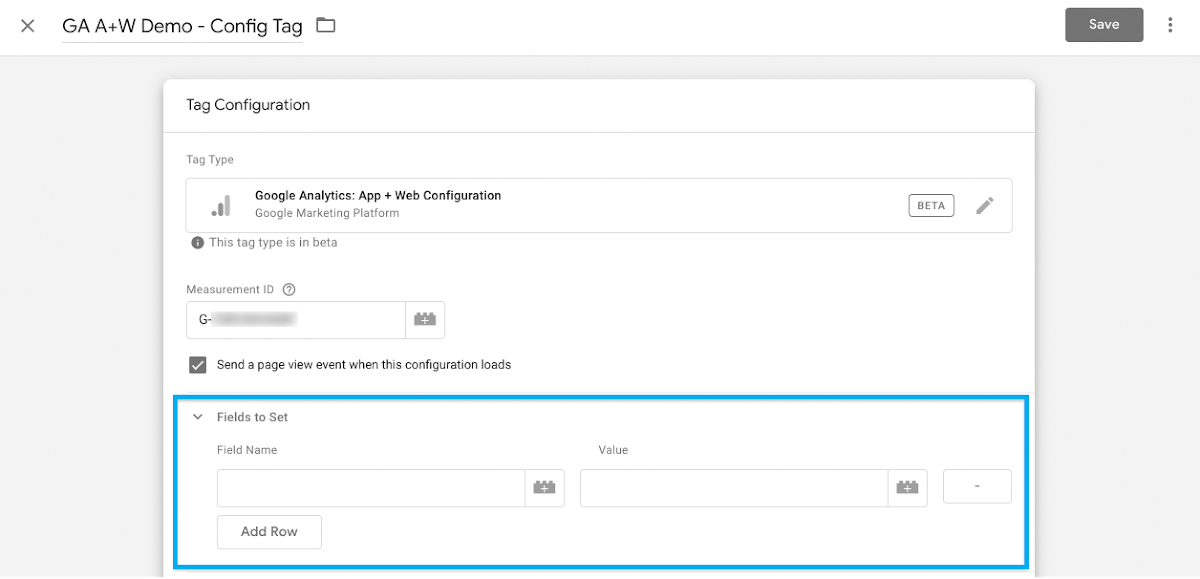
Optional: Add any parameters you'd like to configure in
Fields to Set
. Use
recommended event parameter names
for best results.

-
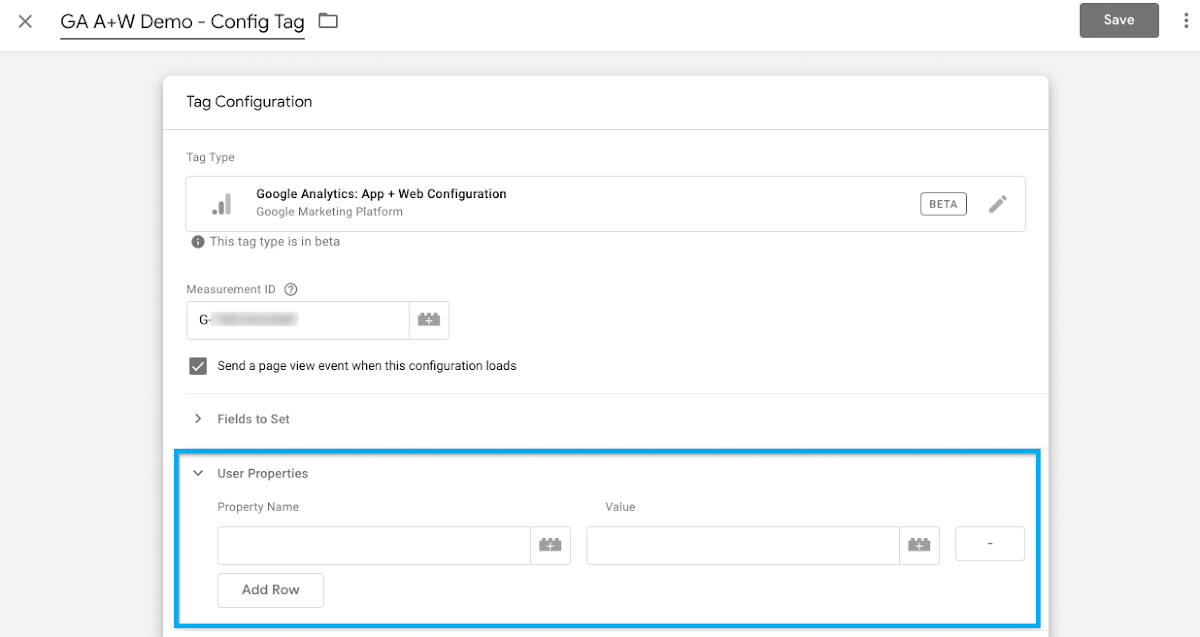
Optional: Add any custom user properties that you'd like to configure in
User Properties
.
Note: Analytics automatically logs some user properties. You can set up to 25 additional user properties per Google Analytics 4 property.

-
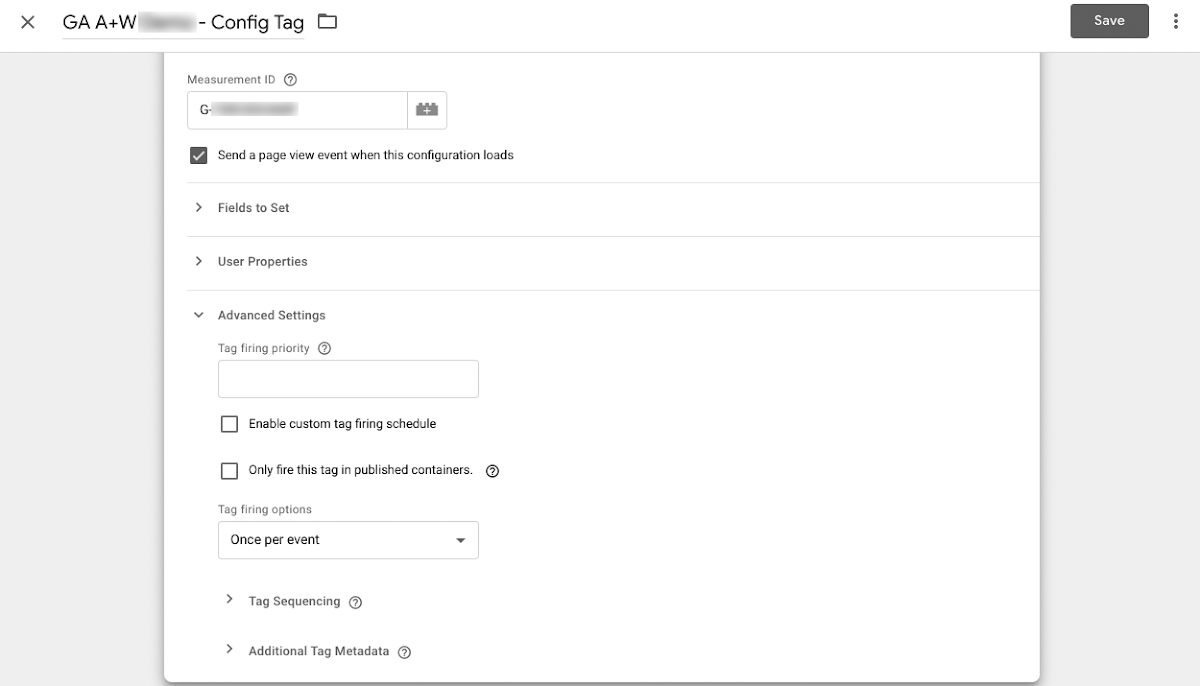
Optional: Use
Advanced Settings
to set a
Tag Firing Priority
or use
Tag Sequencing
to help ensure that the Configuration tag fires before any other event tags that require it.

-
Click Triggering and select appropriate triggers that would cause the tag to fire, e.g. "All Pages", so that the configuration tag fires on all pages of your website.
-
Save the tag configuration and publish your container.
cross domain
https://support.google.com/analytics/answer/10071811?hl=en&ref_topic=9303319
[GA4] Set up cross-domain measurement
This article is for website owners who need unified measurement across more than one domain, e.g. across a customer website and a separate shopping cart domain. This article pertains to Google Analytics 4 properties; if you are using Universal Analytics, read this article instead.
Cross-domain measurement allows activity to be accurately attributed to a single user as they cross domains. Outbound clicks that would ordinarily trigger an event via enhanced measurement are ignored when the outbound link leads to a domain that you've listed as part of cross-domain measurement.
Video overview
Cross Domain Measurement in Google Analytics 4 Properties
Cookies and cross-domain measurement
Analytics uses first-party cookies to set an identifier for each unique user and session to a website.
- Without cross-domain measurement, new cookies with new identifiers are set for each domain a user visits. Analytics count these new cookies with new identifiers as separate users with separate sessions.
- With cross-domain measurement, the same identifiers are passed from from one site to another via a URL parameter identified by the key
_gl:, for example:https://www.example.com/?_gl=1*abcde5*.
If you also have a Universal Analytics property
For your Universal Analytics property, you configured cross-domain measurement via code (either in the source code through analytics.js or gtag.js, or via Google Tag Manager). For your Google Analytics 4 property, you'll do this via the Admin page. Follow the instructions below to add the same domains you've identified in your Universal Analytics page code.
If you have an existing configuration in the global site tag for your Universal Analytics property, it will be applied to your Google Analytics 4 property as well. Any domains you've specified in the code or via the Admin will apply to your Google Analytics 4 property. However, we recommend that you configure in the Admin only.
Set up cross-domain measurement via the Admin
You need Edit permission to set up cross-domain measurement.
Check the Analytics tag (e.g. the global site tag on each of your HTML pages) for each domain that you want to include in your cross-domain measurement. The tag on each page must use the same Measurement ID (i.e same. "G-" ID) from the same web data stream.
-
In Admin, navigate to one of the properties you want to include in cross-domain measurement.
-
In the Property column, click Data Streams > Web.
-
Click the data stream for your website, then under Additional Settings, click Tagging settings.
-
Click Configure your domains.
-
Under
Include domains that match ANY of the following conditions
:
- Choose a match type.
- Under Domain, enter the identifier for the domain you want to match (e.g., example.com).
- Click Add condition to add the next domain. (Add each domain you want to include in cross-domain measurement.)
Conditions are evaluated using OR logic.
-
Click Save.
Manual setup
Verify that cross-domain measurement is working properly
- Open a page of your site that contains a link or a form that points to a domain you configured for cross-domain measurement.
- Click the link or submit the form to navigate to the destination domain.
- Verify that the URL in the destination domain contains the linker parameter
_gl; for example:https://www.example.com/**?_gl=1\*abcde5\***.
Troubleshooting
If you can't confirm the presence of the parameter _gl in the URL of the destination domain per the steps above, double check that the domain you configured in the interface matches the domain your site is pointing to.
It's also possible that your website is configured in a way that prevents cross-domain measurement from working correctly. With the help of an experienced web developer, investigate whether your website is being affected by the following issues.
URL redirects
If the destination page redirects or doesn't support arbitrary query parameters, the parameter _gl may end up being removed from the URL even if it was appended by Analytics in the previous page. (This usually happens too quickly to observe by eye.) To confirm if this is happening to your site, check the network requests made by the previous page using the Chrome Developer Tools. To fix this issue, configure your site to preserve the parameter _gl in redirects.
Conflicts with other scripts
Cross-domain measurement works by creating an event listener on the document node of a page. When users click a link, the click event bubbles up to the document node and the parameter _gl is added to the link URL. This process cannot work properly in the following scenarios:
- When the navigation is triggered by JavaScript as opposed to a direct response to a user action.
- When competing scripts in the page stop the event propagation before it reaches the document node; for example, when
Event.stopPropagation()is used.


