
RESOURCES
- Turn off unwanted sizes (Used – Stop Generating Unnecessary Thumbnails)
- WP-CLI best option to run regenerate
- delete unnecessary
- https://developer.wordpress.org/reference/functions/remove_image_size/
- https://developer.wordpress.org/reference/functions/add_image_size/#reserved-image-size-names
- MORE
- REPLACE SIZE: replace custom calls with generic
- COMPRESSION: get compression / webp working
- WEBp: how to get this finally working
https://github.com/wp-cli/media-command
wp-cli/media-command
Imports files as attachments, regenerates thumbnails, or lists registered image sizes.
Quick links: Using | Installing | Contributing | Support
Using
This package implements the following commands:
wp media
Imports files as attachments, regenerates thumbnails, or lists registered image sizes.
wp media
EXAMPLES
# Re-generate all thumbnails, without confirmation.
$ wp media regenerate --yes
Found 3 images to regenerate.
1/3 Regenerated thumbnails for "Sydney Harbor Bridge" (ID 760).
2/3 Regenerated thumbnails for "Boardwalk" (ID 757).
3/3 Regenerated thumbnails for "Sunburst Over River" (ID 756).
Success: Regenerated 3 of 3 images.

# Import a local image and set it to be the featured image for a post.
$ wp media import ~/Downloads/image.png --post_id=123 --title="A downloaded picture" --featured_image
Success: Imported file '/home/person/Downloads/image.png' as attachment ID 1753 and attached to post 123 as featured image.

# List all registered image sizes
$ wp media image-size
+---------------------------+-------+--------+-------+
| name                      | width | height | crop  |
+---------------------------+-------+--------+-------+
| full                      |       |        | N/A   |
| twentyfourteen-full-width | 1038  | 576    | hard  |
| large                     | 1024  | 1024   | soft  |
| medium_large              | 768   | 0      | soft  |
| medium                    | 300   | 300    | soft  |
| thumbnail                 | 150   | 150    | hard  |
+---------------------------+-------+--------+-------+
wp media import
Creates attachments from local files or URLs.
wp media import <file>... [--post_id=<post_id>] [--title=<title>] [--caption=<caption>] [--alt=<alt_text>] [--desc=<description>] [--skip-copy] [--preserve-filetime] [--featured_image] [--porcelain]
OPTIONS
<file>...
	Path to file or files to be imported. Supports the glob(3) capabilities of the current shell.
	    If file is recognized as a URL (for example, with a scheme of http or ftp), the file will be
	    downloaded to a temp file before being sideloaded.

[--post_id=<post_id>]
	ID of the post to attach the imported files to.

[--title=<title>]
	Attachment title (post title field).

[--caption=<caption>]
	Caption for attachent (post excerpt field).

[--alt=<alt_text>]
	Alt text for image (saved as post meta).

[--desc=<description>]
	"Description" field (post content) of attachment post.

[--skip-copy]
	If set, media files (local only) are imported to the library but not moved on disk.
	File names will not be run through wp_unique_filename() with this set.

[--preserve-filetime]
	Use the file modified time as the post published & modified dates.
	Remote files will always use the current time.

[--featured_image]
	If set, set the imported image as the Featured Image of the post its attached to.

[--porcelain]
	Output just the new attachment ID.
EXAMPLES
# Import all jpgs in the current user's "Pictures" directory, not attached to any post.
$ wp media import ~/Pictures/**\/*.jpg
Imported file '/home/person/Pictures/landscape-photo.jpg' as attachment ID 1751.
Imported file '/home/person/Pictures/fashion-icon.jpg' as attachment ID 1752.
Success: Imported 2 of 2 items.

# Import a local image and set it to be the post thumbnail for a post.
$ wp media import ~/Downloads/image.png --post_id=123 --title="A downloaded picture" --featured_image
Imported file '/home/person/Downloads/image.png' as attachment ID 1753 and attached to post 123 as featured image.
Success: Imported 1 of 1 images.

# Import a local image, but set it as the featured image for all posts.
# 1. Import the image and get its attachment ID.
# 2. Assign the attachment ID as the featured image for all posts.
$ ATTACHMENT_ID="$(wp media import ~/Downloads/image.png --porcelain)"
$ wp post list --post_type=post --format=ids | xargs -d ' ' -I % wp post meta add % _thumbnail_id $ATTACHMENT_ID
Success: Added custom field.
Success: Added custom field.

# Import an image from the web.
$ wp media import http://s.wordpress.org/style/images/wp-header-clickety-clack-site/june2021/logo.png --title='The WordPress logo' --alt="Semantic personal publishing"
Imported file 'http://s.wordpress.org/style/images/wp-header-clickety-clack-site/june2021/logo.png' as attachment ID 1755.
Success: Imported 1 of 1 images.

# Get the URL for an attachment after import.
$ wp media import http://s.wordpress.org/style/images/wp-header-clickety-clack-site/june2021/logo.png --porcelain | xargs -I {} wp post list --post__in={} --field=url --post_type=attachment
http://wordpress-develop.dev/wp-header-logo/
wp media regenerate
Regenerates thumbnails for one or more attachments.
wp media regenerate [<attachment-id>...] [--image_size=<image_size>] [--skip-delete] [--only-missing] [--yes]
OPTIONS
[<attachment-id>...]
	One or more IDs of the attachments to regenerate.

[--image_size=<image_size>]
	Name of the image size to regenerate. Only thumbnails of this image size will be regenerated, thumbnails of other image sizes will not.

[--skip-delete]
	Skip deletion of the original thumbnails. If your thumbnails are linked from sources outside your control, it's likely best to leave them around. Defaults to false.

[--only-missing]
	Only generate thumbnails for images missing image sizes.

[--yes]
	Answer yes to the confirmation message. Confirmation only shows when no IDs passed as arguments.
EXAMPLES
# Regenerate thumbnails for given attachment IDs.
$ wp media regenerate 123 124 125
Found 3 images to regenerate.
1/3 Regenerated thumbnails for "Vertical Image" (ID 123).
2/3 Regenerated thumbnails for "Horizontal Image" (ID 124).
3/3 Regenerated thumbnails for "Beautiful Picture" (ID 125).
Success: Regenerated 3 of 3 images.

# Regenerate all thumbnails, without confirmation.
$ wp media regenerate --yes
Found 3 images to regenerate.
1/3 Regenerated thumbnails for "Sydney Harbor Bridge" (ID 760).
2/3 Regenerated thumbnails for "Boardwalk" (ID 757).
3/3 Regenerated thumbnails for "Sunburst Over River" (ID 756).
Success: Regenerated 3 of 3 images.

# Re-generate all thumbnails that have IDs between 1000 and 2000.
$ seq 1000 2000 | xargs wp media regenerate
Found 4 images to regenerate.
1/4 Regenerated thumbnails for "Vertical Featured Image" (ID 1027).
2/4 Regenerated thumbnails for "Horizontal Featured Image" (ID 1022).
3/4 Regenerated thumbnails for "Unicorn Wallpaper" (ID 1045).
4/4 Regenerated thumbnails for "I Am Worth Loving Wallpaper" (ID 1023).
Success: Regenerated 4 of 4 images.

# Re-generate only the thumbnails of "large" image size for all images.
$ wp media regenerate --image_size=large
Do you really want to regenerate the "large" image size for all images? [y/n] y
Found 3 images to regenerate.
1/3 Regenerated "large" thumbnail for "Sydney Harbor Bridge" (ID 760).
2/3 No "large" thumbnail regeneration needed for "Boardwalk" (ID 757).
3/3 Regenerated "large" thumbnail for "Sunburst Over River" (ID 756).
Success: Regenerated 3 of 3 images.
wp media image-size
Lists image sizes registered with WordPress.
wp media image-size [--fields=<fields>] [--format=<format>]
OPTIONS
[--fields=<fields>]
	Limit the output to specific fields. Defaults to all fields.

[--format=<format>]
	Render output in a specific format
	---
	default: table
	options:
	  - table
	  - json
	  - csv
	  - yaml
	  - count
	---
AVAILABLE FIELDS
These fields will be displayed by default for each image size:
- name
- width
- height
- crop
- ratio
EXAMPLES
# List all registered image sizes
$ wp media image-size
+---------------------------+-------+--------+-------+-------+
| name                      | width | height | crop  | ratio |
+---------------------------+-------+--------+-------+-------+
| full                      |       |        | N/A   | N/A   |
| twentyfourteen-full-width | 1038  | 576    | hard  | 173:96|
| large                     | 1024  | 1024   | soft  | N/A   |
| medium_large              | 768   | 0      | soft  | N/A   |
| medium                    | 300   | 300    | soft  | N/A   |
| thumbnail                 | 150   | 150    | hard  | 1:1   |
+---------------------------+-------+--------+-------+-------+
Installing
This package is included with WP-CLI itself, no additional installation necessary.
To install the latest version of this package over what's included in WP-CLI, run:
wp package install git@github.com:wp-cli/media-command.git
Regenerate Thumbnails with WP-CLI
If you prefer not to use a plugin, there’s another solution for WordPress: Regenerate thumbnails without a plugin by doing so manually with WP-CLI.
Keep in mind that you need to have access to the command line on your server for this option.
Regenerating thumbnails using WP-CLI is a far superior option over using a WordPress plugin because it’s faster and isn’t subject to HTTP limitations and timeouts.
The basic command to regenerate thumbnails is below:
wp media regenerate
After entering it, confirm you want to regenerate all thumbnails by pressing the letter “y” for “yes” on your keyboard.
Regenerate All Thumbnails with WP-CLI
Once you have fired up the command line, you can enter the following command for WordPress to regenerate thumbnails without a plugin in a matter of seconds:
wp media regenerate --yes
With this command, thumbnails will be regenerated without having to manually confirm it.
Regenerate Specific Thumbnails Using WP-CLI
You also have the option to regenerate specific thumbnails using WP-CLI and the IDs of the images you want to update.
Here’s the command to do that:
wp media regenerate 12 34 567
Just be sure to replace the three example IDs – “12,” “34,” and “567” – with the actual IDs of the specific images you want to regenerate.
You can include as many IDs as you want. Just be sure to separate each of them with a space.
PLUGINS
-
Stop Generating Unnecessary Thumbnails (Formerly Stop Generating Image Sizes)
-
https://wordpress.org/plugins/regenerate-thumbnails/ – ### Regenerate Thumbnails
-
WP-CLI
If you have command line access to your server, I highly recommend using WP-CLI instead of this plugin as it’s faster (no HTTP requests overhead) and can be run inside of a
screenfor those with many thumbnails. For details, see the documentation of itsmedia regeneratecommand. -
https://developer.wordpress.org/cli/commands/media/regenerate/
-
wp media regenerate
Regenerates thumbnails for one or more attachments.
[. 2/3 Regenerated thumbnails for "Horizontal Image" (ID 124). 3/3 Regenerated thumbnails for "Beautiful Picture" (ID 125). Success: Regenerated 3 of 3 images. # Regenerate all thumbnails, without confirmation. $ wp media regenerate --yes Found 3 images to regenerate. 1/3 Regenerated thumbnails for "Sydney Harbor Bridge" (ID 760). 2/3 Regenerated thumbnails for "Boardwalk" (ID 757). 3/3 Regenerated thumbnails for "Sunburst Over River" (ID 756). Success: Regenerated 3 of 3 images. # Re-generate all thumbnails that have IDs between 1000 and 2000. $ seq 1000 2000 | xargs wp media regenerate Found 4 images to regenerate. 1/4 Regenerated thumbnails for "Vertical Featured Image" (ID 1027). 2/4 Regenerated thumbnails for "Horizontal Featured Image" (ID 1022). 3/4 Regenerated thumbnails for "Unicorn Wallpaper" (ID 1045). 4/4 Regenerated thumbnails for "I Am Worth Loving Wallpaper" (ID 1023). Success: Regenerated 4 of 4 images. # Re-generate only the thumbnails of "large" image size for all images. $ wp media regenerate --image_size=large Do you really want to regenerate the "large" image size for all images? [y/n] y Found 3 images to regenerate. 1/3 Regenerated "large" thumbnail for "Sydney Harbor Bridge" (ID 760). 2/3 No "large" thumbnail regeneration needed for "Boardwalk" (ID 757). 3/3 Regenerated "large" thumbnail for "Sunburst Over River" (ID 756). Success: Regenerated 3 of 3 images.GLOBAL PARAMETERS #GLOBAL PARAMETERS
These global parameters have the same behavior across all commands and affect how WP-CLI interacts with WordPress.
Argument Description --path=<path>Path to the WordPress files. --url=<url>Pretend request came from given URL. In multisite, this argument is how the target site is specified. --ssh=[<scheme>:][<user>@]<host\|container>[:<port>][<path>]Perform operation against a remote server over SSH (or a container using scheme of “docker”, “docker-compose”, “vagrant”). --http=<http>Perform operation against a remote WordPress installation over HTTP. --user=<id\|login\|email>Set the WordPress user. --skip-plugins[=<plugins>]Skip loading all plugins, or a comma-separated list of plugins. Note: mu-plugins are still loaded. --skip-themes[=<themes>]Skip loading all themes, or a comma-separated list of themes. --skip-packagesSkip loading all installed packages. --require=<path>Load PHP file before running the command (may be used more than once). --[no-]colorWhether to colorize the output. --debug[=<group>]Show all PHP errors and add verbosity to WP-CLI output. Built-in groups include: bootstrap, commandfactory, and help. --prompt[=<assoc>]Prompt the user to enter values for all command arguments, or a subset specified as comma-separated values. --quietSuppress informational messages. Command documentation is regenerated at every release. To add or update an example, please submit a pull request against the corresponding part of the codebase.
- […]
Basic Overview – Learn: The WordPress Images Sizes & The Upload Process
What happens to an image uploaded to WordPress? How are the thumbnails are created? What are those WordPress Images Sizes? I will try to reply to those questions as simply as possible.
The Process of Uploading an Image into WordPressIn the FilesystemIn the WordPress DatabaseWhy is this happening?The Big Image TresholdThe Images SizesThe Standard Image SizesThe Additional Images SizesResponsive ImagesSupport in WordPressHow does it work exactly?
The Process of Uploading an Image into WordPress
When you upload an image to WordPress, a new entry is created in the Media Library. But behind this, it is slighty more complicated.
In the Filesystem
At least 4-5 files are added in your filesystem (more specifically, in the /uploads directory, where your WordPress is installed). Those files are known as thumbnails, as they are smaller than the original file you have uploaded. In your filesystem, it will look like this.

Your original file keeps its name. The additional thumbnails are suffixed with their new dimension. Here, we have a square (150×150), and the others are reduced version of the original file. In fact, when you are looking at your Media Library (in List Mode), it is that square (150×150) image which is used.
In the WordPress Database
A new media entry is created in the database, and the associated metadata is generated. This metadata is very important: it contains the information about the files which were created, such as their dimensions, and their location.
Unfortunately, that metadata is not shown by WordPress. If you are curious about it, you can install Media Metadata and you will see a new column in the Media Library.
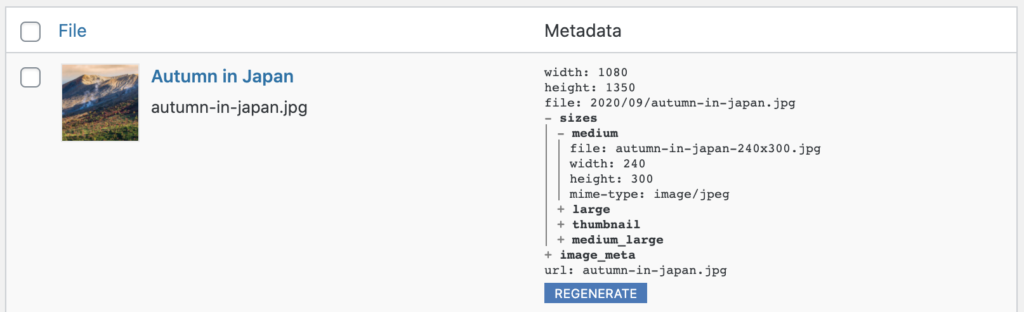
Here, you can see that your metadata contains the information about your thumbnails. Each thumbnail is associated with a name. Here, it’s medium, large, thumbnail, and medium_large. They correspond to the Image Sizes which were active at the time of the creation of the files and the metadata. We will dig into the Images Sizes soon.
Why is this happening?
Simply because your original file would be usually too big to be used directly on your website. Indeed, there are many ways to use an image, for example as a preview image when your posts are listed (in which the image appears small), or maybe in very big when it’s used at the top of your article.
Your theme or the plugins you are using, depending on the situation, will pick a different image to work with.
The Big Image Treshold
We are not done yet! Since version 5.3, WordPress resizes automatically your original image if it is bigger than 2560 pixels in width or height. This new image is called myfilename-scaled.jpg. This image is the one which will be used in your WordPress. The original myfilename.jpg will be also there, part of your files, but not used anywhere.
The way they did it is actually quite confusing; if you upload images smaller than 2560 pixels, they will not be scaled. So you might end with a mix of files with -scaled included or not in their names.
I strongly suggest you to disable this feature, in order to keep your filesystem clean and totally under your control. For this, you can simply use the Perfect Images plugin. You can also use the following code.
add_filter('big_image_size_threshold', '__return_false');
The Images Sizes
Welcome in the messy world of the Images Sizes! 🙂
The Standard Image Sizes
It’s very easy to check the image sizes registered by default in WordPress. They are accessible under Settings > Media. There, you can modify their dimensions. By the way, I highly recommend you to check the Organize my uploads into month option!
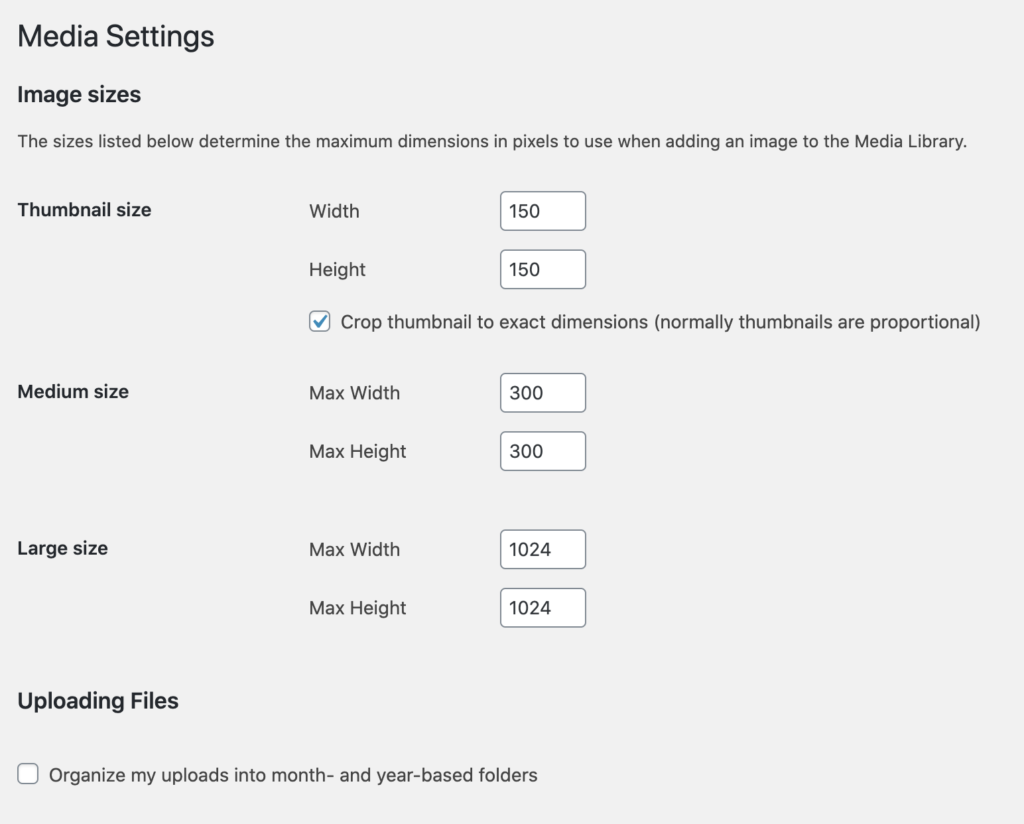
But that’s not all. You probably noticed it before, but in the screenshot of the metadata I shared with you earlier, there was a medium_large size. It is not displayed here (even it is part of the standard sizes), and you can’t pick it anywhere. So why is it there? Why are you making everything so complicated, WordPress!? Well, it’s actually an attempt to make things a bit simpler (and they don’t tell you about it), and this size is used to enhanced the Responsive Images feature (check the section about it to learn more).
The Additional Images Sizes
And now, there are all the additional image sizes added by your theme and the plugins. For example, WooCommerce adds 3 more image sizes. They talk about this in their documentation: WooCommerce Image Sizes for Theme Developers.
Unfortunately, there isn’t a screen to see all this clearly, and it’s more or less totally out of your control. That said, using the little plugin Media Metadata, you can see the metadata and guess what are those image sizes. I am working on another plugin which will allow you to have more control over those additional image sizes.
Responsive Images
Nowadays, there are many ways of browsing a website, with many different kind of devices. When you visit a website at home, on your big screen and with a very fast connection, you would be probably happy to see beautiful and crisp, large images. However, when you are on a trip with a somewhat slower connection, you would prefer to see a smaller image (since your device has a small screen anyway), and maybe even lower quality.
Support in WordPress
Luckily, since WordPress 4.4 (back in… 2015!), there is support for Responsive Images. If your theme or plugins take advantage of this feature, then your images will be responsive images.
How does it work exactly?
This part is a bit technical. When an image is being written into the HTML through the WordPress system, instead of just a src in the img tag, a src-set is used. All your images sizes are added into this src-set. Then, automatically, the browser of the visitor will pick the best suited images, depending on the size of the screen and the device connectivity.
If you are curious, here is an example of an image with a src-set.
<figure class="wp-block-image size-large"><img loading="lazy" width="819" height="1024" src="http://website.com/wp-content/uploads/2020/09/autumn-in-japan-819x1024.jpg" alt="Autumn in Japan" class="wp-image-360" srcset="http://website.com/wp-content/uploads/2020/09/autumn-in-japan-819x1024.jpg 819w, http://website.com/wp-content/uploads/2020/09/autumn-in-japan-240x300.jpg 240w, http://website.com/wp-content/uploads/2020/09/autumn-in-japan-768x960.jpg 768w, http://website.com/wp-content/uploads/2020/09/autumn-in-japan.jpg 1080w" sizes="(max-width: 819px) 100vw, 819px" /></figure>
REMOVE / ADD UPDATE IMAGE SIZES – HOOK AFTER THEME / PLUGIN CALLS
https://wordpress.stackexchange.com/questions/74934/remove-or-update-add-image-size
The function is graceful enough to handle multiple calls using the same $name. It simply overwrites the existing value:
$_wp_additional_image_sizes[$name] = array( 'width' => absint( $width ), 'height' => absint( $height ), 'crop' => (bool) $crop );
So that means that all you need to do to override the parent Theme's definition of the custom image size is to ensure that your call to add_image_size() fires after the parent Theme's call.
Assuming that the Parent Theme does like so:
function parent_theme_setup() {
    add_image_size( 'name', 500, 200, true );
    add_image_size( 'new-name', 400, 300, true );
}
add_action( 'after_setup_theme', 'parent_theme_setup' );
Then the parent Theme's add_image_size() call fires at the after_setup_theme hook, at the default priority (i.e. 10).
(Note: if the calls are not wrapped in a callback, then they fire at the plugins_loaded hook, at priority 10.)
Here's the critical part: the child Theme's functions.php file is parsed *before* the parent Theme's, so if you use the same hooks to fire your add_image_size() calls, they'll get overridden by the parent Theme's add_image_size() calls.
The solution is to use a later hook or a lower priority, to ensure that the child Theme's add_image_size() call fires after the parent Theme's.
This should do the trick, regardless of how the parent Theme fires its calls:
function child_theme_setup() {
    add_image_size( 'name', 400, 300, true );
}
add_action( 'after_setup_theme', 'child_theme_setup', 11 );
Note that we use the same after_setup_theme hook, but use a lower priority (i.e. 11 instead of 10. Callbacks fire in order from higher priority (lower number) to lower priority (higher number), starting with priority 0. So a callback hooked into priority 11 will fire after a callback hooked into priority 10.
Note also that the after_setup_theme hook itself fires after the plugins_loaded hook, so this callback will still override the parent Theme, even if the parent Theme is _doing_it_wrong() by not wrapping such calls in an appropriate callback, hooked into an appropriate hook.
https://wordpress.stackexchange.com/questions/182477/wp-get-attachment-image-src-and-server-path
WordPress doesn't store path of generated sizes anywhere, you need to build it.
As suggested by can be used to obtain some of the pieces you need to build the path. An alternative is .
The missing piece is the absolute path of upload folder. In theory, that can be retrieved via but there's a problem: that function returns the upload folder in the moment it is called, but there's always the possibility that when the file was uploaded the upload path was different.
So the only possibility is to make the assumption that scaled image is in the same folder of original image.
This assumption may appear hackish, and probably is, but it is used in WordPress core itself by functions like ), so if you're looking for the official way.. that's the one.
Putting things togheter:
function scaled_image_path($attachment_id, $size = 'thumbnail') {
    $file = get_attached_file($attachment_id, true);
    if (empty($size) || $size === 'full') {
        // for the original size get_attached_file is fine
        return realpath($file);
    }
    if (! wp_attachment_is_image($attachment_id) ) {
        return false; // the id is not referring to a media
    }
    $info = image_get_intermediate_size($attachment_id, $size);
    if (!is_array($info) || ! isset($info['file'])) {
        return false; // probably a bad size argument
    }

    return realpath(str_replace(wp_basename($file), $info['file'], $file));
}
Function above takes the attachment id and a size and returns the path.
I've applied before to return paths because that function returns false for non-existent files, so the whole function always returns false if something went wrong.
The only alternative to this flow would be saving by yourself the path of scaled image(s) somewhere, probably post meta, and retrieve when needed, but that can only work for files uploaded after your plugin has been activated…
PLUGINS
-
Stop Generating Unnecessary Thumbnails (Formerly Stop Generating Image Sizes)
-
https://wordpress.org/plugins/regenerate-thumbnails/ – ### Regenerate Thumbnails
-
WP-CLI
If you have command line access to your server, I highly recommend using WP-CLI instead of this plugin as it’s faster (no HTTP requests overhead) and can be run inside of a
screenfor those with many thumbnails. For details, see the documentation of itsmedia regeneratecommand. -
https://developer.wordpress.org/cli/commands/media/regenerate/
-
wp media regenerate
Regenerates thumbnails for one or more attachments.
[. 2/3 Regenerated thumbnails for "Horizontal Image" (ID 124). 3/3 Regenerated thumbnails for "Beautiful Picture" (ID 125). Success: Regenerated 3 of 3 images. # Regenerate all thumbnails, without confirmation. $ wp media regenerate --yes Found 3 images to regenerate. 1/3 Regenerated thumbnails for "Sydney Harbor Bridge" (ID 760). 2/3 Regenerated thumbnails for "Boardwalk" (ID 757). 3/3 Regenerated thumbnails for "Sunburst Over River" (ID 756). Success: Regenerated 3 of 3 images. # Re-generate all thumbnails that have IDs between 1000 and 2000. $ seq 1000 2000 | xargs wp media regenerate Found 4 images to regenerate. 1/4 Regenerated thumbnails for "Vertical Featured Image" (ID 1027). 2/4 Regenerated thumbnails for "Horizontal Featured Image" (ID 1022). 3/4 Regenerated thumbnails for "Unicorn Wallpaper" (ID 1045). 4/4 Regenerated thumbnails for "I Am Worth Loving Wallpaper" (ID 1023). Success: Regenerated 4 of 4 images. # Re-generate only the thumbnails of "large" image size for all images. $ wp media regenerate --image_size=large Do you really want to regenerate the "large" image size for all images? [y/n] y Found 3 images to regenerate. 1/3 Regenerated "large" thumbnail for "Sydney Harbor Bridge" (ID 760). 2/3 No "large" thumbnail regeneration needed for "Boardwalk" (ID 757). 3/3 Regenerated "large" thumbnail for "Sunburst Over River" (ID 756). Success: Regenerated 3 of 3 images.GLOBAL PARAMETERS #GLOBAL PARAMETERS
These global parameters have the same behavior across all commands and affect how WP-CLI interacts with WordPress.
Argument Description --path=<path>Path to the WordPress files. --url=<url>Pretend request came from given URL. In multisite, this argument is how the target site is specified. --ssh=[<scheme>:][<user>@]<host\|container>[:<port>][<path>]Perform operation against a remote server over SSH (or a container using scheme of “docker”, “docker-compose”, “vagrant”). --http=<http>Perform operation against a remote WordPress installation over HTTP. --user=<id\|login\|email>Set the WordPress user. --skip-plugins[=<plugins>]Skip loading all plugins, or a comma-separated list of plugins. Note: mu-plugins are still loaded. --skip-themes[=<themes>]Skip loading all themes, or a comma-separated list of themes. --skip-packagesSkip loading all installed packages. --require=<path>Load PHP file before running the command (may be used more than once). --[no-]colorWhether to colorize the output. --debug[=<group>]Show all PHP errors and add verbosity to WP-CLI output. Built-in groups include: bootstrap, commandfactory, and help. --prompt[=<assoc>]Prompt the user to enter values for all command arguments, or a subset specified as comma-separated values. --quietSuppress informational messages. Command documentation is regenerated at every release. To add or update an example, please submit a pull request against the corresponding part of the codebase.
- […]
Guide to WordPress Custom Post Thumbnail Sizes
https://medium.com/@micsumner/guide-to-wordpress-custom-post-thumbnail-sizes-6d62af0725f8
You may have stumbled upon the fact that in the role as a theme developer it is a standard to build your theme with web performance in mind. This means to make sure that the images outputted in your theme are not in ‘full’ size if they might be more than .
Also, making use of WordPress’s functionality for the HTML image attribute srcset is another reason to be using the wp_get_attachment_image() function in outputting images.
Another usage would be in outputting blog posts with featured images. As a theme developer you want to make sure that you either specify: (a) one of the default post thumbnail sizes, or (b) create your own custom post thumbnail size.
Using a Default Post Thumbnail Size
There are cases wherein you might not have to use a custom post thumbnail size. However you may instead use a default post thumbnail size that will do perfectly for your requirements.
The default thumbnail sizes available for you to use are the following:
thumbnail(uses the size 150px × 150px)medium(uses the size 300px × 300px)medium_large(uses the size 768px × 0px)large(uses the size 1024px × 1024px)
In these cases you can easily specify if you have a similar size to use for any one of these default thumbnail sizes. All you’ll have to do is use any one of the above mentioned strings in the $size parameter of the the_post_thumbnail() function.
You will notice that these default post thumbnail sizes are almost all square-cropped images. This is likely due to the maximal space of which an image can be outputted — a square. To make the most use of space, the decision was made to make these default post thumbnail sizes as square images.
When to Use a Custom Post Thumbnail Size
However, there are cases when you need to output an image that is not a square. Take for example that you have to add a featured image above your blog single article using the function the_post_thumbnail().
You can use the following code that will output a featured image of your article with the size 1024px × 768px:
add_image_size( 'single-feature', 1024, 768, true );
And quickly identifying what this means in layman’s terms:
- add_image_size() — create a custom post thumbnail size
- ‘single-feature’ — parameter
$name, just a name of the custom post thumbnail size - 1024 — parameter
$width, the width of the custom post thumbnail size - 768 — parameter
$height, the height of the custom post thumbnail size - true — parameter
$crop, means if to (a) hard crop, or (b) scale image into the custom post thumbnail size. More info in the WP Dev docs
As additional info: from the example the width and height specified were chosen (1024 × 768) as they are the common sizes to use for featured images. However this doesn’t have to mean that you can’t use any other size. Make sure you see what fits best for your theme design and use that.
How to Update Custom Post Thumbnails
As you will be testing out the new image sizes for your WordPress images you will notice that you may have trouble updating the width and height without changing the $name of the custom post thumbnail size.
Let us take for example that you have the old size:
add_image_size( 'single-feature', 1024, 768, true );
But now you need to update the size of this ‘single-feature’ thumbnail size to the following:
add_image_size( 'single-feature', 1366, 768, true );
You see that the change was in the width from 1024 to 1366. But as you refresh the template wherein this size is supposed to be displayed, it will still show its image with the width of 1024. How can this be fixed?
To remedy this, you will have to regenerate the thumbnail.
So to start off, make sure that you have updated your thumbnail width and height, then install the plugin . Follow the instructions of the plugin and you will then have regenerated the thumbnail sizes successfully.
Regenerating all your images may take some time especially if your website has a lot of images in your Media Library.
Where to Place the add_image_size Function
The add_image_size() function will not work unless you place it properly within the WordPress after_setup_theme action hook. This means that the following example code:
add_image_size( 'archive-featured', 792, 446, true );
Must be within the following action hook in your theme’s functions.php file under:
function ms_setup() {add_image_size( 'archive-featured', 792, 446, true );}add_action( 'after_setup_theme', 'ms_setup' );
Adding add_image_size in the Underscores Theme
A very popular starter theme called the or _s theme has a good place to add your add_image_size() functions.
You can add the custom post thumbnail size function add_image_size() under the add_theme_support( 'post-thumbnails' ); line in the functions.php file of the Underscores theme.
The reason you can add the function add_image_size() under here is because it is already within the after_setup_theme action hook mentioned earlier.
Add Image Size Function Snippet for WordPress Themes
If you like, you can copy the snippet below for the add_image_size in the Underscores theme for your future reference:
/* * Custom post thumbnail sizes for use across the theme. * * @link https://developer.wordpress.org/reference/functions/add_image_size/ */add_image_size( $name, $width, $height, $crop );
Note: Please make sure you define the parameters used in the snippet to make sure you do not receive any PHP warning errors in your theme. The above snippet is used as a template for you to copy-paste into your theme functions.
https://wpshout.com/wordpress-custom-image-sizes/
Adding and Using WordPress Custom Image Sizes: A Guide to the Best Thing Ever

[, and a smaller one halfway down the homepage. We also use custom image sizes to make sure that the images in our post bodies aren’t unnecessarily large for the space they’re occupying.
That’s a lot of image-sizing complexity, and WordPress just handles it all for us, straight out of the box. Imagine if we were doing all the resizing and optimizing ourselves, in something like Photoshop—it would just about eat our business. Images would be an unattainable luxury.
With that pep talk, let’s see how you can use WordPress custom image sizes as well!
One more thing before we get started. If you’re looking to learn WordPress development, we’ve written the best guide to it out there:
A Very Quick Guide to WordPress Image Sizing
Every time you upload an image, WordPress generates a resized version of the image for each registered custom image size.
Every time you upload an image to your WordPress site, WordPress automatically generates a resized version of that image for every custom image size that your theme (and parent theme, if you’re on a child theme) has registered.
In your WordPress filesystem, which is where those image files live, that looks like this:
Do you see the power of this? You retain the original image you uploaded—which in this case is over 1MB, too huge to use on the site. But you can also use automatically generated, resized and cropped versions of that same image across your site. The image will fit into the spaces it should fit into, and not be a larger file than it ought to be—and WordPress takes care of it all automatically.
One special case is the featured image, a single image that you set to be the “official representative” of the post it’s attached to. WordPress has special ways for displaying featured images across the site, and you can take advantage of the same cropping and resizing functionality you can with any other image.
It all sounds pretty cool, right? Let’s look at how you can program some WordPress custom image sizes for yourself.
“Thumbnails” and “Featured Images”: Ugh, Here We Go
Before we get to coding, there’s one WordPress semantics detour we’ll need to take.
“Featured Image” started out, and is often referred to, as “Thumbnail.”
Because WordPress is backwards-compatible, “Featured Image” started out, and is often referred to, as “Thumbnail.” (This type of legacy naming issue should sound familiar from our earlier post on “sidebars” and “widget areas.”)
This issue crops up as follows: the WordPress function set_post_thumbnail_size() sets the thumbnail image size across your site. This size (150px square by default) is also the default featured image size: it’s what you’ll see if you call the function to display featured images—the_post_thumbnail()—with no arguments.
So you’ve got a confusingly named function, the_post_thumbnail(), whose purpose is actually to display featured images. You’ve also got a totally bizarre function, set_post_thumbnail_size(), that sets the default “Thumbnail” size and featured image size across your site.
My advice is just to leave
set_post_thumbnail_size()completely unused.
My advice is just to leave set_post_thumbnail_size() alone completely; don’t use it. Let “thumbnail”-sized (150px square) images dangle like an appendix, and leave it at that. Instead, we’ll be using a function called add_image_size(), and calling the_post_thumbnail() with arguments to tell it which image size we want to use for our featured images.
Adding WordPress Custom Image Sizes in function.php
In this section, we’ll look at the main code for handling featured images and image sizes in WordPress. The sample code we’ll be using is below; it goes in the functions.php of your active theme:
// Make sure featured images are enabled
add_theme_support( 'post-thumbnails' );

// Add featured image sizes
add_image_size( 'featured-large', 640, 294, true ); // width, height, crop
add_image_size( 'featured-small', 320, 147, true );

// Add other useful image sizes for use through Add Media modal
add_image_size( 'medium-width', 480 );
add_image_size( 'medium-height', 9999, 480 );
add_image_size( 'medium-something', 480, 480 );

// Register the three useful image sizes for use in Add Media modal
add_filter( 'image_size_names_choose', 'wpshout_custom_sizes' );
function wpshout_custom_sizes( $sizes ) {
    return array_merge( $sizes, array(
        'medium-width' => __( 'Medium Width' ),
        'medium-height' => __( 'Medium Height' ),
        'medium-something' => __( 'Medium Something' ),
    ) );
}
The comments in the code itself pretty much explain what’s going on, as will the rest of this post; but here are two quick notes that should help you get an early grasp on the code:
ADD_IMAGE_SIZE() ARGUMENTS
add_image_size() takes four arguments:
name, a string (required)width, an integer (optional)height, an integer (optional)crop, a boolean (optional)
name explains itself. width and height are target size values, in pixels. We’ll explain how they work (and how they work with crop) below.
WPSHOUT_CUSTOM_SIZES()
All you need to know about that function is that WordPress requires some boilerplate code in order to add custom image sizes into the “Add Media” modal—where site users can use them—and to define what name those sizes go by in the “Add Media” environment. Hooking into a filter hook called image_size_names_choose and registering the three desired image sizes are all wpshout_custom_sizes() does; here’s the result:
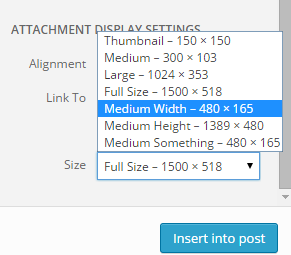
Using Added Image Sizes
We talked about the_post_thumbnail() earlier. It always gets called in The Loop. (If you’re outside The Loop, there’s a function get_the_post_thumbnail() that lets you specify which post you’re talking about.)
We’re always going to call
the_post_thumbnail()with at least one argument: the name of the custom image size to use.
Because we don’t want to be getting actual 150px x 150px “thumbnails” as discussed above, we’re always going to call the_post_thumbnail() with at least one argument: the name of the registered-by-us custom image size we want to use.
That looks as follows (this code belongs in a WordPress page template like index.php or single.php):
// Start The Loop
if ( have_posts() ) : while ( have_posts() ) : the_post();

		// This could be anything; here we'll just pretend we want the post title
		the_title();

		// Display post's featured image, in 'featured-image-large' size
		the_post_thumbnail( 'featured-image-large' );

		// Continue with everything else in The Loop...
There you have it! You’ve put the post’s featured image, in a defined image size, onto the page. There’s more to learn here, but that’ll do for a start. If you have more questions about additional function arguments you can tack onto the_post_thumbnail(), check the Codex.
Regenerate Thumbnails
Run Regenerate Thumbnails after every time you change the image sizes on your site.
One of my top five favorite WordPress plugins of all time is Regenerate Thumbnails. It does the dirty work of making sure every image you upload has versions for all of the image sizes you declare. Run it after every time you switch up the image sizes on your site, or old images will start looking really funny.
Understanding Cropping
Let’s look at the function arguments of add_image_size() a little more closely. If you notice, some calls to the function have a fourth argument, set to true, and some only have two or three. As it turns out, this matters a lot for how your images come out looking, and is part of the awesome power of WordPress custom image sizes.
We’re going to structure this discussion by looking at the two available types of cropping: soft crop and hard crop.
SOFT CROP
The more accurate term for “soft crop” might be “resize.”
“Soft crop” is actually a bit of a misnomer: the more accurate term might be “resize.” It’s WordPress’s default: you achieve soft crop either by omitting the fourth function argument in add_image_size() (or set_post_thumbnail_size(), if you do decide to use it), or setting that argument to false.
Regardless, the thing to know about soft crop is that it maintains proportionality of your image. In other words, it’ll resize see the whole image according to the dimensions you specify, but it won’t change the shape of the image, or cut any bit out of it. This makes soft crop a smart default for image sizes you hope to use inside your post and page bodies.
As a fine point, soft crop can work in one of two ways: with one or two specified dimensions.
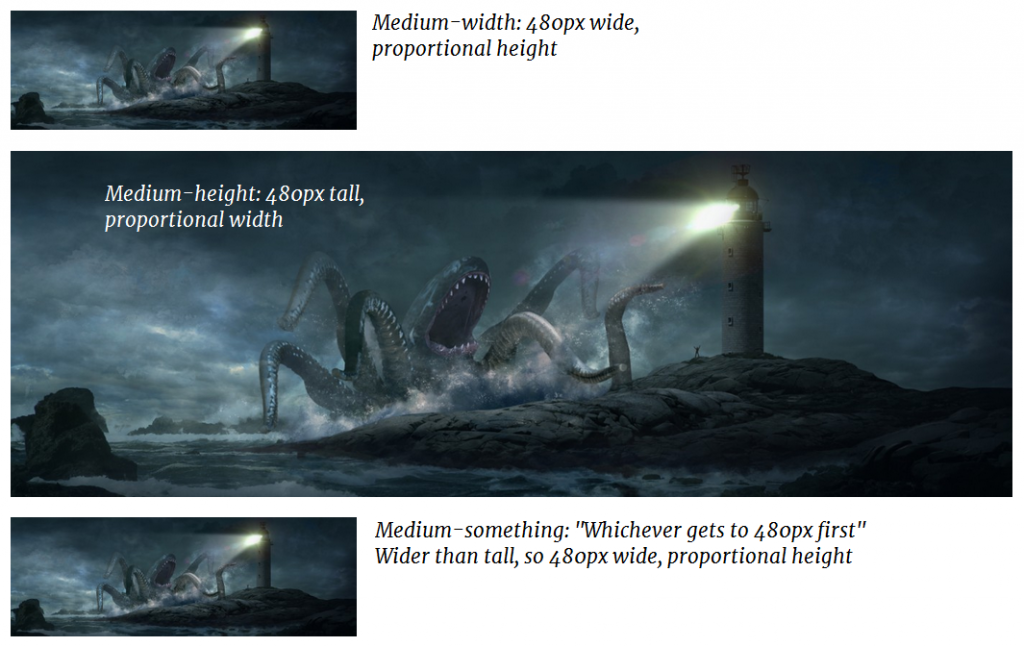
With One Specified Dimension
This corresponds to the code for the medium-width and medium-height image sizes above.
If you soft crop and specify only one dimension (either width alone, or height plus “9999” for width), you will get an image that grows proportionally to the size of that dimension. So if you specify 300 for width, your image will be 300 pixels wide, and whatever height makes the image proportional.
With Two Specified Dimensions
This corresponds to the code for the medium-something image size above.
If you soft crop and specify both width and height, the image will grow proportionally until one of the dimensions touches its target, and it’ll stop there. So if you specify 300px width and 100px height, a long image would stop at, say, 300px x 80px, and a tall image would stop at, say, 60px x 100px.
The following three images demonstrate soft crop results for the three soft-cropped image sizes we registered above.
Click to enlarge
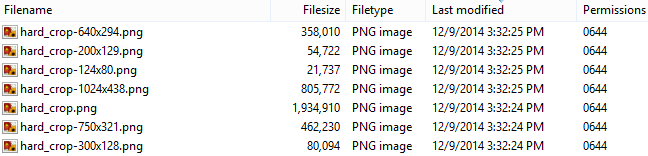
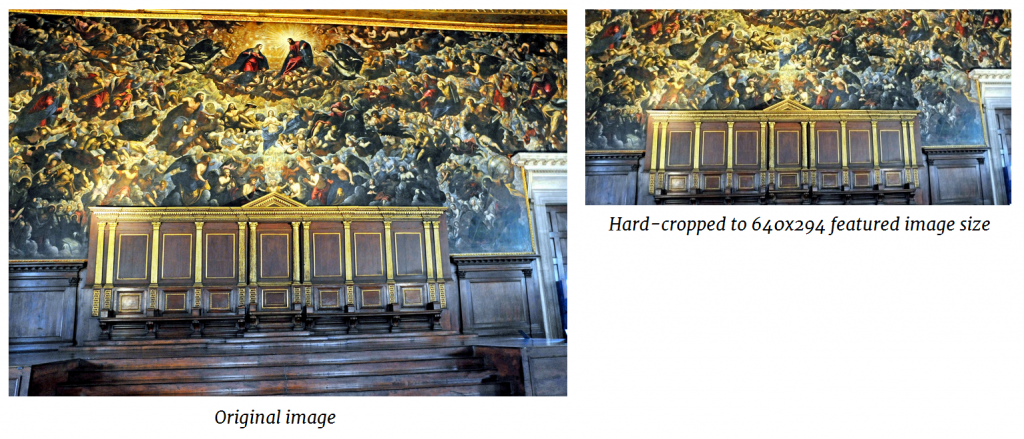
HARD CROP
This corresponds to the code for the featured-large and featured-small image sizes above.
Basically, a hard crop cuts something to a predefined shape and size.
You achieve a hard crop by setting the fourth parameter of add_image_size() (or set_post_thumbnail_size()) to true.

Click to enlarge
Notice that the hard-cropped image is no longer the same shape as—nor does it contain the full contents of—its original.
Hard-crop is often most useful for featured images, which typically have to fit into a defined area within your site’s layout.
In my experience, hard-crop is most useful for featured images, which typically have to fit into a defined area within your site’s layout. There are other uses for it as well, but that’s where it comes in really handy.
You probably wouldn’t want to hard-crop images that you’ll be inserting into your posts (unless you want, say, all your images to be square as a design decision), since post contents are normally more fluidly laid out and hard-cropping does destroy image information.
WHAT IF THE ORIGINAL IMAGE IS SMALLER THAN THE DESIRED CROP SIZE?
Too-small dimensions will just stay their original sizes.
Good question! In general, if the image you uploaded is too small to meet the desired dimensions, the too-small dimensions will just stay their original sizes.
Let’s say you’re cropping an image to 500px x 400px, but the original image itself is actually 300px x 200px. You’ll just get the full-sized version back.
Soft-Crop
Note that soft-cropping stops the moment your image reaches its first dimension target. So the only way you’ll fail a crop in soft-crop mode is if your image is too small in both dimensions, like the example in the previous paragraph. if you’re soft-cropping to 500px x 400px, and your image is 1000px x 200px, this isn’t a failed crop; you’ll just get a 500px x 100px image back, which is probably what you were looking for.
Hard-Crop
In hard-crop, however, it’s quite possible for an image to be big enough in one dimension, but too small in the other. If you’re hard-cropping to 500px x 400px and the original is 1000px x 200px, you’ll get back a 500px x 200px image. It will just look like the original image, with the outermost 50% (500px) cut off from the left and right sides. Most importantly, it won’t be in the 5 x 4 dimension you expected, but 5 x 2.
…So Upload Big Images
As you might be able to imagine, this can cause some major formatting ugliness if, for example, featured images are suddenly too small (and/or the wrong shape) for their containers. So upload the biggest thing you’ve got—in an emergency, you can even enlarge an image to meet your requirements in something like Photoshop; but be aware that this will reduce the image’s quality.
Setting the Right Image Sizes
We don’t want to be putting overlarge images on the page, so here’s where we need to get practical about limiting image sizes and filesizes.
Okay, now we know how to set WordPress image sizes. Now what image sizes should we set?
You may recall from our earlier post, Commonsense Image Sizing, that add_image_size() lets you view every image in any size you want! Because of that, it’s best to have the biggest raw material to work with, since you can shrink it to any size and filesize you want.
To state the obvious, though, we don’t want to be putting overlarge images on the page because they’ll slow the site down. So here’s where we need to get practical about limiting image sizes and filesizes. Fortunately, it’s not difficult: as in Commonsense Image Sizing, the guideline is to set image sizes that will be:
- Big enough to be properly sized under any view of the site on any device.
- No bigger than that.
In practice, this means just looking at your site on different device widths. If an image should fill a whole column, what’s the widest that column can be? It could be 800px when your site smushes to a single-column layout on iPads, for example. If you have a lot of images that should fill that column, you’ll want to register an image size that’s 800px or a little more wide.
This can get tricky if you start thinking about, say, full-width background images on 14-megapixel iMac screens. (Also, do not get me started on retina displays.) But for most images (and most sites), just keep it simple, see where an image fits on the page at different widths, and make an image size that’s that big and no bigger.
WordPress Responsive Images, and How They Interact with WordPress Custom Image Sizes
A major improvement to WordPress image sizing arrived in late 2015, with WordPress 4.4: responsive images. This is a background feature that you don’t have to “do” anything to enjoy, so in most cases it’s best just to be happy that other people have figured it out for us. But it’s good to understand how it interacts with WordPress’s image sizes system.
WHAT RESPONSIVE IMAGES ARE GOOD FOR
Responsive images speed up websites for users on narrow devices, by serving different image sizes to browser windows of different widths.
Responsive images are a web convention that emerged out of a simple problem: narrow devices being served wide images.
If you’re on a mobile phone that’s 480px wide, why should you be loading images (say, a post’s featured image) that are twice that width or more? An image that’s twice as large dimension-wise is four times as large filesize-wise. When a mobile device loads large images only to have them resize down to width the device can handle, it slows down page loads—especially problematic on phones, which often already have relatively slow and spotty connections.
On the other hand, we can’t just restrict every image on the internet to the width of the narrowest phone. What we need is to serve different image sizes to different devices, based on the width of the device. This is what responsive images are all about.
HOW RESPONSIVE IMAGES WORK
You may at some point have opened up your browser’s code inspector, and been frightened by an <img> tag that looks like this:
<img class="aligncenter size-large wp-image-12558" src="https://i0.wp.com/wpshout.com/wp-content/uploads/2014/12/wordpress_srcset_example_one.png?resize=1024%2C687&ssl=1" alt="wordpress responsive images example" srcset="https://i0.wp.com/wpshout.com/wp-content/uploads/2014/12/wordpress_srcset_example_one.png?resize=1024%2C687&ssl=1 1024w, https://i0.wp.com/wpshout.com/wp-content/uploads/2014/12/wordpress_srcset_example_one.png?resize=750%2C503&ssl=1 750w, https://i0.wp.com/wpshout.com/wp-content/uploads/2014/12/wordpress_srcset_example_one.png?resize=300%2C201&ssl=1 300w, https://i0.wp.com/wpshout.com/wp-content/uploads/2014/12/wordpress_srcset_example_one.png?resize=768%2C515&ssl=1 768w, https://i0.wp.com/wpshout.com/wp-content/uploads/2014/12/wordpress_srcset_example_one.png?w=1178&ssl=1 1178w" sizes="(max-width: 1000px) 100vw, 1000px" width="538" height="361">
This is the markup for WordPress responsive images. To understand how they work, let’s pull this example apart into its component parts.
class, alt, and width: What Hasn’t Changed
<img class="aligncenter size-large wp-image-12558", alt="wordpress responsive images example", and width="538" height="361"> are nothing new to responsive images. These bits of markup are the way WordPress assigns classes, alt tags, and (almost entirely obsolete) hardcoded width and height values to images, whether they’re WordPress responsive images or not.
src: Now a Fallback
This should look familiar, since it’s how non-responsive images work: they have a single src (“source”) attribute, a URL that says where the image can be found.
For a responsive image, src is a fallback, a way to make images work for browsers (hi IE!) that don’t support responsive images. So what’s in src is what will be served in IE (and any other obsolete browser a user might visit the site with, although all common browsers other than IE support responsive images).
srcset: a Set of Different-Sized Image Sources
This is new, and the main engine of responsive images. srcset identifies a list of src attributes (a “set of sources”) that the browser will fetch, depending on its width. Let’s look at the first of the srcset options:
https://i0.wp.com/wpshout.com/wp-content/uploads/2014/12/wordpress_srcset_example_one.png?resize=1024%2C687&ssl=1 1024w
This is actually made up of two parts, separated by a space:
https://i0.wp.com/wpshout.com/wp-content/uploads/2014/12/wordpress_srcset_example_one.png?resize=1024%2C687&ssl=1: This is the image link itself, the thing you could paste into your browser (try it!) to see an image. If this image link looks funny to you, it’s because WPShout is using a CDN (content delivery network) to serve its images. Your own site’s links my look more like simplyhttps://mysite.com/media/etc.1024w. This is what dictates the target width at which this image will apply: in other words,1024wmeans “this image source applies to widths that are 1024 pixels wide or narrower.”
But what does “applies to widths” mean? Does 1024px refer to the overall width of the browser? It’s a bit more complex than that, and that’s where sizes comes in.
sizes: Rules Dictating When to Show Which Image from srcset
sizes works together with srcset as a crucial component of responsive images. sizes is a set of browser width statements to check one after the other, with each statement paired with a rule to follow if that browser width statement is true. (Don’t worry, the next couple of paragraphs will make this clear.)
Our responsive image’s sizes attribute reads as follows:
sizes="(max-width: 1000px) 100vw, 1000px"
Read in English, that would follow these two rules:
- “If the browser is 1,000 pixels wide or narrower, use the smallest image from
srcsetthat is at least 100% of the width of the browser.” - “Otherwise, use the smallest image that is at least 1,000 pixels wide.”
So sizes goes in order from the first width statement to the last, stopping on the first true one. In WPShout’s case, there are only two rules in sizes: One that holds if the browser is 1000px wide or narrower (in which case the smallest image from srcset that’s 100vw wide or wider will be used), and one that holds at all other times (in which case the smallest image from srcset that’s 1000px or wider will be used ).
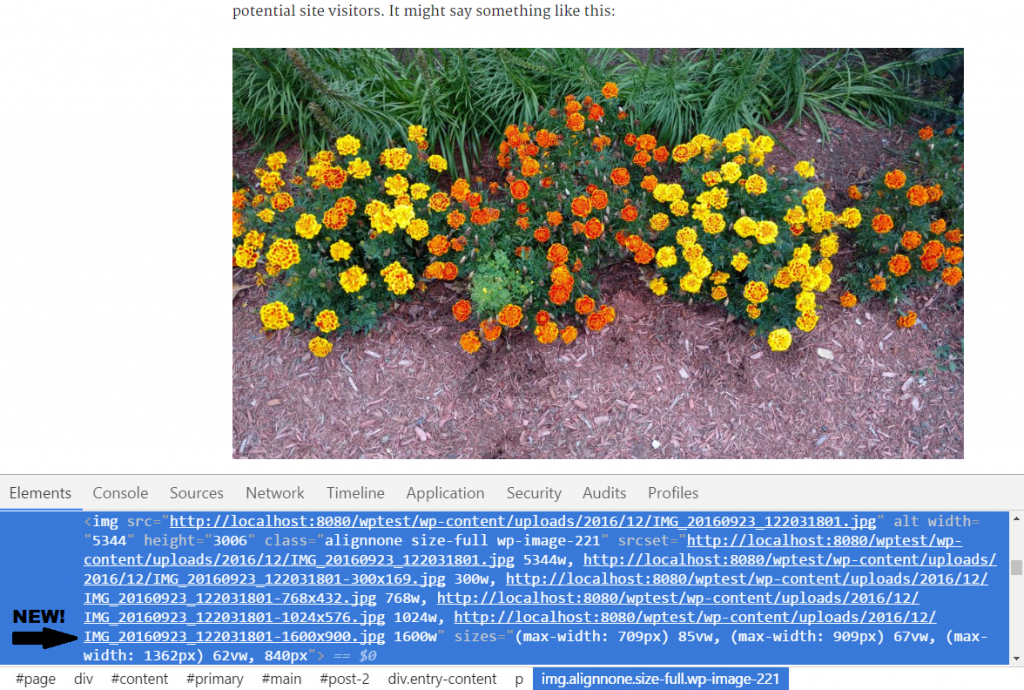
SPECIFYING THE RULES IN SIZES WITH WP_CALCULATE_IMAGE_SIZES
As a note, WPShout’s two-rule sizes setup, centered around 1000px as a breakpoint, is the default for WordPress responsive images, since we at WPShout never bothered to specify more intelligent rules. Some other themes, particularly “official” themes like Twenty Sixteen, use a WordPress filter hook called wp_calculate_image_sizes to set more intelligent and theme-specific sizes values. For Twenty Sixteen, the sizes attribute reads as follows:
sizes="(max-width: 709px) 85vw, (max-width: 909px) 67vw, (max-width: 1362px) 62vw, 840px"
If you want to understand srcset and sizes more deeply, they’re well explained here and other places. And Smashing Magazine has done a good job explaining how to use wp_calculate_image_sizes to set your own width statements, breakpoints, and rules in sizes for WordPress responsive images.
HOW WORDPRESS RESPONSIVE IMAGES INTERACT WITH CUSTOM IMAGE SIZES
WordPress’s responsive images system interacts quite simply and healthily with custom image sizes.
For a long time, I was pretty nervous that creating my own custom image sizes could somehow “break,” slow down, or otherwise impact WordPress’s responsive image sizes (which I didn’t understand well). I’m happy to report that how these two systems interact is quite simple and healthy:
- Every custom image size that you create with the same aspect ratio (width-height ratio) as the original image will simply be added to
srcset. - Every hard-cropped custom image size you create with a different aspect ratio from the original image will be ignored by WordPress’s responsive image system.
To show you how this works, I took two screenshots in sequence on a theme that is a child theme of Twenty Sixteen and so inherits its sizes rules. This was the first screenshot, before creating any custom image sizes in the child theme:
Click to enlarge
I then created two custom image sizes in the functions.php of the child theme using the following code:
add_image_size( 'big-size-soft-crop', 1600, 1200, false );
add_image_size( 'giant-size-hard-crop', 2000, 1500, true );
Next, I reuploaded the image and took the following screenshot:
Click to enlarge
As you can see, srcset has one new size: the 1600px-by-900px version of the underlying image. Because the 2000px-by-1500px hard crop doesn’t have the same aspect ratio (4:3 instead of 16:9), it doesn’t get added to srcset.
Now, will the 1600px-by-900px version of the image ever get shown to any user on any device? To know the answer to that question, we need to examine the image’s sizes attribute to see whether 1600px wide is ever the smallest size that satisfies any rule. As it turns out, it isn’t: the final rule, covering any device wider than 1362px, looks for the smallest element in srcset that’s wider than 840px, and that’s always going to be the 1024w element (1024px wide) rather than the 1600w element. So in this case, the specific custom image size we registered isn’t a useful addition to srcset, since there’s always another better match for the theme’s sizes rules, but it’s not doing any harm, either.
Enjoy!
As I said, the image sizing API is one truly great thing about WordPress. I hope this has gotten you a long way toward understanding the what, how, and why of creating WordPress custom image sizes and featured image sizes.
So, what tricks do you know for sizing images in WordPress? Let us know in the comments below!
P.S.: do you want to learn more about WordPress development? Check out Up and Running, where we’re offering a free course on the five key principles of WordPress development. Start learning today!
Regenerating WordPress Thumbnails with WP-CLI
When uploading images to the media library, WordPress will automatically generate several thumbnails so that a more optimized image size can be used.
Since different themes and plugins will often use different sizes, you might need to periodically regenerate your those resized images. In this article, we'll show you how to regenerate your image thumbnails using WP-CLI.
REGENERATING ALL THUMBNAILS
To regenerate all thumbnails for all images inside your WordPress media library, you can use the following command:
wp media regenerate --yes
Once the command is run, all thumbnails for all images will be regenerated. Of course, if you have a large number of images inside your media library, it might take some extra time to run through them all.
REGENERATING MISSING THUMBNAILS
What if you updated your theme to add an additional image size but don't want to regenerate the thumbnails that already exist? You can regenerate thumbnails for only the missing image sizes using the –only-missing option like this:
wp media regenerate --only-missing
REGENERATING THUMBNAILS FOR SPECIFIC IMAGES
If you want to regenerate thumbnails for a specific image, you can specify it by including the attachment ID after the command like this:
wp media regenerate 123
To regenerate thumbnails for multiple specified attachment IDs, just add them to the command like the following example:
wp media regenerate 123 456 789
KEEPING OLD THUMBNAIL SIZES
When regenerating your WordPress media library image thumbnails, the default behavior is to delete the old thumbnails. If you want to keep them, you can use the –skip-delete option:
wp media regenerate --skip-delete
REGENERATING SPECIFIC THUMBNAIL SIZES
In addition to being able to specify a specific image to regenerate thumbnails for, you can also define a specific thumbnail size to regenerate. To regenerate a specific size, use the –image_size option with the name of your thumbnail size as the value like in the following example:
wp media regenerate --image_size=large